行车记录仪英文说明书
AST100汽车行车记录仪说明书
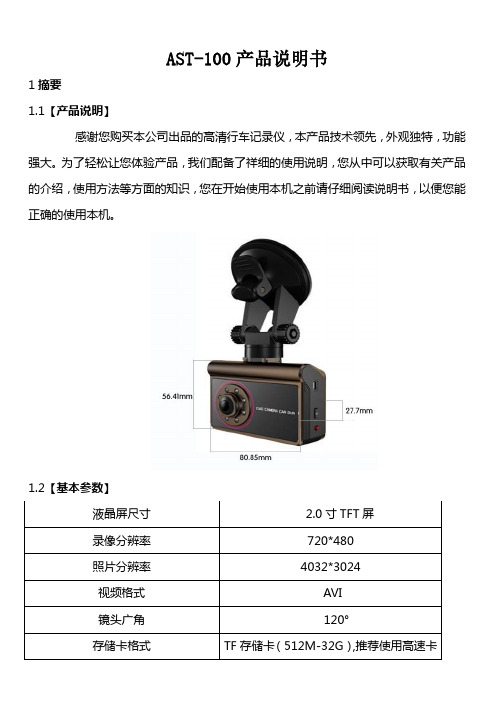
AST-100产品说明书1摘要1.1【产品说明】感谢您购买本公司出品的高清行车记录仪,本产品技术领先,外观独特,功能强大。
为了轻松让您体验产品,我们配备了祥细的使用说明,您从中可以获取有关产品的介绍,使用方法等方面的知识,您在开始使用本机之前请仔细阅读说明书,以便您能正确的使用本机。
1.2【基本参数】液晶屏尺寸 2.0寸TFT屏录像分辨率720*480照片分辨率4032*3024视频格式AVI镜头广角 120°存储卡格式TF存储卡(512M-32G),推荐使用高速卡1.3【产品特性】·内建120度超广角镜头 1280*720P(差值) 640*480P画质·汽车发动就自动开机录影,熄火自动关机·内建大萤幕2.0寸TFT,发生行车纠纷时可马上播放影片,不必忙着找电脑读取影片影片画面内嵌日期时间水印,·最大支援32GB SDHC卡,满足长时间录影的需求·可掀式TFT萤幕,可随时关闭萤幕节省电力·夜视功能超级八个灯,射波更远,让你晚上看得更清楚(可设定关闭/开启)·循环录制功能,会自动删除旧档录新档·9国语言:简体、繁体、日语、俄语、英语、韩语、德语、葡萄牙、西班牙1.4【使用说明】首先将车充插入DC5V接口,然后连入车上电源接口进行充电,再将支架扣入顶部支架孔固定在车前挡风玻璃上。
1)产品功能结构图2)按键定义1:SD卡槽 2:喇叭 3: AV接口 4:电源接口5:主按键 6:摄像头 7:夜视灯 8:支架口9:电池指示灯 10:USB接口1.5【供电方式】A)使用内键可充电锂电池充电方式:1)连接车充2)用USB连接电脑。
注:有使用锂电池供电时,需要按电源键启动或关闭DVR録影。
B)连接5V车充汽车启动以后,DVR自动开始录影。
断电后停止工作,并自动保存其前面的档案。
注意:只能使用输出为5V的车充电源。
1.6【功能说明】1、功能介绍DVR带有录影/拍照/播放功能。
博仕BH021三录行车记录仪英文说明书
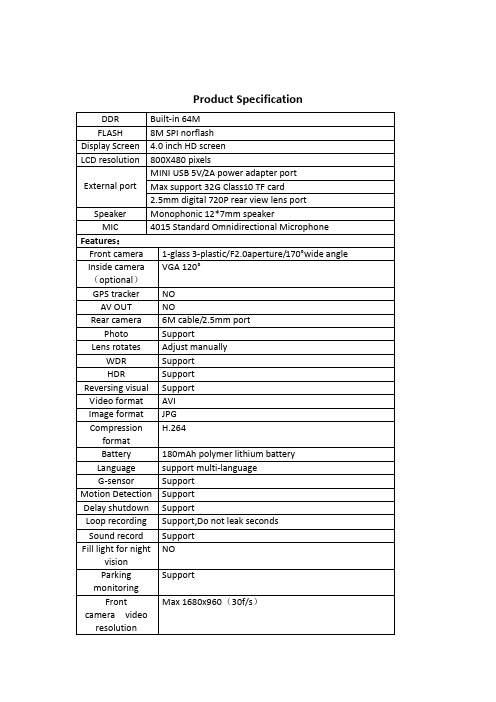
Product Specification①Menu / Camera / Playback② Power button③ Down ④ Confirm button⑤ Up⑥ Front camera⑦ Microphone ⑧ Reset button⑨ Holder interface ⑩ Rear camera interface⑪ Power interface ⑫ TF Card slot⑬ Display screen ⑭ Inside camera (optional)【】Power button, short press to turn on/off screen, long press to switch on/off the device.【M】Menu / camera / playback buttonPress 【OK】key to stop recording, press 【M】to enter photo mode, press 【OK】to take photo;In the camera mode, press 【M】to enter playback mode, press 【OK】key to playback. Lock function: In case of video recording, short press 【M】for a key lock function to protect the current video file, and this file will not be covered by the cyclevideobutton to turn on/off sound record at the shooting interface.【◀】Up key. 1, short press【◀】to select function at the Menu interface; 2, In case of video recording, short press OK button to pause, then short press【◀】button to switch front-inside view image (require inside view lens); 3, long press【◀】button to switch front-rear view image; 4, In case of front-rear view image, short press OK button to pause, then short press 【◀】button to switch front-rear view image (require rear view lens)【OK】Confirm button, short press to confirm in the menu interface , short press to video record on/off in the video modeRear view lens (optional)In case of video recording, 4 pin plug of rear view lens insert AV-in hole of device, there’s a rear view image in topright of the screen, that means connected successfully; short press OK button to pause, long press【◀】button to switch front-rear view image, When hang up “R” gear, it will show full image of rear view Note: This device can only support dual cameras to video record at the same time instead of 3 channels camera, that is front-inside camera or front-rear camera; if installed a rearview camera and choose front-inside view mode, it will automatically indicate full image of car reversing visual when you hang up "R" gear, but won't effect front-inside video record, also will automatically switch back front-inside view after cancel "R" gear.As for system update to support 3 channels camera to video record at the same time, please prevail in kind and we're sorry for no further notice.Reset key【RESET】If the recorder crashes and accidental operation is not a normal fault, press 【RESET】to shutdown the device, then press 【OK】to reboot the device.Installation Notes1. Please test the rear view camera firstly, if it works well then install (package without rear view lens can be ignored).2. Turn off the car engine.3. The TF card insert the recorder slot.【Note】Please use the high-speed TF card (Class10 above), capacity of not less than 4GB, TF card maximum support 32GB.4. The recorder via a bracket fixed to the front windshield of the car.5. Insert the car charger into the car cigarette lighter.【Note】When wiring, extend the charging line along the edge of the car door frame and carpet under the car laying.6. Install the rear camera at the rear of the vehicle, and pay attention to the up and down direction. Wiring can be buried along the edge of the car roof laying.【Note】There are two ways to install the rear camera:A.Adsorbed on the glass above and behind the car, hands-on self-installation (Reversing visual function can not be achieved, only real-time recording rear video).B.To find a professional installation staff installed in the license plate above the camera at the same time need to connect the power reversing lights(Reversing visual function can be achieved).7. Adjust the lens position to ensure the best viewing angle.8. Start the engine and check that the machine is operating properly.Featurese the automatic recording functionStart the car engine, the recorder automatically starts to open the recording function.Close the car engine, The recorder automatically saves the contents of the log and shuts down,recorded video segments are stored on the TF card,When the TF card is full, the recorder will overwrite the oldest recorded image preferentially.【Note】a. Time segment of record can be set 1/2/3 minutes in the menu .b. The video individually saved in the folder named “DCIMA” and “DCIMB” in TF card (package include rear view lens)。
行车记录仪英文说明书

Road Safety GuardInstruction ManualThank you for purchasing Portable DVR from our company.In order to help you operate it correctly, please read this instruction carefully before using.Product Picture and Function1. USB Slot2. AV-OUT Slot3. DC-5V4. SD/MMC Card Slot5. Speaker6. Mount hole7. Microphone8.Battery cover9. Lens10. Night Lights11. ON/OFF Power Switch12. REC / Snap13. 2.4 inch LCD14. Menu15. 16.Up /Down17. Mode ButtonAttached Accessories●Manual ●Mount ●USB Cable●Car Charger (Include the adaptor 12V/24V transfers to 5V)OperateTwo Power options:A) Use can remove built-in Li-ion batteryDVR can be activated after it has been placed on the vehicle by pressing thePower Switch for 1 second and turn off by pressing it for 2 seconds.Charging: connect with USB cable or car charger.B) Connect with Car ChargerDVR will record automatically when the car starts, turn off and save the lastfile when the car stops.RecordingDVR will enter into defaulted recording mode when turn it on, the work indicator blinkers and indicates it is recording. The recording file is saved in the SD/MMC Card. To stop, press Recording Button or ending when car stops , the work indicator won`t blinker.Camera modeTurn on the DVR and press Mode Button to enter into Camera mode. To take photo by pressing Snap Button .Manual Focus FunctionIn Camera or Recording mode ,press UP/DOWN Button the screen will show focus icon them press UP/DOWN button to choose need focus, you can choose (1x~8x) Night Vision FunctionPress Menu button then choose Night vision , DVR will enter Night vision status ,if you want to exit choose offPreview and DeleteTurn on the DVR and press Mode Button twice to enter into Preview Mode. Press Up or Down to select the previewed file. If it is video file, it can play or pause bypressing REC Button, and stop by pressing Mode Button. If you want to delete it, press Menu Button to enter into delete mode, and then, select Single, All by Menu Button and Up/Down and confirm to delete the file by Menu Button. Also select Slide show, Protect file, Thumbnail mode and volume (from 1 to 8) under the Preview Mode.Setting the functions:Turn on the DVR and Press Menu Button under Video mode or Camera mode to enter into setting interface. Confirm by Menu Button and Select by Up/Down for the following setting. Press REC Button to exit.A.Video mode1.Size: Select VGA, QVGA, SXGA.2.Time Stamp: Off/Data Only/Data &Time3.Motion Detect: Off/On4.Video Time: 3Min/5Min/10Min/15Min5.Audio: On/Off6.Night Mode: Off/OnB.Camera mode:1.Size: VGA/1.3M/2M/3M/5M/8M/12M2.Time Stamp: Off/Data Only/Data &Time3.Burst: Off/OnC.Setting ModeWhether under idle Mode, Press Menu Button and then press Mode Button to enter into Setup interface.1.Format: Select it if you want to format the SD card.2.Beep: Off/Onnguage: Select[English/ French/ Deutsch/Italian/Spanish/Portuguese / T-Chinese/ S-Chinese/ Russian/ Turkish/Korean4.Auto Off: 1Min/2Min/5Min/Off5.System Reset: select [Cancel or Execute system] reset.6.Light Frequency: 50Hz/60Hz Output: NTSC/PAL8.Data Input: Set correct recording data and time.B: PC Cam/Disk Drive10.Version :Check software versionPreview on the TVConnect the AV link of DVR with the TV, and enter into the preview mode automatically. The operating steps are same as preview on the screen.USB ModeConnect DVR with computer by USB cable, [My computer] will occur removable disk, the file id stored at Removable Disk/DCIM/100DSCIM. At the moment, the file of the DVR can be downloaded to the computer.Note:1)Please insert the SD/MMC card before recording.2)This DVR Records in cycle if you choose 3/5/10/15 minutes as storage time.When the storage medium is full, it will record from the beginning again and erase over the previously recorded material automatically. It will have 3seconds pause time, and namely the contents in the 3 seconds will not record.3)Because the DVR is DC5Vinput, please use the attached car charger. It hasadaptor 12V/24V transfers to 5V already.Technical Specifications1)Recording resolution: 1280*960/640*480/320*240 pixels2)Video format: AVI3)Repeat storage by section: 3/5/10/15 minutes4)Power source: Built-in rechargeable battery OR 5V Car Charger5)Supports SD/MMC card(From 256MB up to 32GB)6)Microphone: can record soundNo further notice will be given for any modification of the technical specification.。
novatek行车记录仪说明书

novatek行车记录仪说明书
行车记录仪按键说明如下
1.录影模式
按下电源开关键ON/OFF或连接充电器后,记录仪会自动进入录影模式并开始录影,此时蓝色指示灯闪烁。
录影时按REC/SNAP键停止录影,此时指示灯常亮。
按MENU键进入主菜单。
2.拍照模式
开机后按MODE键选择进入拍照模式,按REC/SNAP进行拍照,按MENU 键进入子菜单。
3.预览模式
开机后按MODE键选择进入预览模式,按UP、DOWN选择视频文件或照片文件按REC/SNAP播放或暂停,按MODE退出预览。
4.日期时间设置
在录影界面(停止录影)按MENU(菜单)键,再按MODE(模式)键,在系统菜单界面选择项,按MENU(菜单)或REC(录影)键进入下一级菜单,按MENU(菜单)或REC(录影)键选择设置项。
在日期时间设置界面按REC(录影)键或MENU(菜单)键进入下一个设置,使用上翻/下翻对年/月/日、时间进行调整,设定好后按MENU(菜单)或REC(录影)键确定退出。
唯赛思通摩托车行车记录仪X1S(英文)使用说明书
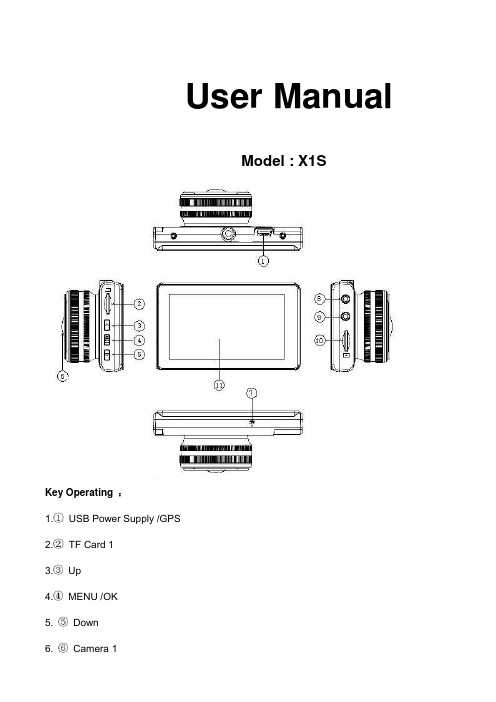
User ManualModel : X1SKey Operating :B Power Supply /GPS2.TF Card 13.Up4.MENU /OK5. Down6. Camera 17. Microphone8. Camera 29. Camera 310. TF Card 211. LCD ScreenMenu main interface and settingHow to Video recording and Menu settingVideo recordingWhen engine is started the Camera is turn on automatically, and then start to Video recording, Press “ OK ” button to stop recording ,the video file save to TF CardCamera built-in super capacitor When the Car suddenly flameout will auto save last video file to TF CardMenu Setting OptionPress Up/Down button to select setting icon Press “OK” enter Menu setting option ,and Press Up/Down button to select specific parameters Press “ OK ” button to confirm ,long Press Menu button to Exit1. Front Camera1080P 1920*1080P720P 1280*720480P 720*480VGA 640*4802. Side CameraVGA 640*480HD 1280*7203. Time StampOff No display date and timeDate Only Only display dateDate and Time Display date and Time4. Loop Recording1Min Video file 1 minute When the Card full will delete front file3Min Video file 3 minute When the Card full will delete front file5Min Video file 5 minute When the Card full will delete front fileOff Until the Card FullSystem Setting1. BeepOn Turn On operation button soundOff Turn off operation button sound2. Screen OffOff Camera LCD keep on1 Min No any operating the Camera after 1min enter screensaver3 Min No any operating the Camera after 3min enter screensaver5 Min No any operating the Camera after 5min enter screensaver(In the Screensaver status ,Press any button Can be restore)3. G-sensorSetting G-sensor sensitivity, Off/ High/Normal/LowWhen happen emergency, will auto Protect the file, and When Card full only delete Normal recording file4. Date FormatYY/MM/DDMM/DD/YYDD/MM/YY5. Date Input1)Press “Up”/Down button to setting number2)Press “OK ” button jump next setting3)Press “OK ” button confirm and Exit set6. Time Input1)Press “Up/Down ”button to setting number2)Press “OK ” button jump ne xt setting3)Press “OK ” button confirm and Exit set7. Time ZoneCancelSet Setting GPS Time zone8. Sys. ResetWhen Setup Error, Can setting this option restore factory setting9. Fw VersionCheck software version informationFormat TF Card 1 / Card 2In the Video recording Mode , long Press “Menu “ button enter Menu main interface ,Press Up/Downbutton to select format TF Card 1/ Card 2 Press “OK ” button enter setting interface Press “OK “ button finishLanguage SettingIn the Video recording Mode , long Press “Menu “ button enter Menu main interface ,Press Up/Downbutton to select Language iconEnglish/ French/ Deutsch/Italian/Spanish/Portuguese / T-Chinese/ S-Chinese/ Russian/Turkish/Korean/JapanPlayback ModeIn the Video recording Mode ,long Press “Menu “ button enter Menu main interface ,Press Up/Down button to select Playback icon Card 1 or Card 21. Press Up/Down button to select previous/next video file2. Press “OK” Play/Stop3. long Press “Menu” button Exit playback modeGPS FunctionConnect the GPS module to the GPS slot , then start to recording ,Camera start Search GPS Signal the GPS icon flashing after received GPS Signal the GPS icon light up and the date time will auto updatePlayback GPS fileOpen GPS Player ( Drplayer )Open iconClick button to select GPS file then Click “Play” button to playing as followCamera Change1) Front Camera In the other mode ,Press “ Up “ button Can be change the Front Camera to SideCamera2) Side Camera In the other mode ,Press “ Down “ button Can be change to Camera 2 or Camera 3 Parking ModeWhen the Car in the Park status, After 3 minute the Camera will auto change to parking mode, the LCD display” Parking Mode “ in the parking mode the video file is 1FPSPower Supply Mode1) OBD Cable Compatible with all the standard OBD interface in you Car the Camera willworking 24/7 days ,once your choose this power supply ( Low voltageprotection system is built in )2) Car charger Used Car charger connect to Car cigarette lighter socket, When engine isstarted the Camera is turn on automatically, and then start to Videorecording,TF Card Installment :1. Insert the TF Card in the TF Card slot according to the indicative direction ,until it softly clicks2. When removing the TF Card push in the TF Card and gently release to eject it.Notes:1. Make sure the TF Card are facing the right way ,if it is in the wrong direction ,it may damage theCamera and TF Card2. If the TF Card is incompatible with the Camera, please try to insert again ,change other TF Card3. Please use the high- speed TF Card.(The Card have CLAS S⑩icon)Technical SpecificationsNotice: Due the camera software update camera function has change, without prior notice。
唯赛思通摩托车行车记录仪C3(英文)使用说明书

Road Safety GuardOperation InstructionKey Operation :1. Power on/off2. Reset3. Camera 14. Camera 25. USB6. Menu7. Mode8. OK9. TF Card10. LCD Display screen11. MUTE/UP12. REC/DOWN13. FlashlightMenu operating instructionsVideo recording ModeIn the Video recording Mode,Press “Menu” button enter Setup interface.Press UP/Down button to select specific parameters, Press “OK” to confirm and Press “Menu”to Exit.1. Video ResolutionHD 1280*720D1 720*480VGA 640*4802. CameraSelect camera to recording, camera 1/camera 2/ camera 1+23. Time StampOff No display date and timeDate Only Only display dateDate and Time Display date and time4. Voice setupOn Turn on Voice PromptOff Turn off Voice Prompt5. REC SoundOff Video recording turn off the soundOn Video recording sound and image sync4. G-sensitivitySetting G-sensor sensitivity, Off/ high/Medium/LowWhen happen impact the video file will protect and the file name is (EVE.XXXXX) ,the card is full only delete normal recording file (REC.XXXXX).7. BrightnessSet camera 1/camera 2 brightnessSetting ModeIn the other Mode, Press “Menu” button twice enter Setup interface.Press UP/Down button to select specific parameters, Press “OK” to confirm and Press “Menu”to Exit.1. FormatFormat TF Card (S elect “Execute “format TF Card )2. ScreensaverOff Camera LCD keep on1 Min If no any operating the camera after 1min enter screensaver3 Min If no any operating the camera after 3min enter screensaver5 Min If no any operating the camera after 5min enter screensaver(Screensaver status ,Press any button to restore)3. BeepOn Turn On operation button soundOff Turn off operation button sound4. LanguageEnglish/ French/ Deutsch/Italian/Spanish/Portuguese / T-Chinese/ S-Chinese/ Russian/ Turkish/Korean5. Auto offOff Camera not auto power off1 Min If no any operating the camera after 1min auto power off3 Min If no any operating the camera after 3min auto power off5 Min If no any operating the camera after 5min auto power off6. Sys. ResetWhen Setup Error, can setting this option restore factory setting7. Light Frequency50HZ60HZ8. Date Input1)Press “Up”/Down button to setting number2)Press “Mode” button jump next setting3)Press “REC” button Exit set9. VersionCheck software version informationPlayback ModeP ress “Mode” button change to Playback mode (Press “OK” button to playback the video file)1. Press Up/Down button to select previous/next video /photo file2. Press “OK” Play/Stop1. DeleteSingle Delete single fileAll Delete all the file2. ProtectSingle Delete single fileAll Delete all the file3. Thumbnail /Execute4. File List /Execute5. VolumeAdjust volume 1~8Loop RecordingWhen TF Card is full ,the Camera will auto delete in front of the old files, When happen impact the video file will protect(EVE.XXXXX) ,the card is full only delete normal recording file (REC.XXXXX).Flashlight functionCamera in the power off or other mode, short Press power button to turn on flashlight, press again turn off .Parking ModeWhen the car in the stop status, after 3 minute will auto change to parking mode, in the parking mode the video file is 1FPSNote:1) According the need of customers, this function is options.2) In order to avoid the improper operation to install damage the camera , Please to auto service center to find a professional maintenance technicians to install, and use package accessory special cable (DC Input:12-24 V Output :5V-1.5A)Wired Controller FunctionCamera in the Video recording Standby mode or recording mode, Press any key on the wired Controller ,Camera will auto saved Video file name is (KEY-XXXX.AVI ) the same is (EVE.XXXX.AVI) When TF Card is full only delete Normal Video recording file (REC.XXXX.AVI)Connect Computer1. Connect the camcorder with computer by USB cable, [My computer] will occur removable disk, the file id stored at Removable Disk/DCIM/100DSCIM which can be downloaded to the computer.2. System support of the Computer: Windows 2000/XP/Vista/Windows 7Power on test1)First time use camera ,please use package accessory USB cable connect to charger(DC-5V 1A), then connect to USB slot, power on test normal recording and other function2)After power on test normal, can install and useCharging the battery1. Directly connect car cigarettes with the USB interface, to charge battery2. Use a USB cable to connect the computer with the USB interface, to charge battery3. Use the USB cable to connect charger the USB interface, to charge battery.4. The battery level display shows the remaining power of the battery as below:Low power Not fully charged fully chargedTF card installment :1. insert the TF card in the TF Card slot according to the indicative direction ,until it softly clicks2. When removing the TF card push in the TF card and gently release to eject it.Notes:1. Make sure the TF card are facing the right way ,if it is in the wrong direction ,it may damage thecamera and TF card2. If the TF card is incompatible with the camera, please try to insert again ,change other TF card3. Please use the high- speed TF card.(The card have CLAS S⑩icon)Notice:Suppose the camera is in dead halt due to the improper operation, you can press reset button to restore the camera will return to normalTechnical specificationsLCD screen 2.0 TFTCamera lens 120 degrees A+ level high resolution lensLanguage English/French/ German /Italian/Spanish/Portuguese / T-Chinese/S-Chinese/ Russian/ TurkishVideo format AVI (MJPG)Memory card TF Up to 32GBMicrophone Built–inFrequency 50Hz/60HzUSB interface USB2.0Battery Built-inG-SENSOR SupportNotice: Due the camera software update camera function has change, without prior notice。
EOSS DVR720E HD 720P 行车记录仪使用说明书
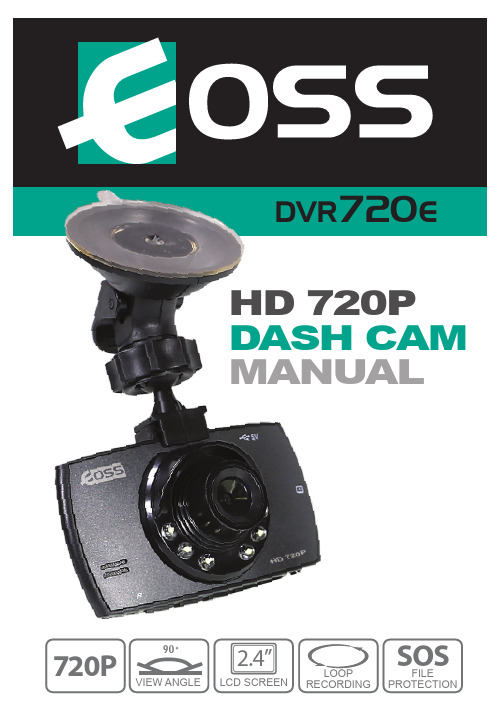
DVR720 HD 720P DASH CAM MANUAL!HD 1280 x 720 @ 30FPS 90 Degree angle lens Date & time stamp 2.4” LCD screen Mini USB interfaceSeamless loop recordingBuilt-in MIC and Speaker SOS Lock function 6x LED LightsSuction car mount with 360 degree rotation Supports Micro SD card class10 up to 32GBMini USB interface with data transfer & charging cable 12V car chargerThank you for purchasing the EOSS DVR720E Dash Cam.Please ensure that you have read the product manual and instructions in full, prior to installation and use. Failure to do so may result in product failure/damage or incorrect operation and therefore impact the product performance.The EOSS DVR720E Dash Cam has been designed to provide highdefinition recordings of your trips for security and evidence in the case of an accident. The Dash Cam simply mounts to the windscreen and records footage onto a Micro SD memory card.Table of ContentsIntroduction2223 Package components4 Product structure5 Installation of Dash Cam 678Dash Cam functionsMenu setting features explained Product specificationsInfringement of copyright warning 9 9 1214 14 15Product overviewProduct featuresTable of contentsVideo/Photo/Audio playbackSafety information & warnings Technical assistance 13Trouble shooting guideInstructions for video, photo & audio operationDVR720E Dash CamSuction MountingBracketUSB to Mini USBCar Charger!1) Micro SD card slot2) Screen display3) Emergency lock key4) Suction mount attach point5) Speaker6) LED lights7) Camera Lens8) Power On/Off button9) Arrow button10) Menu button11) OK button12) Mode button13) Arrow button14) Reset button15) Mini USB Interface!1. Ensure windscreen is clean and free of debris. Attach suction cup tothe windscreen and lock into position with the lever.2. Fix where the vision is not blocked (Place close to rear-view mirroris recommended). Don't install device on airbag or within its working range.3. Insert Micro SD card into the Dash Cam4. Insert Mini USB end of the power cord into the Mini USB interface/charging point of the Dash Cam. Place adapter into 12V power socket of vehicle.5. Adjust the mounting bracket and rotate the camera direction to getthe best view. Ensure of the vehicles bonnet is visible from thebottom of the screenfor alignment.6. Turn vehicles ignition to accessories, push the power button on theDash Cam and it will power ON and start recording automatically, you will hear an audible tone once powered.7. A RED circle will start flashing on the screen when recording hasstarted.8. A solid red LED will show when the Dash Cam is receiving power.9. For the Dash Cam to work it must receive power from the chargingadapter. Once power is removed or turned off the Dash Cam will save the current file and turn off.To turn on the Dash Cam press the Power On/Off button once, the redindication lamp will be light up if it is connected to a power source. To turn it off, hold down the power button and the device will turn off.Press the Mode button to switch to video mode if not already. To start recording in video mode press the OK button to start the recording. You know it is recording by the red circle indicator on the top left corner of the LCD. To stop the recording, simply press the OK button again.Press the Mode button to switch to photo mode. There is a camera icon at the top left corner of the LCD to signify you are on photo mode. To take a photo, press the OK button. The screen will flash and make a camera sound when a picture is taken. Pressing the Menu button in photo mode will allow you to change the photo resolution to 3M/2M/1.3M or VGA.Powering device on and off:Video ModePhoto ModeBattery BatteryLED lights OnDate/TimeVideo mode Photo mode Video resolution Photo resolutionRecording timeRecordingFile type & numberRecording timePress the mode button until you see the playback button icon on the top right of the screen representing playback mode. Using the arrow buttons, you can choose between all your recorded videos,photos or audio. The protected files have a lock icon meaning they cannot be deleted until unlocked. Press the OK button to select a file for playback. Pressing the Menu button will give the option to delete, unlock, create thumbnail and change volume of the file. Simply press the Mode button again to return to video mode.Press the Mode button to switch to audio recording mode. There is a microphone icon on the left of the LCD to signify you are on audiorecording mode. To record audio, press the OK button. A red circle will flash and clock timer will appear and start recording audio only. Press OK button to stop recording.Audio ModeMenu SettingsPress the Menu button to get into the menu settings. You can navigate the settings menu by using the Up/Down buttons. To change or edit a selected setting, press the OK button. Press the menu button again to get out of the menu settings.When the Dash Cam is charging, a red indicator on the Dash Cam glows red. The Dash Cam takes about 2 hours to fully charge.When the Dash Cam hits full charge, the red indicator will turn blue.The Dash Cam can be charged multiple ways:1. Using the provided Mini USB cable to connect to a USB interface for charging.2. Using the provided car chargerResolution:The recommended resolution should be set at ‘720p 1280x720’ inorder to get the best quality footage.Time Stamp:This feature will stamp the date and time on all your footage produced by your Dash Cam.Video Loop:This feature allows you to set the size of the files your Dash Cam will record before saving and creating a new file. We recommend the Dash Cam to be set to ‘3’ minute filesVoice Record:This Feature will allow you to turn the Dash Cam’s recording sound onor off. If you want to stop the Dash Cam recording sound in the cab of your vehicle, set this feature to ‘off’.Format:This feature allows you to format/delete all the files off your micro SD card and also reinstalls your DCIM directory and Dash Cam software on your SD card so the micro SD card can operate with your Dash Cam free of errors. It also reinstalls your EVENT (SOS locked files) and NORMAL (Video and jpegs) directories on your Micro SD card.Language:Allows you to choose from a selection of languages.Screen saver:This feature will turn your LCD off after 1, 3 or 5 minutes but will continue to record regardless. This feature is useful for night driving as having the LCD on could be a distraction.System Reset:This feature will allow the user to reset the Dash Cam’s functions to factory settingsLight Frequency:This feature allows the best recording in conditions where street lights and ac lighting is used. The Australian standard frequency is 50HZ so it should be set to ‘50hz’.Date Input:This feature will allows the user to enter Day/Month/Year to use with Time StampUSB:When connecting a USB cable with a PC, the Dash Cam will present two options. PC Cam & Disk Drive. The ‘PC Cam’ option allows you to use your Dash Cam as a webcam for your computer. ‘Disk Drive’ allows you to transfer your videos and photos to your PC.Version:This simply shows the firmware/software employed by the Dash Cam’s hardware.Resetting the Dash Cam:To hard reset the device in the case of a system jam or crash. Insert afine point paper clip into reset hole on the bottom of the unit..Maintaining the Battery:To prolong the battery life you must charged your Dash Cam on a 5 volt home charger at least once a week for 2-3 hours with the dash cam off, if you don't use the car daily, for cars that are used daily for more than 1 hour you can charge the Dash cam once every 3 weeks for 2-3 hours.It is not recommended to power the dash cam with only the battery.The battery will only run for 10 mins continuously, always use the charger provided.Formatting Card:It is advisable to format the card weekly if you have the setting G-sensor and park mode setting active, all footage that are locked in G-sensor and park mode will fill up the card causing it to stop recording any footage.LED lights:When in recording mode press the Power button once to turn on the LED’s. The Sun icon on the screen will change to a Moon icon. Note: They are not Infra-Red LED’s. These are used to record video or take pictures inside the cabin in a dark environment.Lock Footage (SOS) :Press the Emergency Lock Key button on the right side of the display for 3 seconds to activate the lock footage function, this will save any footage from getting erased from the card. Files can be unlocked in playback mode through menu settings.Power interface5V DC/1ADisplay2.4-inch LCD screenColorBlackVideoAVI720P 1280*720 at 30fpsVGA 640*480 at 30fpsPicture3M/2M/1.3M/VGAPicture formatJPG90 Degree view angleViewing AngleLED lightsx 6Loop recording, SOS file lockFunctionsOSD LanguageEnglish, Russian, Chinese, etcAudioBuilt-in Microphone and speakerStorageSupports Micro SD card 4GB-32GB Class 10 Max Input / OutputUSBBattery200mAh lithium batteryDimension6.8*4.5*3.3CM(L*W*H)AccessoriesCar mount, Car charger, USB cableUnder normal operating conditions, if there are problems with the device, please refer to the following methods to resolve.Please check whether there is enough space on the microSD card or internal storage.Stopping automatically while recording?Due to the high amount of HD video data being recorded, please use a high-speed Micro SD card. To tell if you have the required high speed card,check if it has the ‘Micro SDHC’ logo on the SD card and 8GB class 10 orabove is recommended. Make sure that your card is labeled Micro SDHC and not Micro SDXC as SDXC cards will not work with this Dash Cam.Fuzzy/dirty image?Please check if the lens is filled with dirt or fingerprints and clean carefully. Please clean lens with cloth before shooting.The DASH CAM is jammed or not responding?Please reset the device by pushing in the reset button on the underside of the Dash Cam.Why is the DASH CAM not turning on in the car?Please check and make sure that there is power in the cigarette lighter socket of your car.Micro SD card not recognised by DASH CAM?Format card in the Dash Cam’s menu setting’s before use.A coloured tinge showing up in the video?Make sure to peel off the transparent protective sticker on the front of the Dash Cam's lens.Do not use the Dash Cam in damp working conditions; the Dash Cam isnot waterproofDo not try opening the shell or trying to repair the Dash Cam by yourself. If the accessories for the Dash Cam have any problems, please take it to an authorised repair agent for repair.Do not use a chemical substance, cleaning solvent or cleaner to clean the Dash Cam, please use a moist soft cloth if you would like to clean theDash Cam.Do not use the Dash Cam under conditions where dust is present.Please pay attention to cleaning the lens surface, use a moist soft cloth toclean the lens before use, to avoid poor video footage.Please note that this product is for personal use only, the method of use shall not violate the goods, or infringe on domestic or international copyright laws. Recorded images are for personal use only, please note that in some cases to use this product to record performances, exhibitions or business activities may infringe the copyright or other legal rights and interests of others.If you need assistance setting up or using your EOSS product now or in the future, call EOSS Support.Australia Array TEL: 03 – 8587 8898FAX: 03 – 8587 8866Mon-Fri 9am – 5pm AESTThis manual is considered correct at time of printing but is subject to change.Copyright © 2017 by TDJ AustraliaAll rights reserved. No part of this publication may be reproduced, distributed, or transmitted in any form or by any means, including photocopying, recording, copying or other electronic or mechanicalmethods, without the prior written permission of the author.。
【VIP专享】行车记录仪英文说明书

Road Safety GuardInstruction ManualThank you for purchasing Portable DVR from our company.In order to help you operate it correctly, please read this instruction carefully before using.Product Picture and Function1. USB Slot2. AV-OUT Slot3. DC-5V4. SD/MMC Card Slot5. Speaker6. Mount hole7. Microphone8.Battery cover9. Lens10. Night Lights11. ON/OFF Power Switch12. REC / Snap13. 2.4 inch LCD14. Menu15. 16.Up /Down17. Mode ButtonAttached Accessories●Manual●Mount●USB Cable●Car Charger (Include the adaptor 12V/24V transfers to 5V)OperateTwo Power options:A) Use can remove built-in Li-ion batteryDVR can be activated after it has been placed on the vehicle by pressing the Power Switch for 1 second and turn off by pressing it for2 seconds.Charging: connect with USB cable or car charger.B) Connect with Car ChargerDVR will record automatically when the car starts, turn off and save the last file when the car stops.RecordingDVR will enter into defaulted recording mode when turn it on, the work indicator blinkers and indicates it is recording. Therecording file is saved in the SD/MMC Card. To stop, pressRecording Button or ending when car stops , th e work indicator won`t blinker.Camera modeTurn on the DVR and press Mode Button to enter into Camera mode. To take photo by pressing Snap Button .Manual Focus FunctionIn Camera or Recording mode ,press UP/DOWN Button the screen will show focus icon them press UP/DOWN button to choose need focus, you can choose (1x~8x)Night Vision FunctionPress Menu button then choose Night vision , DVR will enter Night vision status ,if you want to exit choose offPreview and DeleteTurn on the DVR and press Mode Button twice to enter into Preview Mode. Press Up or Down to select the previewed file. If it is video file, it can play or pause by pressing REC Button, and stop bypressing Mode Button. If you want to delete it, press Menu Button to enter into delete mode, and then, select Single, All by Menu Button and Up/Down and confirm to delete the file by Menu Button.Also select Slide show, Protect file, Thumbnail mode and volume(from 1 to 8) under the Preview Mode.Setting the functions:Turn on the DVR and Press Menu Button under Video mode or Camera mode to enter into setting interface. Confirm by Menu Button and Select by Up/Down for the following setting. Press REC Button to exit.A.Video mode1.Size: Select VGA, QVGA, SXGA.2.Time Stamp: Off/Data Only/Data &Time3.Motion Detect: Off/On4.Video Time: 3Min/5Min/10Min/15Min5.Audio: On/Off6.Night Mode: Off/OnB.Camera mode:1.Size: VGA/1.3M/2M/3M/5M/8M/12M2.Time Stamp: Off/Data Only/Data &Time3.Burst: Off/OnC.Setting ModeWhether under idle Mode, Press Menu Button and then press Mode Button to enter into Setup interface.1.Format: Select it if you want to format the SD card.2.Beep: Off/Onnguage: Select[English/ French/ Deutsch/Italian/Spanish/Portuguese /T-Chinese/ S-Chinese/ Russian/ Turkish/Korean4.Auto Off: 1Min/2Min/5Min/Off5.System Reset: select [Cancel or Execute system] reset.6.Light Frequency: 50Hz/60Hz Output: NTSC/PAL8.Data Input: Set correct recording data and time.B: PC Cam/Disk Drive10.Version :Check software versionPreview on the TVConnect the AV link of DVR with the TV, and enter into the preview mode automatically. The operating steps are same as preview on the screen.USB ModeConnect DVR with computer by USB cable, [My computer] will occur removable disk, the file id stored at Removable Disk/DCIM/100DSCIM. At the moment, the file of the DVR can be downloaded to the computer.Note:1)Please insert the SD/MMC card before recording.2)This DVR Records in cycle if you choose 3/5/10/15 minutes asstorage time. When the storage medium is full, it will recordfrom the beginning again and erase over the previously recorded material automatically. It will have 3 seconds pause time, and namely the contents in the 3 seconds will not record.3)Because the DVR is DC5Vinput, please use the attached carcharger. It has adaptor 12V/24V transfers to 5V already.Technical Specifications1)Recording resolution: 1280*960/640*480/320*240 pixels2)Video format: AVI3)Repeat storage by section: 3/5/10/15 minutes4)Power source: Built-in rechargeable battery OR 5V Car Charger5)Supports SD/MMC card(From 256MB up to 32GB)6)Microphone: can record soundNo further notice will be given for any modification of the technical specification.。
- 1、下载文档前请自行甄别文档内容的完整性,平台不提供额外的编辑、内容补充、找答案等附加服务。
- 2、"仅部分预览"的文档,不可在线预览部分如存在完整性等问题,可反馈申请退款(可完整预览的文档不适用该条件!)。
- 3、如文档侵犯您的权益,请联系客服反馈,我们会尽快为您处理(人工客服工作时间:9:00-18:30)。
Road Safety GuardInstruction ManualThank you for purchasing Portable DVR from our company.In order to help you operate it correctly, please read this instruction carefully before using.Product Picture and Function1. USB Slot2. AV-OUT Slot3. DC-5V4. SD/MMC Card Slot5. Speaker6. Mount hole7. Microphone8.Battery cover9. Lens10. Night Lights11. ON/OFF Power Switch12. REC / Snap13. 2.4 inch LCD14. Menu15. 16.Up /Down17. Mode ButtonAttached Accessories●Manual ●Mount ●USB Cable●Car Charger (Include the adaptor 12V/24V transfers to 5V)OperateTwo Power options:A) Use can remove built-in Li-ion batteryDVR can be activated after it has been placed on the vehicle by pressing thePower Switch for 1 second and turn off by pressing it for 2 seconds.Charging: connect with USB cable or car charger.B) Connect with Car ChargerDVR will record automatically when the car starts, turn off and save the lastfile when the car stops.RecordingDVR will enter into defaulted recording mode when turn it on, the work indicator blinkers and indicates it is recording. The recording file is saved in the SD/MMC Card. To stop, press Recording Button or ending when car stops , the work indicator won`t blinker.Camera modeTurn on the DVR and press Mode Button to enter into Camera mode. To take photo by pressing Snap Button .Manual Focus FunctionIn Camera or Recording mode ,press UP/DOWN Button the screen will show focus icon them press UP/DOWN button to choose need focus, you can choose (1x~8x) Night Vision FunctionPress Menu button then choose Night vision , DVR will enter Night vision status ,if you want to exit choose offPreview and DeleteTurn on the DVR and press Mode Button twice to enter into Preview Mode. Press Up or Down to select the previewed file. If it is video file, it can play or pause bypressing REC Button, and stop by pressing Mode Button. If you want to delete it, press Menu Button to enter into delete mode, and then, select Single, All by Menu Button and Up/Down and confirm to delete the file by Menu Button. Also select Slide show, Protect file, Thumbnail mode and volume (from 1 to 8) under the Preview Mode.Setting the functions:Turn on the DVR and Press Menu Button under Video mode or Camera mode to enter into setting interface. Confirm by Menu Button and Select by Up/Down for the following setting. Press REC Button to exit.A.Video mode1.Size: Select VGA, QVGA, SXGA.2.Time Stamp: Off/Data Only/Data &Time3.Motion Detect: Off/On4.Video Time: 3Min/5Min/10Min/15Min5.Audio: On/Off6.Night Mode: Off/OnB.Camera mode:1.Size: VGA/1.3M/2M/3M/5M/8M/12M2.Time Stamp: Off/Data Only/Data &Time3.Burst: Off/OnC.Setting ModeWhether under idle Mode, Press Menu Button and then press Mode Button to enter into Setup interface.1.Format: Select it if you want to format the SD card.2.Beep: Off/Onnguage: Select[English/ French/ Deutsch/Italian/Spanish/Portuguese / T-Chinese/ S-Chinese/ Russian/ Turkish/Korean4.Auto Off: 1Min/2Min/5Min/Off5.System Reset: select [Cancel or Execute system] reset.6.Light Frequency: 50Hz/60Hz Output: NTSC/PAL8.Data Input: Set correct recording data and time.B: PC Cam/Disk Drive10.Version :Check software versionPreview on the TVConnect the AV link of DVR with the TV, and enter into the preview mode automatically. The operating steps are same as preview on the screen.USB ModeConnect DVR with computer by USB cable, [My computer] will occur removable disk, the file id stored at Removable Disk/DCIM/100DSCIM. At the moment, the file of the DVR can be downloaded to the computer.Note:1)Please insert the SD/MMC card before recording.2)This DVR Records in cycle if you choose 3/5/10/15 minutes as storage time.When the storage medium is full, it will record from the beginning again and erase over the previously recorded material automatically. It will have 3seconds pause time, and namely the contents in the 3 seconds will not record.3)Because the DVR is DC5Vinput, please use the attached car charger. It hasadaptor 12V/24V transfers to 5V already.Technical Specifications1)Recording resolution: 1280*960/640*480/320*240 pixels2)Video format: AVI3)Repeat storage by section: 3/5/10/15 minutes4)Power source: Built-in rechargeable battery OR 5V Car Charger5)Supports SD/MMC card(From 256MB up to 32GB)6)Microphone: can record soundNo further notice will be given for any modification of the technical specification.。