ANSYS计算有预紧力的螺栓连接
ANSYS Workbench中一种螺栓预紧力施加方法
ANSYS Workbench中一种螺栓预紧力施加方法
螺栓预紧的目的在于增强联接的可靠性和紧密性,以防止受载后被联接件间出现缝隙或相对滑移。
对于有螺栓联接的机械结构有限元分析,如何将其施加于模型上,较好地模拟螺栓受力情况达到在有限元分析中的准确加载并得到正确的分析结果,有一定难度。
本文介绍在ANSYS Workbench中施加螺栓预紧力的一种方法。
1. 分析对象
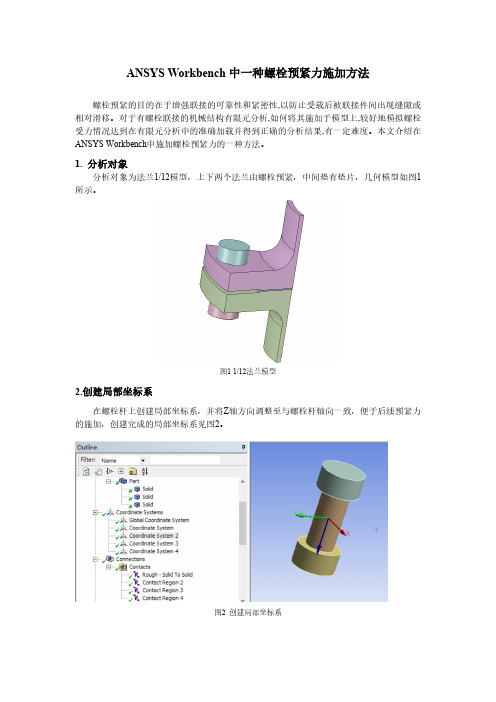
分析对象为法兰1/12模型,上下两个法兰由螺栓预紧,中间垫有垫片,几何模型如图1所示。
图1 1/12法兰模型
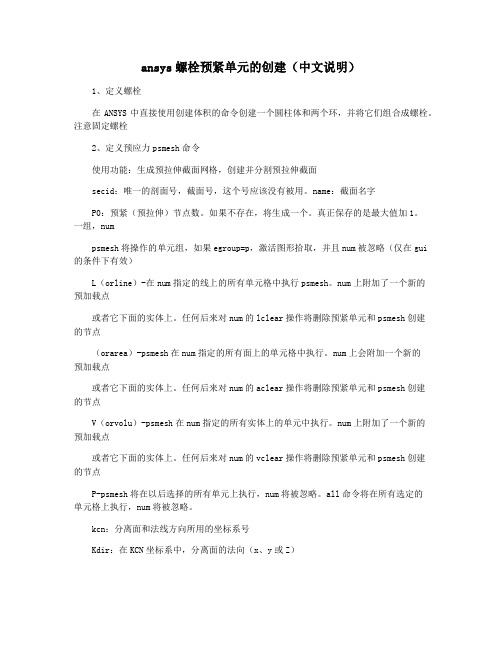
2.创建局部坐标系
在螺栓杆上创建局部坐标系,并将Z轴方向调整至与螺栓杆轴向一致,便于后续预紧力的施加,创建完成的局部坐标系见图2。
图2 创建局部坐标系
3.接触设置
法兰与垫片之间采用粗糙“Rough”接触方式,如图3所示,其他接触对采用绑定“Bonded”接触方式。
图3 粗糙“Rough”接触方式
4.网格划分
螺栓头、螺栓杆和螺母采用拓扑共享,螺栓与法兰接触区域采取局部控制,网格划分结果如图4所示。
图4 网格划分结果
5.螺栓预紧力施加
上下法兰受螺栓预紧力,法兰内侧面受5MPa压强,上法兰上端面受1000N拉力。
载荷的施加分三个载荷步,第一个载荷步施加4000N的螺栓预紧力,第二和第三载荷步设置为“LOCK”状态,其他两个外载荷均在第三个载荷步施加。
螺栓预紧力施加方法如图5所示。
图5 螺栓预紧力施加
6.法兰与垫片接触结果
(a)接触状态(b)接触压力
(c)接触间隙(d)接触渗透
图6 法兰与垫片接触结果。
ansys螺钉连接的处理方法

ansys螺钉连接的处理方法ANSYS螺钉连接的处理方法螺钉连接是机械设计中常用的一种连接方式,它主要适用于两个或多个部件的连接。
在进行机械分析时,通过使用ANSYS软件可以方便地模拟螺钉连接,进而得到该连接的强度和可靠性。
本文将介绍ANSYS螺钉连接的处理方法,以帮助读者在机械设计过程中使用该软件进行螺钉连接的模拟分析。
一、建立模型首先,在ANSYS软件中导入需要进行螺钉连接分析的模型。
导入的模型需要包括螺钉、螺母、垫圈以及被连接的部件等。
此外,还需要对模型进行几何参数的定义,例如螺钉直径、螺距、角度等。
二、定义材料属性在进行螺钉连接分析前,还需要为模型中的材料定义属性。
这些属性包括描绘材料的弹性模量、泊松比、屈服强度等。
这些属性的定义可以使用ANSYS中的材料库,也可以根据具体的材料进行手动设定。
三、设定约束和载荷在ANSYS中,为了保证分析结果的精确性,需要对模型进行约束和载荷的设定。
对于螺钉连接分析,一般情况下需要给被连接的部件施加由螺钉产生的预紧力,同时需要考虑外力对部件的作用。
这些都需要在ANSYS中进行明确设定。
四、进行力学分析在进行完以上设定后,就可以使用ANSYS对螺钉连接进行力学分析。
在进行分析过程中,需要设置仿真时间,以便ANSYS计算出模型在受载状态下的行为。
此外,还需要针对具体的连接模型设置求解器来解决模型所涉及的非线性或者其他复杂的物理现象。
五、分析结果展示分析结果可以在ANSYS中通过多种方式呈现。
比如,可视化图形、动画、数据图表等。
可以通过这些结果来详细了解螺钉连接的强度和可靠性,以及必要的响应和位移信息。
综上所述,ANSYS软件具有强大的模拟分析能力,可以方便地进行螺钉连接的模拟分析。
通过以上的操作步骤,读者可以清晰地了解整个分析的流程,快速得到可靠的分析结果。
这对于机械设计师来说无疑是一种非常有价值的工具和资源。
基于ANSYS软件的螺栓法兰连接结构应力和疲劳分析

基于ANSYS软件的螺栓法兰连接结构应力和疲劳分析徐静;薛欣玮;卢健【摘要】为保证风力发电机在恶劣的自然环境中可靠运行,需要对风力发电机塔架转接段法兰进行应力和疲劳分析.应用ANSYS有限元软件对风力发电机塔架的螺栓法兰连接结构进行应力分析,分析结果显示:当施加载荷时,法兰和螺栓中都出现应力集中;随着载荷的增大,法兰还出现弯曲现象;外侧螺栓产生的应力小于对应内侧螺栓产生的应力,可见内侧螺栓受到的影响较大,应特别注意.通过疲劳分析,确认选择35CrMoA合金钢材作为螺栓法兰结构的整体材料符合使用要求,为螺栓法兰结构选材提供了理论依据.【期刊名称】《机械制造》【年(卷),期】2018(056)012【总页数】4页(P17-20)【关键词】螺栓;法兰;连接;应力;疲劳;计算机【作者】徐静;薛欣玮;卢健【作者单位】西安工程大学机电工程学院西安 710048;西安工程大学机电工程学院西安 710048;西安工程大学机电工程学院西安 710048【正文语种】中文【中图分类】TH131.31 研究背景随着全球大气污染越来越严重,清洁环保的风能发电成为人们竞相研究的热点[1-2]。
风力发电机组一般都安装在风力资源较为充沛、自然环境较为恶劣的野外[3-4],为了保证风力发电机在复杂的自然环境中能够可靠运行,对连接塔架各筒身的螺栓法兰连接结构进行应力分析及疲劳寿命评估是必不可少的工作[5]。
近20年来,国内外学者主要集中于对风力发电机连接塔架的标准碳钢法兰设计及垫片性能的研究[6-7]。
螺栓法兰在制造过程中,材料内部会存在一些缺陷,如气孔、夹杂和裂纹等,这些缺陷会严重影响法兰的使用寿命,如果法兰和螺栓出现损伤,那么会影响整个风力发电机的性能[8]。
因此,笔者对螺栓法兰连接结构进行材料选择,并利用ANSYS软件对其进行应力及疲劳寿命分析,为结构设计和优化分析等后续研究工作提供理论依据。
2 螺栓法兰连接结构及材料选择风力发电机塔架上的螺栓法兰连接结构由上法兰、下法兰、垫片和螺栓组成,在这一结构中,螺栓与螺母紧固,用于连接上、下两个法兰,法兰上分布着内、外侧螺栓。
ansys螺栓连接的处理方法

ansys螺栓连接的处理方法在机械设计中,螺栓连接是一种常见的连接方式。
螺栓连接的优点是连接紧固力大,可拆卸性好,适用于各种工况。
在使用螺栓连接时,需要考虑螺栓的强度和连接的可靠性。
本文将介绍如何使用ansys软件进行螺栓连接的处理方法。
一、建立模型需要建立螺栓连接的模型。
在ansys中,可以使用DesignModeler或SpaceClaim进行建模。
建模时需要考虑螺栓的几何形状、材料和连接方式等因素。
在建模时,需要注意螺栓的直径、长度、螺纹等参数的设置。
二、设置材料属性在进行螺栓连接分析前,需要设置螺栓和连接件的材料属性。
在ansys中,可以使用材料库中的材料或自定义材料。
在设置材料属性时,需要考虑材料的弹性模量、泊松比、屈服强度等参数。
三、设置边界条件在进行螺栓连接分析前,需要设置边界条件。
在ansys中,可以设置螺栓和连接件的约束和载荷。
在设置约束时,需要考虑螺栓和连接件的实际约束情况。
在设置载荷时,需要考虑螺栓和连接件的实际载荷情况。
四、进行螺栓连接分析在设置好模型、材料属性和边界条件后,可以进行螺栓连接分析。
在ansys中,可以使用静力学分析或非线性分析进行螺栓连接分析。
在进行分析时,需要考虑螺栓和连接件的实际工作情况。
五、分析结果处理在进行螺栓连接分析后,需要对分析结果进行处理。
在ansys中,可以使用PostProcessor进行结果处理。
在处理结果时,需要考虑螺栓和连接件的实际工作情况。
可以对应力、应变、位移等参数进行分析。
六、优化设计在进行螺栓连接分析后,可以对模型进行优化设计。
在ansys中,可以使用OptiSLang进行优化设计。
在进行优化设计时,需要考虑螺栓和连接件的实际工作情况。
可以对螺栓的直径、长度、螺纹等参数进行优化设计。
七、总结螺栓连接是一种常见的连接方式,在机械设计中应用广泛。
在使用ansys进行螺栓连接分析时,需要考虑螺栓的几何形状、材料和连接方式等因素。
在进行分析时,需要考虑螺栓和连接件的实际工作情况。
ansys高级接触分析第11章-螺栓预紧

螺栓预紧
...一般过程
• 可以进行如下操作删除预拉伸单元:
– Preprocessor > Modeling > Delete > Pre-tens Elemnts
• ANSYS会自动删除预拉伸单元并在切割处合并节点.
– 然而,预拉伸节点K并没有被删除
预载荷方 向
• 可以是任意位置.
• 有一个自由度: UX.
• 用来定义预载荷FX或UX. • 作用线为预拉伸载荷方向
K
节点 I 预拉伸面
螺栓 — 实体, 壳 或梁
May 16, 2005 Inventory #002256 11-5
螺栓预紧
…PRETS179单元
• 预拉伸单元特征:
– 预载荷方向固定 – 旋转时仍保持不变 – 无材料属性或关键选项 – 和螺栓相连接的单元可以是实体、壳体或梁,高阶的或低阶的 – 使用GUI方式自动生成单元
• 下面我们详细讨论3、4两步.
May 16, 2005 Inventory #002256 11-7
螺栓预紧
...一般过程
创建预拉伸单元 • 在所有结构都划分好网格后的下一步创建预拉伸单元. – 使用PSMESH
• 紧固件必须作为一个零件划分网格.
• 两个选项:
• PSMESH将把紧固件切割成两部分并使用预拉伸单元生成预拉伸截面.
…螺栓预紧
• 尽管预拉伸单元存在接触问题,但该章节我们主要讲解如何预拉伸 螺栓
• 该章包括以下几个主题:
A. PRETS179 单元 B. 一般过程 C. Workshop
May 16, 2005 Inventory #002256 1
ansys螺栓预紧单元的创建(中文说明)
ansys螺栓预紧单元的创建(中文说明)1、定义螺栓在ANSYS中直接使用创建体积的命令创建一个圆柱体和两个环,并将它们组合成螺栓。
注意固定螺栓2、定义预应力psmesh命令使用功能:生成预拉伸截面网格,创建并分割预拉伸截面secid:唯一的剖面号,截面号,这个号应该没有被用。
name:截面名字P0:预紧(预拉伸)节点数。
如果不存在,将生成一个。
真正保存的是最大值加1。
一组,numpsmesh将操作的单元组,如果egroup=p,激活图形拾取,并且num被忽略(仅在gui 的条件下有效)L(orline)-在num指定的线上的所有单元格中执行psmesh。
num上附加了一个新的预加载点或者它下面的实体上。
任何后来对num的lclear操作将删除预紧单元和psmesh创建的节点(orarea)-psmesh在num指定的所有面上的单元格中执行。
num上会附加一个新的预加载点或者它下面的实体上。
任何后来对num的aclear操作将删除预紧单元和psmesh创建的节点V(orvolu)-psmesh在num指定的所有实体上的单元中执行。
num上附加了一个新的预加载点或者它下面的实体上。
任何后来对num的vclear操作将删除预紧单元和psmesh创建的节点P-psmesh将在以后选择的所有单元上执行,num将被忽略。
all命令将在所有选定的单元格上执行,num将被忽略。
kcn:分离面和法线方向所用的坐标系号Kdir:在KCN坐标系中,分离面的法向(x、y或Z)如果kcn是笛卡尔坐标系,预紧截面的法线方向平行于kdir轴而不管预紧节点的位置。
如果KCN不是笛卡尔坐标系,则预加载截面的法线方向与KCN坐标系中预加载节点处KDR的方向相同。
value:在kdir轴上,分离面的位置点。
如果指定了ndplane将被忽略。
Ndplane:现有节点。
Psmesh用于生成分离面的位置。
如果ndplane提供了分离面的位置,则由ndplane的kdir坐标确定。
Ansys螺栓预紧力模拟

Ansys螺栓预紧力模拟螺栓连接是机械设计中比较常见的一种连接固定方式,为了保证连接的可靠性,需要通过拧紧螺栓的方式施加必要的预紧力来防止螺纹松脱,本文通过一个简单的实例来计算螺栓的预紧力,以及模拟螺栓连接受到预紧力时的应力应变情况。
一、建立CAD模型在CAD中建立以下螺栓连接模型,钢板在中间,螺栓和螺母上下锁死。
螺纹规格为M10 x 1.5,为了简化,没有对螺纹进行建模:二、校验最大预紧力和锁紧扭力根据以下公式校验螺栓能够承受的最大预紧力:安全系数取1.5,结构钢屈服应力为250MPa,螺纹大径为10mm 可以得到最大预应力为P = 0.67*(250x3.14/4*100)=13,155KN根据以下公式计算该螺栓可以承受的最大扭力:T = 0.2*0.01*13155 = 26.3Nm.三、设立边界条件1)将模型导入Ansys workbech, 将三个零件的材料设为结构钢。
2)接触面设置:a. 将螺栓和钢板的接触设置为“Friction”,摩擦系数设为0.15。
b. 将螺母和钢板的接触设置为“Friction”,摩擦系数设为0.15。
c. 将螺栓和螺母的螺纹连接设置为'Bonded',接触行为设为非对称“Asymmetric”,打开修剪接触,将公差设为1mm:3)预紧力设置:首先设置预紧力施加的位置,需要先建立一个坐标系,这里选择钢板上下面作为参考面,生成的坐标系会坐落在钢板的中间平面。
然后选择螺栓body,选择刚建立的坐标系,设置预紧力大小为5KN。
注意预紧力那两个箭头要跟螺栓的中心轴方向一致,箭头所指的位置就是预紧力作用的位置。
预紧力作用的位置4)网格设置基础网格大小设为2.5mm,追加接触面网格细化(0.5mm)和螺栓细化(1.5mm)。
5)约束设置:将钢板四周面设为固定面。
四、求解器设置和结果求解步骤需要设为两步在预紧力中将第一步设为Load 5KN, 第二步设为Lock整体形变,注意到最大变形发生在预紧力施加的位置:整体应力分布:螺栓应力分布,最大应力在根部:安全系数分布:变形动画,可以看到螺栓和螺母在锁紧扭力的作用下相对移动,这个与实际操作相符。
利用ANSYS模拟螺栓预紧力的研究_李会勋
第25卷第1期山东科技大学学报(自然科学版)Vol.25No.1 2006年3月Journal of Shandong University of Science and Technology(Natural Science)Mar.2006文章编号:1672-3767(2006)01-0057-03利用ANSYS模拟螺栓预紧力的研究*李会勋1,胡迎春1,2,张建中3(1.广西大学机械工程学院,广西南宁530004;2.广西工学院计算机工程系,广西柳州545006;3.山东科技大学机械工程系,山东泰安271000)摘要:在螺栓联接的有限元分析中准确模拟螺栓的预紧力是一项复杂而困难的工作。
论述了利用有限元技术在ANSY S中模拟螺栓预紧力的预紧力单元法、降温法和渗透接触法等方法。
通过对比发现预紧力单元法能较好的模拟实际预紧力,从而为有限元分析中施加预紧力载荷提供了可靠的理论和应用依据。
关键词:AN SY S;预紧力单元法;降温法;渗透接触法中图分类号:T H123.4文献标识码:AStudy on Simulating Bolt Pretension by Using ANSYSLI Hu-i xun1,HU Ying-chun1,2,ZH ANG Jian-zhong3(1.College of M echanical Eng.,Guangx i University,Nanning,Guangx i530004,China;2.Dept.of Computer Science,GuangxiPolytechnic College,Liuzhou,Guangxi545006,China;3.Dept.of M echan i cal Eng.,S UST,Taian,Shandong271000,China) Abstract:It is quite complex and difficult to simulate bolt pretension accurately in the analysis of bolt joint by finite element method.T hree methods such as the pretension element,decreasing temperature and pene-trative contact methods are discussed in ANSYS by using finite element technology.And comparisons of them find that pretension element method could be the best w ay to simulate the real bolt pretension,pro-viding a reliable theoretic and application bases for pretension loading in the analysis of bolt joint by using f-i nite element method.Key words:ANSYS;pretension element method;decreasing temperature method;penetrative contact method受拉紧螺栓联接是机械结构中应用最广泛的联接方式。
- 1、下载文档前请自行甄别文档内容的完整性,平台不提供额外的编辑、内容补充、找答案等附加服务。
- 2、"仅部分预览"的文档,不可在线预览部分如存在完整性等问题,可反馈申请退款(可完整预览的文档不适用该条件!)。
- 3、如文档侵犯您的权益,请联系客服反馈,我们会尽快为您处理(人工客服工作时间:9:00-18:30)。
/ti t le, Sample application of PSMESHet,1,92mp,ex,1,1e7mp,alpx,1,1.3e-5mp,prxy,1,0.30mp,ex,2,3e7mp,alpx,2,8.4e-6mp,prxy,2,0.30tref,70/foc,,-.09,.34,.42/dist,,.99/ang,,-55.8/view,,.39,-.87,.31/pnum,volu,1/num,1cylind,0.5,, -0.25,0, 0,180cylind,0.5,, 1,1.25, 0,180cylind,0.25,, 0,1, 0,180wpoff,.05cylind,0.35,1, 0,0.75, 0,180wpoff,-.1cylind,0.35,1, 0.75,1, 0,180 wpstyle,,,,,,,,0vglue,allnumc,allvplotmat,1smrt,offvmesh,4,5mat,2vmesh,1,3/pnum,mat,1eplotpsmesh,,example,,volu,1,0,z,0.5,,,,elems CM,lines,LINE/dist,,1.1cmplot/solueqslve,pcg,1e-8asel,s,loc,yda,all,symmdk,1,uxdk,12,uxdk,1,uzsload,1,9,,force,100,1,2/ti t le,Sample application of PSMESH - preload onlysolve!!!!!!!!!!!!!!!!!!!!!!!!!!!!!!!!!!!!!!!!!!!!!!!!!!!!!!!!!!!!!!Finally, we construct the actual solution of interest. We want to!know what happens to the preload in the bolt, and the stress field around !it, when the assembly temperature rises to 150° F.!Both the preload and the stresses increase because, for a uniform!temperature rise, there is greater thermal expansion in the aluminum plates !than in the steel bolt. Any method for applying preload that did not!allow the load to change would be unable to predict this result.!!!!!!!!!!!!!!!!!!!!!!!!!!!!!!!!!!!!!!!!!!!!!!!!!!!!!!!!!!!!!/post1plnsol,s,z/soluantype,,restarttunif,150/ti t le,Sample application of PSMESH - uniform 150°solve/post1plnsol,s,zGUI操作流程:1. Set the Analysis Title(1) Choose Utility Menu> File> ChangeTitle(2) Enter the text, “Sample Application ofPSMESH” and click OK.2004-8-17 11:27 #3yiby金牌会员UID 23110精华 5积分64帖子564阅读权限70注册2003-7-3来自西南交通大学状态离线回复:【寻找】那位大哥给一个预紧分析的例子2. Define the Element TypeDefine SOLID92 as the element type.(1)Select Main Menu> Preprocessor> ElementType> Add/Edit/Delete. The Element Types dialog boxappears.(2)Click Add. The Library of Elements dialog boxappears.(3)In the scroll box on the left, select Structural,Solid.(4)Select Tet 10 node 92 in the scroll box on the rightand click OK.(5)Click Close in the Element Types dialog box.2004-8-17 11:28#4yiby金牌会员UID 23110精华 5积分64帖子564阅读权限70注册2003-7-3来自西南交通大学状态离线回复:【寻找】那位大哥给一个预紧分析的例子3. Define Material Properties(1)Select Main Menu> Preprocessor> Material Props> MaterialModels. The Define Material Model Behavior dialog box appears.(2)In the Material Models Available window, double click on Structural, Linear,Elastic, and Isotropic. A dialog box appears.(3)Enter 1E7 for EX, 0.3 for PRXY and click OK. Linear Isotropic appears underMaterial Model Number 1 in the Material Models Defined window.(4)Under Structural in the Material Models Available window, double click onThermal Expansion Coef, Isotropic. A dialog box appears.(5)Enter 1.3E-5 for ALPX and click OK. Thermal Expansion (iso) appears underMaterial Model Number 1 in the Material Models Defined window.(6) Choose Material> New Model, then enter 2 for the new material ID andclick OK. Material Model 2 appears in the Material Models Defined window on theleft.(7) Double click on Isotropic under Structural, Linear, Elastic in the MaterialModels Available window. A dialog box appears.(8) Enter 3E7 for EX, 0.3 for PRXY and click OK. Linear Isotropic appears underMaterial Model Number 2 in the Material Models Defined window.(9) Double click on Isotropic under Structural, Thermal Expansion Coef in theMaterial Models Available Window. A dialog box appears.(10) Enter 8.4E-6 for ALPX and click OK. Thermal Expansion (iso) appearsunder Material Model Number 2 in the Material Models Defined window.(11) Choose Material> Exit to close the Define Material Behavior dialog box.(12) Select Main Menu> Preprocessor> Loads> Define Loads>Settings> Reference Temp.(13) Enter 70 as the reference temperature and click OK.2004-8-17 11:30 #5 yiby金牌会员UID 23110精华 5积分 64帖子 564阅读权限 70注册 2003-7-3 来自 西南交通大学 状态 离线 回复: 【寻找】那位大哥给一个预紧分析的例子 4. Set Viewing Options (1) Select Utility Menu> PlotCtrls> View Settings> Focus Point. The Focus Point dialog box appears. (2) Choose User Specified. (3) Enter -.09, .34, and .42 as the User specified locate and click OK. (4) Select Utility Menu> PlotCtrls> View Settings> Magnification. The Magnification dialog box appears(5) Choose User Specified.(6) Enter .99 as the User specified distance and click OK.(7) Select Utility Menu> PlotCtrls> View Settings> Angle of Rotation.The Angle of Rotation dialog box appears.(8) Enter -55.8 as the Angle in degrees value and click OK.(9) Select Utility Menu> PlotCtrls> View Settings> Viewing Direction.The Viewing Direction dialog box appears.(10) Enter .39, -.87, and .31 as the XV, YV, and ZV values, respectively andclick OK.(11) Select Utility Menu> PlotCtrls> Numbering. Turn on Volumenumbers.(12) Choose Numbering shown with Colors only and click OK.2004-8-17 11:32 #6 yiby金牌会员UID 23110精华 5积分 64帖子 564阅读权限 70注册 2003-7-3 来自 西南交通大学 状态 离线 回复: 【寻找】那位大哥给一个预紧分析的例子 5. Create Geometry (1) Select Main Menu> Preprocessor> Modeling> Create> Volumes> By Dimensions. The Create Cylinder by Dimensions dialog box appears. (2) Enter the following values:Outer radius (RAD1): 0.5 Z-coordinates (Z1, Z2): -0.25, 0 Ending angle (THETA2): 180(3) Click Apply to create the cylinder and keep the Create Cylinder by Dimensions dialog box open.(4) Enter the following values:Outer radius (RAD1): 0.5Z-coordinates (Z1, Z2): 1, 1.25Ending angle (THETA2): 180(5) Click Apply to create the cylinder and keep the Create Cylinder byDimensions dialog box open.(6) Enter the following values:Outer radius (RAD1): 0.25Z-coordinates (Z1, Z2): 0, 1Ending angle (THETA2): 180(7)Click OK to create the cylinder and close the Create Cylinder by Dimensions dialog box.(8)Select Utility Menu> WorkPlane> Offset WP by increments(9)Enter 0.05 in X, Y, Z Offset, press enter, and click OK. This offsets the working plane 0.05 units in the working plane x-direction.(10)Select Main Menu> Preprocessor> Modeling> Create> Volumes> Cylinder> By Dimensions. The Create Cylinder by Dimensions dialog box appears.(11)Enter the following values:Outer radius (RAD1): 1Optional inner radius (RAD2): 0.35Z-coordinates (Z1, Z2): 0, 0.75Ending angle (THETA2): 180(12)Click OK to create the cylinder and close the Create Cylinder by Dimensions dialog box.(13)Select Utility Menu> WorkPlane> Offset WP by increments.(14)Enter -0.10 in X, Y, Z Offset, press enter, and click OK. This offsets the working plane -0.10 units in the working plane x-direction.(15)Select Main Menu> Preprocessor> Modeling> Create> Volumes> Cylinder> By Dimensions. The Create Cylinder by Dimensions dialog box appears.(16)Enter the following values:Outer radius (RAD1): 1Optional inner radius (RAD2): 0.35Z-coordinates (Z1, Z2): 0.75, 1Ending angle (THETA2): 180(17)Click OK to create the cylinder and close the Create Cylinder by Dimensions dialog box.(18)Select Utility Menu> WorkPlane> Display Working Plane (toggle off).(19)Select Main Menu> Preprocessor> Modeling> Operate> Booleans> Glue> Volumes.(20)Pick all (in the picker).(21) Select Main Menu> Preprocessor> Numbering Ctrls> CompressNumbers.(22) Select All for Item to be compressed and click OK.(23) Select Utility Menu> Plot> Volumes.2004-8-17 11:34 #7 yiby金牌会员UID 23110精华 5积分 64帖子 564阅读权限 70注册 2003-7-3 来自 西南交通大学 状态 离线 回复: 【寻找】那位大哥给一个预紧分析的例子 6. Mesh Geometry (1) Select Main Menu> Preprocessor> Meshing> Meshtool. (2) Under Element Attributes, choose Global and click Set. (3) Set the Material number to 1 and click OK. (4) Be sure smart sizing is off and click Mesh.(5) Pick volumes 4 and 5 (the two annular plates) and click OK in the picking menu.(6) Select Utility Menu> Plot> Volumes.(7) In the MeshTool dialog box, choose Global and click Set under ElementAttributes.(8) Set the Material number to 2 and click OK.(9) Click Mesh.(10) Pick volumes 1, 2, and 3 and click OK in the picking menu.(11) Close the MeshTool dialog box.(12) Select Utility Menu> PlotCtrls> Numbering.(13) Choose Material numbers for Elem/Attrib numbering and clickOK.(14) Select Utility Menu> Plot> Elements.(15) Select Main Menu> Preprocessor> Sections> Pretension>Pretensn Mesh> With Options> Divide at Valu> Elements in Volu.(16) Pick volume 1 and click OK in the picker.(17) Enter the following information in the dialog box and click OK:NAME:ExampleKCN: Global CartesianKDIR: Z-axisVALUE: 0.5ECOMP: elems(18) Select Utility Menu> Select> Comp/Assembly> CreateComponent.(19) Enter Line for the Component name (Cname).(20) Choose Lines for the Entity and click OK.(21) Select Utility Menu> PlotCtrls> View Settings> Magnification.(22) Choose User Specified.(23) Enter 1.1 for the User specified distance and click OK.(24) Select Utility Menu> Plot> Components> Selected Components.2004-8-17 11:37 #8 yiby金牌会员UID 23110精华 5积分 64帖子 564阅读权限 70注册 2003-7-3 来自 西南交通大学 状态 离线 回复: 【寻找】那位大哥给一个预紧分析的例子 7. Solution: Apply Pretension (1) Select Main Menu> Solution> Analysis Types> Sol'n Controls. (2) Click on the Sol'n Options tab. (3) Choose Precondi t ion CG under Equation Solvers and click OK. (4) Select Utility Menu> Select> Entities.(5) Choose Areas, By Location, and Y -coordinates and click OK.(6) Select Main Menu> Solution> Define Loads> Apply>Structural> Displacement> Symmetry B.C.> On Areas.(7)Click Pick All.(8)Select Utility Menu> Select> Entities.(9)Make sure Areas are still selected and click Sele All.(10)Click OK.(11)Select Main Menu> Solution> Define Loads> Apply>Structural> Displacement> On Keypoints.(12)Pick the middle keypoint on the bottom of the bolt (KeyP No. = 1) andclick OK in the picker.(13)Choose UX and UZ for DOFs to be constrained (Lab2) and click Apply toaccept your choices and return to the picker.(14)Pick the middle keypoint on the top of the bolt (KeyP No. = 12) and clickOK in the picker.(15)Choose UX for DOFs to be constrained (Lab2) and click OK.(16)Select Main Menu> Solution> Define Loads> Apply>Structural> Pretensn Sectn.(17)Choose 1 Example under Pretension Sections.(18)Enter 100 for Force (under Pretension Load) and click OK.(19)Select Utility Menu> File> Change Title.(20)Change the ti t le to “Sample Application of PSMESH - Preload Only” andclick OK.(21)Select Main Menu> Solution> Solve> Current LS.(22)R eview the information in the /STATUS Command window and click OK tobegin the solution.(23)Click Close when the Solution is Done message appears.2004-8-17 11:39 #9yiby金牌会员UID 23110精华 5积分 64帖子 564阅读权限 70注册 2003-7-3来自 西南交通大学状态 离线回复: 【寻找】那位大哥给一个预紧分析的例子 8. Postprocessing: Pretension Results (1) Select Main Menu> General Postproc> Plot Resul t s> Contour Plot> Nodal Solu. The Contour Nodal Solution Data dialog box appears. (2) Select Stress from the scroll box on the left and Z-direction (SZ) from the scroll box on the right and click OK. 2004-8-1711:40 #10 yiby金牌会员UID 23110精华 5积分 64帖子 564阅读权限 70注册 2003-7-3 来自 西南交通大学 状态 离线 回复: 【寻找】那位大哥给一个预紧分析的例子 9. Solution: Apply Thermal Gradient (1) Select Main Menu> Solution> Analysis Type> R estart. Close any warning messages that appear. (2) Select Main Menu> Solution> Define Loads> Settings> Uniform Temp. (3) Enter 150 for the uniform temperature and click OK.(4) Select Utility Menu> File> Change Title.(5) Change the title to “Sample Application of PSMESH - Uniform 150 deg” andclick OK.(6) Select Main Menu> Solution> Solve> Current LS.2004-8-1711:41 #11 yiby金牌会员回复: 【寻找】那位大哥给一个预紧分析的例子 10. Postprocessing: Pretension and Thermal ResultsUID 23110精华 5积分 64帖子 564阅读权限 70注册 2003-7-3来自 西南交通大学状态 离线(1) Select Main Menu> General Postproc> Plot Resul t s> Contour Plot> Nodal Solu. The Contour Nodal Solution Data dialog box appears. (2) Select Stress from the scroll box on the left and Z-direction (SZ) from the scroll box on the right and click OK. 2004-8-1711:42 #12 yiby金牌会员UID 23110 精华 5 积分 64 帖子 564阅读权限 7注册 2003-7-3来自 西南交通大学状态 离线回复: 【寻找】那位大哥给一个预紧分析的例子 11. Exit ANSYS (1) Choose QUIT from the ANSYS Toolbar.(2) Choose Quit - No Save!(3) Click on OK.2004-8-17 11:42 #13 yiby金牌会员UID 23110精华 5积分 64帖子 564 回复: 【寻找】那位大哥给一个预紧分析的例子 模型初始网格划分: 图片附件: 306487--embed.jpg (2004-8-17 11:46, 0 bytes)注册 2003-7-3来自 西南交通大学状态 离线2004-8-1711:46 #14 yiby金牌会员UID 23110精华 5积分 64帖子 564阅读权限 70注册 2003-7-3来自 西南交通大学 回复: 【寻找】那位大哥给一个预紧分析的例子 定义预紧力单元: 图片附件: 306488--embed.jpg (2004-8-17 11:47, 0 bytes)2004-8-17 11:47#15yiby金牌会员UID23110精华5回复:【寻找】那位大哥给一个预紧分析的例子结果图:图片附件: 306490--embed.JPG (2004-8-17 11:48, 0 bytes)线。