驱动安装说明
USB驱动安装指南说明书

USB Driver Installation GuideCopyright and Technical SupportUSB Driver Installation GuideMTCMR-xx-All Versions, MTSMC-xx-IP/GP-All Versions, MTCBA-H3/EV1-U1, MTSMC-H3/EV1-U,S000507A, Revision ACopyrightThis publication may not be reproduced, in whole or in part, without prior expressed written permission from Multi-Tech Systems, Inc. All rights reserved.Copyright © 2011 by Multi-Tech Systems, Inc.Multi-Tech Systems, Inc. makes no representation or warranties with respect to the contents hereof and specifically disclaims any implied warranties of merchantability or fitness for any particular purpose.Furthermore, Multi-Tech Systems, Inc. reserves the right to revise this publication and to make changes from time to time in the content hereof without obligation of Multi-Tech Systems, Inc., to notify any person or organization of such revisions or changes. Check Multi-Tech’s Web site for current versions of our product documentation.Revision HistoryRevision Date DescriptionA10/19/11 Initial release.Trademarks and LogosThe Multi-Tech logo, SocketModem, and MultiModem are registered trademarks of Multi-Tech Systems, Inc. Windows is a registered trademark of Microsoft in the U.S. and other countries. Other trademarks and trade names mentioned in this publication belong to their respective owners.Contacting Multi-Tech SupportIn order to better serve our customers, manage support requests and shorten resolution times, we have created the online web portal allowing you to submit questions regarding Multi-Tech products directly to our technical support team. Get answers to your most complex questions, ranging from implementation, troubleshooting, product configuration, firmware upgrades and much more.To create an account and submit a Support Case on the Portal, visit https://Online Web Portal https://The Knowledge Base provides immediate answers to your questions and gives you access to support resolutions for all Multi-Tech products. Visit our support area on the website for other support services.Knowledge Base and Support Services /support.goWorld HeadquartersMulti-Tech Systems, Inc.2205 Woodale DriveMounds View, Minnesota 55112Phone: 763-785-3500 or 800-328-9717Fax: 763-785-9874Technical SupportBusiness Hours: M-F, 9am to 5pm CSTCountry By Email By PhoneEurope, Middle East, Africa: ********************.uk+(44) 118 959 7774U.S., Canada, all others: *********************(800) 972-2439 or (763) 717-5863WarrantyTo read the warranty statement for your product, please visit: /warranty.goContentsChapter 1 – Product Description (4)Introduction (4)Models and Build Option Descriptions (4)Chapter 2 – USB CDC-ACM Driver Installation on Windows (5)Introduction (5)Installing a Virtual COM Port (5)Installing the Modem Driver (6)Verifying That Your Modem Has Been Installed Successfully (9)Account Activation for Cellular Devices (9)Chapter 3 – USB Huawei Driver Installation on Windows (10)Introduction (10)Installing the Huawei Driver (10)Account Activation for Cellular Devices (11)Chapter 4 – Installing Drivers on Linux kernel 2.6.x (12)Introduction (12)Account Activation for Cellular Devices (12)IntroductionThe Multi-Tech® USB Driver Installation Guide provides driver installation procedures for the Multi-Tech SocketModem®, MultiModem® Cell and MultiModem® iCell products. This Installation Guide is organized into four chapters; Chapter 2 provides installation procedures for the USB CDC-ACM drivers on a Windows Operating System; Chapter 3 provides installation procedures for the Huawei drivers on a Windows Operating System; and finally Chapter 4 provides installation procedures on Linux Kernel 2.6.X and newer Operating Systems.The SocketModem models with Universal IP capabilities in a Windows environment use the USB CDC-ACM driver; SocketModem models without UIP capabilities in a Windows environment use the Huawei Driver; modem models in a Linux environment have the drivers embedded in the Linux Operating System. An example Linux installation, using Ubuntu Operating System version 11.04 with the Linux kernel 2.6.38 is provided in Chapter 4 for the Linux environment.After you have installed the modem driver, you need to activate your modem by going to the Multi-Tech Activation website and establishing an account with your cellular carrier.Models and Build Option DescriptionsCDC-ACM Drivers MTCMR-xx – All versionsMTSMC-xx-IP/GP – All versionsHuawei Drivers MTCBA-H3/EV1-U1MTSMC-H3/EV1-UIntroductionFor Windows XP (SP3 or greater), VISTA, 2003/2008 Server, Windows 7 (32-bit or 64-bit), run the automatic installer from the driver you just downloaded from the Multi-Tech website.Note: Certain versions of Windows have an issue with their CDC-ACM driver (Usbser.sys). If you are having connection problems (file download, web pages not loading) your version of Usbser.sys must be updated. Microsoft article 925681 documents this issue and provides a fix.After installing the virtual com port, the correct modem driver may be installed to the com port. This is covered below.Installing a Virtual COM PortYour downloaded driver files contain an installer program for current Windows operating systems (Windows XP and newer only) . Run install.bat from the VCOM_autoinstall directory you down loaded.1.Ensure that the USB cable is connected to your PC.2. For GSM build options, ensure that the SIM card is installed prior to powering up.3. From the Drivers folder, run the install.bat file to initiate the install.4.If any Windows Install Wizard pops up, close or cancel the wizard.5.Windows may pop-up a User Account Control window. Select the YES button to continue with the driverinstallation.6.Click on the Next button to start the driver pre-installation.Chapter 2 – USB CDC-ACM Driver Installation7.There will be a transitory screen, then the process will complete. Click on the Finish button.8.Next, continue with installing the modem driver.Installing the Modem Driver1.Click on the Control Panel button. On the Control Panel screen, double-click on Phone and Modem Options icon.Then click on the Modems tab.Chapter 2 – USB CDC-ACM Driver Installation 2. When this Phone and Modem Options screen appears, click on the Add button.3. On the Install New Modem screen, click Don’t detect my modem, I will select it from a list. Then click Next >.4. On the Install New Modem screen, click the Have Disk button to browse to the Driver folder on your local PC.Chapter 2 – USB CDC-ACM Driver Installation5. Browse to the Driver folder on local PC.6. Select the MTSMCIP_MTCMRIP.INF file. Then click OK.7. In the Models window, scroll down the list of Models and select the model that is applicable to your modem.Once you have selected your model, click on Next>.8. You will now have to choose which com port the MultiModem is connected to.If you know exactly which port your modem is on, click on that port; otherwise, go to Device Manager > Ports (COM & LPT) to verify which port your modem is installed on. Click Next>.Chapter 2 – USB CDC-ACM Driver Installation9. To finish the install, click on Finish.You have now successfully installed the MultiModem driver to your PC.Verifying That Your Modem Has Been Installed Successfully1. After you have successfully installed the MultiModem driver as stated above, you should be brought back to thePhone and Modems Options screen. Make sure that the modem is now listed under the column Modem andAttached To (the correct com port).2. Highlight the modem and then click on Properties.3. A Properties screen will open for the Multi-Tech modem. Click on the tab labeled Diagnostics.4. In the middle of the screen, click on the Query Modem button. Windows will now try to query the Multi-Techmodem. If this process passes, the second box on this screen will show the columns Command and Response.Note:To make sure that the modem is correctly being queried, look at the LED lights of the modem after you click on Query Modem. The TR light should come on and the TD and RD lights should flicker.5. If this process passes, then the modem should be properly installed and ready for use. Click OK to close themodem Properties window. Then click on OK to close the Phone and Modem Options window. Account Activation for Cellular DevicesPre-Configured Multi-Tech ProductsSome Multi-Tech cellular modems have been pre-configured to operate on a specific cellular network, such as Verizon Wireless.However, before you can begin to use the modem, you must set up a cellular data account with your cellular network provider. Please refer to Multi-Tech’s Cellular Activation Web site /activation.go forinformation on activating your cellular modem.IntroductionThis chapter provides procedures on how to install the Huawei Drivers on a Windows Operating System. Installing the Huawei Driver1.Download drivers to a Temp folder on your local PC.2.From the Temp folder, select DriverSetup.exe file.3.The Program Compatibility Assistant screen appears.Chapter 3 – USB Huawei Driver Installation4.Click This program installed correctly.5.Plugin the USB cable into the PC.6.When the Driver Software Installation screen states Your device is ready to use, your modem is installed.Account Activation for Cellular DevicesPre-Configured Multi-Tech ProductsSome Multi-Tech cellular modems have been pre-configured to operate on a specific cellular network, such as Verizon Wireless.However, before you can begin to use the modem, you must set up a cellular data account with your cellular network provider. Please refer to Multi-Tech’s Cellular Activation Web site /activation.go forinformation on activating your cellular modem.IntroductionThis chapter provides procedures on how to install drivers on Linux kernel 2.6.X or higher. The drivers are embedded in the Linux kernel.1.Boot Ubuntu Operating System2.Plugin the USB cable into the PC.3.The Multi-Tech modem will be detected and installed immediately.4.To show system status and the last devices installed, enter dmesg command. The following screen is an example.Account Activation for Cellular DevicesPre-Configured Multi-Tech ProductsSome Multi-Tech cellular modems have been pre-configured to operate on a specific cellular network, such as Verizon Wireless.However, before you can begin to use the modem, you must set up a cellular data account with your cellular network provider. Please refer to Multi-Tech’s Cellular Activation Web site /activation.go forinformation on activating your cellular modem.。
安装打印机驱动的方法步骤
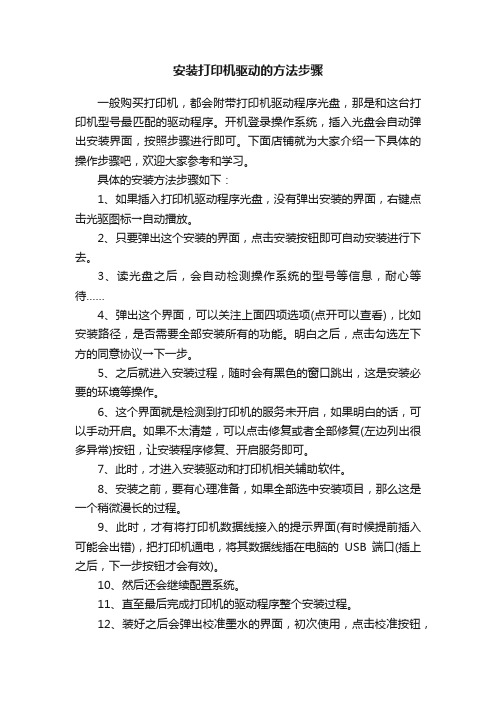
安装打印机驱动的方法步骤一般购买打印机,都会附带打印机驱动程序光盘,那是和这台打印机型号最匹配的驱动程序。
开机登录操作系统,插入光盘会自动弹出安装界面,按照步骤进行即可。
下面店铺就为大家介绍一下具体的操作步骤吧,欢迎大家参考和学习。
具体的安装方法步骤如下:1、如果插入打印机驱动程序光盘,没有弹出安装的界面,右键点击光驱图标→自动播放。
2、只要弹出这个安装的界面,点击安装按钮即可自动安装进行下去。
3、读光盘之后,会自动检测操作系统的型号等信息,耐心等待……4、弹出这个界面,可以关注上面四项选项(点开可以查看),比如安装路径,是否需要全部安装所有的功能。
明白之后,点击勾选左下方的同意协议→下一步。
5、之后就进入安装过程,随时会有黑色的窗口跳出,这是安装必要的环境等操作。
6、这个界面就是检测到打印机的服务未开启,如果明白的话,可以手动开启。
如果不太清楚,可以点击修复或者全部修复(左边列出很多异常)按钮,让安装程序修复、开启服务即可。
7、此时,才进入安装驱动和打印机相关辅助软件。
8、安装之前,要有心理准备,如果全部选中安装项目,那么这是一个稍微漫长的过程。
9、此时,才有将打印机数据线接入的提示界面(有时候提前插入可能会出错),把打印机通电,将其数据线插在电脑的USB端口(插上之后,下一步按钮才会有效)。
10、然后还会继续配置系统。
11、直至最后完成打印机的驱动程序整个安装过程。
12、装好之后会弹出校准墨水的界面,初次使用,点击校准按钮,检测一下即可。
13、如需打印校验,点击打印页面,如果出错(比如没有投入打印纸),点击继续,让系统自动检测。
14、如遇异常,可以打开自述文件,这里详尽地给出了处理故障的方案,不妨仔细查看。
15、测试完毕,点击退出,打印机整个安装过程到此结束。
注意:相同型号的打印机与之匹配的操作系统驱动程序版本是不一样的,比如Windows 7 操作系统,还分为32位和64位的驱动程序,如果自行安装驱动程序,错装了驱动程序文件就会导致系统异常,系统也会自动卸载错装的驱动程序,希望能帮到大家。
Y460驱动安装顺序说明
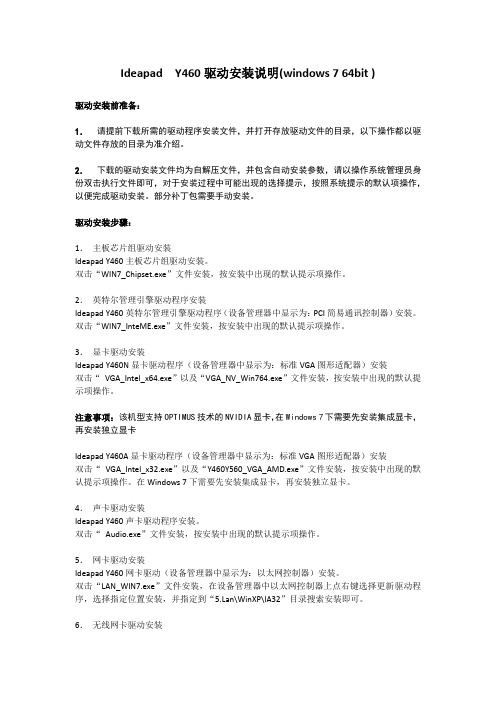
Ideapad Y460驱动安装说明(windows 7 64bit )驱动安装前准备:1.请提前下载所需的驱动程序安装文件,并打开存放驱动文件的目录,以下操作都以驱动文件存放的目录为准介绍。
2.下载的驱动安装文件均为自解压文件,并包含自动安装参数,请以操作系统管理员身份双击执行文件即可,对于安装过程中可能出现的选择提示,按照系统提示的默认项操作,以便完成驱动安装。
部分补丁包需要手动安装。
驱动安装步骤:1.主板芯片组驱动安装Ideapad Y460主板芯片组驱动安装。
双击“WIN7_Chipset.exe”文件安装,按安装中出现的默认提示项操作。
2.英特尔管理引擎驱动程序安装Ideapad Y460英特尔管理引擎驱动程序(设备管理器中显示为:PCI简易通讯控制器)安装。
双击“WIN7_InteME.exe”文件安装,按安装中出现的默认提示项操作。
3.显卡驱动安装Ideapad Y460N显卡驱动程序(设备管理器中显示为:标准VGA图形适配器)安装双击“VGA_Intel_x64.exe”以及“VGA_NV_Win764.exe”文件安装,按安装中出现的默认提示项操作。
注意事项:该机型支持OPTIMUS技术的NVIDIA显卡,在Windows 7下需要先安装集成显卡,再安装独立显卡Ideapad Y460A显卡驱动程序(设备管理器中显示为:标准VGA图形适配器)安装双击“VGA_Intel_x32.exe”以及“Y460Y560_VGA_AMD.exe”文件安装,按安装中出现的默认提示项操作。
在Windows 7下需要先安装集成显卡,再安装独立显卡。
4.声卡驱动安装Ideapad Y460声卡驱动程序安装。
双击“Audio.exe”文件安装,按安装中出现的默认提示项操作。
5.网卡驱动安装Ideapad Y460网卡驱动(设备管理器中显示为:以太网控制器)安装。
双击“LAN_WIN7.exe”文件安装,在设备管理器中以太网控制器上点右键选择更新驱动程序,选择指定位置安装,并指定到“n\WinXP\IA32”目录搜索安装即可。
电脑外设驱动安装教程

电脑外设驱动安装教程在使用电脑的过程中,我们常常需要连接各种外设,如打印机、摄像头、鼠标等。
为了使外设正常工作,我们需要安装相应的驱动程序。
本文将为您介绍电脑外设驱动的安装教程。
第一步:准备工作在安装驱动程序之前,我们需要准备一些必要的工作。
首先,确保您已经将外设正确地连接到电脑上,并确保电脑正常工作。
其次,您需要找到外设的驱动程序。
通常,驱动程序会随附在外设的光盘中,您也可以从外设官方网站上下载最新的驱动程序。
另外,您还可以通过搜索引擎来获取所需的驱动程序。
第二步:安装驱动程序1. 从外设光盘安装驱动程序将外设光盘插入电脑的光驱中。
接下来,您可以使用资源管理器或者我的电脑来浏览光盘的内容。
在光盘中找到包含驱动程序的文件夹,通常这个文件夹的名称为"驱动程序"、"Driver"或者外设的品牌名称。
然后,双击打开该文件夹,并运行其中的安装程序。
按照安装程序的指示进行操作,直至安装完成。
2. 从外设官方网站下载并安装驱动程序打开您的浏览器,访问外设官方网站。
在网站上,通常可以在“支持”或“下载”页面中找到相应的驱动程序。
找到适用于您的操作系统和外设型号的驱动程序,并下载到本地计算机中。
下载完成后,双击运行驱动程序的安装文件,按照安装程序的指示进行操作,直至安装完成。
第三步:检查驱动程序安装情况完成驱动程序的安装后,您可以进行如下检查,确保驱动程序安装成功:1. 设备管理器打开“设备管理器”,可以通过搜索栏键入“设备管理器”来快速找到。
在设备管理器中,您可以看到已连接的设备列表,检查是否有黄色的叹号或问号标记。
如果有,说明相应的驱动程序未能成功安装,您需要重新安装驱动程序。
2. 测试外设功能重新启动电脑后,连接外设,并测试其功能是否正常。
例如,如果安装的是打印机驱动程序,您可以尝试打印测试页;如果安装的是鼠标驱动程序,您可以尝试移动鼠标,并确认是否能够正常响应。
总结:通过以上步骤,您可以成功地安装电脑外设的驱动程序。
USB驱动安装说明
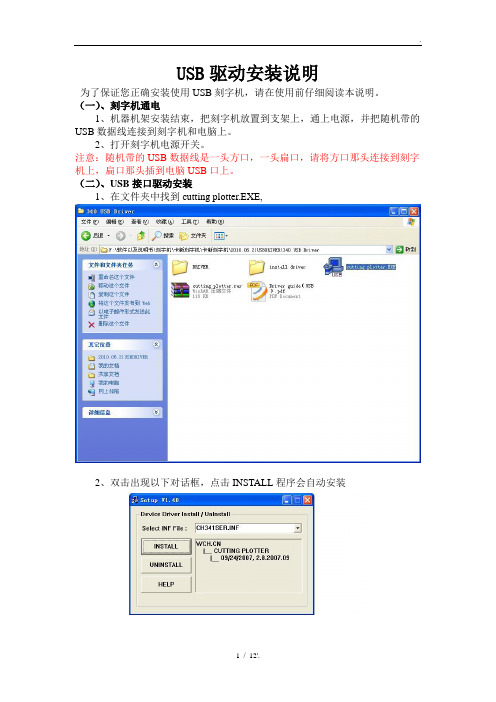
USB驱动安装说明为了保证您正确安装使用USB刻字机,请在使用前仔细阅读本说明。
(一)、刻字机通电1、机器机架安装结束,把刻字机放置到支架上,通上电源,并把随机带的USB数据线连接到刻字机和电脑上。
2、打开刻字机电源开关。
注意:随机带的USB数据线是一头方口,一头扁口,请将方口那头连接到刻字机上,扁口那头插到电脑USB口上。
(二)、USB接口驱动安装1、在文件夹中找到cutting plotter.EXE,2、双击出现以下对话框,点击INSTALL程序会自动安装3、如果安装过程请出现其他对话框时请点击“仍然继续”,如下图:4、如果没有出现上面情况,就直接等到出现“驱动安装成功”字样。
USB 接口驱动安装完毕。
虚拟串口设置1、USB驱动安装完毕后,请用鼠标右键点击桌面“我的电脑”——“属性”,如下图:2、点击上方菜单栏中的“硬件”——“设备管理器”,如下图:3、用鼠标右键点击“端口”——“USB-SERIAL CH34(COM1)——“属性”如下图:4、点击“端口设置”,如下图:注意:每秒位数(就是软件中的输出波特率)设置成9600。
5、用鼠标点击“高级”,出现以下对话框:选择COM3,然后点击“确定”,虚拟端口设置完成。
文泰2009版本或更高版本支持虚拟COM3或COM4,用户在设置本虚拟端口时请根据计算机实际闲置的端口来设置。
不一定非要设置在COM1或COM2端口。
注意:请将“接收缓冲区”“传输缓冲区”调到最低那头。
6、如果USB端口显示的不是“COM3”, 右键选择“扫描检测硬件改动”,则自动变为“COM3”,如下图:文泰刻绘软件输出设置1、打开文泰软件,编辑好文本,点击“文件——刻绘输出”或点击菜单栏中的出现以下对话框:2、点击对话框左上角的“刻绘设备”,出现一下对话框:3、选择“其他”——支持HPGL指令刻字机,然后点击“添加”,如下图;4、输出端口设置:点击“端口设置”如下图:“端口类型”选择“串口”,在“已安装端口”那里选择“COM3”,如果没有就在“端口号”选择“3”,点击“增加”即设置好COM3端口。
电脑显卡驱动怎么安装
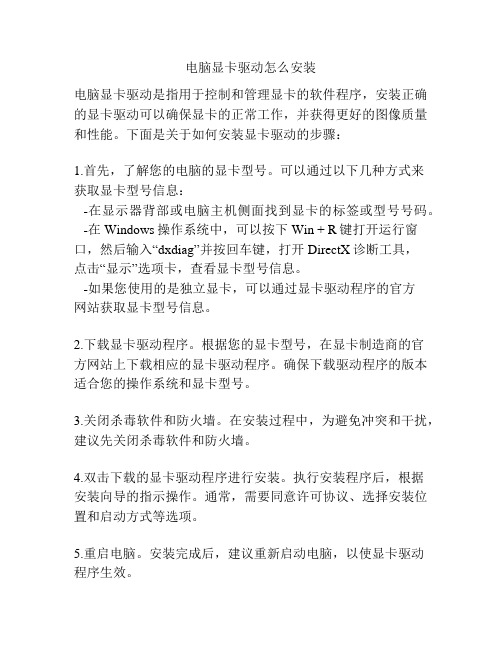
电脑显卡驱动怎么安装电脑显卡驱动是指用于控制和管理显卡的软件程序,安装正确的显卡驱动可以确保显卡的正常工作,并获得更好的图像质量和性能。
下面是关于如何安装显卡驱动的步骤:1.首先,了解您的电脑的显卡型号。
可以通过以下几种方式来获取显卡型号信息:-在显示器背部或电脑主机侧面找到显卡的标签或型号号码。
-在Windows操作系统中,可以按下Win + R键打开运行窗口,然后输入“dxdiag”并按回车键,打开DirectX诊断工具,点击“显示”选项卡,查看显卡型号信息。
-如果您使用的是独立显卡,可以通过显卡驱动程序的官方网站获取显卡型号信息。
2.下载显卡驱动程序。
根据您的显卡型号,在显卡制造商的官方网站上下载相应的显卡驱动程序。
确保下载驱动程序的版本适合您的操作系统和显卡型号。
3.关闭杀毒软件和防火墙。
在安装过程中,为避免冲突和干扰,建议先关闭杀毒软件和防火墙。
4.双击下载的显卡驱动程序进行安装。
执行安装程序后,根据安装向导的指示操作。
通常,需要同意许可协议、选择安装位置和启动方式等选项。
5.重启电脑。
安装完成后,建议重新启动电脑,以使显卡驱动程序生效。
6.检查显卡驱动安装情况。
在Windows操作系统中,可以按下Win + R键打开运行窗口,然后输入“devmgmt.msc”并按回车键,打开设备管理器,展开“显示适配器”选项,查看是否显示您的显卡型号。
7.完成。
如果显卡驱动安装成功,您可以在电脑上享受更好的图像质量和性能。
需要注意以下几点:-确保下载的显卡驱动程序是来自显卡制造商的官方网站,以确保下载的是正版和最新版本的驱动程序。
-在安装过程中,确保不要随意中断安装过程,以免出现问题。
-如果遇到安装过程中的错误或问题,可以尝试重新下载显卡驱动程序并重新安装,或者通过搜索引擎搜索相关解决方法。
-建议定期检查和更新显卡驱动程序,以获得最佳的图像质量和性能。
Ralink_3070产品驱动安装使用说明书
一.驱动安装与上网设置
1.驱动安装
①双击驱动进行安装。
(未安装驱动前,请不要插入无线网卡)
②选择后单击下一步如下图:
③选择默认的图标后单击下一步如下图:
④选择默认图标后单击下一步:
⑤单击安装进行安装过程(注意:有些杀毒软件可能影响安装,如安装不完全,请在安装前关闭杀毒软件)。
如下图:
⑥驱动正在安装,如下图:
⑦驱动安装完成。
单击完成后如下图:
完成以后电脑右下角任务栏会出现驱动图标,这时驱动已经安装全部完成,然后将无线网卡插入电脑USB口,电脑自动更新完成后即可连接无密码的网络。
2.上网设置
①
双击电脑右下角任务栏驱动图标出现入下图:
②单击左上角第一个按钮重新扫描刷新网络如下图:
(刷新时多刷新几次网络就越多)
③单击刷新后网络表中信号最好已知密码的网络名(这里我选择TYY)然后
单击上图中第二个按钮加入连线设定,后出现如下图:
④单击下一步图标出现如下图:
⑤再次单击上图中下一步图标出现如下图:
⑥在上图中WEP金钥框输入已知密码单击下一步图标出现如下图:
输入密码时要正确的输对密码,注意大小写字母。
错误的密码输入会造成不能连接网络或者不能自动获取IP地址。
其中序号③④⑤⑥界面设置为默认的
⑦单击下一步图标出现如下图:
⑧选择上图连线设定列表中网络名TYY后单击右下角套用图标出现如下图:
此时IP地址为软件自动获取,连接成功即可正常高速上网了。
(注意:如果没有获取到IP或收不到数据包都有可能是没有输对密码,请输入对应的密码重新获取IP)。
电脑显卡驱动怎么安装
电脑显卡驱动怎么安装电脑显卡驱动怎么安装电脑在换显卡的时候,需要重新安装驱动。
但很多人不知道电脑显卡驱动怎么安装,今天店铺来为大家介绍一下显卡驱动安装的操作方法。
一、电脑显卡型号1.右键单击桌面—属性—设置—显示,下面写着就是电脑上正在使用的显卡型号;接着点击“高级”,窗口上方显示的“即插即用监视器”后边一串字符和数字,也是这台电脑的显卡型号;2.也可以点击开始—运行—输入dxdiag,打开“Direct诊断工具”—显示,也可看到显卡型号。
二、将显卡驱动光盘放入光驱1.如果现在是随机附送的显卡驱动,就直接将显卡驱动光盘放入光驱,右击“显示卡”下的?选项;2.选择“更新驱动程序”,打开“硬件更新向导”,选择“是,仅这一次”—下一步—自动安装软件—下一步;3.系统即自动搜索并安装光盘中的显卡驱动程序,如果该光盘没有适合电脑的.显卡驱动,再换一张试试,直到完成。
三、从专业的下载网站下载驱动如果没有合适的光盘,可到显卡的官方网站、驱动之家、中关村在线等网站下载。
从网上下载的驱动程序软件,下载驱动一要看型号,二要看适不适合电脑的系统使用,最好多下载几个备用。
四、显卡驱动下载的程序软件1.这些程序软件,一般有自动安装功能,按软件的要求去安装,就可以顺利完成;2.不能自动安装的,解压备用,要记下该软件在磁盘中的路径;3.打开“硬件更新向导”,去掉“搜索可移动媒体”的勾选状态,勾选“从列表或指定位置安装”,点击“下一步”;4.勾选“在搜索中包括这个位置”,在下拉列表框中填写下载的显卡驱动文件夹的路径,点击“下一步”,系统自动搜索并安装指定位置中的显卡驱动程序;5.显卡装上之后,再调分辨率和刷新率。
下载全文。
安装USB驱动程序说明
安装USB驱动程序说明1、USB 通讯的考勤机,首次连接电脑时都会弹出“发现新硬件”的窗口,这时点“下一步”加载USB驱动程序。
USB驱动程序加载完成后,会在电脑右下角出现一个绿色小图标,跟U盘插上电脑的图标一样。
2、如果考勤机连接上电脑没有任何反应,而且电脑右下角也没有出现任何图标。
可按以下方法处理:1) 重启考勤机。
2) 检测USB线是否通讯良好,否则更换同类型的数据线再连接。
3) 检查电脑的USB接口是否接触不良,插到另外USB接口测试或换台电脑测试是否能连接。
4) 重新加载USB驱动程序请参照以下图文:第一步:右键点击“我的电脑”→属性第二步:点击硬件→设备管理器第三步:找到其他设备中打了黄色叹号或问号的“SmackBio USB Moudle”,右击点中此设备–更新驱动程序,更新过程参考以下教程:(如图:)如果出现打了黄色问号的“SmackBio USB Moudle””设备不是在其他设备下,是在通用串行总线控制器下面的,右击点中此设备–卸载,之后重启考勤机,将会自动弹出硬件安装向导,安装过程参照以下教程。
手动加载USB驱动程序教程:A:在弹出的硬件安装向导中,选择从列表中安装。
(如图:)B:点下一步,–>选中在搜索中包括这个位置,点击浏览,选中软件安装目录下的USBDeviceDrivers 文件夹(如D:\RIMS\USBDeviceDrivers)(如图:)C:点击下一步,搜索驱动程序。
(如图:)如果有遇到选择程序,继续点击下一步。
D:搜索驱动程序中,如果遇到提示插入光盘(如图:)E:点确定,点浏览,选中软件安装目录下的USBDeviceDrivers文件夹内的SBUM1_0.sys 文件,点打开。
(如图:)F:点确定后,提示完成安装。
这时发现电脑右下角出现硬件图标,打开软件连接设备。
USB-RS232驱动程序安装说明
USB-RS232驱动程序安装说明来源: 作者:概述USB-RS232电缆是通过将电脑的USB口模拟成传统的串行口系统要求请在使用USB编程电缆之前确认你的电脑是IBM PC兼容型并具备以下最低系统要求:● Intel兼容586DX4-100MHz中央处理器或更高● 一个标准的USB接口(4-pin A型插座)驱动程序的安装驱动程序的安装非常简单,只需按提示进行即可,以Windows XP为例,按以下步骤进行:1、 打开电脑主机,插入驱动程序光盘。
2、 将USB-RS232电缆插入电脑的USB接口,Windows将检测到设备并运行添加新硬件向导帮助你设置新设备,并单击下一步继续。
如果Windows没有提示找到新硬件,那么在设备管理器的硬件列表中,展开“通用串行总线控制器”,选择带问号的USB设备,单击鼠标右键并运行更新驱动程序。
3、 Windows将检测到安装信息,并出现如下没有通过Windows徽标测试的信息框,单击“仍然继续”。
4、 继续安装,让Windows拷贝驱动程序文件到你的硬盘。
5、 当Windows显示完成找到新硬件向导,单击“完成”结束安装。
6、 安装完成后,请确认在Windows的“开始设置控制面板系统硬件设备管理器”菜单的“端口(COM和LPT)”展开条目中出现“Prolific USB- to-Serial Bridge (COMx)”,这个COMx就是USB编程电缆使用的COM口号,该端口号与电脑有关,一般为COM3或COM4,以后每次使用只要插入编程电缆就会出现该COM口,你只需在编程软件或通信软件等应用软件中选中该COM口号即可通信。
驱动程序的删除删除驱动程序是为了释放COM口资源以便其他设备使用,或驱动程序故障时需将其删除后重新安装,按下面步骤删除驱动程序:1、 从你的电脑上拔下USB编程电缆。
2、 运行面板中的添加或删除程序”,选择“Prolific USB- to-Serial Bridge (COMx)”,单击删除按钮。
- 1、下载文档前请自行甄别文档内容的完整性,平台不提供额外的编辑、内容补充、找答案等附加服务。
- 2、"仅部分预览"的文档,不可在线预览部分如存在完整性等问题,可反馈申请退款(可完整预览的文档不适用该条件!)。
- 3、如文档侵犯您的权益,请联系客服反馈,我们会尽快为您处理(人工客服工作时间:9:00-18:30)。
驱动安装说明
以win10安装驱动为例,win7、win8安装步骤相同。
第一步:通过附赠的USB数据线使开发板与电脑连接上,数据线务必直接接到电脑自带USB接口上,请勿接在集线器上。
第二步:开发板通过数据线连接至电脑后打开《WIN7_8_10共用驱动》文件夹,鼠标光标指向“CH341SerSetup_5Lg.exe”驱动程序,单击鼠标右键,在弹出菜单中选择“以管理员身份运行”
,下一步
,继续点下一步
,等待安装完成后点“完成”按键
第二步:查下系统为开发板分配的端口号。
鼠标光标指向“此电脑”或“我的电脑”单击右键,在弹出的菜单中
单击“管理”
,随后弹出的界面中单击“设备管理器”,展开“端口”(此刻开发板必须保持与电脑连接上),如下图:
在正确安装完成驱动后,此时便可在端口列表中查看到系统为开发板分配的端口号。
如下图“USB-SERIAL CH340(COM3)”就是系统分配的端口号,在烧写程序的时候需要选择。
注意:本次演示中系统分配的端口号为“USB-SERIAL CH340(COM3)”,端口序号是系统随机分配的,用户在安装时可能分配的端口号有所不同,如分配为“USB-SERIAL CH340(COM5)”等,这都属于正常现在,在以后烧录程序中选择对应的端口号即可。
XP系统驱动安装方法:
打开《XP驱动》文件夹,直接双击运行“CH341SER V3.3.EXE”驱动程序,在软件界面中点击“安装”等待安装完成即可。
如果安装失败,可以使用win10系统安装步骤去安装。
如果在安装过程中遇到无法解决的异常,您可以联系淘宝旺旺上在线客服为您处理,工作时间周一至周六上午9点整~下午6点整。