Linux系统下安装VMware虚拟机
Jenkins:VMware虚拟机Linux系统的详细安装和使用教程
Jenkins:VMware虚拟机Linux系统的详细安装和使⽤教程jenkins:VMware虚拟机Linux系统的详细安装和使⽤教程 (⼀)不是windows安装虚拟机可跳过1.Windows安装VMware2.VMware安装linux系统3.windows⽤putty或SecureCRT连接linux(不需要在window上操作linux命令的可跳到5)在linux上查看ip:ifconfig 例如:inet addr:192.168.213.128在window的cmd上ping该ip: ping 192.168.213.128如果ping失败了进⾏下⾯的修改(成功忽略):VMware Workstation:在虚拟机设置中找到光驱CD,然后将右边“已连接”、 “启动连接”的两个选框均选中即可。
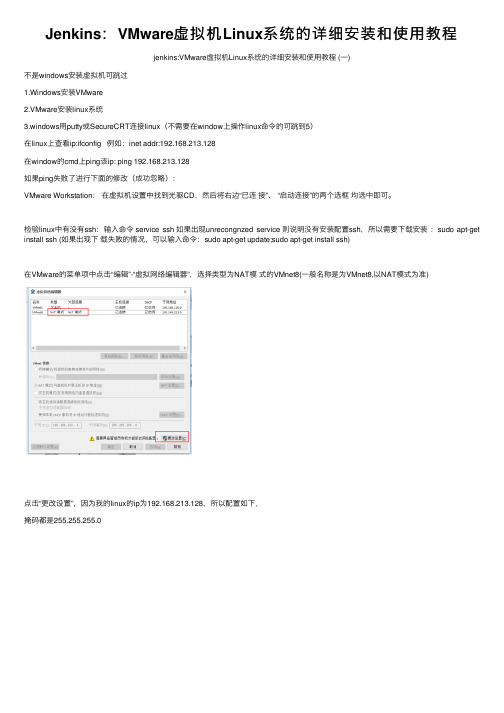
检验linux中有没有ssh:输⼊命令 service ssh 如果出现unrecongnzed service 则说明没有安装配置ssh,所以需要下载安装:sudo apt-get install ssh (如果出现下载失败的情况,可以输⼊命令:sudo apt-get update;sudo apt-get install ssh)在VMware的菜单项中点击“编辑”-“虚拟⽹络编辑器”,选择类型为NAT模式的VMnet8(⼀般名称是为VMnet8,以NAT模式为准)点击“更改设置”,因为我的linux的ip为192.168.213.128,所以配置如下,掩码都是255.255.255.0设置如下:window上的VMware8⽹卡设置,我的linux的ip:192.168.213.128这时在window上再⽤putty或者SecureCRT连接l i n u x ,⼀般不能⽤root管理员来连接,需要⾮r o o t 账号连接成功后,再进⾏切换到root账号:su root ,⼀般能成功了,不成功⾃⾏了断吧。
VBoxvmware虚拟机安装Linux及Linux基础入门学习

VBoxvmware虚拟机安装Linux及Linux基础⼊门学习VBox&vmware虚拟机安装Linux及Linux基础⼊门学习通过VMware workstation安装Linux在安装虚拟机之前,我特意上⽹搜索了⼀下⽬前常使⽤的,了解了相关知识之后,我先选择通过VMware workstation安装Linux。
我选择VMware版本为: VMware workstation 12.5 pro我选择安装的Linux版本为: 深度(deepin)的Ubuntu⾸先安装 VMware workstation 12.5 pro ,⼗分简单就不再赘述。
接下来便开始安装Linux:1.⾸先新建虚拟机,先将Ubuntu的镜像放在⾃⼰指定的位置,⽅便后⾯安装,然后选择稍后安装镜像,先进⾏⼀些基本设置:2.接下来是⼀些基本设置:3.其次是创建虚拟磁盘:4.开始安装操作系统,选择CD设备,把启动时的连接改成之前放置镜像的位置:5.从bios启动,在左侧点击我们的虚拟机名称,把⿏标悬停在电源上,然后选择并点击“打开电源时进⼊固件”。
在BIOS设置中找到BOOT设置,使⽤“+”将CD-ROM的优先级提到最上⾯,点击F10保存设置,弹出对话框之后,选择yes,直接回车确定即可:6.开始安装操作系统,选择第⼀项Install Deepin,等待⼀会⼉:7.选择语⾔,设置⽤户8.接下来开始分区,这⾥我上⽹查阅了⼀下资料,发现⼀个基本的linux系统中都有最少两个挂载点,分别是“/”(根⽬录)及 /swap(交换分区),于是我设置了上⾯两个挂载点后⼜加了⼀个home挂载点,:9.设置好分区后,选择确定,等待⽚刻,⼤⾄就安装完成了:10.此刻别忘记将之前的虚拟机中的CD设置改回“物理驱动器”,然后再重启虚拟机:通过VMware workstation安装Linux⾸先在下载VirtualBox 5.1.14然后开始安装VirtualBox,安装过程很简单,按照默认即可:然后配置虚拟机:我设置的是⼀台内存为1G,硬盘容量为16G的虚拟机:虚拟硬盘就按照默认设置就好,为了保持虚拟机的流畅,使⽤动态分配:在启动盘中设置好镜像的路径,然后安装:等待⼀会⼉就安装完成了,这⾥发现相⽐于之前的VMware,少了分区这⼀步,在之后我查看Linux系统配置后了解到这个是⾃动分区了:下⾯安装虚拟增强功能:⾸先按照⽼师给的教程,VBox菜单栏的“设备”项,选择最下⾯的“安装增强功能”,等待出现图标。
Linux系统在VMware 10 虚拟机中安装安装
Linux系统在VMware 10 虚拟机中安装安装
1、安装材料准备
(1)VMware Workstation安装包
(2)红帽子7.1版本Linux系统镜像文件
2、VMware 10安装步骤
单击下一步
接收并选择下一步
选择典型安装
选择虚拟机工作站安装路径
继续开始安装
安装完成
3、Linux安装步骤
新CD/DVD选择本地iso镜像文件路径
网络适配器选择nat模式
该3者可以选择移除
然后点击完成
开启虚拟机
4、Linux初次启动配置选择简体中文,点击继续
点击安装位置,
选择完成
配置网络
点击开启,获取到的IP地址即为该虚拟机ip,然后点击完成
点击开始安装
出现如下界面设置root超级用户密码,无需创建用户
安装完成点击重新启动
重新启动完成后即可用xshell相关远程工具连接该虚拟机
ssh ip地址输入用户名root 密码即可
接下来即可安装相关软件,安装软件前可先建立快照哦。
Linux系统下安装VMware虚拟机

VMware Workstation Linux安装方法:1.在终端下以root身份登录输入:su root2.然后进入你下载好到VMware Workstation 7.1目录中,如在桌面输入:CD ./桌面3.然后输入安装命令:#sh VMware-Workstation-Full-7.1.0-261024.i386VMware Workstation 卸载命令:# vmware-installer -u vmware-workstatiLinux系统下安装VMware虚拟机在Linux 下,VMware 提供了两种按装包:tar 包和RPM 包其中,后者更容易安装,这里以Redhat Linux 9系统为例。
使用tar 包安装登陆Linux 主机[sanren@localhost sanren]$登陆到管理员权限[sanren@localhost sanren]$ su -Password:[root@localhost root]#进入临时目录[root@localhost root]# cd /tmp解压缩tar 包[root@localhost tmp]# tar –zxvf VMware-workstation-6.0.0-45731.i386.tar.gz执行安装命令[root@localhost tmp]# cd ./vmware-distrib/vmware-install.pl开始安装Installing the content of the package.选择二进制文件安装路径In which directory do you want to install the binary files?[/usr/bin]选择库文件安装路径In which directory do you want to install the library files?[/usr/lib/vmware]选择操作手册文件安装路径In which directory do you want to install the manual files?[/usr/share/man]选择文档文件安装路径In which directory do you want to install the documentation files?[/usr/share/doc/vmware]The path "/usr/share/doc/vmware" does not exist currently. This program is goingto create it,including needed parent directories. Is this what you want?[yes]选择初始化目录安装路径What is the directory that contains the init directories (rc0.d/ to rc6.d/)?[/etc/rc.d]选择初始化脚本文件安装路径What is the directory that contains the init scripts?[/etc/rc.d/init.d]安装完成!The installation of VMware workstation 6.0.0 build-45731 for Linux completedsuccessfully. You can decide to remove this software from your system at anytime by invoking the following command: "/usr/bin/vmware-uninstall.pl".启动vmware 配置Before running VMware Workstation for the first time, you need to configure itby invoking the following command: "/usr/bin/vmware-config.pl". Do you want this programto invoke the command for you now? [yes]停止VMware Workstation 的服务Making sure VMware Workstation's services are stopped.Stopping VMware services:Virtual machine monitor [ 确定]终端用户许可协议(很长,这里不详细列出)You must read and accept the End User License Agreement to continue.Press enter to display it.是否接受许可协议Do you accept? (yes/no) yesThank you.安装监视模块Trying to find a suitable vmmon module for your running kernel.The module up-2.4.20-8.athlon-RH9.0 loads perfectly in the running kernel.安装虚拟网络模块Trying to find a suitable vmnet module for your running kernel.The module up-2.4.20-8.athlon-RH9.0 loads perfectly in the running kernel.配置网络Do you want networking for your virtual machines? (yes/no/help) [yes] yes配置vmnet0 Configuring a bridged network for vmnet0.配置vmnet8Configuring a NAT network for vmnet8.探测DHCP 子网1,自动探测,随机选择Do you want this program to probe for an unused private subnet? (yes/no/help)[yes]Probing for an unused private subnet (this can take some time)...The subnet 172.16.151.0/255.255.255.0 appears to be unused.The version of DHCP used in this version of VMware Workstation is licensed asdescribed in the "/usr/share/doc/vmware/DHCP-COPYRIGHT" file.Hit enter to continue.探测DHCP 子网2,以主机网卡所在的网段为DHCP 的地址域Do you want this program to probe for an unused private subnet? (yes/no/help)[yes] nWhat will be the IP address of your host on the private network? 192.168.100.0What will be the netmask of your private network? 255.255.255.0The version of DHCP used in this version of VMware Workstation is licensed asdescribed in the "/usr/share/doc/vmware/DHCP-COPYRIGHT" file.Hit enter to continue.配置host-only 网络环境,如不需要可以不必配置。
利用VMWare虚拟机安装Linux操作系统
级版本,这也就意味着以后不可能看到HedhatLinux10.0版本,取而代之的是FedoraCore系列版本,Fedora是“毡帽”的意思,目前最新版本是LinuxFedoraCote6,它是于2006年10月发布的。
下面简要地介绍一下在VMWamWolkstation上建立LinuxFedoraCorn4虚拟机的大概过程。
1.VMWare虚拟机软件的安装。
VMWare虚拟机软件的安装非常简单,按照默认设置安装即可,双击VMWare—workslation软件(VMWare—workstation一5.5.2.exe,下载地址为:www.wlnware.eom,安装要求的序列号为:LCT4T一24GFE—A816V一4MTQQ)安装图标。
默认安装即可。
安装完毕后,桌面出现VMWareWorkstation虚拟机图标,双击该图标,将会出现启动VMWareWorkstation软件的主窗口。
2.虚拟机LinuxFedoraCore4系统的安装与配置。
VMWm-eWorkstation虚拟机软件安装完毕后,最关键的就是配置。
在VMWareWorkstation的主窗口中,单击“newvirtualmachine”图标,新建一个虚拟机,然后“下一步”;要安装RedhatLintLxFedoraCole4,在Guestopel·ationsystem栏中选择Linux选项,然后“下一步”;通过(bmwse)改变虚拟机文件所存放的文件夹,一般该文件夹应该在2G以上(如果GuestOS是Linux,得3G以上)o可根据要安装文件大小自己确定。
如果哪个硬盘盘符有这么大空间,就建在哪个盘符下。
然后“下一步”;在(Disksize(GB))的选项选取文件的大小,该选项是根据所要在Linux系统下装的软件的大小所决定的。
如果软件不大,4G已经足够用。
可根据需要自己调节。
然后单击“完成”。
然后出现创建过程,该过程的时间根据你分配的(Disksize(GB))所决定的,直到该过程完毕。
Linux1 在虚拟机中进行安装
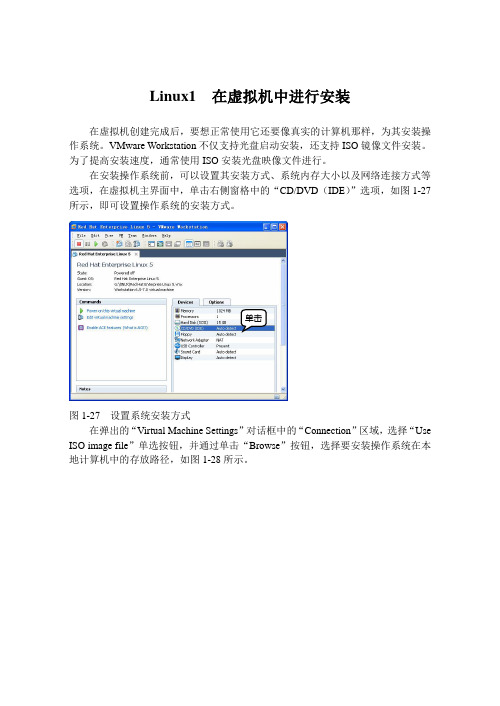
Linux1 在虚拟机中进行安装在虚拟机创建完成后,要想正常使用它还要像真实的计算机那样,为其安装操作系统。
VMware Workstation不仅支持光盘启动安装,还支持ISO镜像文件安装。
为了提高安装速度,通常使用ISO安装光盘映像文件进行。
在安装操作系统前,可以设置其安装方式、系统内存大小以及网络连接方式等选项,在虚拟机主界面中,单击右侧窗格中的“CD/DVD(IDE)”选项,如图1-27所示,即可设置操作系统的安装方式。
单击图1-27 设置系统安装方式在弹出的“Virtual Machine Settings”对话框中的“Connection”区域,选择“Use ISO image file”单选按钮,并通过单击“Browse”按钮,选择要安装操作系统在本地计算机中的存放路径,如图1-28所示。
选择图1-28 设置连接方式接着,单击左侧“Hardware”选项卡内的“Memory”(内存)选项,在右侧“Memory”区域,通过拖动滑块可以设置系统内存的大小,当然用户也可以直接输入指定的内存大小,如在此设置为“512MB”,如图1-29所示。
输入图1-29 设置系统内存大小单击“Network Adapter”(网络适配器)选项,在右侧“Network connection”(网络连接)区域选择“Bridged:Connected directly to the physical network”单选按钮。
然后,单击“ok”按钮完成设置即可,如图1-30所示。
图1-30 设置网络连接方式设置完成后,只需在虚拟机主界面中,单击工具栏中的按钮或者单击“commands ”区域内的“Power on this virtual machine ”选项即可,如图1-31所示。
图1-31 启动虚拟机虚拟机的启动过程和真实计算机的启动过程没有什么不同,一开始也是自检。
由于已经载入了Red Hat Enterprise Linux 5的ISO 安装光盘映像文件,因此虚拟机会自动进入Red Hat Enterprise Linux 5的安装界面,如图1-32所示。
VMware虚拟机及各种版本Linux操作系统安装详解
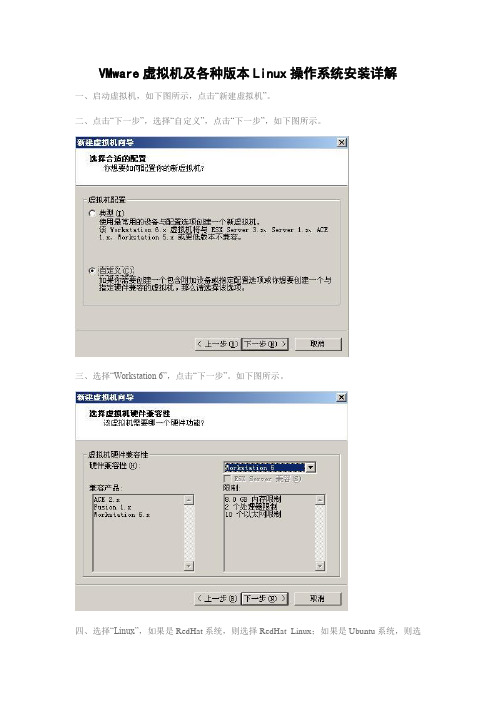
VMware虚拟机及各种版本Linux操作系统安装详解一、启动虚拟机,如下图所示,点击“新建虚拟机”。
二、点击“下一步”,选择“自定义”,点击“下一步”,如下图所示。
三、选择“Workstation 6”,点击“下一步”。
如下图所示。
四、选择“Linux”,如果是RedHat系统,则选择RedHat Linux;如果是Ubuntu系统,则选择Ubuntu;如果是Fedora系统,版本选择“Other Linux 2.6.x kernel”。
点击“下一步”。
如下图所示。
五、虚拟机名称自定,文件存储位置自定。
点击“下一步”。
六、虚拟处理器数量一般选一个,除非你的电脑的主板上有两块CPU。
点击“下一步”。
七、在内存分配方面,Linux操作系统的KDE桌面环境比较占资源,因此最好分配256MB 的内存给虚拟机使用。
点击“下一步”。
八、接下来配置网络连接,如果有联网需要,一般选择“使用网络地址转换(NAT)”。
点击“下一步”。
如下图所示。
九、SCSI 适配器选择“LSI Logic”。
如果选择“总线”并且使用虚拟的SCSI硬盘,安装某些版本的Linux系统时会提示说找不到可用硬盘。
点击“下一步”。
如下图所示。
十、选择“创建一个新的虚拟磁盘”。
不推荐“使用一个物理磁盘”。
点击“下一步”。
如下图所示。
十一、虚拟机磁盘类型选择“SCSI”。
点击“下一步”。
如下图所示。
十二、对于Linux来说,如果不安装工具盘,则分配5.5GB的磁盘空间足矣。
点击“下一步”。
如下图所示。
十三、指定磁盘文件,一般按默认,点击“完成”开始创建磁盘文件。
完成后如下图所示。
十四、如果使用光盘镜像来安装Linux,则点击“编辑虚拟机设置”,在“硬件”标签页中点击“CD-ROM1(IDE 1:0)”,勾选右侧的“使用ISO 映象”,点击“浏览”选择ISO文件,点击“打开”即可。
如下图所示。
如果已经将ISO文件刻录成光盘,则将光盘放入光驱,点击“启动此虚拟机”,点击黑色背景的启动界面,让虚拟机捕获鼠标,按下F2键进入虚拟机的BIOS设置界面,按光标键的右箭头移到“Boot”标签页,按光标键的下箭头选择“CD-ROM Drive”,按数字键盘区的加号键将“CD-ROM Drive”移到第一位。
VMware虚拟机中安装redhat linux操作系统图解
VMware虚拟机中安装redhat linux操作系统图解最初在学linux时,在虚拟机上安装linux的确花了不少时间,遇到了不少问题,随着linux学习的深入,我也曾在虚拟机上安装了Ubuntu,还尝试了在电脑上直接安装redhat.现在总结了一下自己遇到的一些问题,以及我逛百度知道时网友遇到的问题,以RedHat Linux 5企业版在VMware虚拟机上的安装做一个详细一点的图解教程,希望可以给刚接触linux的朋友一点帮助(由于图片太多,我将该教程分为上,下来两部分进行讲解)。
一.准备安装所需要的软件先推荐一个redhat的下载地址,RedHat Linux 5企业版:/content,这个比较全面,但是也比较大(2.68G),如果自己有合适的linux安装版本,可以不使用这个。
二.在VMware虚拟机为RedHat Linux创建新的虚拟机:1.打开虚拟机,选择新建虚拟机:2.下一步:3.选择自定义(这里选择典型可能会在安装过程中出现一个硬件找不到的错误,所以推荐选择自定义),然后点下一步:4.下一步:5.操作系统选择linux,版本不用修改:6.命名,并选择虚拟操作系统的存放位置(位置所在硬盘空间最好大于5G):7.下一步:8.给虚拟机分配内存(这个自己看情况,我的电脑内存是512,给虚拟机分配了256)9.选择虚拟机网络类型(推荐使用桥接网络)10.下一步11.下一步12.选择磁盘类型,这里选择IDE(这也是第三步选择自定义的原因,因为选择典型的话,系统会自动选择SCSI硬盘,而有的linux,主要是早的linux版本,不能使用SCSI硬盘,所以才会出现没有发现硬盘的错误)13.指定磁盘容量(推荐大小为8g,基本够用了)14.完成在开始安装Linux之前,请首先收集一下相关硬件信息。
如果不能确定系统对硬件的兼容性可以到 进行查询。
为Linux准备一个5G以上空间(建议值)大小的分区。
- 1、下载文档前请自行甄别文档内容的完整性,平台不提供额外的编辑、内容补充、找答案等附加服务。
- 2、"仅部分预览"的文档,不可在线预览部分如存在完整性等问题,可反馈申请退款(可完整预览的文档不适用该条件!)。
- 3、如文档侵犯您的权益,请联系客服反馈,我们会尽快为您处理(人工客服工作时间:9:00-18:30)。
Linux系统下安装VMware虚拟机WebjxCom友情提示:在Linux 下,VMware 提供了两种按装包:tar 包和RPM 包其中,后者更容易安装,这里以Redhat Linux 9系统为例。
Linux系统在Linux 下,VMware 提供了两种按装包:tar 包和RPM 包其中,后者更容易安装,这里以Redhat Linux 9系统为例。
使用tar 包安装登陆Linux 主机[sanren@localhost sanren]$登陆到管理员权限[sanren@localhost sanren]$ su -Password:[root@localhost root]#进入临时目录[root@localhost root]# cd /tmp解压缩tar 包[root@localhost tmp]# tar –zxvfVMware-workstation-6.0.0-45731.i386.tar.gz执行安装命令[root@localhost tmp]# cd ./vmware-distrib/vmware-install.pl开始安装Installing the content of the package.选择二进制文件安装路径In which directory do you want to install the binary files?[/usr/bin]选择库文件安装路径In which directory do you want to install the library files?[/usr/lib/vmware]选择操作手册文件安装路径In which directory do you want to install the manual files?[/usr/share/man]选择文档文件安装路径In which directory do you want to install the documentation files? [/usr/share/doc/vmware]The path "/usr/share/doc/vmware" does not exist currently. This program is goingto create it,including needed parent directories. Is this what you want?[yes]选择初始化目录安装路径What is the directory that contains the init directories (rc0.d/ torc6.d/)?[/etc/rc.d]选择初始化脚本文件安装路径What is the directory that contains the init scripts?[/etc/rc.d/init.d]安装完成!The installation of VMware workstation 6.0.0 build-45731 for Linux completedsuccessfully. You can decide to remove this software from your system at anytime by invoking the following command: "/usr/bin/vmware-uninstall.pl". 启动vmware 配置Before running VMware Workstation for the first time, you need to configure itby invoking the following command: "/usr/bin/vmware-config.pl". Do you want this programto invoke the command for you now? [yes]停止VMware Workstation 的服务Making sure VMware Workstation's services are stopped.Stopping VMware services:Virtual machine monitor [ 确定 ]终端用户许可协议(很长,这里不详细列出)You must read and accept the End User License Agreement to continue. Press enter to display it.是否接受许可协议Do you accept? (yes/no) yesThank you.安装监视模块Trying to find a suitable vmmon module for your running kernel.The module up-2.4.20-8.athlon-RH9.0 loads perfectly in the running kernel.安装虚拟网络模块Trying to find a suitable vmnet module for your running kernel.The module up-2.4.20-8.athlon-RH9.0 loads perfectly in the running kernel.配置网络Do you want networking for your virtual machines? (yes/no/help) [yes] yes配置vmnet0Configuring a bridged network for vmnet0.配置vmnet8Configuring a NAT network for vmnet8.探测DHCP 子网1,自动探测,随机选择Do you want this program to probe for an unused private subnet? (yes/no/help)[yes]Probing for an unused private subnet (this can take some time)...The subnet 172.16.151.0/255.255.255.0 appears to be unused.The version of DHCP used in this version of VMware Workstation is licensed asdescribed in the "/usr/share/doc/vmware/DHCP-COPYRIGHT" file.Hit enter to continue.探测DHCP 子网2,以主机网卡所在的网段为DHCP 的地址域Do you want this program to probe for an unused private subnet?(yes/no/help)[yes] nWhat will be the IP address of your host on the private network? 192.168.100.0What will be the netmask of your private network? 255.255.255.0The version of DHCP used in this version of VMware Workstation is licensed asdescribed in the "/usr/share/doc/vmware/DHCP-COPYRIGHT" file.Hit enter to continue.配置host-only 网络环境,如不需要可以不必配置。
Do you want to be able to use host-only networking in your virtual machines?[no] n配置Samba 文件系统访问Do you want this program to automatically configure your system to allow yourvirtual machines to access the host's filesystem? (yes/no/help) [no] y The version of Samba used in this version of VMware Workstation is licensed asdescribed in the "/usr/share/doc/vmware/SAMBA-LICENSE" file.Hit enter to continue.Starting VMware services:Virtual machine monitor [ 确定 ]Virtual ethernet [ 确定 ]Bridged networking on /dev/vmnet0 [ 确定 ]Host-only networking on /dev/vmnet1 (background) [ 确定 ]Host-only networking on /dev/vmnet8 (background) [ 确定 ]NAT networking on /dev/vmnet8 [ 确定 ]配置Samba 客户端帐户You have successfully configured VMware Workstation to allow your virtual machines to access the host's filesystem. Would you like to add a username andpassword for accessing your host's filesystem via network interface vmnet1 atthis time? (yes/no/help) [yes] y主机上存在的用户Please specify a username that is known to your host: lupaworldNew SMB password:Retype new SMB password:Added user sanren.You have successfully configured VMware Workstation to allow your virtual machines to access the host's filesystem. Your system appears to already be setup withusernames and passwords for accessing the host's filesystem via network interface vmnet1. Would you like to add another username and password at thistime? (yes/no/help) [no] nYou can add more usernames at any time by invoking the following command asroot: "/usr/bin/vmware-smbpasswd vmnet1 -a <username>"Samba 配置完成The configuration of VMware workstation 6.0.0 build-45731 for Linux for thisrunning kernel completed successfully.vmware 配置完成You can now run VMware Workstation by invoking the following command: "/usr/bin/vmware".Enjoy,--the VMware team使用RPM 包安装执行安装命令[root@localhost tmp]# rpm -ivh VMware-workstation-6.0.0-45731.i386.rpmPreparing... ########################################### [100%] 1:VMwareWorkstation ########################################### [100%]安装完成。