西屋破壁机料理机使用说明
料理机使用说明书
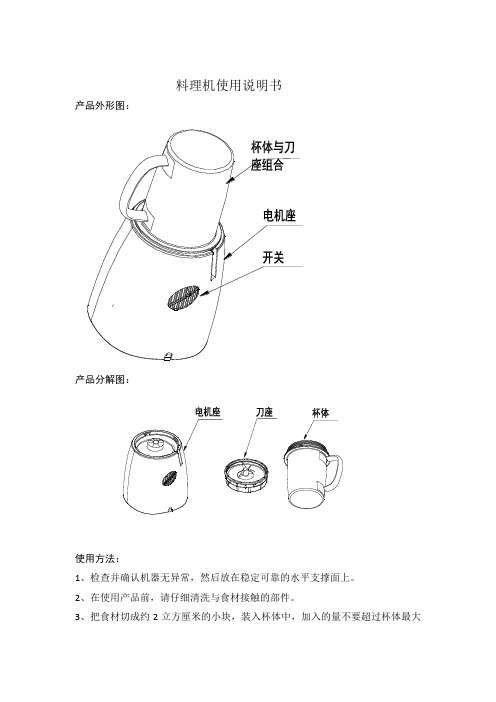
料理机使用说明书产品外形图:产品分解图:使用方法:1、检查并确认机器无异常,然后放在稳定可靠的水平支撑面上。
2、在使用产品前,请仔细清洗与食材接触的部件。
3、把食材切成约2立方厘米的小块,装入杯体中,加入的量不要超过杯体最大刻度;肉类食材按:“肉类”刻度线;糊类食材按:“奶昔类”刻度线。
4、杯体与刀座完全旋紧后,把杯体与刀座组合安装在电机座上,然后顺时针方向旋紧。
5、确认电源插座无异常并且其供电电压与料理机适用的电压一致,然后把料理机的电源插头插入电源插座中,检查确认插接可靠。
6、把料理机的按钮开关拨到“1”档,料理机开始运转,料理食物。
7、把料理机的旋钮开关拨到“0”档,料理机停止运转。
8、料理机连续运转时间不要超过1分钟;如果需要把食材搅得细一点,可通过开1分钟、停1分钟的方法来实现。
9、食材加工好后,逆时针旋转杯体,把杯体与刀座组合从电机座上取出;然后旋开刀座,把加工好的食物注入清洁的容器中。
10、清空杯体的食材后,。
11、料理机不用时,或者人员离开时,应拔出电源插头,确认料理机放置稳定可靠后,然后才能离开。
注意事项1、为确保安全、请于使用前仔细阅读使用说明书。
2、开启产品包装后,请当即检查有无异常。
3、请勿把包装材料留给儿童或老弱病残孕者。
4、在插入电源前,请检查确认使用的电源符合料理机规格对应技术参数的要求,并且确认开关处于关闭位置。
5、杯体与刀座必须完全旋紧后,才可安装在电机座上;严禁把刀座单独安装在电机座上。
6、请勿在料理机运转时用手指、铅笔及其它类似物插入料理机内。
7、请勿用湿手、湿脚或者潮湿的身体其它部位触及料理机。
8、料理机必须放在儿童或老弱病残孕者不能触及的位置。
9、请勿通过拉扯料理机及其电源线的方法来切断电源。
10、移动、清洁、送修前,必须切断电源,拔出电源线插头。
11、发现异常时,应该关闭电源,拔出电源线插头,联系本公司或者本公司指定的维修部维修。
12、如果电源软线损坏,为了避免危险,必须由制造商、其维修部或类似部门的专业人员更换。
西屋破壁机按键操作方法

西屋破壁机按键操作方法西屋破壁机是一款功能强大的家用厨房电器,具有多种功能和按键操作方法。
以下是详细的按键操作方法说明:1. 开关按键:西屋破壁机的开关按键位于机器底部或侧面,通常有一个“开/关”标识。
按下这个按键来启动或关闭破壁机。
2. 电源选择按键:有些型号的西屋破壁机具有多种电源选择,如110伏特和220伏特。
此按键一般位于机器侧面,用于选择合适的电源。
3. 菜单选择按键:西屋破壁机通常具有多种预设菜单和程序,以满足不同食物的处理需求。
这些菜单通常标有名称或编号,并通过按键选择。
通过按下相应的数字键或上下箭头键,选择所需的菜单或程序。
4. 时间/温度设置按键:大多数西屋破壁机在处理食物时需要设置时间和温度。
通过按下时间/温度设置按键,在液晶显示屏上显示出待处理食物的时长和温度,并通过上下箭头键进行调整。
5. 开始/停止按键:在设置好时间和温度之后,通过按下开始/停止按键启动或停止破壁机的操作。
按下开始键后,机器开始工作,按下停止键后,机器停止工作。
6. 速度控制按键:西屋破壁机通常具有多种搅拌速度可选。
通过按下速度控制按键,可以选择不同的搅拌速度。
通常使用“+”和“-”按键来增加或减小搅拌速度,或者使用数字键直接选择所需速度。
7. 配料口按键:有些西屋破壁机具有配料口功能,通过按下配料口按键,可以在搅拌过程中向机器中加入额外的食材。
这样可以在不中断机器工作的情况下进行食材添加。
8. 清洗按键:西屋破壁机特别注重用户体验,因此大多数型号都具有清洗功能。
通过按下清洗按键,可以启动清洗程序,清洗机器内部容器和刀片,以确保卫生安全。
9. 保留温度按键:有些西屋破壁机具有保留温度功能,通过按下该按键,可以在搅拌完成后保持食物的温度,以便后续食用。
10. 倒计时显示按键:西屋破壁机一般都具有倒计时显示功能,在开始搅拌后,通过按下倒计时显示按键,可以在液晶屏上实时显示剩余时间。
总结:通过上述按键操作方法,我们可以轻松地完成对西屋破壁机的操作。
破壁机手动操作方法
破壁机手动操作方法
1. 首先,确保破壁机的电源已经插上,并且机器已经处于开启状态。
2. 将需要破壁的食材放入破壁杯中,可以根据自己的需要加入适量的水或其他液体。
3. 将破壁杯安装到机器的底座上,确保杯子安装牢固。
4. 根据破壁机身上的操作按钮,选择所需要的速度和时间。
5. 按下启动按钮开始破壁,机器会自动开始运行。
6. 破壁完成后,关掉机器的电源,并等待杯子内的食物停止运动后,再拿出破壁杯。
7. 将破壁后的食物倒入容器中,可以根据个人需求加热或冷藏后食用。
需要注意的是,每个牌子和型号的破壁机操作方法可能略有不同,因此使用前最好阅读一下使用说明书。
另外,操作时要注意安全,避免将手指或其他物体接触到破壁杯中的刀刃部分,以免发生意外。
破壁机说明书

破壁机说明书引言:现代社会的生活节奏越来越快,人们的工作职责和压力也越来越大,让压力在生活中的体现也越来越明显,对人们的身体和心理健康造成了不小的影响,而破壁机的出现解决了这个问题。
本篇文章将详细介绍破壁机的结构、工作原理、使用方法、注意事项以及清洁保养等方面,希望能帮助用户更好地了解和使用这一智能电器。
一、产品简介首先,破壁机是一种高端小家电,它可以将各种蔬菜、水果、坚果、谷物等食材进行精细破壁,将食材内部的营养成分释放出来,保留食材原本的纤维结构,让人们在享受美食的同时摄入更多的营养成分。
同时,破壁机还具备完美的自动保护功能,当破壁机在使用过程中出现异常,就会自动断电保护,从而提高用户的安全保障。
破壁机还具有智能化特点,用户只需要按下按钮,就可以自动完成破壁过程,方便快捷。
二、产品结构破壁机包括机身、破壁杯、刀具、容器等部件。
其中,机身采用优质塑料材料,重量轻、结构紧凑,方便用户进行携带和保存。
破壁杯采用食品级PC材料,具有优质耐酸碱性和高温抗冲击性,可耐受高温鲜榨汁的加工,保证安全健康。
刀具采用不锈钢材料,保证切割效果的精准和质量的稳定。
容器容积大,可以满足用户对不同口味饮品的需求。
三、产品特点破壁机具有以下几个特点:1、优质原料:机身、破壁杯等部件采用耐磨性好、耐温性高、防水性强等优质原料,保证产品的营养、环保、节能、健康等特性。
2、切割精确:刀具采用高质量不锈钢材料,保证切割效果的精确和稳定,让食材更容易被破壁,更容易提取其营养成分。
3、多功能:破壁杯容量大,集破碎、拌和、榨汁等功能于一体,可以帮助用户轻松解决不同的饮品需求,例如健康饮品、果汁、冰沙等。
4、电源安全:破壁机采用低电压直流马达,运行时较为安全,同时加入快速停止保护装置,使用户使用更加安心。
5、易于清洁:产品容易拆卸,清洗起来更加方便,不会繁琐复杂,还可全自动智能清洗。
四、产品使用方法1、选好食材:选择所需要的食材,切成小块或切碎,放入破壁杯内。
vitamix 6300料理机中文说明书9页word文档

Vitamix6300全食物料理机中文说明书简易上手部分一、功能键介绍,如图二、操作步骤首先把机器连上变压器。
变压器连国内插座。
开机:这里有一个开关键。
开关键打开,机器会亮蓝灯的。
亮蓝灯就是圆圈截图的地方。
这说明机器电源已经完全打开了。
接下去就是操控键的使用了。
左边3档是自动档。
第一档水滴图标的是果昔档第二档雪花图标是冰激凌档位第三档热汤图标是加热档位右边是1-high的手动挡。
自动档工作正常操作如下:选好要自动的档位后,需要按一下最右边的启动键,机器才会工作。
想要自动挡停止,再按一下右边的启动键就会停下来。
手动档工作正常操作如下:手动挡必须从1档启动。
把开关拨到1的位置,然后按下最右边的启动键。
机器开始运转。
在手动挡的过程中想要让机器停下来,只需要把旋钮拨到正当中位置。
机器就会停止工作的。
点打键功能介绍:这个点打键的作用是均匀食物的作用。
用来切洋葱也是不错的。
详细部分Vitamix 6300料理机说明书控制面板1.ON/OFF SWITCH (开关按钮/电源开关):开关按钮在机器前端左面的底部(在控制面板与开关指示灯之下)。
开关按钮控制着料理机的动力(电力)。
插上电源之后,将开关按钮按至ON,料理机便通电并预备好运作了。
晚上或不再使用料理机时请将开关按钮关闭(按至OFF)2.ON/OFF Light(开关指示灯):开关指示灯在控制面板之下。
当开关指示灯亮时,表明电源已经接通,并且开关按钮已经调至ON(开启)状态。
如果您使用预设程序(预设程序包括:SMOOTHIES 冰沙;FROZEN DESSERT S 冷冻甜品,HOT SOUPS 热汤)时,当料理机即将完成您的预设指令时,开关指示灯会闪烁。
3.Start/Stop Switch (开始/停止按钮):向下按压开始/停止开关,料理机便会按照您所选用的转速(1-9 转速)或者预设程序运转(SMOOTHIES,FROZEN DESSERTS,HOT SOUPS)。
西屋慢榨果汁机使用说明书

Instruction & Recipe Booklet Juice Fusion Slow Juicer - CSJ-300XAFor your safety and continued enjoyment of this product, always read the instruction booklet carefully before using.IMPORTANT SAFEGUARDS READ ALL INSTRUCTIONS BEFORE USINGWhen using any electrical appliance, especially when children are present, basic safety precautions should always be taken to reduce the risk of fire, electric shock and/or injury, including the following:• Never leave unattended while cooking to avoid possibility of fire.• This appliance is intended for HOUSEHOLD USE ONLY and similar applications such as:- s taff kitchen areas in shops, offices & otherworking environments;- f armhouses;- c lients in hotels, motels and other residentialtype environments;- bed and breakfast settings• This appliance is not intended for use by persons (including children) with reducedphysical, sensory, or mental capabilities, or lackexperience and knowledge unless, they havebeen given instruction concerning use of theappliance by a person responsible for theirsafety.• Do not use this product on sloping or unstable surfaces.• Avoid contact with moving parts.• Do not operate this appliance if it has been dropped or damaged (including the cord) in any manner or is not operating correctly.• The use of attachments not recommended by Cuisinart may be hazardous.• Do not allow the power cord to come into contact with any hot surfaces, including a stove, or to hang over table edge or counter.• Before turning the motor on, always make sure juice extractor cover is properly positioned andsecurely in place. Do not open cover while thejuice extractor is in operation.• On / Off / Reverse switch to the centre position to switch off after each use, and be sure themotor stops completely before disassembling.• Do not put fingers or other objects into the juice extractor opening while it is in operation. If foodbecomes stuck in the opening, use food pusher or another piece of fruit or vegetable to push itdown, or turn the motor off and disassemble the unit to remove the remaining food.• Always make sure the juice extractor cover is properly positioned and secured before motor is turned on. If it is not, the safety interlock will not operate. Do not loosen cover while the juiceextractor is in use.• Not designed for outdoor use.• Appliance should be plugged into a 230-240V household outlet only.• Do not use the appliance for anything other than the intended purpose, as outlined in thisinstruction booklet.• Do not operate without the pulp container in place.• Do not operate your appliance in an appliance garage or under a wall cabinet. When storing in an appliance garage, always unplug the unitfrom the electrical outlet. Not doing so couldcreate a risk of fire, especially if the appliancetouches the walls of the garage or the doortouches the unit as it closes.• Do not place on or near a hot gas or electric burner or in a heated oven.• Always use the food pusher to push fruit and vegetables into the chute.• Children should be supervised to ensure that they do not play with the appliance.• Do not use the appliance if the rotating Juice Strainer or the protecting cover is damaged orhas visible cracks.• If the supply cord is damaged, it must be replaced by the manufacturer, its service agent or similarly qualified persons in order to avoidhazard.• Maximum operating period is 15 minutes.SPECIAL CORDSET INSTRUCTIONSA short power supply cord is provided to reduce the risks resulting from becoming entangled in or tripping over a longer cord.Extension cords may be used if care is exercisedin their use. If an extension cord is used, the marked electrical rating of the extension cord must be at least as great as the electrical ratingof the appliance, and the longer cord shouldbe arranged so that it will not drape over the countertop or tabletop where it can be tripped over unintentionally or pulled on by children.UNPACKING INSTRUCTIONS1. Place the box on a large, sturdy, flat surface.2. O pen the box and remove any other literature.3. L ift the packing materials, juicer and accessories out of the box.4. R emove all other parts packed in pulp mold and remove packing materials surrounding those parts. Be sure to check all packing materials for all parts listed in the Parts & Features section on page 4 before discarding.5. R emove any protective or promotional labels from your Juice Fusion Slow Juicer and other parts.SAVE THESE INSTRUCTIONS BEFORE THE FIRST USEBefore using the Cuisinart® Juice Fusion Slow Juicer for the first time, we recommend you wipe all of the parts with a damp cloth to remove any dirt or dust. Dry thoroughly with a soft, absorbent cloth and handle carefully.CONTENTSImportant Safeguards (2)Parts and Features (4)Quick Tips Guide (5)Assembly Instructions (6)Disassembly Instructions (7)Operating Instructions (7)Cleaning and Maintenance (7)Troubleshooting (8)Approximate Yield Juicing Chart (9)PARTS & FEATURESA. Food PusherAssists to push ingredients into the food chute.B. Hopper CapLifts for inserting whole foods into the feed chute such as apples and beetroot.C. Plate HopperPlace whole foods onto the hopper plate to be directed into the food chute.D. Feed ChuteChannels ingredients to be juiced.E. Juice Bowl Cover F . AugerSlowly rotates to crush and press fruits, vegetables and nuts. G. Juice Strainer 1In combination with juice strainer 2, removes pulp for a smooth texture. H. Juice Strainer 2In combination with juice strainer 1, removes pulp for a smooth texture.I. Juicing BowlFresh juice is extracted into the juicing bowl before flowing into the juice jug.J. Pulp SpoutDry pulp is ejected through the pulp spout into the Juice Spout with Smart Cap, pulp container placed underneath. K. Juice Spout with Smart CapJuice flows into the juice jug when the smart cap is open. Close the smart cap to close the flow into the juice jug.Note : The black smart cap is located with the parts and needs to be assembled.L. On / Stop / Reverse Switch (REV)M. M otor Base N. Juice JugCollects up to 1L of fresh juice.O. Pulp ContainerHolds approx 1kg of dry pulp.P . Cleaning Brush - not shownNOAB C DEFG H IJMKLASSEMBLY INSTRUCTIONS 1. Place motor base on a clean,flat surface. Make sure themotor base is unplugged fromthe power outlet (not shown).2. Close the pulp spout.The cap will be securelyclosed when you hear a click.3. P lace the juicing bowl bylining up the fixed columns onthe juice container.4. I nsert the juicing bowl into thefixed point of the housing. 5. Place the inner juice strainerinto the outer juice strainer,together this is referred to asthe juice strainer assembly. 6. Insert the juicer strainerassembly into the juicing bowlaligning the 4 tabs on thestrainer with the grooves inthe bowl. This should fit firmlyin place.7. Place the auger into the juicestrainer assembly by pressingdown firmly, so it nestssecurely in place.8. I nstall the cover onto thejuicing bowl. Line up thearrow on the cover with theunlock symbol on the bowl.The cover should be seatedevenly on the juicing bowl.Twist the cover clockwise untillocked in place.9. Place the juice jug next to theunit under the juice spout,and place the pulp containerunder the pulp spout.10. I nsert the food pusher into thefeed tube by aligning thegroove in the food pusherwith the small indent on theinside of the feed chute.3.9.2.8.4.DISASSEMBLY INSTRUCTIONS1. P ress the switch to the STOP position and thenunplug the Slow Juicer.2. Make sure the smart cap that stops juice flow isin the closed position is in the closed position.Remove the juice jug.3. Unlock the cover by twisting it counterclockwiseand then remove from the juicing bowl. Remove the food pusher from the cover.4. Remove auger, strainer assembly and thenjuicing bowl.OPERATING INSTRUCTIONS1. Make sure your Slow Juicer is properlyassembled. (See Assembly Instructions, page 6.)2. Plug the power cord into a 230 - 240V electricaloutlet.3. NEVER PROCESS hard nuts, pits and seeds asthese can damage the juicer and void thewarranty. Hard nuts, pits and seeds candamage the juicer.4. Wash all selected fruits and vegetables.5. Place fruits and vegetables into the feed chutewith use of the pusher. Larger items can be added to the feed chute by lifting the hopper cap andplacing directly on the plate hopper to juice.6. While many fruits and vegetables will not needcutting, any item with a diameter larger than7cm will need to be cut.7. Press the switch to the ON position when readyto commence juicing.REVERSE - Press the REV switch to reverse thedirection of the juicer to help clear the augerand any clogging in the juicing area. to clear the auger to avoid clogging of the juicing area.8. Ensure the pulp and juice containers are in placebefore juicing then open the pulp spout and the juicing spout for the juice to flow into the juicejug and the pulp to accumulate in the pulpcontainer.NOTE: Pay close attention when operating withthe juice cap closed. Juice may overflow if thejuice collected in the juicing bowl exceeds itscapacity.Note: Juicing Fibrous Root Vegetables such as Tumeric, Ginger and Galangal.• W hen adding ginger, add small amounts in themiddle of a combination of ingredients inorder to extract the greatest amount of flavour.• D o not attempt to add a fibrous root vegetableon its own as this can cause the unit to block.NEVER PROCESS ginger or fibrous rootvegetables on their own as this can damage the juicer and void the warranty. Juicing Ginger onits own can damage the juicer.9. W hen finished juicing, press the switch to theSTOP position to stop the motor.10. If the machine suddenly shuts down whileoperating, press the STOP switch first and thenpress the REVERSE button. To make the food in the auger come up, release and then press theON switch. Repeat 3 times.a) When the machine is in reverse, gently pressthe lid to prevent the lid from becoming loose.b) If the machine is still not working, disassembleit and then wash before trying again. CLEANING AND MAINTENANCEDo not immerse the motor base in water or spray it with water. Clean only by wiping with a damp sponge, cloth or paper towel. Use any liquid dishwashing detergent, but do not use any products containing ammonia or scouring powders, as these products will dull, scratch or mar the finish.For easy cleanup, remove excess pulp from the juice strainer and the lid after each use. RINSE CLEAN and AIR DRY for next use. Vegetables and fruits will harden if left to dry on the unit parts, making it harder to clean.• Unplug juicer and carefully take it apart, following Disassembly Instructions on this page.• Rinse all removable parts with cold water.• Wash the pulp container, juice container, cover, pusher, feed tube with hopper and juice strainer assembly in hot, sudsy water, or on the top rack of dishwasher. Do not use a metal brush or pad. • Towel-dry all parts.• Any other servicing should be performed by an authorized service representative.TROUBLESHOOTINGAPPROXIMATE YIELD JUICING CHARTNOTES:.au©2022 CuisinartSuite 101 Ground Floor18 Rodborough RdFrenchs Forest NSW, 2086AustraliaVisit our Website:.auPrinted in ChinaTrademarks or service marks of third parties referred to herein arethe trademarks or service marks of their respective owners.。
西屋破壁机料理机使用说明

西屋破壁机料理机使用说明
一、开箱检查:
1、确认是否包含主机和配件;
2、检查主机外观是否完好无损;
3、检查配件是否齐全。
二、准备工作:
1、选取适合的食材,如水果、蔬菜、谷物等;
2、清洗干净食材;
3、处理食材,如去皮、去核等。
三、基本操作:
1、将准备好的食材放入破壁杯内,不要超过最高标识线;
2、将破壁杯盖好,确保盖子紧密;
3、将破壁杯放入主机底座上;
4、根据需要选择合适的时间和速度设置;
5、按下启动按钮,开始搅拌。
四、注意事项:
1、破壁机使用时,避免将手指或其他物品伸入主机底座内;
2、避免将破壁杯底部接触到高温物体,以防破裂;
3、避免将破壁杯放入冰箱或冷藏室内;
4、使用时,保持破壁机放置在平稳的台面上;
5、长时间使用后,应停止使用,并等待机器冷却后再继续使用。
五、清洁与保养:
1、拆卸破壁杯,按照说明书清洗;
2、主机底座可以用湿布擦拭;
3、不要将主机底座浸入水中清洗;
4、定期检查机器零件是否损坏,如有损坏及时更换;
5、使用后,在干燥通风处存放。
六、常见问题及解决方法:
1、机器不能启动:检查电源是否接通,机器是否拧紧,破壁杯是否放置正确;
2、机器噪音大:检查搅拌杯是否放置平稳,食材是否过多;
3、机器不能工作或自动停止:检查机器是否过热,关闭机器冷却一段时间后再使用;
4、机器漏液:检查破壁杯是否放置正确,是否超过最高标识线。
破壁机最详细的使用攻略及基础食谱

破壁机最详细的使用攻略及基础食谱X如果说两年前破壁机还是个新鲜事物的话,那么它现在已经成为关注美食生活和注重健康生活方式的家庭必备的小家电了。
我用破壁机的时间超过两年,这两年是实打实的一直在用,不同品牌各种功能都经过反复试验,看到很多初次使用破壁机的新手甚至经常用的人因为盲目使用出现这样那样的问题,一直想整理一篇实用的使用指南和基础食谱,把我积累的经验分享给大家。
本文不讨论品牌,只讲通用的操作和注意事项。
以下集结了这两年我遇到的大家最关心的问题和使用中最容易出状况的问题,没想到细细碎碎的列了这么多,码字不易,如果本文能对你有所帮助,转需不谢,但请注明出处。
【破壁机究竟是什么东东】首先,破壁机是什么?百度百科是这样解释的:破壁料理机集合了榨汁机、豆浆机、冰激凌机、料理机、研磨机等产品功能,完全达到一机多用功能,是可以瞬间击破食物细胞壁,释放植物生化素的机器。
这些功能的描述应该来自破壁机生产厂商,不能否认,这些功能破壁机确实都能做。
但任何东西都有一个最核心的功能,那么,第二个问题来了。
【破壁机的核心功能是什么】破壁机被国人认可源于一些养生专家的食谱,甚至于李开复在与癌症的抗争中也提到了几款用破壁机制作的食谱,所以破壁机最核心的功能就是调理养生。
其实在西方家庭中,破壁机是常见的生活电器,在国外这类机器并没有被冠以“破壁”的概念,欧美称之为“食品料理机”,台湾称之为“调理养生机”,破壁源于国人的营销理念。
无论如何,转速高的好处就是可以把东西打得细碎,口感细腻,让一些粗纤维或者坚硬的东西变得容易入口。
有了破壁机,你会发现家里的杂粮消耗快了很多,它无异对健康生活是有益的,但它绝非是一款万能的机器,也并没有商家宣传的或者你想象中的那么强大。
哈哈,不涉及品牌的好处就是我这么说也不会有商家找我麻烦吧。
- 1、下载文档前请自行甄别文档内容的完整性,平台不提供额外的编辑、内容补充、找答案等附加服务。
- 2、"仅部分预览"的文档,不可在线预览部分如存在完整性等问题,可反馈申请退款(可完整预览的文档不适用该条件!)。
- 3、如文档侵犯您的权益,请联系客服反馈,我们会尽快为您处理(人工客服工作时间:9:00-18:30)。
西屋破壁机料理机使用
说明
Company number:【WTUT-WT88Y-W8BBGB-BWYTT-19998】
西屋破壁机料理机使用说明
西屋破壁料理机使用说明
感谢您选购西屋破壁料理机,作为世界领先的破壁技术拥有者,我们深知机器再好,也需要使用恰当方能发挥其强大的性能。
本说明将以面板上的功键为核心,逐渐让您了解西屋破壁技术的强大。
使用说明
盖好盖子
杯盖中内置了磁感应智能耦合开关,如果没有盖到位,机器是不会开始工作的。
准备就绪之后出现以下画面
果蔬功能
此功能运转周期为两分钟,机器大部分时间会处于8档的破壁工作状态,期间会有几次降到4档,让那些没有破壁完成的食材由于重力作用回到刀片附近,接受下一轮破壁。
8档状态下,由于刀片的飞速运转,可以瞬间击破细胞壁,将细胞液中的营养成分释放出来。
注意事项:
①关于破壁
目前网络上有人质疑,牙齿也能达到破壁效果,没必要特意买台破壁机。
需要指出的是,牙齿破壁仅能作用于和
牙齿接触到的食材细胞,没有人吃东西的时候会有耐心将食材完完全全不漏一个细胞的咀嚼一遍,所以才需要专业的破壁机器对食物进行最大限度的破壁。
②关于空转
大部分果蔬的水分含量不高,破壁时请加入50—100ml 饮用水用来传导动力。
水分充足的水果不用加饮用水,比如葡萄,但不加水可能会较浓口感没那么好,所以建议还是加点水哦。
③某些水果籽
常见的是葡萄籽和苹果籽,这类水果籽质量大而体积小,很容易躲过刀片的搅拌,建议多搅拌几次。
④关于打粉
用不锈钢杯打粉的时候,最好选择果蔬功能为一次工作周期;打粉之前将食材切成2厘米左右的长度再打粉;不同食材打粉所需周期不同,一次没打碎也不用担心,再多打几个周期即可。
浓汤功能
此功能运转周期为60分钟,只加热不搅拌,适合煲汤,或者破壁前需要长时间加热的食材。
是西屋公司为中国市场定制的功能。
注意事项:
长时间加热淀粉含量高的食材,或者比较粘稠的汤类,会有轻微糊底现象,以及可能会导致杯底出现干烧现象,导致机器不会运作。
如果出现糊底现象稍作浸泡即可轻松擦洗干净,擦拭杯内底部时须小心刀片。
如果要使用带有加热功能的例如熬汤、煮粥等功能,为了避免杯底干烧可以在最后6分钟才加入粉末状的食材。
熬粥功能
此功能运转周期为21分钟,加热过程中会间歇性的使用1档搅拌,此功能前16分钟为加热,可能会有气泡产生,最后6分钟开始高速搅打,既能使杯中食材加热充分,又能避免粘稠的粥造成糊底,煮出更加营养美味的粥。
注意事项:
①熬粥之前请将食材浸泡一小时左右,为了是食物的口感和更好地释放营养成分。
②作为西屋为中国市场新增的特色功能,熬粥过程中只会1档轻微搅拌几次,不会进行破壁工作,所以请参照普通的熬粥食谱,先浸泡食材再选择熬粥功能。
豆浆功能
此功能运转周期为23分钟,开始时一边1档搅拌一边加热,然后只加热不搅拌。
最后几分钟会使用8档快速搅拌达到破壁效果,和米糊于玉米汁功能键不同的是,豆浆
功能加热时间最长,确保能完全煮熟豆浆,适合处理豆类比例较大的配方。
注意事项:
建议按照100g黄豆加水至1250ml这个比例,如果按照量杯上的刻度,有一定几率会轻微溢出,对于不希望任何溢出现象的用户,水位保持不高于1250ml比较好。
米糊功能
此功能运转周期为24分钟,开始时一边1档搅拌一边加热,然后只加热不搅拌,最后几分钟会使用8档快速搅拌达到破壁效果,是破壁机最常用的功能,请熟读注意事项,以确保最大的发挥机器性能。
作为最常用也是最实用的破壁功能,米糊功能的用法非常灵活,可简单看带加热的破壁功能。
除了做米糊之外,所有需要破壁和加热的操作都可以用米糊功能来完成。
注意事项:
米糊的配方自由灵活,食材和水的比例保证1比12的范围内,用户只需根据自身的营养需求,确保食材总重量,便可以自由搭配。
一般100g食材加水到1250ml比较好,加水超过1250ml,会偶尔遇到溢出现象,如果介意的话,降低水位即可。
玉米汁功能
此功能运转周期为22分钟,与豆浆和米糊功能很接近,也是边加热边搅拌,但是搅拌频率较低,时间较短,适合玉米这类较软又容易熟的食材,也是较为常用的功能键。
注意事项:
注意事项和米糊的差不多,豆类和谷物含量多的配方,请用米糊或者豆浆功能处理。
食材和水的比例最好保证在1比12的范围内,根据自身的营养需求,确保食材总重量,便可以自由搭配。
点动清洗功能
此功常用于清洗,以8档的最大动力快速的将杯壁附着的残留物清理干净,非常实用,有时也可以用短时间的搅拌(比如做好的米糊里加糖,需要将糖快速搅匀的时候)。
注意这个功能要长按哦!。