SDK接入之安卓端
腾讯信鸽推送AndroidSDK快速指南

腾讯信鸽推送AndroidSDK快速指南信鸽Android SDK是⼀个能够提供Push服务的开发平台,提供给开发者简便、易⽤的API接⼝,⽅便快速接⼊。
⽬前⽀持Android 2.2及以上版本系统。
本⽂档将引导⽤户以最快的速度嵌⼊信鸽SDK。
注册&下载SDK前往前台信鸽⾸页,使⽤QQ号码登陆,打开注册页⾯,填写“应⽤名称”和“应⽤包名”(必须要跟APP⼀致),选择“操作系统”和“分类”,最后点击“创建应⽤”。
应⽤创建成功后,点击“应⽤配置”即可看到APP专属的AccessId和AccessKey等信息。
10min demo regi.png注册完成后,请下载最新版本的Android SDK到本地,并解压。
⼯程配置以eclipse为开发的IDE为例,将SDK导⼊到⼯程的步骤为:1、创建或打开Android⼯程(关于如何创建Android⼯程,请参照开发环境的章节)。
2、将信鸽 SDK⽬录下的libs⽬录所有⽂件拷贝到⼯程的libs(或lib)⽬录下。
3、选中libs(或lib)⽬录下的信鸽jar包,右键菜单中选择Build Path,选择Add to Build Path将SDK添加到⼯程的引⽤⽬录中。
4、打开Androidmanifest.xml,添加以下配置(建议参考下载包的Demo修改),其中YOUR_ACCESS_ID和YOUR_ACCESS_KEY替换为APP对应的accessId和accessKey,请确保按照要求配置,否则可能导致服务不能正常使⽤。
<application<!-- APP项⽬的其它配置... --><!-- 【必须】信鸽receiver⼴播接收 --><receiverandroid:name="com.tencent.android.tpush.XGPushReceiver"android:process=":xg_service_v2" ><intent-filter android:priority="0x7fffffff" ><!-- 【必须】信鸽SDK的内部⼴播 --><action android:name="com.tencent.android.tpush.action.SDK" /><action android:name="com.tencent.android.tpush.action.INTERNAL_PUSH_MESSAGE" /><!-- 【必须】系统⼴播:开屏和⽹络切换 --><action android:name="ER_PRESENT" /><action android:name=".conn.CONNECTIVITY_CHANGE" /><!-- 【可选】⼀些常⽤的系统⼴播,增强信鸽service的复活机会,请根据需要选择。
Android-SDK接入-YSDK(应用宝1.7.0)

Android-SDK接⼊-YSDK(应⽤宝1.7.0)SDK接⼊-YSDK(应⽤宝1.7.0)-2021-01-07 ⼤家好,近期在做多渠道打包平台,会定期遇到第三⽅SDK升级,所以很被动的是,我们也要跟随他们的步伐,及时升级。
否则将⾯临第三⽅开发者站⽆法过审的问题。
之前我整理了 CodeReview 系列的博客,今天开始会抽时间整理第三⽅SDK接⼊的系列问题。
当然,CodeReview系列的还会进⾏下去。
应⽤宝SDK的接⼊其实还是很繁琐的,各种参数的配置,还需要注意区分沙盒环境的配置和现⽹环境的配置的不同区别。
今天我分享⼏个典型的问题:1.沙盒环境和现⽹环境最容易出现的错误:MidasPay 的沙盒环境下的 appKey 其实和 qqAppKey的值是相同的,但本质上者俩个东西是独⽴的,所以在切换到现⽹环境后,⼀定要注意,千万别把动qqAppKey。
erLoginRet flag:3100;get login ret failed, on login recrod in db!其实3100错误在 YSDK 的官⽹解释是本地票据不可⽤,引导⽤户重新登录。
同时也给出了检测⽅案,⽐如参数核对,包名是否⼀致、签名是否⼀致等等。
但是⼤多情况下,⼤家应该不会出像这些问题。
让我们来看下详细的⽇志: 异常详细信息:2021-01-06 20:56:03.623 8897-8897/? D/YSDK_DOCTOR: OK-notifyWakeupAsync2021-01-06 20:56:03.623 8897-8897/? D/YSDK UserModule: mUserListener.OnWakeupNotify2021-01-06 20:56:03.623 8897-8897/? D/YSDK UserModule: notifyWakeupAsync finished2021-01-06 20:56:14.992 8897-8971/? D/YSDK b$a.run: TaskDispatcher run2021-01-06 20:56:14.993 8897-8971/? D/YSDKDuration: Game time Duration :1202021-01-06 20:56:14.993 8897-8971/? D/YSDK_USER_WX: WX OK-getLoginRecord2021-01-06 20:56:14.993 8897-8971/? D/YSDK_USER_WX: getWXUserLoginRet2021-01-06 20:56:14.993 8897-8971/? D/YSDK_USER_WX: UserLoginRet flag:3100;get login ret failed, on login recrod in db!2021-01-06 20:56:14.993 8897-8971/? D/YSDK_USER_WX: WXUserLoginRet2UserLoginRet2021-01-06 20:56:14.993 8897-8971/? D/YSDK_USER_WX: WX OK-getLoginRecord2021-01-06 20:56:14.993 8897-8971/? D/YSDK_USER_WX: getWXUserLoginRet2021-01-06 20:56:14.993 8897-8971/? D/YSDK_USER_WX: UserLoginRet flag:3100;get login ret failed, on login recrod in db!2021-01-06 20:56:14.993 8897-8971/? D/YSDK_USER_WX: WXUserLoginRet2UserLoginRet上⾯的异常信息发⽣在微信调起后,然后点击授权后,发现app并没有收到回调,也就是 YSDK OnLoginNotify ⽅法没有被回调。
AndroidSDK安装与环境变量配置以及开发第一个Android程序
AndroidSDK安装与环境变量配置以及开发第⼀个Android程序java Android SDK安装与环境变量配置以及开发第⼀个Android 程序JAVA的安装与环境变量的配置2、安装的时候,最好别改安装路径,默认路径⼀直点下⼀步即可!3、安装完成后,接下来就是配置java环境变量了。
4、打开计算机属性,点击⾼级系统设置5、选择“⾼级”-“环境变量”⼆、关于JDK 安装,以及Java环境的设置1、下载JDK1.6,选择对应的安装路径2、配置相应的Java 环境变量A、属性名称:JAVA_HOME属性值:C:\Program Files\Java\jdk1.6.0_02B、属性名称:PATH属性值:;%JAVA_HOME%\bin;%JAVA_HOME%\jre\binC、属性名称:CLASSPATH属性值:.;%JAVA_HOME%\lib\dt.jar;%JAVA_HOME%\lib\tools.jar要加.表⽰当前路径,另外,%JAVA_HOME%就是引⽤前⾯指定的JAVA_HOME6. 关于环境变量是否安装成功的测试“开始”->;“运⾏”,键⼊“cmd”;键⼊命令命令,出现画⾯,说明环境变量配置成功:A、java -version;B、java;C、javac;=================华==丽==的==分==割==线======================Android SDK的安装与环境变量配置⼀、配置Andriod环境变量2、默认路径安装后,安装完成,开始配置环境变量。
3、打开计算机属性——⾼级系统设置——环境变量(如上⽂)4、新建⼀个环境变量,变量名:ANDROID_HOME,变量值:D:\Program Files\android-sdk-windows(以你安装⽬录为准,确认⾥⾯有tools和add-ons等多个⽂件夹),点击确认。
5、在⽤户变量PATH后⾯加上变量值;%ANDROID_HOME%\platform-tools;点击确认即可。
ANDROID地图SDK

一、Android地图SDK概述1.Android 地图SDK v3.7.3百度地图Android SDK是一套基于Android 2.1及以上版本设备的应用程序接口。
您可以使用该套SDK开发适用于Android系统移动设备的地图应用,通过调用地图SDK接口,您可以轻松访问百度地图服务和数据,构建功能丰富、交互性强的地图类应用程序。
2.功能介绍1)地图(1)地图展示包括:普通地图(2D,3D)、卫星图和实时交通图(2)地图操作:可通过接口或手势控制来实现地图的点击、双击、长按、缩放、旋转、改变视角等操作。
2)POI检索(1)周边检索:以某一点为中心,指定距离为半径,根据用户输入的关键词进行POI检索;(2)区域检索:在指定矩形区域内、根据关键词进行POI检索;(3)城市内检索:在某一城市内,根据用户输入的关键字进行POI检索;(4)POI详情检索:根据POI的ID信息,检索该兴趣点的详情。
3)地理编码(1)正向地理编码:实现了将中文地址或地名描述转换为地球表面上相应位置的功能;(2)反向地理编码:将地球表面的地址坐标转换为标准地址的过程。
4)线路规划(1)公交信息查询:可对公交详细信息进行查询;(2)公交换乘查询:根据起、终点,查询策略,进行线路规划方案;(3)驾车线路规划:提供不同策略,规划驾车路线;(支持设置途经点)(4)步行路径检索:支持步行路径的规划。
(5)骑行路径检索:支持跨城骑行路径规划。
5)地图覆盖物百度地图SDK支持多种地图覆盖物,帮助您展示更丰富的地图。
目前所支持的地图覆盖物有:定位图层、地图标注(Marker)、几何图形(点、折线、弧线、多边形等)、地形图图层、POI检索结果覆盖物、线路规划结果覆盖物、热力图图层、瓦片图层等。
6)定位采用GPS、WIFI、基站、IP混合定位模式,请使用Android定位SDK获取定位信息,使用地图SDK定位图层进行位置展示。
7)离线地图用户可以通过SDK在线下载离线包接口,下载离线地图包,使用离线地图可节省用户流量,提供更好的地图展示效果。
sdk接入流程
sdk接入流程SDK接入流程。
一、概述。
SDK(Software Development Kit)是软件开发工具包的缩写,是一套开发工具的集合,用于实现特定软件应用程序的开发。
在移动应用开发中,SDK的接入是非常重要的一环,它可以为开发者提供丰富的功能和服务,帮助开发者更快地完成应用的开发和发布。
二、准备工作。
在进行SDK接入之前,开发者需要做好一些准备工作,包括:1. 确定需求,明确自己的应用需要哪些功能和服务,选择合适的SDK进行接入。
2. 获取SDK,从官方渠道获取最新版本的SDK,并阅读相关文档和说明。
3. 确定平台和版本,确定要接入的平台和版本,例如Android、iOS等,以及对应的版本号。
4. 确认权限,确认应用需要的权限和对应的申请流程,保证应用在接入SDK时能够正常运行。
三、SDK接入流程。
1. 导入SDK,将下载好的SDK导入到开发环境中,例如Android Studio、Xcode等。
2. 配置参数,根据SDK提供的文档,配置相应的参数,例如应用ID、密钥、回调URL等。
3. 添加依赖,在项目中添加SDK的依赖,确保应用能够正常调用SDK提供的功能和服务。
4. 初始化SDK,在应用启动时,初始化SDK,进行必要的设置和初始化操作。
5. 调用接口,根据SDK提供的接口文档,调用相应的接口实现功能,例如登录、支付、分享等。
6. 处理回调,处理SDK回调,处理用户的操作结果或者错误信息,保证应用的正常运行。
7. 测试调试,在接入SDK后,进行测试调试,确保应用在不同环境下能够正常使用SDK提供的功能。
四、注意事项。
在进行SDK接入的过程中,开发者需要注意以下事项:1. 遵循官方文档,严格按照SDK官方提供的文档和规范进行接入,确保接入的正确性和稳定性。
2. 版本更新,定期关注SDK的版本更新,及时更新应用中使用的SDK版本,以获取最新的功能和修复已知的问题。
3. 权限申请,在应用中使用SDK时,需要向用户申请相应的权限,确保用户的隐私和数据安全。
(转)SDK接入与集成——小白入门篇
(转)SDK接⼊与集成——⼩⽩⼊门篇阅读⽬录⼀、简介 通常⼀款游戏开发到后期,⼀般都会涉及到第三⽅SDK的接⼊与集成,对于不熟悉SDK接⼊的同学来说,接SDK每次都是云⾥雾⾥,⽽熟悉SDK接⼊的同学⼜觉得不断地重复做接⼊SDK⼯作这样没有成就感,太尼玛⽆聊了(Android渠道⼀弄就⼗⼏个,直接吐⾎)。
其实通常情况下接⼊SDK都是很简单的⼀个过程,本系列博客就让马三和⼤家从⼩⽩开始,从零基础开始学习如何接⼊SDK以及⼀些常见的SDK的接⼊流程。
本系列博客规划为以下⼏篇:(介绍环境搭建以及Unity和Android的基本交互与调⽤)SDK接⼊与集成——信鸽SDK篇(介绍消息推送框架--信鸽SDK的接⼊)SDK接⼊与集成——QQ与微信SDK篇(都是腾讯开放平台的,就放在⼀起学了)SDK接⼊与集成——科⼤讯飞SDK篇(游戏中的语⾳通信和语⾳识别会⽤到此SDK)SDK接⼊与集成——百度地图SDK篇(做LBS游戏必不可少)SDK接⼊与集成——第三⽅SDK接⼊解决⽅案AnySDK篇SDK接⼊与集成——构建⾃⼰的Android集成多SDK框架篇 先挖了这么多坑,以后慢慢填吧,放⼼博主肯定不会太监的。
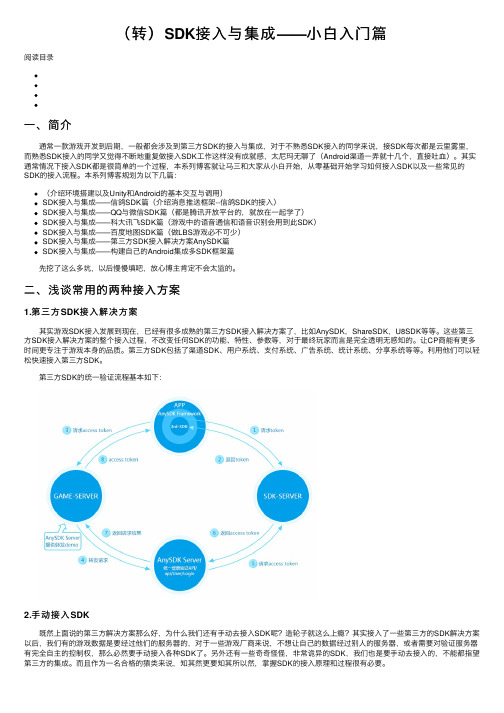
⼆、浅谈常⽤的两种接⼊⽅案1.第三⽅SDK接⼊解决⽅案 其实游戏SDK接⼊发展到现在,已经有很多成熟的第三⽅SDK接⼊解决⽅案了,⽐如AnySDK,ShareSDK,U8SDK等等。
这些第三⽅SDK接⼊解决⽅案的整个接⼊过程,不改变任何SDK的功能、特性、参数等,对于最终玩家⽽⾔是完全透明⽆感知的。
让CP商能有更多时间更专注于游戏本⾝的品质。
第三⽅SDK包括了渠道SDK、⽤户系统、⽀付系统、⼴告系统、统计系统、分享系统等等。
利⽤他们可以轻松快速接⼊第三⽅SDK。
第三⽅SDK的统⼀验证流程基本如下:2.⼿动接⼊SDK 既然上⾯说的第三⽅解决⽅案那么好,为什么我们还有⼿动去接⼊SDK呢?造轮⼦就这么上瘾?其实接⼊了⼀些第三⽅的SDK解决⽅案以后,我们有的游戏数据是要经过他们的服务器的,对于⼀些游戏⼚商来说,不想让⾃⼰的数据经过别⼈的服务器,或者需要对验证服务器有完全⾃主的控制权,那么必然要⼿动接⼊各种SDK了。
AndroidSDKPDKNDK详解
AndroidSDKPDKNDK详解昨天⼀个同事问我 PDK,NDK,SDK都是做什么的,什么意思。
之前听到过这⼏个词,感觉⾃⼰能够理解,但是发现要⽐较清晰的给她解释才发现⾃⼰的理解可能还不是很到位,带着疑问查了查资料,结合⾃⼰的理解写下来。
其实这个三个词应该是在软件开发领域通⽤的,它们的全称分别为SDK(Software Development Kit),PDK(Platform DevelopmentKit),NDK(Native Development Kit),我们可以从它们的⽤途以及针对的⼈群来理解⼀下。
1.SDK 软件开发套件⼀般平台都会发布⾃⼰的SDK,SDK包含该平台为应⽤程序开发⼈员提供的开发⼯具,主要是所有公开API的集合,应⽤程序开发⼈员可以借助SDK中的API快速的进⾏应⽤的开发。
Android SDK针对所有应⽤开发⼈员开放,下载ADT查看sdk⽬录如下:sdk├──add-ons├──build-tools├──extras├── platforms├──platform-tools└──toolsSDK⽂件⽬录解释:1) add-ons 这⾥保存⼀些附加库,例如GoogleMaps2) build-tools 这⾥放的是Android的⼀些重要的编译⼯具,⽐如aapt、aidl、逆向调试⼯具dexdump和编译脚本dx等3) extras 存放的是⼏次⼤的升级添加的新功能相关的static library,如android-v4,android-v7,android-v134) platforms 存放的是平台真正的SDK,其中会根据APILevel来区分SDK的版本,命名规则android-APILevel,如android 4.4 SDK的⽂件夹名称为android-20,其⽂件⽬录如下:├──android.jar├── build.prop├──data├── framework.aidl├── sdk.properties├──skins├── source.properties├── templates└── uiautomator.jar该⽬录下主要⽂件android.jar为该版本framework的主要⽂件,包括class,图⽚等;data⽬录下为系统的资源⽂件,包括字符串资源,fonts 字体库⽂件,activity broadcast的action记录,intent的category,widget的列表等内容;skins⽬录为Android模拟器的⽪肤资源;templates⽬录下为创建Android⼯程默认模板,包括AndroidManifest.xml,⽂件,launch图标等;5) platform-tools 此⽬录主要放置的是平台⼯具,如adb, fastboot, sqlite3等6) tootls 这个⽬录中有⽐较重要的调试⼯具,如ddms(包括⼀些截图),Android模拟器的主程序emulator,traceview性能优化⼯具, UI控件扫描⼯具uiautomatorviewer,UI层级显⽰⼯具hierarchyviewer,代码混淆⼯具proguard,ant编译脚本,代码缺陷扫描⼯具lint等,这个⽬录下也有个templates⽬录,简单看了下不太明⽩是⼲什么⽤的,有兴趣的可以了解⼀下。
AndroidSDK安装方法(官网原文)
AndroidSDK安装⽅法(官⽹原⽂)Installing the SDKIn this documentSee alsoThis page describes how to install the Android SDK and set up your development environment for the first time.If you encounter any problems during installation, see the Troubleshooting section at the bottom of this page.Updating?If you already have an Android SDK, use the Android SDK and AVD Manager tool to install updated tools and new Android platforms into your existing environment. For information about how to do that, see Adding SDK ComponentsStep 1. Preparing Your Development ComputerBefore getting started with the Android SDK, take a moment to confirm that your development computer meets the System Requirements. In particular, you might need to install the JDK, if you don't have it already.If you will be developing in Eclipse with the Android Development Tools (ADT) Plugin—the recommended path if you are new to Android—make sure that you have a suitable version of Eclipse installed on your computer (3.4 or newer is recommended). If you need to install Eclipse, you can download it from this location:/doc/05ec14da76eeaeaad1f3301e.html /downloads/For Eclipse 3.5 or newer, the "Eclipse Classic" version is recommended. Otherwise, a Java or RCP version of Eclipse is recommended.Step 2. Downloading the SDK Starter PackageThe SDK starter package is not a full development environment—it includes only the core SDK Tools, which you can use to download the rest of the SDK components (such as the latest Android platform).If you haven't already, get the latest version of the SDK starter package from the SDK download page.If you downloaded a .zip or .tgz package (instead of the SDK installer), unpack it to a safe location on your machine. By default, the SDK files are unpacked into a directory named android-sdk-.If you downloaded the Windows installer (.exe file), run it now and it will check whether the proper Java SE Development Kit (JDK) is installed (installing it, if necessary), then install the SDK Tools into a default location (which you can modify).Make a note of the name and location of the SDK directory on your system—you will need to refer to the SDK directory later, when setting up the ADT plugin and when using the SDK tools from command line.Step 3. Installing the ADT Plugin for EclipseAndroid offers a custom plugin for the Eclipse IDE, called Android Development Tools (ADT), that is designed to give you a powerful, integrated environment in which to build Android applications. It extends the capabilites of Eclipse to let you quicklyset up new Android projects, create an application UI, debug your applications using the Android SDK tools, and even export signed (or unsigned) APKs in order to distribute your application. In general, developing in Eclipse with ADT is a highly recommended approach and is the fastest way to get started with Android.If you'd like to use ADT for developing Android applications, install it now. Read Installing the ADT Plugin for step-by-step installation instructions, then return here to continue the last step in setting up your Android SDK.If you prefer to work in a different IDE, you do not need to install Eclipse or ADT, instead, you can directly use the SDK tools to build and debug your application. The developer guide has more information about Developing in Other IDEs.Step 4. Adding Platforms and Other ComponentsThe last step in setting up your SDK is using the Android SDK and AVD Manager (a toolincluded in the SDK starter package) to download essential SDK components into yourdevelopment environment.The SDK uses a modular structure that separates the major parts of the SDK—Androidplatform versions, add-ons, tools, samples, and documentation—into a set of separatelyinstallable components. The SDK starter package, which you've already downloaded, includes only a single component: the latest version of the SDK Tools. To develop an Androidapplication, you also need to download at least one Android platform and the SDKPlatform-tools (tools that the latest platform depend upon). However, downloading additional components is highly recommended.If you used the Windows installer, when you complete the installation wizard, it will launch the Android SDK and AVD Manager with a default set of platforms and other components selected for you to install. Simply click Install to accept the recommended set of components and install them. You can then skip to Step 5, but we recommend you first read the section about the Available Components to better understand the components available from the Android SDK and AVD Manager.You can launch the Android SDK and AVD Manager in one of the following ways:From within Eclipse, select Window > Android SDK and AVD Manager.On Windows, double-click the SDK Manager.ext file at the root of the Android SDK directory.On Mac or Linux, open a terminal and navigate to the tools/ directory in the Android SDK, then execute:To download components, use the graphical UI of the Android SDK and AVD Manager, shown in Figure 1, to browse the SDK repository and select new or updated components. TheAndroid SDK and AVD Manager will install the selected components in your SDK environment.For information about which components you should download, see the following section about Recommended Components.Figure 1. The Android SDK and AVD Manager's Available Packages panel, which shows the SDK components that are available for you to download into your environment.Available ComponentsBy default, there are two repositories of components for your SDK: Android Repository and Third party Add-ons.The Android Repository offers these types of components:SDK Tools (pre-installed in the Android SDK starter package) — Contains tools for debugging and testing your application and other utility tools. You can access these in the /tools/ directory of your SDK and read more about them in the Tools section of the developer guide.SDK Platform-tools— Contains tools that are required to develop and debug your application, but which are developed alongside the Android platform in order to support the latest features. These tools are typically updated only when a new platform becomes available.You can access these in the /platform-tools/ directory. Read more about them in the Tools section of the developer guide.Android platforms— An SDK platform is available for every production Android platform deployable to Android-powered devices. Each platform component includes a fully compliant Android library and system image, sample code, emulator skins, and any version specific tools. For detailed information about each platform, see the overview documentsavailable under the section "Downloadable SDK Components," at left.USB Driver for Windows (Windows only) — Contains driver files that you can install on your Windows computer, so that you can run and debug your applications on an actual device. You do not need the USB driver unless you plan to debug your application on an actual Android-powered device. If you develop on Mac OS X or Linux, you do not need a special driver to debug your application on an Android-powered device. (See Developing on a Device for more information about developing on a real device.)Samples— Contains the sample code and apps available for each Android development platform. If you are just getting started with Android development, make sure to download the samples to your SDK.Documentation— Contains a local copy of the latest multiversion documentation for the Android framework API.The Third party Add-ons provide components that allow you to create a developmentenvironment using a specific Android external library (such as the Google Maps library) or a customized (but fully compliant) Android system image. You can add additional Add-onrepositories, by clicking Add Add-on Site.Recommended ComponentsThe SDK repository contains a range of components that you can download. Use the table below to determine which components you need, based on whether you want to set up a basic, recommended, or full development environment:++Once you've installed at least the basic configuration of SDK components, you're ready to start developing Android apps. The next section describes the contents of the Android SDK to familiarize you with the components you've just installed. For more information about using the Android SDK and AVD Manager, see the Adding SDK Components document. Step 5. Exploring the SDK (Optional)Once you've installed the SDK and downloaded the platforms, documentation, and add-ons that you need, we suggest that you open the SDK directory and take a look at what's inside.The table below describes the full SDK directory contents, with components installed.Optionally, you might want to add the location of the SDK's andplatform-tools to your PATH environment variable, to provide easy access to the tools.How to update your PATHAdding both tools/ and platform-tools/ to your PATH lets you run command line tools without needing to supply the full path to the tool directories. Depending on youroperating system, you can include these directories in your PATH in the following way:On Windows, right-click on My Computer, and select Properties. Under the Advanced tab, hit the Environment Variables button, and in the dialog that comes up, double-click on Path (under System Variables). Add the full path to the tools/ and platform-tools/ directories to the path.On Linux, edit your ~/.bash_profile or ~/.bashrc file. Look for a line that sets the PATH environment variable and add the full path to the tools/ andplatform-tools directories to it. If you don't see a line setting the path, you can add one:On a Mac OS X, look in your home directory for .bash_profile and proceed as for Linux. You can create the .bash_profile if you don't already have one.Next StepsOnce you have completed installation, you are ready to begin developing applications. Here are a few ways you can get started:Set up the Hello World applicationIf you have just installed the SDK for the first time, go to the Hello World tutorial. The tutorial takes you step-by-step through the process of setting up your first Android project, including setting up an Android Virtual Device (AVD) on which to run the application.Following the Hello World tutorial is an essential first step in getting started with Androiddevelopment.Learn about AndroidTake a look at the Dev Guide and the types of information it providesRead an introduction to Android as a platform in What is AndroidLearn about the Android framework and how applications run on it in Application FundamentalsTake a look at the Android framework API specification in the Reference tabExplore the development toolsGet an overview of the development tools that are available to youRead how to develop in Eclipse/ADT or in other IDEsRead Developing on a Device to set up an Android-powered device to run and test your application.Follow the Notepad tutorialThe Notepad Tutorial shows you how to build a full Android application and provides helpful commentary on the Android system and API. The Notepad tutorial helps you bring together the important design and architectural concepts in a moderately complex application.Following the Notepad tutorial is an excellent second step in getting started with Android development.Explore some codeThe Android SDK includes sample code and applications for each platform version.You can browse the samples in the Resources tab or download them into your SDK using the Android SDK and AVD Manager. Once you've downloaded the samples, you'll find them in /samples//.Visit the Android developer groupsTake a look at the Community pages to see a list of Android developers groups. In particular, you might want to look at the Android Developers group to get a sense for what the Android developer community is like.TroubleshootingUbuntu Linux NotesIf you need help installing and configuring Java on your development machine, you might find these resources helpful:o https:///doc/05ec14da76eeaeaad1f3301e.html /community/Javao https:///doc/05ec14da76eeaeaad1f3301e.html /community/JavaInstallationHere are the steps to install Java and Eclipse, prior to installing the Android SDK and ADT Plugin.1. If you are running a 64-bit distribution on your development machine, you need to install theia32-libs package using apt-get::2. Next, install Java:3. The Ubuntu package manager does not currently offer an Eclipse 3.3 version for download, sowe recommend that you download Eclipse from /doc/05ec14da76eeaeaad1f3301e.html(/doc/05ec14da76eeaeaad1f3301e.html /downloads/). A Java or RCP version of Eclipse is recommended.4. Follow the steps given in previous sections to install the SDK and the ADT plugin.Other Linux NotesIf JDK is already installed on your development computer, please take a moment to make sure that it meets the version requirements listed in the System Requirements. Inparticular, note that some Linux distributions may include JDK 1.4 or Gnu Compiler for Java, both of which are not supported for Android development.。
讯飞移动广告平台Android SDK接入指南
科大讯飞股份有限公司iFLYTEK CO.,LTD讯飞移动广告平台Android SDK接入指南讯飞移动广告平台/,中国最大的移动交互式广告平台。
平台凭借优质的广告资源、精准的数据分析、高效稳定的收益效果、智能多维的交互形式,为开发者带来强悍稳定的变现能力,致力于构建一个高质、高效的广告技术服务平台。
讯飞移动广告平台聚焦移动广告聚合优化,通过先进的收入优化算法和简单易用的管理界面,帮助开发者快速实现应用变现,大幅提高移动广告收入。
独创的智能语音交互广告,打破了传统广告交互形式,让广告变得更生动有趣,从而带来极致的广告体验和最高效的广告收益。
1.概述欢迎使用讯飞移动广告平台。
通过本文档,您可以在几分钟之内轻松完成移动广告的集成过程。
集成过1.0~1.6版本SDK的开发者朋友,请先阅读SDK2.0集成注意事项,方便您快速集成。
2.集成说明2.1申请appid在/网站中注册成为开发者并创建一款应用,您将获得一个appid,用于标识您的应用。
2.2导入SDK1.下载最新版SDK的zip包,将其中的libs 文件夹下jar文件复制到本地工程libs子目录下。
2.Eclipse用户右键点击工程根目录,选择Properties -> Java Build Path -> Libraries,然后点击Add External JARs... 选择指向jar的路径,点击OK,即导入成功。
2.3配置AndroidManifest文件2.4组件声明2.5添加旗帜广告旗帜广告,即Banner 广告,可以将该广告视图放于任何可以容纳的位置(容纳的容器或位置必须在屏幕内并且尺寸等于或大于广告视图,推荐放在界面的顶部或底部)。
旗帜广告具备轮播功能,默认15秒轮播一次。
为了提高应用体验效果,开发者可以为放置广告的Layout自定义背景色或背景图片。
2.6添加插屏广告插屏广告,是一种开发者可以在界面过场时请求并根据需要进行展示的间质性广告形式。
android sdk帮助文档说明
1、解压Android SDK文件,里面有两个应用程序:“SDK Manager.exe”(负责下载或更新SDK包)和"AVD Manager.exe"(负责创建管理虚拟机)。
我们先运行“SDK Manager.exe”进行SDK下载。
2、运行后出现下面的界面,我们选择自己想安装的Android 版本,我选择了最新版本,然后点击“Install X packages”安装。
3、在新出现的界面上,选择接受并遵守所有许可内容(Accept All),再点击“Install”。
Android SDK 管理器就开始下载并安装你所选的包了,我们等上一段时间就好了。
4、安装好后,在Android SDK 管理器界面上你所选的包后面会显示“Installed”,表示已经安装好了。
5、接着我们回到文件夹界面,运行AVD Manager.exe。
6、打开AVD Manager.exe后,点击“New"创建新的模拟器:7、创建一个新的Android Virtual Device (AVD):输入AVD 名称、选择Target、输入模拟的SD Card 的容量大小、以及选择外观皮肤Skin。
然后“Create AVD”。
8、开始运行你新建的模拟器Virtual Device:选中这个虚拟设备并点击“Start”,在出现的界面上直接点击“Launch”就可以启动Android 模拟器了。
9、最后运行成功,是Android4.1,哦嚎嚎~~~PS:最后我在试玩的时候,发现在模拟器上打字,要鼠标点上面输入法的字母时,很痛苦。
所以这时我想能不能直接用键盘打字,这就方便多了。
经过一番折腾,终于找到了解决方法,看下图:。
- 1、下载文档前请自行甄别文档内容的完整性,平台不提供额外的编辑、内容补充、找答案等附加服务。
- 2、"仅部分预览"的文档,不可在线预览部分如存在完整性等问题,可反馈申请退款(可完整预览的文档不适用该条件!)。
- 3、如文档侵犯您的权益,请联系客服反馈,我们会尽快为您处理(人工客服工作时间:9:00-18:30)。
一、如何生成一个新的渠道项目(在这篇文章中,我们都是以武圣的uc渠道
为例)
新建一个cocos2dx Lua项目,项目目录如下图:
其中的proj.android就是android可以跑在android上的项目,接下来我们生成我们需要的其他渠道的项目,步骤为:
1、右键>>新建文件夹>>命名为:proj.android-uc
2、拷贝proj.android下的所有内容到proj.android-uc如下图:
这个时候要将这个项目导入eclipse,会报项目已经存在,而不让导入。
接下来我们修改项
目的名称,使项目得以导入到eclipse中。
3、将.project拖入Sublime中,或其他文本工具,修改name标签WSSG为WSSG-UC,如下图,接下来就可以导入进eclipse了。
4、项目导入eclipse过程:
(1)在Package Explorer下,右键import
(2)General下的Existing Projects into workspace>>next
(3)点击Browse >>选择你刚刚新创建的proj.android-uc >>去掉copy projects into workspace 前面的对号>>点击finish 导入成功。
二、android端,接入sdk
为了使之适用于所有的Lua游戏,我们将这部分单独拿出来,以依赖库的形式供项目使用。
我们以统一命名方式命名项目的名称,方便后期的管理,以libBridge开头,如:uc的就叫做,libBridgeUC。
所有sdk相关的东西,都放在,根目录下的plugin下。
1、plugin下右键新建文件夹,uc>>uc下新建文件夹proj.android
2、在eclipse中,右键new>>Android Application Project>>如下图
填入信息
>>点击next上方四个选项,只选择Mark this project as a library>>点击Browse选择你刚刚新建的plugin>>uc>>proj.android>>点击finish。
(注:因为我这里之前
已经做过这部分所以会报上方的红错,新建的项目不会出现这个问
题)
3、在src下右键新建package和class,命名格式为(这个是一成不不变的,如果想要修改,记得在Lua端的GameSdkUser.lua也做相应的修改。
)
4、android端接入sdk全过程:
(1)UserLogin类中,首先创建这个几个方法,然后可能有的会有一些其
他的需求,如UC的需要统计玩家的信息,这个时候我们需要另外加一个
方法,ZCSuccessLogin
其中,ZCInit主要是获取此游戏对应的appid等信息,并且在这个方法中
调用sdk的初始化方法。
ZCLogin方法主要是Lua端已经登录成功了,通
知android端进行登录。
ZCLoginCallback方法主要是android端已经登录成功了,将登录成功的参数传给Lua端,让Lua端进行登录。
ZCLogout
用于账号的退出。
ZCExist方法,用于退出游戏,有的sdk不需要。
(2)IApOnlinePay类中,需要创建这几个方法,这个一般情况下是固定不
变的。
ZCPay方法,主要接受Lua端传递过来的参数,ZCPayCallback方法,主
要是android端支付成功进行回调Lua端,然后有的sdk是将支付成功的
回调放在android端的,这个时候需要发送给Lua端,再由Lua端发送给
服务器。
有的是直接发送给服务器的,所以前端只需要通知Lua,sdk的
支付界面关闭了就可以了。
(3)将sdk的res下的内容全部都拷贝到libBridge下的res,将所有lib
包,都拷贝到libBridge下的libs下。
将配置文件中需要的权限和activity,拷贝到我们自己项目WSSG-UC下的配置文件中。
然后就可以照着sdk文
档进行接入了。
(4)项目之间的依赖关系为,libBridge依赖于libcocos2dx,WSSG-UC依
赖于libBridge。
三、Lua端接入sdk
接入思想:
1、程序入口处,进行sdk初始化,如:在main函数中
--平台初始化
zctech.ZCInitInLua()--实现
2、在需要登录的地方,判断是sdk登录还是官网登录,我们这部分是在gameloading中写的
zctech.LoginInCnOrSDK()--实现
3、如果是sdk登录,创建一个sdk登录的层,我们的是LoginLayerInSDK
这个界面的出现,有两种情况,登录和切换账号,所以可以加个判断,详情请见该类
4、接下来就是,从客户端获取sdk登陆成功的信息,发送给我们的服务器,进行登陆。
登陆不同的渠道,后端需要不同的参数,这里需要特殊写一下。
5、登陆成功之后,需要进行选择服务器,这里就需要跟官网分隔开来做了,我们的思路是:
通过渠道号来在后台区分不同的渠道,这样这部分就不用动了。
6、选择服务器和角色界面关闭也需要加上平台判断。
7、接下来就是在支付的地方,进行sdk判断,不同的sdk平台,有不同支付参数需求。
接入过程:
Java需要修改JavaBridge这个类,Oc需要修改OcBridge这个类。
这里以Java为例,Oc是相同的。
1、zctech.ZCInitFromJava函数,sdk初始化,不同的渠道传入的参数是不同的。
2、zctech.ZCLoginCallbackFromJava,sdk登陆成功的回调。
3、zctech.ZCLoginUrlForJava(),调用sdk的登陆。
4、zctech.ZCPayInSDKForJava,调用sdk的支付。
Java端:
分别创建erLogin
org.cocos2dx.plugin.IApOnlinePay这两个类UserLogin中,创建ZCInit用于sdk的初始化。
ZCLogin用于sdk的登陆。
ZCLoginCallback用于获取Lua端返回的callback 函数对应的int值,用于Java调Lua
setLoginCallbackFunc getLoginCallbackFunc set、get函数ZCLogout用于sdk登出。
ZCExist用于游戏退出时,显示sdk的退出界面,有的sdk需要,有的不需要。
IApOnlinePay中,创建ZCPay用于sdk的支付
ZCpayCallback用于获取Lua方法的返回。
setPayCallbackFunc、getPayCallbackFunc set和get方法。
四、编译文件详解
如果有新的渠道要加进来,我们应该修改一下.py文件
1、LUA_SAMPLES数组中写上这次要加进来的渠道,如uc
2、如果有的sdk渠道需要将他们的一些资源拷贝到assets下面,需要修
改copy_resources函数,比对360的写就可以。
3、修改build_samples函数中加上,你的渠道。
至此,就可以进行编译你的sdk了。
编译方式为:./android-build_zc.py(LUA_SAMPLES数组中,你写入的参数)如我想编译uc渠道的,./android-build_zc.py uc。