Eagle—E大型血管造影机演示
Polycom鹰眼摄像头拆机
Polycom® EagleEye™ 高清摄像机拆机指南/解决机械故障
Polycom EagleEye 高清摄像机比较脆弱容易摔坏,被甩后最容易出现的就是机械故障,如镜头不能上下或左右转动。
这些故障大多都是机械故障,本身电路没有损伤,送到专业维修点需要支付很昂贵的修理费。
如果是简单的机械故障,而且有基本的拆卸工具,我们就可以自行维修(前提是设备已经过保,你有这方面的维修经验,如果没有请慎重!)。
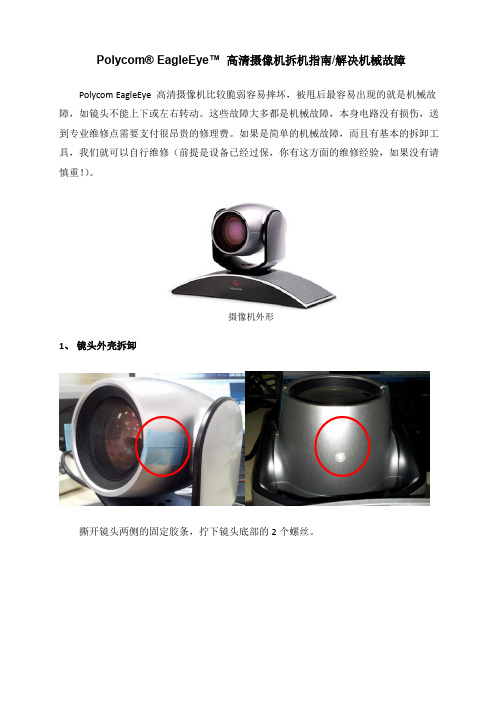
摄像机外形
1、镜头外壳拆卸
撕开镜头两侧的固定胶条,拧下镜头底部的2个螺丝。
拆开镜头后面的盖板,如图所示。
拆下镜头外壳,镜头机芯见下图所示。
机芯转轴固定位置
注:如果摄像机出现的是上下不能转动,多般是机芯转轴从机架固定孔上滑落出来了。
解决办法:只需要用力掰开左侧支架,将转轴插入固定孔即可。
2、机芯拆除
拆除右侧用来固定机芯的2个螺丝,如图所示。
拨开排线压片,拆下图中所示2条排线。
用螺丝刀扳动卡扣,取下压线挡板,拿下机芯如下图所示。
3、左右旋转电机拆卸
拆下镜头支架下方的3个螺丝;
拆下摄像机底部6颗螺丝,打开底盒。
拆下固定电机的3个螺丝,如下图所示。
左右旋转电机固定板
左右旋转电机
注:一般摄像机左右转动受阻,都是因为左右电机固定板(上图所示)受外力变形引起的。
解决办法:
借助手和工具将变形的固定板复原,固定板背面有电路,在复原的时候要非常小心,防止破坏电路。
ZEISS Supreme Prime 高精度主镜头安装指南说明书

ZEISS Supreme Prime Mount Change InstructionsTable of ContentsIntroduction 3Explanation of Symbols 3Overview 4Delivery Contents of a ZEISS Supreme Prime 4Technical Data 5Changing the Mount of a ZEISS Supreme Prime6Detaching a Mount 6Attaching a Mount 10Adjusting a ZEISSSupreme Prime to YourDigital Camera 15Testing the Sharpness 16Correcting the Flange Focal Distance 19Appendix 21Color Code of the Shims 21Shimming Table 21Mount Change Accessories 22Glossary 23 2IntroductionIn this manual you learn how to change the mount of a ZEISS Supreme Prime and how to match it to a digital camera. In order to explain the procedure, this manual uses a ZEISS Supreme Prime lens, which is scaled in feet with PL mount.Explanation of SymbolsThe information symbol indicates additional information, which is useful for the context.The skip symbol indicates that under certain circumstances you can skip certain steps.The result symbol indicates information about the obtained result of a step.The warning symbol indicates dangerous situations and actions, which might impair the functionality ofthe product, damage the product or hurt the user.Overview1front lens2focus ring3focus and aperture index mark4aperture ring5lens foot6lens barrel7small screw8groove of the lens9eXtended Data interface10electrical interface11rear lens12shims13mount including the black inner ring14T6 screws34Delivery Contents of a ZEISS Supreme Prime• 1x ZEISS Supreme Prime• 1x Front cap • 1x Rear cap • 1x Focus lever• 3x Lens support riser 3/8”Technical DataZEISS Supreme Prime lensesApertureClose Focus 1Length 2Front diameterWeight 3Full- Frame 4Super355 Supreme Prime 21 mm T1.5 T1.5 to T 22 0.3 m 12” 120 mm 4.7” 95 mm 3,7’’ 1.61 kg 3.55 lbs 79.5°59.8°Supreme Prime 25 mm T1.5 T1.5 to T22 0.26 m 10” 119 mm 4.7” 95 mm 3,7’’ 1.42 kg 3.13 lbs 70.8° 52.3°Supreme Prime 29 mm T1.5T1.5 to T220.33 m 13”121 mm 4.8”95 mm 3,7’’1.61 kg 3.55 lbs64° 46.8°1 Close focus distance is measured from the image plane2 Front to PL mount flange3 The specified weight refers to the ZEISS Supreme Prime standard lenses.4 Horizontal angle of view for a full-frame camera (aspect ratio 1:1.5, dimensions 36 mm x 24 mm / 1.42“ x 0.94“)5Horizontal angle of view for an ANSI Super 35 Silent camera (aspect ratio 1:1.33, dimensions 24.9 mm x 18.7 mm / 0.98“ x 0.74“)Supreme Prime 35 mmT1.5T 1.5 toT 220.32 m10”119 mm4.7”95 mm3,7’’1.40 kg3.09 lbs55°39.6°Supreme Prime 50 mmT1.5T 1.5 toT 220.45 m18”119 mm4.7”95 mm3,7’’1.22 kg2.69 lbs39°27.5°Supreme Prime 65 mmT1.5T 1.5 toT 220.6 m2‘121 mm4.8”95 mm3,7’’30.530.5°21.3°Supreme Prime 85 mmT1.5T 1.5 toT 220.84 m2‘9”119 mm4.7”95 mm3,7’’1.42 kg3.13 lbs24°16.7°Supreme Prime 100 mmT1.5T 1.5 toT 221.1 m3’9”119 mm4.7”95 mm3,7’’1.7 kg3.74 lbs20.4°14.2°Supreme Prime 135 mm CF10 T1.5T 1.5 toT 221.35 m4’5”146 mm 95 mm5.7” 3,7’’2.27 kg5.00 lbs15.6°10.9°Changing the Mount of a ZEISS Supreme Prime LensIn this chapter you learn how to change the mount of a ZEISS Supreme Prime. The procedure consists of two parts which are both mandatory to successfully change a mount. You learn howto detach the currently attached mount and how to attach a different mount. To make sure the ZEISS Supreme works properly, additionally complete the subsequent procedure: Adjusting a ZEISS Supreme Prime to your Digital Camera.Detaching a MountYou needZEISS Supreme PrimeZEISS T6 torx wrench with a torque of 0.4 Nm alternatively: regularT6 torx wrench with a torque of 0.4 Nm ZEISS InterchangeableMount Set for Supreme PrimeThe use of tools offered by ZEISS is highly recommended. You can purchase these tools directly from ZEISSor your trusted ZEISS dealer. See Mount Change Accessories5RequirementsEnsure that your working space is flat and leveled, in order to prevent the lens from tilting and falling over.Ensure that the environment is clean and free from dust so that no dust particles enter the ZEISS Supreme Prime.Ensure that the front lens cap sits on your ZEISS Supreme Prime, in order to avoid scratches.61. Place your ZEISS Supreme Prime on a flat surface with the mount facing up and the serial number facing away2.Remove the rear lens cap.You can now see the mount.3.With a T6 torx wrench remove the eight torx screws of the mount.The shape and height of the black adapter ring varies according to the different mounts.The black inner ring is securely fastened to the mount at the ZEISS factory and does not need to beremoved. This also applies to the electrical interface.78When detaching the mount for the first time, do not remove the shims. Neverremove the small screw in the groove of the lens.4 . C arefully detach the mount from your ZEISS Supreme Prime.If you are changing from a PL mount, you can directly see the shims.Attaching a MountYou needZEISS Supreme PrimeZEISS T6 torx wrench with a torx of 0.4 NmZEISS Interchangeable Mount Set for ZEISS Supreme PrimeThe use of tools offered by ZEISS is highly recommended. You can purchase these tools directly from ZEISSor your trusted ZEISS Dealer. See Mount Change AccessoriesRequirementsEnsure that your working space is flat and leveled, in order to prevent the lens from tilting and falling over.Ensure that the environment is clean and free from dust so that no dust particles enter the ZEISS Supreme Prime.Ensure that the front lens cap sits on your ZEISS Supreme Prime, in order to avoid scratches.Make sure you successfully completed Part 1: Detaching a MountIf you are changing to a PL mount, skip step 1 and 2, since the PL mount doesn´t have an adapter ring.1. Carefully place the adapter ring, which came with your ZEISS Interchangeable Mount Set for the ZEISS SupremePrime. Make sure the small screw in the groove of the ZEISS Supreme Prime sinks into groove of the adapter ring and the electrical contact fits into the recess.93.Place the mount on your ZEISS Supreme Prime:3.I PL mount: Place the PL mount on the ZEISS Supreme Prime in such a way that the recess of the mount lays on topof the electrical interface. The groove on the other side of the PL mount should then also lay on top of the small screw on the lens barrel.2. With the T6 torx wrench tighten the torx screws using a torque of 0.4103.II LPL mount: Place the LPL mount on the ZEISS Supreme Prime in such a way that the recess of the mount lays on topof the electrical interface. The groove on the other side of the LPL mount should then also lay on top of the smallscrew on the lens barrel.114.With the T6 torx wrench tighten the torx screws using a torque of 0.4 NY ou have now successfully changed the mount of a ZEISS Supreme Prime.In this chapter you learned how to detach the mount of your ZEISS Supreme Prime and attach a new mount to your ZEISS Supreme PrimeTo make sure your ZEISS Supreme Prime works properly, also complete the subsequent procedure: Adjusting a ZEISS CP.3 to Your Digital CameraAdjusting a ZEISS CP.3 to Your Digital CameraIn the following chapter you learn how to adjust your ZEISS Supreme Prime to a digital camera. This is necessary to ensure that the ZEISS Supreme Prime works properly and delivers the maximum image quality. In order to perform this adjustment, ZEISS provides shims in different colors which indicate their thickness.You need:TripodDigital camera with live viewZEISS Supreme Prime that needs to be adjustedSiemens star test chartMeasuring tape or folding rulerFlat-blade screwdriverAt least 3,5 m or 12 ft of free spaceZEISS Interchangeable Mount Set for ZEISS Supreme Primealternatively: ZEISS Shims set1213The use of tools offered by ZEISS is highly recommended. You can purchase these tools directly from ZEISS or your trusted ZEISS Dealer. See Mount Change AccessoriesTesting the Sharpness1. Fasten the siemens star test chart on a wall.2. Mount the ZEISS Supreme Prime on the camera.3. Mount the camera on a tripod.4. Position your camera at the testing distance of 3 m or 10 ft.5. Level the camera.The testing distance is measured from the siemens star test chart to image plane on your camera.ZEISS Supreme Prime lens are clean.146. Set the aperture of the Supreme Prime to full speed by rotating the aperture ring.The aperture setting must not be changed during the adjustment process.7.Activate the live view of your camera.8. Select the maximum magnification of the live view.9. Make sure that the center of the image aligns with the center of the siemens star test chart.10. Set the focus ring according to the testing distance. See Shimming Table.The focus setting must not be changed during the adjustment process.11. Obtain maximum image sharpness on the live view by varying the distance between the test chart and the camera.12.Now remeasure the testing distance between the image plane mark on the camera body and the test chart (= theactual distance)If the testing distance has changed, note the distance. The change indicates that the flange focal distanceof the ZEISS Supreme Prime must be adjusted. Proceed with the steps in Correcting the Flange FocalDistance.13.Do not take down the setup as you will need it again to recheck the sharpness later in the process.Correcting the Flange Focal Distance1.Remove the ZEISS Supreme Prime from the camera.2.Follow the steps of chapter Detaching a Mount.3.Determine the total thickness of the shims that already lay in the lens groove.4.Increase or decrease the total shim thickness according to the tables in the appendix by using a flat-bladedscrewdriver or a pair of tweezers.Any combination of shims is possible to achieve the required thickness and therefore the desired flange focaldistance. Always use the closest possible combination of shims.Example:Using a Supreme Prime 35mm/T1.5 lens with an EF mount, scaled in feet and a test chart at a test distanceof 4 ft, an actual distance of 4 ft 1´ is measured. Due to the table on page 18, you add a silver shim0.013mm to the total thickness of the shims.e a flat-bladed screwdriver or a pair of tweezers to remove or add shims.15Handle the shims carefully as they can easily kink or tear which makes them unusable.Ensure that the colored shims lie on top of each other in the groove of the lens barrel and do not coverthe screw holes. The shims might otherwise be damaged, while screwing in the screws.6.Follow the steps of chapter Attaching a Mount to attach a new mount.7.Recheck the sharpness of the lens. Follow the steps of testing the sharpness once more.a.If the testing distance has changed, follow the steps of chapter Correcting the Flange Focal Distance once more.b.If you achieve the maximum sharpness at the testing distance proposed in the tables, you successfully tested your Compact Prime Supreme Prime. No further steps are required.In this chapter you learned how to adjust a Compact Prime Supreme Prime16AppendixColor Code of the ShimsShimming TableMinus sign: Enlarge the flange focal distance. → Remove ShimsPlus sign:Reduce the flange focal distance. → Add ShimsMeter distance scale Feet distance scaleDistance to test chart [mm]3000Distance to test chart [ft]10Object distance at best focus [mm]Change of total washerthickness [mm]Object distance atbest focus [ft]Change of total washerthickness [mm]2960 -0,05 9ft 10’ -0,06Light Blue172970 -0,04 9ft 10 1/2’ -0,05 2980 -0,02 9ft 11’ -0,03 2990 -0,01 9ft 11 1/2’ -0,02 3000 0,00 10ft 0’ 0,00 3010 +0,01 10ft 1/2’ +0,02 3020 +0,02 10ft 1 ‘ +0,03 3030 +0,04 10ft 1 1/2’ +0,05 3040 +0,05 10ft 2’ +0,0618Mount Change AccessoriesAccessoriesZEISS Identification Number Front Lens Cap Supreme Prime4047865905114Rear Lens Cap - PL4047865900577IMS LPL - XD eXtended Data – T1.5/135; T1.8/150000000-2329-934IMS LPL - XD eXtended Data – T1.5/21000000-2330-031IMS LPL - XD eXtended Data – T1.5/25; T1.5/29; T1.5/35; T1.5/50; T1.5/85; T1.5/100000000-2271-441IMS LPL - XD eXtended Data – T1.5/65000000-2271-19619GlossaryFlange focal distance flange-to-film distance, flange focal depth, flange back distance, flange focal length Shim washerIndex mark aperture indicator, aperture line, aperture mark, aperture indexFlat-blade screwdriver slotted screwdriver, flathead screwdriver21 Carl Zeiss AG Consumer Products Carl-Zeiss-Straße 22 73446 Oberkochen Germany /cine。
海鹰医疗彩超机B超机机器性能图像展示
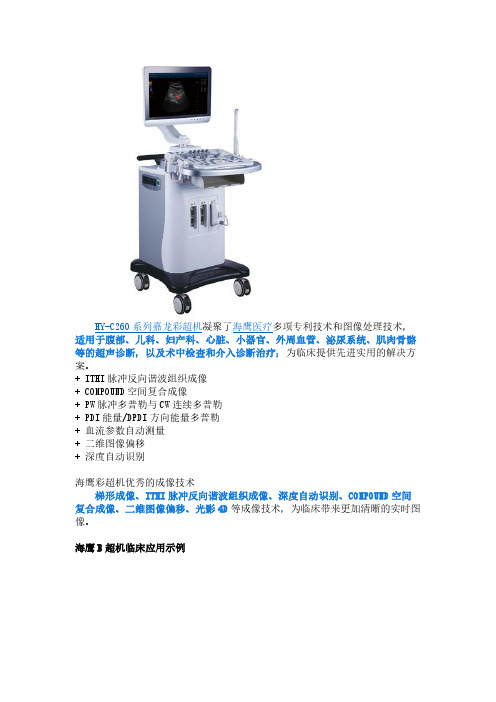
HY-C260系列嘉龙彩超机凝聚了海鹰医疗多项专利技术和图像处理技术,适用于腹部、儿科、妇产科、心脏、小器官、外周血管、泌尿系统、肌肉骨骼等的超声诊断,以及术中检查和介入诊断治疗;为临床提供先进实用的解决方案。
+ ITHI脉冲反向谐波组织成像
+ COMPOUND空间复合成像
+ PW脉冲多普勒与CW连续多普勒
+ PDI能量/DPDI方向能量多普勒
+ 血流参数自动测量
+ 二维图像偏移
+ 深度自动识别
海鹰彩超机优秀的成像技术
梯形成像、ITHI脉冲反向谐波组织成像、深度自动识别、COMPOUND空间复合成像、二维图像偏移、光影4D等成像技术,为临床带来更加清晰的实时图像。
海鹰B超机临床应用示例
<< 滑动查看下一张图片>>
B超机厂家人性化的设计
» 高效锂电池设计(选配),适应基层时常断电的使用环境» 大视角宽屏高清彩色液晶显示器,防止视觉疲劳
» 多模式图像参数智能一键优化,无需重复调节
» 自适应斑点噪声抑制等图像技术,增强图像清晰度
» 各科专用测量软件包和一体化图文工作站,简化工作流程。
Eagle-E医用血管造影系统说明
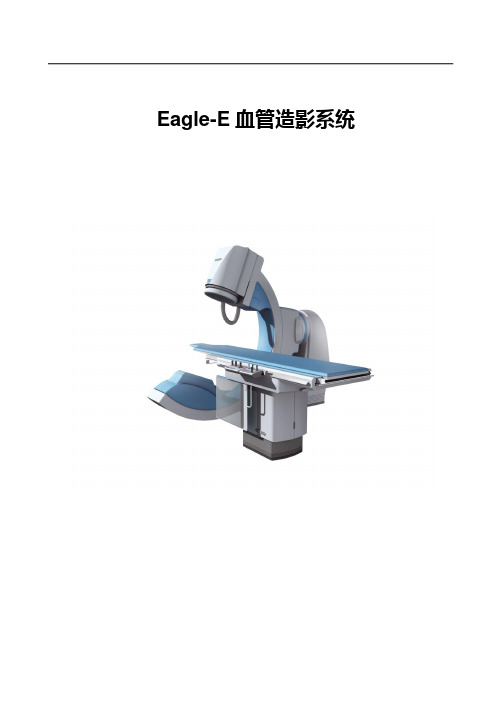
Eagle-E血管造影系统Eagle-E血管造影系统是TCL医疗集团的高端血管造影机,采用了灵活的落地式机架、200kHz超高频高压发生器、全球顶级的旋转阳极球管、高达百万像素的图像分辨率,兼容心血管介入、神经内外科介入、外周大血管介入、消化系统疾病介入、妇科泌尿系统疾病介入、肿瘤介入等各科室介入手术。
1. 全功能性的兼容设计:Eagle-E的独特设计使它可以充分满足不同科室介入手术的需要,大尺寸C臂开口和宽广的C臂弧深能帮助医生获得更多角度的投照体位。
智能的床旁控制系统,将机架和C臂的运动控制功能全部集中起来,帮助医生更加专注于手术,不必为设备的调控问题分散精力。
12英寸影像增强器有大小不同三个视野,医生可以根据病患的情况自由选择合适的视野尺寸。
标配的多功能软件包具有高清路径图功能,实时DSA功能,以及强大的血管狭窄百分比测量功能,为医生提供真实可见的参考数据。
无论是从硬件上还是软件上,都能充分确保医生高质量高效率地完成复杂的介入手术。
临床适用范围包括心血管介入、神经内外科介入、外周大血管介入、消化系统疾病介入、妇科泌尿系统疾病介入、肿瘤介入等,应用范围从骨科的椎体成形术、妇产科的输卵管造影及再通、消化科的ERCP,到外周介入的肿瘤栓塞化疗和血管跟踪造影、神经介入的血管瘤弹簧圈植入和动静脉畸形治疗、心脏介入的冠脉造影及PTCA、射频消融术、先心病封堵、起搏器植入等各科室介入治疗。
2. 落地式机架:为适合不同科室的需要,Eagle-E设计上采用的是落地式机架,落地式的设计避免了天轨消毒的麻烦,充分保障手术的无菌环境要求。
同时也免去了医院层流设计的麻烦,而且安装时对场地的要求也相对较少,减少了医院装修场地的费用。
落地式机架,不仅可以单轴转动,更可以多轴联动,且多轴是围绕一个空间的等中心点进行运动的,占地面积小,覆盖面积广。
所有的机械运动包括床的运动都可以通过床边的手柄来完成。
无论灵活性,稳定性,安全性还是操作的方便性都最大程度地满足了临床要求。
大型数字血管造影机技术规格及要求
任意位置承重≥250KG + 500N 额外 CPR 承重
★ 2.8
床身纵向运动伸出最远端时,无需回床即能在床面任
意位置进行 CPR.
2.9
床长度≥319cm
2.10
床宽度≥50cm
2.11
床面患者最大有效覆盖≥223cm
2.12
床面旋转角度≥270 度2.13导管床床垫源自轨道夹及输液架3、床旁液晶触
摸屏控制系统
3.1
提供床旁一套液晶触摸控制屏
3.2
控制屏可置于导管床 3 边,或者控制室内,便于医生
操作
3.3
可进行图像采集条件控制
3.4
可进行图像后处理及量化分析控制
3.5
床旁液晶屏上配置触摸式鼠标功能接口,方便床旁的
定量分析等操作
4、高压发生器
4.1
高频逆变发生器,功率≥100KW
4.2
最大管电流≥1000mA
5.12
配备通用型、虹膜型等多种遮光器
5.13
遮光器位置可存储
5.14
心脏介入手术中,半透明楔形挡板可根据投照角度自 动定位
5.15
透视末帧图像上可实现无射线调节遮光板、滤线器位
置
6、平板探测器
6.1
探测器类型:非晶硅数字化平板探测器
6.2
平板外壳大小≤42 X 52cm
6.3
最大有效成像视野(边长) ≥30cm X 38cm
★6.4
≥8 种物理成像视野,以适应不同部位介入需要
6.5
最大图像矩阵灰阶输出:2480 x 1920 x 16 bits
6.6
平板探测器分辨率≥3.25LP/mm
6.7
像素尺寸≤154μm
“救命利器”DSA,实力和颜值兼备!先进设备

“救命利器”DSA,实⼒和颜值兼备!先进设备说起CT、彩超、拍⽚⼤家⼀定不陌⽣但是说到DSA⼤家的表情⼀定是DSA听起来感觉很⾼端但它到底是啥东西?长啥样?有什么⽤?今天就带⼤家了解⼀下这个集⾼颜值、⾼科技于⼀⾝的DSA让我们⼀睹它的⾼颜值↓↓↓什么是DSA?DSA是数字减影⾎管造影(Digital subtraction angiography)的英⽂缩写,通俗的讲就是将造影剂注⼊需要检查的⾎管中,使⾎管显露原形。
然后通过系统处理,使⾎管显⽰更加清晰,便于医⽣诊断或进⾏⼿术。
早在2007年深圳恒⽣医院就引⼊了先进设备DSA此次,DSA设备全新升级换代医院最新引进了西门⼦Artis Zee III Ceiling悬吊式平板探测器⾎管造影系统(DSA)该系统为⽬前新⼀代平板⾎管造影系统可以覆盖全⾝各部位⾼质量的扫描能够在较短的时间内使⽤较低的X线剂量和造影剂⽤量快速得到动脉⾎管影像DSA有啥⽤呢?DSA可以开展⼼⾎管介⼊、脑⾎管介⼊、神经介⼊、外周⾎管介⼊、肿瘤介⼊、综合介⼊⼿术等,兼顾诊断和治疗。
介⼊诊疗技术的开展可覆盖全⾝⾎管,涉及⼼⾎管内科、消化内科、神经内科、神经外科、呼吸内科、肿瘤科、⾻科、疼痛科等相关临床科室。
相对磁共振(MRI)、CT 和超声等影像诊断类设备,DSA功能上偏重于治疗。
DSA⾎管介⼊是在医学影像设备的导向下,利⽤穿刺针、导丝和导管等器械所进⾏的诊断与治疗,并以治疗为主的⼀门学科。
介⼊治疗是介于外科、内科治疗之间的新兴治疗⽅法,包括⾎管内介⼊和⾮⾎管介⼊治疗。
微创介⼊是DSA的⼀个最⼤优点,具有微创性、不开⼑、痛苦⼩、定位准确、可重复性强、疗效⾼、康复快、并发症少、住院时间短、费⽤低等特点,可以有效帮助患者尽快摆脱疾病的折磨。
DSA主要应⽤于哪些⽅⾯?DSA主要⽤于急诊出⾎⽌⾎,可⽤于完成冠状动脉造影及⽀架成型术、先天性⼼脏病的封堵术、⼼内电⽣理检查及射频消融术、永久性⼼脏起搏器植⼊术、脑⾎管造影及动脉瘤栓塞术、各种常见肿瘤的化疗、栓塞术等,以及⾮脉管系统的治疗、⾷道⽀架植⼊术、⽓管⽀架植⼊术、胆道⽀架植⼊术及椎间盘突出的介⼊⼿术等。
Artis zeego血管造影系统使用体会

Artis zeego血管造影系统使用体会我院手术室于2011年引进西门子Artiszeego血管造影系统,经过几年来的使用和探索,取得点滴经验体会,在此分享,期待指教提高!Artis zeego血管造影系统采用智能机器人8轴位落地机架设计,可实现在手术中机架的轻松定位,手术医生可根据实际需要随意选择C臂的位置在患者的左侧、右侧还是头侧,通过多角度“随意”旋转,显示复杂解剖结构,使介入手术医生能够从各个方向精确观察血管和病变。
医师在执行“复杂随意”的C臂移动的同时,还可以使患者检查床倾斜成像,床面旋转成角,极大的方便了介入过程中的医师工作,实现了按照检查医生的实际需要进行灵活定位的愿望,这在传统的C臂系统多数是无法实现的。
另外,灵活可调的工作高度、等中位高度调整,不但为操作带来方便,而且减轻了手术医生因“穿戴整齐”长时间手术而导致的疲劳,这与传统C臂系统相比,它的操作确实更简便快捷、精准实用。
安全方面,设备还采用了全方位的安全防护设计,防撞系统灵敏度高,为术者和患者提供安全保障。
机械灵活多变的同时,该机最大的临床优势还在于能够提供大容积的3D成像和大容积的DynaCT断层成像。
例如在肿瘤的化疗栓塞或活检过程中可以获得整个腹部或肝脏的影像、在神经外科动脉瘤的治疗中可以通过3D重建“人机互找”定位、口腔外科三叉神经痛的射频治疗,可以通过DynaCT的骨窗重建图像,精准定位颅底卵圆孔,达到精准穿刺目的等。
因为它独特的大平板多级变焦技术,可提供更广泛的颅骨、颈部和脊椎成像,使它在脊柱外科和血管外科的大范围图像需求方面越来越尽如人意,因此说Artiszeego在血管造影技术和应用方面引领了新的潮流,可以极大的满足介入科、血管外科、心内外科、神经外科等各临床介入诊断和治疗的多方面需求。
具体使用中,首先,由于整机智能化程度的比较高,要求技术人员必须具备高度的责任感,具备一定的计算机应用技术,密切观察机器的运行情况和屏幕上的随机提示,注意培训和协调手术医生的具体操作;其次,机器人技术带来巨大灵活性的同时,由于机械系统采用了全方位的安全防护设计,防撞系统灵敏度高,要求操作医师在执行“复杂随意”的C臂或者床面移动的同时,必须小心谨慎,密切注意机架周边障碍物是否影响、平板探测器和机头与患者间的相对距离等,否则,如至预警系统的警示于不顾的话,系统极容易保护锁机,原则上,在不影响图像质量的前提下,平板探测器或者机头与病人的贴近距离应大于10公分以上。
OEC9900Elite(NXPowerLite)

•弧深: 84cm
图像显示终端—独有的拉近模式
•全方位多角度观察 •所有操作3步完成 •满足各种手术摆位需求
GE OEC 9900 Elite ----2010年最新产品
术中DSA
1.DRM 多源成像技术 ----大C品质保证的核心技术 2.复合全电动多角度成像 ----业内唯一可移动复合电动C臂 3.低剂量模式,大视野模式 ----业界公认发展方向 4. 临床应用实例
全身骨
高空间分辨率
导管 导针 骨缘 细小血管 软组织 骨骼细节
低对比度
Company Confidential – Internal use only
噪声
1、DRM多源重建技术
1次曝光,6倍数据采集,6步图像处理,6幅图像合成
1、DRM多源重建技术
轻巧触控,所想即所得
1、DRM多源重建技术
1次曝光,6倍数据采集,6步图像处理,6幅图像合成
326 台GE OEC C型臂
GE OEC 9900:术中DSA
复合手术的最佳伙伴
谢谢!
Company Confidential – Internal use only
2.缺乏专业外科手术设备
3.导管室无法达到手术要求标准
在手术室使用小C
存在的问题: 1.无数字减影、路径图功能
2.9寸影增、C臂弧深小
3.球管曝光能力差
在手术室使用大C ---复合手术室
1.成本过高,约2000万左右
2.改造期间影响正常使用 3.设备固定,无法多手术室共享
是否有新的方案满足如下要求?
1 血管外科 2 神经外科
3 肿瘤科
4 心内科
5 消化科
6 泌尿外科
7 妇产科
- 1、下载文档前请自行甄别文档内容的完整性,平台不提供额外的编辑、内容补充、找答案等附加服务。
- 2、"仅部分预览"的文档,不可在线预览部分如存在完整性等问题,可反馈申请退款(可完整预览的文档不适用该条件!)。
- 3、如文档侵犯您的权益,请联系客服反馈,我们会尽快为您处理(人工客服工作时间:9:00-18:30)。
法国THOMSON影像增强器
*视野:12" / 9" / 6/56/68
*对比度:30:1
CCD系统
*像素:1024x1024
*速率:25-30帧/秒
*输出方式:12BIT数字传输 *点频:40MHz
数字减影系统 1
*数字电影: 1Kx1Kx12Bit 25-30帧/秒 即满足心脏介入手术的要求,又保证无论心 还是周边都得到百万像素的图像。 *实时数字减影:减影精度1%可调,可保留各种 程度的减影背景 *采集图像均进行了实时的动态降噪 、边缘增强、 伽玛矫正 。 *血管地图功能,帮助大夫透视下顺利插管 *脉冲采集:25-30帧/秒
C臂系统(两轴)
*焦平面距离 800-1200mm *C型臂开口直径 2000mm *C型臂运动范围 LAO45oRAO90o CAR55oCRU55o *影像增强器运 动范围400mm *多位置存储功能
安装在中国人民解放军总医院 (301医院)
导管床
*床面距地面 最小高度790mm *床面距地面最大 高度1060mm *床面横向移动距 床体中心距离 130mm *纵向移动最大距 离1600mm *床面总长2400mm
Eagle-E的性能及特点
• Eagle—E大型血管造影机,在立项之初,就确 立了高配置、高性价比与高图像质量的设计思 想。以进口散件国内组装的形式大大降低了设 备的成本,更能适用国内的消费需求。瞄准世 界尖端科技,公司预计在2004年推出在现有设 备基础上升级的平板式(DR)大型C臂血管造 影机。 • Eagle-E大型C臂血管造影机分三轴、两轴两种 型号,均适合开展心脏和周边的所有介入手术。 产品一经推出,即以清晰的图像、齐全的功能、 合理的价位、稳定的性能得到了各方面的认可。
美国VARIAN球管
*焦点:三轴0.3/1.0(12KW/90KW) 两轴0.6/1.2 (40KW/100KW) *高速阳极启动器(与发生器一体化) 低速(透视) :2700RPM 高速(曝光) :8500RPM *热容量:1MHu(三轴)、600KHu(两轴) *冷却方式:循环油冷60KHu/min *缩光器 :具有虹膜遮挡技术,手动/自动方式
Eagle—E大型C臂血管造影机
公司简介
• 北京恒瑞美联公司系中外合资企业,成立于 1996年,注册于中关村高新科技园区,生产基 地坐落于大兴科技园。专业从事数字减影系统 和大型C臂血管造影机的引进、开发、生产。 下属三个子公司,恒瑞美联信息技术有限公司 (负责生产制造)、恒瑞美联商贸有限公司(负责 销售)、恒瑞美联科技有限公司(负责新技术的 引进、消化、开发及研制)。由公司历经5年研 发生产的Eagle—E大型C臂血管造影机现已上 市。
病历管理
数字减影系统2
*图像处理:窗宽窗位调整 高通滤波 后处理减影 图像旋转 图像反白 区域标注 蒙片选择 半减影模式 多幅显示 心室容积测量 图像锐化 边缘检测 像素移动 图像反转 文字标注 图像缩放 叠加处理 末帧冻结 长度测量 射血分数计算
数字减影系统3
*病历管理:病人数据库 数据库查询 病历书写模板 编辑病历 预览打印报告 图文报告打印 *硬盘存储:40GB *输出功能:光盘刻录 DICOM3.0传输 胶片打印
遥控操作台
*管电压、管电流、 曝光时间设置 *透视脚闸
*曝光手闸
*DSA功能控制
近台操作台 ( 床边悬挂式 )
*C型臂控制摇杆
*影像增强器控制摇杆
*数字系统控制快捷键 *缩光器控制按键
加拿大CPI高压发生器:
*功率:80KW *高频:100KHz *脉冲曝光:30次/秒或12.5次/秒 *脉冲透视:30次/秒 *高对比透视:20-40mA *自动亮度控制
C臂系统(三轴)
*焦平面距离 800-1100mm *C型臂开口直径1800mm *C型臂运动范围 L=90oLAO45oRAO45o CAR55oCRU55o L=0o LAO90oRAO90o CAR45oCRU45o *L型臂运动范围+90o-90o *影像增强器运动范围 300mm *多位置存储功能 安装在北京阜外心血管病医院