(12V)portable sine wave invertor
WaveST产品知识
音源 CD/MP3
模式(英文) NORMAL PLAY
翻译 种播放模式中英对照
音源
模式(英文)
翻译
注解
CD/MP3
NORMAL PLAY
顺序播放
一次连续播放所有歌曲
CD/MP3
SHUFFLE DISC
随机播放光盘
一次随机播放所有歌曲
CD
SHUFFLE RPT CD
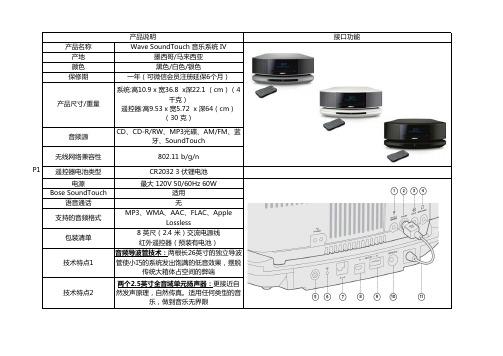
卓越的信号处理电路DSP:可提供无与伦比 的宽广声场,做到一体式的音响可以听声场
宽广的交响乐
技术特点4
SoundTouch、蓝牙:可以使用它可以播 放来自网络的几百万首歌曲、成千上万网络 电台以及存储在智能手机、平板电脑或电脑
上的音乐。
技术特点5 技术特点6
感光显示窗口:可以随着外界光线环境变化 而变化,及时深夜起床看时间也不会感到刺 人性化的闹铃功能:眼 可以用您喜欢的音乐把
指示灯显示 进入路由器设 P5 黄色常亮。 置界面更改加
密方式
6、等待几
分钟直到主
机wifi指示
灯变为白色
7、此界
长亮,在如
面点选
图界面更改
否,至此
设备名称,
设置完成
此名称也会
您从睡梦中叫醒,摆脱恼人的蜂鸣器声音
技术特点7
Aux输入:可通过音频连接线播放外接设备 中的音乐,适用范围更广
12伏特杠挂型链 saw锐化器产品说明书

12VO LT B A R-M O U N T C H A I N S A WS H A R P E N E ROWNER’S MANUALWARNING: Read carefully and understand all INSTRUCTIONS before operating. Failure to follow thesafety rules and other basic safety precautions may resultin serious personal injury.Thank you very much for choosing a NORTHERN TOOL + EQUIPMENT CO., INC. Product! For future reference, please complete the owner’s record below:Model: _______________ Purchase Date: _______________Save the receipt, warranty and these instructions. It is important that you read the entire manual to become familiar with this product before you begin using it.This machine is designed for certain applications only. Northern Tool + Equipment cannot be responsible for issues arising from modification. We strongly recommend this machine is not modified and/or used for any application other than that for which it was designed. If you have any questions relative to a particular application, DO NOT use the machine until you have first contacted Northern Tool + Equipment to determine if it can or should be performed on the product.For technical questions please call 1-800-222-5381.INTENDED USEThis unit allows chain sharpening without removing the chain from the bar.TECHNICAL SPECIFICATIONS & PACKING LISTItem DescriptionInstalled power Electrical motor, max. 12V supplyWheel thickness1/8 in. (3.2mm) and 3/16 in. (4.7 mm)Maximum speed5500 RPMType of chains pitches 1/4in. ; .325in. ; 3/8in. ; .404in.Weight sharpener 4.5 lbs (2 kg)GENERAL SAFETY RULESWARNING: Read and understand all instructions. Failure to follow all instructions listed below may result in electric shock, fire and/or serious injury.WARNING:The warnings, cautions, and instructions discussed in this instruction manual cannot cover all possible conditions or situations that could occur. It must be understood by the operator that common sense and caution are factors which cannot be built into this product, but must be supplied by the operator.SAVE THESE INSTRUCTIONSWORK AREA·Keep work area clean, free of clutter and well lit.Cluttered and dark work areas can cause accidents.·Do not use your tool where there is a risk of causing a fire or an explosion; e.g. in the presence of flammable liquids, gasses, or dust. Power tools create sparks, which may ignite the dust or fumes.·Keep children and bystanders away while operating a power tool. Distractions can cause you to lose control, so visitors should remain at a safe distance from the work area.·Be aware of all power lines, electrical circuits, water pipes and other mechanical hazards in your work area, particularly those hazards below the work surface hidden from the operator’s view that may be unintentionally contacted and may cause personal harm or property damage. ·Be alert of your surroundings. Using power tools in confined work areas may put youdangerously close to cutting tools and rotating parts.ELECTRICAL SAFETY·WARNING:Always check to ensure the power supply corresponds to the voltage on the rating plate.·Do not abuse the cord.Never carry a portable tool by its power cord, or yank tool or extension cords from the receptacle. Keep power and extension cords away from heat, oil, sharp edges or moving parts. Replace damaged cords immediately.Damaged cords may cause a fire and increase the risk of electric shock.·Do not expose power tools to rain or wet conditions. Water entering a power tool will increase the risk of electric shock.·The sharpener-motor can be used continuously for 20 minutes; then, it needs to be turn off to cool down to avoid possible damage from over- heating·If sharpening chain on an electrical saw, always disconnect the electrical saw power cable.PERSONAL SAFETY·Stay alert, watch what you are doing and use common sense when operating a power tool. Do not use a power tool while you are tired or under the influence of drugs, alcohol or medication. A moment of inattention while operating power tools may result in serious personal injury. ·Dress properly. Do not wear loose clothing, dangling objects, or jewelry. Keep your hair, clothing and gloves away from moving parts. Loose clothes, jewelry or long hair can be caught in moving parts. Air vents often cover moving parts and should be avoided.·Use safety apparel and equipment. Use safety goggles or safety glasses with side shields which comply with current national standards, or when needed, a face shield. Use as dust mask in dusty work conditions. This applies to all persons in the work area. Also use non-skid safety shoes, hardhat, gloves, dust collection systems, and hearing protection when appropriate. ·Avoid accidental starting. Do not carry the power tool with your finger on the switch. Ensure the switch is in the off position before plugging tool into power outlet. In the event of a power failure, while a tool is being used, turn the switch off to prevent surprise starting when power is restored.·Do not overreach. Keep proper footing and balance at all times.·Remove adjusting keys or wrenches before connecting to the power supply or turning on the tool. A wrench or key that is left attached to a rotating part of the tool may result in personal injury. ·Never wear rings, bracelets and/or loose clothing that could come into contact with the grinding wheel.·Always wear gloves and approved protective eyewear while operating or maintaining the sharpener.·Before starting up the sharpener, check that the working area is free of tools or other objects. ·Keep all other people or by-standards away from work area during its operation.·Always work in a stable and safe position.·Only allow users familiar with the sharpener’s operation to use the sharpener.·Store the sharpener in a safe, dry place when not in use. Keep away from children.TOOL USE AND CARE·Do not force the tool. Tools do a better and safer job when used in the manner for which they are designed. Plan your work, and use the correct tool for the job.·Never use a tool with a malfunctioning switch.Any power tool that cannot be controlled with the switch is dangerous and must be repaired by an authorized service representative before using. ·Disconnect power from tool and place the switch in the locked or off position before servicing, adjusting, installing accessories or attachments, or storing. Such preventive safety measures reduce the risk of starting the power tool accidentally.·Secure work with clamps or a vise instead of your hand to hold work when practical. This safety precaution allows for proper tool operation using both hands.·Use only accessories that are recommended by the manufacturer for your model.Accessories that may be suitable for one tool may create a risk of injury when used on another tool.·Keep guards in place and in working order.·Never leave tool running unattended.·Never stop the grinding wheel with your hands, even after stopping the motor.·Check that all power is disconnected when changing grinding wheels, during maintenance, ortransporting.·Never start the sharpener without the wheel guard in place. The guard is supplied with theaccessories bag and must be installed before operation. The guard can be removed only for wheel replacement; then, it must be reinstalled.·Check that the voltage and frequency indicated on the sharpener correspond to supplied power. ·Never use higher rated power supply, as this will damage the sharpener.·Never use defective and/or non-standard cables, plugs or extension cables.·Remove power or cables immediately if cables show signs of damaged or are cut.·The power supply cables are complete with terminals. Never use cables that are manipulated in any way.·Check the cable position during operation, making sure that cables stay away from grinding wheels during operation. Never work near other electrical cables.·Never advance the chain with-your-hands until the grinding wheel has moved entirely back to the upright position (non-cutting position).·Before starting the grinder, always check that the grinding wheel is correctly installed and notdamaged.·Before using the sharpener, check any safety, or other devices, are properly working.·Never use the sharpener as a cutter or for grinding objects other than saw chains·Never use near or expose sharpener to any explosive or flammable liquids or environment. ·Never start the sharpener with hands or fingers touching or near wheel·Never force the sharpener or any tool while working, maintaining or sharpening.ASSEMBLYOPERATIONFIRST: Check that you have proper size grinding wheel to match your chain.Check your chain saw specifications for proper wheel size.Be sure the wheel is securely installed and always check wheel for any damage before each use.NEVER use without wheel guard installed.NEXT: Install the sharpener onto chain saw chain bar, approximately centered.- Notes: This machine is equipped with a safety switch with a release coil.The provided power cables are complete with terminals for quick and safe connectionto any 12V battery.This allows the operator to use this sharpener on-the-job or in-the-field, wherever a12V battery is available.MAINTENANCEWARNING: Make sure this tool is disconnected from its power source before attempting any maintenance, cleaning, or inspection.·Maintain your tools. It is recommended that the general condition of any tool be examined before it is used. Keep your tools in good repair by adopting a program of conscientious repair and maintenance in accordance with the recommended procedures found in this manual. If any abnormal vibrations or noise occurs, turn the tool off immediately and have the problemcorrected before further use. Have necessary repairs made by qualified service personnel.·Keep cutting tools sharp and clean. Properly maintained cutting tools with sharp cutting edges are less likely to bind and are easier to control. Keep handles dry, clean, and free from oil and grease.·e only soap and a damp cloth to clean your tools. Many household cleaners are harmful to plastics and other insulation. Never let liquid get inside a tool.·Always disconnect from power source before carrying out any maintenance, lubrication or cleaning operations·Keep sharpener clean using a cloth rag with soap and water. Always dry after cleaning·Never use compressed air for cleaning, it can cause wood or metal dust to reach small areas in the sharpener causing damage to essential components of the sharpener.·DIAGRAM & PARTS LISTParts # Description Qty Parts # Description Qty1 Grinding wheel cover 1 16 Cable Set 12 Self-tapping screw 1 17 lock nut 13 Grinding wheel 1 18 Reset spring 44 Grinding wheel 1 19 Adjustment bolt 45A Grinding wheel coverboard1 20 Torsion limit board 15B Grinding wheel seat 1 22 Torsion 16 Axis Card 1 23 Elastic clip chain plate 27 Antifriction pad 1 24 Rotating Seat 18 Torsion Cover 2 25 bearing spring 2 10 Body 1 26 Angle plate 1 10-1 Handle 1 27 lock nut 111 PCB board 1 28 M5 nut 112 Pressure Line board 1 32 Limited board Set 113 Electrical Set 1 33 bolt M5X10 114 Self-tapping screw 4 34 Gauge 1Switch Cover 1 35 Shaping of sand 1For replacement parts and technical questions, please call 1-800-222-5381.WARRANTYOne-year Limited WarrantyWARNINGSome dust created by power sanding, sawing, grinding, drilling, and other construction activities contains chemicals known to the State of California to cause cancer, birth defects or other reproductive harm. Some examples of these chemicals are:• lead from lead-based paints,• crystalline silica from bricks and cement and other masonry products, and• arsenic and chromium from chemically-treated lumber.Your risk from these exposures varies, depending on how often you do this type of work. To reduce your exposure to these chemicals: work in a well ventilated area, and work with approved safety equipment, such as those dust masks that are specially designed to filter out microscopic particles.Northern Tool + Equipment Co.,2800 Southcross Drive WestP.O. Box 1499 Burnsville, MN 55337-0499Made in China。
音频插件(Wave3.0)效果各种简介!

音频插件(Wave3.0)效果各种简介!第一种效果:AudioTrack(音频轨)它是针对通常我们见到的普通的音轨的,综合了4段EQ均衡、压缩、噪声门三种效果器。
如果你用过T -racks(母带处理软件),你会发觉它与AudioTrack的功能非常相像。
只不过T-racks的界面要漂亮得多了。
下图是AudioTrack(音频轨)的界面:使用它之后,你的整个混音作品就可以站立在坚实的基础之上了。
在均衡方面,具体*作和参数设置可以参照Ultrafunk--EQ效果器。
在压缩方面可以参照Ultrafunk的压缩效果器。
在Gate(噪声门)的几个参数中,只有Floor(基底)是我们不熟悉的,不熟悉怎么办,试试就知道了。
1。
Rel为Release(释放)的缩写。
2。
将鼠标放在按钮上,鼠标会变化成一个双向的箭头,照此方向拖动,可以直接调整按钮相应的值。
3。
如果你觉得某一步*作错误,可以点击左上方的UNDO按钮,将这一步取消。
4。
如果你在Output(输出)的设置上调得过大,右面的No Clip(没有削波)会变成Out Clip(溢出,削波),同时在下面显示出已超过多少。
如果你将此时的设置处理成波形,则会看到被放大的电平信号和被削去的“刺儿头”。
5。
你可以在Setup A中选择一种预置方案,点击Setup A之后再显示出来的Setup B中再调入一种方案,然后进行两种方案的对比。
再点一下A->B 或是B->A 都会让两种方案统一。
第二种效果器:C1 Compressor(C1 压缩器)如下图:左面为压缩/扩展电平表。
中间的按钮分别是:Low Ref,低反射,点击之后改变为峰值反射;Makeup,电平弥补;Threshold,阀值;Ratio,压缩比率;Attack,起音时间;Release,释放时间;第三种效果器C1 Gate(噪声门)如下图:除了有些按钮的功能与C1 compressor不同之外,基本界面都很相似。
JBL Micro Wireless说明书

J BL® Micro WireLess Introducing the JBL® Micro Wireless ultra-portable speaker. With its built-in bassport and compact size, this speaker lets you take great JBL bass any place, andstream music wirelessly from any Bluetooth®-equipped device.The JBL Micro Wireless is the first ultra-portable speaker featuring a Li-ion (lithium-ion) rechargeable battery, a built-in bass port and a wireless Bluetooth connection.With a 1-5/8-inch (40mm) driver and an acoustic volume of 100cc, it deliverslegendary JBL sound with exceptional bass – all in a speaker that fits easily inbackpacks or clips onto clothing. You can wirelessly stream audio to thespeaker from any Bluetooth-equipped device, or use the included audio cable toconnect it to any mobile device or MP3 player. You can even daisy-chain it with otherJBL Micro Wireless speakers for a powerful sonic experience.HiGHLiGHTs:•Bluetooth® technology• Built-in bass port• 5-hour, Li-ion rechargeable battery • Portable design • Smart cable design • LED indicator• Daisy-chain capabilityUltra-portable, 3-watt speaker with a Li-ion rechargeable battery, built-in bass port and wireless Bluetooth® connectionFinishes:The JBL Micro Wireless is the ultimate wireless portable audio solution for indoor or outdoor playback – with performance, portability and pricing the competition can’t touch.k ey fea Tures JBL ®Micro WireLess The JBL Micro Wireless portable speaker has a built-in Li-ion battery that provides up to five hours of playback time. The battery is easily re-charged using a micro USB port, which saves you battery hassles and money.The JBL Micro Wireless portable speakerstreams music wirelessly from any Bluetooth -equipped device, making JBL sound availablefor a wide range of portable devices. JBL speakers are famous for powerful bass. But it might surprise you to hear JBL bass this strong from a speaker this small. A built-in bassport enables the JBL Micro Wireless to generate bass that’s superior to comparable portableproducts.A clearly visible LED lets you know when the built-in Li-ion rechargeable battery is low, so you know when the JBL Micro Wireless needs charging.It’s easy to get attached to JBL sound. Thelightweight, compact JBL Micro Wireless fitseasily into backpacks or pockets. The JBL Micro Wireless portable speaker is always ready to connect and play. And when your source device isn’t connected, the built-in11-13/16-inch (30cm) audio cable stores inthe bottom of the speaker case to prevent tangling. Built-in bass port Portable design Smart cable design LED indicator If you want to add some “macro” to yourMicro, the portable speaker can be connectedto other JBL Micro Wireless speakers, creatingan impressive sound environment.Daisy-chain capability5-hour, Li-ion rechargeable batteryWhat’s included:• 1 JBL Micro Wireless speaker• 1 Micro USB cable for recharging• 1 Carrying pouch• 1 Quick Start GuidesPecs and inforMaTion input requirements• 1/8" (3.5mm) stereo mini-jackdriver• 1 x 1-5/8" (40mm)Power• 3 wattsacoustic volume• 100ccfrequency response• 150Hz – 20kHzsignal-to-noise ratio• >80dBBattery type• L i-ioninput connections• 1 x integral 1/8" (3.5mm) stereo cable• 1 x 1/8" (3.5mm) stereo jackListening time on battery power• U p to 5 hoursdimensions (d x H)• 3-1/4" x 1-9/16" (83mm x 39mm)Weight• 4.5 oz. (127g)Go online to register your purchase and access professional tips that’ll show you just how serious sound can get./registermyproductDon’t let the compact size fool you. Hearing is believing.sPecificaTions JBL ® Micro WireLess © 2012 HARMAN International Industries, Incorporated. All rights reserved.JBL is a trademark of HARMAN International Industries, Incorporated, registered in the United States and/or other countries. The “Hear the truth” logo is a trademark of HARMAN International Industries, Incorporated. The Bluetooth word mark and logo are registered trademarks and are owned by Bluetooth SIG, Inc., and any use of such marks by HARMAN International Industries, Incorporated, is under license.Features, specifications and appearance are subject to change without notice.HARMAN International Industries, Incorporated8500 Balboa Boulevard, Northridge, CA 91329 USA 。
simulink的正弦波

simulink的正弦波
在Simulink中创建正弦波可以使用Sine Wave Generator(正弦波发生器)模块:
1. 在Simulink库中选择"Sources"(源)文件夹。
2. 从该文件夹中拖动"Sine Wave Generator"(正弦波发生器)
模块到Simulink模型中。
3. 打开"Sine Wave Generator"(正弦波发生器)的参数窗口。
4. 在参数窗口中设置波形的频率、振幅、相位和采样时间等参数。
5. 连接正弦波发生器模块的输出线到其他模块或范围(Scope)模块以显示波形。
6. 运行模型并查看波形。
示例:
以下是一个简单的Simulink模型,其中包含一个正弦波发生
器模块和一个范围(Scope)模块。

- 打开Sine Wave Generator(正弦波发生器)的参数设置窗口,设置正弦波的振幅、频率和相位等参数。
- 将正弦波发生器的输出线连接到范围(Scope)模块的输入线。
- 运行模型并查看范围(Scope)模块中显示的波形。
wavehelp
概述敬爱的用户:您好!非常感谢您使用伟福系列仿真器。
伟福仿真品种多、功能强,和国内外同类高档仿真器功能相比,先进的特点如下:1.主机+POD组合,通过更换POD,可以对各种CPU进行仿真。
对待不同的应用场合,用户往往会选择不同的CPU,从而需要更换仿真器,伟福仿真软件WINDOWS版本支持本公司多种仿真器。
支持多类CPU仿真。
仿真器则采用主机+POD 组合,通过更换不同的POD,可对各种不同类型的单片机进行仿真。
为用户提供了一种低价位的,灵活的多CPU仿真系统。
2.双平台DOS版本,WINDOWS版本。
其中Windows版本功能强大。
中文界面,英文界面可任选,用户源程序的大小不再有任何限制,支持ASM,C,PLM语言混合编程,具有项目管理功能,为用户的资源共享,课题重组提供强有力的手段。
支持点屏显示,用鼠标左键点一下源程序中的某一变量,即可显示该变量的数值。
有丰富的窗口显示方式,多方位,动态地显示仿真的各种过程,使用极为便利。
本操作系统一经推出,立即被广大用户所喜爱。
3.双工作模式1 软件模拟仿真(不要仿真器也能模拟仿真)。
2 硬件仿真。
4.双CPU结构,100% 不占用户资源。
全空间硬件断点,不受任何条件限制,支持地址、数据、外部信号、事件断点、支持实时断点计数、软件运行时间统计。
5.双集成环境编辑、编译、下载、调试全部集中在一个环境下。
多种仿真器,多类CPU仿真全部集成在一个环境下。
可仿真51系列,196系列,PIC 系列,飞利蒲公司的552、LPC764、DALLAS320,华邦438等51增强型CPU。
为了跟上形势,现在很多工程师需要面对和掌握不同和项目管理器、编辑器、编译器。
他们由不同的厂家开发,相互不兼容,使用不同的界面。
学习使用都很吃力。
伟福 WINDOWS 调试软件为您提供了一个全集成环境,统一的界面,包含一个项目管理器,一个功能强大的编辑器,汇编Make、Build和调试工具并提供一个与第三方编译器的接口。
VEX产品介绍
产品介绍套装系列 (4)VEX机器人基本套装 (4)控制器套装M ICROCONTROLLER K IT (4)升级W I F I无线遥控套装N ET U PGRADE K IT (5)马达套装M OTOR K IT (5)双线加强马达套装H IGH S TRENGTH M OTOR K IT (6)伺服器套装 S ERVO K IT (6)遥控接收套装T RANSMITTER &R ECEIVER K IT (7)晶振套装A C RYSTAL U PGRADE K IT A (7)晶振套装B C RYSTAL U PGRADE K IT B (8)碰撞开关套装B UMPER S WITCH K IT (8)行程开关套装L IMIT S WITCH K IT (9)巡线传感器套装L INE T RACKER K IT (9)光敏传感器套装L IGHT S ENSOR K IT (10)超声波传感器套装U LTRASONIC R ANGE F INDER K IT (10)编码器套装O PTICAL S HAFT ENCODER K IT (11)双向编码器套装B IDIRECTIONAL O PTICAL S HAFT ENCODER K IT (11)探照灯套装F LASHLIGHT K IT (12)角度传感器套装P OTENTIOMETER K IT (12)信号分频器套装S IGNAL S PLITTER K IT (13)单向气泵套装VEX P NEUMATIC P ARTS K IT 1 (13)双向气泵套装VEX P NEUMATIC P ARTS K IT 2 (14)9.6V两电一充电池套装P OWER P ACK K IT (14)美国原装电池套装VEX P OWER P ACK (15)9.6V一电一充电池套装9.6V P OWER K IT (15)7.2V电池套装7.2V P OWER K IT (16)电源扩展器套装P OWER E XPANDER K IT (16)程序套装P ROGRAMMING P ARTS K IT (17)结构件套装H ARDWARE K IT (17)高级五金件套装A DVANCED M ETAL P ACK (18)铝金属件套装A LUMINUM M ETAL K IT (18)加长铝金属件套装L ONG A LUMINUM M ETAL K IT (19)齿条架套装R ACK B RACKET P ACK (19)蜗轮架套装W ORM B RACKET P ACK (20)差速架套装B EVEL B RACKET P ACK (20)滑动架套装L INEAR S LIDE P ACK (21)齿轮套装G EARS K IT (21)加强齿轮套装H EAVY G EARS K IT (22)高级齿轮套装A DVANCED G EAR P ACK (22)马达齿轮套装M OTOR G EARS K IT (23)金属小齿轮套装M ETAL G EARS K IT (23)车轮套装W HEEL K IT (24)万向轮套装O MNI-DIRECTIONAL W HEEL K IT (24)大万向轮套装L ARGE O MNI-DIRECTIONAL W HEEL K IT (25)腿轮套装W HEEL L EGS K IT (25)自组螺丝套装B EARING R IVETS P ACK (26)链轮套装S PROCKET AND C HAIN K IT (26)加强链轮套装H IGH S TRENGTH S PROCKET AND C HAIN K IT (27)履带套装T ANK T READ K IT (27)加强履带套装T ANK T READ U PGRADE K IT (28)电池扎带套装B ATTERY H OLD-DOWN K IT (28)扎带套装H OLD-DOWN K IT (29)防护眼镜S AFEGUARD G LASSES (29)工具包T OOLS K IT (30)竞赛系列 (31)高地战斗比赛场地 (31)高地战斗竞赛机器人范例......I型. (32)高地战斗竞赛机器人范例......II型.. (32)高地战斗竞赛机器人范例......III型.. (33)大获全胜比赛场地----中间隔墙 (33)大获全胜比赛场地----围板 (34)大获全胜比赛场地----场地纸 (34)大获全胜比赛场地----比赛用球 (35)大获全胜全套比赛场地 (35)大获全胜美国原装进口全套场地 (36)大获全胜场地控制器 (36)大获全胜竞赛机器人范例----Ⅰ型 (37)大获全胜竞赛机器人范例----Ⅱ型 (38)大获全胜竞赛机器人范例----Ⅲ型 (38)大获全胜竞赛机器人范例----Ⅳ型 (39)VEX LCD显示模块VEX LCD D ISPLAY (40)橡皮筋套装R UBBER B AND (40)网布A NTI-SLIP M AT (41)英文版程序套装E ASY C (41)套装系列VEX 机器人基本套装产品编号:产品 说明 含主控制器套装1套、遥控接收套装1套、马达套装3套、伺服器套装1套、碰撞开关套装1套、行程开关套装1套、车轮套装1套、齿轮套1套、五金件套装1套、工具套装1套、扎带1包 特性1. 高端质量、丰富齐全的零部件,为无限创意提供可能。
波士顿波音波瑞 Wave Bluetooth 音乐适配器的用户指南说明书
္၍༟ৃ
此標誌表示本產品不得作為生活垃圾丟棄,必須送至相關回收部門循環利用。適當的處理和回收有助於保護自然資源、 人類健康以及自然環境。想了解更多有關本產品和回收的資訊,請與當地民政部門、處理服務部或購買本產品的商店 聯絡。
ϞאݭϞيሯאʩ९ٙΤ၈ʿϓʱ
ϞאݭϞيሯאʩ९
10 - 繁體中文
ဲᗭર༆
ਪᕚ
ણ݄
藍芽® 裝置播放音樂 時沒有聲音。
• 在藍芽裝置清單中,選取 Bose ৣટ̔(見第 7 頁)。 • 增大音量且取消系統靜音。 • 增大音量且取消您的藍芽裝置靜音。 • 確保音樂應用程式正在運行,並且音量已調大,沒有處於靜音狀態。 • 停止任何其他音訊或視訊流應用程式。 • 重新啟動藍芽裝置。
௪ൗj • 產品標籤位於產品底部。 • 操作溫度範圍:0 到 35ºC。本產品僅適合室內使用。
Bose Corporation 在此聲明本產品嚴格遵守 2014/53/EU 指令和其他適用指令中的基本要求和其他相關規定。符合聲 明全文載於 : /compli O O O O
͛ପ˚ಂj序號中第八位數字表示生產年份;「5」表示 2005 年或 2015 年。 ʕආɹਠjBose 電子(上海)有限公司,中國 ( 上海 ) 自由貿易試驗區,日櫻北路 353 號,9 號廠房 C 部 ᆄݲආɹਠjBose Products B.V., Gorslaan 60, 1441 RG Purmerend, The N etherlands ̨ᝄආɹਠjBose 台灣分公司,台灣 104 台北市民生東路三段 10 號,9F-A1 ©2017 Bose Corporation。未經事先書面許可,不得複製、修改、發行或以其他方式使用本資料的任何部分。
I.C.T在线选择波焊 Soldering 机器介绍说明书
Online Selective Wave Soldering MachineIntroduce:Selective wave soldering is a special form of wave soldering invented to meet the development requirements of through-hole components soldering.It is mainly suitable for the soldering of through-hole components in high-end electronic products.For example:military electronic products,automotive electronics,switching power supply products and other industries which require higher soldering reliability.I.C.T online selective wave soldering is a high performance equipment developed and assembled in China.For higher flexibility or multiwave soldering for high-volume processes.Parallel process due to the separation of fluxing,preheating and soldering,operation of up to two spray heads,up to five lower preheating with upper convection heating,perfect for the connection to assembly stands and periphery,connection to traceability systems for process control.Features:1.PCB plate fixed,spray and soldering platform moving;2.High soldering quality,greatly improve the pass rate of soldering;3.Modular design of SMEMA online transportation,support customers for flexible line formation;4.Full PC control.All parameters can set in PC and saved to PCB menu,like moving path,solder temperature,flux type,solder type,N2 temperature etc,best trace-ability and easy to get repeat soldering quality;5.Auto wave height calibration function,to check&calibrate wave’s height after every certain PCB,so to keep a very good stability of wave;D Mark positioning function,to check PCB’s mark point after every certain PCB;7.Self design motion table with cast aluminum,lighter weight with quick motion speed;8.Panasonic servo motor&driver provide stable,with ball screw&linear guild rail,less noise,stable movement;9.With dust proof plate above motion table,so to avoid flux or solder drop to damage ball screw;10.The jet valve originated in Germany is selected with small flux dot,please note flux solid content should be less than10%;11.Flux is stocked by pressure tank,make sure pressure stable without influenced of amount of flux;12.Electromagnetic pump coil adopts German imported brand to ensure the stability and reliability of the peak;13.Solder pot is made of stainless steel with anti-corrosion coating,not leakage,also Stainless steel can be used according to customer requirements;14.With cast iron heater outside,robust&quick heat up;15.N2online heating system,to wet the soldering perfectly and reduce the solder dross;16.With stainless steel roller for conveyor,not wearable with long term usage.Features1Flux system:Flux Overview1.German high-frequency pulse injection valve to get precious fluxing result with small flux dot,flux solid content should be less than10%.Theflux nozzle jam detection function is optional.2.It is configuration with tray under the jet valve to catch the flux residue for easy maintenance.3.The nozzle is mounted on the XY platform,the accuracy of repetition and positioning can reach0.02mm.4.Flux is stocked by pressure tank,make sure pressure stable without influenced of amount of flux.5.High precision pressure flow meter is used for flow control and corrosion resistant material is used.6.All pneumatic components are made of Japanese SMC brand.7.Flux pressure flow meter and nitrogen flow are placed on the surface of the machine for visual operation.8.The external humanized design is convenient for operation and adjustment.9.SMC brand automatic extraction pump is adopted to ensure stable flux supply. Features2Preheat system:Preheat Overview1.The machine is equipped with bottom IR preheating as standard,and the preheating area can be set;top hot air preheating,infrared heatingConduction is efficient and stable.2.Design structure for maximizing preheating area.3.All round high temperature cotton design to ensure temperature stability.4.Heat-generating and heat-conducting parts and motors adopt top brands.5.Maintenance plug-in design,tool-free maintenance mode.Soldering Overview1.Electromagnetic pump coil adopts Sweden“PRECIMETER”brand to ensure the stability and reliability of the peak.2.Solder temperature,N2temperature,wave height,wave calibration etc all able to set in software.3.Solder pot is made of stainless steel with anti-corrosion coating,not leakage.With cast iron heater outside,robust&quick heat up.4.N2online heating system,to wet the soldering perfectly and reduce the solder dross.5.Best tin spraying stability in the industry.6.Real time visual monitoring and video can be saved and traced for900hours.7.Visual fast programming to improve programming reliability and efficiency.8.XYZ platform is composed of high precision lightweight sports module and high-speed servo motor.9.All servo motor are equipped with reducer to ensure stability.10.Sealed and protected,anti pollution treatment.11.Omron Magnetic sensor,Ensure more accurate movement.13.Cleaning frequency can be adjusted flexibly.ser detection system for soldering wave height.15.German“SICK”non-contact laser sensor is used to ensure measurement accuracy,no pollution and no error measurement.16.Rational Design of Nozzle Cleaning and Measuring Mechanism.Features4Transmission system:Transmission Overview1.Special material profiles ensure stability,and rational design ensures convenience.2.The transmission module is composed of the roller.3.PCBA side clamp and top clamp system can ensure the stability of the board.4.Thickened customized rail,20KG load.5.Independent work control of each area of the transportation system.6.The motor and pneumatic components are all Japanese brands.7.More simple and convenient rational design.8.The transportation buffer zone is set to ensure the smooth operation of PCBA without collision.9.The detailed design of different PCBA design processes shall be carried out to ensure zero error measurement of PCBA.10.Solder parts PCBA clamping mechanism for different PCBA and different fixtures.Features5Control system:Controlbox Overview1.Keyence KV7500PLC+Keyence module high-end bus control system,ensure the stability and extensibility of the system.2.Conform to CE and other standards.3.Underfloor design of Industry4.0.4.Ensure the capacity improvement,add the underlying control of the soldering machine module,and ensure the stability.5.Application of global high-quality stability electrical parts.6.Cat-6network cable,faster communication speed and sensitive response.Operating Overview1.Guided programming mode.D fast programming function.3.Picture programming,make coordinate correction,coordinate intelligent verification.4.Real time data visualization of interface.One button switching of CCD soldering real-time monitoring interface.5.Chinese,English,can be switched.1.Standards and adaptability of MES,WIFI connection,online software upgrade,remote control,intelligent.2.Soldering data can be traced to confirm the process of each soldering point.Other Features:Fan outlet diversion and prevention Motor with a reducer for more stable Computer cooling type holderProtection for all connecting wire Adjustable operating height Additional protection of all access linesPump Comparison:ComparisonElectromagnetic pump Mechanical pumpMade in Sweden Made in ChinaWave stability Wave stabilityMaintenance free Regular maintenance Influence of ambient temperature Mechanical drive,mature technology Repair free,overall replacement,high cost Widely used and low maintenance costNo.Item SS540SS5501ControlsystemPC and PLC.Real time monitoring camera.Controller and control card.1setPC and PLC.Real time monitoring camera.Controller and control card.1set2DrivesystemSpary and soldering in same platform.XYZ axis:high speed motion module for sparyand soldering.The platform is all aluminum cast.1set2axis platform for spray.XY2axis:high speed motion module for spray.XYZ3axis:high speed motion module for soldering.The platform is all aluminum cast.1set3SpraysystemImported fluiding jetting valve.Flux pressure tank.Spray pneumatic control.Nozzle automatic cleaning system.1setImported fluiding jetting valve.Flux pressure tank.Spray pneumatic control.Nozzle automatic cleaning system.1set4HeatingsystemHot air top and bottom IR heater1set Hot air top and bottom IR heater1set5Solderingsystem11kg tin pot,electromagnetic pump drive.Pot over temperature and liquid level alarmdevice.Pot temperature control system.N2independent temperature control system.Five soldering nozzles(inner diameter3mm,4mm,6mm,8mm,10mm)as standard.3axis platform for soldering.3axis:high speed motion module for soldering.3axis:servo motor+retarder&Driver forsoldering.The platform is all aluminum cast.1set11kg tin pot,electromagnetic pump drive.Pot over temperature and liquid level alarm device.Pot temperature control system.N2independent temperature control system.Five soldering nozzles(inner diameter3mm,4mm,6mm,8mm,10mm)as standard.3axis platform for soldering.3axis:high speed motion module for soldering.3axis:servo motor+retarder&Driver for soldering.The platform is all aluminum cast.1set6HandlingsystemRoller transport guide for soldering.PCB blocking device for spray and soldering.PCB side clamping system.1setIndependent step transport system for spraypreheating.PCB blocking device for spray preheating.Independent step transport system for soldering.Roller transport guide for soldering.PCB blocking device for soldering.PCB side clamping system.1set7MESsystemSupport1set Support1setLeading Advantage:No.Item I.C.T Other Brand Comparison1Double solder potdriveDouble Y axis Single Y axisAdvantages of dual Y-axis independent:each tin pot cansoldering any position within the PCB,and it can also beconfigured with different nozzles sizes for PCB soldering,or itcan soldering the panel PCB at the same time.2Soldering wave heightdetectionNon-contact lasersensorContact-type sensorI.C.T's non-contact laser detection has higher precision andmore accurate results.The probes of other companies'Contact-type detection methods are easy to be polluted,affecting the detection accuracy.3Solder nozzle typeidentifyOption N/A Some companies do not have this function.4Soldering nozzleJet-flow status realtime monitoringOption N/A Some companies do not have this function.5Solder wave heightmonitoringOption N/A Some companies do not have this function.6Solder wave cutoffmonitoringOption N/A Some companies do not have this function.7Tin pot liquid levelmonitoringHigh precisionsensorDifferential pressuregaugeTraditional differential pressure sensor has large error,falsealarm and inaccuracy.8Wave solderingstability±0.2mm±1.0mmThe real data±0.2mm measured by KEYENCE's laser sensor,the wave soldering stability of I.C.T is leading in the industry.I.C.T selective wave soldering has a number of leading and mature technology applications.No.Item Brand Original1PLC Keyence Japan2Solder pot PRECIMETER Sweden3Spray Nozzle Jet Valve Germany4Servo motor Panasonic Japan5Servo driver Panasonic Japan6Camera Toshiba/Hikvision Japan7Solder Nozzle Customized Japan8Ball Screw THK/Hiwin Japan/Taiwan 9Sensor OMRON,KEYENCE Japan10Stepper motor Panasonic Japan11Pneumatic Component SMC Japan 12SSR Carlo Switzerland 13Boxrelay ABB/Schneider Switzerland14Contactor ABB/SchneiderSwitzerland 15ACcontactor ABB/Schneider Switzerland 16Sensor Keyence/Sick Japan/Germany 17Fiber sensorKeyence/Sick Japan/Germany 18Magnetic components SMC Japan 19Switch MW Taiwan 20BearingNSKJapan 21Other Electrical Component IDEC,Mitsubishi,Fuji Japan 22Heating TubeSAKAGUCHIJapanModelSS540SS550SS550P1SS550P2PhotoOn-line Modular Spray +Preheating &SolderingSpray +Preheating +SolderingSpray +Preheating +Soldering1+Soldering 2Spray +Preheating +Soldering 1+Soldering 2+Soldering 3Soldering System Nozzle Quantity 1123Solder Pot Quantity 1set 1set 2set 3set Double Pot (Option)N/A Option Option Option Solder Pot Power 2.35kw2.35kw4.70kw7.05kwSolder Capacity 11KgSolder PotStainless steel +Japan SURF high temperature resistant and corrosion resistant processNozzle Inner Diameter Φ3-30mm (Customization Special dimensions)Wave Height 3~5mm Soldering Precision ±0.25mmSolder Pot Drive Single Pot:XYZ independent driveDual Pot:Dual Y axis,dual Z axis independent drive,synchronous or asynchronous action.(Option)Dual Pot Clearance Min:110mm~300mm (Only for dual soldering pot)Solder Pot Liquid Level DetectionHigh precision sensorSoldering Wave Height DetectionLaser sensorSolder Pot Z Axis Move50~100mm/sSpeedSoldering Monitoring CCDWave Control Electromagnetic pump(Sweden)Solder Pot Temperature Room Temperature~300℃Heating Control PID+SSRTemperature Accuracy±1℃Warm-up Time<60min(setting300℃)Flux SystemFlux Storage Tank1L1L2L2LFlux Support Flux Alarm,AutomaticSpray Nozzle Germany Jet Valve(Spot and line spraying)1setSpray Nozzle Size130um(180um,210um Option)Spray Range3~8mmSpray Speed0~20mm/sSpray Nozzle Move0~400mm/sSpeedSpray Precision0.1mmSpray Pressure0.05~0.1MPaSpray Flow Control Electronic Flow Meter1setFlux Tank Pressure tankAlcohol Tank Pressure tankPreheating SystemPreheating Mode Hot air and IR Hot air and IR Hot air and IR Hot air and IR Preheating Area L500*W500mm L500*W500mm L500*W500mm L500*W500mm Preheating Zone Top hot air:2,Bottom IR:1Top hot air:2,Bottom IR:1Top hot air:2,Bottom IR:1Top hot air:2,Bottom IR:1Bottom PreheatingMax.12kwPowerTop Preheating Power Max.6kw Max.6kw Max.6kw Max.6kw Preheating Temp.Room Temperature~250℃Warm-up Time Approx.15min(setting150℃)Control Mode PC+PLCTransport SystemPCB Size(with fixture)120*60~500*500mmPCB Replacement OnlineComponents Lead≥0.5mmPin PitchComponents and Pad≥1.5mmClearancePCB Top Clearance120mm PCB Bottom Clearance60mm PCB Weight<15KG PCB Thickness0.5-6.0mm Clearance fromPCB Edge4mm Transport Height900±20mm Transport Direction L to R(R to L) Transport Width60~500mm Width Adjustment AutoTransport Mode Roller,segmentedtransportationRoller,segmentedtransportationRoller,segmentedtransportationRoller,segmentedtransportationSoftware SystemOperating System Windows10Language Chinese,English can be switched. Programming Mode CCD fast online program.Offline program,Picture program. Program Import CCD shooting,Picture importFacilityN2Purity Purity of N2:99.999%,25L/min,Outer diameterΦ6mm N2Pressure0.5~1.0MPaN2Pressure Monitoring Low pressure automatic alarmN2Consumption(1.5m³/h~2m³/h)/PotAir Pressure4~6Kg/cm²Air Pressure Monitoring Low pressure automatic alarmAir Source Flow8~12L/minCompressed AirConsumption≤0.014m³/hPower Supply 3P5W,380V AC±10%,50/60HZ3P5W,380V AC±10%,50/60HZ3P5W,380V AC±10%,50/60HZ3P5W,380V AC±10%,50/60HZPower52A,21Kw52A,21Kw52A,43Kw52A,43Kw Operate Power5-8Kw7-10Kw10-12Kw10-12Kw Exhaust Volume700m³/hExhaust Pipe DiameterΦ190mm*2Dimension L1850*W1850*H1480mmL2560*W1750*H1480mm L2560*W1950*H1480mm L2600*W1950*H1480mmWeight Approx:800kg Approx:1200kg Approx:1300kg Approx:1500kgNo.Item Spec.1Flux spray clogging monitoring Real-time monitoring of spraying clogging 2Tin furnace liquid level detection High-precision sensor liquid level detection 3Automatic tinning device TinΦ2mm,Max.4kg4Wave height detection KEYENCE laser imaging wave height sensor,digital monitoring of wave height.5Real-time monitoring of nozzle jet flow status.Nozzle spray height monitoring,flow monitoring.6Barcode scanner/7Wave control Mechanical pump8Nozzle model identification Soldering nozzle type auto identifyStandard Accessories:No.Item Quantity1Soldering nozzle3/61pcs2Soldering nozzle4/81pcs3Soldering nozzle6/101pcs4Soldering nozzle8/121pcs5Soldering nozzle10/141pcs6Nozzle cleaning fluid,NC02H-0111pcs7Nozzle cleaning powder,NC02H-0211pcs8Manual1book9Tool Case1set*Attachments may change with product upgrade.If different,please follow the new list.Recommend Spare Parts:No.Item Brand Quantity Usually replacement cycle 1Nitrogen seal top I.C.T1pcs6months2Nitrogen seal bottom I.C.T1pcs6months3Drainage tube I.C.T1pcs1year4Flux filter I.C.T1pcs6months5Flux nozzle I.C.T1pcs N/A6Soldering nozzle I.C.T1pcs1monthSS540Customers: Country Product1Japan Toyota&Honda,etc Automotive Electronics2Japan Toyota,etc Japanese Automotive Electronics3Italy&Japan Automotive Electronics4Japan Automotive Electronics5Japan Medical Equipment6Japan Camera Equipment*I.C.T keeps working on quality and performance,specifications and appearance may be updated without particular notice.YouTube Video Link:https://youtu.be/eQKYI6P4r60https://youtu.be/VgzNyreLSE4Thanks for choosing I.C.T.I.C.T looks forward to win-win cooperation.Thank you.。
波士顿Wave音响系统和波士顿波浪波II音频系统的Wave SoundLink适配器商品说明书
Owner’s guideiiSafety InformationPlease read this owner’s guidePlease take the time to follow the instructions in this owner’s guide carefully. It will help you set up and operate your system properly and enjoy all of its advanced features. Please save this owner’s guide for future reference.To reduce the risk of fire or electrical shock, do not expose the product to rainmoisture.Do not expose this apparatus to dripping or splashing,the apparatus. As with any electronic products, use care not to spill liquids into any part of the system. Liquids can cause a failure and/ora fire hazard.iiiThe lightning flash with arrowhead symbol within an equilateral triangle alerts the user to the presence of uninsulated dangerous voltage within the system enclosure that may be of sufficient magnitude to constitute a risk of electrical shock.The exclamation point within an equilateral triangle, as marked on the system, is intended to alert the user to the presence of important operating and maintenance instructions in this owner’s guide.product warranty.WARNING: K eep the remote control battery away from children. It may cause a fire or chemical burn if mishandled. Do not recharge, disassemble, heat above 100ºC (212ºF), or incinerate. Dispose of used batteries promptly. Replace only with a battery of the correct type and model number.WARNING: Danger of explosion if battery is incorrectly replaced. Replace only with Duracell, Eveready, Energizer, Maxell, Toshiba, or Shun Wo CR2032 or DL2032 3-volt lithium battery.following any local regulations. not incinerate.ivDo not place any naked flame sources, such as lighted candles, on or nearapparatus.Contains small parts which may be a choking hazard. Not suitable for children under Note: The product label is located on the bottom of the product.Note:Where the mains plug or appliance coupler is used as the disconnect device, such disconnect device shall remain readily operable.Note: Operating temperature range: 0 to 35°C.This product is intended for indoor use only.Note: This product is intended for use only with the power supply provided.This product conforms to all EU Directive requirements as applicable by law.The complete Declaration of Conformity can be found at:/static/compliance/index.html.This product complies with the Canadian ICES-003 Class B and RSS-210 specifications.In the U.S. only, this product complies with CFR 47 Part 15 specifications.Additional safety information: See the additional instructions on the Important Safety Instructions sheet (North America only) enclosed in the shipping carton.ContentsProduct parts . . . . . . . . . . . . . . . . . . . . . . . . . . . . . . . . . . . . . . . . . . . . . . . . . . . . . . . . . . . . . . 2A. Using a kit with basic contents only . . . . . . . . . . . . . . . . . . . . . . . . . . . . . . . . . . . . . . . . 2B. Using a kit with both basic and upgrade contents . . . . . . . . . . . . . . . . . . . . . . . . . . . . . 2 Upgrading your Wave® music system, as needed . . . . . . . . . . . . . . . . . . . . . . . . . . . . . . . . . . 3 Preparing your Wave® music system or Wave® radio II for wireless . . . . . . . . . . . . . . . . . . . . . 4 If your kit includes an adapter power pack . . . . . . . . . . . . . . . . . . . . . . . . . . . . . . . . . . . . . 5 Preparing your computer . . . . . . . . . . . . . . . . . . . . . . . . . . . . . . . . . . . . . . . . . . . . . . . . . . . . . 6 To disconnect your Wave® music system from the computer . . . . . . . . . . . . . . . . . . . . . . . 8 To reconnect to your Wave® system . . . . . . . . . . . . . . . . . . . . . . . . . . . . . . . . . . . . . . . . . . 8 Listening to music on your computer . . . . . . . . . . . . . . . . . . . . . . . . . . . . . . . . . . . . . . . . . . . . 9 Troubleshooting . . . . . . . . . . . . . . . . . . . . . . . . . . . . . . . . . . . . . . . . . . . . . . . . . . . . . . . . . . . . 10 Manually linking the SoundLink TM adapter and USB key . . . . . . . . . . . . . . . . . . . . . . . . . . . . . 15 Customer service . . . . . . . . . . . . . . . . . . . . . . . . . . . . . . . . . . . . . . . . . . . . . . . . . . . . . . . . . . . 15 Limited warranty . . . . . . . . . . . . . . . . . . . . . . . . . . . . . . . . . . . . . . . . . . . . . . . . . . . . . . . . . . . . 16 Technical information . . . . . . . . . . . . . . . . . . . . . . . . . . . . . . . . . . . . . . . . . . . . . . . . . . . . . . . . 17vProduct partsThere are two versions of the SoundLink TM kit. Which version you chose for your specific Wave®system determines which steps you follow in making the connections.Identify your kit as A. or B. and follow the instructions that apply.A. Using a kit with basic contents onlyIf you have only the basic contents kit directly below:Skip ahead to “Preparing your Wave® music system or Wave® radio II for wireless” on page4.B. Using a kit with both basic and upgrade contentsIf you have all of the contents shown below: 1.Begin with “Upgrading your Wave® musicsystem, as needed” on page3.2.Proceed with “Preparing your Wave® musicsystem or Wave® radio II for wireless” onpage4.2Upgrading your Wave® music system, as neededIf your kit includes an upgrade CD, it is important to use the CD before making any SoundLink TM kit connections.Follow this procedure:1.Make sure your Wave® music system is plugged in and ready to use.For detailed instructions,refer to the Bose® owner’s guide that came with the system.2.Insert the update CD, label side up, into the disc drive on the system.UPDATING appears on the Wave® systemWhen the update is complete, the system ejects the disc. Your system is now compatible with the SoundLink adapter.3If the adapter is to the left of the system (as you face it), be sure the two are at least2in.(5cm) apart to eliminate any interference with AM reception.45If your kit includes an adapter power packincludes a the power supply.SOUNDLINK POWER CABLE UNPLUGGED scrolls across the Wave ® system display if the required power pack is not connectedwhen you press the SoundLink/CD button.CONNECTING appears on the Wave® system display and lights on the USB key and Sound-Link adapter flash rapidly. The lights stop blinking and the Wave® system emits a brief beep when the SoundLink connection is ready for use.5.For best performance, set your computer volume control to the maximum level you use.Then open a music application or locate an Internet radio station and set the music to play. Important for Mac computer users:On first using the USB key, you may need to open your computer Sounds settings in System Preferences and select “Bose SoundLink Audio.”Note: While listening to music from your computer, no sound plays through the computer’s internal speakers or sound card. On some computers, you can choose a separate audio output for your music and still hear computer alerts on its internal speakers.When you plug the SoundLink USB key into the USB port on your computer, it should automatically reconnect to your Wave® system. Make sure your system is turned on and COMPUTER appears on the system display.If you have problems connecting, see “Troubleshooting” on page11.Listening to music on your computerYour SoundLink TM kit remote control gives you access to the music on your computer.It works much like the original Wave ® music system remote and controls all of the system features.The buttons that operate with your computer include:Press: Selects the audio from your computer or an AUX device. (if one is connected to the system).Press again: Switches between your computer and the AUX device.Begins music track play.Pauses a playing track.••Mute••••*May not work with Internet radio and some music applications.Note for Wave ® radio II owners: The new remote provides all of the buttons needed to operate the Wave ®radio II, plus some that work solely with the Wave ® music system.TroubleshootingComputer does not recognize the SoundLink TM USB key (in its list of connected devices).•Remove the SoundLink TM USB key from your computer, wait 30 seconds, and insert it again.•If you are using a USB hub, make sure the hub is powered.•T ry a different USB port. If you are using a powered USB hub, try moving the SoundLink USB key to a USB port on the computer.•Remove the SoundLink USB key, restart your computer, and insert the USB key again.•Refer to the owner’s guide, help system, or technical support for your computer to learn how to detect and install new hardware.Computer and Wave®system do not connect.Symptom A: SOUNDLINK or COMPUTER never appear on the Wave® system display and no lights blink.Or see Symptom B on the next page.•Press the SoundLink/AUX button to turn on the system and select the computer.•Make sure the SoundLink TM adapter is connected to the Wave® system.•Unplug the Wave® music system for 30 seconds and plug it back in.•If you received an upgrade CD with your kit and have not used it, be sure to run it now.•If this does not resolve the problem, contact Bose Customer Service. Refer to the address list included in the carton.Computer and Wave®system do not connect.Symptom B: CONNECTING remains on the Wave® system display and the adapter light blinks continuously.)– NO SIGNAL – appears eventually on the system display.Or, see Symptom A on the previous page.•Make sure the USB key is plugged in and your computer is turned on.•Decrease the distance between the Acoustic Wave® system and your computer.See “Connection range” on page17.•T ry moving the Wave® system away from possible sources of interference such as another wireless device, a microwave oven, or wireless computer network router.•If you are using a desktop computer, try moving the USB key to a port that provides a more direct path to the adapter. Or use a USB extension cable, available for purchase at computer stores.•Remove the USB key from your computer, wait 30 seconds and insert it again.•Disconnect the power supply from the Wave® system and reconnect it.•T ry restoring the wireless link between the speaker and the USB key. See “Manually linking the SoundLink TM adapter and USB key” on page15.No sound when the computer music plays.•Press the SoundLink/AUX button on the SoundLink TM remote to select your computer as the source. COMPUTER should be displayed.•Make sure your Wave® system volume is turned up and the sound is not muted.•Make sure the volume on your computer is turned up and is not muted.•Make sure your music application is running, the volume is turned up and not muted.•Check your computer Sound settings to make sure “Bose SoundLink Audio” is selected as the audio output device.•Close or quit the music application on your computer and restart it.•Restart your computer.Reception of sound from the computer is poor or the sound is dropping out.•Move the SoundLink TM adapter farther from the Wave® system.•Change the angle of the antenna on the SoundLink USB key.•Decrease the distance between the Acoustic Wave® system and your computer.See “Connection range” on page17.•T ry moving the Acoustic Wave® system away from possible sources of interference such as another wireless device, a microwave oven, orwireless computer network router.•Use a USB extension cable, available for purchase at computer stores.Plug the USB key into the appropriate end of the cable and the computer into the other end.•Close other applications that can tax your computer memory.•If you continue to experience reception problems, contact Bose Customer Service. Refer to the address list included in the carton.Play/Pause and Seek buttons do not control music on the computer. •Make sure your computer media player or Internet radio application is selected as the active window.Note: Not all players and Internet radio services support this form of playback control.TMFor additional help in solving problems, see notes about the product at: . To contact Bose Customer Service for help, or to replace a lost remote control, see the phonenumbers on the inside the back cover of your Wave® music system guide.Limited warrantyYour Bose® SoundLink TM kit is covered by a limited transferable warranty. Details of the limited warranty are provided on the product registration card that is included in the carton. Please complete the information section on the card and mail it to Bose. Failure to do so will not affect your limited warranty rights.What you must do to obtain Limited Warranty Service:Return product, with proof of purchase from an authorized Bose® dealer, using the following procedures:1.Contact the Bose organization in your country/region (visit for Bosecontact information in your country/region) for specific return and shipping instructions;bel and ship the product, freight prepaid, to the address provided by the Boseorganization in your country; and3.Place any necessary return authorization number prominently on the outside of the carton.Cartons not bearing a return authorization number, where required, will be refused.Technical informationAdapter power rating120V 50/60Hz with 5V output at 500mAConnection rangeWireless capability spans the area of most homes. The range varies with the presence of other wireless devices such as network routers or microwave ovens) and signal obstructions (multiple walls, metal appliance, etc.DimensionsSoundLink adapter: 3.6" H x 2.6" D x 1" W (9.1 cm H x 7.6 cm D x2.3 cm W)WeightSoundLink adapter: 0.33 lb(150 grams +/-10 grams)Computer requirementsCompatible with computers running Windows XP or Vista systems or MAC OSX (10.4 or later).Requires use of a USB port on a computer or a powered USB hub connected to the com-puter.Bose® system requirementExclusive use of the Bose link connector on the rear of the Wave® system.Bluetooth® QD IDSoundLink USB key: B015403SoundLink Adapter: TO COME ON 6/22The Bluetooth® word mark and logos are registered trademarks owned by Bluetooth SIG, Inc. and any use of such marks by Bose Corporation are under license.17。
- 1、下载文档前请自行甄别文档内容的完整性,平台不提供额外的编辑、内容补充、找答案等附加服务。
- 2、"仅部分预览"的文档,不可在线预览部分如存在完整性等问题,可反馈申请退款(可完整预览的文档不适用该条件!)。
- 3、如文档侵犯您的权益,请联系客服反馈,我们会尽快为您处理(人工客服工作时间:9:00-18:30)。
Portable Pure Sine Wave InverterUser’s ManualThank you to choose our pure sine wave inverters and hope our service and products could satisfy you all along.Characteristic of productsT his model of pure sine wave inverters is a multifunctional convertible power supply adopting up to date converting technology. It adopts the most advanced control technology of SPWM, and it has a lot of characteristics such as: precise control, isolation of input and output, security, efficiency, good reliability. They can convert 12V DC current from batteries to 220V pure sine wave AC current, which specially can supply electricity power to families, marketplace and so on. They are also applied for cars, ships and camping widely. They have the function of perfect intellectualized protection. they are researched and developed by ourselves with many highly technologies and intellectualized electrical components, which could simplify the fussy control and protection made by apart components and improve the reliability of inverters as well as make the operation more convenient. This mode of inverters is fairly applicable in family, wind power supply, solar power, trains, cars, communication and so on. The degree of wave shape distortion is much better than our imagination.Technical DataUsing condition:0.1 The temperature of environment: -10℃—+45℃0.2 No electric and explosive dust and no metal corrosive or insulating gas. 0.3 Keep the power supply dry, ventilated and without any sundries, especially no combustible goods within one meter in order to cause fire.The indication of state: When it work normally, the green LED lights. When it is in the state of over voltage or low voltage, it gives an alarm or closes the output (it can resume automatically). When it is in the state of thermal, the red LED lights and closes the output. When it is in the state of overload, the red LED lights and closes the outputProtection Function1. The protection of overload: When many loads are connected to the inverter and the total power exceed 125% than the permitted loading power, the inverter will stop working automatically within 20 seconds. At the same time the red LED will get light, the inverter is in the state of protection. Until you reduce the load and restart the inverter, it will work normally.2. The protection of short circuit: Same as the protection of overload.3. The protection of thermal: Due to many loads, long working time or bad ventilation the temperature inside the inverter will be increased. When it is over 80℃, the red LED will get light and the inverter will stop working in the state of protection. Suggest you to reduce the loads, and improve the ventilation environment, then restart the inverter after the temperature fall to below 80℃.4. The protection of low voltage: when the voltage of the battery de-escalates till the point of closing, the red LED light goes on and the inverter will stop working. Inverter will come to work till charging voltage of battery goes up to restore point.5. The protection of over voltage: When the input voltage over the safety voltage battery voltage, output will be cut off and the inverter stops working. As the input voltage turn to normal, the inverter will start to work automatically.6. The protection of conversed connection: If the connection were conversed, the fuse will be burned. The inverter will work normally until you replace the burned fuse with new fuse. Although our inverter has the protection of conversed connection, users can not make the connection conversed on purpose because it is possible to cause bad effects on person or the equipment.System InstallationBefore you install and use inverters, please read th e safe notices in this user’s manual. After you understand the content, you could install the inverters to prevent the danger. Please install the inverters as follows:1. Inverter can convert the 12V or 24V DC voltage from battery to the 220V AC voltage. Please make the switch of inverter at “OFF” before connection.2. Connect the red wire of the inverter to the “+” pole of the battery, and black wire to the “-“pole of the battery. Don’t connect them conversely. Otherwise the fuse of the inverters will be burned.3. Open the switch of the inverter, and then the green LED gets light which means the inverter work normally.4. Connect the wires of appliances to the 220V output of the inverter, then the inverter could work normally. If the total power of the appliances exceeds the rated power of the inverter, the inverter will stop output. At the same time the red LED will get light and give an alarm, which means inverter is in the state of protection. You should reduce appliances and restart inverter. If inverter always give an alarm, that means the battery is in the state of low voltage and should be charged.5. For TV or other appliances which are difficult to be started you could open their switches firstly, then connect them to the outlet of the inverters and then open the switch of the inverter.NoticeAlthough the inverter is designed specially considering the safe protection functions, it will also cause dangers if it isn’t used properly.1. Please note not to connect the poles of inverter and battery conversely. Otherwise the fuse of the inverter will burn off2. Please check if the voltage of inverter is 12V and prevent to connect to 24V or 36V. And please check if the connections of input or output are correct in order to prevent the damage of inverter due to the wrong input or wrong connections.3. You should use the inverter<125W for car’s cigarette adaptor. If the inverter is >125W, please make new cables between the car’s cigarette adaptor and battery instead which can load the relevant big current and use relevant fuses.4. Don’t replace the cables of the inverter with long ones.5. Please close the switch of the inverter and disconnect the connections in order to reduce the wastage of unloading.6. Don’t put any object or liquid inside the box of the inverter. Don’t touch the inverter when your hands are wet. Don’t allow children or other person without incompetence to use the inverter. Don’t use the inverters in the environment with humidity, many dusts and high temperature or with the biggest temperature difference. Don’t use the inverter in the combustible environment, such as the room full of car batteries.7. Keep radiators on the both sides of inverters ventilated. Don’t use the inverter near to immersion heater or warmin g machines. Don’t put any heavy object on the inverter. And prevent the irradiation directly from the sun.8. This inverter is independent power supply, so it can not be used together with other power supply in parallel. Don’t connect the AC power grid t o the AC output socket.9. Please don’t make the inverter affected with damp or rain to prevent it from the damage.10. Don’t repair the inverter by yourselves. Person will be tip-and-run or meet other dangers if they open the outer box.Trouble DisposalIf inverter can not work normally and have no output, please check it step by step. The problems are possibly as follows:Reason1, use too many appliances or loads. Solution: Reduce appliances and make sure the total power of appliances should be smaller than the rated power of the inverter.Reason 2, the inverter is too hot and in the state of thermal. Solution: Restart the inverter in 15 minutes after it is cool.Reason 3, fuses are burned off. Solution: Replace same model of fuses. Reason 4, the cable connections are not firm. Solution: Please check and make sure the connections are firm.Reason 5, the voltage of the battery is low. Solution: Charge the battery. Reason 6, the battery is too old. Solution: Replace the battery.The product standard mentioned in the user’s manual is only for reference. The content will be amended and will not be notified specially.Power supply and inverter selection1. Selection of Power Supply:The battery or Constant Voltage DC Power Supply must be fit for the inverter, the voltage should be within the rated input voltage of inverter and the current should be enough for working current of the inverter.(Not less than the rated input current of the inverter)For example, a 400w/12v inverter should use the Power Supply which the output current is more than 35A. If the converter uses Constant Voltage DC Power Supply, then the degree of the stabilization should be ≦1%,the output voltage ripple should be <10mV.If the inverter uses storage battery, please choose the lighting battery(deep cycle lead acid battery).Because it can discharge with the capacity less than 50% and the working time is longer.The using time of the battery could be calculated by this formula:Using time = ( the capacity of battery Ah X the input voltage of inverter)/ the load of the inverter or the total power of appliances.2. Selection of InverterGenerally electrical products are all labeled rated power, rated current and so on. As the loads, their power summation should be lower than the power of the inverter. Some inductive loads such as fridge, TV and motors, theypossibly need start power several folds bigger than their rated power.Here please turn off the inverter and restart again. If the loading can not startup after repeat several times, you should replace bigger power inverter instead.The power of the inverter could be calculated through below formula:Power of inverter is equal to the total of load power. For example, you need to use a laptop (100w),a lamp(60w) and a 29inch TV(150w) at the same time, the total power is 310w.Here you should use an inverter the continuous output power is 400w.In deed others may be deduced by analogy. But if it is inductive load such as fridge and TV, the power of inverter should be 1.5 to 2 times bigger than the load power.Suggestion:If you use on-board (or automobile) power supply, for example the load reach to 300w and continuous working more than 45minutes, we suggest don’t stop the engine. Otherwise the power from the battery will be used up because of the different storage batteries (car or ship) have different performance. It is very hard to control the point of over discharge, and then the car (or ship) will not start up next time and bring more inconvenience.After service1. The product is guaranteed to keep in good free repair for one year and are serve all the life.2. This guarantee is not valid as the following damages happen. Contingency, don’t use the product according to the manual, improper use, neglect, face-lifting, reparation, improper installation, improper test and so on.Accessories along with the inverter1. a piece of pure Sine Wave Inverter2. A pair of power supply cables3. A book of user’s manual4.auto Fuse (30A/40A)。