Ubuntu 远程桌面共享 与共享win磁盘
ubuntu 访问 windows 共享很简单

ubuntu 访问 windows 共享很简单:打开 nautilus,CTRL+L,在地址栏输入 smb://192.168.100.x 即可。
windows 访问 ubuntu 共享文件夹方法如下:ubuntu 中右键共享文件夹,设置 SMB 共享,设置名称和允许浏览文件夹。
在windows 中访问 \xxx.xxx.xxx.xxx 会提示输入用户名和密码。
在 ubuntu 中sudo gedit /etc/samba/smbusers建立文件,输入下面内容system_username = “ABC”保存退出。
运行sudo smbpasswd -a username设置密码。
用以上的用户名和密码访\xxx.xxx.xxx.xxx问即可。
一步一学Linux与Windows 共享文件Samba(v0.2b)作者:北南南北,正在增加中... ... 需要您的参与;来自:简介:本文只是讲一讲我们最常用的Linux与Windows共享文件,主要是为新手指一指路。
如何建立最简单的Samba服务器,并讲述遇到问题应该从何处寻找解决方案;正在更新之中,希望您的参加 ... ... 谢谢;目录0、架设Samba 服务器的前提;0.1 查看文件内容和编辑文件的工具;0.2 关于文件和目录相关;03 用户和用户组相关;04 进程管理;1 Samba 简介2 Samba 功能和应用范围3 Samba 两个服务器相关启动程序、客户端及服务器配置文件等;3.1 Samba 有两个服务器,一个是smbd,另一个是nmbd;3.2 查看Samba 服务器的端口及防火墙;3.3 查看Samba 服务器的配置文件;3.4 Samba 在Linux 中的一些工具(服务器端和客户端);3.5 在Linux 中的常用工具,Windows查看Linux共享的方法;3.5.1 在Linux系统中查看网络中Windows共享文件及Linux中的Samba共享文件;3.5.2 在Windows中访问Linux Samba服务器共享文件的办法;3.5.3 smbfs文件系统的挂载;4 由最简单的一个例子说起,匿名用户可读可写的实现;第一步:更改smb.conf第二步:建立相应目录并授权;第三步:启动smbd和nmbd服务器;第四步:查看smbd进程,确认Samba 服务器是否运行起来了;第五步:访问Samba 服务器的共享;5、复杂一点的用户共享模型(适合10人左右的小型企业);5.1 共享权限设计实现的功能;5.2 在服务器上创建相应的目录;5.3 添加用户用户组,设置相应目录家目录的权限;5.3.1 添加用户组;5.3.2 添加用户;5.3.3 添加samba用户,并设置密码;5.3.4 配置相关目录的权限和归属;5.4 修改Samba配置文件;5.5 关于客户端访问;5.5.1 Windows客户端访问;++++++++++++++++++++++++++++++++++++++++++++++++正文++++++++++++++++++++++++++++++++++++++++++++++++0、架设Samba 服务器的前提;Linux是一个多用户的操作系统,对任何服务器的架设与都用户、用户组及权限相关,这是操作的基础。
VMware中ubuntu虚拟机与windows的端口映射共享一个IP地址的设置教程(图文教程)
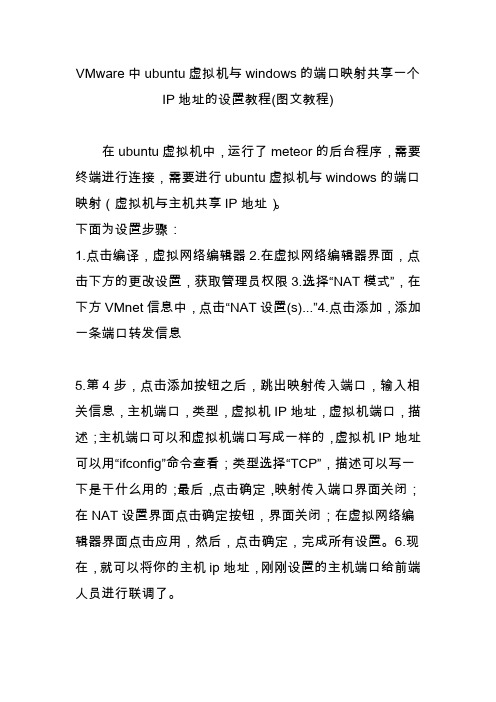
VMware中ubuntu虚拟机与windows的端口映射共享一个
IP地址的设置教程(图文教程)
在ubuntu虚拟机中,运行了meteor的后台程序,需要终端进行连接,需要进行ubuntu虚拟机与windows的端口映射(虚拟机与主机共享IP地址)。
下面为设置步骤:
1.点击编译,虚拟网络编辑器
2.在虚拟网络编辑器界面,点击下方的更改设置,获取管理员权限
3.选择“NAT模式”,在下方VMnet信息中,点击“NAT设置(s)...”
4.点击添加,添加一条端口转发信息
5.第4步,点击添加按钮之后,跳出映射传入端口,输入相关信息,主机端口,类型,虚拟机IP地址,虚拟机端口,描述;主机端口可以和虚拟机端口写成一样的,虚拟机IP地址可以用“ifconfig”命令查看;类型选择“TCP”,描述可以写一下是干什么用的;最后,点击确定,映射传入端口界面关闭;在NAT设置界面点击确定按钮,界面关闭;在虚拟网络编辑器界面点击应用,然后,点击确定,完成所有设置。
6.现在,就可以将你的主机ip地址,刚刚设置的主机端口给前端人员进行联调了。
ubuntu12.04加入windows域中访问共享和远程桌面连接方法
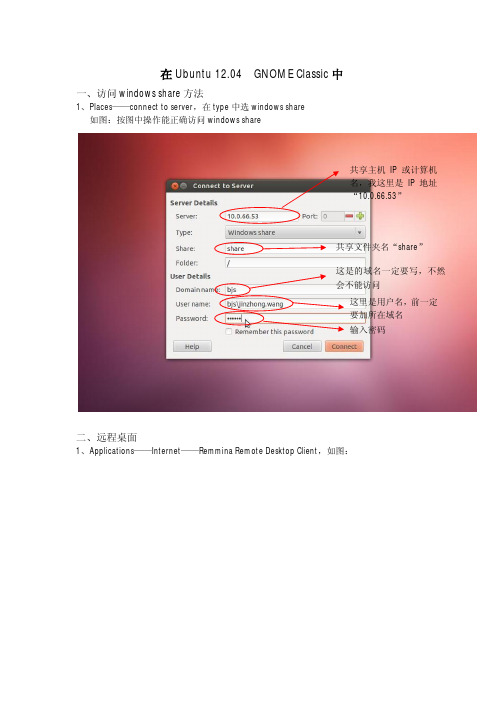
在Ubuntu 12.04 GNOME Classic中一、访问windows share方法1、Places——connect to server,在type中选windows share如图:按图中操作能正确访问windows share共享主机IP或计算机名,我这里是IP地址“10.0.66.53”共享文件夹名“share”这是的域名一定要写,不然会不能访问这里是用户名,前一定要加所在域名输入密码二、远程桌面1、Applications——Internet——Remmina Remote Desktop Client,如图:2、点击添加,如图:默认选择默认选择服务器地址用户名,注:用户名前要加入域名注:一定要添入所在域选择True color(32 bpp)3、点击Connect连接在Ubuntu12.04 Ubuntu模式中一、访问windows share方法1、选Dash Home——输入“\\10.0.64.17”共享IP或主机名,如图:2、输入地址后按Enter 键,如图二、远程桌面1、选Dash Home ——输入remmina 如图输入密码,自己域帐户密码,Connect 连接选择Remmina Remote DesktopClient2、选择Remmina Remote Desktop Client,如图:2、点击添加,如图:默认选择默认选择服务器地址用户名,注:用户名前要加入域名注:一定要添入所在域选择True color(32 bpp)3、点击Connect连接。
如何在Ubuntu上设置网络共享?

如何在Ubuntu上设置网络共享?在日常的计算机使用中,网络共享是一项非常实用的功能。
它可以让我们在多台设备之间方便地共享文件和资源,提高工作效率和便利性。
对于使用 Ubuntu 操作系统的用户来说,了解如何设置网络共享是很有必要的。
下面,我将为您详细介绍在 Ubuntu 上设置网络共享的步骤和方法。
首先,我们需要确保 Ubuntu 系统已经连接到网络。
您可以通过查看系统右上角的网络图标来确认网络连接状态。
如果显示已连接,那么就可以开始进行网络共享的设置了。
接下来,我们需要安装一些必要的软件包。
打开终端(可以通过快捷键 Ctrl + Alt + T 打开),输入以下命令来安装 Samba 服务:```sudo aptget install samba```安装过程中可能会提示您输入密码,输入您的用户密码即可。
安装完成后,我们需要对 Samba 进行配置。
打开 Samba 的配置文件,输入以下命令:```sudo nano /etc/samba/smbconf```在打开的配置文件中,您需要找到以下几行内容并进行相应的修改:```globalworkgroup = WORKGROUPsecurity = userhomescomment = Home Directoriesbrowseable = yesprinterscomment = All Printersbrowseable = nopath =/var/spool/sambaprintable = yes```将“WORKGROUP”修改为您所在的工作组名称(如果您不确定,可以保持默认)。
然后,我们需要添加一个共享目录的配置。
假设我们要共享“/home/_____/shared_folder”这个目录,您可以在配置文件的末尾添加以下内容:```shared_foldercomment = Shared Folderpath =/home/_____/shared_folderbrowseable = yeswritable = yesguest ok = yes```请将“_____”替换为您的用户名。
ubuntu与windows共享文件夹

ZT ubuntu 安装smb共享文件夹已有29 次阅读2010-5-7 22:02一、安装smb执行命令行:#sudo apt-get install samba#sudo apt-get install smbfs二、添加准备共享的文件夹。
有如下三种配置共享文件夹的方法,任选一种方法即可:1、在ubuntu中使用图形界面的共享功能按Alt+F2或打开终端,把执行运行程序界面叫出來。
输入如下命令:shares-admin2、以图形界面管理SAMBA服务(system-config-samba)你也可以使用简单的图形化管理界面來管理一些常用的功能,可以在终端运行如下命令来安装图形界面的管理程序。
sudo apt-get install system-config-samba安裝完成以后,就可以利用系統-->系统管理-->samba,来启动图形界面的samba管理功能。
3、使用快速积易、图形界面共享工具(nautilus-share)无需修改任何设定,任何人都可以通过此工具快速简易共享自家目录下的文件夾,在ubuntu9.10中已经默认安装,如还没安装此工具可在终端运行如下命令安装。
sudo apt-get install nautilus-share使用方法,进入自家目录,你可以在要共享的文件夹上右健,选择“共享选项”,在弹出的窗口勾选“共享此目录”。
如果出现执行子进程“testparm”失败(没有该文件或目录)的提示,这个时候你再执行下面的安装命令就行了。
sudo apt-get install samba-common-bin三、windows下匿名访问Ubuntu共享文件使用samba不进行任何设置时,winXP机器可以连接到Ubuntu机器但提示输入用户名密码,此时不论输入什么都不能访问,要实现匿名访问需要做如下设置:1) 修改配置文件smb.conf:sudo nano /etc/samba/smb.conf搜索"security = user"并改为"security = share",再把这一行前面的注释符"#"去掉。
Ubuntu和windows系统的文件共享
Ubuntu和windows进行文件共享方式一通过samba服务共享设置打开终端依次输入命令安装Sudo apt-get install sambaSudo apt-get install smbfsUbuntu 下文件的共享1配置samba服务的方式共享打开终端输入一下修改smb.conf文件#Share Test[share]comment = Linux Sharepath = /forlinxpublic = yeswriteable = nobrowseable = yesguest ok = yes修改完成以后重新启动服务sudo /etc/init.d/smbd restart启动成功后提示smbd start/running, process 3527查看本机的ip地址ifconfigeth0 Link encap:以太网硬件地址 00:0c:29:bb:27:4dinet 地址:192.168.218.138 广播:192.168.218.255 掩码:255.255.255.0 inet6 地址: fe80::20c:29ff:febb:274d/64 Scope:Link通过ifconfig命令我们看到我的ip地址是192.168.218.138在wondows中输入就可以打开共享了方式二- 通过vsftpd的方式在终端中输入sudo apt-get install vsftpd按章vsftpd软件修改文件sudo gedit /etc/vsftpd.conf如下的格式# Example config file /etc/vsftpd.conf## The default compiled in settings are fairly parano id. This sample file# loosens things up a bit, to make the ftp daemon more usable.# Please see vsftpd.conf.5 for all compiled in defaults.## READ THIS: This example file is NOT an exhaustive list of vsftpd options.# Please read the vsftpd.conf.5 manual page to get a full idea of vsftpd's# capabilities.### Run standalone? vsftpd can run either from an inetd or as a standalone# daemon started from an initscript.listen=YES## Run standalone with IPv6?# Like the listen parameter, except vsftpd will listen on an IPv6 socket# instead of an IPv4 one. This parameter and the listen parameter are mutually # exclusive.#listen_ipv6=YES## Allow anonymous FTP? (Disabled by default)anonymous_enable=NO## Uncomment this to allow local users to log in.local_enable=YES## Uncomment this to enable any form of FTP write command.write_enable=YES## Default umask for local users is 077. You may wish to change this to 022,# if your users expect that (022 is used by most other ftpd's)#local_umask=022## Uncomment this to allow the anonymous FTP user to upload files. This only # has an effect if the above global write enable is activated. Also, you will# obviously need to create a directory writable by the FTP user.#anon_upload_enable=YES## Uncomment this if you want the anonymous FTP user to be able to create# new directories.#anon_mkdir_write_enable=YES## Activate directory messages - messages given to remote users when they# go into a certain directory.dirmessage_enable=YES## If enabled, vsftpd will display directory listings with the time# in your local time zone. The default is to display GMT. The# times returned by the MDTM FTP command are also affected by this# option.use_localtime=YES## Activate logging of uploads/downloads.xferlog_enable=YES## Make sure PORT transfer connections originate from port 20 (ftp-data). connect_from_port_20=YES## If you want, you can arrange for uploaded anonymous files to be owned by # a different user. Note! Using "root" for uploaded files is not# recommended!#chown_uploads=YES#chown_username=whoever## You may override where the log file goes if you like. The default is shown # below.#xferlog_file=/var/log/vsftpd.log## If you want, you can have your log file in standard ftpd xferlog format.# Note that the default log file location is /var/log/xferlog in this case.#xferlog_std_format=YES## You may change the default value for timing out an idle session.#idle_session_timeout=600## You may change the default value for timing out a data connection.#data_connection_timeout=120## It is recommended that you define on your system a unique user which the # ftp server can use as a totally isolated and unprivileged user.#nopriv_user=ftpsecure## Enable this and the server will recognise asynchronous ABOR requests. Not # recommended for security (the code is non-trivial). Not enabling it,# however, may confuse older FTP clients.#async_abor_enable=YES## By default the server will pretend to allow ASCII mode but in fact ignore# the request. Turn on the below options to have the server actually do ASCII # mangling on files when in ASCII mode.# Beware that on some FTP servers, ASCII support allows a denial of service # attack (DoS) via the command "SIZE /big/file" in ASCII mode. vsftpd# predicted this attack and has always been safe, reporting the size of the# raw file.# ASCII mangling is a horrible feature of the protocol.#ascii_upload_enable=YES#ascii_download_enable=YES## You may fully customise the login banner string:#ftpd_banner=Welcome to blah FTP service.## You may specify a file of disallowed anonymous e-mail addresses. Apparently # useful for combatting certain DoS attacks.#deny_email_enable=YES# (default follows)#banned_email_file=/etc/vsftpd.banned_emails## You may restrict local users to their home directories. See the FAQ for# the possible risks in this before using chroot_local_user or# chroot_list_enable below.#chroot_local_user=YES## You may specify an explicit list of local users to chroot() to their home# directory. If chroot_local_user is YES, then this list becomes a list of# users to NOT chroot().#chroot_local_user=YES#chroot_list_enable=YES# (default follows)#chroot_list_file=/etc/vsftpd.chroot_list## You may activate the "-R" option to the builtin ls. This is disabled by# default to avoid remote users being able to cause excessive I/O on large# sites. However, some broken FTP clients such as "ncftp" and "mirror" assume # the presence of the "-R" option, so there is a strong case for enabling it.#ls_recurse_enable=YES## Debian customization## Some of vsftpd's settings don't fit the Debian filesystem layout by# default. These settings are more Debian-friendly.## This option should be the name of a directory which is empty. Also, the# directory should not be writable by the ftp user. This directory is used# as a secure chroot() jail at times vsftpd does not require filesystem# access.secure_chroot_dir=/var/run/vsftpd/empty## This string is the name of the PAM service vsftpd will use.pam_service_name=vsftpd## This option specifies the location of the RSA certificate to use for SSL# encrypted connections.rsa_cert_file=/etc/ssl/private/vsftpd.pem重新启动服务sudo service vsftpd restart按照上面的方式查看了本机的ip资质以后在地址栏中输入就可以进行共享了。
Windows系统怎么访问Ubuntu的共享

Windows系统怎么访问Ubuntu的共享
在一个小局域网内既有windows系统又有Ubuntu系统时,Ubuntu系统中如何共享文件给用windows系统的小伙伴们呢?请看下面店铺整理的具体方法!
Windows系统访问Ubuntu的共享的方法
首先在ubuntu系统里新建个用于共享的文件夹,并右击选择“本地网络共享”。
创建共享时会提示“共享服务没有安装”,此时点击关闭并打开ubuntu软件中心,搜索并安装”libpam-smbpass“软件。
再次创建即可,此时文件夹的右下角会有双向箭头显示。
这表示创建共享成功。
在windows系统里通过\\IP或\\主机名便可以访问了。
注意事项:
ubuntu系统的ip与windows系统的ip要在同一个局域网内!。
Vbox虚拟机中的ubuntu下如何与windows共享文件
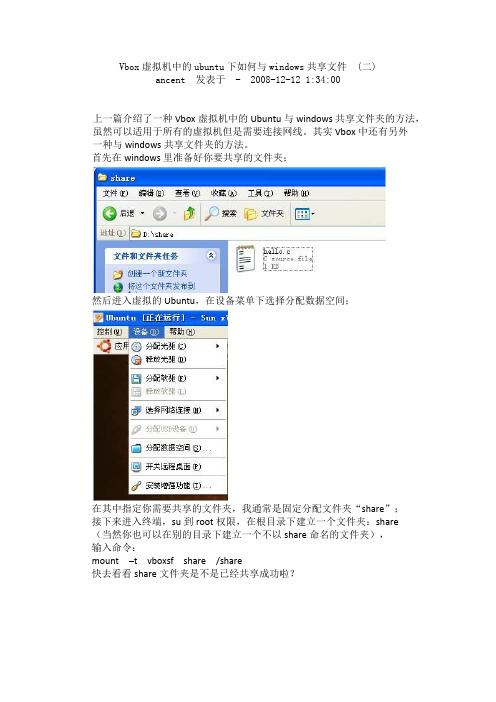
Vbox虚拟机中的ubuntu下如何与windows共享文件 (二)ancent 发表于 - 2008-12-12 1:34:00上一篇介绍了一种Vbox虚拟机中的Ubuntu与windows共享文件夹的方法,虽然可以适用于所有的虚拟机但是需要连接网线。
其实Vbox中还有另外一种与windows共享文件夹的方法。
首先在windows里准备好你要共享的文件夹;然后进入虚拟的Ubuntu,在设备菜单下选择分配数据空间;在其中指定你需要共享的文件夹,我通常是固定分配文件夹“share”;接下来进入终端,su到root权限,在根目录下建立一个文件夹:share(当然你也可以在别的目录下建立一个不以share命名的文件夹),输入命令:mount –t vboxsf share /share快去看看share文件夹是不是已经共享成功啦?[原创]虚拟机与主机间共享文件的两种方法由于最近要进行SBO8.8测试,而客户目前基本用的都是SBO2007B,我们知道,在一台机器上不能同时安装SBO的两个版本,不得已,只能安装虚拟机,使用虚拟机,经常会用到主机上的文件,很多人可能都不清楚如何在本机和虚拟机间共享文件和数据,下面我就给大家分享下我所知道的两种简单的方法:环境:主机操作系统:WINDOWS 2008 R2虚拟机:VMware Workstation 7.0.1 Build 227600 汉化版虚拟机操作系统:windows 2008 R21、直接在主机和虚拟机间拖拽文件或复制文件。
这个不用多说,不过要注意的是,有些情况下拖拽会出错,主机往虚拟机里面拖动拷贝文件/ 文件夹时,主机上的源文件的全路径/源文件夹(及其子文件夹)的全路径名称中不能包含非标准ASCII码字符。
也就是说,源文件的全路径/源文件夹(及其子文件夹)的全路径名称只能是英文字符,有中文的就会报错,不然会报以下错误:“你可能没有权限执行该操作”。
不过你将文件夹压缩后,却能将其拷贝过来。
- 1、下载文档前请自行甄别文档内容的完整性,平台不提供额外的编辑、内容补充、找答案等附加服务。
- 2、"仅部分预览"的文档,不可在线预览部分如存在完整性等问题,可反馈申请退款(可完整预览的文档不适用该条件!)。
- 3、如文档侵犯您的权益,请联系客服反馈,我们会尽快为您处理(人工客服工作时间:9:00-18:30)。
Ubuntu 远程桌面共享与共享win磁盘
一、远程桌面共享
其实Ubuntu 11.10本身就是一个图形化系统,所以他既然能够查看远程桌面,当然也能做远程桌面共享。
Ubuntu远程桌面使用的是VNC协议,而Windows远程桌面使用的是RDP协议。
所以我们只要做一下简单的三步操作,就可以是在Windows上远程桌面使用Ubuntu。
第一步,安装VNC协议。
Ubuntu下只需要输入指令:
sudo apt-get install vnc4server
他就会自动安装,完成后就自动运行了。
第二步,设置VNC主机。
Ubuntu 11.10下,只需要打开“桌面共享”,在“允许其他人查看你的桌面”选项打上勾,就可以了,其他的设置很简单。
第三步,远程登录。
如果你的系统是Ubuntu 11.10,则我们只需要打开“远程桌面连接”,输入IP地址便可以直接访问。
如果是在Windows下,则需要安装VNC查看器,百度RealVNC,只有700多K,包含Vncserver和Vncclient,只需要安装Vncclient就可以了。
安装好后,打开它,输入IP地址,连接成功。
二、共享win磁盘
自己研究ubuntu,目的是为了跟上时代的脚步。
Linux的使用越来越广,所以自己也想熟悉一下这个系统。
无论是为了好玩,还是为了工作。
我用的Ubuntun是11.10版本的,安装不只一次,但真正的开始使用还是第一次。
这个版本可以说是和Win功能很接近了。
安装好系统后,我们就可以进入系统了,开机比Win快了很多。
此时如果我们已经把硬盘接的电脑了,在打开主文件夹后,会在左上方的位置看到我们原来硬盘的分区。
他们现在的状态时未挂载状态,只有我们点击它才能自动挂载上去。
而我们首先要做的,就是让他自动挂载分区,这样就不会因为重启而使分区无法自动挂载而造成无法访问共享分区。
1、设置自动挂载分区
使用ntfs-config软件进行图形化设置。
按Crtl+Alt+T打开终端,输入命令
sudo apt-get install ntfs-config (安装程序包)
sudo mkdir /etc/hal
sudo mkdir /etc/hal/fdi
sudo mkdir /etc/hal/fdi/policy (第一次运行程序时会提示“OSError: [Errno 2] 没有那个文件或目录: ‘/etc/hal/fdi/policy’”,所以需要手工创建这几个目录)ntfs-config (运行程序)
设置好后就可以开机自动加载分区,并且可以进行读写操作了。
2、设置共享
共享我们需要samba支持。
sudo apt-get install samba (安装samba)
图形化界面就是方便,就像win一样直接设置共享。
不过有可能会出现这样的提示:“‘net usershare’返回错误 255:net usershare add: cannot share path
/media/magiclock as we are restricted to only sharing directories we own.
Ask the administrator to add the line ‘usershare owner only = false’ to the [global] section of the smb.conf to allo w this.”
这时候我们可以看“权限”一项,发现“所有者”变成了“root”。
解决方法:
sudo apt-get install vim (安装vim)
sudo vim /etc/samba/smb.conf (编辑smb.config文件)
找到“usershare allow guests = yes”这样行,按"a"键进行编辑,把“usershare owner only = false”加到后面,然后按“Esc”键退出编辑模式,输入“:wq”保存退出。
在试一次,问题解决。