组态王蜂鸣器控件说明文档
组态王6.5使用手册 第14章 控件(共101页 74~101页)

注:函数声明中函数名称不管是否有参数,都要加小括号。命令语言编辑器和自定义函数的定义、使用方法请参见本手册第十章 创建命令语言程序。
5、为控件曲线赋值:设置画面命令语言,初始化控件,和在运行过程中为各条曲线赋值。假设在组态王中的变量:实数1、实数2、实数3代表三个步骤的数值。
定义画面定义画面命令语言显示时:
初始化图表为三行三列。
定义画面定义画面命令语言存在时:1000毫秒
步骤图.Column=1;
步骤图.Row=1;
//为第一行第一列的第一条曲线赋值
图14.54 控件事件函数编辑器
编辑:编辑控件属性已关联的事件函数。当控件事件关联有事件函数时,单击鼠标右键,该项有效。
删除:删除控件属性已关联的事件函数。当控件事件关联有事件函数时,单击鼠标右键,该项有效。
例1:在日历控件的“Change”事件中添加一个控件事件函数,用组态王的变量读取控件的属性值。操作方法如下:
步骤图.Row=2;
步骤图.Data=StrFromReal( \\本站点\实型2*1.8, 2, "f" );
步骤图.Column=3;
步骤图.Row=3;
步骤图.Data=StrFromReal( \\本站点\实型3*1.8, 2, "f" );
保存画面后,切换到组态王运行系统,运行结果如下图所示。
图14.63 设置控件属性
控件名:一个Video视频控件对应一个控件名称,而且是唯一的,不能重复命名,控件名由工程人员设定,例如设为“监控”。
组态王7.5SP1版本第6章控件介绍
第七讲 控 件第一节 控件的作用控件可以作为一个相对独立的程序单位被其他应用程序重复调用。
控件的接口是标准的,凡是满足这些接口条件的控件,包括第三方软件供应商开发的控件,都可以被组态王直接调用。
组态王中提供的控件在外观上类似于组合图素,工程人员只需把它放在画面上,然后配置控件的属性进行相应的函数连接,控件就能完成其复杂的功能。
组态王除了支持本身提供的各种控件外,还支持Windows 标准的Active X 控件,包括Microsoft 提供的标准Active X 控件和用户自制的Active X 控件。
Active X 控件的引入在很大程度上方便了用户,用户可以灵活地编制一个符合自身需要的控件或调用一个已有的标准控件来完成一项复杂的任务,而无须在组态王中做大量的复杂的工作。
一般的Active X 控件都具有属性、方法、事件,用户通过设置控件的这些属性、事件、方法来完成工作。
第二节 超级XY 控件下面利用XY 控件显示原料油液位与原料油罐压力之间的关系曲线,操作过程如下:1、新建一画面,名称为:XY 控件画面。
2、选择工具箱中的工具,在画面上输入文字:XY 控件。
3、单击工具箱中的插入通用控件工具,在弹出的插入控件窗口中双击“KvChatXY ActiveX Control ”,在画面上绘制XY 曲线窗口,如图7-1所示:图7-1 XY曲线控件窗口4、并双击此控件,弹出动画属性设置对话框,如图7-2所示。
图7-2 XY控件属性设置对话框在此窗口中您可对控件的名称(名称设置为:XY)进行设置。
设置完名称,确定,保存画面。
然后选择控件,点击右键,弹出控件属性对话框,您可以对控件的相关属性进行设置。
普通选项卡:设置曲线对应的前景背景颜色,设置字体,标题,图例,边框,如图7-3。
坐标选项卡:定义X轴信息,定义Y轴信息,如图7-4所示。
图7-4 xy轴信息设置曲线选项卡:定义曲线最大点数1024,曲线名称、颜色、线型、标记和Y轴对应设置,如图7-5所示。
组态王使用说明

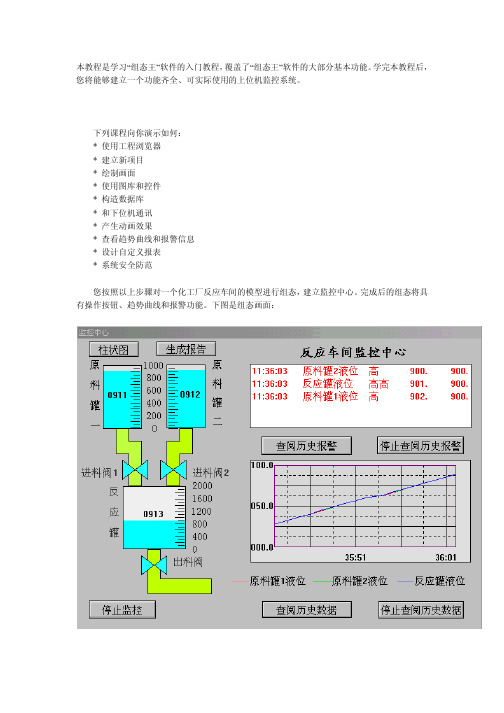
皖西学院监控组态软件实验指导书机械与电子工程学院电气工程教研室2013.3实验一监控组态工程建立与工艺流程图绘制一、实验目的熟练掌握工控组态软件的绘图工具二、实验内容熟悉工控组态软件的绘图工具,完成反应工段工艺流程绘制以及外部设备和变量的定义。
三、实验步骤1.1创建工程在工程管理器中选择菜单“文件/新建工程”,或者点击工具栏的“新建”按钮,根据“新建工程向导”对话框完成工程创建,如图一所示图一工程管理器1.2 组态画面双击工程管理器中的工程,打开工程浏览器,在工程浏览器中左侧的“工程目录显示区”中选择“画面”,在右侧视图中双击“新建”,弹出新建画面对话框如图一所示。
图二画面属性设置点击图二确定按钮后,在工具箱和图库中选中相应图素进行监控画面组态,绘制工艺流程图如图三所示。
图三反应车间监控画面1.3定义设备根据工程中实际使用得设备进行定义,本例程使用亚控的仿真PLC设备,使用“PLC-亚控-仿真PLC-串口”驱动,定义设备名称为“PLC”。
1.4定义变量在组态王中定义三个变量:原料油液位(IO实数类型)、成品油液位(IO实数类型)、催化剂液位(IO实数类型)。
原料油液位变量:最小值0,最大值100,最小原始值0,最大原始值100,连接设备PLC,寄存器DECREA100,数据类型short,读写属性为只读,采集频率1000。
记录和安全区选择“数据变化记录”,变化灵敏度选择“0”。
催化剂液位变量:最小值0,最大值100,最小原始值0,最大原始值100,连接设备PLC,寄存器DECREA100,数据类型short,读写属性为只读,采集频率1000。
记录和安全区选择“数据变化记录”,变化灵敏度选择“0”。
成品油液位变量:最小值0,最大值200,最小原始值0,最大原始值200,连接设备PLC,寄存器INCREA200,数据类型short,读写属性为只读,采集频率1000。
记录和安全区选择“数据变化记录”,变化灵敏度选择“0”。
组态王6.5使用手册 第14章 控件(共101页 1~33页)
第十四章控件14.1 控件简介14.1.1 什么是控件控件实际上是可重用对象,用来执行专门的任务。
每个控件实质上都是一个微型程序,但不是一个独立的应用程序,通过控件的属性、方法等控制控件的外观和行为,接受输入并提供输出。
例如,Windows操作系统中的组合列表框就是一个控件,通过设置属性可以决定组合列表框的大小,要显示文本的字体类型,以及显示的颜色。
组态王的控件 (如棒图、温控曲线、X-Y轴曲线)就是一种微型程序,它们能提供各种属性和丰富的命令语言函数用来完成各种特定的功能。
14.1.2 控件的功能控件在外观上类似于组合图素,工程人员只需把它放在画面上,然后配置控件的属性,进行相应的函数连接,控件就能完成复杂的功能。
当所实现的功能由主程序完成时需要制作很复杂的命令语言,或根本无法完成时,可以采用控件。
主程序只需要向控件提供输入,而剩下的复杂工作由控件去完成,主程序无需理睬其过程,只要控件提供所需要的结果输出即可。
另外,控件的可重用性也提供了方便。
比如画面上需要多个二维条图,用以表示不同变量的变化情况,如果没有棒图控件,则首先要利用工具箱绘制多个长方形框,然后将它们分别进行填充连接,每一个变量对应一个长方形框,最后把这些复杂的步骤合在一起,才能完成棒图控件的功能。
而直接利用棒图控件,工程人员只要把棒图控件拷贝到画面上,对它进行相应的属性设置和命令语言函数的连接,就可实现用二维条图或三维条图来显示多个不同变量的变化情况。
总之,使用控件将极大地提高工程人员工程开发和工程运行的效率。
14.1.3 组态王支持的控件组态王本身提供很多内置控件,如列表框、选项按钮、棒图、温控曲线、视频控件等,这些控件只能通过组态王主程序来调用,其它程序无法使用,这些控件的使用主要是通过组态王相应控件函数或与之连接的变量实现的,其使用方法请参见14.2节。
随着Active X技术的应用,Active X控件也普遍被使用。
组态王支持符合其数据类型的Active X标准控件。
组态王使用教程
组态王简明教程 第一课
了解组态王 在本课程您将: ·了解组态王软件的整体结构 ·了解组态王的工件方式 ·了解建立应用程序的一般过程
组态王软件的结构
“组态王”是运行于 Microsoft Windows 98/NT 中文平台的全中文界面的组态软件,采用了多 线程、COM 组件等新技术,实现了实时多任务,软件运行稳定可靠。组态王具有一个集成开发 环境“组态王工程浏览器”,在工程浏览器中您可以查看工程的各个组成部分,也可以完成构造数 据库、定义外部设备等工作。画面的开发和运行由工程浏览器调用画面制作系统 TOUCHMAK 和画面运行系统 TOUCHVEW 来完成的。TOUCHMAK 是应用程序的开发环境。您需要在这个 环境中完成设计画面、动画连接等工作。TOUCHMAK 具有先进完善的图形生成功能;数据库中 有多种数据类型,能合理地抽象控制对象的特性;对变量报警、趋势曲线、过程记录、安全防范 等 重 要 功 能 都 有 简 单 的 操 作 办 法 。 TOUCHVEW 是 “ 组 态 王 ” 软 件 的 实 时 运 行 环 境 , 在 TOUCHMAK 中建立的图形画面只有在 TOUCHVEW 中才能运行。TOUCHVEW 从工业控制对 象中采集数据,并记录在实时数据库中。它还负责把数据的变化用动画的方式形象地表示出来, 同时完成变量报警、操作记录、趋势曲线等监视功能,并生成历史数据文件。
使用图形工具箱 接下来在此画面中绘制各图素。绘制图素的主要工具放置在图形编辑工具箱内。当画面打开
时,工具箱自动显示,如果工具箱没有出现,选择菜单“工具\显示工具箱”或按 F10 键打开它。 工具箱中各种基本工具的使用方法和 WINDOWS 中“画笔”很类似,假如你熟悉“画笔”的使用, 绘制本画面将是很容易的。首先绘制监控对象原料罐和反应罐:在工具箱内单击圆角矩形工具, 在画面上绘制一个矩形作为第一个原料罐;在矩形框上单击鼠标左键,在矩形框周围出现 8 个小 矩形,当鼠标落在任一小矩形上时,按下鼠标左键,可以移动图形对象的位置用同样的方法绘制 另一原料罐和反应罐。在工具箱内单击多边形工具,绘制三条管道。要改变管道的填充颜色,请 选中此对象,然后单击调色板窗口的第二个按钮,再从调色板中选择任一种颜色。在工具箱内单 击文本工具,输入文字。要改变文字的字体、字号,请先选中文本对象,然后在工具箱内选择“改 变字体”。选择菜单“图库\刻度”,在图库窗口中双击一种竖向的刻度。在画面上单击鼠标左键,
组态王课件7控件-文档资料
选择此项,在系统重新启 动或打开画面时(原画面 处于关闭状态)自动载入 组态王上次运行时自动保 存的实时曲线。
在“画面属性”命令语言“存在时”中输入如下脚本语 言:
pvAddNewRealPt( "温度", 1, \\本站点\成品油液位1, "commentTag" ); pvAddNewSetPt( "温度", 1, 38);
chartAdd
此函数用于在指定的棒图控件中增加一个新的条形图。 语法格式使用如下:
chartAdd( "ControlName", Value, "label" );
参数说明: ControlName:工程人员定义的棒图控件名称。 Value:设定条形图的初始值。 label:设定条形图的标签值,默认值=索引值Index,Index的 取值范围是1-16。
pvAddNewRealPt
此函数用于在指定的温控曲线控件中增加一个采样实时值。 pvAddNewRealPt(“ControlName”,timeOffset,Value, “commentTag” ); 参数说明: ControlName:定义的温控曲线控件名称。 timeOffset:相对前一采样点的时间偏移量(即距前一值的时间间隔值) 。 Value:温度的采样值,通常为组态王数据库中定义的I/O实数变量。 commentTag:注释性字符串,也可以是SetPt
此函数用于在指定的温控曲线控件中增加一段温度设定曲线。适用于 自由设定模式。
语法格式使用如下: pvAddNewSetPt( "ControlName", TimeOffset, Value ); 参数说明:
ControlName:工程人员定义的温控曲线控件名称。
kingview 控件的使用

组态王KingviewPid控件使用方法KingviewPid控件是组态王提供的用于对过程量进行闭环控制的专用控件。
通过该控件,用户可以方便的制作PID控制。
一、控件功能:1.pid控制算法:标准型,分为增量型输出和反向作用。
2.显示过程变量的精确值,显示范围[-999999.99~999999.99]。
3.以百分比显示设定值(SP)、实际值(PV)和手动设定值(M)。
4.开发状态下可设置控件的总体属性、设定/反馈范围和参数设定。
5.运行状态下可设置PID参数和手动自动切换。
二、使用说明:1.在画面中插入控件:组态王画面菜单中编辑\插入通用控件,或在工具箱中单击“插入通用控件”按钮,在弹出的对话框中选择“Kingview Pid Control”,单击确定。
2.按下鼠标左键,并拖动,在画面上绘制出表格区域。
图1 控件画面3.设置动画连接:双击控件或选择右键菜单中动画连接,在弹出的属性页中设置控件名称等信息。
(1)常规:图2 动画连接属性—常规设置控件名称:应符合组态王中关于名称定义的规定,例如:PIDCtrl0。
优先级:是控件的操作优先级,范围在1~999。
安全区:安全区只允许选择。
(2)属性类型关联对象:图3动画连接属性—属性SP:FLOAT,控制器的设定值。
PV:FLOAT,控制器的反馈值。
YOUT:FLOAT,控制器的输出值。
Type:LONG,PID的类型。
CtrlPeriod:LONG,控制周期。
FeedbackFilter:BOOL,反馈加入滤波。
FillterTime:LONG,滤波时间常数。
CtrlLimitHigh:FLOAT,控制量高限。
CtrlLimitLow:FLOAT,控制量低限。
InputHigh:FLOAT,设定值SP的高限。
InputLow:FLOAT,设定值SP的低限。
OutputHigh:FLOAT,反馈值PV的高限。
OutputLow:FLOAT,反馈值PV的低限。
KING COBRA-2 12按钮带蜂鸣器编程指南说明书

Code/iButton Functions:The twelve-button King Cobra-2 family of locks is manually or computer programmable to have up to 1000 codes and accepts programming from a PDA or SNAP based on data created in SMS, Locklink, or the SNAP PC Application. The codes can have different functions as described below. Several types of functions have factory default values which are operational as soon as the lock is installed. It is highly recommended that the Programming Code be changed (this will delete all factory default codes) and new codes be added. In addition, it is recommended that at least one Freeze/Lockout Code be added - in case the batteries get completely drained. (See “Battery Information” on page 3.) All codes can be 3-6 digits in length (except the Programming code which must be 5-6 digits.) Keep a log of all issued codes. A sheet is provided for this pur-pose at the end of this manual. It can be duplicated as required.The office function provides a ‘lock’and an ‘unlock’button on the inside escutcheon of the lock. This allows a person to lock or unlock the lock from the inside of the door. If a ‘freeze/lockout’code/iButton is entered, the buttons will be disabled and the lock ‘frozen’in its current condition until a ‘freeze/lockout’code/iButton is entered again.The beeper provides additional audible feedback and can be turned on or off during various events if desired (see page 7 for additional information).FUNCTION:FACTORY DEFAULT:DESCRIPTION:PROGRAMMING NORMAL 97531 13579N O N E N O N E N O N EONE USE SUPERVISED PASS THRU The programming code (or iButton) puts the lock into a programming mode. It will not unlock the lock. When a Programming code plus “*” isentered the LEDs alternately flash several times indicating the lock is in a programming mode. If more than 30 seconds pass in between program-ming entries, the lock returns to a normal operational state.Normal codes/iButtons unlock the lock for the relock time delay. While the lock is unlocked the green LED will flash. The LED will stop flashing and the lock will relock.One Use codes unlock the lock for the relock time delay. They will only work once and then are deleted from memory. They can be used again if they are programmed (added) into memory again.Supervised codes require that two different supervised codes be entered in order to unlock the lock for the relock time delay.Pass Thru codes will unlock the door for the relock time delay even if the door is in the lockout mode.TOGGLE FREEZE/LOCKOUTToggle code/iButtons unlock the lock indefinitely. When the same (oranother) toggle code/iButton is entered, the lock will immediately relock.When a toggle code is entered, the green LED will flash once. (When alock is toggled unlocked, both LEDs will light each time a button ispressed.)Freeze/Lockout codes prevent other codes from working. The lock can belocked or unlocked when one is entered. If it is locked, a Pass Thru codewill unlock it but all other codes will not. Only another Lockout code willreverse the effect.N O N EN O N E7TO CHANGEPROGRAMMING CODEENTER NEW PROG.CODE ENTER NEW PROG.CODE AGAIN***7TO CHANGE TOPROGRAMMING iBUTTONENTER NEW PROG.iBUTTON*99TO CHANGE RELOCK TIME DELAY (DEFAULT 3 SEC.)TO END***115TO DELETE CODES/iBUTTONSENTER CODE/PINTO DELETE MORETO END****5PRESS 1 FOR 1SEC. AND/OR 5FOR 5 SEC. THE TIMES WILL ADD.PROG. CODE & *or iBUTTONPROG. CODE & *or iBUTTONPROG. CODE & *OR iBUTTONPROG. CODE & *or iBUTTONBATTERY INFORMATION:The KC5100-2/KC5500-2 uses four, standard AA ALKA-LINE batteries.The KC9000-2 uses four AAA ALKALINE batteries. The batteries should provide enough life for approximately 80,000 lock/unlock cycles (40,000 for the KC9000-2). When the battery voltage gets down toapproximately 4.4VDC, the lock provides low battery indi-cation as follows: when a code/iButton is entered, the red LED will flash twelve times before the lock executes the command. This is an indication that it is time to replace the batteries. The lock will continue to operate for approx-imately 500 cycles in this condition. When the battery voltage gets down to approximately 4.3VDC, the lock will go into “Low Battery Lockout” mode. A Freeze/Lockout code must be entered to gain access. If the batteries are not changed, the lock will eventually cease to function and the mechanical key override must be used.CLEARING MEMORY:Clearing memory will delete all programmed codes and iButtons and restore factory default codes. The program-ming code or iButton will also be deleted and the default programming code will be restored. The factory default relock time delay will also be restored. If the memory ever needs to be erased follow the steps below:1. Remove the inside escutcheon.2. Remove one battery.3. Press and hold the *key.4. Reinstall the battery.>Red LED flashes 2 times.> Green LED illuminates and beeper sounds.4. Release the *key.5. Reinstall the inside escutcheon.ERROR CODE DESCRIPTION(Note: the beeper does not sound during error code indication.)2 Code too long 6 digits max.3 Memory full, must delete some codes.4 Can not delete Programming code - use Change steps.5 Second entry did not match first (Programming Code).6 Invalid entry, start over. (Verify that any codes entered prior to thiserror do not operate the lock.)7 Code to be deleted does not exist.8 Code too short - 3 digits minimum (or 5 digit for Programming Code).9 Duplicate code, code already exists.10 Manual Programming is disabled.12 Lockout modeCodes and iButtons can be deleted using these steps. It is required that the PIN be used to delete an iButton,therefore it is necessary to keep a record of the PINs associated with each iButton.It is highly recommended that the programming code be changed for maximum security. It can be changed to a different 5-6 digit code or to an iButton, if desired.To change relock time fol-low these step. Relock time can be adjusted from 1 to 240 seconds.BATTERY VOLTAGE DISPLAY:You can find out how much voltage is left in your batteries by doing the following:1. Enter Programming Code, press *2. Enter 11 **> The LEDs will blink indicating battery voltage:- Red LED indicates unit volts (left of decimal point).- Green LED indicates tenths of a volt.(Example: If the red LED blinks 5times and then the green LED blinks 3times, this indicates that the battery voltage is approximately 5.3VDC.)The pattern of blinking LEDs repeats 3 times.PROGRAMMING STEPS - HOW TO ENTER CODES:33TO ADD TOGGLE CODEENTER NEW CODETO ADD MORE TO END*191****33TO ADDFREEZE/LOCKOUT CODEENTER NEW CODETO ADD MORETO END*115****33TO ADDONE TIME USE CODEENTER NEW CODETO ADD MORE TO END*113****33TO ADDSUPERVISED CODE ENTER NEW CODETO ADD MORE TO END*117****33TO ADDPASS THRU CODEENTER NEW CODETO ADD MORETO END*119****TO ADDNORMAL USE CODEENTER NEW CODETO ADD MORETO END ****3Use the steps on this page to program codes into the lock. This must be a unique,3-6 digit code. The “*” key is used like the <ENTER > key on a computer. After press-ing the “*” key, wait for the red and green LEDs to stop flashing before proceeding to the next step. An error has occurred if the red LED stays on while the green LED flashes. The flashing mes-sage will repeat three times.Count the number of flashes and consult the error code chart on page 3.PROG. CODE & *or iBUTTONPROG. CODE & *or iBUTTONPROG. CODE & *or iBUTTONPROG. CODE & *or iBUTTONPROG. CODE & *or iBUTTONPROG. CODE & *or iBUTTON33TO ADD TOGGLE iBUTTON ENTER NEW PIN TO ADD MORE TO END *191***33TO ADD FREEZE/LOCKOUT iBUTTON ENTER NEW PIN TO ADD MORE TO END *115***33TO ADDONE TIME USE iBUTTONENTER NEW PINTO ADD MORE*113**33TO ADDSUPERVISED iBUTTONENTER NEW PINTO ADD MORE*117**33TO ADDPASS THRU iBUTTONENTER NEW PINTO ADD MORE*119**TO ADDNORMAL USE iBUTTON ENTER NEW PIN TO ADD MORE TO END**ENTER iBUTTON ENTER iBUTTONENTER iBUTTONENTER iBUTTONENTER iBUTTON ENTER iBUTTON *3Use the steps on this page to program iButtons into thelock. Note that each iButton must have a PIN associat-ed with it. This must be a unique, 3-6 digit code. It will not open the door and itcan not be used as anaccess code. It is important to record the PINs so thatthe iButton can be deletedif it is lost.If at any time the red LEDstays on while the green LED flashes an error has occurred. The flashing mes-sage will repeat threetimes. Count the number of flashes and consult the error code chart on page 3.PROGRAMMING STEPS - HOW TO ENTER iBUTTONS:PROG. CODE & *or iBUTTON PROG. CODE & *or iBUTTON PROG. CODE & *or iBUTTONPROG. CODE & *or iBUTTONPROG. CODE & *or iBUTTONPROG. CODE & *or iBUTTONTO END*TO END*TO END*33TO ADD LINKED TOGGLE iBUTTON ENTER NEW PINTO ADD MORETO END*391***33TO ADD LINKED FREEZE/LOCKOUT iBUTTON PROG. CODE/iBUTTON ENTER NEW PINTO ADD MORETO END**315***33TO ADD LINKEDONE TIME USE iBUTTON ENTER NEW PINTO ADD MORETO END*313***33TO ADD LINKED SUPERVISED iBUTTON ENTER NEW PINTO ADD MORETO END*317***33TO ADD LINKED PASS THRU iBUTTONENTER NEW PINTO ADD MORETO END*319***ENTER iBUTTONENTER iBUTTONENTER iBUTTONENTER iBUTTON33TO ADD LINKEDNORMAL USE iBUTTON ENTER NEW PINTO ADD MORETO END*311***ENTER iBUTTONENTER iBUTTONUse the steps on this page to program iButtons withLinked Access. Linked Access adds a higher levelof security in case an iButton gets lost or stolen.To use a Linked Access iButton, enter the iButton into the lock and then enter the PIN associated with it. If at any time the red LED stays on while the green LED flashes an error has occurred. The flashing mes-sage will repeat threetimes. Count the number of flashes and consult the error code chart on page 3.PROGRAMMING STEPS - HOW TO ENTER LINKED ACCESS iBUTTONS:PROG. CODE & *or iBUTTON PROG. CODE & *or iBUTTONPROG. CODE & *or iBUTTONPROG. CODE & *or iBUTTONPROG. CODE & *or iBUTTONBEEPER SETTINGBeeper sounds for key press in User Mode Beeper sounds for key press in Programming Mode Beeper sounds for motor running for lock or unlock. 0 No No No 1 Yes No No 2 No Yes No 3 Yes Yes No 4 No No Yes 5 Yes No Yes 6No Yes Yes 7YesYesYesCHANGING THE BEEPER SETTING :The lock comes with the beeper set to beeper setting number 7 which is ON for all functions. It can be turned off or on using the following steps:99BEEPER OFFTO END***3PROG. CODE & *or iBUTTON99BEEPER ON (all functions)TO END***37PROG. CODE & *or iBUTTON99TO CHANGE BEEPERSETTINGTO END***3BEEPER SETTING (SEE TABLE)PROG. CODE & *or iBUTTONNote that the beeper does not sound during error code flashing no matter what the beeper set-ting is.BEEPER OFFBEEPER ONIt is possible to choose to have the beeper on for some functions and off for others. If you want to change the setting (see table for avail-able settings) follow these steps. Note that in general you will either choose setting 0 (for off)or 7 (for on).Building:___________________________ Door/Room Number:_________________Lock Type:___________________________ Manager:____________________________CODE/PIN:iBUTTON (Y/N):TYPE OF ACCESS(NORMAL/TOGGLE, ETC.):MANUALLY PROGRAMMED ACCESS CREDENTIAL RECORDING SHEET。