电脑故障维修:老主板安装希捷大硬盘
电脑维修教程如何更换电脑硬盘

电脑维修教程如何更换电脑硬盘电脑维修教程-如何更换电脑硬盘在使用电脑的过程中,有时候我们可能会遇到硬盘损坏或需要更换硬盘的情况。
本文将为大家介绍电脑硬盘的更换步骤,让大家可以轻松自行更换电脑硬盘,解决硬盘问题。
一、备份重要数据更换电脑硬盘前,首先需要备份重要的数据。
由于更换硬盘后原有的数据都会丢失,因此我们需要提前将重要的文件、照片和其他资料进行备份,以免丢失。
二、购买新硬盘在购买新硬盘时,我们需要明确自己的需求,选择适合自己的硬盘型号和容量。
常见的硬盘类型有机械硬盘(HDD)和固态硬盘(SSD)。
固态硬盘的读写速度更快,但价格相对较高。
根据自己的需求和预算,选择适合的硬盘。
三、准备工具和材料更换电脑硬盘需要一些专用工具和材料,包括螺丝刀、硬盘固定螺丝、硬盘数据线等。
在开始操作之前,确保已经准备好所需的工具和材料。
四、打开电脑主机在更换电脑硬盘之前,我们需要先关闭电脑并拔掉电源插头。
然后使用螺丝刀打开电脑主机的侧板,注意要轻柔并小心操作,以避免对电脑主机造成损害。
五、拆卸旧硬盘在打开电脑主机后,我们可以看到原来的硬盘。
首先,找到硬盘连接数据线和电源线的接口,并将它们拔出。
然后,使用螺丝刀拧松硬盘固定螺丝,取下旧硬盘。
六、安装新硬盘在拆卸旧硬盘后,我们可以将新硬盘安装到电脑主机中。
首先,将新硬盘插入硬盘连接数据线和电源线的接口。
然后,使用硬盘固定螺丝将新硬盘固定在硬盘槽上。
七、重新连接电脑在安装新硬盘后,我们需要重新连接电脑主机。
首先,将电脑主机的侧板盖好,并用螺丝刀将其固定。
然后,将电脑插头重新插入电源插座。
八、安装操作系统在更换完硬盘后,我们需要安装操作系统。
插入操作系统安装光盘或者制作好的启动U盘,按照提示进行操作系统安装。
在安装过程中,可以选择格式化新硬盘并设置分区。
九、恢复备份的数据当操作系统安装完成后,我们可以将之前备份的重要数据恢复到新硬盘上。
将备份的文件、照片和其他资料复制到新硬盘的指定位置。
老主板安装大硬盘的问题

几天看到很多人问老主板安装大硬盘的问题,我前段时间正好遇到同样问题,在网上收集了一些资料,特贴出共享,希望对大家有所帮助:随着硬盘价格的迅速下跌,硬盘是最值得升级的硬件了。
很多老主板用户都想添加了大容量硬盘。
但硬盘买来后,面临着两个比较棘手的问题,一是老主板无法正确识别大容量硬盘,二是怎样快速将旧硬盘上的文件复制到新硬盘上或建立多启动系统。
为此,笔者将自己在老主板上成功安装大硬盘的经历给读者作个介绍。
以供读者借鉴。
在五一节长假到来的时候, 我做出一个已经萦绕在心头一年多的决定:为我的“老主板”买一个大硬盘,以便好好地把当今琳琅满目的好东西装进去领略一番。
原来的3.2G硬盘其实早已不堪重负,这个决定姗姗来迟的原因只有一个,就怕新买来的硬盘主板认不到,使用不成,岂不冤枉。
没想到这个40G的新硬盘真的会耗掉我的整个五一长假,原本想和新的40G大硬盘一起过一个愉快的五一节,却还是被“老主板无法识别大容量硬盘”所困。
在着手买盘之前,到网上看了许多有关大硬盘处理问题的讨论文章,又查阅了近几年的…电脑报合订本‟上的相关文章。
来到电脑城,本想买一个Maxtor新系列的40G“星钻”。
嘿!“星钻”缺货。
经…店小二‟推荐,花了580元购得“西部数据” WD 40G 5400rpm 硬盘一个。
性价比不错。
回到家,上网到/download/dlg/dlgmaker.exe 本地下载下载“西数”的Data Lifeguard Tools v2.8:此程序非常有用,当你的系统不支持大容量硬盘时,可以使用此程序来分区与格式化西部数据的大容量硬盘,(经笔者测试它也适用于其它IDE 硬盘。
)它取代了原来使用的EZ-Drive 与磁盘管理软件。
下载的是一个压缩包,直接解压在A盘上,此盘是张启动工具盘,从A盘启动后自动运行程序。
需要注意的是,该程序必须在DOS下软盘中运行,如果在硬盘上直接运行有可能会造成硬盘数据的丢失或者扫描错误等结果。
Seagate 硬盘安装指南说明书
Interface connectorPower connectorU7 Family Installation GuideST3120020A, ST380022A, ST360012A, ST340012A, ST330012A Publication number: 100240407, Rev. AThe Easiest Way to Install Your DriveDiscWizard™ Starter Edition is an exclusive Seagate ® Windows program that can be used with your drive for easy installation. Download the software from our Web site at .Run the DiscWizard diskette creator before installing your drive for custom-ized step-by-step instructions for your system.To run DiscWizard:Follow the instructions on the download page at to create a diskette and complete the installation.If you cannot run DiscWizard, follow the instructions on this installation sheet to install and configure your drive.What You Need• A Phillips screwdriver and four 6-32 UNC drive mounting screws• A standard 40-pin ATA interface cable, or an 80-conductor cable to run UltraATA 100 (max length: 18 inches)• An unused drive power cable for your new drive• A version of Windows with FAT32 file system for drives over 32 GbytesUltra ATA/100 RequirementsThe drive can be configured to support a default maximum transfer rate. This drive can support transfer rates up to 100 Mbytes per second (UDMA 5) in Ultra ATA/100 mode. Using a software utility, you can set the default transfer rate to the best capability of your system. For your drive to run in this mode,you need the following:• A computer that supports UDMA mode 5• A 40-pin, 80-conductor cable (available from your dealer)• A software utility to confirm and activate Ultra ATA/100. Seagate providesa utility called UATA100.exe. You can download the latest version from our Web site at .• Windows XP, Windows Me, or Windows 98 operating system whichsupports Ultra ATA 100Disc drives are extremely fragile. Do not drop or jar the drive.Keep the drive in the protective SeaShell™ container until you are ready to install it. This minimizes handling damage.The drive has a protective cover called SeaShield ®. Do not remove this permanent cover—it protects the drive from electrostatic discharge (ESD) and minor impact damage.Protect your drive from static discharge by wearing a grounded wrist strap throughout the installation process.Always handle the drive by the edges or frame.Do not apply pressure or attach labels to the circuit board or the top of the drive.Setting the JumpersRefer to the jumper settings on your drive label to configure the drive for your system. Jumper settings can also be accessed online from our Web site at .SlaveIf you are using a 40-pin 80-conductorcable, attach the blue connector to the motherboard, the black connector to the master drive, and the grey connector to the slave. Options jumper block• Master or single drive: The drive is shipped configured for a master or asingle drive with a jumper set on pins 7 and 8.• Drive is slave: To configure the drive as a slave, or second drive on the cable, remove all the jumpers.• Master with non-ATA compatible slave: Use this setting if the slavedrive is not recognized. Configure the master drive with a jumper set on pins 5 and 6 and pins 7 and 8 to enable this option.• Cable-select option: Computers that use cable-select determine the master and slave drives by selecting or deselecting pin 28, CSEL, on the interface bus. To enable cable select, set a jumper on pins 5 and 6.• Alternate capacity jumper: Drives with a 40-Gbyte capacity are limitedto 32 Gbytes. This jumper is used to provide a solution to specific legacy BIOS problems. When using the alternate capacity jumper, Disk Manager software is required to achieve the drive’s full capacity.Attaching Cables and Mounting the Drive1.Attach one end of the drive interface cable to the interface connector on your computer’s motherboard (see your computer manual for connector locations).Caution. Align pin 1 on the motherboardconnector with pin 1 on your drive connector.Pin 1 is marked by a stripe on one side of the cable.2.Attach the interfaceconnector and the power connector to the drive.Note. You can mount the drive in any orientation,however, the most common orientation is with the circuit board down.3.Secure the drive in the computer using four 6-32 UNC mounting screws in either the side-mounting or bottom-mounting holes. Insert the screws no more than 0.20 inch (5.08 mm) into the bottom-mounting holes and no more than 0.14 inch (3.55 mm) into the side-mounting holes.Caution. Do not overtighten the screws or use metric screws. Thismay damage the drive.Configuring the BIOSFor your computer to recognize your new drive, configure your computer’s BIOS as follows:1.Run the system setup program.2.Enable LBA mode and UDMA mode, if available.3.Select the auto-detect option. If necessary, refer to the drive parameters on your drive label to configure the drive for your system. BIOS settings can also be accessed at . To access the full capacity of the drive, use LBA mode or use Disk Manager.4.Save and exit the system setup program.BIOS Settings Drive Model Formatted GbytesTotal Sectors*ST3120020A 120.0240,067,800ST380022A 80.0160,045,200ST360012A 60.0120,033,900ST340012A 40.080,022,600ST330012A30.060,016,950*One sector equals 512 bytes.Preparing the Drive with DiscWizardInstalling a Single DriveIf you are installing a single drive, we recommend using DiscWizard to automatically partition and format your drive. DiscWizard software is available at . During the download, the Diskette Creator creates a portable bootable diskette. To run DiscWizard:1.Insert your bootable DiscWizard diskette and follow the instructions.DiscWizard will guide you through the installation process.2.Boot your computer from the Windows operating system CD-ROM orfrom your system startup diskette with the Windows CD loaded. At the prompt, type setup.Installing a Slave DriveIf you are installing a second drive, or slave, to your system, use the DiscWizard software available at .Note. If you do not want to install your drive using either DiscWizard or Disk Manager, see “Standard Microsoft Installation” below to partition and format your drive.Standard Microsoft InstallationCaution.Partitioning or formatting a drive erases all data on it.Seagate assumes no liability if you erase your data.Drive PartitioningPartitioning divides the drive into sections or partitions that function as separate logical drives (labeled C,D,E, etc.). To partition your new drive:1.Insert a bootable startup diskette and restart your computer.2.Run fdisk and create a primary DOS partition.3.Mark the partition as active to make the partition bootable.Drive FormattingCaution. Use the correct drive letters to prevent formatting a drive that already contains data.1.At the A: prompt, type format x: where x is the letter of your first newpartition. Repeat the format process for all new partitions.2.Proceed to “Loading the Operating System” below.Loading the Operating SystemNote. The operating system needs to be installed on the master drive only. It is not required when adding a second drive.1.Boot your computer from your Windows operating system CD-ROM orfrom your system startup diskette with the Windows CD loaded.2.At the prompt, type setup and continue with the Windows setup.TroubleshootingIf your drive is not working properly, follow these troubleshooting steps.1.Does the drive spin up? A spinning drive produces a faint whine andclicking noise that begins when power is applied. If your drive does not spin, check that the power connector and interface cable are securely attached and the jumpers are installed correctly.2.Does the computer recognize the drive? Verify that the drive isenabled in the system CMOS or setup program. If not, select theautodetect option and enable it. If your drive has a problem, it may not be recognized by the system.3.Does FDISK detect the drive? Run the FDISK program located onyour Windows startup diskette. Type fdisk/status to verify that your hard drive is present.4.Does Scandisk find the drive defect-free? Scandisk is a utilitylocated on your Windows startup diskette that scans the drive fordefects. If defects are detected, this may be an indication of a problem.5.Why won’t the drive format to full capacity? Verify that your BIOShas autodetect and LBA mode enabled. Otherwise you may need to use Disk Manager to achieve the full capacity of your drive. Download the latest version from or find it on your CD.6.The computer hangs on startup. Verify that your system is ATA/100compatible with the UDMA mode setting. Some legacy BIOS causehangs on startup or other problems if not ATA/100 compatible. For more information, see the earlier section on the Ultra ATA/100 requirements. In addition, some legacy BIOS may cause a hang due to the large drive capacity. Consider using the alternate capacity jumper if it is available on your drive model.Use the alternate capacity jumper if your computer does not support higher capacity drives. The jumper will limit 40-Gbytes drives and larger to 32 Gbytes.Note.If these steps do not solve the problem, contact your dealer or visit to download SeaTools disc diagnosticssoftware and more troubleshooting advice.Seagate Support ServicesFor online information about Seagate products, visit ore-mailyourdiscquestionsto:***********************.If you need further help installing your drive, first consult your dealer. Dealers are familiar with their unique system configurations and can help you with system conflicts and other technical issues. If you need additional help, you can talk to a Seagate technical support specialist. Before calling, note your system configuration and drive model number.Africa+31-20-316-7222New Zealand0800-443988Australia1800-14-7201Norway800-113 91Austria0 800-20 12 90Poland00 800-311 12 38Belgium0 800-74 876Singapore800-1101-150Denmark80 88 12 66Spain900-98 31 24France0 800-90 90 52Sweden0 207 90 073Germany************Switzerland0 800-83 84 11Hong Kong800-90-0474T aiwan+886-2-2514-2237India1-600-33-1104Thailand001-800-11-0032165 Indonesia001-803-1-003-2165Turkey00 800-31 92 91 40Ireland 1 800-55 21 22United Kingdom************Italy800-790695USA/Canada/1-800-SEAGATE or Malaysia1-800-80-2335Latin America+1-405-936-1234Middle East+31-20-316-7222Other EuropeanNetherlands************Countries+ 31-20-316-7222 Warranty To determine the warranty status of your Seagate disc drive, contact your place of purchase or visit our Web site at for more information.RMA (Return Merchandise Authorization) Run SeaTools to diagnose your drive before requesting a return authorization. In addition, please verify that your drive is defective by following the troubleshooting checklist in this guide. Seagate offers comprehensive customer support for all Seagate drives worldwide. Seagate customer service centers are the only facilities authorized to service Seagate drives. Drive return procedures vary depending on geographical location and are subject to current International Trade Regulations.Shipping Your DriveCaution. Back up the data on your drive before shipping it. Seagate assumes no responsibility for data lost during shipping or drive repair. Shipping a drive in an unapproved container voids the warranty. Pack the drive with foam rubber only.Do not use peanuts, bubble wrap or newspapers.Keep your original box and packing materials for storing or shipping your drive. To preserve the warranty status of your drive, any product returned to Seagate must be properly packaged in the original box or a Seagate-approved container to prevent physical and electrical damage while in transit.Electromagnetic Compliance for the European Union This model complies with the European Union requirements of the Electromagnetic Compatibility Directive 89/336/EEC of 03 May 1989 as amended by Directive 92/31/EEC of 28 April 1992 and Directive 93/ 68/EEC of 22 July 1993. Compliance of this drive, as a system component, was confirmed with a test system. We cannot guarantee that your system will comply. The drive is not meant for external use (without properly designed enclosure, shielded I/O cable, etc.). Sicherheitsanleitung 1. Das Gerrät ist ein Einbaugerät, das für eine maximale Umgebungstemperatur von 55°C vorgesehen ist. 2. Zur Befestigung des Laufwerks werden 4 Schrauben 6-32 UNC-2A benötigt. Bei seitlicher Befestigung darf die maximale Länge der Schrauben im Chassis nicht mehr als 3,3 mm und bei Befestigung an der Unterseite nicht mehr als 5,08 mm betragen.3. Als Versorgungsspannugen werden benötigt: +5V ± 5% 0,6A; +12V ±% 0,8A (1,9A fur ca. 30 Sek. fur ± 10%)4. Die Versorgungsspannung muss SELV entsprechen.5. Alle Arbeiten auf dem Festplatte dürfen nur von Ausgebildetem Servicepersonal durchgeführt werden. Bitte entfernen Sie nicht die Aufschriftenschilder des Laufwerkes.6. Der Einbau des Laufwerkes muss den Anforderungen gemäss DIN IEC 950 VDE 0805/ 05.90 entspreche.© 2002 Seagate Technology LLC. All rights reserved.Publication Number: 100240407, Rev. A, Printed in USA, October 2002Seagate, Seagate Technology, and the Seagate logo are either registered trademarks or trademarks of Seagate Technology LLC. U7, DiscWizard, SeaShell and SeaShield are either registered trademarks or trademarks of Seagate Technology LLC. Other product names are registered trademarks or trademarks of their owners.。
如何让老主板支持大硬盘
如何让老主板支持大硬盘
(故障现象)我的主板是精英P6BAT-A+,PCB1.1近日由于原来的硬盘损坏,新购入希捷U6 40GB硬盘一个,但BIOS不认。
请问该如何处理才能使我的老主板支持大硬盘?
(分析处理)一般而言,对于比较新的或者是牌子比较好的主板,可以通过升级它的BIOS来支持最新的大硬盘而不必用DM之类的第三方软件。
比如你的主板可以到网上去下载最新的BIOS来升级。
这样,除了解决硬盘的问题外,他还更新乐为P III准备的新CPU代码。
,在“Chipset Feature”中添加“I/O Recovery Time”,支持ACPI功能,支持533MHz Pentium III CPU(133MHz X4)。
由此可见,通过升级BIOS,可以使一些老主板重新焕发青春。
对于不能升级BIOS的主板来说,只用通过DM或者其他工具来识别大硬盘。
让老主板识别大硬盘
让老主板识别大硬盘分类:硬盘2005.4.20 22:00 作者:bskl2008 | 评论:0 | 阅读:1047随着磁盘技术的更新,硬盘容量飞速暴涨,硬盘价格节节下跌。
人们纷纷掏钱购置10GB 以上的大硬盘。
但随之也带来了相应的问题,安装了大容量硬盘却不能使用全部硬盘空间,不知为何故?为什么会出现这种情况呢?还是让我们简要回顾一下这一问题的历史原因吧。
一、历史原因在最早的时候硬盘存在528MB与2.1GB的容量限制问题,笔者考虑到现在不会有人再使用386级的电脑或者用540MB的硬盘,所以对于上面两种容量限制,就不再加以说明了。
在这里重点说的是现在我们常常碰到的8.4GB容量限制问题。
由于老式的BOIS使用10bit表示柱面数,8bit表示磁头数,6bit表示扇区数,因此老式BOIS最多可以支持8.4GB的容量(512×63×255×1024=8.4GB)。
这就是8.4GB容量限制的原因,就这么简单。
大家都知道现在的硬盘容量早以突破了8.4GB,最高IDE硬盘容量已经达到了200GB以上。
因此如果不想出一个解决此问题的办法,硬盘容量再大也是白搭。
为了超越这个容量限制,人们又定义了新的扩展INT13。
新的INT13不使用操作系统的寄存器传递硬盘的寻址参数,它使用存储在操作系统内存里的地址包。
地址包里保存的是64位LBA地址,如果硬盘支持LBA寻址,就把低28位直接传递给ATA界面,如果不支持,操作系统就先把LBA地址转换为CHS地址,再传递给ATA界面。
通过这种方式,能实现在ATA总线基础上CHS寻址最大容量是136.9GB,而LBA寻址最大容量是137.4GB。
因此,要正常使用大容量硬盘,可以从软、硬件两方面来加以解决。
下面具体来说解决8.4GB容量限制的办法。
二、解决方法1. 升级主板或主板BIOS这是解决容量限制问题的最佳办法。
新的主板BIOS对磁盘读写中断INT13H进行了扩展,一般主板升级BIOS后即可支持 8.4G以上的磁盘。
电脑故障维修:原来老电脑也能用大硬盘
原来老电脑也能用大硬盘和笔者一样爱琢磨电脑的同事,近日在把单位一台原配置为15.2GB硬盘的电脑升级到80GB时遇到了问题,症状为直接安装好新硬盘后开机自检到硬件列表时死机。
多次重启后故障依旧,无奈向笔者求助。
经检查这是一台2000年购买的联想奔月4000型电脑,CPU为PⅢ650E,主板型号不详,内存条已升级到256MB。
看了电脑配置后,笔者基本可以肯定是由于主板太老不支持大容量硬盘导致,决定刷新主板BIOS试试。
为弄清主板具体型号,笔者拨通了联想800服务热线,在提供了主机编号后,联想工程师告诉我该电脑主板为一款OEM产品,没有具体型号资料可提供。
在听了笔者的症状描述后建议笔者把原15.2GB硬盘作为主盘安装Windows2000操作系统,将80GB 硬盘跳线为从盘,在BIOS设置中将从盘设为无,由Windows2000系统来识别新的80GB硬盘。
由于同事想利用15.2GB的硬盘自制移动硬盘,无奈笔者只得放弃工程师的建议。
既然在BIOS里(电脑自动关机)把硬盘设为自动识别时,并不能正确识别出新硬盘,笔者设想何不将主盘手动设置为一个假定参数,以便跳过自检死机现象进入系统安装步骤呢经过几次设置,发现只要将硬盘容量设为40GB以下参数时均可以自检通过,为最大限度地利用这块大硬盘,笔者最终设成了40GB,可在进行安装WindowsXPSP2系统过程中,提示创建分区时显示硬盘总容量只有8GB。
笔者觉得非常奇怪,决定干脆不分区直接安装,倒要看看最终会出现什么结果。
经过40多分钟的漫长等待,终于等来揭开谜底的时刻。
双击“我的电脑”,C盘显示78GB。
在同事的欢呼声中,笔者也悟出了一个道理,主板BIOS识别不了的大硬盘,通过安装新系统后是有可能完全被识别的。
原来老电脑也能用大硬盘。
电脑硬盘故障排除和维修技巧
电脑硬盘故障排除和维修技巧电脑硬盘是计算机的重要组成部分,存储着用户的各种数据和系统文件。
然而,由于使用过程中的各种原因,硬盘可能会出现故障,导致数据丢失或无法访问。
本文将介绍一些常见的硬盘故障排除和维修技巧,以帮助读者解决硬盘问题。
一、硬盘无法被识别或访问当电脑无法识别或访问硬盘时,首先需要检查以下几点:1.连接线路检查:检查硬盘与电脑之间的连接线,确保其牢固插入。
可以尝试重新插拔连接线,确保连接良好。
2.驱动程序更新:检查硬盘的驱动程序是否需要更新。
可以通过访问硬盘制造商的官方网站来获取最新的驱动程序并进行安装。
3.硬盘电源检查:确保硬盘所使用的电源是否正常工作。
可以尝试更换电源线或使用其他可靠的电源来排除电源问题。
如果上述方法无法解决问题,可能硬盘本身存在故障。
这时候可以尝试以下维修技巧:1.使用数据恢复软件:如果数据非常重要,并且无法通过其他方式访问硬盘,可以尝试使用数据恢复软件。
这些软件通常能够扫描硬盘并恢复丢失的数据。
2.更换电路板:硬盘的电路板可能会因为过电、过热等原因损坏。
如果有相同型号的硬盘,可以尝试更换电路板来解决问题。
3.找专业数据恢复机构:如果数据非常关键且自己无法解决问题,可以寻求专业的数据恢复机构的帮助。
这些机构通常有专业的设备和技术,可以有效地恢复硬盘中的数据。
二、硬盘出现异常声音当硬盘发出异常的响声时,表明硬盘可能存在故障。
以下是一些常见的声音和可能的原因:1.“咔嚓声”:这种声音通常表示硬盘的读写臂出现问题。
这可能是由于硬盘内部零件的损坏或松动导致的。
如果听到这种声音,应立即备份数据并联系专业人士进行维修。
2.“嘶嘶声”:这种声音可能表示硬盘的读写头磨损或接触不良。
这种情况下,也应及时备份数据并寻求专业维修。
3.“滴答声”:这种声音通常是硬盘的机械部件损坏或硬盘读写头与盘片接触不良所导致。
听到这种声音后,应立即停止使用硬盘,并找专业人士修复。
三、硬盘传输速度变慢当硬盘传输速度变慢时,可能是由以下原因引起的:1.磁盘碎片:长期使用后,硬盘上的数据可能会变得不连续,从而影响读写速度。
老主板使用大硬盘方案
老主板使用大硬盘方案在维修服务过程中,可能会遇到用户要求给老机器升级,其中升级硬盘时经常会发生老主板不支持大硬盘的情况,下面就此问题提供一些解决方法。
注:本方案中大硬盘指容量40G(含)以上的硬盘。
通过升级主板BIOS来实现:如果能找到新版BIOS的话,升级BIOS是首选方案,此方式操作简便,稳定性和兼容性也最好。
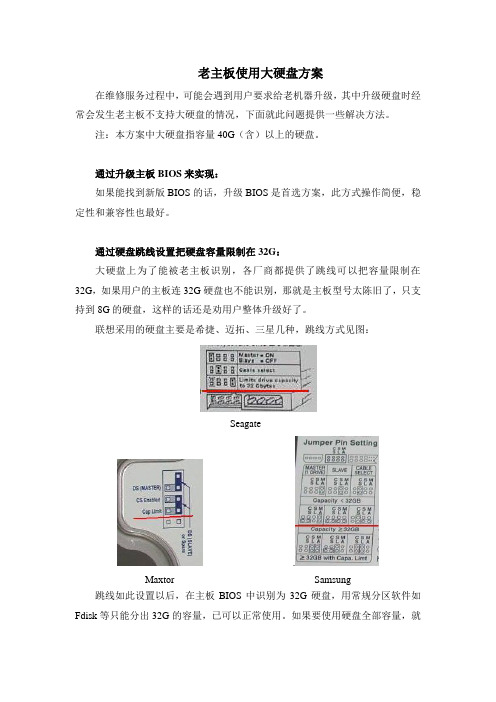
通过硬盘跳线设置把硬盘容量限制在32G:大硬盘上为了能被老主板识别,各厂商都提供了跳线可以把容量限制在32G,如果用户的主板连32G硬盘也不能识别,那就是主板型号太陈旧了,只支持到8G的硬盘,这样的话还是劝用户整体升级好了。
联想采用的硬盘主要是希捷、迈拓、三星几种,跳线方式见图:Seagate.Maxtor Samsung跳线如此设置以后,在主板BIOS中识别为32G硬盘,用常规分区软件如Fdisk等只能分出32G的容量,已可以正常使用。
如果要使用硬盘全部容量,就要继续使用一些特殊的工具软件来分区,但由于兼容性和稳定性方面难以保证,我们并不推荐使用。
此类各硬盘厂商都有提供,如IBM的EZ-BIOS、迈拓的Maxblast,希捷的DM(Disk Manager),因DM的通用性较好,这里以DM V9.56为例着重介绍DM的使用方法。
DM对大硬盘的分区操作大硬盘通常支持DMA66、DMA100甚至更高的工作模式,而一般老主板只支持DMA33标准的硬盘接口,因此只能使用DMA33标准的信号线,并把硬盘接在主板IDE2上,才能正常进行分区操作。
将DM拷贝到DOS启动盘中,然后用这张盘启动机器,进入DM的目录直接输入“dm”即可进入DM,开始一个说明窗口,按任意键进入主画面。
选DM主菜单中的“(E)asy Disk Install ation”即可完成分区工作,虽然方便,但是默认把全部容量给一个分区,不推荐使用。
建议选择“(A)dvanced Options”进入二级菜单,然后选择“(A)dvanced Disk Installati on”进行分区的工作。
- 1、下载文档前请自行甄别文档内容的完整性,平台不提供额外的编辑、内容补充、找答案等附加服务。
- 2、"仅部分预览"的文档,不可在线预览部分如存在完整性等问题,可反馈申请退款(可完整预览的文档不适用该条件!)。
- 3、如文档侵犯您的权益,请联系客服反馈,我们会尽快为您处理(人工客服工作时间:9:00-18:30)。
老主板安装希捷大硬盘
以前见到过关于老主板安装大硬盘的文章,但都没仔细读过,总以为那是486级别的老爷机才会出现的问题。
买了个希捷的40GB硬盘回家后才发现,自己的Intel 430LX主板不支持33GB以上硬盘!从报上、网上找了一些资料,没有一篇是针对我的希捷硬盘写的。
经过几天的摸索,终于成功,现将老主板安装希捷硬盘的方法拿出来与大家共享。
在安装硬盘前,要下载希捷的专用管理工具DiskManager。
希捷的官方网站下载页在
/support/disc/drivers/discwiz ard_16bit_download.html,驱动之家的下载页是
/cgi-bin/disk/840,1.htm。
下载后的程序是一个可执行文件,运行后插入空白软盘并一路回车即可得到一张DM启动盘。
接下来对新硬盘进行操作。
首先,关机断电,取下旧硬盘,将新硬盘跳为主盘换上,开机进入BIOS,将STANARD CMOS SETUP中的Primary Master TYPE设为NONE,保存后插入DM启动盘并重启。
用启动盘启动电脑后软件会自动寻找硬盘,如发现希捷硬盘则出现欢迎屏幕,按回车即可进入。
进入管理界面后选择Advanced options(高级选项)
→Maintenance option(维护选项)→Utilites(实用功能),屏幕左边会出现找到的硬盘,右边是硬盘的几个基本数据。
在新硬盘上回车,又出现一个菜单,选Set Drive Size(设置硬盘大小),出现蓝色背景提示,回车继续,这时会有一个字符框让你输入想要设置的硬盘大小。
注意,此处的改变并不会影响硬盘的真正大小,只不过是用来骗骗主板罢了。
已经在输入框内的大小正好是33GB,如果你的主板和我的一样是430LX/EX的,直接回车即可。
如果是更老的主板,就再改小点吧,就是改成1MB也不要紧的。
在接下来出现的警告屏中按Alt+C完成操作,重启时将BIOS中的Primary Master TYPE/MODE设为AUTO/AUTO,保存并重启后你会发现硬盘被认出来了!
因为硬盘是以33GB的身份“混”进电脑的,所以硬盘启动时会加载一个叫做ONTRACK的东东,它可以让你完整的使用全部硬盘空间。
并不像有的文章所说,有了这个ONTRACK的硬盘就不能拿到别的电脑上使用了。
我把装过ONTRACK的硬盘装到能够正确识别大硬盘的电脑上,照样可以使用,数据也丝毫无损。
经过一段时间的摸索发现,ONTRACK对硬盘的使用没有什么影响,甚至用FDISK和SYSTEM COMMANDER分区并安装多操作系统,也一点问题都没有。
与不安装ONTRACK时的一点区别是只能在出现蓝色提示后才可以用软盘启动并对硬盘进行操作。
方便起见,BIOS中
的启动顺序只设为C only就行了,惟一的遗憾就是不能用光盘启动了。
老主板安装希捷大硬盘。