味达维皇家系列说明书
Vitamix PRO750料理机中文说明书

控制面板1.ON/OFF SWITCH (开关按钮/电源开关):开关按钮在机器侧面右边最后端(在控制面板与开关指示灯之下)。
开关按钮控制着料理机的动力(电力)。
插上电源之后,将开关按钮按至ON,料理机便通电并预备好运作了。
晚上或不再使用料理机时请将开关按钮关闭(按至OFF)2.ON/OFF Light(开关指示灯):开关指示灯在控制面板之下。
当开关指示灯亮时,表明电源已经接通,并且开关按钮已经调至ON(开启)状态。
如果您使用预设程序(预设程序包括:SMOOTHIES 冰沙;FROZEN DESSERTS 冷冻甜品, HOT SOUPS 热汤)时,当料理机即将完成您的预设指令时,开关指示灯会闪烁。
3.Start/Stop Switch (开始/停止按钮):向下按压开始/停止开关,料理机便会按照您所选用的转速(1-9 转速)或者预设程序运转(SMOOTHIES,FROZEN DESSERTS,HOT SOUPS)。
4.Variable Speed/ Programming Dial 变速转盘/预设程序转盘:控制面板中央的变速/预设程序转盘具有两个功能:当按钮旋转至左边区域时,并按压START/STOP 开始/停止按钮,料理机会执行预设程序。
当按钮旋转至右边时,料理机会按照您选用的转速运转。
当您需要让机器停止运作时,请再次按压开始/停止按钮。
Pulse Switch 脉冲键:脉冲键是为了让料理机执行短暂性的操作与运转(比如您选用了预设程序打冰沙,但料理机停止运转时,您又想让它打的更细腻些,这时便可按下脉冲键,让机器继续运作一会)当变速/预设程序转盘中间的按钮转向右边区域的时候,在您持续按住脉冲键的期间,料理机会按照按钮指向的转速运转。
当您将中间的旋转按钮转向左边的预设程序,并按住脉冲键,料理机的运转速度是预设程序原先运转速度的50%。
重要提示:在机器按照预设程序键运转期间,如果您要让机器停止运作,请使用Start/Stop Switch 开始/停止按钮,而不是开关按钮。
菲仕乐高压锅说明书.docx

当您使用本产品超过400次或者2年左右.需要定期更换遭受磨损的雪部件.比如硅胶圈或者其他橡胶部分「 需要更换零部件时.请使用菲仕乐的正品•:当肉眼即可看到一些詹损时(晋如出现裂口.变色.变形)或者 不匹配.请立即更换 否则.它会影响到锅的工作性能和安全性
3•这3个颜色的是出气指示阀的,黄色的出现表示可以lE常升床,绿色的是己经 达到最佳状态了,可以关小火了,红色的耍是出现了,表示锅子里边床力过大, 一足耍立马转小火,耍不容易损坏配件之类的,并且火太大,有可能方向阀和压 力阀的地方会冒气出来,这个是正常现象,主耍是为了平衡里边压力的。
4.这个是档位调节的,1档的是108。, 2档的是118。的
vitavitcomfort压力锅
Fissler.Perfect every time.
这款的高斥锅是6L的一般做饭的时候箜按照个人的饭呈多少來做的哦
最人的水位线耍离锅边4cm左右耍不然就会溢出來的不耍太簡的哦
一般做肉类的话 是15到20分钟左右的
蔬菜的话10分钟左右就可以了
水的比例这个就耍看亲的控制了,一般用锅蒸米饭的话
请不要将本产品用干医疗用途.特别是把它当作消苗器.因为高速快锅达不到杀菌所需要的温度。
请不要在高速快锅中炖水果或者苹果酱,因为当您打开锅盖时蒸汽会飞溅引起烫伤
烹饪带皮的肉类或其他食物时.皮在膨胀的时候.请不要对其开孔 以免被烫伤,
安全维护
每次使用本产品之前.请确保所有的阀门和安全装直未破堵塞和损坏.并且他们能正常运作.这是确保高速 快锅使用时安全的唯一途径.您可以在第五章中找到相关信息。
6 Serie Forno da Incasso 60 x 60 cm 产品说明书
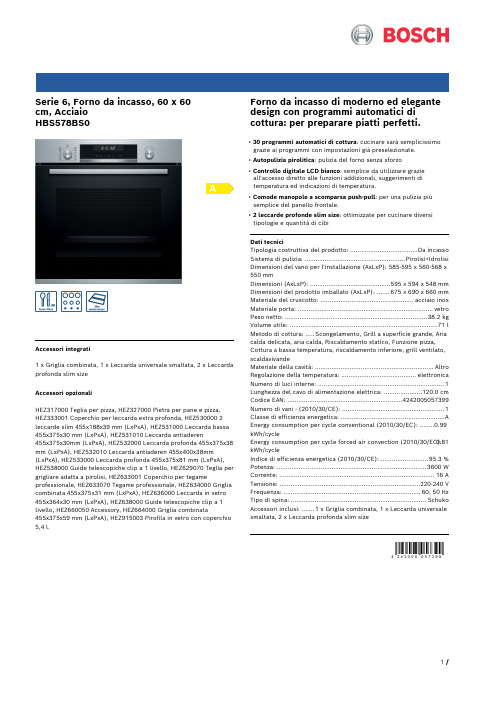
Serie 6, Forno da incasso, 60 x 60cm, AcciaioHBS578BS0Accessori integrati1 x Griglia combinata, 1 x Leccarda universale smaltata,2 x Leccarda profonda slim sizeAccessori opzionaliHEZ317000 Teglia per pizza, HEZ327000 Pietra per pane e pizza, HEZ333001 Coperchio per leccarda extra profonda, HEZ530000 2 leccarde slim 455x188x39 mm (LxPxA), HEZ531000 Leccarda bassa 455x375x30 mm (LxPxA), HEZ531010 Leccarda antiaderen455x375x30mm (LxPxA), HEZ532000 Leccarda profonda 455x375x38 mm (LxPxA), HEZ532010 Leccarda antiaderen 455x400x38mm (LxPxA), HEZ533000 Leccarda profonda 455x375x81 mm (LxPxA), HEZ538000 Guide telescopiche clip a 1 livello, HEZ629070 Teglia per grigliare adatta a pirolisi, HEZ633001 Coperchio per tegame professionale, HEZ633070 Tegame professionale, HEZ634000 Griglia combinata 455x375x31 mm (LxPxA), HEZ636000 Leccarda in vetro 455x364x30 mm (LxPxA), HEZ638000 Guide telescopiche clip a 1 livello, HEZ660050 Accessory, HEZ664000 Griglia combinata455x375x59 mm (LxPxA), HEZ915003 Pirofila in vetro con coperchio 5,4 l.Forno da incasso di moderno ed elegante design con programmi automatici di cottura: per preparare piatti perfetti.• 30 programmi automatici di cottura: cucinare sarà semplicissimo grazie ai programmi con impostazioni già preselezionate.• Autopulizia pirolitica: pulizia del forno senza sforzo• Controllo digitale LCD bianco: semplice da utilizzare grazieall'accesso diretto alle funzioni addizionali, suggerimenti di temperatura ed indicazioni di temperatura.• Comode manopole a scomparsa push-pull: per una pulizia piùsemplice del panello frontale.• 2 leccarde profonde slim size: ottimizzate per cucinare diversi tipologie e quantità di cibiDati tecniciTipologia costruttiva del prodotto: .....................................Da incasso Sistema di pulizia: .......................................................Pirolisi+Idrolisi Dimensioni del vano per l'installazione (AxLxP): 585-595 x 560-568 x 550 mmDimensioni (AxLxP): ............................................595 x 594 x 548 mm Dimensioni del prodotto imballato (AxLxP): .......675 x 690 x 660 mm Materiale del cruscotto: ...................................................acciaio inox Materiale porta: ..........................................................................vetro Peso netto: ..............................................................................38.2 kg Volume utile: .................................................................................71 l Metodo di cottura: .....Scongelamento, Grill a superficie grande, Aria calda delicata, aria calda, Riscaldamento statico, Funzione pizza, Cottura a bassa temperatura, riscaldamento inferiore, grill ventilato, scaldavivandeMateriale della cavità: .................................................................Altro Regolazione della temperatura: .........................................elettronica Numero di luci interne: (1)Lunghezza del cavo di alimentazione elettrica: .....................120.0 cm Codice EAN: (4242005057399)Numero di vani - (2010/30/CE): (1)Classe di efficienza energetica: .........................................................A Energy consumption per cycle conventional (2010/30/EC): ........0.99 kWh/cycleEnergy consumption per cycle forced air convection (2010/30/EC):0.81 kWh/cycleIndice di efficienza energetica (2010/30/CE): ..........................95.3 % Potenza: ..................................................................................3600 W Corrente: .....................................................................................16 A Tensione: .............................................................................220-240 V Frequenza: ...........................................................................60; 50 Hz Tipo di spina: ..........................................................................Schuko Accessori inclusi: .......1 x Griglia combinata, 1 x Leccarda universale smaltata, 2 x Leccarda profonda slim sizeSerie 6, Forno da incasso, 60 x 60cm, AcciaioHBS578BS0Forno da incasso di moderno ed elegante design con programmi automatici di cottura: per preparare piatti perfetti.- HBS578BS0- Forno pirolitico Classe A InoxCaratteristiche principali- 10 programmi di cottura: MultiCottura HotAir 3D, Riscaldamento superiore e inferiore, Grill ventilato, Grill a superficie grande, Funzione pizza, Riscaldamento inferiore, Cottura a bassa temperatura, Scongelamento, Mantenere in caldo- Display digitale LCD bianco- Volume cavità: 71 l- Regolazione della temperatura da 30 °C a 275 °C- Programmi automatici: 30- Autopulizia pirolitica- Cleaning AssistanceAltre caratteristiche- Temperatura porta max. 30 °C- Riscaldamento rapido- Illuminazione interna alogena, Illuminazione disinseribile- Orologio elettronico con impostazione inizio e fine cottura- Settaggio temperatura tramite manopola, Comode manopole a scomparsa push-pullSistema di controllo- Sistema di cottura assistita: Programmi automaticiAccessori- Accessori: 1 leccarda universale profonda smaltata, 1 griglia combinata, Leccarda profonda slim sizeEtichetta energetica- Assorbimento massimo elettrico: 3.6 kW- Classe di efficienza energetica (acc. EU Nr. 65/2014): A(in una scala di classi di efficienza energetica da A+++ a D)- Consumo energetico per ciclo durante funzionamento convenzionale:0.99 kWh- Consumo energetico per ciclo durante funzionamento ventilato:0.81 kWh- Numero di cavità: 1 Tipo di alimentazione: elettrica Volume della cavità:71 lSerie 6, Forno da incasso, 60 x 60cm, Acciaio HBS578BS0。
royal简单操作说明

Saeco royal 机型简单操作说明1.插上电源,打开主开关(在机器左侧下方)。
2.WARMING UP
表示预热请稍等。
3.ENERGY SA VING
表示待机状态,此时不能制作咖啡,按先MENU键,再按ESC键即可。
4.SELECT PRODUCT READY FOR USE
表示随时准备工作。
5.WATERTANK EMPTY
水箱缺水,请加水。
6.DREGDRAWER FULL
废渣盒满了,请清理废渣。
7.COF。
BEANSEMPTY
豆箱空了,请加豆。
8.VENTILA
有多余蒸汽或水,请打开蒸汽旋钮或是热水键。
9.BREW UNIT MISS
中心煮件没有安装好,请重新安装冲泡器。
10.DREGDRAWER MISS
废渣盒未安装好,请重新安装。
11.DESCALING
机器需要除垢,请参照说明书用专用除垢药水除垢
12.BREW UNIT BLOCK
清洁中心煮件
13.GRINDER BLOCKED
对磨豆机进行清洁,请联系工程师。
VAV系统空调设备手册-Royal-20091020

出风
干球 温度
冷冻水 流量
(95%
RH)
热水 流量
新风
新风 量
新风温 新风温 新风 干球 湿球 温度 (夏季) (夏季) (冬季)
加湿 量
机组尺寸
长宽高 LWH
备注
M3/H M3/H
Pa
KW 全热 (KW)
℃
℃
℃
%
℃ 水流量 L/S L/S
M3/H
℃
℃
℃ Kg/h mm mm mm
22 AHU-27F28F-02 K-22-06 30000 28640 710 18.5 222 8 13 29.5 39 13 10.59 2.56 5240 29 26 -9 32 4840 2970 1600 23 AHU-29F30F-01 K-22-07 30000 28660 710 18.5 222 8 13 29.5 39 13 10.62 2.56 5490 29 26 -9 32 4840 2970 1600 24 AHU-29F30F-02 K-22-08 30000 28640 710 18.5 222 8 13 29.5 39 13 10.59 2.56 5240 29 26 -9 32 4840 2970 1600 25 AHU-31F32F-01 K-35-01 30000 28660 710 18.5 222 8 13 29.5 39 13 10.62 2.56 5490 29 26 -9 32 4840 2970 1600 26 AHU-31F32F-02 K-35-02 30000 28640 710 18.5 222 8 13 29.5 39 13 10.59 2.56 5240 29 26 -9 32 4840 2970 1600 27 AHU-33F34F-01 K-35-03 30000 28660 710 18.5 222 8 13 29.5 39 13 10.62 2.56 5490 29 26 -9 32 4840 2970 1600 28 AHU-33F34F-02 K-35-04 30000 28640 710 18.5 222 8 13 29.5 39 13 10.59 2.56 5240 29 26 -9 32 4840 2970 1600 29 AHU-36F37F-01 K-35-05 30000 29350 710 18.5 224 8 13 29.5 39 13 10.69 2.56 5260 29 26 -9 32 4840 2970 1600 30 AHU-36F37F-02 K-35-06 30000 30360 710 18.5 234 8 13 29.5 39 13 11.19 2.56 5470 29 26 -9 32 4840 2970 1600 31 AHU-38F39F-01 K-35-07 30000 29350 710 18.5 224 8 13 29.5 39 13 10.69 2.56 5260 29 26 -9 32 4840 2970 1600 32 AHU-38F39F-02 K-35-08 30000 30330 710 18.5 233 8 13 29.5 39 13 11.15 2.56 5470 29 26 -9 32 4840 2970 1600 33 AHU-40F41F-01 K-35-09 30000 29350 710 18.5 224 8 13 29.5 39 13 10.69 2.56 5260 29 26 -9 32 4840 2970 1600 34 AHU-40F41F-02 K-35-10 30000 30120 710 18.5 231 8 13 29.5 39 13 11.04 2.56 5400 29 26 -9 32 4840 2970 1600 35 AHU-42F43F-01 K-35-11 30000 29350 710 18.5 224 8 13 29.5 39 13 10.69 2.56 5260 29 26 -9 32 4840 2970 1600 36 AHU-42F43F-02 K-35-12 30000 29870 710 18.5 228 8 13 29.5 39 13 10.90 2.56 5310 29 26 -9 32 4840 2970 1600 37 AHU-44F45F-01 K-51-01 30000 29350 710 18.5 224 8 13 29.5 39 13 10.69 2.56 5260 29 26 -9 32 4840 2970 1600 38 AHU-44F45F-02 K-51-02 30000 29580 710 18.5 227 8 13 29.5 39 13 10.82 2.56 5320 29 26 -9 32 4840 2970 1600 39 AHU-46F47F-01 K-51-03 30000 29250 710 18.5 223 8 13 29.5 39 13 10.65 2.56 5260 29 26 -9 32 4840 2970 1600 40 AHU-46F47F-02 K-51-04 30000 29770 710 18.5 228 8 13 29.5 39 13 10.88 2.56 5340 29 26 -9 32 4840 2970 1600 41 AHU-48F49F-01 K-51-05 30000 29020 710 18.5 222 8 13 29.5 39 13 10.62 2.56 5350 29 26 -9 32 4840 2970 1600 42 AHU-48F49F-02 K-51-06 30000 29190 710 18.5 223 8 13 29.5 39 13 10.64 2.56 5240 29 26 -9 32 4840 2970 1600
Garland 商业烹饪机 产品说明书
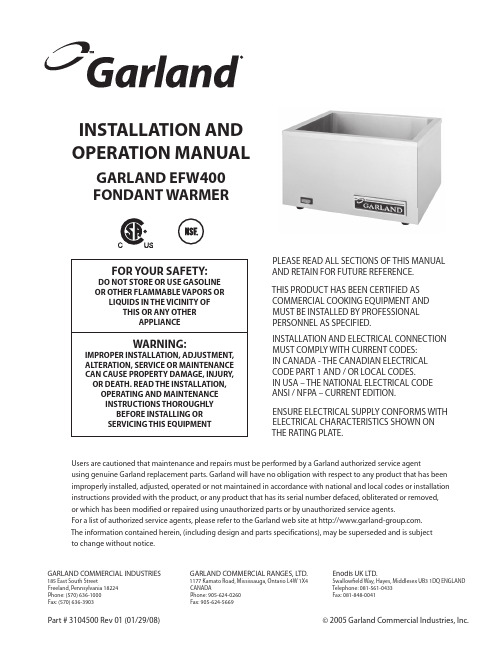
Part # 3104500 Rev. 01 (01/29/08)Page 1Users are cautioned that maintenance and repairs must be performed by a Garland authorized service agent using genuine Garland replacement parts. Garland will have no obligation with respect to any product that has been improperly installed, adjusted, operated or not maintained in accordance with national and local codes or installation instructions provided with the product, or any product that has its serial number defaced, obliterated or removed, or which has been modified or repaired using unauthorized parts or by unauthorized service agents.For a list of authorized service agents, please refer to the Garland web site at . The information contained herein, (including design and parts specifications), may be superseded and is subject to change without notice.GARLAND COMMERCIAL INDUSTRIES 185 East South Street Freeland, Pennsylvania 18224Phone: (570) 636-1000Fax: (570) 636-3903GARLAND COMMERCIAL RANGES, LTD.1177 Kamato Road, Mississauga, Ontario L4W 1X4CANADA Phone: 905-624-0260Fax: 905-624-5669Enodis UK LTD.Swallowfi eld Way, Hayes, Middlesex UB3 1DQ ENGLAND Telephone: 081-561-0433Fax: 081-848-0041Part # 3104500 Rev 01 (01/29/08)© 2005 Garland Commercial Industries, Inc.FOR YOUR SAFETY:DO NOT STORE OR USE GASOLINE OR OTHER FLAMMABLE VAPORS OR LIQUIDS IN THE VICINITY OF THIS OR ANY OTHER APPLIANCE WARNING:IMPROPER INSTALLATION, ADJUSTMENT, ALTERATION, SERVICE OR MAINTENANCE CAN CAUSE PROPERTY DAMAGE, INJURY, OR DEATH. READ THE INSTALLATION, OPERATING AND MAINTENANCE INSTRUCTIONS THOROUGHLY BEFORE INSTALLING ORSERVICING THIS EQUIPMENTINSTALLATION AND OPERATION MANUALGARLAND EFW400 FONDANT WARMERPLEASE READ ALL SECTIONS OF THIS MANUAL AND RETAIN FOR FUTURE REFERENCE.THIS PRODUCT HAS BEEN CERTIFIED AS COMMERCIAL COOKING EQUIPMENT AND MUST BE INSTALLED BY PROFESSIONAL PERSONNEL AS SPECIFIED.INSTALLATION AND ELECTRICAL CONNECTION MUST COMPLY WITH CURRENT CODES:IN CANADA - THE CANADIAN ELECTRICAL CODE PART 1 AND / OR LOCAL CODES.IN USA – THE NATIONAL ELECTRICAL CODE ANSI / NFPA – CURRENT EDITION.ENSURE ELECTRICAL SUPPLY CONFORMS WITH ELECTRICAL CHARACTERISTICS SHOWN ON THE RATING PLATE.GENERAL INFORMATIONUnpackingCarefully remove unit from carton. Remove all packing materials, any protective material covering the stainless steel should be removed immediately after the unit is installed. Serial Plate LocationElectrical rating is shown on the serial plate and is readily visible on the rear of the unit next to the power supply cord inlet.NOTE: Ensure electrical supply conforms with electrical characteristics shown on the rating plate.Safety• A qualified person must make the installation in accordance with the authority having jurisdiction andlocal codes.• This unit must only be operated by a qualified person. DO NOT operate without reading this manual.• DO NOT operate this appliance unless all service and access panels are in place and fastened properly.• DO NOT attempt to repair or replace any part of this appliance unless all main power supplies have beendisconnected.• DO NOT clean this appliance unless the power supply is disconnected.• DO NOT immerse appliance in water. WARNINGTo avoid serious personal injury:• USE EXTREME CAUTION in setting up, operating and cleaning these appliances to avoid coming in contactwith hot surfaces. Suitable protective clothing should be worn or proper utensils to prevent the risk of burns.• NOTE all warning labels and markings on this appliance, which call attention to further dangers and necessaryprecautions.Wall ClearancesBack: 0Sides: 0National Code RequirementsThe installation and connection should comply with current codes: In Canada - The Canadian Electrical Code Part 1 and / or local codes. In USA – The National Electrical Code ANSI / NFPA – current edition.OPERATING INSTRUCTIONSThis appliance has been designed to have water in the tank for even heating. Before first use it is recommended that the inside of the tank be cleaned with a detergent soaked cloth, to remove fabricating and protective oils. Rinse with clean water and dry with a clean cloth.1. Fill the tank with water so that the level is between theminimum and maximum embossed lines on the inside wall of the tank.2. Insert pan with a maximum depth not exceeding 4”(102mm)3. Plug appliance into electrical outlet.4. Turn on appliance with green switch. The appliance willheat the bath of water and maintain it at 130°F to 140°F (54° C to 60°C).Part # 3104500 Rev. 01 (01/29/08)Page 2NOTE: Periodic checks should be made during the operatingduration to ensure that the water level does not get belowthe lower embossed line. Should it do so, top up with freshwater.OPERATING INSTRUCTIONS continued MAINTENANCE AND CLEANINGDaily MaintenanceEmpty the water from the tank and clean any lime deposit with a non-metallic scouring pad. Clean with a cloth soaked in a mild detergent and hot water. Rinse with a sponge dipped in clean hot water dry with a clean cloth. CleaningStainless steel should be cleaned using a mild detergent, a soft cloth and hot water. If it is necessary, use a non-metallic scouring pad to remove stubborn grime. Always rub in the direction of the grain in the metal to prevent scratching. Wash a small area at a time and rinse the washed area with a clean sponge dipped into a disinfectant and wipe dry with a soft clean cloth.Use only stainless steel, wood, or plastic tools to scrape off heavy deposits. Do not use ordinary steel scrapers or knives, as particles of iron may become embedded and rust. NEVER USE STEEL WOOL.Preventative MaintenanceTo ensure long life, efficient and safe operation or your equipment, it is recommended that a maintenance and servicing program be performed at regular intervals, the frequency of which will vary, depending on the installation conditions and amount of usage.Competent persons in accordance with the authority having jurisdiction must carry out all servicing and repairs.It is essential that the instructions in this manual be strictly followed for the safe and economical operation of this equipment. If it is known or suspected that a fault exists on an appliance, then that appliance must not be used until the fault has been rectified by a competent person.Part # 3104500 Rev. 01 (01/29/08)Page 3。
皇家烧烤 Royal Gourmet 三合一煤气 煤炭烧烤机 ZH3003S15 用户指南说明书

hotline***************************Durable Stainless Steel 3-Burner Gas/Charcoal Combo GrillModel: ZH3003S151920-2122-2326Preparation 67-14151617-18Trouble Shooting Guide Warranty and Customer Service Grilling Recipes24-25LP Gas and Cylinder Information Cylinder SpecificationsLP Cylinder Leak Testatserioushotline. or hot.AT ALL TIMES .2135891513186741412101116172124232225192627202829343133323012141553B6Aback support4A25back support12the shelvesthe rear shelves shelves6A rear AF722andC.rightshelf822andC.leftshelf94A and 4Cfront support10A211cart front beamand to back support1413the124AHwith 2 bolts (I) and 2 nuts (F)with 2 bolts (A).131415161015,i 16Install tank base upper (17) to the bottom shelfAthermal baffles 18 to Assemble8Cand middle brace171819201119Alid handle (20) to lid with 4 bolts (A)419firebox cartHalf screw 4 bolts (A) to shown positions of both sides of firebox.Assemble the side table (L) (21)to the fireboxby hanging it to the half screwed bolts, fasten it with 4 bolts (A). Then secure the half screwed bolts.Assemble the side table (R) (22)to the firebox by hanging it to the half screwed bolts, fasten it with 4 bolts (A). Then secure the half screwed bolts.2112A23248A23252428262728Assemble the grease cup brace (30) to the grease tray (29) with 4 bolts (D) and 4 nuts (G).1330underneath the fireboxes.(31) and grease tray (29)Attach the grease cup (32) underneath the grease tray .33f2s the middle bottle opener fireboxess3414Your new gas grill operates on LP (Liquid Petroleum )Gas.It is odorless,colorless,and non-toxic when produced. You can smell LP gas as it has been given an odor similar to rotten cabbage for your safety.Never leave the grill unattended or move the grill when in use.It will provide you with many years of enjoyment but a minimal amount of maintenance needed.when the burners go out in cookingwhenair ventreconstructiveDo not obstruct the flow of air for combustion and ventilation .1516metricscleaning productsProduction of bubbles indicates a gas leak.17erat all times. regulatorregulator1819grill2021EmergenciesPossible cause Prevention/ SolutionTroubleshooting: Problem Possible cause Prevention/ SolutionGas leaking from cracked/cut/burned hoseGrease fire or continuousexcessive flames above cooking surfaceToo much grease buildup in burner areaTurn off LP Tank. Leave lid open to allow flames to die down. After cooling, clean food particles and excess grease from inside firebox area, grease cup/pan/tray, and other surfacesBurner will not light using ignitorBurner will not light using ignitorGas issues1. Trying to light wrong burner2. Burner not engaged with control valve3. Obstruction in burner4. No gas flow5. Vapor lock at coupling nut to LP tank6. Coupling nut and LP tank valve not fully connected.Electrical issues:1. Electrode cracked or broken;” sparks at crack.”2. Electrode tip not in proper position3. Wire and/or electrode covered with cooking residue.4. Wires are loose or disconnected5. Wires are shorting (sparking) between igitor and electrode.6. Push button sticks at bottom sparking between ignitor and electrode1. Replace electrode.2. Tip of electrode should be pointingtoward port hole in burner. The distance should be 1/8” to 3/16”. Adjust if necessary.3. Clean wire and or electrode with rubbing alcohol and clean swab.4. Reconnect wires or replace electrode/ wire assembly.5. Replace ignitor wire6. Replace ignitor7. Inspect wire insulation and proper connection. Replace wires if insulation is broken.1. See instructions on control panel and section in the Use and Care.2. Make sure valve are positioned inside of burner tubes.3. Ensure burner tubes are not obstructed with spider webs or other matted, see cleaning section of use and care4. Make sure LP tank is not empty. If LP tank is not empty, refer to “sudden drop in gas flow.5. Turn off knobs and disconnect coupling nut from LP tank. Reconnect and retry.6. Turn the coupling nut approximately one-half to three-quartersDamaged hoseTurn off gas at LP tank, if hoes is cut or cracked, replace hose.See LP tank lead test and connection regulator to the LP Gas leaking from LP tank Mechanical failure due to resting or mishandlingTurn off LP tank valveFailure or tank valve from mishandling or mechanical failureTurn off LP tank valve. Return LP tank to gas supplierImproper installation, untight connection , failure of rubber sealTurn off LP tank valve, remove regulator from cylinder and visually inspect rubber seal for damage, see LP tank test and connection regulator to the LP tank Turn off control knobs and LP tank valve. After fire is out and grill is cold, remove burner and inspect for spider nests or rust. see natural hazard and cleaning the burner assembly pages.Fire in burner tube section of burner due to partial blockageGas leaking from LP tank valveGas leaking between LP tank and regulator connectionFire coming through control panel 22Troubleshooting: ProblemBurner will not match light Sudden drop in gas flow or low flameFlames blow outPersistent grease fire Flashback…(fire in burner tube(s)Flare-upUnable to fill LP tankOne burner does not light from other burner(s)See ”gas issues;” on previous page.2. Improper method of match-lighting1. Grease buildup.2. Excessive fat in meat.3. Excessive cooking temperatureHigh or gusting winds. Low on LP gas.Excess flow valve tripped.Grease trapped by food buildup aroundburner system.Burner and burner tubes are blocked1. Grease buildup.2. Excessive fat in meat.3. Excessive cooking temperatureSome dealers have older fill nozzles withworn threads.Grease buildup or food particles in end ofcarryover tubeTurn knobs to OFF. Turn gas off at LP tank.Leave lid in position and let fire burn out.After grill cools, remove and clean all partsTurn knobs to OFF. clean burnerand/or burner tubes. See burner cleaningsection of use and care manual1. Clean burners and inside of grill/firebox2. Trim fat from meat before grilling.3. Adjust (lower) temperatureTurn worn nozzles don’t have enough“bite” to engage the valve. Try a secondLP dealer.Clean carry-over tube with wire brushTurn front of grill to face wind or increaseflame height.Refill LP tank.Refer to “sudden drop in gas flow” above.1. See “Pilot Gas Control Ignition” sectionof use and care.1. Clean burners and inside of grill/ firebox2. Trim fat from meat before grilling. Possible cause Prevention/ SolutionIf your problem is not resolved from the information above, please Contact your local gas dealer.a) Turn the burner on for 15 to 20 minutes. Ensure appliance is cold before continuing.b) Grids should be cleaned periodically by soaking and washing in soapy water.c) The interior surfaces of the grill housing cover should also be washed with hot, soapy water. Use a wire brush, steel wool or a scouring pad to remove stubborn spots.d) Periodically check the burner to see that it is free from insects and spiders which may clog the gas system, deflecting gas flow. Ensure to clean venturi pipes on burner very carefully, make sure that there are no obstructions. We recommend that you use a pipe cleaner to clean the venturi pipe area.e) Any modifications of this appliance may be dangerous and are not permitted.Safety RemindersStand your gas grill on a safe level surface, away from inflammable items such as wooden fences or overhanging tree branches.Never use your gas grill indoors!Once lit do not move your gas grill or leave it unattended.Keep children and pets at a safe distance from the gas grill.Keep a fire extinguisher handy.The gas grill will become hot when in use, so handle lids etc. with the help of gloves.Ensure that the appliance has completely cooled down before storing.Notes:23Direct Heat24STEAK (& ALL MEATS):• Cook food on the charcoal side of the unit, directly above coals/heat.• To grill meats, raise fire grate to high position (hot) and sear for one minute on each side withthe lid o pen to seal in flavor and juices. Then lower fire grate to medium position with lid closed and cook• Control heat with dual dampers and adjustable fire grate.Tip: Place grilled meat back in the marinade for and juicie r.CAUTION: Boil extra marinade first to kill bacteria MARINATED FLANK STEAK:• Mix marinade ingredients in nonmetal dish. • Let steak stand in marinade for no less than 4 hours in refrigerator.• Brown each side for 5 minutes, but center should remain rare.• Cut steak diagonally across the grain into thin slices before serving.• Grill with fire grate in high (hot) position with lid Meat Marinade1/2 cup vegetable or olive oil 1/3 cup soy sauce1/4 cup red wine vinegar 2 tbsp lemon juice 1 tsp dry mustard 1 minced clove garlic 1 small minced onion 1/4 tsp pepper QUAIL OR DOVES:• Cover birds with good seasons and marinate overnight.• Pour remaining dressing and cover with Texas Pete Hot Sauce for 6 hours.• Wrap birds in thick bacon secured by a toothpick. • Place on grill. Keep turning until bacon is black. • Grill for 20 minutes. Sear with lid open and fi re before lowering grate and closing lid.• KABOBS:• Alternating on skewers any combination of meat, onions, tomatoes, green peppers, mushrooms,zucchini, c ircular slice of scallops, lobster, chicken, • Marinate the meat in refrigerator for several hours. • Grill each side approximately 7 minutes turning occasionally while basting with marinade.Leave a small amount of room between pieces in order • to desired doneness.several minutes before serving – it will become tastier remaining from the raw meat.open or closed.corn-on-the-cob, or pineapple. Meatcould consist of shrimp,sausage, pork, beef, etc.grate in high (hot) position for 1 minute on each side Kabob Marinade:1 cup soy sauce ½ cup brown sugar ½ cup vinegar½ cup pineapple juice 2 tsp salt½ tsp garlic powder• Mix all ingredients in a saucepan and bring to boil.• Allow marinade to cool before marinating your meat in it.• Marinate beef in mixture a minimum of 4 hours.HOT DOGS:• Grill with lid up and cooking grates in high(hot)position for approximately 6 minutes.• Turn every few minutes. HAMBURGERS:See meat marinade on prior pages.You may also marinate by allowing to stand in marinade for 1 or 2 hours at room temperture before cooking or let stand in covered dish in refrigerator up to 24 hours.• Bring to room temperature before cooking.• Mix in chopped onions, green peppers, salt, sear 3/4 inch patties on each side with cooking grates in high position for a few minutes.• Lower fi re grate to medium position and grill with lid down to avoid flare-ups.• Cook each side 3 to 7 minutes according to desired doneness.• Cook ground meat to 150 internally or until juice runs clear (free of blood) for prevention of E-coli. • Burgers can be basted with marinade when turning and/or other ingredients can be mixed in with the ground beef such as chili sauce or powder. SHRIMP (Peeled) & CRAYFISH:• Place on skewers.• Coat with melted butter and garlic salt.• Grill 4 minutes on each side or until pink. Cocktail sauce optional.BAKED POTATOES:• Rub with butter and wrap in foil and cook on grill with lid down for 50 minutes.• Turn after 25 minutes (no need to turn if smoked).• Squeeze to check for doneness.SWEET CORN IN HUSKS:• Trim excess silk from end and soak in cold salted water 1 hour before grilling.• Grill 25 minutes – turning several times.To smoke and place brids in center of grates with fire in both ends of fire box.Grill with lid up and the cooking grates in the lowest position. to cook faster.• 25***************************Corpprior to obtainCombo26。
布沙电器 Lavastoviglie 6 系列 45 cm 白色 SPS6EMW23E 说明书
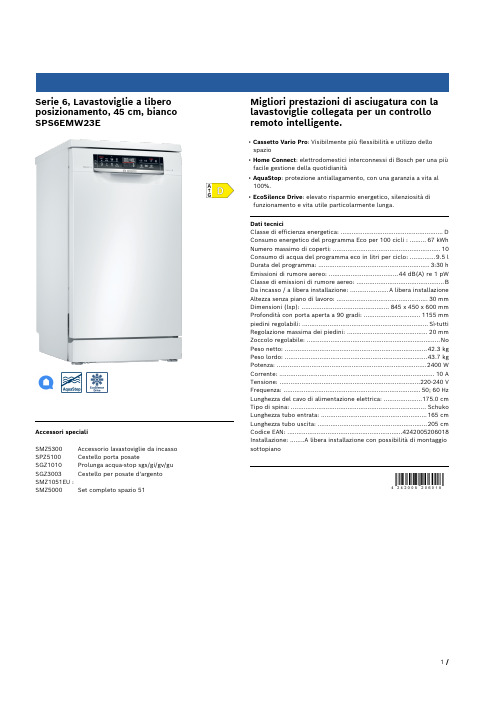
Serie 6, Lavastoviglie a libero posizionamento, 45 cm, bianco SPS6EMW23EAccessori specialiSMZ5300 Accessorio lavastoviglie da incasso SPZ5100 Cestello porta posateSGZ1010 Prolunga acqua-stop sgs/gi/gv/gu SGZ3003 Cestello per posate d'argento SMZ1051EU :SMZ5000 Set completo spazio 51Migliori prestazioni di asciugatura con la lavastoviglie collegata per un controllo remoto intelligente.• Cassetto Vario Pro: Visibilmente più flessibilità e utilizzo dello spazio• Home Connect: elettrodomestici interconnessi di Bosch per una piùfacile gestione della quotidianità• AquaStop: protezione antiallagamento, con una garanzia a vita al 100%.• EcoSilence Drive: elevato risparmio energetico, silenziosità di funzionamento e vita utile particolarmente lunga.Dati tecniciClasse di efficienza energetica: ........................................................D Consumo energetico del programma Eco per 100 cicli : .........67 kWh Numero massimo di coperti: .. (10)Consumo di acqua del programma eco in litri per ciclo: ..............9.5 l Durata del programma: .............................................................3:30 h Emissioni di rumore aereo: ......................................44 dB(A) re 1 pW Classe di emissioni di rumore aereo: ................................................B Da incasso / a libera installazione: .....................A libera installazione Altezza senza piano di lavoro: ..................................................30 mm Dimensioni (lxp): ................................................845 x 450 x 600 mm Profondità con porta aperta a 90 gradi: ...............................1155 mm piedini regolabili: .....................................................................Sì-tutti Regolazione massima dei piedini: ............................................20 mm Zoccolo regolabile: .........................................................................No Peso netto: ..............................................................................42.3 kg Peso lordo: ..............................................................................43.7 kg Potenza: ..................................................................................2400 W Corrente: .....................................................................................10 A Tensione: .............................................................................220-240 V Frequenza: ...........................................................................50; 60 Hz Lunghezza del cavo di alimentazione elettrica: .....................175.0 cm Tipo di spina: ..........................................................................Schuko Lunghezza tubo entrata: ..........................................................165 cm Lunghezza tubo uscita: ............................................................205 cm Codice EAN: (4242005206018)Installazione: ........A libera installazione con possibilità di montaggio sottopianoSerie 6, Lavastoviglie a libero posizionamento, 45 cm, biancoSPS6EMW23EMigliori prestazioni di asciugatura con la lavastoviglie collegata per un controllo remoto intelligente.Prestazioni e consumo- Classe di efficienza energetica¹: D- Energia² / Acqua³: 67 kWh / 9.5 litri- Capacità: 10 coperti- Durata del programma⁴: 3:30 (h:min)- Livello sonoro: 44 dB(A) re 1 pW- Livello di rumore programma Silence: 41(A) re 1 pW- Classe di efficienza di rumore: BProgrammi e opzioni- 8 Programmi: Eco 50 °C, Auto 45-65°, Intensive 70 °C, Express 65°, Express 45°, Glass 40 °C, Silence 50 °C- Prelavaggio- 4 Programmi supplementari: Home Connect, Drying Assistant, Intensive Zone, SpeedPerfect+- Home Connect-capibile via WLAN- Programma manutenzione- Silence on demand (tramite App)Tecnologia lavaggio- Scambiatore di calore e EfficientDry- DosageAssist- EcoSilence Drive- Sistema DuoPower: doppio braccetto nel cestello superiore- Automatismo di pulizia- Sistema di filtri autopulenti con ondulazione a 3 livelli- Contenitore interno: Materiale della vasca interna in acciaio inox Sistema Cestelli- Cestelli VarioFlex Pro- VarioCestello Pro- Ruote con scorrimento facile nel cestello inferiore e nel terzo cestello- Cestello inferiore con blocco (rackStopper) per evitare che fuoriesca dalle guide.- Cestello superiore regolabile in altezza con Rackmatic (3 livelli)- Griglie abbattibili nel cestello superiore (3x)- Griglie abbattibili nel cestello inferiore (4x)- Ripiano per tazze nel cestello superiore- Carrello inferiore con ripiani per tazze- Carrello inferiore con supporto per bicchieri con stelo lungo Indicazione e funzionamento- PiezoTouchControl (nero)- EmotionLight- Iscrizioni di testo in chiaro (inglese)- Indicazione tempo residuo (min.)- Programmatore inizio lavaggio (1-24 h)Sicurezza - AquaStop: una garanzia Bosch per danni causati dall'acqua - durata del dispositivo*- Sicurezza bambini (Tasti)- Tecnologia di protezione del vetro- Aiuto per il riempimento del sale (Imbuto)Dimensioni- Dimensioni del prodotto (HxLxP): 84.5 x 45 x 60 cm¹ In una scala di classi di efficienza energetica da A a G² Consumo di energia in kWh per 100 cicli (nel programma Eco 50°C)³ Consumo di acqua in litiri per ciclo (nel programma Eco 50 °C)⁴ Durata del programma Eco 50 °C* Verificare i termini di garanzia al link/ch/it/condizioni-generali-di-garanziaSerie 6, Lavastoviglie a libero posizionamento, 45 cm, bianco SPS6EMW23E。
- 1、下载文档前请自行甄别文档内容的完整性,平台不提供额外的编辑、内容补充、找答案等附加服务。
- 2、"仅部分预览"的文档,不可在线预览部分如存在完整性等问题,可反馈申请退款(可完整预览的文档不适用该条件!)。
- 3、如文档侵犯您的权益,请联系客服反馈,我们会尽快为您处理(人工客服工作时间:9:00-18:30)。
16 辅助把手─凹槽手柄方便拿取 17 安全装置─如锅盖没有正确地闭合,
该装置可以使锅内不会产生压力
18 芳香阀─自动上压,如锅盖没有正确
地闭合,该装置可以使锅内不会产生 压力,自动限制压力,如果锅子还未 泄压,不会让锅盖打开
19 锅盖把手螺丝─锅盖上被固定的垫圈。
4
标准容量 B
CE标志 A
4 首次使用须知
在您使用之前请确保您已经了解如何使用本产品
锅盖的开启:
定位辅助:
把锅盖把手的释放锁钮向箭头方向按下去,并 且向右转动直到停止不动,就可打开锅盖。
锅盖的关闭:
在锅盖上有个 CLOSE 标记,相应的在把手上 有个凹槽,这样就可以轻松地把锅盖调整到 正确的位置,开启或关闭锅盖。
2 使用注意事项
在您使用该产品之前请仔细阅读产品使用说明书和其他资料,不正确的使用可能导致锅具损坏或者人身伤害 及其它物品损失的风险。 在没有阅读说明书之前,请不要让任何人使用高速快锅。 如果您把高速快锅转让给他人,请务必连同使用说明书一并交给他。
注意! 请不要让儿童接近高速快锅烹饪区域。
高速快锅的使用
7
6 使用味达维高速快锅烹饪注意事项
你可以用本产品使用很多方法进行烹饪。炖、煸、煎或榨汁。(详见第 8 章)
准备工作
把你需要的食物全部放入高速快锅,注意前面提到的容量问题。然后盖上锅盖,如果烹饪指示器变成绿色, 表示锅盖正确安装,可以开始烹饪的状态。
选择烹饪设置
用本产品您可以选择高压烹饪或者低压烹饪。关于烹饪时间的表格可以给您建议。
或使用比锅底大的炉灶。如果使用比锅底小的炉灶,其热源可能将不会起作用。
特别注意:为了防止过度加热对锅具造成损害,请不要在无人看管的情况下加热锅具或者空烧锅 具。也要仔细遵守各个热源的说明书。在您使用高速快锅时,其会发出蜂鸣叫声,这是提醒您调 小热源,并不代表您的高速快锅质量有任何问题。
节能技巧
● 当需要调节火力时,调节热源使烹饪指示器不会显示上升的迹象。 ● 选择合适大小的炉灶。 ● 选择合适大小的锅具。 ● 充分利用能储热的锅底。在烹饪结束前就把热源关闭,在还有余温的情况下继续烹饪。
5
清洗高速快锅
高速快锅在制造时会附着上打磨油等物质,所以在首次使用前请务必洗干净锅身,锅盖和硅胶圈。我们推荐 您使用菲仕乐专用不锈钢清洁剂进行清洗,这会使不锈钢更能抵抗盐和酸性物质。残渣必须被彻底清洗干净, 当您发现不锈钢表面发生变化时,要及时进行清洗。
5 基本使用方法
安全装置
这款味达维高速快锅配备了不同的安全装置使其极其安全。每次使用之前,请确保以下的安全装置都正常 运行,不要随意更换这些装置。在烹饪前,请确定控制阀和锅盖把手完全扣合,(详见第 10 章)
控制阀:
芳香阀:
从锅盖上取下控制阀进入烹饪设定 2,用 手指检查一下烹饪指示器和阀体是否装卸 灵活
请确保芳香阀干净以及能活动,芳香阀密 闭圈必须下芳香阀里的白色球是否 粘连,能否装卸灵活
6
请确保硅胶圈和锅盖边缘干净,没有被损坏, 安全装置能被灵活取下。硅胶圈必须完全和 锅盖内的边缘扣合,必须装在安全装置之前, 从锅盖边缘按下扣合。
容量指示 12
硅胶圈 20
锅盖把手螺丝 19
芳香阀密闭圈22
21 控制阀螺母
安全装置 芳香阀 18
硅胶帽 24
图A
3
看图示A
1 锅盖把手─可以拆卸,方便清洗 2 释放锁钮─用于泄压和打开高速快锅 3 锁定指示器─指示锅子是否完全扣合 4 蒸汽排出口─用释放锁钮进行泄压时,
蒸汽将被放出
5 控制阀─有烹饪指示,在超过压力限
安全维护
每次使用本产品之前,请确保所有的阀门和安全装置未被堵塞和损坏,并且他们能正常运作,这是确保高速 快锅使用时安全的唯一途径,您可以在第五章中找到相关信息。 请不要对高速快锅进行改造。尤其针对一些安全装置,除了进行使用说明书上的保养操作外,请不要进行多 余的改造。并且不要在控制阀上滴油。 当您使用本产品超过 400 次或者 2 年左右,需要定期更换遭受磨损的零部件,比如硅胶圈或者其他橡胶部分。 需要更换零部件时,请使用菲仕乐的正品。当肉眼即可看到一些磨损时(譬如出现裂口,变色,变形)或者 不匹配,请立即更换。否则,它会影响到锅的工作性能和安全性。 更换零部件时,请使用菲仕乐的正品。请不要使用不匹配的锅身与锅盖。另外在您更换零部件时,请根据您 使用的产品型号选择专用正品。(详见第 12 章)
调节热源
这些信息仅供参考,这要根据您电磁炉的功率等。您也需要参考电磁炉的说明书。 不管锅内是否有食物,当锅盖开着时,如果过度加热,锅底会变成金黄色,不过这不影响高速快锅工作的性能。
电陶炉 ─ 炉面的直径应和锅底一致或小于锅底。 煤气灶 ─ 把高速快锅放在煤气灶当中加热,确保火焰不超过锅底的边缘。 电磁炉 ─ 请记得一定要把高速快锅放在电磁炉当中位置加热。锅底的大小请与炉灶的大小保持一致,
2
3 味达维高速快锅描述及其优点
5 控制阀 烹饪指示器
6 7 蒸汽排出口 16 辅助把手
定位辅助标 8
蒸汽排出口 4
释放锁钮 2
锁定指示器
3
14 圆锥形锅身
13
15 锅底 17 安全装置 安全突起 22 安全阀门橡胶塞 25
阀门圈 23
锅盖把手 1
防滑锅身把手 10 定位卡钉 9
加热保护装置 11
6
第六章. 使用味达维高速快锅烹饪注意事项
8
第七章. 高速快锅的泄压方法
9
第八章. 高速快锅的用途
10
第九章. 烹饪时间
11
第十章. 清洗与保养
12
第十一章.常见疑问
13
第十二章.维修与更换部件
15
第十三章.保修与服务
17
第十四章.重要安全事项
18
1 高速快锅如何工作
自从第一个高速快锅发明以来,其基本工作原理一直未改变。高速快锅通过锅内部产生压力,在高压、高温 的状态下烹调食物。食物在超过 100°C 密闭的容器里进行加热上压,锅内的高压会使水沸腾,因此可以用高 温进行烹饪。这大大降低了烹饪时间。 排除锅内多余的空气和缩减烹饪时间使这款高速快锅烹饪出来的食物非常鲜嫩。它比传统烹饪方式更大程 度地保留了食物的维他命,矿物质和香味。亲自品尝味道,您会发现食物出乎意料地保持原汁原味。
1
高速快锅的操作
锅在使用那一刹那就已经上压了,不正确的操作会导致危险。上压之前确保锅处于安全状态,详见第 4 章。 请仅仅使用第 5 章提到的加热装置。 请您确保使用前锅内有一定量的水,否则,会引起对锅的损害。至少在锅中放入 200-300ml 的水,根据高速 快锅的直径而定。万一过度加热,锅的塑料配件以及底部会融化和液化,请立即关闭加热装置,不要用水等 进行快速冷却,而应该自然冷却,并且给房间进行换气。 请确保 1 次的烹饪量保持在锅身容量 2/3 以下。像米饭、豆类、汤类等煮熟后会膨胀的食物容量应该在 1/2 以下。 请不要在无人看管的情况下使用本产品。调节能源装置,在未达到您设定好的烹饪指标前它不会上升。如果 能源装置不泄压,蒸汽会通过阀门排出,锅内的液体会逐渐减少。如果所有的液体都蒸发完毕,会发生燃烧 以及高速快锅遭到损坏。 加压时如果移动高速快锅,要注意防止被烫伤。请拿着锅身把手与辅助把手,根据需要使用锅夹,以免手 直接接触受热的表面。
制时会自动排气,可以拆卸,清洗起 来简单
6 烹饪指示器─可以根据颜色指示来调
节热源
7 蒸汽排出口(控制阀内)─如果压力比
所设定值高,则在进行烹饪时会放出 蒸汽
8 定位辅助标─当您在盖上锅盖时,可
以借助它来定位
9 定位卡钉─在定位时所用的卡钉 10 防滑锅身把手 11 加热保护装置─高速快锅在煤气灶上
高速快锅烹饪容量最多只能是锅身的 2/3。像米饭、豆类、汤类等煮熟后 会膨胀的食物容量应该在 1/2 以下。
注意:不要空烧锅,锅内的水蒸汽不能全部被蒸发。如果空烧, 会出现火灾以及锅身变形、把手以及零部件破损的情况。
适用灶具
耐热的锅底能更好地吸收热量,且可以用于任何灶具,包括电磁炉。底部看上去类似五角星的完整扩大部分 确保了其底部的坚固性。锅底良好的导热性确保了最佳的烹饪效果。
容量
请注意以下关于容量的信息,锅内的容量指示线能更方便地为您测量容量
最小容量
这由高速快锅的直径大小决定,至少需要 200-300ml 的水来产生蒸汽,无论 你有没有放任何东西在锅内。在 200-300ml 液体之下,绝不要使用高速快锅。
18 cm: 200 ml 22 cm: 250 ml 26 cm: 300 ml 最大容量
打开高速快锅
请不要强行打开本产品。请您确认完全泄压后再打开锅盖。( 详见第 7 章 ) 请轻轻晃动后再打开锅盖以确保蒸汽不会飞溅出来烫伤您。这在快速减压或者冷却高速快锅时非常重要。 请确保泄压时您在危险区域以外,因为蒸汽可能会飞溅出来伤害到您。在使用释放锁钮时要格外小心。
重要事项
高速快锅锅身或零部件如果破损或变形,请您不要再继续使用。除此以外,如果出现本使用说明书中所述的 不正常情况时,请停止使用,并尽快与附近的菲仕乐专柜或菲仕乐客服中心联系。 (联系方式见第 13 章)
使用时,保护手柄远离火源
12 容量指示─ min :所需最低水量;
1/2 :易膨胀、多汁的食材的最大容量; max :普通食材的最大容量
13 蒸屉,三角架─大的蒸屉孔能使蒸汽
最佳渗透,即使烹饪再大食物,蒸汽
照样也能排出,还有三角架
14 圆锥形锅身─如果直径相同的锅,即
便叠放也不容易留有划痕,便于收纳
请不要把本产品用于烹饪以外的任何用途(详见第 8 章) 请不要在微波炉里使用本产品,因为高温会破坏锅子的把手,阀门和安全装置。 如果需要油炸烹饪,请不要盖上锅盖,油只要倒满锅子的一半即可,请不要在高压下煎炸任何食物(详见 第 8 章) 请不要将本产品用于医疗用途,特别是把它当作消毒器,因为高速快锅达不到杀菌所需要的温度。 请不要在高速快锅中炖水果或者苹果酱,因为当您打开锅盖时蒸汽会飞溅引起烫伤。 烹饪带皮的肉类或其他食物时,皮在膨胀的时候,请不要对其开孔。以免被烫伤。