金泰昌TC-1006说明书
安美乐TCP(TC) 控制电源模块安全使用说明说明书

目 录 (01)关于说明书 (02)TCP(TC)控制电源模块安全使用说明 (02)涉及的其它说明书 (02)安全警示说明 (03)免责声明 (03)第一章产品说明 (04)1.1 产品简介 (04)1.2 设计及功能 (05)1.3 性能指标 (06)1.4 订货资料 (06)第二章安装连接 (07)2.1 TCP控制电源模块的安装连接 (07)2.1.1 连接TCP-100、TCP-240控制电源模块和TD驱动模块 (07)2.1.2 D15外控通讯接口 (07)2.1.3 连接供电电源 (08)2.1.4 安装环境要求 (08)2.2 TC-100控制模块的安装连接 (08)2.2.1 连接TC-100控制模块和TD驱动模块 (08)2.2.2 D15外控通讯接口 (09)2.2.3 安装环境要求 (09)第三章 操作方法 (10)3.1 TCP控制电源模块的操作方法 (10)3.1.1 连接TCP-100、TCP-240控制电源模块和TD驱动模块 (10)3.1.2 操作与显示 (10)3.2 TC-100控制模块的操作方法 (14)3.2.1 连接TC-100控制模块和TD驱动模块 (14)3.2.2 操作与显示 (14)第四章售后服务 (15)产品保修单 (16)关于说明书TCP(TC)控制电源模块安全使用说明在安装与使用TCP(TC)控制电源模块前,操作人员都应仔细阅读本说明书,并按照说明书中规定的条款安装与操作,以免造成人员伤害与设备损坏。
本说明书适用于TC-100控制模块、TCP-100和TCP-240控制电源模块及其后续改进型号。
因上述产品技术改进或说明书改版等原因导致的内容更新,本公司恕不另行通知,敬请谅解。
相关信息可登录中科科仪官方网站查询,网址:,或与本公司联系!本说明书版权及由本说明书引起、产生和包含的与“KYKY”相关知识产权归北京中科科仪股份有限公司所有,任何单位或个人未经授权不得擅自使用。
TC系列电子天平使用说明书

TC系列电子天平使用说明书(适用于TC3K、TC6K、TC10K、TC20K、TC30K、TC3KA、TC6KA、 TC10KA、TC20KA、TC30KA、TC10KB、TC20KB)一.概述TC系列电子天平是常熟市双杰测试仪器厂采用工业级的高精度传感器和测量电路以及“双杰”专用的单片计算机系统精心设计和制作而成的高品质电子称重仪器,先进的技术、优良的选材、精湛的制作工艺和严格的检测手段,使该系列电子天平具备了极其完美的优点:1.精度及灵敏度高,反应速度快;2.采用高精度应变式称重传感器,克服了一般的高精度电磁式电子天平不能称量铁、镍等导磁物质的缺陷。
3.线路模式先进,选材和制作工艺精良,因而产品可靠性高,抗干扰能力强,使用寿命长,长期使用稳定性好,可以适应恶劣的使用环境并长时间连续工作;4.具有自动校正功能;5.采用高亮度绿色大显示器,显示清晰,读数直观;6.具有单位转换功能,可在“kg”(千克)→“lb”(磅)之间任意转换;7.天平配置有数据输出接口和打印按键,可直接连接打印机进行数据打印,更可直接与计算机接口,进行数据的采集、统计,同时计算机也可以通过接口来控制天平的工作,对天平进行实时的远程控制;8.天平具有计数功能,可方便用户对大批量的物件进行计数。
二. 规格及性能指标型 号 TC3K TC6K TC10K TC10KB TC20K TC20KB TC30K最大秤量 3kg 6kg 10kg 10kg 20kg 20kg 30kg分 辨 率 0.1g 0.1g 1g 0.1g 1g 0.1g 1g检定分度 10d 10d 10d 10d 10d 10d 10d去皮范围 3kg 6kg 10kg 10kg 20kg 20kg 30kg校准重量 2kg 5kg 10kg 10kg 20kg 20kg 20kg秤台尺寸 340mm×220mm体 积 350 (W)×327 (D)×100 (H) mm供 电 AC 220V ± 10% 50Hz ± 1Hz使用温度 0-40°C使用湿度 ≤80% R.H型 号 TC3KA TC6KA TC10KA TC20KA TC30KA最大秤量 3kg 6kg 10kg 20kg 30kg分 辨 率 0.5g 1g 2g 5g 5g检定分度 10d 10d 10d 10d 10d去皮范围 3kg 6kg 10kg 20kg 30kg校准重量 2kg 5kg 10kg 20kg 20kg秤台尺寸 340mm×220mm体 积 350 (W)×327 (D)× 100 (H) mm供 电 AC 220V ± 10% 50Hz ± 1Hz使用温度 0-40°C使用湿度 ≤ 80% R.H三. 操作方法1. 接通电源,调整好水平,按开关键,显示窗显示“F----1”到“F----9”,稳定一段时间后出现“0”,接下来应通电预热15分钟。
保护 600杠杆抬高器产品说明书

PROTEKT® 600 LIFT POWER PATIENT LIFT MODEL: 33600OWNER’S MANUALThank you for choosing the Protekt® 600 Lift!To better serve you, please record the following information: Supplier Name:Telephone:Serial #:Date of PurchaseINSPECT YOUR MERCHANDISEUpon receipt of your patient lift, verify that all merchandise is complete and free from any shipping damage. Refuse delivery if the packaging appears to be badly damaged. If the merchandise is received damaged or is missing components, contact the shipping company immediately and file a claim.For further assistance, contact your local dealer or Proactive Medical Products at the following:Features Chart:1. Boom2. Spreader Bar3. Mast4. Actuator5. Base6. Pendant7. Control Box8. Caster with Brake9. Front Caster10.Emergency Lowering DeviceDiagram of Control Box:Battery release clip Control box on/off and emergency stop buttonControl buttons LCD screenBattery pack Charger connectorLifting actuator connector Hand pendant connectorSAFETY INSTRUCTIONSThe Protekt® 600 Power Patient Lift 33600 reflects innovative state of the art design to increase user mobility.The Protekt® 600 Lift will provide years of service if it is properly maintained as any piece of electrical/mechanical equipment requires.Please pay careful attention to the following important information regarding the care, maintenance, and operation of the Protekt® 600 Lift. Carefully read these instructions before assembling the lifter, or attempting to lift any user with the device.PLEASE NOTE THE FOLLOWING:Special care must be taken with users/patients who cannotthemselves provide assistance while being lifted. (i.e. patients who are comatose, spastic, agitated, or otherwise severely handicapped.)The Protekt® 600 Lift should be used solely for transferring auser/patient from one utility (beds, bathtubs, toilets, etc.) to another. The patient lift should not be used for transporting or moving any patient from one location to another location. During lifting or lowering, whenever possible, always keep thebase of the lift in the widest position.The base of the lift should be closed before moving the lift.Do not roll casters over any object while the user/patient is inthe sling.While being lifted in a sling, always keep the user/patient centered over the base and facing the caregiver operating the lifter.Maximum weight that can be safely lifted is 600 lbs.The Protekt® 600 Lift allows a person to be lifted and transferred safely with minimum physical effort provided by the caregiver. Before attempting, practice operating the lift. Also prior to actual lifting, explain the lifting procedure to the user/patient.Do not attempt to transfer a patient without prior approval of the patient's nurse. Also, do not transfer without having studied the instructions and practiced operating the product several times. Together with the patient's doctor, nurse, or medical attendant, select a Proactive Medical Products sling that is both practical and comfortable. The sling selected should be one that serves the needs of the patient, while providing the patient with optimal safety. Never interfere with the lift, unless instructed by the attendant. Have a doctor, nurse, or medical attendant present during the first few times the lift is used to transfer a new user.WARNING!Proactive Medical slings are specially designed to be used in conjunction with Proactive lifts. Do not use slings manufactured by other companies with any of Proactive Medical's equipment. USING OTHER MANUFACTURER'S SLINGS ON THIS EQUIPMENT IS UNSAFE AND MAY RESULT IN SERIOUS INJURY TO USERS AND CAREGIVERS. PROACTIVE MEDICAL is not responsible for any consequence resulting from the use of non-Proactive slings on this equipment.WARNING!Do not put anything (e.g. cushion, pad, etc.) between the user and the sling. This may cause the user/patient to slide out of the sling and cause injury.WARNING!Avoid personal injury by making sure no children or pets are near the Protekt® 600 Lift while it is in motion.WARNING!Avoid personal injury by making sure all extremities (such as fingers, arms, legs, or feet) are clear of the lift mechanism while it is in operation.Avoid personal injury and possible damage to the Protekt®600 Lift by making sure the maximum weight limit of 600 lbs. is not exceeded.WARNING!Replace any worn parts with only genuine Proactive Medical parts. The patient lift parts are not interchangeable withparts from other patient lift brands. Using other patient lift parts on these products is unsafe and may result in serious injury to user and caregiver. Proactive Medical is not responsible for any consequence resulting from the use of non-Proactive parts and components.WARNING!Avoid personal injury by making sure the electrical connector is disconnected before conducting any electrical inspection. Contact your dealer if any electrical problem is detected.WARNING!Service and repair of this equipment should be performed only by an authorized dealer. Proactive Medical is not responsible for any consequence resulting from any unauthorized service or repair.CAUTIONAvoid damage to the Protekt® 600 Lift by keeping foreign objects from coming into contact with the lift mechanism.NOTEArrange all necessary items (lift, slings, commode chair or wheel-chair) for a smooth procedure. The user/patient being transferred should be positioned in the center of the bed before being lifted, as well as when he/she is returned to the bed. Keep lifter base widened and brakes locked during lifting.ASSEMBLY INSTRUCTIONSWARNING!The lift is heavy! Therefore, avoid injury and DO NOT attempt to remove the lift from the box without any assistance.1. Stand Mast from base.2. Tighten mast to base with bolts and nuts provided.3. Attach boom to top of mast.4. Attach spreader bar to front of boom.5. Attach Actuator to mast and boom.6. Attach the control box bracket to the mast with the twoscrews,then attach the control box to the mast with the two screws, then slide the battery in until itsnaps into place, as shown above.MAINTENANCE & INSPECTION CHECK LISTThe operator of the lift is to inspect the Protekt ® 600 Lift before each use. Check all bolts for tightness. Make sure the base can be easily widened, and that all lift parts are in place. Make sure all casters turn freely, and that the caster brakes can be engaged. Make certain all necessary items (i.e. slings, wheel chairs, etc.) are accessible and ready for use.Check the battery capacity. See instructions below.At least once a month, the lift should be thoroughly inspected by a person qualified to recognize any signs of wear, and looseness of bolts or parts. Replace any worn parts immediately.To lubricate, place a drop of oil on the following points when the Protekt ® 600 Lift is serviced and every month thereafter- Top of Mast, Spreader Hinge, and Caster Axles.USER GUIDECHARGING THE BATTERY -The lift can be charged by plugging the charger directly into the control box while it is attached to the liftOrThe battery pack can be charged while seated in the (optional) wall/desk charging caddy.OPERATING INSTRUCTIONS — USING THE CONTROL BOX1. If you press either control button (shown at right) for less than 0.5 seconds, you can access the screens shown below.2.L - Left buttonPressing the left button for more than 0.5 seconds will begin actuator extension.R - Right buttonPressing the right button for more than 0.5 seconds will begin actuator retraction.Raise / Lower LiftLong pressto raise liftLong press to lower lift3. Press the button to raise or the button to lower the lift.OPERATING INSTRUCTIONS — USING THE HAND PENDANTRaise / Lower LiftLong pressto raise liftLong pressto lower lift1. Press the bu�on to raise or the bu�on to lower the lift.MAINTENANCE SCHEDULEOPERATING INSTRUCTIONSNOTE: Turn the lift "ON" by turning the red "RESET" button clockwise. Turn the lift "OFF" by pressing down the "RESET" button.Transfer From BedUser/patient should be in the center of the bed.Position user onto his/her side by rolling user towardsyou.Roll the sling in half, approximately. The handle on the backsection should face outward when the sling is fitted. Position the sling under the user/patient so the commodeaperture aligns with the base of the spine and top of the sling close to the neck.Roll user onto the opposite side and position him/her on theflat section of the sling. This will allow you to unroll the remainder of the sling from the other side of the user.Once the sling has been positioned centrally, feed the legsections under the thighs and draw them up between the thighs.Raise the head of the bed if this function is available.Move the lift slowly towards the user and position thespreader bar over the user's/patient's chest.acLift the user above the bed by using the hand control.Pull lift away from bed. Position user over thewheelchair or chair then lower the patient onto thesurface.Note: Reverse the above procedures when returning the user/patient to bed.Transfer From WheelchairGrasp the sling at each corner of the "U" shape of thecommode aperture.The sling should be fitted with the handle on the backsection facing outward.Help the user lean forward slightly, then slide the slingdown between the chair and the user's back.Position the commode aperture where the buttocksmeets the seat.Position the sling equally around both sides of the body.Draw the leg sections to the front along the length of the user's thigh.Check the sling's central positioning by comparing thelengths of the leg sections when they are drawn forward.Reposition the sling if the leg sections are not equal inlength.Feed the leg sections under the thighs.From between the legs, gently pull the leg section up theinner thigh.Feed as much material as possible under and between thethighs. Ensure the leg sections are positioned midwayunder the thighs to provide good support and greater comfort.Move the lift slowly towards the user and position thespreader bar over the user's chest.Attach Loop a of sling to Hook A on Spreader Bar; attachLoop b to Hook B; attach Loop c to Hook C; attach Loop d to Hook D.Lift patient above the wheelchair by using the handcontrol.Pull lift away from wheelchair. Position patient over bed andlower patient onto it.Note: Reverse the above procedures when returning the user/patient to a wheelchair.WARNING!Use ONLY Proactive Medical slings/products with this equipment.Full Body Mesh SlingsITEM #DESCRIPTION30110 Medium Mesh full body: medium 600 lb. weight capacity 30111 Large Mesh full body: large 600 lb. weight capacity 30124 X-Large Mesh full body: X-large 600 lb. weight capacity 30118 XX-Large Mesh full body: XX-large 600 lb. weight capacity Full Body Mesh Slings w/CommodeITEM #DESCRIPTION30114 Medium Mesh full body: medium w/commode opening600 lb. weight capacity30115 Large Mesh full body: large w/commode opening600 lb. weight capacity30116 X-Large Mesh full body: X-large w/commode opening600 lb. weight capacity30119 XX-Large Mesh full body: XX-large w/commode opening600 lb. weight capacityFull Body Solid SlingsITEM #DESCRIPTION30112 Medium Solid fabric full body: medium600 lb. weight capacity30113 Large Solid fabric full body: large600 lb. weight capacity30117 X-Large Solid fabric full body: X-large600 lb. weight capacity30123 XX-Large Solid fabric full body: XX-large600 lb. weight capacityDivided leg design is best suited for high level spinal cord injuries or patients where sling removal is more difficult.Support ranges from the upper back to beneath the thighs. Can be positioned with patient seated.Greatly s implifies t he use of bathroom facilities. Divided Leg SlingsITEM #DESCRIPTION30100P Small Solid divided leg: small 450 lb. weight capacity30100 Medium Solid divided leg: medium 450 lb. weight capacity 30101 Large Solid divided leg: large 450 lb. weight capacity30102 X-Large Solid divided leg: X-large 450 lb. weight capacity30103 XX-Large Solid divided leg: XX-large 600 lb. weight capacity Padded Divided Leg Slings w/o Head Support ITEM #DESCRIPTION30100P-NHS Small Solid padded divided leg w/o head support: small600 lb. weight capacity30100-NHS Medium Solid padded divided leg w/o head support: medium600 lb. weight capacity30101-NHS Large Solid padded divided leg w/o head support: large600 lb. weight capacity30102-NHS X-Large Solid padded divided leg w/o head support: X-large600 lb. weight capacityPadded Divided Leg Slings w/Head Support ITEM #DESCRIPTION30100P-HS Small Solid padded divided leg w/head support: small600 lb. weight capacity30100-HS Medium Solid padded divided leg w/head support: medium600 lb. weight capacity30101-HS Large Solid padded divided leg w/head support: large600 lb. weight capacity30102-HS X-Large Solid padded divided leg w/head support: X-large600 lb. weight capacityTROUBLE SHOOTINGWARNING: If you experience a problem with your lift and are unable to service it yourself, contact Proactive Medical or your Proactive authorized distributor.21LIMITED WARRANTYThe Protekt® 600 Lift you purchased is guaranteed to be free from defects in material and workmanship under normal use and service. The warranty period for this product is 2 Years Electronics/3 Years Frame from the date of purchase by the original purchaser. This warranty shall be voided upon transfer of ownership of this product. Proactive Medical agrees to repair or replace this product, at our discretion and at no charge, within the warranty period provided and that Proactive Medical consents the unit is defective. The repaired or replacement unit shall be warranted for a period equal to the balance of the defective unit's warranty period.NOTE:To ensure the best service to our customers, Proactive Medical requires the following information to be included with the returned unit:1. Model Name/Number and Serial Number on the packaging.2. Proof of purchase, i.e. a copy of the original invoice.3. A Return Authorization number (RA#) obtained by callingAuthorized dealer/distributor prior to the return of the product.The RA# must be clearly indicated on the outside of thepackaging.4. A detailed description of the problem and its symptoms on a note.22This warranty shall not apply to any product which has been repaired or altered in any way so as, in our judgment, to affect its functionality and durability, nor to any product subject to abuse, misuse, negligence or accident, improper maintenance, improper installation, nor to any product used with other parts, components and/or accessories with quality and/or specifications not compatible with this product. This warranty does not cover products that have been impaired by occurrences considered Acts of God over which authorized dealer has no control. This warranty shall also be voided if any required periodic maintenance, if applicable, has not been properly performed on this product.This warranty and the aforementioned remedies presented are exclusive and in lieu of all other express or implied warranties. No other representations or claims shall be binding or obligate authorized dealer in any way. Any warranty applicable to this product is limited to the aforementioned period indicated. In no event shall authorized dealer be liable for any special, incidental, or consequential damages; loss of revenue; or cost of replacement goods; resulting from the use or malfunction of this product to the associated equipment on which and with which it is used. This warranty gives specific legal rights and you may be entitled to other rights that vary from state to state.23。
艾顿 Moeller 系列 MSC-D DOL 电机启动器 102976 产品说明说明书
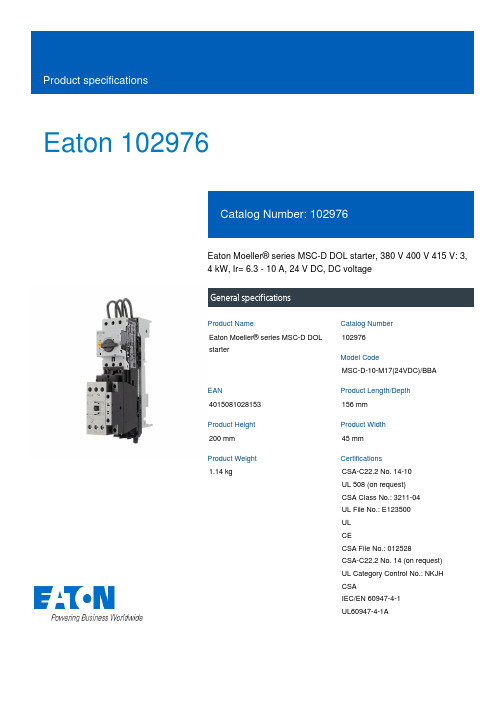
Eaton 102976Eaton Moeller® series MSC-D DOL starter, 380 V 400 V 415 V: 3, 4 kW, Ir= 6.3 - 10 A, 24 V DC, DC voltageGeneral specificationsEaton Moeller® series MSC-D DOL starter102976MSC-D-10-M17(24VDC)/BBA4015081028153156 mm 200 mm 45 mm 1.14 kgCSA-C22.2 No. 14-10 UL 508 (on request) CSA Class No.: 3211-04 UL File No.: E123500 UL CECSA File No.: 012528CSA-C22.2 No. 14 (on request) UL Category Control No.: NKJH CSAIEC/EN 60947-4-1 UL60947-4-1AProduct NameCatalog Number Model CodeEANProduct Length/Depth Product Height Product Width Product Weight CertificationsShort-circuit releaseTemperature compensated overload protection CLASS 10 AScrew terminalsNo2IP00NEMA OtherDirect starterMounting on Busbar 60 mm16.3 A10 AIII36000 V ACAlso motors with efficiency class IE3 Starter with Bi-Metal releaseDCFitted with: Functions ClassConnectionConnection to SmartWire-DTCoordination typeDegree of protectionModelMounting methodNumber of auxiliary contacts (normally closed contacts) Number of auxiliary contacts (normally open contacts) Overload release current setting - minOverload release current setting - maxOvervoltage categoryPollution degreeRated impulse withstand voltage (Uimp)Suitable forTypeVoltage typeMax. 2000 m -25 °C55 °C 8.5 A10 A2.2 kW4 kW230 - 415 V AC1 A, 250 V DC, (UL/CSA)15 A, 600 V AC, (UL/CSA)A600, AC operated (UL/CSA) P300, DC operated (UL/CSA)50000 A 155 A 0.5 W 0 V0 V0 V0 V 24 V 24 VAltitudeAmbient operating temperature - min Ambient operating temperature - max Rated operational current (Ie)Rated operational current (Ie) at AC-3, 380 V, 400 V, 415 V Rated operational power at AC-3, 220/230 V, 50 HzRated operational power at AC-3, 380/400 V, 50 HzRated operational voltageSwitching capacity (auxiliary contacts, general use) Switching capacity (auxiliary contacts, pilot duty)Rated conditional short-circuit current (Iq), type 2, 380 V, 400 V, 415 VShort-circuit release (Irm) - max Power consumption (sealing) at DCRated control supply voltage (Us) at AC, 50 Hz - min Rated control supply voltage (Us) at AC, 50 Hz - max Rated control supply voltage (Us) at AC, 60 Hz - min Rated control supply voltage (Us) at AC, 60 Hz - max Rated control supply voltage (Us) at DC - minRated control supply voltage (Us) at DC - max8.1 W0 W2.7 W10 A0.9 WMeets the product standard's requirements.Meets the product standard's requirements.Meets the product standard's requirements.Meets the product standard's requirements.Meets the product standard's requirements.Does not apply, since the entire switchgear needs to be evaluated.Does not apply, since the entire switchgear needs to be evaluated.Meets the product standard's requirements.Does not apply, since the entire switchgear needs to be evaluated.Meets the product standard's requirements.Does not apply, since the entire switchgear needs to be evaluated.Motor Starters in System xStart - brochureSimple, flexible and safe! Distribution system for motor-starter combinationsSave time and space thanks to the new link module PKZM0-XDM32MEProduct Range Catalog Switching and protecting motorsDA-DC-00004879.pdfDA-DC-00004911.pdfeaton-manual-motor-starters-adapter-msc-d-dol-starter-dimensions-002.epseaton-manual-motor-starters-adapter-msc-d-dol-starter-3d-drawing.eps eaton-general-ie-ready-dilm-contactor-standards.epsDA-CE-ETN.MSC-D-10-M17(24VDC)_BBAIL03402010ZIL03402015ZWIN-WIN with push-in technologyDA-CD-msc_d_bba_bg2DA-CS-msc_d_bba_bg2eaton-manual-motor-starters-device-msc-d-dol-starter-wiring-diagram.epsEquipment heat dissipation, current-dependent PvidHeat dissipation capacity PdissHeat dissipation per pole, current-dependent PvidRated operational current for specified heat dissipation (In) Static heat dissipation, non-current-dependent Pvs10.2.2 Corrosion resistance10.2.3.1 Verification of thermal stability of enclosures10.2.3.2 Verification of resistance of insulating materials to normal heat10.2.3.3 Resist. of insul. mat. to abnormal heat/fire by internal elect. effects10.2.4 Resistance to ultra-violet (UV) radiation10.2.5 Lifting10.2.6 Mechanical impact10.2.7 Inscriptions10.3 Degree of protection of assemblies10.4 Clearances and creepage distances10.5 Protection against electric shock10.6 Incorporation of switching devices and components BrochuresCatalogues Declarations of conformity DrawingseCAD modelInstallation instructions Installation videosmCAD modelWiring diagramsEaton Corporation plc Eaton House30 Pembroke Road Dublin 4, Ireland © 2023 Eaton. All rights reserved. Eaton is a registered trademark.All other trademarks areproperty of their respectiveowners./socialmediaDoes not apply, since the entire switchgear needs to be evaluated.Is the panel builder's responsibility.Is the panel builder's responsibility.Is the panel builder's responsibility.Is the panel builder's responsibility.Is the panel builder's responsibility.The panel builder is responsible for the temperature rise calculation. Eaton will provide heat dissipation data for the devices.Is the panel builder's responsibility. The specifications for the switchgear must be observed.Is the panel builder's responsibility. The specifications for the switchgear must be observed.The device meets the requirements, provided the information in the instruction leaflet (IL) is observed.10.7 Internal electrical circuits and connections 10.8 Connections for external conductors 10.9.2 Power-frequency electric strength 10.9.3 Impulse withstand voltage 10.9.4 Testing of enclosures made of insulating material 10.10 Temperature rise10.11 Short-circuit rating10.12 Electromagnetic compatibility10.13 Mechanical function。
高宝 HM-TC 手动烫金机 操作说明书
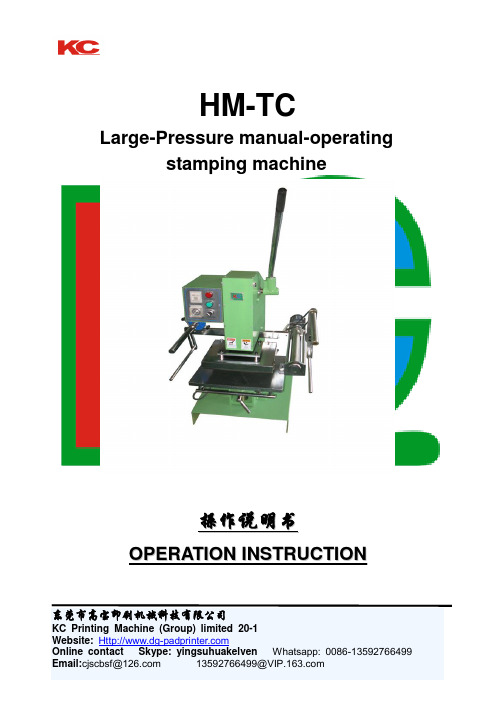
HM-TCLarge-Pressure manual-operatingstamping machine操作说明书O P E R A T I O N I N S T R U C T I O N东莞市高宝印刷机械科技有限公司KC Printing Machine (Group) limited 20-1目录Contents一、概述…………………………………………………………………………………Summarize二、主要结构及性能(见附图一)Mainly structure and performance……………………………………………………三、参数的设置与调整…Setting and adjusting param eter of stamping process………………………………………………………………四、操作事项…Operation notice………………………………………………………………………五、电气电板效果图(见附图二)Operation panel instruction……………………………………………………六、使用烫金机的有关事项…Detailed notice…………………………………………………………七、所用电器元件明细(见附图三)Electric accessories …………………………………………………八、电气原理图(见附图四)Circult elementary diagram…………………………………………………………主要结构明细表…Major detailed structures………………………………………………………………………附图一(picture one)……………………………………………………………………………………附图二(picture two)……………………………………………………………………………………九、日常维护及故障处理M aintaining and troubleshooting………………………………………………………………十、常见烫印图案缺陷原因分析Some simple stamping problems……………东莞市高宝印刷机械科技有限公司KC Printing Machine (Group) limited 20-2HM-TC手动大压力烫金机Manual stamping machine ⚫概述:Summarize东莞市高宝印刷机械科技有限公司KC Printing Machine (Group) limited 20-3东莞市高宝印刷机械科技有限公司KC Printing Machine (Group) limited 20-4 1、系列烫金机是在平面烫金机的基础上,根据杠杆的原理,将杠杆的力量作用于发热体与工作介面,从而达到工作时所需的大压力,该机不但可用作烫金,而且可作压痕和小型模切。
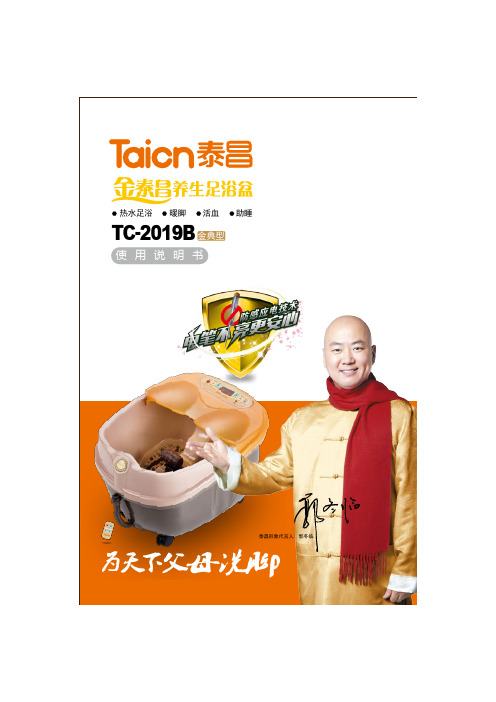
TC-2019B足浴盆使用说明书
7 “振动、气波、臭氧”等功能可按说明书操作图示进行操作。可任意 选择功能浴足,也可开启所有功能浴足。
8 足浴定时结束前五分钟,该机会预警三声“嘀、嘀、嘀”,足浴定时 结束时,该机会自动关闭所有功能,显示屏显示“OF”的关机状态。
上海泰昌健康科技股份有限公司 厂区鸟瞰图
1
感谢您购买和使用上海泰昌健康科技股份有限公司生产的“金泰昌 养生足浴盆”TC-2019B 金典型。使用前请仔细阅读本使用说明书,并 特别注意安全事项,以确保正确使用本产品。
请妥善保管本使用说明书,以便随时查询。 如将本产品转借他人使 用,请务必附上本说明书。
使用会造成触电及 火灾危险。请尽快 联系维修处。
不要使用酒精、汽油、香蕉 水等稀释剂清洁机器。 *会造成机体
龟裂、异味 及火灾意外。
清洁保养及移动本机时,务 必拔掉电源插头。 *否则会有短路、 漏电、触电意外。
产品外观结构
按键开关(六个) 电源线 防水护盖 装饰件
天然玉石按摩点 鼓轮按摩头
铬刚玉磨脚石与鼓轮 按摩头可互换使用。
目 录
企业简介 ⋯⋯⋯⋯⋯⋯⋯⋯⋯⋯⋯⋯⋯⋯⋯⋯⋯⋯⋯⋯⋯⋯⋯⋯⋯ 1 目录 ⋯⋯⋯⋯⋯⋯⋯⋯⋯⋯⋯⋯⋯⋯⋯⋯⋯⋯⋯⋯⋯⋯⋯⋯⋯⋯⋯ 2 安全事项 ⋯⋯⋯⋯⋯⋯⋯⋯⋯⋯⋯⋯⋯⋯⋯⋯⋯⋯⋯⋯⋯⋯⋯⋯⋯ 3 产品外观结构 ⋯⋯⋯⋯⋯⋯⋯⋯⋯⋯⋯⋯⋯⋯⋯⋯⋯⋯⋯⋯⋯⋯⋯ 5 控制面板说明及操作 ⋯⋯⋯⋯⋯⋯⋯⋯⋯⋯⋯⋯⋯⋯⋯⋯⋯⋯⋯⋯ 5 遥控器说明及操作 ⋯⋯⋯⋯⋯⋯⋯⋯⋯⋯⋯⋯⋯⋯⋯⋯⋯⋯⋯⋯⋯ 6 产品功能 ⋯⋯⋯⋯⋯⋯⋯⋯⋯⋯⋯⋯⋯⋯⋯⋯⋯⋯⋯⋯⋯⋯⋯⋯⋯ 7 装箱清单 ⋯⋯⋯⋯⋯⋯⋯⋯⋯⋯⋯⋯⋯⋯⋯⋯⋯⋯⋯⋯⋯⋯⋯⋯⋯ 7 使用方法及步骤 ⋯⋯⋯⋯⋯⋯⋯⋯⋯⋯⋯⋯⋯⋯⋯⋯⋯⋯⋯⋯⋯⋯ 8 足浴常识 ⋯⋯⋯⋯⋯⋯⋯⋯⋯⋯⋯⋯⋯⋯⋯⋯⋯⋯⋯⋯⋯⋯⋯⋯⋯ 9 产品保养事项 ⋯⋯⋯⋯⋯⋯⋯⋯⋯⋯⋯⋯⋯⋯⋯⋯⋯⋯⋯⋯⋯⋯⋯ 9 故障的排除 ⋯⋯⋯⋯⋯⋯⋯⋯⋯⋯⋯⋯⋯⋯⋯⋯⋯⋯⋯⋯⋯⋯⋯⋯ 10 紧急处理方法 ⋯⋯⋯⋯⋯⋯⋯⋯⋯⋯⋯⋯⋯⋯⋯⋯⋯⋯⋯⋯⋯⋯⋯ 10 技术参数 ⋯⋯⋯⋯⋯⋯⋯⋯⋯⋯⋯⋯⋯⋯⋯⋯⋯⋯⋯⋯⋯⋯⋯⋯⋯ 10 “泰昌”产品防伪识别方法 ⋯⋯⋯⋯⋯⋯⋯⋯⋯⋯⋯⋯⋯⋯⋯⋯ 封底
TC 系列控制台用户操作手册说明书
◆慎重保证本公司生产的产品,在发货之日起三个月内,如产品出现缺陷,实行包换。
三年(包括三年)内如产品出现缺陷,实行免费维修。
三年以上如产品出现缺陷,实行有偿终身维修。
◆安全要求请阅读下列安全注意事项,以免人身伤害,并防止本产品或与其相连接的任何其它产品受到损坏。
为了避免可能发生的危险,本产品只可在规定的范围内使用。
只有合格的技术人员才可执行维修。
—防止火灾或人身伤害使用适当的电源线。
只可使用本产品专用、并且符合本产品规格的电源线。
正确地连接和断开。
当测试导线与带电端子连接时,请勿随意连接或断开测试导线。
产品接地。
本产品除通过电源线接地导线接地外,产品外壳的接地柱必须接地。
为了防止电击,接地导体必须与地面相连。
在与本产品输入或输出终端连接前,应确保本产品已正确接地。
注意所有终端的额定值。
为了防止火灾或电击危险,请注意本产品的所有额定值和标记。
在对本产品进行连接之前,请阅读本产品使用说明书,以便进一步了解有关额定值的信息。
请勿在无仪器盖板时操作。
如盖板或面板已卸下,请勿操作本产品。
使用适当的保险丝。
只可使用符合本产品规定类型和额定值的保险丝。
避免接触裸露电路和带电金属。
产品有电时,请勿触摸裸露的接点和部位。
在有可疑的故障时,请勿操作。
如怀疑本产品有损坏,请本公司维修人员进行检查,切勿继续操作。
请勿在潮湿环境下操作。
请勿在易爆环境中操作。
保持产品表面清洁和干燥。
-安全术语警告:警告字句指出可能造成人身伤亡的状况或做法。
小心:小心字句指出可能造成本产品或其它财产损坏的状况或做法。
一、概述TC 系列控制台是高压试验变压器的配套设备。
与试验变压器一起作耐压和泄漏试验。
本产品符合电力行业标准:DL/T848.2-2004。
二、主要特点本系列产品具有外形美观、体积小、重量轻、操作简单、使用维修方便等特点。
本系列控制台是由接触式调压器及控制、保护、测量、信号电路组成。
通过接入220V/380V 工频电源,调节调压器的输出电压(即试验变压器的输入电压)取得所需要的试验高电压(被试品的耐压值),其工作原理如图。
金泰昌养生足浴盆百问百答
泰昌养生足浴盆百问百答1、泰昌养生足浴盆的保修期限是多长时间?答:一年2、泰昌养生足浴盆的维修期限是多久?答:终身3、泰昌足浴盆有哪些功能?答:无线遥控、彩屏显示、防水防盖、循环水流冲浪加热、设定温度、设定时间、清洁过滤网、磁石功能、气波功能、臭氧功能、浮动针刺按摩、振动按摩、超长波功能、铬刚玉磨脚石、自动排水等,这么多功能同类产品中可不多见。
4、泰昌养生足浴盆有哪些功效?答:主要功效有:促进气血循环,加速新陈代谢,消除疲劳,改善睡眠,调整血压,调节微循环,养生美容,减肥瘦身,养脑护脑,通经活络,活化细胞,提高免疫机能,增强内分泌的平衡之功效。
5、泰昌足浴盆安全吗,不会漏电吧?答:泰昌成功掌握了足浴盆行业的核心技术-----绝缘墙技术,再加上多重漏电保护装置,使用非常安全,尽可放心使用。
泰昌的绝缘墙技术又主要表现在两个关键部件(加热管和线路板)的四大核心技术(水电分离技技术、热保护技术、铝合金焊点技术、三插电源保护技术)6、泰昌养生足浴盆会漏水吗?答:该机外壳是选用进口的ABS工程塑料,韧性好,牢度强,质量好,不会漏水。
7、泰昌养生足浴盆使用寿命如何?答:经我们对该机老化实验表明,该机在正常使用下寿命在10年左右。
8. 金泰昌成立于哪一年?至今多少年的文化历史?答:泰昌成立于1998年,12年的文化历史,以雄厚的实力,领跑中国足浴盆行业。
9. 金泰昌的代言人是谁?你对他了解多少?答:金泰昌的代言人郭冬临是中国著名小品、相声演员,多次在春节联欢晚会等大型文艺晚会上露脸,多才多艺的他给观众留下了深刻的印象,从1993-2010年的18年中有16年上了央视的春晚。
10. 超长波有何作用?答:超长波也叫超长电磁波,当超长波发射到足底时,会引起组织内部物质元素的互激功效,强化组织的再生力和促进组织内部的新陈代谢,具有增强人体自然治愈力,可以杀死病菌,降低血压等功效,没有任何副作用(譬如对香港脚治疗效果比较显著)11、气波增氧,臭氧杀菌有何作用?答:气波增氧主要就是能使您浴足的水中增加氧份,有利于足底穴位的吸收。