lmt用户指南
LMT工具使用手册

选择LMT模式:进入正常登陆模式,该模式通过与设备建立连接以到达实时访问不同类型的网元,并进行各种维护操作。
选择离线配置模式:进入离线模式,可以进行配置数据制作,和历史数据分析。
(3)LMT登录接口,默认为管理员身份登录。
1.3
LMT应用程序主接口的功能是提供菜单及工具栏供操作员调用其它功能接口,提供状态区显示当前用户名、与网元的链路状态、显示告警和事件到达指示以及其它信息,另外还提供信息浏览窗口显示LMT与网元的交互信息,属性窗口显示对象的属性。
读者对象
本书适合下列人员阅读:
工程技术人员
网络管理人员
系统维护工程师
本书约定
通用格式约定
格式
意义
宋体
正文采用宋体表示。
黑体
除一级标题采用宋体加粗以外,其余各级标题均采用黑体。
楷体
警告、提示等内容一律用楷体,并且在内容前后增加线条与正文隔离。
命令行格式约定
格式
意义
粗体
命令行关键词(命令中保持不变、必须照输的部分)采用加粗字体表示。
设备日志管理:能够将基站侧的日志上传到本地。日志包括公共文件、板卡日志、RRU日志及小区日志。
LMT系统日志:能够查看LMT做了哪些主要操作,包括登录,退出,命令的下发等。
(6)工具:主要包括启动流程图、配置文件比较、信息浏览日志查看、UE信息显示、软件升级等。
启动流程图:以图像化的方式将设备的启动流程以及各个物理资源或逻辑资源的可用状态进行显示。
使用方便
表达清楚
内容完整
内容正确
结构合理
图表说明
装帧形式
总体满意
2.您认为我们应该在以下哪些方面进行改进?(打“”)
LMT工具使用说 明(详解)1

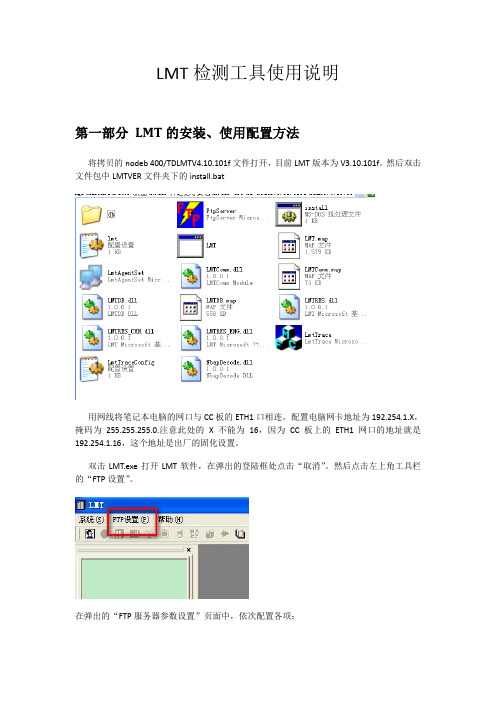
LMT检测工具使用说明第一部分LMT的安装、使用配置方法将拷贝的nodeb 400/TDLMTV4.10.101f文件打开,目前LMT版本为V3.10.101f。
然后双击文件包中LMTVER文件夹下的install.bat用网线将笔记本电脑的网口与CC板的ETH1口相连。
配置电脑网卡地址为192.254.1.X,掩码为255.255.255.0.注意此处的X不能为16,因为CC板上的ETH1网口的地址就是192.254.1.16,这个地址是出厂的固化设置。
双击LMT.exe打开LMT软件,在弹出的登陆框处点击“取消”。
然后点击左上角工具栏的“FTP设置”。
在弹出的“FTP服务器参数设置”页面中,依次配置各项:FTP地址:你网卡所设置的IP地址,例如192.254.1.18这个地方大家需要注意一下不要选错了,因为现在笔记本电脑往往都打开了无线网络,有时候这个地方的地址会是无线网卡的地址,大家一定要选172这个网段的才对。
(不要参照上图中的IP)FTP主目录:这里要创建一个空的文件夹,名为ZDB用户名、密码:建议大家设置一下。
默认的用户名和密码分别为ftpuser、FTP123.这样,LMT的设置就完成了,大家在登录的时候,可以选择“系统”——“登录”,也可以点击下面的小图标:在前台登录时,选择“在线配置”。
注意勾选“开启内置FTP”。
用户名为root,密码为空。
默认即可,不需要更改。
前台IP为基站的IP登录以后可能会有如下提示,不用理会,点击“确定”,进入LMT操作页面。
Nod eB基本信息的配置一.在配置数据之前,需把设备内部的ATM信息删除,需做一下操作:1-1.选择【传输管理】→【PVC链路管理】,选定内部保存的数据,删除1-2.选择【传输管理】→【IMA组参数管理】,选定内部保存的数据,删除二.在“设备管理”栏内将基站类型更改为“全IP”,具体操作如下:2-1.选择【设备管理】→【NodeB配置】【传输类型】选择:全IP三.传输管理配置3-1. FE端口配置选择【传输管理】→【FE端口管理】,点击【创建】FE端口。
LMT简易操作流程
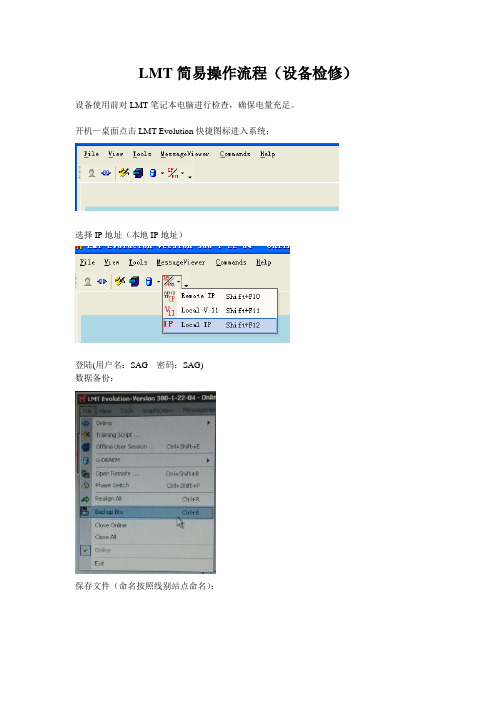
LMT简易操作流程(设备检修)设备使用前对LMT笔记本电脑进行检查,确保电量充足。
开机—桌面点击LMT Evolution快捷图标进入系统;
选择IP地址(本地IP地址)
登陆(用户名:SAG 密码:SAG)
数据备份:
保存文件(命名按照线别站点命名):
BTS检修:
驻波比、功率测试:
锁定CU、合路器卸掉天线,接入通过式功率计(INPUT端接合路器、OUTPUT端接入天线)功率选择瓦,解锁对应的CU以及合路器,记录测试数据,锁闭对应的CU以及合路器;依次完成测试。
BTS风扇检修:
Lock锁闭风扇,拔掉风扇进行清扫;
风扇解锁时先进行Perftest复位操作,再进行unlock;
COBA倒换:
选中主用COBA板,右键switch复位,等待1分钟左右查看有无倒换到备用COBA板,如倒换不成功,对BTSM0进行复位,切换到原来主要板上。
注意倒换成功时一定要在倒换到原来主用板上。
合肥高铁车间整修工区
2014年5月14日。
LMTDF-46L用户手册说明书
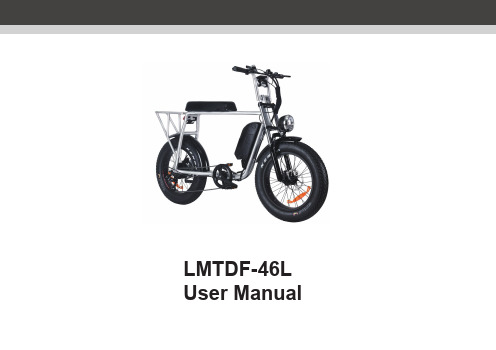
User ManualEnglishSafety Instructions 4-7 Overview 8-9 Operation 10-14 Troubleshooting 15 Specifications 16 Other 17 Doc 18Warning:ÆTo reduce the risk of electric shock, do not remove cover. No user serviceable parts inside.Refer servicing to qualified service personnel.ÆEnsure the equipment is not too close to heat emitting appliances or placed in direct sunlight.ÆDo not immerse the equipment in water or any other liquids.ÆRepairs to electrical appliances should only be performed by qualified personnel.ÆImproper repairs may place the user and/or equipment at serious risk.ÆThis equipment is intended for household use only and should not be used for industrial orcommercial purposes.ÆDo not operate this appliance after being dropped or damaged in any way.ÆIf the power adapter is damaged, it must be replaced by the manufacturer or similarlyqualified persons in order to avoid a hazard.ÆDo not use this equipment for anything other than its intended use.ÆDo not push objects into any openings as damage to the equipment.ÆRead the manual and safety instructions carefully before you start riding the product.ÆCheck for damage and loose parts before use.ÆDo not modify any parts of the product. It may damage the performance of the product andhighly increases the risk of injuries.ÆThis appliance can be used by persons aged above 12 years and persons with reducedphysical, sensory or mental capabilities or lack of experience and knowledge if they have been given supervision or instruction concerning use of the appliance in a safe way and understand the hazards involved.ÆChildren shall not play with the appliance.ÆCleaning and user maintenance shall not be made by children without supervision.Speed limit:ÆThe maximum speed of the product is 25 km/h.ÆWhen driving below the maximum speed, you will more easily keep the balance.4Weight and height limit:ÆMax. load: 120 kgBattery and charging:ÆConnect the power adapter to the product before connecting it to a wall outlet to avoidelectric sparks.ÆThe battery must be removed from the appliance before it is scrapped.ÆThe appliance must be disconnected from the supply mains when removing the battery.ÆThe battery is to be disposed of safely.ÆDo not use any other charging devices but the included power adapter to charge the product.The longest distance depends on:ÆTerrain: Riding on a smooth, flat groundincreases the total range.ÆWeight: The weight of the driver affects the distance.ÆSurrounding temperature: Use or storage of the product below or above the recommendedtemperatures will reduce the distance.ÆMaintenance: Reasonable charging andmaintenance of the battery can increase therange.ÆSpeed and driving style: Medium speedincreases the range. Frequent start, stop,acceleration and deceleration will reduce thedistance.5Driving:´Do not under any circumstances use the the product if you are likely to lose control, collide, fall or cause any other harm. Ensure that theproduct is in good condition before you use it.´Suggest wear helmet, knee and elbow pads etc when use the product.´The product is only for personal use, it is prohibited to commercial use.´Children shall not weigh less than 30 kg and if they weigh below 45 kg the the product mayonly be used under supervision from an adultthat is responsible for their safety.´People with high blood pressure and/or heart disease, people with lack of experience, oldpeople or people with disabilities and pregnant women shall not use the product.´Do not ride the product under the influence of alcohol or drugs.´Do not use the product to transport goods.´Comply with local traffic laws when riding the product. ´Ensure you keep a good view of thesurroundings.´Suggest se sports clothes when riding the product, it helps you handle steering and falling better.´Do not carry one or more people on the product.´Total weight of user and belongings shall not exceed the maximum load of the product. This may cause risk of injuries and damage to theproduct.ÆKeep the speed of the product at a controllable level to ensure safety of the driver and others.ÆIf driving the product and an accident occurs, wait for the help to arrive for a reasonable and lawful process.ÆWhen driving the product with other drivers, keep a certain distance between each other in order to avoid a collision.ÆPay attention to the position of you body centre when steering. When the centre of gravity gets offset or moves too fast you might fall off.ÆDo not get distracted when driving the product.ÆDo not answer the phone, listen to music, or6engage in any other activities.ÆDo not push the driver to gain extra speed.ÆDo not drive the product in dim light or dark places to avoid an accident.ÆAvoid driving on slippery surfaces. Such as ice, snow and wet floors.ÆAvoid driving on scattered objects, branches, trash or a pebbles.ÆAvoid driving in narrow spaces.ÆDo not drive the product in places where driving is not allowed. Obtain permission to use theproduct in that certain place first.ÆDo not start or stop the product suddenly.ÆAvoid driving on a steep slope.ÆDo not drive the product in environmentscontaining flammable gas, liquid, dust or fibre.7EnglishBike:1. Throttle2. Throttle lock3. Dash board4. Bell5. Power/Mode button6. Up button7. Down button8. Brake9. Head light10. Front wheel11. Back wheel12. Seat13. Back light14. Kick stand15. Pedal16. Chain wheel17. Chain18. Battery19. Battery lock and key20. Power button13247688 589111213141516171820199English10Assemble the Bike1. Install the handle bar.´Insert front fender and make sure it is in place.´Tighten the handle bar.2. Install front wheel´Use the Axle to fixed the front wheel´Tighten the screw on one side of the axle.´Tighten the Quick lock on another side of the axle.11English 3. Install front fender4. Install pedals´Install the pedals in place by securely tightening with a 15mmwrench.Note: “L” and “R” are marked on the threaded fitting of the pedals.Left and right side is determined by sitting on the seat.5. Install Front light´Before assemble, prepare below parts:´Loosen the screws on the front light.´Put the lamp shade C and holder A into the front light and fixedby screws.Note: Do not fix the screws too tight.12´Put the light with holder A on the front suspension bar, andfixed with holder B. .Note: Put the holder A outside and holder B inside.´Tighten all the screws after fix the front light’s position.´Connect front light’s wire and put the wires inside front light’srear space, finished.6. Battery installation and remove´The battery has been installed at begining.´Rotate the key anticlockwise to unlock the battery and pull upto remove it.Steer the bike:1. Press the power button on the battery to turn on thebattery power.2. Long press the M button to turn on the bike. The dashboard lights up; Long press the M button again to turn off the bike. The dash board will be off.3. Rotate the throttle lightly to accelerate the vehicle androtate harder the speed goes faster.Note: Be accelerate according to the proficiency toassure safety, and accelerate gradually for initial use. 4. Throttle lockPress down the throttle lock switch to lock the throttle,the LCD shows Error 008.´At this mode, the vehicle won’t accelerate when rotating the throttle, you can ride the bike by pedal.´At this mode, long press the button to move in fixed speed 6KM/h even though loosen the accelerator, itwon’t decelerate until you brake.5. Pedal assistantThis vehicle has pedal assistant. When you ride the pedal, the motor will start work automatically to bring you faster speed while pedaling.When you stop riding, the motor will stop as well.6. Pedal assistant levelSingle press the and button to switch speedbetween level 1, 2, 3, 4 and 5.´Level 1: maximum speed is around 12km/h.´Level 2: maximum speed is around 15 km/h.´Level 3: maximum speed is around 17km/h.´Level 4: maximum speed is around 21km/h.´Level 5: maximum speed is around 25km/h.7. Lightly hold the brake to decelerate, hold harder and thedeceleration more obvious.Note: The left brake is for rear brake and the right one is for front brake.Note: Be brake in advance when the barriers are in thefront.8. Mileage modePress the M button to show the different mileage mode:´TRIP (cumulative mileage of this boot running)´ODO (cumulative mileage of the bike’s record)7. LightLong press the button to turn on the front and rearlight.Long press the button again to turn off the front andrear light.13EnglishBattery indicator:Adjusting the brake:1. Use the M5 hex wrench anti-clockwise to release theplate screws on back wheel, adjust the length of exposed tail, shorten for tighting and lengthen for loosing thebrake.2. Lock the pressure plate screws by rotating clockwise.Inflate the tires:1. Remove the front and rear tire inflatable mouth cap.2. Connect the pump to inflate and tight it to the inflatablemouth.Max inflate to 1.4barNormal inflate to 1.2barNote: We recommend a hand pump to avoid over inflating the tires.3. Replace the mouth cap when finish pumping.Maintenance:1. Wipe the exterior with a damp sponge.Note: Do not use any abrasive cleaning or scouringproducts. This may damage the surfaces.2. Wipe the wheels with a damp sponge to remove any dirt.Storage:´Store the bike where it is not exposed to moisture, dust, direct sunlight, extremely high or low temperatures.´Store the bike out of reach from children.English 14Error code descriptionEnglish1516EnglishCopyright:This manual is the copyright of CI no 556520-4137. No part of this manual may be revised, copied or transmitted in any way without written permission from CI no 556520-4137. Recycling:This product’s packaging materials are recyclableand can be reused. This product and the accessories packed together are the applicable product to theWEEE directive except batteries. Please dispose ofany materials in accordance with your local recycling regulations. When discarding the unit, comply withyour local rules or regulations. Batteries should neverbe thrown away or incinerated but disposed of in accordance with your local regulations concerning chemical wastes.Law and Safety:The CE mark indicates that this product has been manufactured according to current regulationsfor electromagnetic fields, which means that it is safeto use if used according to safety instructions. The product is manufactured according to current regulations within the EU legislation, limiting the use of hazardous substances in electrical and electronic equipment.Statement:This manual does not provide any warranty or related declarations. All information in this manual including theproduct specification, pictures and literatures is just for reference, CI no 556520-4137 reserves the rights toupdate contents of this manual without further notice.17。
LMT近端调试指导书
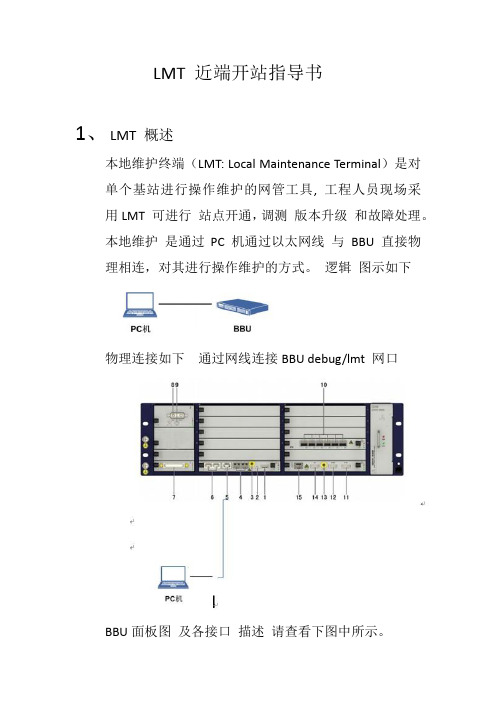
LMT 近端开站指导书1、LMT 概述本地维护终端(LMT: Local Maintenance Terminal)是对单个基站进行操作维护的网管工具, 工程人员现场采用LMT 可进行站点开通,调测版本升级和故障处理。
本地维护是通过PC 机通过以太网线与BBU 直接物理相连,对其进行操作维护的方式。
逻辑图示如下物理连接如下通过网线连接BBU debug/lmt 网口BBU面板图及各接口描述请查看下图中所示。
2、软件使用2.1、LMT 使用前需提前安装JAVA运行环境(JRE),默认安装在系统盘下即可,特殊情况下如无法打开LMT 需设置电脑环境变量。
2.2、设置笔记本电脑IP 地址为192.254.1. X 掩码255.255.255.0 X 不等于16 网线连接笔记本电脑网口与CCE1 板debug 口。
2.3 、登录前测试电脑与BBU联通性2.4 、LMT 登录双击EOMS.Jar 文件进入登录界面登录用户名admin 密码为空登录前需添加基站ip 192.254.1.16/24登录后进入基站拓扑视图3、开站方式一,直接导入基站数据3.1 基站数据导入BBU(数据由后台督导从网管导出同步文件发给前台督导)。
格式为.XML选择确定基站数据将下发至BBU 内导入后BBU 会重启LMT 软件将断开连接。
重启过后需重新登录。
3.2 开站方式二修改BBU内IP层配置实现建链。
(修改信息包括IP ,掩码网关VLAN ID,OMC 通道)VLAN id 无法直接修改只能选择因此修改VLAN id 前需新建一个VLANOMC 通道修改此处极为重要地址错误基站与网管无法建链。
所有修改完毕,点击图中导出到基站完成修改。
4,诊断测试双击打开EDMS.jar文件皆可依次ping 网关,OMC 服务器,和核心网地址均能ping 通则基站可正常建链。
如果无法ping 通基站网关,进入诊断测试-单板诊断检查BBU 与PTN 连接光口收发光查看光模块型号速率,公里数收发功率是否正常BBU 与RRU 收发光是否正常同理测试CRO 单板,和RRU 光电模块即可。
LMT工具使用说-明(详解)1
LMT检测工具使用说明第一部分LMT的安装、使用配置方法将拷贝的nodeb 400/TDLMTV4.10.101f文件打开,目前LMT版本为V3.10.101f。
然后双击文件包中LMTVER文件夹下的install.bat用网线将笔记本电脑的网口与CC板的ETH1口相连。
配置电脑网卡地址为192.254.1.X,掩码为255.255.255.0.注意此处的X不能为16,因为CC板上的ETH1网口的地址就是192.254.1.16,这个地址是出厂的固化设置。
双击LMT.exe打开LMT软件,在弹出的登陆框处点击“取消”。
然后点击左上角工具栏的“FTP设置”。
在弹出的“FTP服务器参数设置”页面中,依次配置各项:FTP地址:你网卡所设置的IP地址,例如192.254.1.18这个地方大家需要注意一下不要选错了,因为现在笔记本电脑往往都打开了无线网络,有时候这个地方的地址会是无线网卡的地址,大家一定要选172这个网段的才对。
(不要参照上图中的IP)FTP主目录:这里要创建一个空的文件夹,名为ZDB用户名、密码:建议大家设置一下。
默认的用户名和密码分别为、.这样,LMT的设置就完成了,大家在登录的时候,可以选择“系统”——“登录”,也可以点击下面的小图标:在前台登录时,选择“在线配置”。
注意勾选“开启内置FTP”。
用户名为root,密码为空。
默认即可,不需要更改。
前台IP为基站的IP登录以后可能会有如下提示,不用理会,点击“确定”,进入LMT操作页面。
Nod eB基本信息的配置一.在配置数据之前,需把设备内部的ATM信息删除,需做一下操作:1-1.选择【传输管理】→【PVC链路管理】,选定内部保存的数据,删除1-2.选择【传输管理】→【IMA组参数管理】,选定内部保存的数据,删除二.在“设备管理”栏内将基站类型更改为“全IP”,具体操作如下:2-1.选择【设备管理】→【NodeB配置】【传输类型】选择:全IP三.传输管理配置3-1. FE端口配置选择【传输管理】→【FE端口管理】,点击【创建】FE端口。
LMT基础操作
LMT基础操作LMT(Local Memory Table)是一种一体化超算存储架构,通过内存和硬盘的混合技术,结合传统的超算存储方式,提供了更高的存储容量和更快的数据访问速度。
在LMT的基础操作中,包括数据管理、文件管理和与其他计算节点的通信等方面。
首先是数据管理方面,在LMT中,数据是以文件的形式进行存储和管理的。
可以通过LMT提供的命令行接口或者图形化界面来管理数据。
通过这些接口,用户可以创建、删除、复制和移动文件。
可以通过路径或文件名来操作文件,也可以通过文件的权限进行控制。
LMT还提供了数据的读写接口,用户可以通过这些接口来读取和写入数据。
读取数据时,用户可以指定读取的位置和长度,并可以选择是否进行数据压缩。
写入数据时,用户可以指定写入的位置和长度,也可以选择是否进行数据压缩和加密。
用户还可以指定数据的存储位置,可以选择存储在内存中,也可以选择存储在硬盘中。
除了数据管理,LMT还提供了文件管理功能。
用户可以通过LMT提供的接口来查看文件的属性,包括文件的大小、创建时间和修改时间等。
还可以查看文件的权限,并可以进行权限的修改。
用户还可以对文件进行重命名和移动操作,可以将文件移动到不同的目录下或者重命名文件,同时还可以选择是否保留原有文件的权限。
另外,LMT还支持与其他计算节点的通信。
用户可以通过LMT提供的接口来向其他计算节点发送消息,并可以接收其他计算节点发送的消息。
用户可以指定发送消息的计算节点和接收消息的计算节点,可以选择发送的消息类型和消息内容。
通过这些接口,用户可以实现计算节点之间的数据共享和协调工作。
总之,LMT作为一种新型的超算存储架构,在数据管理、文件管理和与其他计算节点的通信等方面提供了一系列基础操作。
通过这些操作,用户可以方便地进行数据和文件的管理,实现数据的读写和文件的移动等功能。
同时,LMT还支持与其他计算节点的通信,可以进行数据共享和协调工作,提高计算效率。
华为LMT操作指南

华为TD-SCDMA网络RNC Web LMT操作指导书目录华为TD-SCDMA网络 (1)RNC WEB LMT操作指导书 (1)1、WEB LMT应用场景 (5)1.1LMT主界面 (5)1.1.1LMT登陆界面 (5)1.1.2整体界面如下: (6)2、常用MML命令 (6)2.1本地小区配置 (6)2.1.1查询NodeB本地小区 (6)2.1.2增加NodeB本地小区 (6)2.1.3删除NodeB本地小区 (7)2.2主公共控制物理信道配置 (7)2.2.1查询主公共控制物理信道 (7)2.2.2增加主公共控制物理信道 (8)2.2.3修改主公共控制物理信道 (8)2.2.4删除主公共控制物理信道 (8)2.3下行导频信道配置 (9)2.3.1查询下行导频信道 (9)2.3.2增加下行导频信道 (9)2.3.3修改下行导频信道 (10)2.3.4删除下行导频信道 (10)2.4上行导频信道配置 (10)2.4.1查询上行导频信道 (10)2.4.2增加上行导频信道 (10)2.4.3修改上行导频信道 (11)2.4.4删除上行导频信道 (11)2.5从公共控制物理信道配置 (11)2.5.1查询从公共控制物理信道 (11)2.5.2增加从公共控制物理信道 (12)2.5.3删除从公共控制物理信道 (12)2.6前向接入信道配置 (12)2.6.1查询前向接入信道、 (12)2.6.2增加前向接入信道 (12)2.6.3修改前向接入信道 (12)2.6.4删除前向接入信道 (13)2.7寻呼信道配置 (13)2.7.1查询寻呼信道 (13)2.7.2增加寻呼信道 (13)2.7.3修改寻呼信道 (13)2.7.4删除寻呼信道 (13)2.8寻呼指示信道配置 (14)2.8.1查询寻呼指示信道 (14)2.8.2增加寻呼指示信道 (14)2.8.3修改寻呼指示信道 (14)2.8.4删除寻呼指示信道 (14)2.9小区环境参数表配置 (15)2.9.1 查询小区环境参数 (15)2.9.2增加小区环境参数 (15)2.9.3删除小区环境参数 (15)2.9.4修改小区环境参数 (15)2.10小区HSPA伴随信道复用参数配置 (16)2.10.1查询小区HSPA伴随信道复用参数 (16)2.10.2修改小区HSPA伴随信道复用参数 (16)2.11小区相关信息 (16)2.11.1快速增加小区 (16)2.11.2查询小区基本信息 (17)2.11.3增加小区 (18)2.11.4修改小区基本信息 (18)2.11.5删除小区基本信息 (18)2.11.6激活小区 (19)2.11.7去激活小区 (19)2.11.8闭塞小区 (19)2.11.9解闭塞小区 (20)2.11.10查询小区状态 (20)3、算法参数配置 (21)3.1各种参数算法配置信息 (21)3.1.1查询小区接入限制信息 (21)3.1.2查询小区选择重选信息 (21)3.1.3查询小区测量控制系统信息 (22)3.1.4查询面向小区的切换公共参数 (23)3.1.5查询面向小区的同频切换测量算法参数 (23)3.1.6查询面向小区基于覆盖的异频切换测量算法参数 (23)3.1.7查询面向小区基于非覆盖的异频切换测量算法参数 (23)3.1.8查询面向小区基于覆盖的系统间切换测量算法参数 (24)3.1.9查询面向小区基于非覆盖的系统间切换测量算法参数 (24)3.1.10查询面向小区基于时间提前量的异频切换测量算法参数 (24)3.1.11查询小区SIB开关 (24)4、邻近小区配置 (24)4.1增加TD和GSM小区 (24)4.1.1查询TD小区的邻区信息 (24)4.1.2增加TD小区的邻区信息 (25)4.1.3修改TD小区的邻区信息 (26)4.1.4删除TD小区的邻区信息 (26)4.1.5查询GSM邻近小区 (26)4.1.6增加GSM邻近小区 (27)4.1.5修改GSM邻近小区 (27)4.1.7删除GSM邻近小区 (28)4.1.8查询邻近RNC小区 (28)4.1.9增加邻近RNC小区 (28)4.1.10增加GSM小区 (29)4.1.11查询GSM小区 (30)4.1.12删除GSM小区 (30)4.1.13修改GSM小区 (30)5、监测模块 (31)5.1小区上行ISCP监测 (31)5.2小区UPPCH干扰监测 (32)5.3小区码树使用情况监测 (33)6、跟踪模块 (34)6.1I U跟踪 (34)6.2I UR跟踪 (35)6.3I UB跟踪 (35)6.4U U跟踪 (36)6.5UE跟踪 (36)6.6小区跟踪 (37)7、告警模块 (38)7.1浏览活动告警 (38)7.2查询告警日志 (38)7.3告警日志获取 (38)8、批处理 (38)9、导出工程参数 (39)9.1执行MML命令:EXP CFGMML (39)9.2提取工参 (39)1、Web LMT应用场景1.1LMT主界面1.1.1LMT登陆界面步骤:打开IE浏览器,输入IP地址:XX.XXX.XX.XX,点击进入,输入用户名;密码、验证码,点击进入LMT系统1.1.2整体界面如下:2、常用MML命令2.1本地小区配置2.1.1查询NodeB本地小区命令:LST TLOCALCELL2.1.2增加NodeB本地小区命令:ADD TLOCALCELL2.1.3删除NodeB本地小区命令:RMV TLOCALCELL2.2主公共控制物理信道配置2.2.1查询主公共控制物理信道命令:LST TPCCPCH2.2.2增加主公共控制物理信道命令:ADD TPCCPCH2.2.3修改主公共控制物理信道命令:MOD TPCCPCH省略2.2.4删除主公共控制物理信道命令:RMV TPCCPCH2.3下行导频信道配置2.3.1查询下行导频信道命令:LST TDWPCH2.3.2增加下行导频信道命令:ADDTDWPCH2.3.3修改下行导频信道命令:MOD TDWPCH 2.3.4删除下行导频信道命令:RMV TDWPCH2.4上行导频信道配置2.4.1查询上行导频信道命令:LST TUPPCH2.4.2增加上行导频信道命令:ADD TUPPCH2.4.3修改上行导频信道命令:MOD TUPPCH2.4.4删除上行导频信道命令:RMV TUPPCH2.5从公共控制物理信道配置2.5.1查询从公共控制物理信道命令:LST TSCCPCH2.5.2增加从公共控制物理信道命令:ADD TSCCPCH2.5.3删除从公共控制物理信道命令:RMV TSCCPCH2.6前向接入信道配置2.6.1查询前向接入信道、命令:LST TFACH2.6.2增加前向接入信道命令:ADD TFACH2.6.3修改前向接入信道命令:MOD TFACH2.6.4删除前向接入信道命令:RMV TFACH2.7寻呼信道配置2.7.1查询寻呼信道命令:LST TPCH2.7.2增加寻呼信道命令:ADD TPCH2.7.3修改寻呼信道命令:MOD TPCH2.7.4删除寻呼信道命令:RMV TPCH2.8寻呼指示信道配置2.8.1查询寻呼指示信道命令:LST TPICH2.8.2增加寻呼指示信道命令:ADD TPICH2.8.3修改寻呼指示信道命令:MOD TPICH2.8.4删除寻呼指示信道命令:RMV TPICH2.9小区环境参数表配置2.9.1 查询小区环境参数命令:LST TCELLENVALGO2.9.2增加小区环境参数命令:ADD TCELLENVALGO 2.9.3删除小区环境参数命令:RMV TCELLENVALGO 2.9.4修改小区环境参数命令:MOD TCELLENVALGO2.10小区HSPA伴随信道复用参数配置2.10.1查询小区HSPA伴随信道复用参数命令:LST TCELLDPCHMULTPARA2.10.2修改小区HSPA伴随信道复用参数命令:MOD TCELLDPCHMULTPARA2.11小区相关信息2.11.1快速增加小区命令:ADD TQUICKCELL2.11.2查询小区基本信息命令:LST TCELL2.11.3增加小区命令:ADD TCELL2.11.4修改小区基本信息命令:MOD TCELL2.11.5删除小区基本信息命令:RMV TCELL2.11.6激活小区命令:ACT TCELL2.11.7去激活小区命令:DEA TCELL2.11.8闭塞小区命令:BLK TCELL2.11.9解闭塞小区命令:UBL TCELL2.11.10查询小区状态命令:DSP TCELL3、算法参数配置3.1各种参数算法配置信息3.1.1查询小区接入限制信息命令:LST TCELLACCESSSTRICT3.1.2查询小区选择重选信息命令:LST TCELLSELRESEL3.1.3查询小区测量控制系统信息命令:LST TCELLMEAS3.1.4查询面向小区的切换公共参数命令:LST TCELLHOCOMM3.1.5查询面向小区的同频切换测量算法参数命令:LST TCELLINTRAFREQHO3.1.6查询面向小区基于覆盖的异频切换测量算法参数命令:LST TCELLINTERFREQHOCOV3.1.7查询面向小区基于非覆盖的异频切换测量算法参数命令:LST TCELLINTERFREQHONCOV3.1.8查询面向小区基于覆盖的系统间切换测量算法参数命令:LST TCELLINTERRA THOCOV3.1.9查询面向小区基于非覆盖的系统间切换测量算法参数命令:LST TCELLINTERRA THONCOV3.1.10查询面向小区基于时间提前量的异频切换测量算法参数命令:LST TCELLINTERFREQHOTA3.1.11查询小区SIB开关命令:LST TCELLSIBSWITCH4、邻近小区配置4.1增加TD和GSM小区4.1.1查询TD小区的邻区信息命令:LST TNCELL4.1.2增加TD小区的邻区信息命令:ADD TNCELL4.1.3修改TD小区的邻区信息命令:MOD TNCELL4.1.4删除TD小区的邻区信息命令:RMV TNCELL4.1.5查询GSM邻近小区命令:LST TGSMNCELL4.1.6增加GSM邻近小区命令:ADD TGSMNCELL4.1.5修改GSM邻近小区命令:MOD TGSMNCELL4.1.7删除GSM邻近小区命令:RMV TGSMNCELL4.1.8查询邻近RNC小区命令:LST TNRNCCELL4.1.9增加邻近RNC小区命令:ADD TNRNCCELL增加RNC标识为“1”的RNC下、小区标识为50453的小区信息。
- 1、下载文档前请自行甄别文档内容的完整性,平台不提供额外的编辑、内容补充、找答案等附加服务。
- 2、"仅部分预览"的文档,不可在线预览部分如存在完整性等问题,可反馈申请退款(可完整预览的文档不适用该条件!)。
- 3、如文档侵犯您的权益,请联系客服反馈,我们会尽快为您处理(人工客服工作时间:9:00-18:30)。
LMT用户指南
11/4/2020
For internal use Document ID / v. 0.1 / Life cycle status / Dept. / Author
©2013 Nokia Solutions and Networks. All rights reserved.
一、登陆本地维护终端
NodeB 和LMTB 的连接方式
LMTB 近端直连NodeB
LMTB近端直连NodeB时,需保证LMTB计算机IP地址和NodeB近端维护通道IP地址在同一网段。 LMTB 远端代理连接NodeB
LMTB远端代理连接NodeB时,采用OMC920作为代理服务器。LMTB通过OMC920连接NodeB,主要通过如下方式连接:指
4 11/4/2020
For internal use Document ID / v. 0.1 / Lifehor
©2013 Nokia Solutions and Networks. All rights reserved.
四、管理NodeB 设备
5 11/4/2020
For internal use Document ID / v. 0.1 / Life cycle status / Dept. / Author
©2013 Nokia Solutions and Networks. All rights reserved.
五、管理NodeB 文件
操作物理拓扑图 用户可以通过操作物理拓扑图查询设备当前状态。 管理BBP530 设备 在拓扑图中BBP530节点上单击鼠标右键弹出右键菜单,可对BBP530进行操作。包含单板版本信息、单板活动告警、 复位单板、查询E1链路、打开仿真机框。 管理RRU 设备 查询单板版本信息、查询活动告警、复位RRU
3 11/4/2020
For internal use Document ID / v. 0.1 / Life cycle status / Dept. / Author
©2013 Nokia Solutions and Networks. All rights reserved.
三、管理NodeB 告警
定OMC920作为缺省网关,设置从LMTB计算机到NodeB的路由,登录NodeB。
登录LMTB 本地维护终端 LMTB具备在线和离线两种模式,用户必须在在线登录的情况下才能通过LMTB软件对NodeB进行配置和查询等操作。 登录LMTB有三种方式:在线登录、代理服务器登录和离线登录。 ➢ 在线登录前,必须确保LMTB和网元之间的网络连接正常。在线登录前,需增加局向并选择用户类型。 ➢ 用户也可以通过选择代理服务器进行登录,例如使用OMC920作为代理服务器。 ➢ 如果选择离线登录,用户能够使用本地维护终端的部分功能,例如查看MML命令的联机帮助等。 一个NodeB可以支持10个LMTB同时连接。 登录后LMTB窗口标题显示为:“[局向名:IP地址]本地维护终端 网元名称-[任务窗口名]”。 注意事项 ➢ 默认的用户名密码如下:8.0版本之前发货的WMPT/WMPTc板, “用户名”和“密码”都为“admin”。在8.0版 本新发货的WMPT/WMPTc/UMPTb板,“用户名”为“admin”,“密码”为“hwbs@com”。 ➢ 当所登录的网元不存在或不可达,或者由于网络通讯、网元命令处理拥塞等造成登录时间较长时,可以使用快捷 键“Ctrl+Break”中断登录,待返回“用户登录”对话框后重新登录。 ➢ 在登录过程中如果登录失败,系统弹出错误提示框,用户可以在提示框上单击“处理建议”查看具体处理步骤。 ➢ 如果网元用户被网管强制注销,系统会弹出提示框,单击“确定”后将显示“用户登录”对话框。用户可以选择 重新登录。
NodeB 告警管理相关概念 管理NodeB告警前需要了解NodeB告警的相关概念,包括告警类别、告警日志、告警级别、网管告警分类。 配置NodeB 告警系统属性 配置NodeB告警系统属性包括:告警实时打印设置、告警闪烁提示、告警配置查询、告警配置修改。 处理NodeB 告警 处理NodeB告警的操作包括:浏览告警、查询告警日志、告警实时打印、浏览本地告警文件和告警定制。 告警常用操作 告警常用操作包括:查找告警或事件、手工恢复告警、设置特殊告警过滤和清除显示告警。
设置输出参数 用户可以根据需要设置MML命令行窗口的界面参数。 设置MML 参数面板显示格式 在MML命令参数输入面板上,每个参数输入框前面一般只显示参数描述而不显示参数标识,用户可以通过设置使参 数描述和参数标识同时显示出来。 执行MML 命令 本地维护终端采用基于MML命令行的图形操作界面,提供了丰富的操作维护管理命令,通过执行相关的命令可以对 系统进行全面的维护和管理。 执行批处理命令 执行批处理命令,是指当编排好一系列命令来完成某个独立的功能或某个操作时,可以用批处理的方式一次执行多 条命令。 搜索MML 命令 用户可以通过MML命令的搜索功能,进行模糊查询。 查看操作记录 “操作记录”页签内显示所有已执行过的MML命令(包括成功执行的和未成功执行的)和相关参数信息。 查看命令帮助 MML命令联机帮助提供对每条命令的功能、使用注意事项、各参数含义、使用实例以及输出结果的详细说明。 界面参考:执行NodeB MML 命令 用户登录本地维护终端系统后,操作界面主要包括导航树窗口、系统信息输出窗口、操作信息输出区、MML命令编 辑区、命令和参数输入面板。
2 11/4/2020
For internal use Document ID / v. 0.1 / Life cycle status / Dept. / Author
©2013 Nokia Solutions and Networks. All rights reserved.
二、执行MML命令
管理NodeB文件主要是指NodeB数据配置文件的下载和备份,以及NodeB日志文件和设备档案文件的上载。 NodeB 文件管理概述 NodeB文件管理的相关概念包括:NodeB文件种类和NodeB文件获取途径。 种类:数据配置文件、设备档案文件、日志文件、检测数据文件。 获取途径:将文件上载至FTP服务器后,登录FTP服务器进行浏览;通过OMC920,浏览文件。 管理NodeB 数据配置文件 管理NodeB数据配置文件包括下载、备份和激活数据配置文件。 上载NodeB 文件到FTP 服务器 将NodeB文件上载到FTP服务器后,可登录FTP服务器对文件进行保存、浏览、修改。包含:上载日志文件、上载 NodeB 设备档案文件。