IFC IRAS 5.1易瑞授权访问安装手册(Linux)
安装LINUX5 详细教程
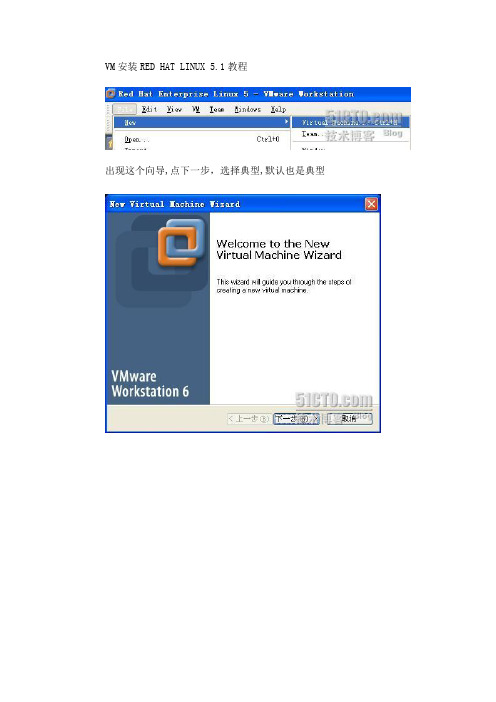
VM安装RED HAT LINUX 5.1教程出现这个向导,点下一步,选择典型,默认也是典型下一步,选择LINUX,版本选择Red Hat Enterprise Linux5输入虚拟机名字及存放位置注意:放虚拟文件的分区至少要10G以上剩余空间下一步,选择默认的桥接网络下一步,虚拟机分配硬盘空间,我们都用30G吧,下面的分页文件大小2G的,要选中,完成了。
如果你物理机器内寸是1G或者以上的,分512给虚拟机。
如果物理机是512的,分256就可以了下面点CD-ROM,点使用ISO镜象,把你们的RHEL5放进去三角符号,是启动的意思这样我们就到了RHEL5安装界面,点回车是以图形截面安装,输入linux text是用CLI安装这里我们选语言为英语,如果选中文的话,在CLI状态下会出现中文乱码的情况这里选美式键盘US这里可以输入RHEL5.1的序列号,也可以跳过不填,对安装应用没关系。
SKIP跳过提示要初始化硬盘,选YES继续。
这里分区我们选择自定义我们进行硬盘分区:New 就是建立新的分区EDIT 就是更改已有的分区DELETE 就是删除已建立的分区RESET 就是把你刚才的设定全部取消。
恢复到现在的样子RAID 是磁盘阵列LVM 是逻辑卷RAID知识点:RAID0、RAID1、RAID0+1、RAID5原理介绍RAID是通过磁盘阵列与数据条块化方法相结合, 以提高数据可用率的一种结构。
IBM早于1970年就开始研究此项技术。
RAID 可分为RAID级别1到RAID级别6, 通常称为: RAID 0, RAID 1, RAID 2, RAID 3,RAID 4,RAID 5,RAID6。
每一个RAID级别都有自己的强项和弱项. “奇偶校验”定义为用户数据的冗余信息, 当硬盘失效时, 可以重新产生数据。
RAID 0: RAID 0 并不是真正的RAID结构, 没有数据冗余。
RAID 0 连续地分割数据并并行地读/写于多个磁盘上。
Linux上jira 5 安装、破解及汉化图文并茂

Linux上Jira 5.0的安装、破解及汉化本方法经过我的测试,不适用于5.0.6最新版,5.0.1下面所有版本都可以用。
准备工作:下载JIRA,下载地址:/software/jira/JIRADownloadCenter.jspa,目前为止,最新版本是5.0,选择atlassian-jira-5.0-x64.bin保证主机上的JDK,MySQL都已经安装完毕在mysql数据库中,建立jira所用的数据库,并给jira用户赋予权限。
Sql代码1.mysql> create database jiradbCHARACTER SET utf8; --注意一定要是utf-8的2.mysql> grant all on jiradb.* to 'jira'@'localhost' identified by 'jira';3.mysql> flush privileges;安装jira:将下载的atlassian-jira-5.0-x64.bin传到服务器上面比如/home/liubing/atlassian-jira-5.0-x64.bin赋予执行权限Chmod +x atlassian-jira-5.0-x64.bin然后开始安装./atlassian-jira-5.0-x64.bin它会提示你是(Y)否(N)安装,当然选y,是用户默认配置(1)还是自定义(2)放弃(3)选2安装的路径,默认为当前路径,在虚拟机下面安装可能会到/opt/下面你修改路径为当前路径并区别一下版本比如:/home/liubing/atlassian5/jira然后是数据路径,一样修改一下比较清晰/home/liubing/atlassian5/application-data/jira然后是否修改启动的服务器端口,你可以修改也可以不改,默认是(8080/8005)下面就开始安装了,稍等1分钟就可以访问http://xxxxx.xxx.xx:8080/来访问它了在运行时可能会出现类似PermGen space的错误,并且jira成功运行后会有多个警告,在这里一次把它搞定:修改bin/catalina.sh 文件,添加如下代码:Java代码1.JAVA_OPTS='-Xms512m -Xmx1024m -XX:PermSize=64M -XX:MaxPermSize=128m -Datlassian.standalone=JIRA -Dorg.apache.jasper.runtime.BodyContentImpl.LIMI T_BUFFER=true -Dmail.mime.decodeparameters=true'重新运行在浏览器中打开jira,按我上面的配置,应该是http://IP/jira进行首次运行的时候,会提示你连接内部数据库(internal)还是外部数据库(external), 你如果有外部数据库mysql或者什么的,那么你就可以在这个地方进行数据库的连接拉,输入数据库ip地址输入数据库用户名输入数据库密码输入数据库这个地方请注意拉,请像这样输入:jiradb?autoReconnect=true&useUnicode=true&characterEncoding=UTF8那么它就会用utf8字符集去连数据库。
Linux 测试 环境 配置 手册 (CentOS5.5) 服务配置

测试环境配置手册文档修订目录1. 概述 (5)1.1 文档内容 (5)1.2 目标 (5)1.3 备注 (6)2. 操作系统安装 (6)2.1 安装前的准备 (6)2.2 安装 (6)3. 前置软件安装 (7)3.1 Sun jdk安装 (7)3.1.1 目标 (7)3.1.2 下载源码 (7)3.1.3 安装 (7)3.2 cmake安装 (8)3.2.1 目标 (8)3.2.2 下载源码 (8)3.2.3 编译安装 (8)3.3 PCRE安装 (8)3.3.1 目标 (8)3.3.2 安装 (8)3.4 pam、db4安装 (8)3.4.1 目标 (8)3.4.2 安装 (9)3.5 libjpeg、libpng安装 (9)3.5.1 目标 (9)3.5.2 安装 (9)3.6 libiconv安装 (9)3.6.1 目标 (9)3.6.2 下载源码 (9)3.6.3 编译安装 (9)3.7 libmcrypt安装 (9)3.7.1 目标 (9)3.7.2 下载源码 (10)3.7.3 编译安装 (10)3.8 mhash安装 (10)3.8.1 目标 (10)3.8.2 下载源码 (10)3.8.3 编译安装 (10)3.9 mcrypt安装 (11)3.9.1 目标 (11)3.9.2 下载源码 (11)3.9.3 编译安装 (11)3.10 freetype安装 (12)3.10.2 下载源码 (12)3.10.3 安装 (12)3.11 giflib安装 (12)3.11.1 目标 (12)3.11.2 安装 (12)3.12 jpeglib安装 (12)3.12.1 目标 (12)3.12.2 下载源码 (12)3.12.3 编译安装 (13)4. 软件安装 (13)4.1 Msql安装 (13)4.1.1 目标 (13)4.1.2 下载源码 (13)4.1.3 编译安装 (13)4.1.3.1 配置 (14)4.1.4 小结 (15)4.2 Tomcat安装 (15)4.2.1 目标 (15)4.2.2 下载源码 (15)4.2.3 安装 (15)4.3 jboss安装 (16)4.3.1 目标 (16)4.3.2 下载源码 (16)4.3.3 安装 (16)4.4 Nginx安装 (17)4.4.1 目标 (17)4.4.2 下载源码 (17)4.4.3 安装 (17)4.5 php安装 (18)4.5.1 目标 (18)4.5.2 下载源码 (18)4.5.3 安装 (18)4.6 Apache Ant安装 (18)4.6.1 目标 (18)4.6.2 下载 (18)4.6.3 安装 (19)4.6.4 配置环境 (19)4.7 vsftp安装 (19)4.7.1 目标 (19)4.7.2 安装 (19)4.8 openoffice安装 (19)4.8.1 目标 (19)4.8.2 下载源码 (19)4.9 swftools安装(有问题) (20)4.9.1 目标 (20)4.9.2 下载源码 (20)4.9.3 安装 (20)4.9.4 解决方案 (20)5. 配置管理 (21)5.1 配置vsftp帐号 (21)5.1.1 目标 (21)5.1.2 建立帐号数据文件 (21)5.2 配置nginx (22)5.2.1 目标 (22)5.2.2 创建网站文档目录 (23)5.2.3 优化nginx.conf配置 (23)5.3 配置tomcat (26)5.3.1 目标 (26)5.3.2 配置server.html (26)5.4 配置Jboss (26)5.4.1 目标 (26)5.4.2 配置 (26)5.5 配置hodson (27)5.5.1 目标 (27)5.5.2 下载hudson (27)5.5.3 安装和配置 (27)5.5.4 管理hudson (30)6. 参考资料 (30)1.概述1.1文档内容●操作系统CentOS 5.5的安装●安装需要用到的库或工具⏹Sun jdk⏹Apache ant 1.8.2⏹Cmake⏹Pcre⏹Pam⏹Db4⏹Libjpeg⏹Libpng⏹Libiconv⏹Libmcrypt⏹Mhash⏹Mcrypt●安装服务器软件⏹Mysql 5.5⏹Tomcat 7.0.5⏹Jboss 4.0.2⏹Nginx 0.8.54⏹Apache ant 1.8.2⏹Php 5.3.5⏹Vsftp 2.0.5⏹openOffice 3.2.1⏹swftools 0.9.1●配置管理⏹配置vsftp,建立协同教育平台测试帐号和开发帐号⏹配置nginx,代理jboss、tomcat、hudson、php,统一外出80端口⏹配置jboss⏹配置tomcat⏹配置php⏹配置hudson⏹Tomcat 部署协同教育平台项目1.2目标测试机的搭建步骤以文档记录,方便以后维护测试机。
InCloud Sphere 6.5.1升级指导手册说明书

InCloud Sphere6.5.1升级指导手册济南浪潮数据技术有限公司2022年04月目录目录 (I)概要说明 (1)准备工作 (2)升级过程说明 (4)3.1确认ICS版本号 (4)3.2上传更新包 (6)3.3iCenter节点升级 (8)3.4iNode升级 (11)3.5确认升级成功 (14)3.6重启主机 (16)虚拟机在线升级 (18)升级后操作 (24)升级异常情况处理 (26)6.1升级检查不通过 (26)6.2升级实体失败 (26)6.3升级后ICS平台页面无法打开 (27)6.4其它异常情况 (28)升级指导手册1概要说明概要说明本文档可指导InCloud Sphere产品从6.5.0升级至6.5.1,在升级的过程中,请务必保证服务器稳定运行,尽量保证系统中无其他操作。
目前,本文档涉及的升级指导只针对InCloud Sphere6.5.0升级。
如果用户环境为InCloud Sphere6.5.0之前版本,请先升级至InCloud Sphere6.5.0版本,再参考本文档进行版本升级。
【注意】:(1)ICS6.5.0版本,不论其是否升级过hotfix,都可以直接升级到ICS6.5.0版本。
(2)用户在升级过程中,不能对主机进行断电以及强制重启操作。
(3)用户在升级时,需要先升级iCenter,然后再升级iNode。
准备工作1)下载好如下表格所示升级包,放到打开iCenter管理控制台的客户端(笔记本/台式机)上。
升级包文件可以联系浪潮工程师获取。
表2-1升级包2)核对升级包SHA256校验值的正确性。
Windows环境下推荐使用certutil 命令:certutil-hashfile C:\InCloudSphere-V6R05B1**-b*-x86_64-M001.upgrade.zip SHA256计算升级包的SHA256检验值。
Linux环境下推荐使用sha256sum命令:sha256sum/root/InCloudSphere-V6R05B1**-b*-x86_64-M001.upgrade.zip计算升级包的SHA256检验值。
Red Hat Enterprise Linux 5 部署指南说明书

Red Hat Enterprise Linux 5Deployment GuideDeployment, configuration and administration of Red Hat Enterprise Linux 5版 6Last Updated: 2022-06-15Red Hat Enterprise Linux 5 Deployment Guide Deployment, configuration and administration of Red Hat Enterprise Linux 5版 6Landmann********************. . . . . . . . . . . . . . . . . . . . . . . . . . . . . . . . . . . . . . . . . . . . . . . . . . . . . . . . . . . . . . . . . . . . . . . . . . . . . . . . . . . . . . . . . . . . . . . . . . . . . . . . . . . . . . . . .. . . . . . . . . . . . . . . . . . . . . . . . . . . . . . . . . . . . . . . . . . . . . . . . . . . . . . . . . . . . . . . . . . . . . . . . . . . . . . . . . . . . . . . . . . . . . . . . . . . . . . . . . . . . . . . . .. . . . . . . . . . . . . . . . . . . . . . . . . . . . . . . . . . . . . . . . . . . . . . . . . . . . . . . . . . . . . . . . . . . . . . . . . . . . . . . . . . . . . . . . . . . . . . . . . . . . . . . . . . . . . . . . .內容目錄簡介1. 我們需要您的寶貴意見!附錄 A. REVISION HISTORY 章 1. 版本紀錄2234內容目錄1Deployment Guide簡介歡迎使用Red Hat Enterprise Linux 建置指南。
IAC-IMX8MP-Kit Linux 用户手册说明书

IAC-IMX8MP-Kit Linux 用户手册版本号:V2.02021年08月浙江启扬智能科技有限公司版权所有QIYANG TECHNOLOGY Co., LtdCopyright Reserved版本更新记录有任何技术问题或需要帮助,请联系:*********************** 第3页 共25页 购买产品,请联系销售:********************更多信息请访问: 目 录目 录 ............................................................................................................................................. 3 阅读前须知:本手册主要介绍IAC-IMX8MP-Kit 开发板Linux 用户手册 ............................... 4 一、前言 . (4)公司简介 ................................................................................................................................... 4 二、上手教程 ................................................................................................................................... 5 2.1、入手指南 .......................................................................................................................... 5 2.2、串口调试 .......................................................................................................................... 6 三、镜像烧写(固件烧写) ......................................................................................................... 10 3.1、启动方式说明 ................................................................................................................ 10 3.2、镜像说明 ........................................................................................................................ 11 3.3、USB 烧写镜像 ............................................................................................................... 12 四、功能说明与测试 ..................................................................................................................... 16 五、Linux 开发 (17)5.1、安装交叉编译器 ............................................................................................................ 17 5.1、NFS 网络文件系统 ....................................................................................................... 18 5.2、镜像编译 ........................................................................................................................ 19 5.3、应用程序开发 ................................................................................................................ 21 六、常见问题 (24)有任何技术问题或需要帮助,请联系:*********************** 第4页 共25页 购买产品,请联系销售:********************更多信息请访问: 阅读前须知:本手册主要介绍IAC-IMX8MP-Kit 开发板Linux 用户手册一、前言公司简介浙江启扬智能科技有限公司2007年成立于杭州, 是一家专注于ARM 嵌入式产品研发、生产与销售的国家高新技术企业。
IAC-335X-Kit Linux 用户手册说明书
IAC-335X-Kit Linux用户手册版本号v1.02013/03/19杭州启扬智能有限公司版权所有QIYANG TECHNOLOGY Co.,LtdCopyright Reserved修改历史记录版本号时间修订内容v1.02013-2-19创建有任何技术问题或需要帮助,请联系:***********************第1页共12页购买产品,请联系销售:********************更多信息请访问:目录前言 (3)一、IAC-335X-Kit资源简介 (4)1.1硬件资源 (4)1.2软件资源 (4)二、搭建嵌入式Linux开发环境 (5)三、启动和烧写Linux系统 (5)3.1启动方式 (5)3.2固化系统镜像到SD卡 (6)3.3烧写Linux系统到NAND Flash (6)四、编译u-boot和Linux内核 (6)4.1编译u-boot (6)4.2编译Linux内核 (7)五、应用程序的开发 (7)5.1Hello World (7)5.2交叉编译 (8)5.3运行应用程序 (8)5.4自动启动应用程序 (9)六、ubi文件系统制作 (9)七、IAC-335X-Kit的硬件接口测试 (10)有任何技术问题或需要帮助,请联系:***********************第2页共12页购买产品,请联系销售:********************更多信息请访问:前言欢迎使用杭州启扬智能科技有限公司产品IAC-335X-Kit,本产品Linux部分包含3份手册:IAC-335X-Kit Linux用户手册、IAC-335X-Kit硬件说明手册以及IAC-335X-Kit Linux测试手册。
硬件相关部分可以参考IAC-335X-Kit硬件说明手册,主板测试可以参考IAC-335X-Kit Linux测试手册。
使用之前请仔细阅读IAC-335X-Kit Linux用户手册以及IAC-335X-Kit硬件说明手册!公司简介杭州启扬智能科技有限公司位于美丽的西子湖畔,是一家集研发、生产、销售为一体的高新技术产业。
Fujitsu PRIMERGY Linux安装后操作指南(适用于x86版本3.0)说明书

2005-11-01 Notes on Using Red Hat Enterprise Linux AS (v.3 for x86) PrefaceAbout This ManualThis manual provides notes on PRIMERGY operation with Linux installed. Be sure to read this manual before using Linux.Intended ReadersThis manual is intended for persons who operate PRIMERGY.Organization of This ManualThis manual consists of the following chapters:Chapter 1 Notes on OperationThis chapter provides notes on operation after installation. Be sure to read this chapterbefore operating PRIMERGY with Linux installed.Chapter 2 Addition of Peripheral Devices and Option CardsThis chapter explains the procedures for adding peripheral devices and cards afterinstallation and provides notes on adding these options. Read this chapter as required.Chapter 3 OthersThis chapter explains other functions and provides other notes such as notes on limits.Operation VerificationThe operations of the products described in this manual have been confirmed by Fujitsu. Please note, however, that these operations are subject to change without prior notice.Support & ServiceA support service(SupportDesk Product basic service), available for a fee, provides customers usingLinux with an enhanced sense of security and confidence. Customers concluding a support and service agreement are entitled to receive support in such areas as assistance with queries regarding this manual and questions and problems that may come up during the installation and operation of this product.Please consider taking advantage of this service option by concluding a support and service agreement with us.CopyrightAll rights Reserved, Copyright (C) FUJITSU LIMITED 20051. Notes on Operation1.1 Assignment of Device NamesLinux assigns device names to a variety of devices, such as the hard disk drive, in the order that it recognizes them during its startup sequence. If the system is restarted after a device such as a hard disk drive or controller fails, the assigned device names may be changed because the system cannot recognize a device that has failed.Example: When hard disk drives are connected to SCSI ID 1, 2, and 3, device names /dev/sda, /dev/sdb, and /dev/sdc are assigned respectively to the disk drives. If /dev/sdb failsunder this condition, the device previously assigned /dev/sdc/ is moved up by one andrecognized as /dev/sdb after the system is restarted.If an assigned device is unexpectedly changed, it may prevent the system from starting or,in the worst case, may damage your data. If a device fault is detected, therefore, Fujitsurecommends starting the system in rescue mode and checking for hardware faults beforerestarting the system (*1). Repair the hardware fault, restore the system by means suchas the backup tape, and then restart the system.*1 For details on starting the system in rescue mode, see Section 1.4, "Starting theSystem in Rescue Mode."After starting the system, use the fdisk command to check whether the relevant hard diskdrive can be recognized, and take necessary steps such as checking for hardware errormessages in /var/log/messages.1.2 Installation of Red Hat Enterprise Linux AS (v.3 for x86) PackagesRed Hat Enterprise Linux provides installation types so that the optimum system can be constructed according to the use purpose. For this reason, packages required for your purposes might not be installed. If a required package has not been installed, log in as the root and install it by executing the following procedure:Install the necessary packages by using the installation CDs (1/4 to 4/4) that have beencreated according to the Installation Procedure included in the driver kit.# mount -r /dev/cdrom /mnt/cdrom# cd /mnt/cdrom/RedHat/RPMS# rpm -ivh <package_file>Example: To install package "make"# rpm -ivh make-3.79.1-17.i386.rpm# cd /# umount /mnt/cdrom# eject* Remove the CD.1.3 Installing and Setting Up Global Array Manager (GAM)Use Global Array Manager (GAM) as a RAID management tool in a system with a mounted onboard SCSI-RAID and SCSI-RAID card (PG-142E3).For details on installing GAM-Client (Windows), see "Outline of Installation Procedure for Global Array Manager-Client", which is an attachment.The GAM-Server (Linux) installation procedure is explained below.[Notes]1)The screen display may become unstable during GAM installation or GAM service startup.This is not an operational problem.2)Specify the port numbers shown below for GAM service.Take care when configuring firewall settings.Port numbers: 157,158(1)To install GAM-Server (Linux), insert the driver CD into the CD-ROM drive, and entercommands as follows:# mount -r /dev/cdrom /mnt/cdrom# cd /mnt/cdrom/UTY/GAM/Linux# rpm -ivh gam-server-6.02-21.i386.rpm# rpm -ivh gam-agent-6.02-21.i386.rpm- Enter the following only if onboard SCSI for RX200 S2# rpm -ivh 1030SNMPAgent-2.4-3.i386.rpm# sh ./insgam* Confirm that “GAM is installed successfully.” is displayed.# cd /# umount /mnt/cdrom# eject* Remove the CD.(2)For user accounts in Linux, create "gamroot" as a user account with GAM administratorauthority and then create user accounts (e.g., "gamuser") with user authority.(If a user account with user authority has already been created, another account need not be created.) # adduser gamroot# passwd gamrootChanging password for user gamrootNew-password <--- Enter a password.Retype new password <--- Re-enter the same password for confirmation.passwd: all authentication tokens updated successfully* Create a user account with user authority in the same way as explained above.(3)Edit three lines as shown below in the /etc/sysconfig/gam file.Events can be posted to GAM-Client after this editing is completed.# vi /etc/sysconfig/gam[Before editing]START_GAMEVENT=nGAMEVENT_OPTIONS=""[After editing]START_GAMEVENT=y <--- Change "n" to "y".GAMEVENT_OPTIONS="-h ip-address" <--- Specify the IP address of the managementWindows system on which GAM-Client isinstalled.[Before editing]START_GAMEVLOG=n[After editing]START_GAMEVLOG=y <--- Change "n" to "y".(4)Restart the system.# shutdown -r now* The following message may be displayed after the system starts. It does not indicate an operational problem.[Message]gamagent: gamagent: Connection refusedgamagent connect failure1.4 Starting the System in Rescue ModeUsing only one of the installation CDs that have been created according to the Installation Procedure included in the driver kit, you can start the system in rescue mode. This may enable system recovery in the event of a problem that prevents the system from starting normally.This section explains only how to start the system as one that has minimum functionality.Start the system in rescue mode as follows:(1)Start the system from installation CD 1/4 that was created according to the InstallationProcedure included in the driver kit. Enter the appropriate response in the following window,and press the [Enter] key.(2)In the Choose a Language window, select "English" and select "OK."(3)In the Keyboard Type window, select "jp106" and select "OK."If an accessory keyboard such as of a flat display (PG-R1DP3) is used, select "us" here.(4)In the following window, select "Yes."(5)In the following window, select "Add Device."(6)In the Driver List window, select the drivers for the devices installed in the system, and select"OK." The following drivers must be selected:[onboard SCSI type for TX200 S2][onboard SCSI type or onboard SCSI-RAID type for RX200 S2]Two drivers must be selected. Select drivers as follows:1.Select the driver shown below, and select "OK.""LSI Logic Fusion MPT Base Driver (mptbase)"2.The Device Selection window is displayed. Select "AddDevice."3. A list of drivers is displayed. Select the driver shown below, and select "OK.""LSI Logic Fusion MPT SCSI Driver (mptscsih)"[SCSI-RAID card(PG-140D1/PG-142E3) for TX200 S2][onboard SCSI-RAID type for RX300 S2]Select the driver shown below, and select "OK.""LSI MegaRAID controller (megaraid2)"(7)Make sure that the selected driver is displayed in the following window, and select "Done."(8)The Setup Networking window is displayed. Select "No" because network settings need not beconfigured at this time.(9)Select "Continue" in the Rescue window.(10)If the root partition (/) in the existing Linux system has been mounted successfully under/mnt/sysimage, this is reported in the Rescue window. Select "OK."(11)When the prompt is displayed, enter the chroot command to change the root path to the harddisk drive.sh-2.05b# chroot /mnt/sysimage(12)This completes startup in rescue mode. To exit rescue mode, enter the exit command twice.sh-2.05b# exit <--- Exit from the chroot environment.sh-2.05b# exit <--- Exit from the rescue mode.1.5 Power-off at ShutdownPower is not automatically turned off at shutdown.When [Power down] is displayed on the console screen, press the power switch to turn off the power.Note that the power is automatically turned off when the system is shut down in an environment in which ServerView is installed.2. Addition of Peripheral Devices and Option Cards2.1 Adding a SCSI DiskThe number of LUNs is set to 1 by default. To add a SCSI disk, shared disk, or tape library, log in as the root and define the number of LUNs as shown below. Multiple LUN referencing is enabled after the system is started next.(1)Add the following lines to /etc/modules.conf:options scsi_mod max_scsi_luns=N <--- Add* N is the number of LUNs. Define the appropriate number.(2)Enter the mkinitrd command to create initrd.To create initrd, enter the mkinitrd command appropriate for the type of kernel used.* Enter the following command to check the type of kernel used:# uname -r[2.4.21-32.0.1.EL (kernel for single CPU)]# cp /boot/initrd-2.4.21-32.0.1.EL.img /boot/initrd-2.4.21-32.0.1.EL.img.bak# mkinitrd -f /boot/initrd-2.4.21-32.0.1.EL.img 2.4.21-32.0.1.EL[2.4.21-32.0.1.EL smp (kernel for multi-CPU)]#cp /boot/initrd-2.4.21-32.0.1.ELsmp.img /boot/initrd-2.4.21-32.0.1.ELsmp.img.bak# mkinitrd -f /boot/initrd-2.4.21-32.0.1.EL smp.img 2.4.21-32.0.1.EL smp(3)Restart the system.Enter the following command to restart the system.# shutdown -r now2.2 Adding Option CardsIf any of the option cards supported by the models listed in the following table is added after system installation, kudzu is automatically started at system startup. This section explains the operations that enable the system to automatically recognize the added card at each subsequent system startup.The table lists models and the option cards supported by them.TX200 S2 RX200 S2 RX300 S2PG-128 V -- -- SCSI cardPG-130L -- V V PG-140D1V V -- SCSI-RAID cardPG-142E3V V -- PG-1852 V V -- PG-1853 V -- -- PG-1853L -- V -- PG-1862 V V -- PG-1882 V -- -- PG-1882L -- V V PG-1892 V -- -- LAN cardPG-1892L -- V V PG-FC106V V V onboard Fibre-Channel cardPG-FC107V V VSCSI cardPG-128 -- -- V SCSI-RAID cardPG-142E3-- -- V PG-1852 -- -- V PG-1853 -- -- V PG-1862 -- -- V PG-1882 -- -- V LAN cardPG-1892 -- -- V PG-FC106-- -- V Raiser Card Fibre-Channel cardPG-FC107-- -- VV: Supported --: Not supported- TX200 S2 or RX300 S2If any of the option cards supported by the models listed in the above table is added after system installation, kudzu is automatically started at system startup. To add a fibre channel card, follow the steps below. Except for a fibre channel card, select "configure."To add a LAN card, configure network settings according to the instructions displayed in the window. Login as a root user at system startup, and perform the operations explained in Section 2.3, "Executing mkinitrd."This section explains the operations that enable the system to automatically recognize the added card at each subsequent system startup.[A fibre channel card is added](1)If a fibre channel card is added after system installation,kudzu is automatically started at system startup.Always select "ignore ."(2)Add the following line to /etc/modules.conf.If SCSI or SCSI-RAID device is installed in the system,number the end of "scsi_hostadapter", as "2, 3, ...".options scsi_mod max_scsi_luns=128 Add- RX200 S2If any of the option cards supported by the models listed in the above table is added after systeminstallation, kudzu is automatically started at system startup.To add a fibre channel card or LAN card, follow the steps below.Except for a fibre channel card and LAN card, select "configure." Login as a root user at system startup, and perform the operations explained in Section 2.3, "Executing mkinitrd."This section explains the operations that enable the system to automatically recognize the added card at each subsequent system startup.[A LAN card(PG-1852, PG-1862, PG-1882L or PG-1892L) is added](1)If any of the LAN cards supported by the models listed in the above table is addedafter system installation, kudzu is automatically started at system startup.Always select " ignore."(2)Add the following lines to /etc/modules.conf.[ PG-1852, PG-1853L,PG-1892L, or PG-1882L]alias eth0 e1000alias eth1 e1000alias eth2 e1000 <--- Add[ PG-1862]alias eth0 e1000alias eth1 e1000alias eth2 e1000 <--- Addalias eth3 e1000 <--- Add(3)Set up the network.[ PG-1852, ,PG-1853L ,PG-1892L, or PG-1882L]# netconfig -d eth0# netconfig -d eth1# netconfig -d eth2[ PG-1862]# netconfig -d eth0# netconfig -d eth1# netconfig -d eth2# netconfig -d eth3[A fibre channel card is added](1)If a fibre channel card is added after system installation,kudzu is automatically started atsystem startup.Always select "ignore ."(2)Add the following line to /etc/modules.conf.If SCSI or SCSI-RAID device is installed in the system,number the end of "scsi_hostadapter",as "2, 3, ...".options scsi_mod max_scsi_luns=128 Add2.3 Executing mkinitrd(1) Create initrd by executing the mkinitrd command.Create initrd by executing the mkinitrd command according to the kernel used.* Enter the following command to check the kernel used:# uname -rCommand execution examples are shown below.[2.4.21-32.0.1.EL (kernel for a single CPU)]# cp /boot/initrd-2.4.21-32.0.1.EL.img /boot/initrd-2.4.21-32.0.1.EL.img.bak# mkinitrd -f /boot/initrd-2.4.21-32.0.1.EL.img 2.4.21-32.0.1.EL[2.4.21-32.0.1.EL smp (kernel for multi-CPUs)]# cp /boot/initrd-2.4.21-32.0.1.EL smp.img /boot/initrd-2.4.21-32.0.1.ELsmp.img.bak# mkinitrd -f /boot/initrd-2.4.21-32.0.1.EL smp.img 2.4.21-32.0.1.EL smp(2) Restart the system.Restart the system as follows:# shutdown -r now3. Others3.1 Sound FunctionNo sound function is supported.3.2 PCI Hot Plug FunctionThe PCI hot plug function is not supported.3.3 Usable KernelsThe kernels that can be used vary depending on the hardware conditions.See the table below for the kernels that can be used.Note that middleware specifications might limit the kernel to be selected. In this case, select the kernel in accordance with the middleware specifications.Hardware conditionsKernel to be selectedMemory Number of logical CPUs (*1)for single CPU1CPU Kernel Up to 4 GB2 or more CPUs Kernel for multi-CPUMore than 4 GB and up to 8 GB No conditions Kernel for multi-CPU(*1) Even when only one CPU is installed, the number of logical CPUs is 2if Hyper Threading = Enabled.3.4 Distribution LimitationsOperation is not guaranteed if one of the following CPU, memory, and file system limitations is exceeded:Maximum number of logical CPUs: 16Maximum memory size: 8 GBFile system: Less than 1 TB3.5 Installation ProcedureFor information on the procedure for installing Red Hat Enterprise Linux ES (v.3 for x86), see the Installation Procedure included in the "Installation Kit" downloaded from Download Search.Attachment Outline of Global Array Manager Client Installation* Perform this operation only when an onboard SCSI-RAID or a SCSI-RAID card (PG-140D1 or PG-142E3) are mounted.* GAM-Client runs on Windows2000 and Windows2003. Prepare a management Windows system.1. Insert the driver CD into the CD-ROM drive in the management Windows system.2. Execute setup.exe in RHEL3¥UTY¥GAM¥Windows on the driver CD.3. When the "Welcome" window is displayed, click "Next."4. The "Software License Agreement" window is displayed. Read the statements and click "Yes" if youaccept the terms of this agreement.5. The "Select Components" window (Figure 1) is displayed. Confirm that the check box before "GlobalArray Manager Client" is selected. Clear the "Global Array Manager Server" and "SAN Array Manager Client" check boxes, and click "Next."Figure 1* "SAN Array Manager Client" is not supported. Do not install it.6.The "Choose Destination Location" window is displayed.Click "Browse," specify the location that you want as the installation destination, and click "Next."* If GAM-Client is already installed, a message confirmingwhether to overwrite is displayed. Click "OK" to continue.7. A dialog box for specifying the GAM-Client installation destination is displayed. Click "Next." and thesetup program starts copying files.8. The "Setup Complete" window is displayed.Click "Finish" to exit the GAM-Client installation wizard.-- END --。
- 1、下载文档前请自行甄别文档内容的完整性,平台不提供额外的编辑、内容补充、找答案等附加服务。
- 2、"仅部分预览"的文档,不可在线预览部分如存在完整性等问题,可反馈申请退款(可完整预览的文档不适用该条件!)。
- 3、如文档侵犯您的权益,请联系客服反馈,我们会尽快为您处理(人工客服工作时间:9:00-18:30)。
本手册的读者为IFC易瑞授权访问系统的使用者。
用户反馈
英富森公司感谢您使用IFC产品。如果您发现本手册中有错误或者产品运行 不正确,或者您对本手册有任何意见和建议,请及时与英富森公司联系。您的意 见将是我们做版本修订时的重要依据。 谢谢您!
联系地址
营销中心: 地址:北京市海淀区中关村东路 66 号世纪科贸大厦 B2509 邮编:100190 电话:010-62670085,62670428,62670438,62670463 传真:010—62670085-853 网址: 邮件:infcn@ 支持中心: 电话:010-62670085,62670428,62670438,62670463 转 818
三、产品注册................................................................................................................................... 11 1、登录..................................................................................................................................... 11 2、网络接口管理.....................................................................................................................12 3、产品注册项.........................................................................................................................13
一、系统软硬件及环境要求.............................................................................................................5 1、硬件要求...............................................................................................................................5 2、操作系统要求.......................................................................................................................5 3、应用软件要求.......................................................................................................................5 4、网络配置................................................................................................................085 技术支持:010-62670085-818
传真:010-62670085-853 3
邮件:infcn@
关于本手册
IFC易瑞授权访问系统(英文名IFC IRAS Authorized Access System,简称 IFC IRAS 或IFC 易瑞)是北京英富森(IFC)信息技术有限公司用于授权访问服 务的应用级产品。该产品是一套基于JAVA技术和浏览器技术的软件,实现了用户 仅限局域网内应用的访问对象在外部的授权访问应用,解决了用户在授权访问本 地访问对象时受限制的困境。 本手册详细介绍了IFC 易瑞授权访问系统的安装过程。
1、硬件要求
PII 以上 CPU; 1G 以上内存; 500M 硬盘安装空间; 至少一个真实 IP(教育网、公网),以及在该 IP 下至少一个对外端口号。
2、操作系统要求
Windows 2000 Server SP4、2003 Server SP1 及 SP2; 或 Linux (内核为 2.4 及以上版本)。
3、应用软件要求
需要安装以下软件: JRE 1.6 或更高版本。 符合 servlet2.3 以上版本规范的 web 容器。 MYSQL5.0 及以上关系数据库 。
营销中心:010—62670085 技术支持:010-62670085-818
传真:010-62670085-853 5
邮件:infcn@
四、常见问题...................................................................................................................................14 1、环境问题.............................................................................................................................14 2、安装问题.............................................................................................................................15
IFC 易瑞(IRAS)授权访问系统 5.1
营销中心:010—62670085 技术支持:010-62670085-818
传真:010-62670085-853 4
邮件:infcn@
安装手册
一、系统软硬件及环境要求
系统采用 JAVA 技术,以 Eclipse 作为开发平台,JAVA 作为内核部分的主要 开发语言,具有良好的可移植性和扩展性。数据库采用功能强大、高效快速的 MySQL 5.1。采用面向对象技术进行分析和设计,在体系结构上采用 B/S 结 构 , 系统管理员可以通过浏览器进行授权管理。运行支撑环境为 WINDOWS 或 Linux 等支持 JRE1.6 的操作系统平台。
版权说明
本手册由北京英富森(IFC)信息技术有限公司(以下简称英富 森公司)出版,版权属英富森公司所有。未经出版者正式书面许可, 不得以任何方式复制本文档的部分或全部内容。
©北京英富森(IFC)信息技术有限公司 版权所有。保留所有权利。
营销中心:010—62670085 技术支持:010-62670085-818
(2)询问网络中心,是否对该 IP 进行 TCP 端口限制,授权访问服务所用 端口号如果被网络中心限制,需向网络中心申请开放该端口或者自行设置另外的 未被限制的端口。本系统默认的对外服务端口号和管理程序默认端口号均为 8080。
(3)如果有多网接入,每个接入网都需要开通类似的 HTTP 协议服务和相 应服务端口来为授权访问的用户提供 HTTP 服务。
IFC 易瑞授权访问系统
(IFC IRAS Authorized Access System)
安装手册
版本:5.1
北京英富森(IFC)信息技术有限公司
营销中心:010—62670085 技术支持:010-62670085-818
传真:010-62670085-853 1
邮件:infcn@
传真:010-62670085-853 2
邮件:infcn@
目录
关于本手册......................................................................................................................................... 4 读者对象..................................................................................................................................... 4 用户反馈..................................................................................................................................... 4 联系地址..................................................................................................................................... 4
4、网络配置
(1)服务器必须配备一个真实 IP,该 IP 地址能够被外部网络(教育网或公 网)访问。如果需要开放非本地访问对象的授权访问,该 IP 地址应获得该访问 对象(如:电子资源)供应商的免流量监控许可。(即访问对象供应商允许授权 访问者共同通过该地址访问其访问对象(如:电子资源),不会因授权访问流量 过大被当作恶意下载而封闭该 IP。)
二、系统安装..................................................................................................................................... 6 1、环境检查...............................................................................................................................6 2、产品安装...............................................................................................................................8 步骤一:安装 java 环境....................................................................................................8 步骤二:安装 tomcat.........................................................................................................9 步骤三:安装 MySQL.................................................................................................... 10 步骤四:部署 iras50.war.................................................................................................10