英码可视化雨量监测系统介绍-V191209
F9164-N RTU遥测终端机使用说明书
F9164-N RTU遥测终端机使用说明书产品版本密级V2.3产品名称:F9164-N共62页F9164-N RTU遥测终端机使用说明书此说明书适用于下列型号产品:型号产品类别F9164-N RTU遥测终端机客户热线:400-8838-199电话:+86-592-6300320传真:+86-592-5912735网址:地址:厦门集美软件园三期A06栋11层文档修订记录日期版本说明作者2013-11-6V1.0初始版本liuqing 2017-10-11V2.0修改地址Linjunxuan 2018-05-11V2.1修改网络模式Harven 2018-07-02V2.2添加NB-IoT、ZigBee、LoRa等Harven 2018-12-26V2.3更新标准、去除ZigBee功能等Harven著作权声明本文档所载的所有材料或内容受版权法的保护,所有版权由厦门四信通信科技有限公司拥有,但注明引用其他方的内容除外。
未经四信公司书面许可,任何人不得将本文档上的任何内容以任何方式进行复制、经销、翻印、连接、传送等任何商业目的的使用,但对于非商业目的的、个人使用的下载或打印(条件是不得修改,且须保留该材料中的版权说明或其他所有权的说明)除外。
商标声明Four-Faith、四信、、、均系厦门四信通信科技有限公司注册商标,未经事先书面许可,任何人不得以任何方式使用四信名称及四信的商标、标记。
产品外形图目录第一章产品简介 (7)1.1产品概述 (7)1.3产品规格 (9)第二章安装 (12)2.1概述 (12)2.2开箱 (12)2.3安装与电缆连接 (12)2.4电源说明 (19)2.5指示灯说明 (19)2.6唤醒按钮说明 (20)2.7接地螺丝说明 (20)2.8设备固定说明 (20)2.9设备防雷说明 (20)第三章RTU功能说明 (21)3.1工作模式 (21)3.2定时采集预设置的传感器数据 (22)3.3触发采集雨量数据 (22)3.4整点上报雨量、水位数据 (22)3.5预警触发加报雨量、水位数据 (23)3.6本地存储采集数据 (23)3.7人工置数 (23)3.8远程查询实时雨量、水位实时数据 (23)3.9远程查询时段数据 (24)3.10电池电压上报功能 (24)3.11图片拍照 (24)3.12主备中心功能 (24)3.13参数配置 (25)3.14远程管理 (25)第四章参数配置 (26)4.1配置工具 (26)4.1.1硬件接口参数 (27)4.1.2硬件接口通信参数 (29)4.1.3报警参数 (31)4.1.4AD参数 (31)4.1.5终端参数 (32)4.1.6中心参数 (34)4.1.7北斗参数 (36)4.1.8摄像头参数 (37)4.1.9短信参数 (38)4.1.10数据查询及存储分配 (39)4.1.11功能操作项 (40)4.2键盘界面配置(可选) (42)4.2.1待机界面 (43)4.2.2主菜单 (44)4.2.2.1服务器参数 (44)4.2.2.1.1APN配置 (45)4.2.2.1.2APN号码 (45)4.2.2.1.3APN用户名和APN密码 (46)4.2.2.1.4TCPIP地址1和UDPIP地址1 (46)4.2.2.1.5端口1 (46)4.2.2.2终端参数 (47)4.2.2.2.1调试等级 (47)4.2.2.2.2工作模式 (47)4.2.2.2.3通信密码 (48)4.2.2.2.4遥测站地址 (48)4.2.2.2.5中心站地址 (48)4.2.2.2.6恢复出厂设置 (49)4.2.2.2.7清除历史数据 (49)4.2.2.2.8查询版本 (49)4.2.2.3人工置数 (50)4.2.2.3.1雨量置数 (50)4.2.2.3.2水位置数 (50)4.2.2.4测试报 (51)4.3远程平台设置 (51)4.3.1进入参数设置 (51)4.3.2远程参数界面 (51)4.3.3获取基本配置 (52)4.3.4基本配置保存 (52)4.3.6运行参数保存 (53)4.4短信配置参数 (53)4.4.1短信配置的格式 (53)第五章程序升级 (55)5.1本地升级 (55)5.2远程升级 (56)附录 (60)超级终端 (60)第一章产品简介1.1产品概述F9164-N遥测终端机集传统水文遥测终端机功能与GPRS/CDMA/WCDMA/EVDO/LTE/NB-IoT无线长距离及LoRa无线短距离传输功能于一体,实现水文/水资源等数据的采集、存储、显示、控制、报警及传输等综合功能。
INFINITI Q50 使用说明手册说明书

12378910目录欢迎您加入日益兴旺的新型INFINITI英菲尼迪车主的行列。
我们满怀信心地向您提供该新型INFINITI英菲尼迪汽车。
它是用最新技术并在严格的质量管理下制造的。
本使用说明手册是为您了解车辆的操作和保养而准备的,有了它,您可享受久驶不损之乐趣。
在使用本车之前,请通读本手册。
另附的《保修和保养手册》对车辆的保修进行了详细的说明。
INFINITI英菲尼迪经销店最了解您汽车的情况。
如果您需要什么服务或有任何问题,我们都会运用重要的安全信息安全注意事项!遵守下列重要的驾驶规则,可确保您和乘客旅途的安全!.切勿酒后或服药后驾驶。
.务必观察限速标志,切勿超速驾驶。
.务必使用安全带及恰当的儿童保护装置。
未满13岁的儿童应坐在后座。
.务必提醒乘客车辆安全装置的正确使用方法。
.务必查阅本使用说明手册以获取重要的安全信息。
本手册说明本手册包括了有关该车型所有选装件的资料。
因此您可能会发现其中有些资料并不适用于您的车辆。
本手册中的所有资料,包括规格和插图,在本手册出版时有效。
INFINITI英菲尼迪汽车公司保留在任何时候修改车辆的规格或设计的权利,恕不另行通知。
车辆的改装不应对该车辆进行改装。
改装可能会影响车辆的性能、安全性或耐久性,甚至可能会违反政府的法规。
另外,INFINITI英菲尼迪汽车公司提供的保修服务将不包括由于改装所引起的损坏或性能问题。
请先阅读—然后安全驾驶在驾驶车辆之前,请仔细阅读本用户手册。
这能确保您熟悉车辆的控制与保养要求,有助于您安全驾驶。
在本手册中,我们使用了符号伴随警告二字。
这表示有可能导致死亡或严重人身伤害的危险。
要避免或降低这种风险,必须认真遵守操作程序。
在本手册里还使用符号伴随注意二字来表示有可能引起轻微或中度人身伤害或车辆损害的危险。
要避免或降低这种风险,必须认真遵守操作程序。
SIC0697如果您看到此符号,它表示“请勿进行此操作”或“请勿让此情况发生”。
如果您在插图中看到与此类似的符号,它表示箭头指向车头。
拉克拉斯技术有限公司:无线雨量站说明书

Wireless Rain StationInstructional ManualModel: 724-1409DC:102017For online video support:http://bit.ly/LaxTechTalkTable of ContentsButton Function Explanation SetupLCD FeaturesSettings MenuDisplay Calendar or Indoor T emperature Rainfall ReadingsReset Current Rainfall Readings Rainfall Cylinder GraphRainfall History by the Month 24 Hour Rainfall AlertAlert Sounds | Disarm AlertButton Function ExplanationFor better programming instructions, please note these terms for button use:• Press: Press the designated button.• Hold: Hold the button for 3 seconds (or 5 seconds if resetting) then release the button.Note: If no buttons are pressed for 20 seconds your station will return to normal rain display.NOW Rainfall Alert (silent) Search for Rain Sensor Position Rain Sensor Position Rain Station Restart Help Us, Help Y ou Let’s Get Social Care and Maintenance Specifications Warranty and Support FCC StatementCanada Statement899991010101011111112335567788Setup1. Insert 2 AA batteries into your rain sensor. Observe correct polarity.2. Insert 2 AA batteries into your rain station. Observe correct polarity.3. Optional: Tip the rocker of your rain sensor to simulate rain and receive a reading on your rain station.4. Leave 5-10 feet apart for 15 minutes. After 15 minutes, with station and sensorconnected, move your rain sensor outside to an open area.(Position Rain Sensor-- Page 9)Rain Sensor:• Flip down the locks on both sides of your rain sensor.• Remove the funnel from the base to access the battery compartment.• Flip up the lock on the side of the battery compartment to open.• Insert 2-AA batteries according to polarity markings.• Lock everything back into position.Station:• Remove the battery cover (under the pull out stand).• Insert 2-AA batteries according to polarity markings.LCD FeaturesAM | PMFahrenheit | CelsiusRain Alert Sensor Reception Low BatterySettings Menu• Hold the HISTORY/TIME SET button to enter the settings menu.• Move through settings with the TIME SET button.• The +/MODE or - button will adjust settings.Settings Menu Order:1. Beep ON |OFF 2. Set Hours 3. Set Minutes 4. 12 | 24 Hour time format 5. Set Y ear 6. Set Month 7. Set Date 8. Month/Day or Day Month order 9. Inches |Millimeters of rain 10. Fahrenheit | Celsius temperatureInches | MillimetersDisplay Calendar or Indoor TemperatureY ou can display either the calendar or the indoor temperature with the touch of a button.• Press the +/MODE button to switch between the calendar display, or the indoor temperature display.Rainfall Readings• Press the RAIN/ALERT button to view different rain readings.• The time/date will disappear for 20 seconds then return to normal time/datereadings.• Rainfall readings will stay on user selection.NOW:• Rain from the start of a rain event,until no rain has accumulated for 30minutes.• Resets to zero after 30 minutes of noadditional rainfall.ONE HR:• Rainfall that has accumulated duringthe past hour.• Example: current time is 6:49, 1HRrain is accumulated total between5:50 to 6:49.24HR:• Rainfall based on past 24 hours oftime.• At each full hour, 1HR is recorded.• This is a running total.7 DAYS:• Rainfall of last 7 consecutive 24HR rainreadings.• Updates each day at 0:00.• Not a subject to the calendar.• Be sure time is set.MONTH:• Current Month. Ex: January 1-31.• Resets the first day of the month• Current month will show in the date area.YEAR:• Current year starting January 1 total.• Current Y ear will show in time display.TOTAL:• T otal rainfall since station was powered onor reset.Note: As time passes without rain, the Now, One Hr, 24 Hrs, and 7 day rainfall totals will count down to zero. This is normal.Reset Current Rainfall Readings• Press the RAIN/ALERT button to view rain readings:(Now, One Hr, 24 Hrs, 7 Days, Month, Y ear or T otal)• While viewing individual rain readings, hold the -/RESET button for 3-5 seconds to reset that rainfall reading.Note: This will not affect the 12 month history readings which are stored in memory.Rainfall History by the Month• Rainfall History is viewable by the month for the past 12 months.• Press the HISTORY/TIME SET button to view previous month’s rainfall totals.• HIST, Month, Y ear and Rainfall amount will show.• The History by the month cannot be reset.Note: History back 12 months, then back to current month with continued presses of HISTORY/TIME SET button.Rainfall Cylinder GraphThe rain cylinder has 10 segments that change with the rainfall total. The numbers next to the cylinder graph will change with increased rainfall amounts.Up to 1 inch of rainfall:• Each segment indicates 0.1 inch of rainfall.• The graph will represent 1 inch.Over 1 inch of rainfall:• The graph will represent 2 inches of rainfall at a time.• Each segment indicates 0.4 inches of rainfall. • Cylinder graph will read up to 70 inches of rain. Over 70 inches of rain, the graphwill show full.24 Hour Rainfall Alert1. Hold the RAIN/ALERT button for 3 seconds to enter the alert settings mode.2. Alert OFF will show. Use the - or +/MODE button to turn ON the rainfall alert.3. When ON is selected the 24-hour rain alert value will show. Use the - or +/MODE buttons to adjust.4. Press the RAIN/ALERT button to confirm and exit.Alert Sounds | Disarm Alert• When armed alert value is reached, station will beep 5 times each minute, until out of alert range.• The flashing alert icon will indicate alert.• Press any button to stop the temp alert sound.1. Hold the RAIN/ALERT button for 3 seconds, until you see Alert ON.2. Press the - or +/MODE button to turn alert OFF.3. Press RAIN/ALERT to exit.NOW Rainfall Alert (silent)• At the beginning of a rain event (NOW), the rain drop icons will flash indicatingcurrent rainfall.• The drops will continue to flash until the NOW reading reaches zero.• This is a silent alert. Y our station will not beep, just the raindrops will flash.• This silent alert can not be deactivated.• The 24 hour rainfall alert is a separate alert that is programmable.1. Mount in an open area for a more accurate rain count.2. Install the Rain sensor on a level platform that is stationary.3. Insert one, two, or three mounting screws (not included) through the holes in the base of the rain sensor.4. Ideally, your rain sensor should be mounted at least 6 ft in the air and have a direct line of sight to the display.5. The rain sensor should be accessible to allow for periodic cleaning of debris or insects.6. The maximum wireless transmission range to the rain station is over 300 feet (91 meters) in open air, not including walls or floors.Search for Rain SensorPosition Rain Sensor• Hold the SENSOR button to search for the rain sensor.• The sensor reception icon will flash until the sensor signal is received or for 3 minutes if no signal available.• After showing dashes for 30 minutes, the station will automatically look for the sensor signal.1. Remove batteries from your sensor and batteries from your station.2. Press any button 20 times.3. After 15 minutes insert batteries into your sensor, and into your rain station.4. Wait 15 minutes to establish a strong connection.5. Place sensor outside.RestartSelf-emptying drain holesPosition Rain Station• Use the triangle hole on back to hang on the wall.• Use the pull out stand on the battery cover to place on your desk or table.Care and Maintenance• Do not mix old and new batteries • Do not mix Alkaline, Standard, Lithium or Rechargeable Batteries • Always purchase the correct size and grade of battery most suitable for use.• Replace all batteries of a set at the same time.• Clean the battery contacts and prior to battery installation.• Ensure the batteries are installed with correct polarity (+ and -).• Remove batteries from equipment which is not to be used for an extended period of time.• Promptly remove expired batteries.SpecificationsRain RangeIndoor TempBatteriesBattery LifeDimensions0-393.6 inches (0-9999mm) over 300 feet open air 433MHz RF +32°F to 99°F (0°C to 37°C)Rain Station: 2-AA, IEC, LR6 batteries (not included)TX14R Sensor: 2-AA, IEC, LR6 batteries (not included)over 12 months with reputable batteries.Rain Station: 3.35” H x 3.55” W x 1.19” D (8.52cm H x 9.02cm W x 3.02cm D)TX14R Sensor: 4.94” H x 7.14” W x 3.43” D (12.54cm H x 18.13cm W x 8.72cm D)Follow us on our social media outlets for the latest promotions, product support, and awesome giveaways.Let’s Be Social!If you have ideas for features or support solutions you’d like to see us make, please let us know! We truly want to make owning a La Crosse T echnology product not only a practical experience, but also a fun one. So email us at: ****************************Help Us, Help Y ou!This equipment has been tested and found to comply with the limits for a Class B digital device, pursuant to part 15 of the FCC Rules. These limits are designed to provide reasonable protection against harmful interference in a residential installation. This equipment generates, uses and can radiate radio frequency energy, and if not installed and used in accordance with the instructions, may cause harmful interference to radio communications. However, there is no guarantee that interference will not occur in a particular installation. If this equipment does cause harmful interference to radio or television reception, which can be determined by turning the equipment off and on, the user is encouraged to try to correct the interference by one or more of the following measures: • Reorient or relocate the receiving antenna.• Increase the separation between the equipment and receiver. • Connect the equipment into an outlet on a circuit different from that to which the receiver is connected. • Consult the dealer or an experienced radio/TV technician for help.This device must not be co-located or operating in conjunction with any other antenna or transmitter. Operation is subject to the following two conditions: (1) This device may not cause harmful interference, and (2) This device must accept any interference received, including interference that may cause undesired operation.Caution! The manufacturer is not responsible for any radio or TV interference caused by unauthorized changes or modifications to this equipment. Such changes or modifications could void the user authority to operate the equipment.All rights reserved. This manual may not be reproduced in any form, even in part, or duplicated or processed using electronic, mechanical or chemical process without the written permission of the publisher. This booklet may contain errors or misprints. The information it contains is regularly checked and corrections are included in subsequent editions. We disclaim any responsibility for any technical error or printing error, or their consequences.All trademarks and patents are recognized.Canada StatementThis device complies with CNR Industry Canada license -exempt devices. Operation is subject to the following two conditions: (1) This device may not cause interference; and (2) This device must accept any interference, including interference that may cause undesired operation of the device. FCC StatementWarranty and SupportLa Crosse T echnology, Ltd. provides a 1-year limited time warranty (from date of purchase) on this product relating to manufacturing defects in materials & workmanship. Before returning a product, please contact our friendly customer support or visit our online help: Phone: 1-608-782-1610 Online: /support。
一体化智能雨量监测终端使用说明书

2、结构特点
一体化智能雨量监测终端由承雨器、翻斗 部件、控制单元、通讯模块和太阳能电池板等 部分组成,结构简单,安装方便。
承雨器用于承接、采集降雨,它固定于外 筒上部,与外筒成为一体。承雨器锥底装有防 虫网,以防止昆虫、树叶等杂物进入承雨器内 阻塞水道;翻斗部件起计量作用;控制和通讯 模块主要对计量的雨量数据进行处理、存储和 传输。
#6500 # sbbh1#(将测站地址改为 1)
选配
选配(默认为 1) 范围[1~65535]
fblz0.5#
选配(默认 0.5 毫米/次) 范围[0.1,0.2,0.5,1,2]
dlzb1#(雨量值变化为 1mm 即上 报),
选配(默认为 1mm) 范[0.1,0.2,0.5, 1,1.5,2…100]
举例
配置属性
ipdk1+#+ip 地址+#+端口号+# ipdk1#10.0.0.172#6500#
必配
xtsj+日期时间+#
xtsj20131004182900#
必配
ymdk+域名+#+端口号+# sbbh+地址+#
fblz+0.5+#
dlzb+设置值+# zbjg+时间间隔+#(分钟为单 位) ylql
一体化智能雨量监测终端
一体化智能雨量监测终端 使用说明书
生产许可证号:(陕)XK07-002-00003 西安沃泰科技有限公司
西安市高新六路 52 号 A 座 5F
雨量在线监测系统方案

雨量在线监测系统解决方案一、系统概述雨量监测预警系统主要通过排水管网分区关键节点布设光电雨量计、翻斗式在线雨量计等设备,实时掌握城市排水分区降雨量数据,利用物联网技术将数据汇集到雨量监测系统平台实时监测、分析。
对连续降雨进行长历时监测,对典型的中雨、大雨、暴雨等级雨量进行选择,根据降雨量数据对项目与设施、排水分区监测数据进行分析。
二、系统架构1.感知层感知层是物联网的核心,是信息采集的关键部分。
感知层内的设备通过传感网络获取感知信息。
2.网络层网络层是数据通信的核心,是数据传输的主要通道,网络层主要采用无线4G传输和以太网通信。
3.通信服务层通信服务层主要是实现降雨量监测设备数据的汇集与数据管理,并提供Socket通讯服务、Data base存储服务、Web Service、MQTT代理服务、App回调服务,实现系统数据与一体化管理平台对接,为平台等应用层提供专业、全面、可靠、稳定的数据通信服务。
4.应用层应用层为排水管网降雨量监测系统平台以及第三方应用平台。
应用平台功能包括了实时告警监测、数据分析、运维管理、综合应用等部分。
实现对监控区域内排水管网降雨量统一管理、信息共享,为紧急情况处理、辅助决策判断、综合规划发展等提供支持。
系统架构图三、系统功能1.实时监测告警实时监测排水管网降雨量状态,根据预先设定报警规则,对排水管降雨量指标超阈值等异常情况进行实时告警监测。
2.GIS地图展示在电子地图上显示监测点位、基本信息、实时状态等,也可以通过文本形式展示监测位置、基本信息、实时状态、历史状态记录等信息。
3.调度运行管理掌握降雨量监测点真实运行状况,当排水管网降雨量发生异常状况时,系统对排水管网分区降雨量异常分析、处理,高效协调相关部门的协同工作。
4.数据分析通过对系统中大量的降雨量数据进行深度挖掘,从不同角度、不同维度、不同需要等方面,对各种数据进行重组、汇总及对比分析,挖掘出有利于提升排水管网管理水平和效率的有价值数据。
JXBS-3001-YL 系列雨量传感器使用说明书

雨量传感器使用说明书JXBS-3001-YLVer1.0第1章产品简介1.1产品概述JXBS-3001-YL系列雨量传感器,是一款能够自动观测并存储“雨量”参数的仪器,分为ABS材质和不锈钢材质两种。
我司研发的传感器外型小巧轻便,便于携带和组装,用于测量自然界降雨量,同时将降雨量转换为以开关量形式表示的数字信息量输出,以满足信息传输、处理、记录和显示等的需要。
广泛适用于气象台(站)、水文站、农林、国防、野外测报站等有关部门,可为防洪、供水调度、电站水库水情管理提供原始数据。
1.2功能特点JXBS-3001-YL系列传感器,具有功耗低、灵敏度高、安装便利、操作简单、使用方便等特点,可长期在野外观测并记录雨量数据;同时还具备24小时数据自动清零、手动清零、历史数据记录等功能。
1.3产品优势(1)成本低,实用性极强,可长期在野外使用。
(2)体积小,操作简单,性能可靠。
(3)采用ABS工程塑料制成,不起锈。
第1页(4)承水口采用ABS塑料注塑和铝合金材质,光洁度高,滞水产生的误差小。
(5)内部翻斗制造精良,产生的摩阻力小,因而反应灵敏,产生误差小。
(6)内部底盘设有水平调节气泡,可以辅助底角将设备调整到最佳水平度。
(7)底部采用铁片和膨胀螺丝固定,保证产品性能稳定和工作可靠。
1.4主要参数响应时间小于1秒通讯方式RS485波特率2400/4800/9600供电方式12V-24V DC耗电<1W工作温度环境-10-50℃工作湿度环境0-95%(相对湿度)、无凝结承水口径ABS材质:第2页第2章硬件连接2.1设备安装前检查安装设备前请检查设备清单:2.2产品外观尺寸和内部结构2.2.1外观尺寸下图是传感器的外观尺寸图,根据尺寸进行合理安装,如图所示:第3页第4页2.2.2内部结构下图是产品内部结构说明,如图所示:第5页2.2.3接口说明电源接口为宽电压电源输入12-24V 均可。
485信号线接线时注意A\B 两条线不能接反,总线上多台设备间地址不能冲突;线序说明如下图(表)所示:电源棕色电源正(12-24VDC)黑色电源负通信黄色485-A蓝色485-B注意:在某些出厂批次中可能提供的线序中没有黄色线,此时灰色线等价替换黄色线作用。
IDM-ET24 LORAWAN雨量监测器 说明书V1

产品说明书
雨量探测器
产品概述
雨量探测器是一种水文、气象仪器,用于测量自然界降雨量、降雨强度、降雨时间等。
雨水通过接收器流入翻斗,当翻斗流入一定量的雨水后漏斗翻转,倒空漏斗里的水,翻斗又开始接水,翻斗的每次翻转动作通过干簧管转换成脉冲信号(1脉冲=0.2mm降雨量)传输到采集系统。
通过LoRa基站将数据实时上传至云平台,以满足信息传输处理、记录和显示的需要。
技术参数
射频参数:
通信协议 LoRaWAN
工作频段 LoRa全频段
接收灵敏度 -142dBm
发射功率≤17dBm(可调整)
工作电压 3.7V
性能参数:
承雨口径Φ160mm
测量范围≤30mm/min
分辨率 0.2mm
响应时间 <2s 物理参数:
工作环境 -20℃~+60℃,0%RH~80%RH
防护等级 IP67
电池容量 9000mAh
产品示意图
1) 数据采集器部分
2)传感器部分
产品安装
1)先用4个螺帽螺丝将铁板固定在传感器下,再在铁板底座
下部平均分布有四个固定铁片的螺丝孔,使用膨胀螺丝,
通过螺丝孔,将传感器固定到需要安装的位置;
2)并观察水平泡(黄色的)的位置,将底座紧紧固定在事先
砌好的平台上,使整套仪器保持在最佳水平度,确保雨量
数据的准确性。
3)数据采集器通过支架固定在墙面、地面或其他任意位置。
注意事项
1)请根据说明书正确安装使用。
2)设备固定的位置,必须可以使用膨胀螺丝。
3)为了测量结果的准确,安装时请观察水平调节泡(黄色
的)的位置,确保设备位于最佳水平度。
IMD-ET24。
Hunter Mini-Clik 雨量传感器 - 说明手册说明书
住宅和商业灌溉Built on Innovation®了解更多请访问 或联系当地销售经理。
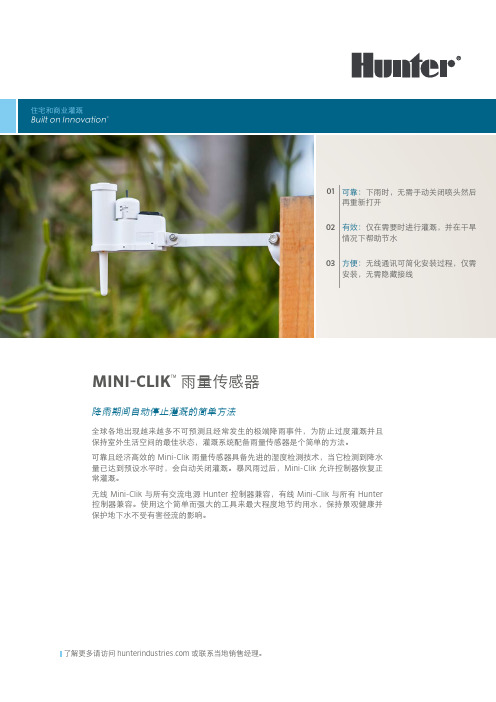
01可靠:下雨时,无需手动关闭喷头然后再重新打开02有效:仅在需要时进行灌溉,并在干旱情况下帮助节水03方便:无线通讯可简化安装过程,仅需安装,无需隐藏接线MINI-CLIK™雨量传感器降雨期间自动停止灌溉的简单方法全球各地出现越来越多不可预测且经常发生的极端降雨事件,为防止过度灌溉并且保持室外生活空间的最佳状态,灌溉系统配备雨量传感器是个简单的方法。
可靠且经济高效的 Mini-Clik 雨量传感器具备先进的湿度检测技术,当它检测到降水量已达到预设水平时,会自动关闭灌溉。
暴风雨过后,Mini-Clik 允许控制器恢复正常灌溉。
无线 Mini-Clik 与所有交流电源 Hunter 控制器兼容,有线 Mini-Clik 与所有 Hunter 控制器兼容。
使用这个简单而强大的工具来最大程度地节约用水,保持景观健康并保护地下水不受有害径流的影响。
网站 | 客户支持 +1-760-752-6037 | 技术服务+***********************************MINI-CLIK 性能与参数主要优势• 当传感器检测到降雨量达到 3 毫米至 19 毫米时,会自动关闭灌溉• 抗杂质,运行可靠,以及避免发生不必要的系统关闭• 无线通讯让安装更简单*• Quick Response™ 快速响应技术可加速系统关闭以保护植物*• 内置霜冻感应功能可在 3°C 时停止运行系统,以保护植物并保持道路和人行道不结冰*• 采用免维护设计,集成式电池维护简单,使用寿命长*• 坚固耐用的聚碳酸酯外壳和金属悬臂支架,最大限度减少磨损,防止生锈• 兼容绝大多数常开或常闭型灌溉控制器,在任何环境条件下轻松使用运行参数• Quick Response (快速响应)技术(启用时): –关闭灌溉系统的时间:约 2 到 5 分钟–重置时间:约 4 小时(在干燥、阳光充足的条件下)–完全湿润时的重置时间:约 3 天(在干燥、阳光充足的条件下)• 所有型号开关额定值(24 VAC ):3 A• 有线型号包含 7 米长、UL 认证、带 AWG 护套的 0.5 mm 2 双股导线• 无线型号工作频率:433 MHz• 无线型号覆盖范围:从传感器到接收器直线距离243 米• 单个无线传感器可以控制多个无线接收器• 认证:UL 、cUL 、FCC 、CE 、RCM • 质保期:5 年*仅无线 Mini-Clik 传感器型号MINI-CLIK 有线型 Mini-Clik 传感器MINI-CLIK-NO 有线型 Mini-Clik 传感器,常开开关MINI-CLIK-C 有线型 Mini-Clik 传感器,套管安装SG-MC 有线型 Mini-Clik 传感器,带不锈钢传感器壳体WM-CLIK无线 Mini-Clik 传感器、接收器和屋檐安装配件有线 Mini-Clik 传感器 (带安装支架)高:5 厘米长:15 厘米宽度:2.5 厘米有线 Mini-Clik 传感器 (带不锈钢壳体)高:13.9 厘米长:7.6 厘米宽:10.1 厘米无线 Mini-Clik 传感器(带安装支架)高:7.6厘米长:20 厘米宽度:2.5厘米无线 Mini-Clik 接收器 (带壁挂套件)高度:10 厘米长度:8 厘米宽度:3厘米无线传感器保护罩 (带安装硬件)高度:7 厘米长:9.5 厘米宽:3.2 厘米无线接收器保护罩 (带安装硬件)高度:12.7 厘米长:10.2 厘米宽:3.2 厘米SGM有线型号的可选屋檐安装配件WS 保护罩可用于平整表面或立杆安装的防破坏无线传感器保护罩(传感器单独订购)WR 保护罩适用于基座安装的防破坏无线接收器保护罩(接收器单独订购)。
- 1、下载文档前请自行甄别文档内容的完整性,平台不提供额外的编辑、内容补充、找答案等附加服务。
- 2、"仅部分预览"的文档,不可在线预览部分如存在完整性等问题,可反馈申请退款(可完整预览的文档不适用该条件!)。
- 3、如文档侵犯您的权益,请联系客服反馈,我们会尽快为您处理(人工客服工作时间:9:00-18:30)。
英码网络®
可视化雨量测报系统方案
2019-12-08
目录
一、系统概述 (3)
二、系统特点 (3)
三、系统功能 (4)
四、技术参数 (5)
五、组网方案 (7)
六、软件展示 (8)
1、PC客户端 (8)
(1)整体界面 (8)
(2)测站列表 (8)
(3)实时视频与云台控制 (9)
(4)报警与继电器控制 (9)
(5)传感器实时值图表 (9)
(6)历史水位/流量图表 (9)
(7)历史雨量图表 (10)
2、手机客户端 (10)
(1)测站列表 (11)
(2)水雨情实时数据 (11)
(3)水雨情历史数据 (11)
(4)继电器控制 (12)
一、系统概述
英码网络®可视化雨量测报系统利用水位法实现雨量自动测报,并可以通过摄像机确认实际的降雨量。
系统由可视化雨量筒、高清摄像机、数据记录仪及相应的软件组成。
它可精确的记录每分钟的降水,并将数据及时准确的输送到记录仪上,实现对降雨量的实时监控。
二、系统特点
符合国家相关行业标准
《水文自动测报系统设备遥测终端机(SL 180-2015)》
《水利水文自动化系统设备检验测试通用技术规范(2006)GBT 20204-2006 》
《GBT 30954-2014 水文自动测报系统通用设备》
《SL 61-2015 水文自动测报系统技术规范》
《SL 323-2011实时水情数据库标准》
●水位法测雨量
通过20CM口径承雨器把降水收到到一个直径10CM的透明筒里,通过传感器测出筒里水位计算出雨量。
解决了翻斗式雨量筒的翻斗滞留水或雨量太大翻来不及造成的测量误差。
●降水数据可通过肉眼确认
把一整天的降水收集到透明的筒里,筒上有刻度,可以通过高清摄像机肉眼远程观测筒上的雨量刻度,与自动测量出来的雨量量进行比对,从而确认降雨量数据的真实性。
●精度高
承雨器口径是20CM,收集降水的透明筒直径是10CM,从而把水位值放大了4倍,筒里4mm的水位=1mm的降雨量。
所使用的水位传感器精度达到±1mm,所以这款产品的雨量测量精度可以达到±0.25mm,达到了行业应用的要求。
三、系统功能
●系统1-5(可设置)分钟自动测量一次,自动统计出日降雨量、小时降雨量、
并上报平台。
●雨量数据可接入现有的水雨情平台。
●系统每小时自动开关摄像机,拍照一张照片上传平台。
●双阀门设计,每天8点或雨量超过50MM时自动排水,排水前自动关闭进水
阀门打开排水阀门,排水后自动关闭排水阀门打开进水阀门。
●可以现场通过透明筒观测雨量。
●中文液晶显示,可显示当前日期时间,日降雨量,小时降雨量。
●4G无线通讯,不但可以传送数据,还可以传输视频。
●内置大容量数据存储器,可存储3年数据。
●低功耗,支持市电和太阳能供电,可自动切换,无太阳可连续工作30天以
上。
●可同时接翻斗式雨量筒和水位传感器。
●客户端软件可以通过高清摄像机远程观测雨量筒里的雨量。
●客户端软件可以显示测站小时雨量、日雨量,并且以柱状图的形式展示。
●客户端软件可以查询历史数据,并且以柱状图的形式展示。
●客户端软件可以远程手动开关摄像机。
●雨量告警时,客户端软件能声音提示。
●客户端可以查询历史视频、照片。
●视频/照片叠加雨量数据显示和存储。
四、技术参数
五、组网方案
系统拓扑图
1、水文平台
2、英码可视雨量筒
3、英码高清拍照摄像机
4、英码数据采集主机
5、水位计
6、太阳能供电系统
(1)可视化雨量筒的水位计、电磁阀信号线接入英码数据采集主机。
(2)在距离雨量筒2米内的位置,安装高清拍照摄像机。
(3)高清拍照摄像机用网线接入英码数据采集主机。
(4)如果有需要,可以增加水位传感器接入数据采集主机,取得水位数据,一同上报平台。
(5)本系统可以用太阳能供电。
六、软件展示
1、PC客户端
PC客户端主要功能有:
●测站列表
●显示实时视频、水位、雨量、流量
●实时数据报警提示
●历史水位、雨量、流量、并以曲线和图表呈现●历史数据导出
●摄像机云台控制
●继电器控制
(1)整体界面
(2)测站列表
(3)实时视频与云台控制
(4)报警与继电器控制
(5)传感器实时值图表
(6)历史水位/流量图表
(7)历史雨量图表
2、手机客户端
手机客户端主要功能有:
●测站管理
●显示实时视频、水位、雨量、流量
●实时数据报警提示
●历史水位、雨量、流量、并以曲线和图表呈现●历史数据查询
●继电器控制
(1)测站列表
(2)水雨情实时数据
(3)水雨情历史数据
(4)继电器控制。