Spring定时器配置(XML和注解)
spring定时任务详解(@Scheduled注解)

spring定时任务详解(@Scheduled注解)Spring配置⽂件xmlns加⼊xmlns:task="/schema/task"xsi:schemaLocation中加⼊/schema/task/schema/task/spring-task-3.0.xsd"Spring扫描注解的配置<context:component-scan base-package="com.imwoniu.*" />任务扫描注解<task:executor id="executor" pool-size="5" /><task:scheduler id="scheduler" pool-size="10" /><task:annotation-driven executor="executor" scheduler="scheduler" />代码实现:注解@Scheduled 可以作为⼀个触发源添加到⼀个⽅法中,例如,以下的⽅法将以⼀个固定延迟时间5秒钟调⽤⼀次执⾏,这个周期是以上⼀个调⽤任务的完成时间为基准,在上⼀个任务完成之后,5s后再次执⾏:@Scheduled(fixedDelay = 5000)public void doSomething() {// something that should execute periodically}如果需要以固定速率执⾏,只要将注解中指定的属性名称改成fixedRate即可,以下⽅法将以⼀个固定速率5s来调⽤⼀次执⾏,这个周期是以上⼀个任务开始时间为基准,从上⼀任务开始执⾏后5s再次调⽤:@Scheduled(fixedRate = 5000)public void doSomething() {// something that should execute periodically}如果简单的定期调度不能满⾜,那么cron表达式提供了可能package com.imwoniu.task;import org.springframework.scheduling.annotation.Scheduled;import ponent;@Componentpublic class TaskDemo {@Scheduled(cron = "0 0 2 * * ?") //每天凌晨两点执⾏void doSomethingWith(){("定时任务开始......");long begin = System.currentTimeMillis();//执⾏数据库操作了哦...long end = System.currentTimeMillis();("定时任务结束,共耗时:[" + (end-begin) / 1000 + "]秒");}}关于Cron表达式(转载)表达式⽹站⽣成:按顺序依次为秒(0~59)分钟(0~59)⼩时(0~23)天(⽉)(0~31,但是你需要考虑你⽉的天数)⽉(0~11)天(星期)(1~7 1=SUN 或 SUN,MON,TUE,WED,THU,FRI,SAT)7.年份(1970-2099)其中每个元素可以是⼀个值(如6),⼀个连续区间(9-12),⼀个间隔时间(8-18/4)(/表⽰每隔4⼩时),⼀个列表(1,3,5),通配符。
Spring注解配置定时任务task:annotation-driven

@Scheduled(cron = "*/5 * * * * ?")//每隔5秒执行一次 public void test() throws Exception {
System.out.println("Test is working......"); }
网络错误421Spring注解配置定时任务task:annotation-driven /article/details?id=50945311
首先在配置文件头部的必须要有: xmlns:task="/schema/task" 1 其次xsi:schemaLocation必须为其添加: /schema/task /schema/task/spring-task.xsd 1 2 然后spring扫描过程必须涵盖定时任务类所在的目录: <context:component-scan base-package="com.xx.xx" /> 1 com.xx.xx属于定时任务类的父级甚至更高级 然后设置动作启用定时任务 <task:annotation-driven/> 1 最后设置任务类 import zy; import org.springframework.scheduling.annotation.Scheduled; import ponent;
//@Scheduled(cron = "0 0 1 * * ?")//每天凌晨1点整 //@Scheduled(cron = "0 30 0 * * ?")//每天凌晨0点30分 //@Scheduled(cron = "0 */60 * * * ?")//1小时处理一次 }
Spring定时器的配置
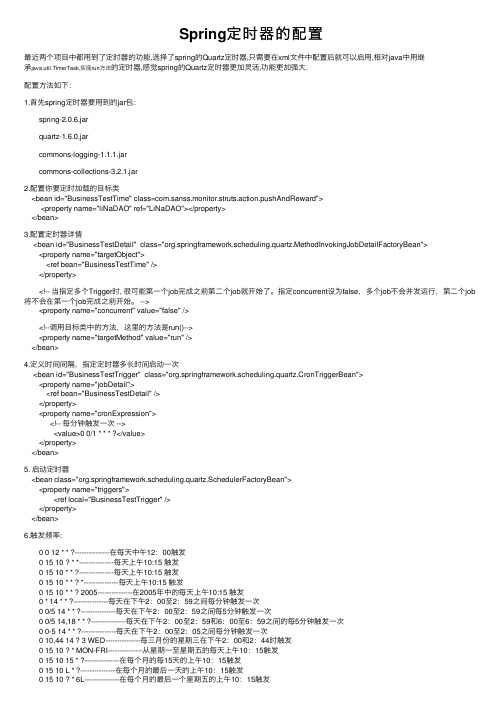
Spring定时器的配置最近两个项⽬中都⽤到了定时器的功能,选择了spring的Quartz定时器,只需要在xml⽂件中配置后就可以启⽤,相对java中⽤继承java.util.TimerTask,实现run⽅法的定时器,感觉spring的Quartz定时器更加灵活,功能更加强⼤.配置⽅法如下:1.⾸先spring定时器要⽤到的jar包: spring-2.0.6.jar quartz-1.6.0.jar commons-logging-1.1.1.jar commons-collections-3.2.1.jar2.配置你要定时加载的⽬标类<bean id="BusinessTestTime" class=com.sanss.monitor.struts.action.pushAndReward"><property name="liNaDAO" ref="LiNaDAO"></property></bean>3.配置定时器详情<bean id="BusinessTestDetail" class="org.springframework.scheduling.quartz.MethodInvokingJobDetailFactoryBean"><property name="targetObject"><ref bean="BusinessTestTime" /></property> <!-- 当指定多个Trigger时, 很可能第⼀个job完成之前第⼆个job就开始了。
指定concurrent设为false,多个job不会并发运⾏,第⼆个job 将不会在第⼀个job完成之前开始。
Spring配置定时器(注解+xml)方式—整理

Spring配置定时器(注解+xml)⽅式—整理⼀、注解⽅式1. 在Spring的配置⽂件ApplicationContext.xml,⾸先添加命名空间1 xmlns:task="/schema/task"2 /schema/task3 /schema /task/springtask3.1.xsd42. 最后是我们的task任务扫描注解1<task:annotation-driven/>3. spring扫描位置1<context:annotation-config/>2<context:component-scan base-package="com.test"/>4.写⾃⼰的定时任务1 @Component //import ponent;2public class MyTestServiceImpl implements IMyTestService {3 @Scheduled(cron="0/5 * * * * ? ") //每5秒执⾏⼀次4public void myTest(){5 System.out.println("进⼊测试");6 }7 }♦注意:定时器的任务⽅法不能有返回值(如果有返回值,spring初始化的时候会告诉你有个错误、需要设定⼀个proxytargetclass的某个值为true)⼆、XML⽅式1.在spring配置⽂件中创建bean,创建schedule1<bean id="schedule"class="org.springframework.scheduling.quartz.SchedulerFactoryBean">3<property name="triggers">4<list>5<ref bean="testTrigger"/>6</list>7</property>8</bean>2. 在spring配置⽂件中创建bean,创建你的triggers1<bean id="testTrigger"class="org.springframework.scheduling.quartz.CronTriggerBean">3<property name="jobDetail" ref="testJobDetail"/>4<property name="cronExpression" value="0 1/5 * * * ?"/>5</bean>3. 在spring配置⽂件中创建bean,指定定时器作⽤在那个类那个⽅法上⾯1<bean id="testJobDetail"class="org.springframework.scheduling.quartz.MethodInvokingJobDetailFactoryBean">3<property name="targetObject" ref="targetTestService"/>4<property name="targetMethod" value="timerTest"/>5</bean>♦注明:把定时器作⽤在targetTestService对象中的timerTest⽅法上⾯4. 当然还得把你作⽤的对象交Spring来管理,所以在spring配置⽂件中创建作⽤类的 bean1<bean id="targetTestService" class=".service.TargetTestService" scope="prototype"></bean>♦这是时间的设置规则org.springframework.scheduling.quartz.CronTriggerBean允许你更精确地控制任务的运⾏时间,只需要设置其cronExpression属性。
Spring中注解配置与xml配置分析

虽然 2.0 版本发布以来,Spring 陆续提供了十多个注解,但是提供的这些注解只是为了在某些情况下简化 XML 的配置,并非要取代 XML 配置方式。这一点可以从 Spring IoC 容器的初始化类可以看出:ApplicationContext 接口的最常用的实现类是 ClassPathXmlApplicationContext 和 FileSystemXmlApplicationContext,以及面向 Portlet 的 XmlPortletApplicationContext 和面向 web 的 XmlWebApplicationContext,它们都是面向 XML 的。Spring 3.0 新增了另外两个实现类:AnnotationConfigApplicationContext 和 AnnotationConfigWebApplicationContext。从名字便可以看出,它们是为注解而生,直接依赖于注解作为容器配置信息来源的 IoC 容器初始化类。由于 AnnotationConfigWebApplicationContext 是 AnnotationConfigApplicationContext 的 web 版本,其用法与后者相比几乎没有什么差别
也可以单独显式地来启用某个注解处理器,而且可以给处理器添加拦截器:
<be.factory.annotation.AutowiredAnnotationBeanPostProcessor"/>
<bean class="monAnnotationBeanPostProcessor"/>
<mvc:annotation-driven />
当然了也可以使用如下的方式显式地加载:
springboot使用quartz+XML格式处理定时任务
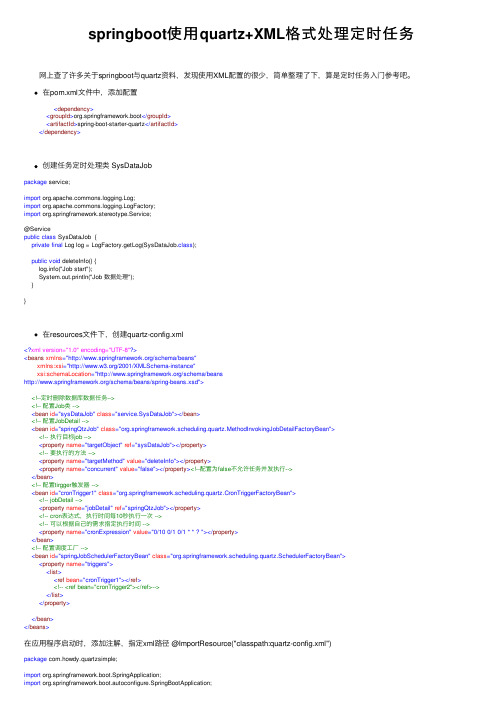
springboot使⽤quartz+XML格式处理定时任务 ⽹上查了许多关于springboot与quartz资料,发现使⽤XML配置的很少,简单整理了下,算是定时任务⼊门参考吧。
在pom.xml⽂件中,添加配置 <dependency><groupId>org.springframework.boot</groupId><artifactId>spring-boot-starter-quartz</artifactId></dependency>创建任务定时处理类 SysDataJobpackage service;import mons.logging.Log;import mons.logging.LogFactory;import org.springframework.stereotype.Service;@Servicepublic class SysDataJob {private final Log log = LogFactory.getLog(SysDataJob.class);public void deleteInfo() {("Job start");System.out.println("Job 数据处理");}}在resources⽂件下,创建quartz-config.xml<?xml version="1.0" encoding="UTF-8"?><beans xmlns="/schema/beans"xmlns:xsi="/2001/XMLSchema-instance"xsi:schemaLocation="/schema/beans/schema/beans/spring-beans.xsd"><!--定时删除数据库数据任务--><!-- 配置Job类 --><bean id="sysDataJob" class="service.SysDataJob"></bean><!-- 配置JobDetail --><bean id="springQtzJob" class="org.springframework.scheduling.quartz.MethodInvokingJobDetailFactoryBean"><!-- 执⾏⽬标job --><property name="targetObject" ref="sysDataJob"></property><!-- 要执⾏的⽅法 --><property name="targetMethod" value="deleteInfo"></property><property name="concurrent" value="false"></property><!--配置为false不允许任务并发执⾏--></bean><!-- 配置tirgger触发器 --><bean id="cronTrigger1" class="org.springframework.scheduling.quartz.CronTriggerFactoryBean"><!-- jobDetail --><property name="jobDetail" ref="springQtzJob"></property><!-- cron表达式,执⾏时间每10秒执⾏⼀次 --><!-- 可以根据⾃⼰的需求指定执⾏时间 --><property name="cronExpression" value="0/10 0/1 0/1 * * ? "></property></bean><!-- 配置调度⼯⼚ --><bean id="springJobSchedulerFactoryBean" class="org.springframework.scheduling.quartz.SchedulerFactoryBean"><property name="triggers"><list><ref bean="cronTrigger1"></ref><!-- <ref bean="cronTrigger2"></ref>--></list></property></bean></beans>在应⽤程序启动时,添加注解,指定xml路径 @ImportResource("classpath:quartz-config.xml")package com.howdy.quartzsimple;import org.springframework.boot.SpringApplication;import org.springframework.boot.autoconfigure.SpringBootApplication;import org.springframework.context.annotation.ImportResource;@SpringBootApplication@ImportResource("classpath:quartz-config.xml")public class QuartzSimpleApplication {public static void main(String[] args) {SpringApplication.run(QuartzSimpleApplication.class, args);}}完整的⽬录结构,最后打印⽇志,是每10秒执⾏⼀次。
Springxml注入以及xml配置

Springxml注⼊以及xml配置xml 配置<?xml version="1.0" encoding="UTF-8"?><beans xmlns="/schema/beans"xmlns:xsi="/2001/XMLSchema-instance"xmlns:aop="/schema/aop"xmlns:tx="/schema/tx"xmlns:context="/schema/context"xsi:schemaLocation="/schema/beans/schema/beans/spring-beans-3.0.xsd/schema/aop/schema/aop/spring-aop-3.0.xsd/schema/tx/schema/tx/spring-tx-3.0.xsd/schema/context/schema/context/spring-context-3.0.xsd"></beans>注⼊⽅式<bean id="Addresa" class=".jieless.Addresa"/><bean id="pojo" class=".jieless.pojo" name="pojo2"><!--第⼀种普通值注⼊直接使⽤value 赋值--><property name="name" value="我是name"/><!--第⼆种 bean注⼊ ref--><property name="address" ref="Addresa"/><!--第三种数组注⼊--><property name="books"><array><value>西游记</value><value>红楼梦</value><value>三国演义</value><value>⽔浒传</value></array></property><!--第三种 List集合注⼊--><property name="hobby"><list><value>西游记List</value><value>红楼梦List</value><value>三国演义List</value><value>⽔浒传List</value></list></property><!--第三种 map集合注⼊--><property name="card"><map><entry key="⾝份证" value="4564645465465456678"></entry></map></property><!--第三种 set注⼊--><property name="wife"><set><value>QQ飞车</value><value>QQ炫舞</value><value>穿越⽕线</value></set></property><!--第三种 null注⼊--><property name="jieW"><null/></property><!--第四种 property注⼊--><property name="info"><props><prop key="driver">4564546</prop><prop key="url">hfafhafafafafaf</prop><prop key="root">root</prop><prop key="pwd">518340</prop></props></property></bean>。
spring定时任务(@Scheduled注解)

spring定时任务(@Scheduled注解)(⼀)在xml⾥加⼊task的命名空间1. xmlns:task="/schema/task"2. /schema/task /schema/task/spring-task-4.1.xsd(⼆)启⽤注解驱动的定时任务<task:annotation-driven scheduler="scheduler" executor="executor" proxy-target-class="true"/>(三)配置定时任务的线程池<task:executor id="executor" pool-size="10"/> <task:scheduler id="scheduler" pool-size="10"/>(四)写我们的定时任务<!-- 计划任务配置,⽤ @Service @Lazy(false)标注类,⽤@Scheduled(cron = "0 0 2 * * ?")标注⽅法 -->Cron Expressionscron的表达式被⽤来配置CronTrigger实例。
cron的表达式是字符串,实际上是由七⼦表达式,描述个别细节的时间表。
这些⼦表达式是分开的空⽩,代表:1. 1. Seconds2. 2. Minutes3. 3. Hours4. 4. Day-of-Month5. 5. Month6. 6. Day-of-Week7. 7. Year (可选字段)例 "0 0 12 ? * WED" 在每星期三下午12:00 执⾏,个别⼦表达式可以包含范围, 例如,在前⾯的例⼦⾥("WED")可以替换成 "MON-FRI", "MON, WED, FRI"甚⾄"MON-WED,SAT".“*” 代表整个时间段.每⼀个字段都有⼀套可以指定有效值,如Seconds (秒) :可以⽤数字0-59 表⽰,Minutes(分) :可以⽤数字0-59 表⽰,Hours(时) :可以⽤数字0-23表⽰,Day-of-Month(天) :可以⽤数字1-31 中的任⼀⼀个值,但要注意⼀些特别的⽉份Month(⽉) :可以⽤0-11 或⽤字符串 “JAN, FEB, MAR, APR, MAY, JUN, JUL, AUG, SEP, OCT, NOV and DEC” 表⽰Day-of-Week(每周):可以⽤数字1-7表⽰(1 =星期⽇)或⽤字符⼝串“SUN, MON, TUE, WED, THU, FRI and SAT”表⽰“/”:为特别单位,表⽰为“每”如“0/15”表⽰每隔15分钟执⾏⼀次,“0”表⽰为从“0”分开始, “3/20”表⽰表⽰每隔20分钟执⾏⼀次,“3”表⽰从第3分钟开始执⾏“?”:表⽰每⽉的某⼀天,或第周的某⼀天“L”:⽤于每⽉,或每周,表⽰为每⽉的最后⼀天,或每个⽉的最后星期⼏如“6L”表⽰“每⽉的最后⼀个星期五”“W”:表⽰为最近⼯作⽇,如“15W”放在每⽉(day-of-month)字段上表⽰为“到本⽉15⽇最近的⼯作⽇”““#”:是⽤来指定“的”每⽉第n个⼯作⽇,例在每周(day-of-week)这个字段中内容为"6#3" or "FRI#3" 则表⽰“每⽉第三个星期五”1)Cron表达式的格式:秒分时⽇⽉周年(可选)。
- 1、下载文档前请自行甄别文档内容的完整性,平台不提供额外的编辑、内容补充、找答案等附加服务。
- 2、"仅部分预览"的文档,不可在线预览部分如存在完整性等问题,可反馈申请退款(可完整预览的文档不适用该条件!)。
- 3、如文档侵犯您的权益,请联系客服反馈,我们会尽快为您处理(人工客服工作时间:9:00-18:30)。
Spring配置定时器(注解+xml)方式—整理一、注解方式1.在Spring的配置文件ApplicationContext.xml,首先添加命名空间xmlns:task="/schema/task"/schema/task/schema/task/spring-task-3.1.xsd2.最后是我们的task任务扫描注解<task:annotation-driven/>3.spring扫描位置<context:annotation-config/><context:component-scan base-package="com.test"/>4.写自己的定时任务@Component//import ponent;public class MyTestServiceImpl implements IMyTestService{@Scheduled(cron="0/5****?")//每5秒执行一次public void myTest(){System.out.println("进入测试");}}注意:定时器的任务方法不能有返回值(如果有返回值,spring初始化的时候会告诉你有个错误、需要设定一个proxytargetclass的某个值为true)二、XML方式1.在spring配置文件中创建bean,创建schedule<bean id="schedule"class="org.springframework.scheduling.quartz.SchedulerFactoryBean"> <property name="triggers"><list><ref bean="testTrigger"/></list></property></bean>2.在spring配置文件中创建bean,创建你的triggers<bean id="testTrigger"class="org.springframework.scheduling.quartz.CronTriggerBean"><property name="jobDetail"ref="testJobDetail"/><property name="cronExpression"value="01/5***?"/> </bean>3.在spring配置文件中创建bean,指定定时器作用在那个类那个方法上面<bean id="testJobDetail"class="org.springframework.scheduling.quartz.MethodInvokingJobDet ailFactoryBean"><property name="targetObject"ref="targetTestService"/><property name="targetMethod"value="timerTest"/> </bean>//注明:把定时器作用在targetTestService对象中的timerTest方法上面4.当然还得把你作用的对象交Spring来管理,所以在spring配置文件中创建作用类的bean<bean id="targetTestService"class=".service.TargetTestService"scope="prototype"></bean>这是时间的设置规则org.springframework.scheduling.quartz.CronTriggerBean允许你更精确地控制任务的运行时间,只需要设置其cronExpression属性。
一个cronExpression表达式有至少6个(也可能是7个)由空格分隔的时间元素。
从左至右,这些元素的定义如下:1.秒(0–59)2.分钟(0–59)3.小时(0–23)4.月份中的日期(1–31)5.月份(1–12或JAN–DEC)6.星期中的日期(1–7或SUN–SAT)7.年份(1970–2099)0010,14,16**?每天上午10点,下午2点和下午4点00,15,30,45*1-10*?每月前10天每隔15分钟300011?2012在2012年1月1日午夜过30秒时008-5?*MON-FRI每个工作日的工作时间各个时间可用值如下:秒0-59,-*/分0-59,-*/小时0-23,-*/日1-31,-*?/L W C月1-12or JAN-DEC,-*/周几1-7or SUN-SAT,-*?/L C#年(可选字段)empty,1970-2099,-*/可用值详细分析如下:“*”——字符可以用于所有字段,在“分”字段中设为"*"表示"每一分钟"的含义。
“?”——字符可以用在“日”和“周几”字段.它用来指定'不明确的值'.这在你需要指定这两个字段中的某一个值而不是另外一个的时候会被用到。
在后面的例子中可以看到其含义。
“-”——字符被用来指定一个值的范围,比如在“小时”字段中设为"10-12"表示"10点到12点"。
“,”——字符指定数个值。
比如在“周几”字段中设为"MON,WED,FRI"表示"the days Monday,Wednesday,and Friday"。
“/”——字符用来指定一个值的的增加幅度.比如在“秒”字段中设置为"0/15"表示"第0, 15,30,和45秒"。
而"5/15"则表示"第5,20,35,和50".在'/'前加"*"字符相当于指定从0秒开始.每个字段都有一系列可以开始或结束的数值。
对于“秒”和“分”字段来说,其数值范围为0到59,对于“小时”字段来说其为0到23,对于“日”字段来说为0到31,而对于“月”字段来说为1到12。
"/"字段仅仅只是帮助你在允许的数值范围内从开始"第n"的值。
“L”——字符可用在“日”和“周几”这两个字段。
它是"last"的缩写,但是在这两个字段中有不同的含义。
例如,“日”字段中的"L"表示"一个月中的最后一天"——对于一月就是31号对于二月来说就是28号(非闰年)。
而在“周几”字段中,它简单的表示"7"or"SAT",但是如果在“周几”字段中使用时跟在某个数字之后,它表示"该月最后一个星期×"——比如"6L"表示"该月最后一个周五"。
当使用'L'选项时,指定确定的列表或者范围非常重要,否则你会被结果搞糊涂的。
“W”——可用于“日”字段。
用来指定历给定日期最近的工作日(周一到周五)。
比如你将“日”字段设为"15W",意为:"离该月15号最近的工作日"。
因此如果15号为周六,触发器会在14号即周五调用。
如果15号为周日,触发器会在16号也就是周一触发。
如果15号为周二,那么当天就会触发。
然而如果你将“日”字段设为"1W",而一号又是周六,触发器会于下周一也就是当月的3号触发,因为它不会越过当月的值的范围边界。
'W'字符只能用于“日”字段的值为单独的一天而不是一系列值的时候。
“L”和“W”可以组合用于“日”字段表示为'LW',意为"该月最后一个工作日"。
“#”——字符可用于“周几”字段。
该字符表示“该月第几个周×”,比如"6#3"表示该月第三个周五(6表示周五而"#3"该月第三个)。
再比如:"2#1"=表示该月第一个周一而"4#5" =该月第五个周三。
注意如果你指定"#5"该月没有第五个“周×”,该月是不会触发的。
“C”——字符可用于“日”和“周几”字段,它是"calendar"的缩写。
它表示为基于相关的日历所计算出的值(如果有的话)。
如果没有关联的日历,那它等同于包含全部日历。
“日”字段值为"5C"表示"日历中的第一天或者5号以后",“周几”字段值为"1C"则表示"日历中的第一天或者周日以后"。
对于“月份”字段和“周几”字段来说合法的字符都不是大小写敏感的。
一些例子:"0012**?"每天中午十二点触发"01510?**"每天早上10:15触发"01510**?"每天早上10:15触发"01510**?*"每天早上10:15触发"01510**?2005"2005年的每天早上10:15触发"0*14**?"每天从下午2点开始到2点59分每分钟一次触发"00/514**?"每天从下午2点开始到2:55分结束每5分钟一次触发"00/514,18**?"每天的下午2点至2:55和6点至6点55分两个时间段内每5分钟一次触发"00-514**?"每天14:00至14:05每分钟一次触发"010,4414?3WED"三月的每周三的14:10和14:44触发"01510?*MON-FRI"每个周一、周二、周三、周四、周五的10:15触发"0151015*?"每月15号的10:15触发"01510L*?"每月的最后一天的10:15触发"01510?*6L"每月最后一个周五的10:15。