BGP实验1(BGP基础配置)
BGP综合实验
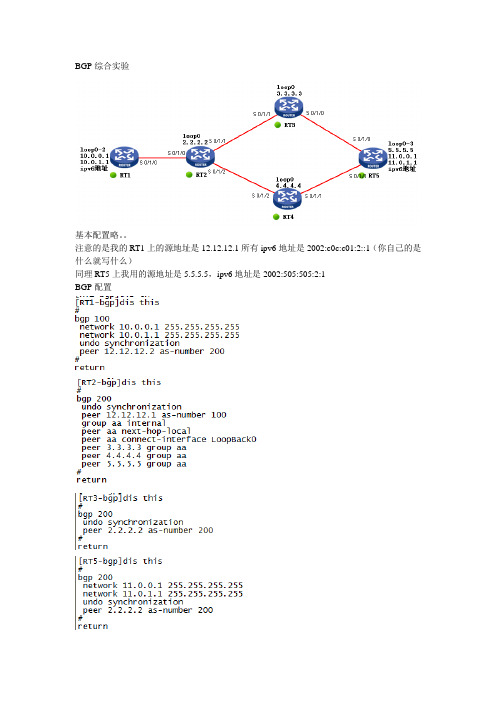
BGP综合实验基本配置略。
注意的是我的RT1上的源地址是12.12.12.1所有ipv6地址是2002:c0c:c01:2::1(你自己的是什么就写什么)同理RT5上我用的源地址是5.5.5.5,ipv6地址是2002:505:505:2:1BGP配置Ospf配置略。
加入验证增加安全注意把12.12.12.0网段发布下不然IPV6隧道路由你还得引入什么的6TO4隧道RT1(注意先开启ipv6功能)ipv6 route-static 2002:: 16 Tunnel 0两边加入静态路由可以看到没有问题选路问题选路有多种方法我这里修改的通过BGP修改下一跳,别的方法我也迷糊,- -!首先我们看RT2的路由表,我只是截取了部分我们想看的太多我们先做RT1到RT5的路由选路,原理是做一个route-policy的过滤器,在第一个节点匹配10.0.0.1和11.0.0.1这个网段的或者这个IP,动作是修改下一跳为3.3.3.3(这个3.3.3.3可以让你断一条链路的情况下也能互通)我这个是为了方便在这RT5的一边做的同样匹配10.0.1.1和11.0.1.1这个,动作是修改下一跳为4.4.4.4应用到import和export两个方向上还需要注意的是11.0.0.1和11.0.1.1这两条路由产生了黑洞,黑洞在RT3和RT4上我没还需要在RT3和RT4上加入静态路由解决黑洞[RT3]ip route-static 11.0.0.0 24 5.5.5.5[RT4]ip route-static 11.0.1.0 24 5.5.5.5这样我们再看路由表RT2上RT5上OK了命令简单想费劲RT1上测试RT5上来回路径一致。
002. BGP基本配置

案例:在多个 间配置 案例 在多个AS间配置 在多个 间配置BGP.(P293)
客户要求:配置 来与两家服务供应商交换路由信息;以实现较强的容错的能力 客户要求 配置BGP来与两家服务供应商交换路由信息 以实现较强的容错的能力 配置 来与两家服务供应商交换路由信息 以实现较强的容错的能力. 方法: 方法 1,保证路由器直连 保证路由器直连. 保证路由器直连 2,配置 配置ISP1,ISP2路由器 实际中不可操作) 路由器.(实际中不可操作 配置 路由器 实际中不可操作 Router bgp 100 Neighbor 192.168.1.6 remote-as 24 Network 10.0.0.0 3,配置公司的边界路由器 配置公司的边界路由器: 配置公司的边界路由器 Router bgp 24 Neighbor 192.168.1.5 remote-as 100 Neighbor 172.16.1.5 remote-as 200 Network 200.100.50.0 4,show ip bgp\\观察到什么情况 观察到什么情况?PING可达吗 可达吗? 观察到什么情况 可达吗 5,请在多台路由器上实现 请在多台路由器上实现BGP的互联 看还需要什么条件 的互联,看还需要什么条件 请在多台路由器上实现 的互联 看还需要什么条件?
BGP nfig-router)#
neighbor {ip-address | peer-group-name} remote-as autonomous-system
The neighbor command activates a BGP session with this neighbor.(只有指定邻居双方 才能建立会话 只有指定邻居双方,才能建立会话 只有指定邻居双方 才能建立会话.) The term remote-as shows what AS this neighbor is in. This AS number is used to determine if the neighbor is internal or external.(邻居 号一样 为IBGP;不一样为 邻居AS号一样 不一样为EBGP.) 邻居 号一样,为 不一样为 This command is used for both external and internal neighbors. The IP address specified is the destination address of BGP packets going to this neighbor.(TCP连接或环回口地址 连接或环回口地址.) 连接或环回口地址 This router must have an IP pathway to reach this neighbor before it can set up a BGP relationship.
BGP第一次实验内容

BGP第一次实验内容实验目的1.了解BGP的基本配置2.了解multihop,next-hop-self的配置方法3.了解BGP中local preference和MED的概念与配置方法实验设备cisco1720 ----5台试验拓扑:172.16.2.1/24 172.16.2.2/24基本配置路由器,并启动BGP协议as65500-A:hostname as65500-a!enable password cisco!interface Loopback1ip address 10.10.1.1 255.255.255.0!interface Serial0ip address 172.16.1.1 255.255.255.0!interface Serial1ip address 172.16.5.1 255.255.255.0!router bgp 65500no synchronizationnetwork 10.10.1.0 mask 255.255.255.0 network 172.16.1.0 mask 255.255.255.0 network 172.16.5.0 mask 255.255.255.0 neighbor 172.16.1.2 remote-as 100 neighbor 172.16.5.2 remote-as 100no auto-summary!line vty 0 4password ciscologinas100-B:hostname as100-b!enable password cisco!interface Serial0ip address 172.16.2.1 255.255.255.0 clockrate 56000!interface Serial1ip address 172.16.1.2 255.255.255.0 clockrate 56000!router ripversion 2network 172.16.0.0!router bgp 100no synchronizationnetwork 172.16.1.0 mask 255.255.255.0 network 172.16.2.0 mask 255.255.255.0 neighbor 172.16.1.1 remote-as 65500 neighbor 172.16.2.2 remote-as 100!line vty 0 4password ciscologin!as100-C:hostname AS100-C!enable password cisco!interface Loopback1ip address 172.16.4.1 255.255.255.0!interface FastEthernet0/0ip address 172.16.3.1 255.255.255.0!interface Serial0/0ip address 172.16.2.2 255.255.255.0!interface Serial0/1ip address 172.16.5.2 255.255.255.0!router ripversion 2network 172.16.0.0!router bgp 100no synchronizationnetwork 172.16.2.0 mask 255.255.255.0 network 172.16.3.0 mask 255.255.255.0 network 172.16.4.0 mask 255.255.255.0 network 172.16.5.0 mask 255.255.255.0 neighbor 172.16.2.1 remote-as 100 neighbor 192.168.1.2 remote-as 300 neighbor 172.16.5.1 remote-as 65500!line vty 0 4password ciscologinas300-D!hostname AS300-D!enable password cisco!interface FastEthernet0/0ip address 172.16.3.2 255.255.255.0!interface Serial0/0ip address 192.168.1.1 255.255.255.0!router eigrp 300network 192.168.1.0!ip route 0.0.0.0 0.0.0.0 172.16.3.1line vty 0 4password ciscologin!as300-Ehostname AS300-E!enable password cisco!interface Loopback0ip address 192.168.2.1 255.255.255.0!interface Serial0/0ip address 192.168.1.2 255.255.255.0!router eigrp 300network 192.168.1.0network 192.168.2.0!router bgp 300network 192.168.1.0network 192.168.2.0neighbor 172.16.3.1 remote-as 100!line vty 0 4password ciscologin!基本配置好路由器后,查看路由器运行BGP协议的情况。
BGP实验配置文档

R1:router bgp 100no synchronizationbgp log-neighbor-changesnetwork 10.10.0.0 mask 255.255.255.0 network 10.10.1.0 mask 255.255.255.0 network 10.10.2.0 mask 255.255.255.0 neighbor 1.1.0.2 remote-as 100no auto-summaryR2:router bgp 100no synchronizationbgp log-neighbor-changesneighbor 1.1.0.1 remote-as 100neighbor 1.1.0.1 next-hop-selfneighbor 1.1.1.2 remote-as 200neighbor 1.1.1.2 distribute-list 10 out neighbor 1.1.1.2 route-map wei0 in neighbor 1.1.8.1 remote-as 400neighbor 1.1.8.1 distribute-list 10 out neighbor 1.1.8.1 route-map wei1 inno auto-summary!ip classlessip http server!access-list 1 permit 192.168.0.0 access-list 2 permit 192.168.1.0 access-list 10 deny 10.10.1.0access-list 10 deny 10.10.2.0access-list 10 permit anyroute-map wei1 permit 10match ip address 2set weight 200!route-map wei0 permit 10match ip address 1set weight 200!R3:router bgp 200no synchronizationbgp log-neighbor-changesnetwork 150.150.4.0 mask 255.255.255.0 neighbor 1.1.1.1 remote-as 100 neighbor 1.1.2.2 remote-as 200 neighbor 1.1.2.2 next-hop-self neighbor 1.1.4.2 remote-as 300 neighbor 1.1.9.2 remote-as 400no auto-summaryR4:router bgp 200no synchronizationbgp log-neighbor-changesnetwork 150.150.0.0 mask 255.255.255.0 neighbor 1.1.2.1 remote-as 200 neighbor 1.1.2.1 next-hop-self neighbor 1.1.2.1 route-map lp out neighbor 1.1.3.2 remote-as 300 neighbor 1.1.3.2 route-map med outno auto-summary!ip classlessno ip http server!access-list 1 permit 192.168.0.0 access-list 1 permit 192.168.1.0 access-list 10 permit 10.10.0.0route-map lp permit 10match ip address 1set local-preference 200!route-map lp permit 20!route-map med permit 10match ip address 10set metric 100!route-map med permit 20R5:router bgp 300no synchronizationbgp log-neighbor-changesnetwork 192.168.0.0network 192.168.1.0neighbor 1.1.3.1 remote-as 200 neighbor 1.1.4.1 remote-as 200 neighbor 1.1.4.1 route-map wei in neighbor 1.1.5.2 remote-as 400no auto-summary!ip classlessno ip http server!access-list 1 permit 150.150.4.0 route-map wei permit 10match ip address 1set weight 200!route-map wei permit 20R6:router bgp 400no synchronizationbgp log-neighbor-changesneighbor 1.1.5.1 remote-as 300 neighbor 1.1.5.1 route-map med out neighbor 1.1.6.2 remote-as 400 neighbor 1.1.6.2 next-hop-self neighbor 1.1.7.2 remote-as 400 neighbor 1.1.7.2 next-hop-self neighbor 1.1.9.1 remote-as 200 neighbor 1.1.9.1 route-map as in no auto-summary!ip classlessip http server!access-list 1 permit 150.150.0.0 access-list 1 permit 150.150.4.0 access-list 10 permit 10.10.0.0 route-map as permit 10match ip address 1set as-path prepend 200 200!route-map as permit 20!route-map med permit 10match ip address 10set metric 100!route-map med permit 20R7:router ospf 1log-adjacency-changesnetwork 1.1.6.2 0.0.0.0 area 0network 1.1.7.1 0.0.0.0 area 0network 172.16.0.0 0.0.255.255 area 0!router bgp 400no synchronizationbgp log-neighbor-changesnetwork 172.16.0.0 mask 255.255.255.0network 172.16.1.0 mask 255.255.255.0network 172.16.2.0 mask 255.255.255.0network 172.17.3.0 mask 255.255.255.0aggregate-address 172.16.0.0 255.255.252.0 summary-onlyneighbor 1.1.6.1 remote-as 400neighbor 1.1.7.2 remote-as 400no auto-summaryR8:router bgp 400no synchronizationbgp log-neighbor-changesneighbor 1.1.6.1 remote-as 400neighbor 1.1.6.1 next-hop-selfneighbor 1.1.7.1 remote-as 400neighbor 1.1.7.1 next-hop-selfneighbor 1.1.8.2 remote-as 100no auto-summary类别:网络工程师学习 | | 添加到搜藏 | 分享到i贴吧 | 浏览(121) | 评论 (0)上一篇:OSPF协议工作原理下一篇:权重控制选路规则最近读者:。
BGP实验手册
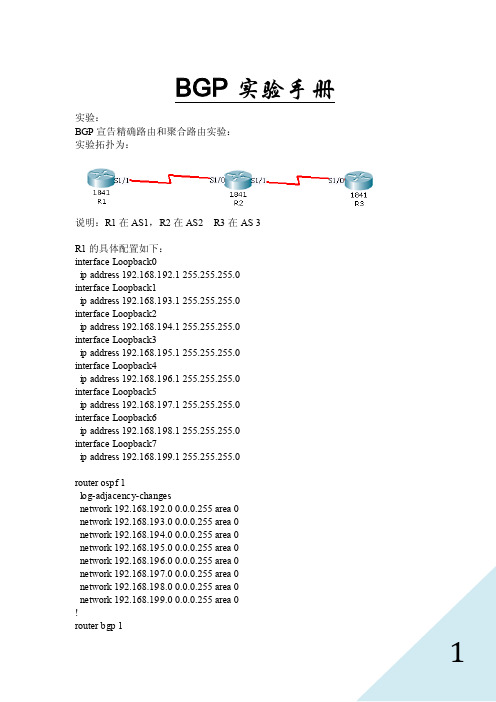
BGP实验手册实验:BGP宣告精确路由和聚合路由实验:实验拓扑为:说明:R1在AS1,R2在AS2 R3在AS 3R1的具体配置如下:interface Loopback0ip address 192.168.192.1 255.255.255.0interface Loopback1ip address 192.168.193.1 255.255.255.0interface Loopback2ip address 192.168.194.1 255.255.255.0interface Loopback3ip address 192.168.195.1 255.255.255.0interface Loopback4ip address 192.168.196.1 255.255.255.0interface Loopback5ip address 192.168.197.1 255.255.255.0interface Loopback6ip address 192.168.198.1 255.255.255.0interface Loopback7ip address 192.168.199.1 255.255.255.0router ospf 1log-adjacency-changesnetwork 192.168.192.0 0.0.0.255 area 0network 192.168.193.0 0.0.0.255 area 0network 192.168.194.0 0.0.0.255 area 0network 192.168.195.0 0.0.0.255 area 0network 192.168.196.0 0.0.0.255 area 0network 192.168.197.0 0.0.0.255 area 0network 192.168.198.0 0.0.0.255 area 0network 192.168.199.0 0.0.0.255 area 0!router bgp 1aggregate-address 192.168.192.0 255.255.248.0 聚合路由redistribute ospf 1 实验采用重分布,但是实际不建议这样。
实验1 配置BGP基本功能
实验1 配置BGP的基本配置
实验名称:
配置BGP的基本功能。
实验目的:
掌握BGP的基本配置。
背景描述:
某公司多宿主到两个ISP,公司希望从ISP那里接收Internet路由。
需求分析:
公司网络要从ISP接收Internet路由,可以使用BGP,BGP的设计就是用于在自治系统之间交换路由信息,并且可以处理大量的路由条目,例如internet路由。
实验拓扑:
拓扑如图6-1所示:
实验设备:
路由器3台
预备知识:
路由器基本配置知识、IP路由知识、BGP工作原理
实验原理:
BGP被设计用于在自治系统之间交换路由信息,并且可以处理大量的路由条目,例如Internet路由。
使用BGP的第一步就是在需要交换路由信息的路由器之间建立BGP邻居关系。
实验步骤:
实验过程中遇到的问题、问题原因和解决方法:。
BGP的基本配置

使用这条命令禁用这条邻居的连接,只有在对邻居路由器的策略做重大修改时,才需要这条命令。
2 peer group 的配置
在BGP中对多个邻居使用相同的策略,那么我们就会使用到peer group(也称对等体组)
Router(config-router)#neighbor group-name peer-group 创建一个BGP的对等组
指定邻居激活接口
Router(config-router)#neighbor A.B.C.D remote-as xx(对端AS号)
BGP路由使用自治系统号判断邻居的种类,同一个AS内为ibgp邻居,不同AS内为ebgp邻居。
指定路由选择更新的源IP地址:
Router(config-router)#neighbor A.B.C.D update-source [interface]
Router(config-router)#neighbor group-name remote-as 以这样的语法去添加组的命令
Router(config-router)#neighbor group-name update-source [interface]
Router(config-router)#neighbour A.B.C.D peer-group group-name 将某个邻居加入对等体组
EBGP邻居使用loopback口建立邻居的时候还要加上
Router(config-router)#neighbor A.B.C.D ebgp-mulithop [2–255]如果不加默认是255
这条命令修改默认的存活时间(TTL)值,以增大ebgp对等体的跳数,从而使得能够路由到ebgp环回接口。
BGP 基础概念及实验

BGP 基础概念及实验简言之,如果IGP是在一个个路由器之间的路由选择,那么BGP就是在一群路由器之间进行路由选择一群路由器,在BGP的定义里叫做AS,(这个不同于EIGRP的AS),这里的AS可以理解为一群被共同管理的、使用相同IGP和度量分组的路由器,也可以暂时理解为一个运营商:中国电信移动联通之类。
公有AS是一个全球化概念,使用需要申请AS:取值范围:1-655351-64511 (公有),64512-65535 (私有)电信AS号:4134 网通AS号:9929 4837 中国教育网:4538上图的4个网络云,每个云就是一个AS,他们之间运行的协议叫做EBGP,相对应的是IBGP 仔细观察上图,AS65500中,AC之间并只有IGP,没有BGP,为了能够是BGP网络能够贯通(使4个黄色的环能够连成一体),我们需要在4个AS中也运行BGP协议,这个叫做IBGP 在图片上很容易分辨出IBGP和EBGP.如果还是不明白,那么可以记住下面几条,可以助于理解:1:一个AS通常代表一个独立的组织结构,并应用它自己的路由和安全策略。
BGP协议用于帮助这些自治系统共享它们的路由信息。
2当BGP运行于一个AS内,它被称为内部BGP(IBGP),当BGP运行于AS之间,它被称为外部BGP(EBGP)3 AS by AS这个理念贯穿整个BGPBGP的特性每本讲BGP的书都有,看起来是一个很牛逼的协议。
支持超大网络啦,可靠啦,对路由的控制啦,甚至官方建议都是不懂的人不要用,反正很牛逼就是。
我们需要知道的就是1:BGP是我们现在所学的的唯一采用TCP作为连接协议的路由协议,端口号是1792:BGP只采用增量和触发更新。
BGP的数据库BGP数据库类似OSPF,也有3张表·邻居表:就是保存BGP的邻居关系的表,话说,思科公司那位神奇的老太太说运行BGP的路由器就叫做BGP speaker,她老人家也说了,一个BPG neighbor也叫做BPG Peer·转发表(BGP表)列出从邻居学到的所有网络列出到目的网络的多条路径到每条路径的BPG属性·路由表就是平时的路由表,谁的AD小,谁就进去BGP报文Open:用来建立基友关系的,包含了一些BGP的属性,计时器,AS号,RouterID等,相当于:“你好,谈爱不?”Keepalive:让基友感觉到我的心跳存在,相当于”我还在这里,我还活着,别当我是空气”Update :更新路由条目用的。
- 1、下载文档前请自行甄别文档内容的完整性,平台不提供额外的编辑、内容补充、找答案等附加服务。
- 2、"仅部分预览"的文档,不可在线预览部分如存在完整性等问题,可反馈申请退款(可完整预览的文档不适用该条件!)。
- 3、如文档侵犯您的权益,请联系客服反馈,我们会尽快为您处理(人工客服工作时间:9:00-18:30)。
第三章 BGP协议特性与配置实验 3-1 IBGP与EBGP学习目的•掌握区域内部BGP的配置方法•掌握多区域BGP的配置方法•观察BGP的邻居表和数据库•掌握BGP更新源的配置方法•掌握EBGP多跳的配置方法•观察IBGP和EBGP中路由的下一跳的变化•掌握IBGP中下一跳的配置•掌握BGP的Network命令的配置方法拓扑图场景学习任务步骤一. 基础配置与IP编址与布置IGP这里IP和OSPF已经配置好,平时大家自己配置好IP的后,配置好后记得测试直连是否能通步骤二. AR1、AR5、AR7建立EBGP邻居(使用直连接口建立)[R1]bgp 200 (进入BGP进程)[R1-bgp]router-id 1.1.1.1 (指定BGP的router-id)[R1-bgp]peer 15.1.1.5 as-number 100(指定与哪个AS的对等体建立邻居)[R1-bgp]peer 17.1.1.7 as-number 400(指定与哪个AS的对等体建立邻居)[R5]bgp 100[R5-bgp]router-id 5.5.5.5[R5-bgp]peer 15.1.1.1 as-number 200(指定与哪个AS的对等体建立邻居)[R7]bgp 400[R7-bgp]router-id 7.7.7.7[R7-bgp]peer 17.1.1.1 as-number 200(指定与哪个AS的对等体建立邻居)对等体关系建立完成后,使用display bgp peer检查对等体关系状态。
[R1-bgp]dis bgp peer(截图,可以看到AR1和AR5、AR7均建立了EBGP邻居关系)步骤三. 建立IBGP对等体在R1、R3、R4上配置IBG。
使用Loopback0地址作为更新源。
IBGP建立之前,需要布置IGP,AR1、AR3、AR4需要建立OSPF(这里OSPF已经配置好)[R1]bgp 200(AR1、AR3、AR4使用回环口建立IBGP对等体关系)[R1-bgp] peer 3.3.3.3 as-number 200[R1-bgp] peer 3.3.3.3 connect-interface LoopBack 0(更新源检测)[R1-bgp] peer 4.4.4.4 as-number 200[R1-bgp] peer 4.4.4.4connect-interface LoopBack 0(更新源检测)用同样的方法在AR3、AR4上配置,使得R1、、R3、R4 建立IBGP关系使用display bgp peer察看各路由器BGP邻居关系状态。
[R1]display bgp peer(截图)[R3]display bgp peer(截图)[R4]display bgp peer(截图)可以看到3台路由器之间的BGP邻居关系处于Established状态,说明邻居关系已建立。
步骤四. AR4、AR6建立EBGP邻居AR4:[AR4]bgp 200[AR4-bgp]peer 6.6.6.6 as-number 300[AR4-bgp]peer 6.6.6.6 ebgp-max-hop 2(EBGP多跳,更改跳数为2)[AR4-bgp] peer 6.6.6.6 connect-interface LoopBack 0(指定更新源为回环口)[AR4]ip route-static 6.6.6.6 255.255.255.255 46.1.1.6(写一条R4到6.6.6.6的静态路由)AR6:[AR6]bgp 300[AR6-bgp]router-id 6.6.6.6[AR6-bgp]peer 4.4.4.4 as-number 200[AR6-bgp] peer 4.4.4.4 ebgp-max-hop 2(EBGP多跳,更改跳数为2) [AR6-bgp]peer 4.4.4.4 connect-interface LoopBack 0(指定更新源为回环口)[AR6]ip route-static 4.4.4.4 255.255.255.255 46.1.1.4 (写一条R6到4.4.4.4的静态路由)在AR4或者AR6上查看邻居关系是否建立成功[R4/6]dis bgp peer(截图)步骤五. 使用Network命令发布路由信息使用network的方式,将AR5,AR6的loop50,60成为BGP路由,要求所有运行BGP 的路由器都能学习到,注意AR1和AR4上配置next-hop-loacl问题[R5]bgp 100[R5-bgp] network 50.1.1.1 32 (将50.1.1.1/32路由network 进BGP,使之成为BGP路由)[R6]bgp 300[R6-bgp] network 60.1.1.1 32 (将60.1.1.1/32路由network 进BGP,使之成为BGP路由)在R5和R6上查看是否学到对方的BGP路由[R5]dis bgp routing-table(截图)[R6]dis bgp routing-table(截图)在这里由于路由没有优化,下一跳不可达,所以看不到对方的BGP路由解决下一跳以及优化:(指定下一跳为自己本身)[R1-bgp]peer 3.3.3.3 next-hop-local(指定下一跳为自己本身)[R1-bgp]peer 4.4.4.4 next-hop-local(指定下一跳为自己本身)[R4-bgp]peer 6.6.6.6 next-hop-local (指定下一跳为自己本身)[R4-bgp]peer 1.1.1.1 next-hop-local (指定下一跳为自己本身)此时再次在R5和R6上查看BGP路由表中是否有对方路由,且是否为优<AR5>dis bgp routing-table (截图,圈出60.1.1.1/32路由)<AR6>dis bgp routing-table (截图,圈出50.1.1.1/32路由)<AR5>ping -a 50.1.1.1 60.1.1.1(截图,看是否能通)在R5和R6上可以看到各自有对方环回口路由,但是ping不同,这是因为R1、R2、R4由于没有全互联而出现了路由黑洞(注意:本题前面R2并没有运行BGP)解决路由黑洞:1.全互联 2.反射器 3.在OSPF中引入BGP,使之成为O_ASE路由[R5]ping -a 50.1.1.1 60.1.1.1(截图)步骤六. 使用import的方式,使AS 200中的OSPF路由成为BGP路由,使其他路由器都能学到[R1-bgp]import-route ospf 1(在BGP中引入OSPF)在R5、R6、R7上查看是否将OSPF路由转变为BGP路由[R5]dis ip routing-table 或者[R5]dis bgp routing-table(截图,观察EBGP路由)[R6]dis ip routing-table 或者 [R6]dis bgp routing-table(截图,观察EBGP 路由)[R7]dis bgp routing-table 或者 [R7] dis ip routing-table(截图,观察EBGP 路由)步骤七. 做策略路由注意:R1的1.1.1.1/32和1.1.1.2/32先前已经宣告进OSPF,但是未宣告进BGP[AR1]acl number 3001 (创建一个ACL)[AR1-acl-adv-3001]rule 0 permit ip source 1.1.1.1 0 destination 40.1.1.10 (允许源1.1.1.1路由访问目的40.1.1.1路由)[AR1-acl-adv-3000]acl number 3002[AR1-acl-adv-3002]rule 0 permit ip source 1.1.1.2 0 destination 40.1.1.20 (允许源1.1.1.2 路由访问目的40.1.1.2路由)[AR1]policy-based-route 1to4 permit node 10[AR1-policy-based-route-1to4-10] if-match acl 3001 (如果匹配ACL 3001)[AR1-policy-based-route-1to4-10]apply ip-address next-hop 12.1.1.2 (做策略,让1.1.1.1路由访问40.1.1.1路由的下一跳为12.1.1.2)[AR1]policy-based-route 1to4 permit node 20[AR1-policy-based-route-1to4-20]if-match acl 3002(如果匹配ACL 3002)[AR1-policy-based-route-1to4-20] apply ip-address next-hop 13.1.1.3(做策略,让1.1.1.2路由访问40.1.1.2路由的下一跳为13.1.1.3)[AR1]ip local policy-based-route1to4 (在全局下调用policy-based-route1to4)<AR1>tracert -a 1.1.1.1 40.1.1.1(截图)<AR1>tracert -a 1.1.1.2 40.1.1.2(截图)步骤八. 附加思考题1.EBGP建立影响因素是什么?2.BGP的防环机制有什么3.请说出BGP邻居状态机4.写出BGP所有的报文,以及作用?。