亚伟代理使用说明
Honeywell WEBs-N4 软件说明书

Honeywell WEBs-N4 Installation GuideVersion 4.9.0.198September 2020Table of ContentsA BOUT THIS G UIDE (3)D OCUMENTATION (3)S YSTEM R EQUIREMENT FOR WEB STATION-N4 (3)Operating System & Software Dependencies (4)Using Web Launcher with Niagara 4.9 (5)WEB STATION-N4I NSTALLATION P ROCEDURE (6)About this GuideThis document is part of the WEBStation-N4 documentation library. WEBStation-N4 software is distributed via the Honeywell Buildings Forum. The platform requirements needed are mentioned in WEBs N4.9.0.198 Software Release Bulletin.For the latest product data, visit or Honeywell Building Controls.NOTE: This version of Honeywell WEBs-N4.9.0.198 is compatible with Spyder Model 5, CIPer Model 10, and WEB-8000 controllers. CIPer Model 30 and CIPer Model 50 controllers are not compatible with this release. DocumentationEach view/dialog is provided with a Help button. Click the Help button to open a help window, that explains the functionality of the displayed view. Alternatively, each view has a help page which can be opened by pressing the F1 key on the keyboard or navigate to Help tab in menu items and click Help On View.Refer the Honeywell Buildings Forum Documents for all latest WEBs-N4 product related documentation. System Requirement for WEBstation-N4IMPORTANT NOTEN4.9 supports only 64-bit installations. So, installing N4.9 will generate a new host ID, if you made a 32-bit in-stallation in the previous N4.X versions. Be sure to transfer your Niagara Workbench license from your previous32-bit host ID to your new 64-bit host ID.To use Lon devices with station running in Windows, use LON tunneling with JACE or use LON/IP.Operating System & Software DependenciesWEBs-N4 is supported on the following listed Microsoft Windows operating systems. The application installation in-cludes Oracle’s Java Runtime Environ ment (JRE) and does not depend on any other software to run.Using Web Launcher with Niagara 4.9Web Launcher 20.1.3 was recently revamped for N4.9 to include essential software dependencies updates along with critical defect fixes. This version of Web Launcher has Java version 8 update 252 and certificate management has been updated to work with N4.9 along with any legacy or prospective release. Prior to using Web Launcher with N4.9, customer should update Web Launcher accordingly (see steps below).How to update Web Launcher?Web Launcher has a feature to check for updates over the internet and prompts the user when a new version is avail-able in the cloud. However, existing version of Web Launcher has a bug that prevents a smooth update. Users will be required to perform a fresh install by downloading the latest version from the cloud via the station web Login page. Click on the Niagara Web Launcher Installer link on the station's Web Launcher Web Page, which can be reached via the link on the Login page itself. Once the download is successful, click on the msi file and follow the installation wiz-ard. You do not have to uninstall the older version. The new installation will automatically update to the latest version.WEBstation-N4 Installation Procedure1.Double click the executable file (Installer_x64.exe)The WEBStation-N4 Installation Program window opens, showing information such as build version, date etc.Click Next to proceed the installation.2.Click Yes to agree with the End User License Agreement [EULA] and Next to continue the installation.Or Click No to cancel the installation.3.The installer loads C:\Honeywell\WEBStation-N4-4.9.0.198 path by default. If this path does not exist,the installer displays warning message, Click Yes to create the folder. Click Next to continue installation.4.If you do not wish to install the WEBStation-N4 in the default directory, click Browse to change the path,and click Next to continue.NOTE: If you are performing a new installation, the installer prompts you to set a system passphrase for en-cryption purposes, as shown in the following image.The system passphrase is used to protect sensitive information stored on all WEBs systems, and on the SD card in WEB-8000 controllers. The system passphrase i s assigned as the file passphrase for “portable files, such as backups and station copies, and is used to encrypt those files. During operations in which you transfer encrypted files to a system (restoring backups, transferring a station, etc.) you are prompted to sup-ply the file passphrase, if it doesn’t match the system passphrase. The system passphrase defaults to the factory default platform password.During commissioning, you will be prompted to change the default system passphrase.NOTE: It is important to remember the system passphrase and keep it safe. If you lose the system pass-phrase, you will lose access to encrypted data. To change the system passphrase, use the Platform Admin-istration tool.5.Niagara Deamon User Home directory is used to store Niagara Deamon user’s data and to run Niagarastations. By default, the directory is created under C:\ProgramData\Niagara4.9\Webs as shown below.If this path does not exist, the installer displays warning message, requesting to create the folder. Click Yes to continuee the Browse option to change default folder location, if desired.Or Click Next to continue.7.Check the options to install Desktop Shortcuts, if needed. Click Next to run the installation.8.After completing of the installation, the installer displays message “WEBStation-N4 installation iscomplete".9.Check the required options and click Finish to complete the installation process.10.Once the installation is finished, license get installed automatically. Click Continue to run WEBstation-N4.WEBs-N4 Workbench opens as shown below.。
中继代理服务器 用户手册说明书

中继代理服务器用户手册什么是中继代理?它能做什么?中继代理是一款用于配合DBL语音网关转发及加密SIP信令、媒体流的软件。
有些情况下,网关所在的网络会对SIP/H.323等信令进行检测和拦截,以达到封杀VoIP的目的。
如图1.1所示:图1.1 信令封杀如果我们使用了中继代理呢?图1.2 使用中继代理后如上图1.2所示,从网关到中继代理之间的网络传输过程中,所有信令都是被加密的,运营商无法检测到。
再由中继代理把加密信令转成正常信令,发送给呼叫中心服务器。
因此中继代理服务器必须部署在“某网络运营商的广域网”之外,否则中继代理发出正常信令到呼叫中心的过程中,同样会被拦截。
另有极少数网络运营商甚至对语音媒体进行检测拦截,导致通话双方完全无声。
我们同样可以用以上的原理来逃避这种封杀。
只不过加密的不是信令,而是语音媒体流。
当信令(或者语音媒体)无法穿透路由器的NAT,导致无法注册(或者通话单/双方无声)。
这是由于SIP、SDP等协议的设计缺陷所致,通常需要额外的工具软件(服务器)来协助解决。
中继代理就是其中之一。
如下图1.3和1.4所示,描述了使用中继代理前后的状态。
图1.3 使用中继代理前图1.4 使用中继代理后总之,如果确定网络连接及设置无误,VoIP依然无法注册,或者通话无声,即可尝试中继代理。
注意:1)如果GoIP或者FXO网关使用了Trunk Gateway模式,则不能使用中继代理转发信令。
2)网关设置中继代理后,信令或者媒体将经由中继代理服务器转发,请确保网络的通畅和保证足够的带宽,特别是媒体代理。
如何安装和使用中继代理?一、准备安装环境中继代理要求linux运行环境,RedHat/CentOS/debian/ubuntu等主流操作系统都已通过测试,可正常运行。
需要注意的是,如果是64位系统,需要安装以下扩展库:RedHat/CentOS系列,执行以下命令:yum install -y glibc.i686 zlib.i686 zlib.x86_64 krb5-libs.i686 krb5-libs.x86_64debian/ubuntu系列,执行以下命令:dpkg --add-architecture i386apt-get updateapt-get install lib32z1-devapt-get install libgssapi-krb5-2:i386如果是32位系统,以上命令无需执行。
代理详细使用图解方法
由于本人喜欢游戏,所以接触代理软件时间,我接触和学习了好多软件,在进本论谈前也没有怎么使用本论谈提到的相关软件,从进来后本人自己学习研究了本论谈的代理猎手、花刺代理软件,可在本论谈各版块中都无法完全理解和学会使用本软件(可能是自己太笨),所以本人在网上到处搜索学习,看了无数教程和别人经验之谈,最后研究了总结一点相关的经验,所以今天写出来希望对和我一样不是很的新人们使用。
好了,进入正题。
首先:去网上下载几个软件1、花刺代理,这是主角,本论谈很好找,网上也多。
2、纯真IP数据库:主要用于查询特定的地区的IP地址段(网上很好找)。
3、ssport高速端口扫描器:用于扫描你所选定的地区IP段时你所需的端口(本软件现在不好找,本人在网上找了两天也没有下载成功,都有病毒)。
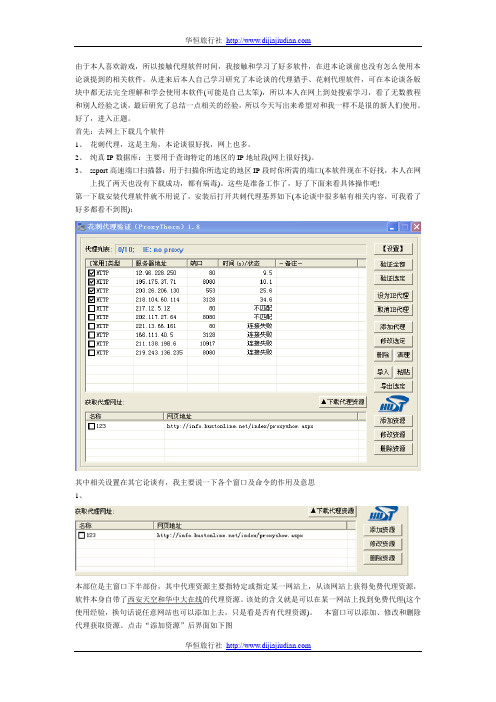
这些是准备工作了,好了下面来看具体操作吧!第一下载安装代理软件就不用说了,安装后打开共刺代理基界如下(本论谈中很多帖有相关内容,可我看了好多都看不到图):其中相关设置在其它论谈有,我主要说一下各个窗口及命令的作用及意思1、本部位是主窗口下半部份,其中代理资源主要指特定或指定某一网站上,从该网站上获得免费代理资源,软件本身自带了西安天空和华中大在线的代理资源。
该处的含义就是可以在某一网站上找到免费代理(这个使用经验,换句话说任意网站也可以添加上去,只是看是否有代理资源)。
本窗口可以添加、修改和删除代理获取资源。
点击“添加资源”后界面如下图软件自带的是西安天空和华中大在线,名称就不用说了吧,网页地址是想寻找代理资源的网站地址,像本软件自带了华中大在线/index/proxyshow.aspx网页。
如果你感觉或我知道那个网站上有免费代理资源你就输入网址,如果你认为是新浪就输点OK就增加了资源。
对资源网址修改和删除就不用说了吧。
2、本软件的上半部位窗口属于代理资源区,下图当在前面说的选定资源网站后,点在上面窗口中就会出面代理资源的IP地址及端口号上面是界面的相关说明及操作,下面讲一下软件右边相关设置的含义,如下图点“设置”如下图其中验证时间参数设置总共有:“连接超时时间”、“验证超时时间”、“并发线程数目”这三个参数可供我们设置。
01-亚伟速录软硬件基础
第一讲亚伟速录系统软硬件基础一、亚伟中文速录机(YW-II型)操作说明(一)使速录机工作1.电源(1)请使用“亚伟”专用直流外接电源,或同规格的电源;电池使用4节5号(AA)干电池,可使亚伟中文速录机工作30-100个小时。
当电池快要使用完时,指示灯快速闪烁(亮0.5秒,灭0.5秒),提醒用户更换电池或使用外接电源。
2.速录机与计算机的连接注意:为了避免烧毁速录机的接口,在YW-II型速录机与计算机连接时,必须使用随机提供的串口/USB两用信号线,或双机操作专用信号线!尤其是老用户,一定不要使用原来的串口信号线!当速录机与计算机连接正常的情况下,YW-II型机可以完成全部YW-A型机可以完成的工作,并可以同时将速录内容以文件方式保存在速录机存储器中;当速录机未与计算机连接时,YW-II型机依然可以将速录内容以文件方式保存在速录机存储器中。
再经过速录机与计算机连接,使用上传功能,即可转换成标准文本。
(二)液晶显示屏1.主显示行(1)接通电源(开机)显示“亚伟中文速录机”(2)显示专用键盘当前一击的内容(字母或符号)(3)显示当前速录机的操作提示(中文)2.状态行显示当前存储器剩余空间、当前电池剩余容量、当前系统时间(三)功能操作1.开/关机轻轻按一下“电源开关”,即可实现开、关机操作。
当亚伟中文速录机接通电源时,指示灯慢速闪烁(亮1秒,灭1秒)。
亚伟中文速录机II型机内置的存储器,最多可以保存255个文件,总共可以储存约20万次击键的汉字内容(约30-50万汉字)。
2.保存文件(1)连续按“F1”键两次,或双手并击专用键盘上的“DGI:DGI”组合键一次,液晶屏显示“开始录入…”。
此时,在速录机内置存储器建立一个文件,文件名称为当时系统的时间。
此后,专用键盘上的任何按键操作都将被保存在上述文件内。
当亚伟中文速录机正在保存文件时,指示灯常亮不闪烁。
(2)连续按“F1”键两次,或双手并击专用键盘上的“DGIN:DGIN”组合键一次,液晶屏显示“结束录入”。
代理IP如何使用代理IP的三种使用方法

代理IP如何使用代理IP的三种使用方法代理IP是一种网络技术,通过使用代理服务器来进行网络访问,隐藏真实的访问者IP地址。
代理IP使用起来可以带来很多好处,比如绕过地区限制、提升访问速度、保护个人隐私等。
下面将介绍代理IP的三种使用方法。
1.手动配置代理IP手动配置代理IP是最基本的使用方法,可以在浏览器或操作系统的设置中手动输入代理服务器的IP地址和端口号。
具体步骤如下:1.打开浏览器的设置或选项菜单,找到代理设置选项。
2.手动输入代理服务器的IP地址和端口号。
代理IP通常由代理服务提供商提供。
3.保存设置并重新启动浏览器。
从此以后,所有的网络请求都将通过代理服务器进行。
手动配置代理IP适合一些临时的、个别的需求,比如只需要访问一些特定的网站或绕过一些特定地区的限制。
但是,手动配置代理IP的方式操作比较繁琐,适用性相对较低。
2.使用代理IP软件为了避免手动配置代理IP的麻烦,可以使用代理IP软件来自动切换代理IP。
代理IP软件有很多种,如Lantern、Shadowsocks等。
使用代理IP软件的步骤如下:2.打开代理IP软件,选择需要的代理服务器。
代理IP软件通常会提供多个代理服务器,可以根据自己的需求选择。
3.保存设置并启动代理IP软件。
从此以后,所有的网络请求都将通过代理服务器进行。
使用代理IP软件的好处是可以自动切换代理服务器,避免了手动配置的麻烦。
同时,一些代理IP软件还提供了加密功能,可以进一步保护个人隐私和数据安全。
但是,代理IP软件通常需要用户付费或限制使用时间,且稳定性和速度也有一定的影响。
3.代理IP池代理IP池是一种更高级的代理IP使用方法,可以实现动态的、自动切换的代理IP。
代理IP池由一些代理IP提供商提供,用户可以通过API 接口来获取和使用代理IP。
1.注册并登录代理IP提供商的网站,获取API接口的密钥和使用方法。
2.调用API接口获取代理IP列表。
代理IP提供商通常会提供多个代理服务器,可以根据自己的需求选择。
ASAHI AV 膜式阀门 Type 15 用户手册说明书

Serial No. H-V031-E-8Diaphragm Valves Type 15User’s ManualContents(1) Be sure to read the following warrantyclauses of our product 1(2) General operating instructions 2(3) General instructions for transportation,unpacking and storage 3(4) Name of parts 4(5) Working pressure vs. temperature 6(6) Specification of limit switch 7procedure7Installation(7)(8) Connection of limit switch procedure 8(9) Operating procedure 9(10) Adjustment procedure for stopper 10(11) Diaphragm replacement procedure 11Inspectionitems 12(12)Troubleshooting12(13)(14) Handling of residual and12wastematerialsThis user’s guide contains information important to the proper installation, maintenance and safe use of an ASAHI AV Product. Please store this manual in an easily accessible location.<Warning & Caution Signs>This symbol reminds the user to take caution due to the potential for serious injury or death.This symbol reminds the user to take caution due to the potential for damage to the valve if used in such a manner.<Prohibited & Mandatory Action Signs>Prohibited: When operating the valve, this symbol indicates an action that should not be taken.Mandatory action: When operating the valve, this symbol indicates mandatory actions that must be adhered to.(1) Be sure to read the following warranty clauses of our product- Always observe the specifications of and the precautions and instructions on using our product.- We always strive to improve product quality and reliability, but cannot guarantee perfection. Therefore, should you intend to use this product with any equipment or machinery that may pose the risk of serious or even fatal injury, or property damage, ensure an appropriate safety design or take other measures with sufficient consideration given to possible problems. We shall assume no responsibility for any inconvenience stemming from any action on your part without our written consent in the form of specifications or other documented approval.- The related technical documents, operation manuals, and other documentation prescribe precautions on selecting, constructing, installing, operating, maintaining, and servicing our products. For details, consult with our nearest distributor or agent.- Our product warranty extends for one and a half years after the product is shipped from our factory or one year after the product is installed, whichever comes first. Any product abnormality that occurs during the warranty period or which is reported to us will be investigated immediately to identify its cause. Should our product be deemed defective, we shall assume the responsibility to repair or replace it free of charge.- Any repair or replacement needed after the warranty period ends shall be charged to the customer. - The warranty does not cover the following cases:(1) Using our product under any condition not covered by our defined scope of warranty.(2) Failure to observe our defined precautions or instructions regarding the construction, installation, handling,maintenance, or servicing of our product.(3) Any inconvenience caused by any product other than ours.(4) Remodeling or otherwise modifying our product by anyone other than us.(5) Using any part of our product for anything other than the intended use of the product.(6) Any abnormality that occurs due to a natural disaster, accident, or other incident not stemming fromsomething inside our product.WarningCaution(2) Generaloperating instructions- Using a positive-pressure gas with our plastic piping may pose a dangerous condition due to the repellent force particular to compressible fluids even when the gas is under similar pressures used forliquids.Therefore, be sure to take the necessary safety precautions such as covering the piping with protective material. For inquiries, please contact us. For conducting a leak test on newly installed piping, be sure to check for leaks under water pressure. If absolutely necessary to use a gas in testing, please consult your nearest service station beforehand.- Do not step on or apply excessive weight on valve. (It can be damaged.)- Do not use the valve in conditions where the fluid may have crystallized.(The valve will not operate properly.) - Keep the valve away from excessive heat or fire. (It can be damaged, or destroyed.)- Always operate the valve within the pressure vs. temperature range.(The valve can be damaged or deformed by operating beyond the allowable range.)- Allow sufficient space for maintenance and inspection.- Select a valve material that is compatible with the media. For chemical resistance information, refer to “CHEMICAL RESISTANCE ON ASAHI AV VALVE”. (Some chemicals may damage incompatible valve materials.)- Keep the valve out of direct sunlight, water and dust. Use cover to shield the valve. (The valve will not operate properly.)- Perform periodic maintenance.(Leakage may develop due to temperature changes or periods of prolonged storage, rest, or operation.) - The travel stop may have to be adjusted if media leakage is detected between the upstream & downstream sides of the valve.- Bonnet bolt torque should be checked before installation, as they may become loose after long-term storage. A periodic check of the valve condition as well as bonnet & flange bolt torque should be made part of preventative maintenance program properly re-tightening the bolts as necessary. It is especially important to re-tighten all bolts during the first shutdown.Nom. Size mm (inch)Bonnet tightening torque valueN ・m {kgf ・cm} [lb ・inch]Rubber PTEF 125 (5)45.0 {459} [400] 45.0 {459} [400] 150 (6)45.0 {459} [400]45.0 {459} [400]WarningCaution(3) General instructions for transportation, unpacking and storage- When suspending and supporting a valve, take care and do not stand under a suspended valve.- This valve is not designed to handle impacts of any kind. Avoid throwing or dropping the valve. - Avoid scratching the valve with any sharp object.- Do not over-stack cardboard shipping boxes. Excessively stacked packages may collapse. - Avoid contact with any coal tar creosote, insecticides, vermicides or paint. (These chemicals may cause damage to the valve.) - When transporting a valve, do not carry it by the handle. - Store products in their corrugated cardboard boxes. Avoid exposing products to directsunlight, and store them indoors (at room temperature). Also avoid storing products in areas with excessive temperatures. (Corrugated cardboard packages become weaker as they become wet with water or other liquid. Take care in storage and handling.)- After unpacking the products, check that they are defect-free and meet the specifications.Warning Caution(4) Name of partsNominal Size: 125, 150mm (5”, 6”)No. DESCRIPTION No. DESCRIPTION No. DESCRIPTION[20] Nut[1] Body [9] Sleeve(A)[1a] Inserted Nut [10] Thrust bearing(A) [21] Gauge cover[2] Bonnet [11] O-ringliner(A) [22] BonnetNipple [23] Stud bolt・nut[3] Diaphragm [12] Grease[3a] Inserted metal of DIA [13] Hand wheel [24] Bolt・Nut[4] Cushion [14] Name Plate [26] Body liner[4a] Cushion cover [15] Cap [27] Rib linerring [28] U-bolt・nut[5] Compressor [17] SheetConicalwasherspring[18] Stopper [29]Pin[7]Compressorwasher[8] Stem [19]Spring[22], [26], [27], [28], [29] are used with special specification.Nominal Size: 125, 150mm (5”, 6”) with Limit Switch (Option)No. DESCRIPTION No.DESCRIPTION[36] Limit Switch [38]Nut (A)[37] Bracket (A) [40]Limit Switch Rod(6) Specification of limit switch (option)Nominal Size Type CodeProtection Grade125, 150mm (5”, 6”)1LS1-J IP67Limit Switch Rating Connection Rate Voltage (V) Resistive Load (A) Inductive Load (A)AC125 10 6 AC250 10 6 DC115 0.8 0.2 DC230 0.4 0.1(7) Installation procedure- When suspending and supporting a valve, take care and do not stand under a suspended valve.- Be sure to conduct a safety check on all hand and power tools to be used before beginning work. - Wear protective gloves and safety goggles as fluid remain in the valve even if the pipeline is empty. (You may be injured.)- When installing a pipe support by means of a U-band or something similar, take care not to over-tighten. (Excessive force may damage the pipe.)- When installing pipes and valves, ensure that they are not subjected to tension, compression, bending, impact, or other excessive stress.- When installing, disassembling, or reassembling the piping, fix the End Connector.- When connecting an ASAHI AV Valve to metal piping, take care not to let the pipe stress on the ASAHI AV Valve.- Be sure to use sealing gaskets (AV Gasket), bolts, nuts, and washers and tighten them to specified torques. (When a non-AV gasket is used, a different tightening torque specification should be followed.)Procedure1) Set the AV gasket between the flanges.2) Insert washers and bolts from the pipe side, insert washers and nuts from the valve side, then temporarily tightenthem by hand.WarningCaution3) Using a torque wrench, tighten the bolts and nuts gradually to the specified torque in a diagonal manner (Refer to fig.1.)Specified torque value Unit : N ・m {kgf ・cm }[lb ・inch]Nom. Size 125mm (5”) 150mm (6”) Torque value40.0{408} [355]40.0{408} [355]- Tighten the bolts and nuts gradually with a torque wrench to the specifiedtorque level in a diagonal manner.(8) Connection of limit switch procedure (option)- Shut down the power on the equipment before connecting wires. There are risks of electrical shock depending on the level of operating voltage.- Be sure that the terminal cover and body cover are put on during the operation. - If you use the limit switch at 1mA-100mA or 5-30V, consult near Asahi dealer.CautionCautionCautionWarningProcedure1) Loosen the three screws used to attach the limit switch cover with ascrewdriver (+) and remove the cover from the limit switch. *These screws are captive.2) Pull and remove the protective cap, made of resin, from the cover.3) Draw the cable through the connector.4) Strip the cable with a wire stripper.5) Install a crimp-style terminal on the lead wire with a terminalcrimping tool.6) Connect the terminal screw with a screwdriver (+) according to the internal circuit diagram show in page 7.* Tighten the screws.(If not, electric leaks or shocks may occur.)7) Tighten the above three screws with a screw driver (+) to install the cover on the limit switch.8) Tighten the cable by connector.(9) Operating procedure- Do not exert excessive force in closing the valve.- Do not use the valve to fluid containing slurry. (The valve will not operate properly.)- The installed valve must never be opened or closed when foreign matter such as sand is present in the pipeline.- When operating the handle, be sure to do so with your hand. (Using a tool may damage the handle.) - If a stopper is loose, adjust it. (To learn how to adjust it, see the operation manual.)○ ○Caution(10) Adjustment procedure for stopper- If a stopper is loose, adjust it. (To learn how to adjust it, see the operation manual.) - Tighten the stoppers securely. (Too weak a torque on a stopper may cause it to loosen.)Travel stop adjustment1) Loosen the gauge cover [21] with hand.3) Loosen the stopper [20].fluid stops.(counter-clockwise) 180°.6) Tighten the nut [18] to the stopper [20] with spanner wrench.7) Tighten the gauge cover [21].Tightening torque of the screw Unit : N ・m {kgf ・cm} [lb ・inch]Nom. Size 125mm (5”), 150mm(6”)Torque valve 10.0 {102} [89]Caution(11) Diaphragm replacement procedure- I f you do work with the piping installed, drain the piping of all its fluid. Some fluid will remain in the valve. Therefore wear protective goggles and protective gloves. (You may otherwise get injured.)1) Drain fluid completely from the pipeline.2) Remove valve bonnet from the body.3) Turn handle of valve clockwise until it stops. (Do not force it).The compressor should be fully extended out of the bonnet.4) Turn the diaphragm clockwise to remove the diaphragm and mount the new diaphragm by reversing step.5) Mount the bonnet to the valve by reversing step 2. Tighten bonnet bolts by hand only.6) Rotate the handle 360°counter-clockwise.7) Using a torque wrench, tighten the bonnet bolts in a diagonal, cross-cross pattern.8) Re-adjust the stopper if necessary.CautionProblem Cause TreatmentFluid is leaking past the fully closed position. The travel stop is not set correctly. Adjust the travel stop.Solid particles have lodged in the valve.Clear the solid particles from the valve.Media has worn diaphragm and / orweir. Replace.Valve can not be fully open. The diaphragm has pulled off the stem.Replace diaphragm. If the valve is invacuum service, special vacuumvalves may be required.Consult factory.The metal joint failed. Remove diaphragm & compressorand replace joint.The handle spins freely. The stem is broken. Disassemble bonnet and replace thestem.The metal joint failed. Remove diaphragm & compressorand replace joint.Valve leaks between body and bonnet. Bonnet bolts have loosened. Re-tighten.Media has crystallized on thediaphragm. Disassemble and clean on a regularbasis. Replace failed diaphragm, ifnecessary.The diaphragm has failed due tofatigue. Replace.Valve leaks from stem. The diaphragm has failed. Replace.(14) Handling of residual and waste materials- Make sure to consult a waste treatment dealer for recommendations on the proper disposal of plastic valves. (Poisonous gas is generated when the valve is burned improperly.)Caution WarningDiaphragm Valve Type 15Information in this manual is subject to change without notice.2016.4。
Honeywell Enraf Servo 854 954罐位器升级指南说明书

MAKE YOUR BEST SERVO, EVEN BETTERHoneywell’s Enraf Servo 854 tank gauges have been market leaders for over 30 years, with more than 65,000 installed worldwide. We continue to invest in this flagship technology and today offer an even more powerful version of its leading servo gauge, along with acost-effective way for customers to upgrade.The new Enraf Smart Servo 954 uses our established measurement technology, but with new electronics and advanced software algorithms todeliver enhanced performance in even more challenging applications.Now Honeywell is offering an easy path to the latest technology. TheServo 954 migration kit provides a simple, safe and cost-effectiveway to refresh the electronics and firmware while keeping existingtank infrastructure to minimize costs and downtime.WHY MIGRATE?Upgrading brings existing 854 Servo customers a range of benefits:-Invest in latest technology to maximize the product lifecycle-Compliance to the latest safety and legal metrology standards-Additional functionality and options, including extended calibrated level and temperature ranges, density profiles upto 50 points, and enhanced connectivity and diagnostics.-Elimination of obsolescence risks including increased maintenance costs and a rising risk of downtime. -Continued support and ready availability of spares for uninterrupted operations.FEATURES AND BENEFITSTackle the Risks of Obsolescence -Replaceend-of-life solutions -Avoid increased maintenance costs and downtime risk -Ensure continued support and spare Cost-EffectiveMigration-Full migration orMigration Kit-Retain cabling,calibration chambers,VITO interfaces,probes and pressuretransmittersImproved Complianceand Safety-SIL certificationfor safety loops-Latest NMi approvals-OIML R85 and API3.1B complianceNew Features-Patented algorithmsfor increased precision-Adaptive dynamiccompensations-Advanced drumcalibration-Lowest safetydiagnostics cycle timeLow Lifecycle Costs-Reuse many 854 parts-Modular design forease of maintenance-Faster commissioningfor reduced downtimeEnraf Servo 954 Migration SolutionEN-21-02-ENG | 02/21© 2021 Honeywell International Inc.For More InformationTo learn more about Honeywell’s Enraf tank measuring technology visit or contact your Honeywell Account Manager.Honeywell Process Solutions 2101 CityWest Blvd,Houston, TX 77042Honeywell House, Skimped Hill LaneBracknell, Berkshire, England RG12 1EB UK Building #1, 555 Huanke Road, Zhangjiang Hi-Tech Industrial Park, Pudong New Area, Shanghai ENRAF SERVO 954 OVERVIEWHoneywell Enraf Servo 954 is our most advanced automatic tank gauge yet. We’ve taken the proven measurement technology of our flagship gauges and added improved electronics and software. With increased intelligence it stands up to the most demanding process conditions.Designed for measuring all kinds of liquids in any storage tank, Servo 954 is reliable, versatile and accurate. New enhancements mean the industry’s best tank gauging solution is now even better: -Patented algorithms andmeasuring principle for improved precision in all applications -Adaptive dynamic compensations to improve measurement under adverse conditions-Patented force transducer technology to optimize stable operation -Advanced drum calibration for guaranteed accuracy -“SIL -by-design” features with unique diagnostics for reliable operation (IEC 61508)-Safety approvals and certifications from legal metrology institutesworldwide, with NMi approvals and OIML R85 and API 3.1B compliance -Faster commissioning to get you up and running more quickly.WHO IS THIS MIGRATION FOR?We strongly recommend that all existing customers upgrade tobenefit from continued support and improved performance. That includes but is not limited to customers with the following products:-854 series servo gauges from 1989-1997 with a Cenelec (or FM) safetyapproval that are non-CE and non-Atex. -The 854 series from 1997-2003 with Cenelec/CE but non-ATEX. -801/802/811 series servos. -854 series from 2003-present day -Customers with a digitalization strategy who are seeking actionable insights from higher resolution tank storage data -Customers with a maintenance strategy that includes predictive diagnostics for improved asset availability -Customers who are pursuing aremote service strategy where Enrafexperts can diagnose and guide by cyber-secure remote connection.MIGRATION OPTIONSWe offer two migration solutions so customers can choose the option that best meets their requirements: -Full Migration, replacing the existing gauge with a new Enraf Servo954, while retaining the calibration chamber, cabling, VITO interface, VITO probes, and pressure transmitters -The Migration Kit, replacing only on-site electronics andsensitive mechanics while retaining the drum compartment, enclosure, calibration chamber, cabling, VITO interface, VITO Probes, and pressure transmitter.Speak to us today and we’ll help you find the best path for you to our latest technology and a better operation.。
代理猎手使用教程(图文)

[04.15]代理猎手使用教程〔图文〕新手必备工具!代理猎手是集代理效劳器的搜索和验证于一身的工具,有以下几个特点: *支持多网址段、多端口自动搜索; *支持不同网段搜索顺序的调整; *支持自动验证并给出速度评价; *支持搜索结果的保存和后续的再验证; *支持搜索结果的灵活排序; *支持搜索结果的导出和导入; *支持用户设置连接超时和验证超时; *支持用户设置验证内容; *支持进度时间预测; *支持自动查找最新版本; *具有搜索完毕,可以在20秒后关机; *具有代理搜索验证历史; *支持Pro*y、SOCKS代理的自动切换和调度; *支持用户设置最**接数〔可以做到不影响其他网络程序〕; *支持自动搜索,可参加Win98方案任务中午夜启动搜索; *根本支持对教育网的搜索,不过仍保护清华、北大和中科院的核心网段; *支持HTTP和SOCKS4、SOCKS5、FTP、TELNET〔WINGATE〕代理效劳器的搜索和验证; *自动扩展系统最大网络连接数的功能,可以使在WIN98下开到几百个并发连接; *具有拨号功能,可以添加拨号任务、挂断任务,断线可以自动重拨、最晚关机时间; *进入Windows可以自动运行、启动时自动开场搜索、自动验证代理调度表; *最大的特点是搜索速度快,最快可以在十几分钟内搜完整个B类地址的65536个地址;代理猎手的下载安装虽然目前代理猎手V3.0还处于beta测试阶段,但新版本提供的功能是以前老版本所不能比较的。
本文就以代理猎手V3.0 Beta5为讲解实例。
代理猎手的最新版本可由作者太阳风的主页下载。
ease./~windzh 下载回来的pro*yht300beta5.e*e是个自解压E*E文件,双击运行就可以开场其安装过程点击"Setup〞按钮,进入下一步:点击"确定〞按钮,选定默认的中文语言。
如果你用的为英文操作系统,还是选英文好。
接着,点击两次"下一步〞后,安装过程就真正开场了,等一会儿安装就完成,安装程序会在桌面和程序组中放入"代理猎手V3.0〞的快捷启动工程。
- 1、下载文档前请自行甄别文档内容的完整性,平台不提供额外的编辑、内容补充、找答案等附加服务。
- 2、"仅部分预览"的文档,不可在线预览部分如存在完整性等问题,可反馈申请退款(可完整预览的文档不适用该条件!)。
- 3、如文档侵犯您的权益,请联系客服反馈,我们会尽快为您处理(人工客服工作时间:9:00-18:30)。
一:软件下载与安装
用户可到黑白网络下载该软件。
下载完成后将压缩包解压,双击名称为"YProxy.exe"的可执行文件,弹出主界面如图:
图一
二:软件使用
点击--文件--搜索代理,搜索到的代理地址如下图:
图二
右击某个代理,有添加删除代理,验证代理,启用停止代理等功能。
亚伟代理软件,可以很快速的查找网络上的免费 Proxy 哦!
主要有以下特点:
1.一键搜索代理,并可过滤掉重复代理。
2.自动验证并给出速度评价,支持后续的再验证。
3.自动识别代理所在国家或地区。
4.支持用户设置连接超时和验证超时,支持用户设置验证内容,支持用户设置线程数(可以作到不影响其他网络程序)。
5.可按自定义选项(如代理地址,哪些国家地区,传输速度)自动整理和过滤代理列表。
6.可以对代理列表进行管理:新增、删除、清空、导入、导出。
7.可以单独查询IP的归属地。
8.可以随时把速度快的代理添加到收藏夹。
9.新增代理吸附功能,可以吸附代理中国等众多代理网站的代理IP.
注意:
亚伟代理网页代理吸附正则表达式为:IP:端口,你在自定义代理搜索网站时确认该网站的源文件的代理IP格式是IP:端口。