DS-9600 8600 7700 7600系列快速操作指南V2.2.0
DS-8600快速操作指南

0203001021222 i
DS-9600/8600/7700/7600 系列快速操作指南
前言
特别声明
在使用视频监控设备时,对于监听接口的使用与维护,请您严格遵守适用的法律、 法规要求。出于非法目地使用视频监控设备、探听他人隐私等,均属于非法监听。
描述内容约定
在本手册中为了简化描述,做以下约定: 本手册提及的“设备”主要指NVR。 本手册提及的“IP设备”主要指的是网络摄像机(IPC)、网络球机(IP DOME) 或编码器(DVS)。 本手册提及的“通道”泛指NVR的IP通道。
UD.6L0102B0199A01
DS-9600/8600/7700/7600 系列快速操作指南
前言
前言
非常感谢您购买我司产品,如您有任何疑问或需求请随时联系我们。
适用型号
本手册适用于以下产品: 产品系列 DS-9600N-ST 系列 DS-9600N-XT 系列 DS-9600N-RT 系列 DS-8600N-ST 系列 DS-7700N-ST 系列 DS-7700N-SP 系列 DS-7600N-ST 系列 DS-7600N-SP 系列 DS-7600N-SE 系列 DS-7600N-SE/N 系列 DS-7600N-SE/P 系列 产品型号 DS-9608/16/32/64N-ST DS-9616/32/64N-XT DS-9608/16/32/64N-RT DS-8608/16/32/64N-ST DS-7708/16/32N-ST DS-7708/16/32N-SP DS-7608/16N-ST DS-7608/16N-SP DS-7604/08N-SE DS-7604/08N-SE/N DS-7604/08N-SE/P 产品名称 NVR NVR NVR NVR NVR NVR NVR NVR NVR NVR NVR
DS-600 操作手册
安装打印机
1-5
4、用手小心将打印头移至中间位置处。 5、更换色带盒之前,请先拿开旧色带盒。 (当第一次安装新色带盒时, 应跳过此步骤,直接进行下一步骤) 6、沿顺时针方向转动色带盒上的旋钮,确保色带芯已被拉紧。
第 7 章 故障和保养 ..................................... 7-1 7.1 7.2 故障处理 ........................................ 7-1 保养与维护 ...................................... 7-6
本产品信息如有更改,恕不另行通知。 本资料仅供参考。除中国现行法律法规规定,得实集团 不承担任何由于使用本资料而造成的直接或间接损失的责 任。 得实集团保留最终解释权。
目录
第 1 章 安装打印机 ..................................... 1-1 1.1 1.2 1.3 1.4 1.5 1.6 1.7 开箱和检查 ...................................... 1-1 放置打印机 ...................................... 1-2 打印机部件 ...................................... 1-3 安装和拆卸色带盒 ................................ 1-5 打印机和主机连接 ................................ 1-8 连接电源 .......................Байду номын сангаас............... 1-10 安装打印驱动程序 ............................... 1-11
DS 8600HMF GB技巧规格书

DS-8600HMF-GB 技术规格书产品诉求DS-8600HMF-GB车载动态取证系统是杭州海康威视数字技术股份有限公司专门面向交警、路政、运管等部门的移动警用执法监控需求而推出的整体解决方案。
该系统以车载动态取证主机为核心,采用多项具有自主知识产权的核心技术,如视音频编解码、嵌入式车牌识别、车牌比对与分析等,可实现视频监控、录像存储、车牌识别、车牌稽查、无线网络传输、夜间补光、远程操控、GPS定位等功能,完全满足各种行车状况下全天候工作需求,可起到执法取证、信息传递、威慑预警、警员保护等作用。
系统组成 设备图片单元名称取证主机车载云台手控键盘 测速雷达 车内枪机功能概述整套系统的核心技术均为杭州海康威视数字技术股份有限公司自主研发或拥有,融合了电子监控、IT 软件、机械制造、信息通信等多个领域的多项先进技术,系统性能稳定、优越: ●视音频编解码技术系统采用海康威视自主研发的国际领先的视音频编解码技术,前端车载取证主机可将采集到的模拟视音频数据进行高效率编码,编码灵活,网络适应性强。
●车牌识别技术内嵌NPR (车牌识别)技术,海康威视拥有自主知识产权,支持国内全部机动车牌制式的识别,识别速度快、准确率高。
●车辆稽查技术系统能将执法取证现场识别的车牌号码实时与数据库中的黑白名单进行快速比对,可稽查出各种备案(如“被盗”、“被抢”、“肇事逃逸”等)车辆。
●雷达测速技术采用车载专用雷达,具有移动测速功能,能够快速、准确测量本车和目标车辆的速度并显示在预览监控画面上,车速信息随数据码流一起存储在录像资料中。
●GPS定位技术内置高灵敏度GPS定位模块,可随时定位车辆地理位置和车速信息,同时支持GPS卫星同步校时,车辆行驶信息可录入码流中长期保存。
●无线网络传输技术系统支持WCDMA、cdma2000(EVDO)、TD-SCDMA国际3G无线网络通信,可将现场采集的视频、音频、GPS等信息及时传输到后台监控中心,保证指挥中心能够在第一时间获取现场状况并作出有效判断。
Konica Minolta fi-7600和fi-7700扫描仪说明书
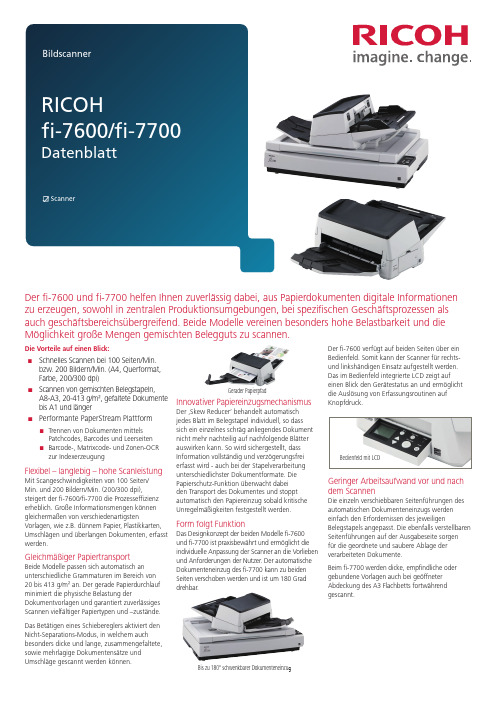
Gerader PapierpfadBedienfeld mit LCD drehbar.unverbindlich. Änderungen an den technischen Daten ohne vorherige Ankündigung vorbehalten.Technische DatenSoftwarepaketÜberragende Scanner-Treiber und Dokumenterfassungssoftware von RicohScanner-Treiber mit hochwertiger Bildverbesserung■Kompatibel zu TWAIN- und ISIS-Schnittstellen ■Überragende integrierte Bildverarbeitung ■Patchcode- und Barcode Erkennung■Vordefinierte und benutzerdefinierte Scanprofile für regelmäßige Aufgabenstellungen■Bei Bedarf unterstützt …Assisted Scan“ den Nutzer durch einfache bildliche Auswahl alternativer Scanergebnisse■Automatisches Zuschneiden und Schräglagenkorrektur, Farberkennung und Leerseitenerkennung sowie -löschungEffizientes Frontend und hochwertige Erfassungslösung■Durchgängige Stapel-Erfassungslösung die mittels …One Click Erfassung“ Arbeitsroutinen erleichtert und beschleunigt■Schnelles Scannen großer Mengen mit Bilddarstellung in Echtzeit, Barcodeerkennung und –indexierung■PaperStream IP Verarbeitungs- und Bildverbesserungs-Technologie ist fester Bestandteil von PaperStream Capture und sichert höchste Bildqualität■Scannen-Verifizieren-Indexieren-Validieren in einem einzigen rationalisierten Vorgang - ganz einfach, für jeden Nutzer■Unterstützt ad hoc Scannen und ermöglicht die spontane Ausnahmehandhabung mittels …Assisted Scan“ und, falls nötig, die einzelfallbezogene, spontane Änderungen von Einstellungen2023.5 8040-1.0PFU (EMEA) Limited BelmontBelmont Road Uxbridge, UB8 1HE GroßbritannienPFU (EMEA) Limited Tower 2Mies-van-der-Rohe Straße 880807 München DeutschlandPFU (EMEA) Limited Viale Monza, 25920126 Milano (MI)ItalienPFU (EMEA) LimitedCamino Cerro de los Gamos, 128224 Pozuelo de Alarcón Madrid SpanienTel: +44 (0)20 8573 4444Tel: +49 (0)89 32378 0Tel: +39 02 26294 1Tel: +34 91 7849000。
SPS-9600 9602高流量切换模式电源供应设备用户手册说明书
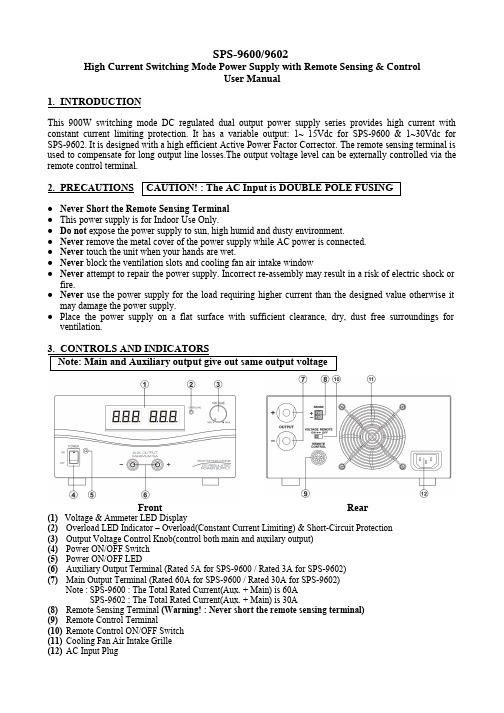
SPS-9600/9602High Current Switching Mode Power Supply with Remote Sensing & ControlUser Manual1. INTRODUCTIONThis 900W switching mode DC regulated dual output power supply series provides high current with constant current limiting protection. It has a variable output: 1~ 15Vdc for SPS-9600 & 1~30Vdc for SPS-9602. It is designed with a high efficient Active Power Factor Corrector. The remote sensing terminal is used to compensate for long output line losses.The output voltage level can be externally controlled via the remote control terminal.2. PRECAUTIONS●Never Short the Remote Sensing Terminal●This power supply is for Indoor Use Only.● Do not expose the power supply to sun, high humid and dusty environment.●Never remove the metal cover of the power supply while AC power is connected.●Never touch the unit when your hands are wet.●Never block the ventilation slots and cooling fan air intake window●Never attempt to repair the power supply. Incorrect re-assembly may result in a risk of electric shock orfire.●Never use the power supply for the load requiring higher current than the designed value otherwise itmay damage the power supply.●Place the power supply on a flat surface with sufficient clearance, dry, dust free surroundings forventilation.(1) Voltage & Ammeter LED Display(2)Overload LED Indicator – Overload(Constant Current Limiting) & Short-Circuit Protection(3)Output Voltage Control Knob(control both main and auxilary output)(4)Power ON/OFF Switch(5)Power ON/OFF LED(6)Auxiliary Output Terminal (Rated 5A for SPS-9600 / Rated 3A for SPS-9602)(7)Main Output Terminal (Rated 60A for SPS-9600 / Rated 30A for SPS-9602)Note :SPS-9600 : The Total Rated Current(Aux. + Main) is 60ASPS-9602 : The Total Rated Current(Aux. + Main) is 30A(8)Remote Sensing Terminal (Warning! : Never short the remote sensing terminal)(9)Remote Control Terminal(10)Remote Control ON/OFF Switch(11)Cooling Fan Air Intake Grille(12)AC Input PlugFront RearCAUTION! : The AC Input is DOUBLE POLE FUSING4. CONNECTION4.1This series has 2 models. Make sure you have purchased the correct one.They have different output voltage range and current as following:Model Number Output Voltage RangeTotal Rated Current (Main+Auxiliary)SPS - 9600 1 ~ 15V 60ASPS - 96021 ~ 30V30A4.2 Check the rating label of the power supply and make sure it complies with your AC mains voltage.Connect the power supply to the AC Mains using the provided power cord.Steps 4.3 & 4.4 explain how to use the special features: remote sensing and remote control.You can use the 2 features at the same time or separately.Please go to step 4.5 if you do not use the 2 features and make sure the remote control ON/OFF switch is in OFF position(rear panel).4.3 REMOTE SENSING – Take note of the warning and follow the order of installation. Warning!:Never short the Remote Sensing TerminalConnection:1. First complete the power connections between power supply and equipment.2. Check and make sure the power connections are secure.3. Then make connections between Remote Sensing and equipment.Warning!:Never short the Remote Sensing TerminalDis-connection:1. First disconnect the remote sensing connections.2. Then disconnect the power connections between the power supply and equipment. Fig 3 showing connections between Remote Sensing, Power output and Equipment.The remote sensing wire should be AT LEAST 22AWG wire size.4.4 REMOTE CONTROL4.4.1 VOLTAGE REMOTE CONTROL Set up the provided remote connector plug(a) Remove the black portion of the remote control connector plug by removing the screw as Fig 4.Black portionSilver portionFig. 42. Rotate the black portion 1. Remove the screw(b) Solder 3 wires(22AWG) to PORT 1, 2 & 3 of black portion as shown in Fig.5.(c)Make sure the load is disconnected and the power supply is OFF.(d)Plug the remote connector plug into the remote control terminal of the power supply.(e)Secure the remote connector plug to the terminal socket by locking connector ring(Fig 6).Then, you can choose either method A or B below to use the remote control feature:Method A : Using External Voltage SourceA variable external voltage source of 0 ~ 5V is fed into the remote control terminal to adjust the output voltage level of both Main and Auxiliary output.Warning! : Do not input higher than 5V, otherwise the OverVoltage Protection(OVP) will betriggered.A (i) Make sure the load is disconnected and the power supply is OFF.(ii) Use ONLY wires from port 2 and 3. Then, connect port 2 to positive polarity of the externalvoltage source and port 3 to negative polarity of the external voltage source.(iii)Turn the Remote Control ON/OFF Switch to ON position. (iv)Switch on the power supply.(v) Vary the external input voltage 0 – 5V to check and verify for the full output voltage range ofpower supply.(vi)Switch off the power supply.Method B : Using Internal Voltage SourceB (i) Make sure the load is disconnected and the power supply is OFF.(ii) Prepare a 5kohm variable resistor and use wires from port 1, 2 and 3 as shown in Fig.7.(iii) Turn the the Remote Control ON/OFF Switch to ON position.(iv) Switch on the power supply.(v) Adjust the 5kohm variable resistor from one end to other end to check and verify for the full output voltage range of power supply.(vi)Switch off the power supply.Outer ring Fig. 6Fig. 5Port numbers are marked on the black portionTo Port 1To Port 2To Port 34.4.2ENABLE AND DISABLE THE OUTPUTYou can use Port 7 and 8 to remote control the OUTPUT ON/OFF.a) Open Port 7 and 8 if you want to ENABLE the output ( By default )b) Short Port 7 and 8 if you want to DISABLE the output.4.5If you do not use the remote control feature, make sure the remote control ON/OFF switch is in OFFposition(Rear panel).4.6Switch on the power supply and the power ON/OFF LED should light up in green.Then, adjust the output voltage to the desired voltage and switch off the power supply.4.7Connect the equipment to the power supply. Red (+) is connected to the positive polarity input of theequipment and Black (-) is connected to the negative polarity input of the equipment.4.8Switch on the power supply first and the LED Indicator should light up in green.4.9Switch on the equipment and the LED Indicator should still remain in green.4.10You can now operate the equipment.When an operation is finished, switch off the equipment first and then switch off the power supply.4.11 When disconnecting the power supply from the unit, disconnect the remote sensing wire first, thendisconnect the output cables.5. SPECIFICATIONSSPS-9600SPS-9602Variable Output Voltage 1 ~ 15V 1 ~ 30VTotal Rated Output Current(Main + Auxiliary Output)60A30ARated Output Current (Main)60A30ARated Output Current (Auxiliary)5A3ARipple and Noise40mVp-pLoad Regulation0.1% + 5mVLine Regulation0.05% + 3mVInput Voltage230VAC / 50Hz ( or on request )Efficiency>85%Dynamic Power Factor Correction>0.97 at optimal loadVoltmeter and Ammeter Display 3 digit LED displayMeter Accurancy+/- 1% + 1 countIndicatorGreen LED for power on/off indication Red LED for overload/short circuit indicationSpecial Feature Remote Control & Remote Sensing Cooling Method Variable Speed thermal static control fan Operating Temperature0 ~ 40°CProtections Overload(Constant Current Limiting), Short Circuit, Overtemperature and OVPApprovals CE-EMC: EN 55022 CE-LVD:EN 60950Dimension220 (W) x (H)110 x 360(D) mmWeight 5.8Kg7673-9602-0002。
hp deskjet 9600 系列打印机 说明书

TrueType™ 是 Apple Computer, Inc. 的美国商标。
UNIX® 是 Open Group 的注册 商标。
安全信息
使用本产品时,应始终遵守基 本的安全防范措施,以降低导 致火灾或电击伤害的风险。
1 请阅读并理解打印机附带 文档中的所有说明。
2 在将本产品与电源连接 时,仅使用接地的电插 座。如果不知道插座是否 接地,请咨询合格的电 工。
使用打印墨盒和附件
使用自动双面打印单元 . . . . . . . . . . . . . . . . . . . . . . . . . . . . . . . . . . . . . . . . . . . . . . . . . .3-1 安装自动双面打印单元. . . . . . . . . . . . . . . . . . . . . . . . . . . . . . . . . . . . . . . . . . . . . . .3-1
Dell EqualLogic FS7600 系列设备硬件用户手册说明书
硬件用户手册© 版权所有 2011-2013 Dell Inc. 保留所有权利。
Dell™ 和 EqualLogic® 是 Dell Inc. 的商标。
本文使用的所有商标和注册商标均属其各自所有者的财产。
本说明文件中的信息如有更改,恕不另行通知。
未经 Dell 书面许可,严禁以任何形式进行复制。
发布时间:2013 年 10 月部件号:110-6178-ZH-CN R1目录前言v1 基本设备信息1设备组件1设备前面板功能部件1设备背面板功能部件2将设备连接至电源4打开和关闭电源5关闭控制器电源6打开控制器电源6所需工具6技术规格62 更换组件9安全建议9所需工具9使用防静电腕带9更换控制器10卸下控制器10安装控制器11安装 SFP+ 收发器12更换电源设备12卸下电源设备12安装电源设备12卸下挡板13连接挡板14更换散热风扇14卸下风扇14安装风扇16更换设备16卸下设备16安装设备17返还故障硬件173 下一步操作19NAS 群集文档19附录 A: NOM 信息(仅限于墨西哥)21词汇表23索引25iiiDell EqualLogic FS7600硬件用户手册目录iv前言Dell™ EqualLogic® FS Series 设备与 PS Series 阵列相结合,提供高性能、高可用性、可扩展的 NAS 解决方案。
本手册介绍如何对 EqualLogic FS7600 设备的客户可更换组件进行维护和故障排除。
读者对象本指南中的信息适用于负责维护 EqualLogic FS7600 硬件的硬件管理员。
相关说明文件有关 FS Series 设备、PS Series 阵列、组、卷、阵列软件以及主机软件的详情,请登录到位于客户支持站点的说明文件页。
Dell 联机服务您可以使用以下步骤了解 Dell 产品和服务:1. 访问或在任何 Dell 产品信息中指定的 URL。
2. 使用地区菜单或单击指定您所在国家/地区或区域的链接。
日立7600操作手册
日立7600操作手册(原创实用版)目录1.日立 7600 概述2.操作手册的作用和结构3.如何阅读和理解操作手册4.日立 7600 的主要功能和操作方法5.安全注意事项6.维护和故障排除7.结论正文【日立 7600 概述】日立 7600 是一款高性能的设备,适用于各种工程和工业应用。
为了确保设备的正常运行和操作者的安全,日立公司提供了详细的操作手册。
【操作手册的作用和结构】操作手册是设备操作者的指南,包含了设备的基本信息、操作方法、安全注意事项和维护保养等内容。
结构上,操作手册通常分为概述、操作方法、安全注意事项、维护和故障排除等章节。
【如何阅读和理解操作手册】阅读操作手册前,应确保已经了解设备的基本用途和性能。
阅读时,应按照章节顺序进行,遇到不理解的内容可以先做好标记,然后再向相关人员咨询。
理解操作手册的内容后,应进行实际操作,以确保能够熟练掌握设备的操作方法。
【日立 7600 的主要功能和操作方法】日立 7600 的主要功能包括但不限于:强大的挖掘能力、灵活的机身设计、高效的液压系统等。
操作方法则包括:启动和关闭设备、控制铲斗运动、调整机身姿态等。
具体的操作步骤和方法,在操作手册中有详细的介绍。
【安全注意事项】操作日立 7600 时,应遵守相关的安全规定,如:穿戴安全防护设备、遵守操作规程、注意周围环境等。
遇到突发情况时,应立即停止操作,确保自身和他人的安全。
【维护和故障排除】为了确保设备的正常运行,应定期进行维护保养,如:更换机油、检查液压系统、清洁过滤器等。
如果设备出现故障,应立即停止操作,并按照操作手册的指引进行故障排除。
【结论】总的来说,日立 7600 操作手册是设备操作者的重要参考资料,能够帮助操作者了解设备的性能、操作方法、安全注意事项和维护保养等内容。
fi-7600文档扫描仪用户手册说明书
Production-class ADF scanningfi-7600 Document Scanner The fi-7600 is full of thoughtful touches to makeclear, accurate scanning easy. It has a large ADFwith easy alignment guides, paper straightening technology, and a straight feeding path, all toprotect your documents and capture the datacorrectly and consistently.Incredible speed and flexibility• Accurately powers through your documents at up to 200 images per minute• High-capacity 300-page Automatic Document Feeder suitable for continuous scanning• Accepts a wide variety of documents: thin paper, plastic cards, long documents, and envelopes• Special mode to scan extra-thick documents• Two independent control panels, one on each side, allow the fi-7600 to fit any workspace Clean up and optimize scans without changing settings in advance• PaperStream IP (PSIP) is a TWAIN/ISIS ®-compliant driver with smart features including:• Assisted Scanning lets you choose the best image cleanup through visual selection• Advanced Image Cleanup corrects the toughest documents, including colored and decorated backgrounds, to improve OCR and reduce rescans• Auto Color Detection identifies the best color mode for the document• Blank Page Detection removes blank pages automatically • Front and Back Merge places two sides of a page into one convenient imageProtect your paper – and the information on it • Straight paper path reduces the stress on your stack ofdocuments during scanning• Forgot to remove a staple? Intelligent Sonic Paper Protection “listens” to paper flowing through the machine and stops if a misfeed occurs, reducing damage to your documents• Intelligent MultiFeed Function allows easy manual bypass for sticky notes, taped receipts, and labels that can slow down batch scanning• Ultrasonic Double Feed Detection identifies sheets stuck together so you don’t miss an image• Skew Reduction significantly improves feeding performance and ensures that your whole document gets accurately captured from edge to edge PaperStream ClickScan simplifies scanningEasy to use capture software for any business. Simple scanning interface with 3-steps: scan, select destination & save.PaperStream Capture makes scanning fast and easy Eliminate the learning curve. PaperStream Capture’s user-friendly interface allows easy operation from start to finish. Changing scan settings is simple. Indexing and sorting features include barcode, patch code, and blank page separation – making batch scanning a breeze for operators.Make it even better with PaperStream Capture Pro Optional PaperStream Capture Pro software offers an improved feature set with superior front-end capture, image processing, and options for enhanced data extraction and indexing for release.Centralized fleet managementIncludes Scanner Central Admin Agent to remotely manage your entire fi Series fleet. Effectively allocate your resourcesbased on scan volume, consumables wear, and more.Production-class ADF document scannerfi-7600©2021 Fujitsu Computer Products of America, Inc. Fujitsu and the Fujitsu logo are registered trademarks of Fujitsu Limited. All text, graphics, trademarks, logos contained herein related to Fujitsu, PFU, or Fujitsu Computer Products of America, Inc. (“FCPA”) are owned, controlled or licensed by or to FCPA with all rights reserved. All other text, graphics, trademarks, service marks and logos used herein are the copyrights, trademarks, service marks or logos of their respective owners.V12107DS7600MFor more information visit the Fujitsu Computer Products of America website , email ********************* or call 888-425-8228.¹ Can scan documents longer than A4 sheets. Documents longer than 34” require using lower resolution (200 DPI or less) 2 Can scan up to 3 flat plastic cards or one embossed card at a time 3 Actual scanning speeds are affected by data transmission and software processing times Using JPEG compression Using TIFF CCITT Group 4 compression 6 Maximum capacity varies depending upon paper thickness 7 Selectable maximum density may vary depending on length of document When scanning at high resolutions (600 dpi or higher), some limitations to document size may apply depending on system environment PFU Limited, a Fujitsu company, has determined that this product meets the ENERGY STAR guidelines for energy efficiency and RoHS requirements (2005/95/EC) Including the ADF chute and stacker open to minimum positions and one control panel open Can be downloaded following instructions on Setup DVD-ROM Replacement units shipped overnight for all requests received by 2 P.M. PST.TrademarksMicrosoft, SharePoint, and Windows are trademarks of Microsoft Corporation. ISIS is a registered trademark of EMC Corporation. ABBYY, FineReader are trademarks of ABBYY Software Ltd. ENERGY STAR is a U.S. registered trademark. PaperStream is registered trademark of PFU Limited. All other trademarks are the property of their respective owners. Specifications subject to change without notice. Any other products or company names appearing in this document are the trademarks or registered trademarks of the respective companies.ENERGY STAR®PFU Limited, a Fujitsu company, has determined that this product meets the ENERGY STAR® guidelines for energy efficiency. ENERGY STAR is a U.S. registered trademark of the U.S. Environmental Protection Agency.Document feeding method Automatic Document Feeder (ADF)Scanning modes Image sensor type Simplex/Duplex in Color, Grayscale, or Monochrome Color Charge-Coupled Device (CCD) x 2(Front x 1, Back x 1)Light source White LED Array x 4 (Front x 2, Back x 2)Multi-feed protection Ultrasonic multi-feed detection sensor Paper detection sensorPaper protection Warped document detectioniSOP (Intelligent Sonic Paper Protection)Document size Maximum MinimumLong page scanning 112” x 17” (304.8 x 431.8 mm)2.0” x 2.7” (50.8 x 69 mm)12” x 220” (304.8 x 5,588 mm)Up to 200m when using auto page truncation)Paper weight PaperPlastic Card5.3 to 110 lb (20 to 413 g/m2)Up to 1.4mm 2Scanning speed 3200 or 300 dpi, Letter, Color 4, Grayscale 4 and Monochrome 5Simplex Duplex100 pages/minute 200 pages/minuteADF capacity 6300 Sheets (A4/Letter: 20 lb. or 80 g/m2)Background colors White / Black (switchable)Output resolution 7Color (24-bit), Grayscale (8-bit), Monochrome (1-bit) 50 to 600 dpi, 600 dpi optical, 1200 dpi software 8Internal video processing 12-bit (4,096 levels)InterfaceUSB 3.1 Gen 1 / USB 3.0 / USB 2.0 / USB 1.1Power requirements100 to 240 VAC, 50/60 HzPower consumption Operating Mode Sleep ModeAuto Standby (Off) Mode 55 W or less 1.7 W or less 0.15 W or lessOperating environment TemperatureRelative Humidity5 to 35 °C (41 to 95 °F)20 to 80% (non-condensing)Environmental compliance ⁹ENERGY STAR 3.0®, RoHSDimensions 10(Width x Depth x Height)25.2” x 18.7” x 8.4” (640 x 473 x 214 mm)Weight24 lb (11 kg)Included in the boxStacker, ADF paper chute, AC cable & adapter, USB cable, Setup DVD-ROMBundled software (DVD format)11PaperStream IP (TWAIN/ISIS) Driver, 2D Barcode for PaperStream 10, PaperStream Capture, PaperStream ClickScan, ScanSnap Manager for fi Series 10, Scan to Microsoft SharePoint 10, ABBYY FineReader for ScanSnap 10, Scanner Central Admin Agent, Software Operation Panel, Error Recovery Guide Supported operating systemsWindows® 10 (19), Windows® 8.1, Windows® 7,Windows Server® 2019, Windows Server® 2012 R2, Windows Server® 2012, Windows Server® 2008 R2, Windows Server® 2008 (20)Image processing functionsMulti-image output, Auto color detection, Blank page detection, Dynamic threshold (iDTC), Advanced DTC, SDTC, Error diffusion, De-screen, Emphasis, Halftone, Dropout color, sRGB output, Hole punch removal, Index tab cropping, Split image, De-skew, Edge correction, Streak reduction, Cropping, Dither, Static threshold, Divide long page Trade compliantYesTechnical InformationInsist on Genuine Fujitsu Service to keep your scanner running at its bestFujitsu industry-leading support keeps digital transformation projects on-time and on budget• U.S. based support • Specialized Teams • Flexible service programsFujitsu Imaging Solutions provide superior engineering at the forefront of innovation through:• Engineering Passion and Dedication • Human Centric Design • Worldwide ReliabilityBasic Onsite ServiceS7600-BAMYNBD-33-year scanner contract with parts, maintenance, labor, 1 cleaning visit per year, and next business day response timeScanCare Onsite Service S7600-SCMYNBD-33-year scanner contract with parts, consumables, maintenance, labor, 2 cleaning visits per year, and next business day response timeAdvance Exchange S7600-AEPWNBD-11-year scanner contract shipping a replacement unit overnight 12Depot Mail-in Repair S7600-DEPW5DY-11-year scanner contract provides mail-in unit repair that includes spare parts, labor, and one-way shipping back to customerPost-scan imprinter (fi-760PRB)PA03740-D101Prints a string of characters on document after a scan Print cartridge for fi-760PRB CA00050-0262Lifetime: approx 4,000,000 printed characters Brake Roller PA03740-K010Lifetime: approx 250,000 sheets or 1 year Pick Roller PA03740-K011Lifetime: approx 250,000 sheets or 1 yearScanAid Kit CG01000-288701Consumable kit with instructions and cleaning supplies ScanAid Kit Large CG01000-289001Consumable kit with instructions and cleaning supplies PaperStream Capture ProPSCP-LV-0001PaperStream Capture Pro Low-Volume software licenseDuplex Scans both sidesScansPlastic CardsFlat and embossed 600Optical DPI24-bit ColorScanning supported TWAIN & I SIS SupportedIndustry Leading Net PromoterScore。
LEXMARK 7600系列 说明书
3
在 USB、以太网和无线连接之间转换(仅限于 Windows).....................................................49 在 USB、以太网和无线连接之间转换(仅限于 Macintosh 英文版)........................................51 高级无线设置............................................................................................................................53
在安装过程中允许使用软件......................................................................................................13 安装打印机(只用作复印机或传真机)....................................................................................13 了解打印机的部件.....................................................................................................................20 使用打印机操作面板按钮和菜单...............................................................................................22
7600 Series 用户手册
- 1、下载文档前请自行甄别文档内容的完整性,平台不提供额外的编辑、内容补充、找答案等附加服务。
- 2、"仅部分预览"的文档,不可在线预览部分如存在完整性等问题,可反馈申请退款(可完整预览的文档不适用该条件!)。
- 3、如文档侵犯您的权益,请联系客服反馈,我们会尽快为您处理(人工客服工作时间:9:00-18:30)。
报警输出接直流、交流负载时,请参考以下连接方式连接:
请注意主板上的 JPA1 短接子的不同用法。当外部接直流负载时,JPA1 两种方式均可安全使用,同时 建议在 12V 电压、1A 电流限制范围内使用。当外部接交流负载时,JPA1 必须跳开,即拔掉主板上的相应
杭州海康威视数字技术股份有限公司 | 版权所有(C)
1、拧开机箱背部和侧面的螺丝,取下盖板。
2、将硬盘数据线一端连接在主板上,另一端连接在硬盘上。
3、将电源线一端连接在主板上,另一端连接在硬盘上。
4、将 NVR 机箱侧立,对准硬盘螺纹口与机箱底部预留孔,用螺丝将硬盘固定。
5、盖好机箱盖板,并将盖板用螺丝固定。
杭州海康威视数字技术股份有限公司 | 版权所有(C)
5、将电源线连接在硬盘上。
6、盖好机箱盖板,并将盖板用螺丝固定。
杭州海康威视数字技术股份有限公司 | 版权所有(C)
6
DS-9600/8600/7700/7600 系列 . 快速操作指南
DS-7700N-ST、DS-7700N-SP、DS-7600N-ST、DS-7600N-SP 系列硬盘安装步骤:
产品名称
NVR NVR NVR NVR NVR NVR NVR NVR NVR NVR NVR NVR NVR NVR NVR NVR NVR NVR
DS-9600N-XT 系列
DS-8600N-ST 系列
DS-7700N-ST 系列
DS-7716N-ST DS-7732N-ST DS-7708N-SP
11
DS-9600/8600/7700/7600 系列 . 快速操作指南
短接子;为保证安全,外接交流负载时推荐使用外接继电器(具体接线方法如图) 。 主板上有四个这样的短接子,每个报警输出对应一个,分别是 JPA1、JPA2、JPA3、JPA4,出厂时均 是短接的,当直接接交流负载时必须拔掉短接子。 警告 当作为交流电路的控制开关时,必须拔掉短接子, 并使用外接继电器, 否则会损坏设备并有触电危险! 接线方法说明 设备提供接信号线的绿色弯针插头,接线步骤如下: 1、拨出插在 NVR 上 ALARM IN、ALARM OUT 的绿色弯针插头; 2、用微型一字螺丝刀按下橙色端子,将信号线放进插孔内,松开螺丝刀; 3、将接好的插头卡入相应的绿色弯针插座上。
1、用螺丝将硬盘固定在直插支架上。 2、用钥匙打开面板锁。
3、参照图示方向按下面板两侧锁扣,打开前面板。
4、参照图示方向,将硬盘缓慢插入。
5、听到“咔咔”的声音后,代表该硬盘已安装牢固。
6、重复以上步骤,完成其他硬盘安装后,合上机箱前挡板, 并用钥匙将其锁定。
杭州海康威视数字技术股份有限公司 | 版权所有(C)
10
DS-9600/8600/7700/7600 系列 . 快速操作指南
4
与其他设备连接
NVR 后面板的报警输入(ALARM IN) 、输出(ALARM OUT)接口示图如下:
4.1 连接报警输入/输出设备
报警输入为开关量(干节点)输入,若报警输入信号不是开关量信号,如电压信号,请参考以下连接 方式连接:
NVR 的安装
若 NVR 安装在机架或机柜内,请使用支架固定并注意以下事项: 1. 安装 NVR 前,请先将支架安装在机架或机柜的适当位置。 2. 请确保设备安全运行所必需的空气流通。 3. 请确保不会因为机械负荷不均匀而造成危险。 4. 请确保机柜内温度不超过 55℃。 5. 请确保视频、音频线缆有足够的安装空间,线缆弯曲半径应不小于 5 倍线缆外径。 6. 请确保报警、485 等线缆牢固安装,良好接触。 7. 如果安装多台设备,设备的间距最好大于 2cm。 8. 请确保 NVR 可靠接地。
0202001020522
杭州海康威视数字技术股份有限公司 | 版权所有(C)
2
DS-9600/8600/7700/7600 系列 . 快速操作指南
目录
1 安装注意事项 ................................................................................................................. 3 2 安装硬盘 ......................................................................................................................... 4 3 后面板接口名称及连接说明 ............................................................................................ 7 4 与其他设备连接 ............................................................................................................ 10 5 开关机 .......................................................................................................................... 13 6 菜单结构 ....................................................................................................................... 15 7 向导 .............................................................................................................................. 16 8 IP 通道配置................................................................................................................... 18 9 回放 .............................................................................................................................. 19 10 备份 ............................................................................................................................ 20 11 技术参数 ..................................................................................................................... 21 12 安装硬盘总容量的参考计算方法 ................................................................................. 28
说明 收到产品后,请打开包装盒,将设备取出并放置在适当的位置,依据盒内的装箱清单确认装箱产品及 附件。 注意 如果发现包装盒内物品有所损坏或任何配件短缺的情况,请及时与经销商联系。
杭州海康威视数字技术股份有限公司 | 版权所有(C)
4
DS-9600/8600/7700/7600 系列 . 快速操作指南
杭州海康威视数字技术股份有限公司 | 版权所有(C)
12
DS-9600/8600/7700/7600 系列 . 快速操作指南
4.2 连接控制键盘
非常感谢您购买我司产品,如您有任何疑问或需求请随时联系我们。 本手册适用于以下产品: 产品系列
DS-9600N-ST 系列
产品型号
DS-9608N-ST DS-9616N-ST DS-9632N-ST DS-9616N-XT DS-9632N-XT DS-8608N-ST DS-8616N-ST DS-8632N-ST DS-7708N-ST
DS-7700N-ST 后接口板
DS-7700N-SP 后接口板
杭州海康威视数字技术股份有限公司 | 版权所有(C)
9
DS-9600/8600/7700/7600 系列 . 快速操作指南
DS-7600N-ST 后接口板
DS-7600N-SP 后接口板
杭州海康威视数字技术股份有限公司 | 版权所有(C)
杭州海康威视数字技术股份有限公司 | 版权所有(C)
3
DS-9600/8600/7700/7600 系列 . 快速操作指南
1 安装注意事项
NVR 是一种专用的监控设备,请在安装使用时注意以下事项: 1. NVR 上不能放置盛有液体的容器(例如水杯) 。 2. 将 NVR 放置在通风良好的位置。 3. 使 NVR 工作在允许的温度及湿度范围内。 4. NVR 内电路板上的灰尘在受潮后会引起短路,请定期用软毛刷对电路板、接插件、机箱及机箱风扇进 行除尘。 5. 电池更换不当会有爆炸危险,不建议用户直接更换;如需更换,只能用同样类型或等效类型的电池进 行更换。 6. 请从正规渠道购买硬盘生产厂商推荐的 DVR 专用硬盘,以保证硬盘的品质和使用要求。
DS-9600/8600/7700/7600N-ST DS-7700/7600N-SP DS-9600N-XT
系列
NVR
快速操作指南
杭州海康威视数字技术股份有限公司 技术热线:400-700-5998 UD.6L0102B0010A01