戴尔OPTIPLEX系列bios设置中文说明
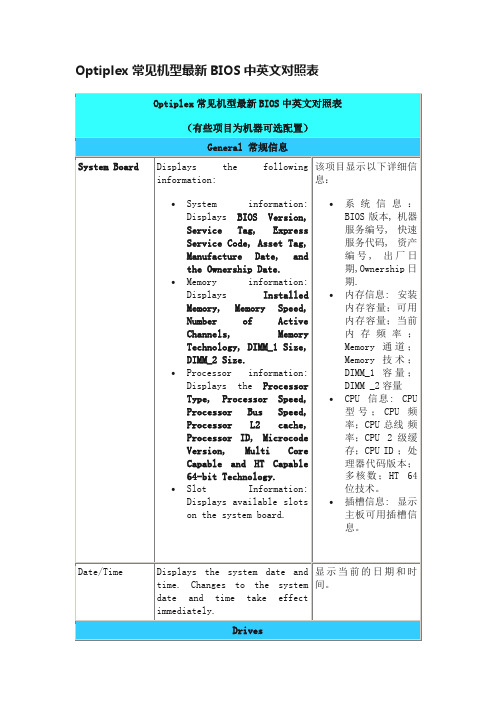
Optiplex常见机型最新BIOS中英文对照表
RAID Autodetect / ATA= RAID if signed drives, otherwise ATA
RAID On / ATA= SATA is configured for RAID on every boot
Enable (default)
Disable
No boot
☆
NOTE:
Operating systems with USB support will recognize USB Storage
启用或禁用集成USB控制器。
可设置:
启用(默认项目)
默认
不启动
Parallel Port
并口
Identifies and defines the parallel port settings. You can set the parallel port to:
Disable - All Floppy drive are disable
Enable - All floppy drive are enable.
☆
NOTE:
The ";USB Controller"; Setup option will affect floppy operation.
该项可以设置软驱。
Onboard or USB Floppy
Onboard SATA Hard Drive
Onboard or USB CD-Rom Drive
计算机尝试从以下列表顺序启动:
软驱
SATA 硬盘
光驱
Dell OptiPlex 745 BIOS 设置详解

Dell OptiPlex 745 BIOS 设置(一)System 系统1、System Info(系统信息)列出计算机名、BIOS Version(BIOS 版本)、Service Tag(服务标签)、Express Service Code(快速服务代码)(如果有)和Asset Tag(资产标签)。
这些字段均无法修改。
2、Processor Info(处理器信息)标识CPU 类型、总线速率、时钟速率和二级高速缓存的大小。
说明处理器是否具有HyperThreading 和多核心功能,以及是否支持64 位技术。
这些字段均无法修改。
3、Memory Info(内存信息)列出已安装的内存的类型、大小、速率、通道模式(双通道或单通道)和内存插槽信息。
对于每个插装的内存插槽,系统设置程序均会列出DIMM 的大小、列、类型和组织。
闲置的内存插槽将被表示为“Empty(闲置)”。
这些字段均无法修改。
4、Date/Time(日期/时间)显示当前日期和时间设置。
5、Boot Sequence(引导顺序)计算机尝试按照此列表中指定的设备顺序进行引导。
此选项使您可以控制/修改引导顺序。
(二)Drives(驱动器)1、Diskette Drive(软盘驱动器)该选项可以启用或禁用软盘驱动器。
选项包括Off(关)、Internal(内部)、USB 和Read Only(只读)。
注:如果选中USB,请确保Onboard Devices(机载设备)下的USB 控制器设置选项设置为On(开)。
2、SATA 0 (默认为On [开])标识并启用和禁用连接至系统板上的SATA 连接器的驱动器,并列出硬盘驱动器的容量。
(SATA 0 )3、Module Bay(默认为On [开])启用或禁用Module模块。
4、SATA Operation(SATA 运行状态)(默认为AHCI)超小型计算机三个选项:AHCI / ATA / LEGACY5、SMART Reporting(SMART 报告)(默认为Off [关])该设置确定在计算机启动期间是否报告集成驱动器错误。
DELL台式机BIOS说明

SATA Operation 设置选项:
禁用,ATA , AHCI 和 Raid On
默认设置是 Raid On=SATA 设置支持Raid
禁用 - 禁用所有软驱。
启用 - 启用所有软驱。
☆
注意:
The ";USB Controller"; 设置选项也将控制USB软驱。
SATA Operation
SATA设置
configures the operating modeogthe integrated hard drive controller
This option is disabled by default.
S.M.A.R.T.
该项可以设置在系统启动时提供硬盘错误信息报告。该技术是S.M.A.R.T.(自我管理分析与报告技术)的一部分。
默认禁用。
Drives
Enables or disables the SATA drives connected to the system board.
Optiplex常见机型最新BIOS中英文对照表
(有些项目为机器可选配置)
General 常规信息
System Board
Displays the following information:
System information: DisplaysBIOS Version, Service Tag,Express Service Code,Asset Tag, Manufacture Date,and theOwnership Date.
戴尔电脑DELLbios设置图解

戴尔电脑DELLbios设置图解当电脑无法检测到硬盘,光盘,软驱,声卡,显卡,或者不小心更改了某些BIOS设置又不知道如何修改的时候,可以按照下面的方法清除NVRAM,恢复BIOS设置为默认值,据说这个设置是DELL工程师的万用法宝o(^-^)o1、开机时按F2键进入BIOS设定2、分别按键盘上的<Caps Lock>, <Scroll Lock>, 以及<Num Lock>三个键,使键盘上相应的三个指示灯点亮3、同时按下<Alt> + <E> 组合键。
这时系统将会发出“嘀”的一声,表明NVRAM已被清除4、按<Alt> + <F> 组合键,这时系统将会发出“嘀”的一声,表明恢复BIOS出厂设置。
5、按<Alt> + <B> 组合键,将所做的更改保存,重新启动机器。
然后系统会自动检查电脑的IDE设备,屏幕上会出现Automatic IDE Device Configuration...对硬盘光驱找不到又良好的疗效。
下面我们以一台Dimension4600的电脑为例来看Bios的各项设置这是Driver Configuration下面的子界面:其实没有什么好介绍的,无非就是看看硬盘光驱有没有检测到,没有发现的话可以试试上面的BIOS万能**(da fa),其次还可以将所有设备后面的off选项设置为auto,那么重新启动后系统一样会重新检测IDE设备,也会有Automatic IDE Device Configuration...的提示。
Hard Disk Driver Sequence将USB Device 移到第一项即可实现从U盘启动(USB 光驱好像也是可以的)由于没有接USB启动设备所有提示not install这里可以设置硬盘,光驱,软驱的启动顺序。
当然,更简单的方法就是不需要设置,而在开机的时候按F12键选择需要启动的设备^_^顺便说一下:5是进入Bios6是进行硬盘诊断7是启动到硬盘的隐藏FAT32分区进行硬件诊断(约32M,如果没有删除的话)Memory Information通过这个菜单可以检测系统的物理内存详细情况:Installed System Memory 物理内存大小System Memory Speed 内存的速度System Memory Channel Mode 有两个选项:Dual 表示当前系统内存运行在双通道模式Single 表示当前系统内存运行在单通道模式。
戴尔电脑BIOS设置方法

戴尔电脑B I O S设置方法TTA standardization office【TTA 5AB- TTAK 08- TTA 2C】戴尔电脑BIOS设置方法目前,Dell品牌旗下的笔记本电脑分为4个系列:针对普通家庭用户的Inspiron系列、针对高端个人用户的XPS系列、商用笔记本电脑中,有面向大中型企业的Latitude系列,以及针对小型企业的Vostro系列。
Dimension系列台式机:如何进入BIOS1. 打开或重新启动计算机;2. 看到DELL图标时,立即按"F2"键进入"系统设置(BIOS)";恢复BIOS原始功能在BIOS界面下,分别按"Caps Lock(大写锁定)、Num Lock(数码锁定)和Scroll Lock(滚动锁定)"键,点亮键盘上的"Caps Lock(大写锁定)、Num Lock (数码锁定)和Scroll Lock(滚动锁定)"三个灯,然后再分别按下面的3组组合键:Alt E -- 清除(释放)中断资源,下次启动重新分配。
在按完此组合键之后将能听到一声清脆的"Bi-"声。
Alt F -- 恢复出厂设置。
在按完此组合键之后将能听到一声清脆的"Bi-"声。
Alt B -- 重新启动。
或者在BIOS界面设置 Reset Config Data ------ 相当于以上的"Alt E"。
Latitude系列笔记本:如何进入BIOS1. 打开或重新启动计算机;2. 看到DELL图标时,立即按"F2"键进入"系统设置(BIOS)";恢复BIOS原始功能Latitude C; CP; CS系列系统:重启计算机,按"F2"进入BIOS设置状态,按"Alt F"可恢复CMOS原始设置。
delloptiplex755bios设置(设置BIOSDellOptiPlex755)
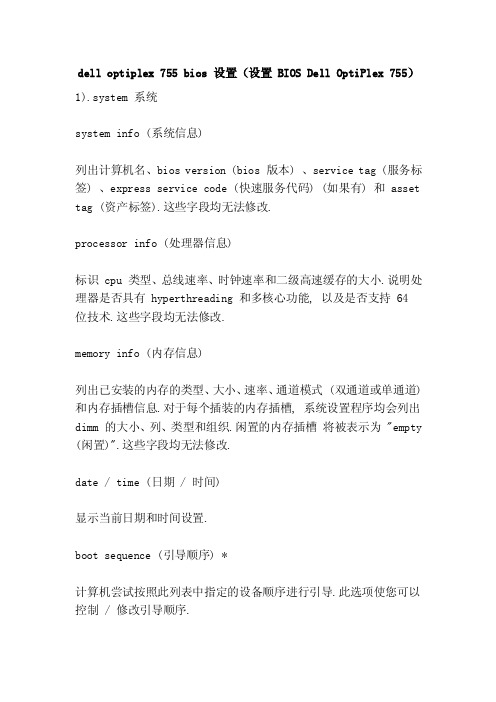
dell optiplex 755 bios 设置(设置 BIOS Dell OptiPlex 755)1).system 系统system info (系统信息)列出计算机名、bios version (bios 版本) 、service tag (服务标签) 、express service code (快速服务代码) (如果有) 和 asset tag (资产标签).这些字段均无法修改.processor info (处理器信息)标识 cpu 类型、总线速率、时钟速率和二级高速缓存的大小.说明处理器是否具有 hyperthreading 和多核心功能, 以及是否支持 64 位技术.这些字段均无法修改.memory info (内存信息)列出已安装的内存的类型、大小、速率、通道模式 (双通道或单通道) 和内存插槽信息.对于每个插装的内存插槽, 系统设置程序均会列出dimm 的大小、列、类型和组织.闲置的内存插槽将被表示为 "empty (闲置)".这些字段均无法修改.date / time (日期 / 时间)显示当前日期和时间设置.boot sequence (引导顺序) *计算机尝试按照此列表中指定的设备顺序进行引导.此选项使您可以控制 / 修改引导顺序.2).drives (驱动器)diskette drive (软盘驱动器) *该选项可以启用或禁用软盘驱动器.选项包括 off (关) 、internal (内部) 、usb 和 read only (只读).注: 如果选中 usb, 请确保 onboard devices (机载设备) 下的 usb 控制器设置选项设置为 he (开).sats 0 (默认为 he [开])标识并启用和禁用连接至系统板上的 sats 连接器的驱动器, 并列出硬盘驱动器的容量 (sats 0).module bay (默认为 he [开])启用或禁用module模块.sats operation (sats 运行状态) (默认为 ahci)超小型计算机三个选项: ahci ata legacysmart reporting (smart 报告) (默认为 off [关])该设置确定在计算机启动期间是否报告集成驱动器错误.3).onboard devices 机载设备integrated no (集成 nothing) (默认为 he [开])启用或禁用集成 nothing 控制器.设置包括 he (开) 、off (关) 或he / (开 pxe pxe, 已启用).当 he / (开 pxe pxe, 已启用) 设置处于激活状态时, 如果无法从网络服务器开始引导例行程序, 则计算机将尝试从引导顺序列表中的下一个设备开始引导.integrated audio (集成音频) (默认为 he [开])启用或禁用机载音频控制器.usb (usb controller 控制器) (默认为 he [开])启用或禁用内部 usb 控制器.no boot (无引导) 将启用控制器但禁用从 usb 设备引导的功能.注: 无论是否设置为 you boot (无引导), 支持 usb usb 的操作系统都会识别软盘驱动器.commander quad usb (usb 后部) (默认为 he [开])启用或禁用计算机背面的上部 usb 端口.commander dual usb (默认为 he [开])启用或禁用计算机主板集成的 usb 端口.front usb (usb 正面) (默认为 he [开])启用或禁用正面的 usb 端口.lpt port mode (lpt 端口模式) (默认为 ps / 2)确定内置并行端口的运行模式.off (关) 将禁用端口.at 将端口配置为与 at 兼容.ps / 2 将端口配置为与 ps / 2 兼容.epp 将端口配置为使用 epp 双向协议.ecp 将端口配置为使用 ecp 双向协议.注: 如果将 lpt port mode (lpt 端口模式) 设置为 ecp, 则选项菜单中将显示 lpt port dma (lpt 端口 dma).lpt port address (lpt 端口地址)确定内置并行端口使用的地址.serial port # 1 (串行端口) (默认为 car [自动])确定串行端口的运行方式.car (自动) (默认设置)Automatically configure the connector to a specific specified value (COM1 or COM3).4).Performance (performance)Multiple CPU Core (multiple CPU cores) (default is On [open])Determines whether the processor handles a core or two cores. On (open) will enable second cores.SpeedStep (default to Off [off])Enable Intel SpeedStep for all supported processors on your computer. This setting automatically changes processor powerloss and frequency.VT, for, Direct, I/O (virtualization technology for direct I/O) (defaults to Off[pass)Specifies whether the virtual machine monitor (VMM) can use other hardware capabilities provided by Direct I/O's Intel virtualization technology.Limit CPUID Value (limit CPUID value) (defaults to Off [off])The maximum value supported by the processor standard CPUID function. The installation of some operating systems cannot be completed if the maximum value of the CPUID function support is greater than 3.HDD Acoustic Mode (voice mode of HDD) (default is Bypass [ignore]) *Quiet (quiet) - the hard drive runs in the quietest settings.Performance (performance) - the hard disk drive runs at maximum speed.Bypass (omitted) - the computer does not detect or change the current sound mode settings.Suggested (recommendation) - the hard disk drive will run at the rate level recommended by the driver manufacturer.Note: the driver may generate greater noise after switching toPerformance (performance) mode, but does not affect its performance.Changing the sound settings does not change the hard drive image.5).Security (safety protection)Admin Password (administrator password) (defaults to Not Set [not set])Displays the current status of the password protection function of the system setup program, and allows you to set and confirm the new administrator password.System Password (system password) (defaults to Not Set [not set])Displays the current status of the computer's system password security protection, and allows you to set and confirm the new system password.SATA 0 Password (SATA 0 password) (defaults to Not Set [not set])Displays the current status of the password protection function of the hard disk drive, and allows you to set and confirm the new hard drive password.Module BaySet up the Module module to connect device protection.Password Changes (password change) (defaults to Unlocked [unlocked])Determine the interaction between the System password (system password) and the Admin password (administrator password). Locked (locked) prevents users from having a valid Admin password (administrator password) to modify the System password (system password). Unlocked (unlocked) so that users with valid System password (system password) can modify the system password.Chassis Intrusion (chassis theft) (default is On-Silent [hint])When you install and enable the switch, this option alerts the user that the host lid has been turned on during the next computer boot. Settings include On (open), On-Silent (no hint) (default setting) and Off (off).Execute Disable (virus protection) (default is On [open])Enabling or disabling virus protected memory protection techniques.Computrace (R) (default is Deactivate [deactivate activation])Enable or disable the BIOS interface for Absolute Software optional Computrace services. This optional monitoring service must be purchased separately.Activate (enabled) permanently enables the BIOS Computrace interface. Disable (disable) can permanently disable the BIOS Computrace interface. Deactivate (deactivate activation) temporarily deactivate the BIOS Computrace interface.Note: once the service is activated, it means that you agree to transfer data from your computer to the Computrace server.6).Power Management (power management)AC Recovery (AC power restoration) (defaults to Off [off])Determine how the computer responds when the AC power is switched off. The Off may command the computer to remain closed when reconnecting the power supply. You must press the front panel power button before you turn on the computer. On (open) can command the computer to reconnect when power is turned on. Last (the last state) can command the computer to restore its power status before it closes.Auto Power On (auto boot) (defaults to Off [off])Set the computer to auto boot. This function will be disabled by Off (off). Everyday (daily) can turn on the computer every day at Auto Power Time (auto boot time). Weekdays (work day) can turn on the computer every day from Monday to Friday, at the time set at Auto Power Time (automatic boot time).Note: this function is invalid if you switch on the computer using a switch on the power panel or a surge protector.Auto Power Time (auto start time)Set the boot time of the computer.The time format is the standard 12 hour system (hour: minute). You can change the start time by pressing the right arrow or left arrow key to increase or decrease the number, or you can type numbers in the date and time fields.Low Power Mode (low power mode) (defaults to Off [off])If the Low Power Mode (low power mode) is selected, the remote wakeup event will not open the computer in the Hibernate (hibernation) or Off (off) state via the onboard network controller.Remote WakeUp (remote wakeup) (default is Off [off])This option enables the computer to open when the network interface controller or the modem that supports the remote wakeup function receives a wake-up signal.On w/ Boot to NIC (open, boot to NIC enabled) enables the computer to try booting from the network before using the bootstrap sequence.Note: normally, computers in suspend mode, sleep mode, or power down state can be turned on remotely. If the Low Power Mode (low power mode) is enabled (in the Power Management power management menu), you can only remotely open the computer inthe Suspend mode.Suspend Mode (suspend mode) (default is S3)Set the suspend mode for the computer. Options for S1 (a pending state, in this state, the computer will run in a low power mode) and S3 (a pending state, in this state the majority of components will reduce the electricity consumption or shut down, but the system memory is still active).7).Maintenanca maintenanceService Tag (service label)Displays the service label for the computer.Load Defaults (load defaults)Restore the system setup options to default settings at factory time.Event Log (event log)Enables you to view the Event Log (event log). The term "R" refers to "Read" (read), and U is "Unread" (unread). The Mark All Entries Read (which reads all the targets as read) adds R to the left of all entries. The Clear Log (clear log) clears the Event Log (event log).8).POST Behavior (POST behavior)Fastboot (quick boot) (default is On [open])After this feature is enabled, the system will shorten the computer startup time by ignoring some compatibility steps. Off does not skip any steps in the computer startup process. On can start the computer more quickly.Numlock Key (digital lock key) (default is On [open])Determine the right numeric key function on the keyboard. The Off can command the right keypad button to be used as the arrow key. On (open) can command the right keypad key to be used as a numeric key.POST Hotkeys (POST hotkey) (defaults to Setup & Boot, Menu [setup program and boot menu]) *Determines whether the signature login screen displays information about the keystroke order needed to enter the Setup (setup program) program or the Quickboot (quick boot) function. The Setup & Boot Menu (setup program and boot menu) will display two messages(F2=Setup, [F2 = settings] and F12=Boot, Menu, [F12 = boot menu). The Setup (setup program) displays only the set program information (F2=Setup [F2 = settings). The Boot Menu (boot menu) displays only Quickboot (quick boot) information (F12=Boot, Menu, [F12 = boot menu). None (no) does not display any information.MEBx Hotkeys (MEBx hotkey) *Specifies whether the signature logon screen displays information indicating the order of keystrokes needed to access the MEBx setup program. The default is on (open).Keyboard Errors (keyboard error) (default is Report [report])When set to Report (reported) (enabled) and detected during POST,BIOS displays error messages and prompts you to press <F1> to continue or press <F2> to enter the system setup program.When set to Do, Not, Report (not reported) (disabled) and error detected during POST, BIOS displays error messages and continues to boot the computer.9).ImageServer (video server)It is the 755 card AMT technology, active management technology that is similar to INTEL, it can be specified for the ImageServer network location, and enable the On-demand Desktop Streaming (ODDS) (on-demand desktop software flow settings).。
戴尔OPTIPLEX-380商务台式机BIOS设置中文说明

此选项在默认设置下已禁用。
C States Control(C状态控制)
此选项启用或禁用其他处理器的睡眠状态。操作系统在空闲状态时可选择使用其他省电模式。
此选项在默认设置下已禁用。
Limit CPUID Value(限制CPUID值)此字段限定处理器标准CPUID功能支持的最大值。如果CPUID功能支持的最大值大于3,则无法完成某些操作系统的安装。
Onboard or USB CD-ROM Drive(机载或USB CD-ROM驱动器)
OnboardNetwork Controller机载网络控制器机载网络控制器)
USB Device(USB设备)
Drives
(驱动器)
Diskettedrive(软盘驱动器)此字段确定BIOS如何配置软盘驱动器。无论配置如何,支持USB的操作系统都会识别USB软盘驱动器。
Enablethe new Password.(启用新密码)
Confirm new Password.(确认新密码)
System Password(系统密码)显示系统密码安全保护功能的当前状态并允许指定和验证新的系统密码。
此选项默认未设置。
Password Changes(密码更改)允许或禁止用户在未获取管理密码的情况下更改系统密码。此选项在默认设置下已启用。
EnableCPUIDLimi
此选项在默认设置下已禁用。
HDD Acoustic Mode(HDD声音模式)此选项允许您根据个人喜好优化硬盘驱动器的性能和声学噪声级别。
Bypass(绕过)(默认设置)-什么也不做。(较早的驱动器需要设置此模式)
Quiet(安静)-驱动器变慢,但更安静。
戴尔bios设置图解教程

戴尔bios设置图解教程平时我们在使用计算机的时候一般很少会接触到BIOS,很多人都是在安装操作系统时才接触到的,所以很多人还不太清楚bios的设置,下面就由小编给你们说说戴尔bios设置图解教程吧!戴尔bios设置图解教程步骤:同样在开机进入到标志画面时,马上按下键盘左上角的F2键,就能进入到BIOS主界面,一般在标志画面出现时,在屏幕的右下方都会有进入BIOS按键提示,如果不记得或不知道,看一看就可以了。
刚进入BIOS时,默认的是Main这一项,这里主要是设置时间,和一些硬件的显示,我们不要动这里面的选项。
我们要通过左右方向键,选择Boot这一项,Boot为“启动”的意思,在这里就是要设置U盘或光盘启动的地方。
如果要从U盘启动,选择USB Storage Device,用上下方向键移动到这一项,然后用+/-键,把这一项移动到最上面,再按Enter键确定。
如果要从光盘启动,选择CD/DVD/CD-RW Drive,用上下方向键移动到这一项,然后用+/-键,把这一项移动到最上面,再按Enter 键确定。
如果装完系统后,要恢复原来硬盘启动,就要选择Hard Drive,同样用上下方向键移动到这一项,然后用+/-键,把这一项移动到最上面,再按Enter键确定。
移到最上面的原因是,哪一项在最上面,哪一项就为第一启动,移到Boot Priority Order这一项下面就可以了,这个是标题,中文意思是“启动顺序设置”。
设置完以后,按F10键进行保存并退出,重启电脑就可以从U盘或光盘启动了,如果在PE中看不到电脑中的硬盘,那就是硬盘模式设置不正确,那就要重新进入BIOS,对硬盘进行模式设置,下面对硬盘模式设置方法进行讲解说明。
设置硬盘模式,进入到BIOS主界面后,把光标移到Advanced这一项上,Advanced为高级设置意思。
进入到Advanced这一项后,选择SATA Uperation这项,其意思是“SATA工作模式”,然后按Enter键,进入其子项。