自动施肥机技术说明书
智能水肥一体机 JXSF- 使用说明书

智能水肥一体机使用说明书JXSF-****Ver1.0第1章产品简介1.1产品概述进入世纪以来,随着科技进步和时代的发展,传统的施肥、灌溉方式和设备已经不能满足现在农业或园林发展的要求;我司根据几年多地区实地考察,自主研发设计了一套现代智慧灌溉设备——“智能水肥一体机”。
我司研发的这套智能设备,是通过借助水路压力系统,将可溶性固体或液体肥料加入肥料罐,通过施肥机自动配比然后均匀、定时、定量随水施。
设备适用于温室大棚、果园、蔬菜以及园林大田园艺等领域。
1.2功能特点●功能强大,即可用于固态肥也可用于液态肥●智能化电脑控制,可根据作物不同生长期设定灌溉施肥时间、灌溉方式等,定时定量保证肥料留存于作物主要根层,精准施肥避免肥料浪费●搅拌功能,方便肥料均匀溶解●注肥压力大可适应于滴灌、微喷、喷灌、卷盘、指针喷灌机等不同灌溉形式●控制面板上有按键的说明,简单易懂1一站式物联网供应平台1.3产品优势●采用铝合金框架结构,坚固耐用、结构简单,使用方便●电器件均使用工业一线品牌,管道使用化工级耐高压、耐腐蚀管道●快速接头管路连接,安装快速简便●节水、节肥、增产、环保、省人工、操作简单、智能化程度高1.4主机参数吸肥接口DN15混肥搅拌桶加水接口DN25单通道重量34kg三通道重量40kg1.5主机显示参数2屏幕亮度250nit色彩65K色1.6水泵电机参数型号功率(KW)电压(V)转速(r/min)BJZ-150T1kW38029001.7产品功能JXSF-00(单路输出)(1)工业级304不锈钢水泵(非普通家用泵可比)(2)注肥流量0-250L(3)注肥最大压力5.5公斤(4)采用塑料转子流量计(5)电压表实时显示电压数值(6)7寸触控屏输出)家用泵可比)(2)注肥流量0-250L(3)注肥最大压力5.5公斤(4)采用塑料转子流量计+电磁阀,定时定量加肥(5)电压表实时显示电压数值(6)**寸触控屏3一站式物联网供应平台第2章硬件连接2.1产品清单安装设备前请检查设备清单:安装配件若干保修卡/合格证1份2.2产品外观JXSF-00系列目前有两款智能水肥机,根据使用环境以及灌溉的面积设计,均可使用220V或380V的供电,并且灌溉面积的大小,取决于水泵的功率。
自走式多功能施肥机技术参数

农用机械
1
自走式多功能施肥机
2 自走式多功能施肥机详情ຫໍສະໝຸດ 3 自走式多功能施肥机技术参数
目录
CONTENTS
自走式多功能施肥机
自走式多功能施肥机适用于所有旱田农作物垄间作业。选配正规企业生产的变速箱,汽油机为配 套动力。易启动,轻便耐用。整体板设计,一次成型,坚固耐用。提升农民们工作效率。
自走式多功能施肥机详情
1、自走式多功能施肥机是集开沟、施肥、搅拌、回填同事作业的多功能施肥机,可一次性完成 商品有机肥和化肥的机械化施肥作业,施肥宽度和深度的变换可通过换装开沟机搅拌零部件实现。 2、履带式行走,可进行原地360度转向。 3、自走式多功能施肥机体积小,重心低,操作灵便,可原地转向,适用于葡萄、果树、枸杞、 蓝莓等经济作物的开沟施肥作业。
轮子尺寸 :260mm 包装尺寸 994*530*420mm 展开尺寸(长宽高) 1810*530*1000mm 转向 :方向盘式 毛重96KG 覆盖功能 有 后排功能 有
汇报完毕,感谢观 看
山东唯信农业
自走式多功能施肥机技术参数
型号:WX-N/ONGYE-08 外形尺寸 长宽高249*100*75 开沟宽度 30厘米 配套动力 28马力柴油机 施肥深度 20-30厘米 开沟深度 20-35厘米
自走式多功能施肥机技术参数
旋耕幅宽 90厘米(可定制) 把手模式 可进行收缩 发动机功率 12.55kw/15.04kw 作业速度 300-1200米/小时 轮子材料 复合橡胶
植物肥料播种机说明书
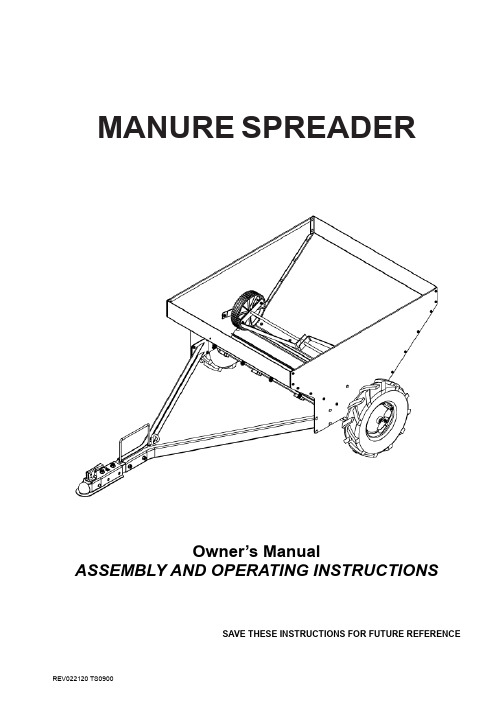
MANURE SPREADEROwner’s ManualASSEMBLY AND OPERATING INSTRUCTIONSSAVE THESE INSTRUCTIONS FOR FUTURE REFERENCETable of ContentsGeneral Warnings and Rules (3)Hazard Signal Word Definitions (4)Controls and Features Identification (5)Assembly Instructions.......................................................................6, 7 Operating Instructions.. (8)Maintenance and Storage (9)Parts Drawing and Parts List......................................................10, 11, 12 Limited Warranty. (13)GENERAL WARNINGSREAD and UNDERSTAND this manual completely before using the Manure Spreader.Operators must read and understand all safety and warning information, operating instructions, maintenance and storage instructions before operating this equipment. Failure to properly operate and maintain the manure spreader could result in serious injury to the operator or bystanders.Operation Warnings●Never carry passengers.●Do not sit or stand on the manure spreader.●Do not allow children to play on, stand upon or climb on the manure spreader.●Always inspect the manure spreader before use for missing or loose hardware.●Replace or repair damaged or worn parts immediately.●Always check and tighten hardware and assembled parts before operation.●Avoid large holes and ditches when transporting loads.●Be careful when operating on steep grades (hills) as the manure spreader may tip over.●Do not pull close to creeks, ditches or public highways.●Do not use the manure spreader in windy conditions.●Always use caution when loading and unloading the manure spreader.●Only tow the manure spreader using a lawn tractor, ATV or golf cart at a speed of no greater than 5mph for spreading.Crush and Cut Hazards●Always keep hands and feet clear from moving parts while operating the manure spreader.●Always keep the work area clean and clear of debris.●Always wear safety gear, eye protection, gloves and work boots while operating the manurespreader.WARNINGThe warnings, cautions, and instructions outlined in this instruction manual cannot cover all possible conditions or situations that may occur. It must be understood by the operator that common sense and caution are factors which cannot be built into this product and must be supplied by the operator.PROP 65 WARNINGThis product can expose you to chemicals including lead and lead compounds which are known to the State of California to cause cancer and birth defects or other reproductive harm. For more information, go to Assembly Is RequiredThis product requires assembly before use. See “Assembly” section for instructions. INSPECT ALL COMPONENTS closely upon receipt to make sure no components are missing or damaged.Hazard Signal Word DefinitionsDANGERWARNINGCAUTIONwithout CAUTIONpotentially hazardousif not avoided, may result in property damage.Read this owner’s manual before operating the equipment. Familiarize yourself with the location and function of all the controls and features. Please save this manual for future reference.1) Hopper 2) 2” Coupler 3) Spreading Drum4) Spreading Engagement Lever 5) Agitator 6) Relief PanelCAUTIONRead and follow all instructions for assembly and operation. Failure to properly assemble this equipment could result in serious injury to the user or bystanders and/or cause equipment damage .123456MANURE SPREADER COMPONENT PARTS AND ASSEMBLYBefore beginning to assemble the manure spreader, take all parts out of the shipping crate and inspect components to ensure there are no missing pieces. Carefully follow assembly steps 1 through 2.TOOLS REQUIRED ∙ 13mm Wrench∙ 17mm Wrenches (2 Each)STEP 1: Attach Tow BarAttach tow bar (#15) to the side plate using M8x16 carriage bolt (#20) and M8 nylon lock nut (#11).STEP 2: Attach Coupler AssemblyAttach coupler assembly to the tow bar using M10x75 Hex Bolt (#12), Ø10 flat washer (#13) and M10 nylon lock nut (#14).ALTERNATIVE CONNECTION FOR THE TOW BAR.Unscrew the M12x70 hex bolt (#3), Ø12 flat washer (#4) and M12 nylon lock nut (#5), then remove coupler (#1) and bushing (#2). Pull out the hitch pin (#8) and the R pin (#10) and insert them into the front hole.1) Attach the manure spreader to a vehicle using either the 2” ball coupler or the clevis hitch. 2) Rotate the agitator until the rubber wheels are resting on the manure spreader drum. 3) Fill the manure spreader with manure.4) Drive the manure spreader to the desired spreading location.5) Flip the spreading engagement lever to engage the spreading drum on either both wheels or one wheel.- Engage only one wheel when making a large number of turns while spreading. Engage the wheel opposite of the way you will be turning. For example, if you are turning left, engage the right wheel. – Engage both wheels for heavy loads of manure and straight-line spreading. 6) Spread the manure while maintaining safe driving speeds.Adjusting the manure spreader discharge rate and pattern.- The spreader discharges manure from between the drum and discharge plate. The spring force ofthe discharge plate against the drum breaks up the manure as the spreader discharges the manure.- Using the adjustment plate to change the size of the holes in the discharge plate allows for furtheradjustment of the manure spread pattern and ability to control the discharge rate.Loosening or tightening the bolts enclosed by the small compression springs on the discharge plate adjusts the manure spreader discharge rate.- Tightening the bolts compresses the springs making it more difficult for manure to pass betweenthe drum and discharge plate. Tighten the bolts to break up the manure into fine pieces before its’ discharged.o Overtightening the bolts may result in manure being unable to discharge.o Suggestion: Tighten the compression springs bolts as far as possible while still allowingmanure to pass, then change the discharge opening by adjusting the discharge adjustment plate.- Loosen the bolts to allow larger pieces of manure to discharge from the spreader.The manure spreader has an adjustment plate which changes the discharge hole sizes in the discharge SPRINGBOLT Lever EngagedLever DisengagedWARNINGImproper maintenance and storage of the manure spreader may void the warranty.MAINTENANCE∙ After each use, carefully clean material out of the hopper.∙ Rinse and dry the inside and outside of the manure spreader after each use. ∙ Prior to each use, inspect and verify that all hardware is tight.∙ Before initial use, add grease to the two grease zerks on each side of the wheels. ∙ Check and periodically add grease to the wheels.∙ After every use, spray out the hopper and the spreading drum. Cleaning the spreader will keep debris and manure from clogging the spreading drum and damaging the spreader. ∙ Check the rubber guard after every use and replace as needed.IMPORTANT:When replacing parts, be sure to only use parts that meet the manufacturer’s specifications. Replacement parts that do not meet the manufacturer’s specifications may result in safety hazards and/ or poor machine operation, and may void the warranty.STORAGE∙ Never allow material to remain in the hopper for extended periods of time. ∙ Before storing, make sure the manure spreader is clean and dry.∙ Store indoors or in a protected area during any severe weather and during winter months. ∙ Store the unit upright to allow any water to drain.Ref# Drawing No. Description Qty1 Z103 2in Coupler 12 DCP1203-00001 Bushing 13 9101-12070-DX8.8 M12x70 Hex Bolt 24 9301-12000-DX Ø12 Flat Washer 65 9206-12000-DX M12 Nylon Lock Nut 66 TS0900-00012 Handle 17 9201-08000-DX M8 Nut 28 N870-00011-DX Hitch Pin 19 TS0900-04000 Coupler Assembly 110 LSP25-00005-DX R Pin 111 9206-08000-DX M8 Nylon Lock Nut 1212 9101-10075-DX8.8 M10x75 Hex Bolt 213 9301-10000-DX Ø10 Flat Washer 414 9206-10000-DX M10 Nylon Lock Nut 215 TS0900-03000 Tow Bar 216 TS0900-00001 Rear Plate 117 TS0900-01000 Right Side Plate 118 9114-06012-DX M6x12 Carriage Bolt 2619 9206-06000-DX M6 Nylon Lock Nut 4920 9114-08016-DX M8x16 Carriage Bolt 821 9101-08020-DX8.8 M8x20 Hex Bolt 622 TS0900-02000 Left Side Plate 123 TS0900-07000 Support Plate 124 TS0900-06000 Discharge Plate 125 TS0900-00004 Adjustment Plate 126 9114-06016-DX M6x16 Carriage Bolt 1427 9301-08000-DX Ø8 Flat Washer 428 9302-06000-DX Ø6 Large Flat Washer 2029 TS0900-00018-DX Spring 530 9101-06040-DX8.8 M6x40 Hex Bolt 5Ref# Drawing No. Description Qty31 TS0900-00013 Pressing Plate 132 9306-06000-DX Ø6 Lock Washer 433 9301-06000-DX Ø6 Flat Washer 1034 NS2600-00015 Threaded Knob 435 9101-12040-DX8.8 M12x40 Hex Bolt 436 TS0900-00014-DX Sleeve 237 TS0900-00007 Fixed Plate 238 9199-08020-DX M8x20 Large Flat Head Screw with CrossGroove239 9306-08000-DX Ø8 Lock Washer 640 9302-08000-DX Ø8 Large Flat Washer 241 9101-06055-DX8.8 M6x55 Hex Bolt 642 TS0900-00009 Paddle Wheel 243 TS0900-00006 Shifter Fork 244 TS0900-00008 Stirring Shaft 145 TS0900-00010 Stirring Shaft Bushing 146 TS0900-00017 Wheel 247 TS0900-00015-DX Limit Hexagon Steel 248 9306-10000-DX Ø10 Lock Washer 249 9101-10045-DX8.8 M12x45 Hex Bolt 250 TS0900-00020-DX Sleeve 451 UCP204 Rolling Bearing 252 TS0900-00003 Drum Fixing Ring 253 TS0900-05000 Axle Assembly 154 TS0900-00016 Aluminum Alloy Drum 155 TS0900-00019-DX Clutch Spring 256 TS0900-00005-DX Clamping Piece 457 9199-06016-DX M6x16 Large Flat Head Screw with CrossGroove558 TS0900-00002 Front Side Plate 159 TS0900-00011 Discharge Rubber Pad 1WarrantyFor one year from the date of purchase YTL International will replace or repair the manure spreader for the original purchaser. The warranty will not apply to any unit which was not assembled correctly, misused, overloaded or which has been used or operated contrary to instructions, or which has been repaired or altered by anyone other than an authorized representative.Warranty ExclusionsThis warranty does not cover cosmetic defects such as paint and decals, or wear items such as tires. This warranty will not cover failures or problems due to acts of God, or events or forces beyond the control of the manufacturer.Normal Wear ExclusionThe manure spreader needs periodic service to perform well. This warranty does not cover repair when normal use has exhausted the life of a part or the equipment as a whole.Installation, Use and Maintenance ExclusionThis warranty will not apply to parts and/or labor if the manure spreader has been misused, neglected, involved in an accident, abused, loaded beyond its limits, modified or assembled incorrectly. Normal maintenance is not covered under this warranty.Limits of Implied Warranty and Consequential Damage ExclusionYTL International disclaims any obligation to cover any loss of time, use of this product, freight, or any incidental or consequential claim by anyone from using this manure spreader. THIS WARRANTY IS IN LIEU OF ALL OTHER WARRANTIES, EXPRESS OR IMPLIED, INCLUDING WARRANTIES OF MERCHANTABILITY OR FITNESS FOR A PARTICULAR PURPOSE.An exchange unit will be subject to the original warranty. The length of the warranty governing the exchanged unit will have the same purchase date of the original unit. This warranty gives you certain legal rights which may vary from state to state. Your state may also have other rights you may be entitled to that are not listed within this warranty.Contact InformationYTL International Inc.17517 Fabrica Way Suite HCerritos, CA 90703Phone: (888) 723-6534Phone: (562) 404-8016Email:**************************Website: 。
自动化施肥系统

自动化施肥系统一、引言自动化施肥系统是一种通过计算机控制和监测的系统,用于实现农作物的精确施肥。
该系统利用先进的传感器技术和控制算法,能够根据作物的需求和土壤的状况,在适当的时间和位置上施肥,从而提高农作物的产量和质量,减少农药和肥料的使用量,降低环境污染。
二、系统组成1. 传感器部份:自动化施肥系统通过多种传感器来监测土壤的湿度、温度、养分含量等参数。
这些传感器将实时采集到的数据传输给控制中心,以便进行分析和决策。
2. 控制中心:控制中心是系统的核心部份,它接收传感器传来的数据,并根据预设的施肥策略进行计算和控制。
控制中心可以根据作物的需求和土壤的状况,自动调整施肥量和施肥时间,以达到最佳的施肥效果。
3. 施肥装置:施肥装置根据控制中心的指令,将肥料精确地投放到作物根部或者根际。
施肥装置可以是喷洒式、滴灌式或者喷雾式,根据具体的作物和土壤条件选择合适的方式。
4. 数据存储和分析:自动化施肥系统还可以将采集到的数据进行存储和分析,以便进行后续的决策和优化。
通过对历史数据的分析,可以了解作物的生长趋势和施肥效果,从而进一步优化施肥策略。
三、系统工作原理1. 数据采集:传感器实时采集土壤的湿度、温度、养分含量等参数,并将数据传输给控制中心。
2. 数据分析:控制中心根据接收到的数据,利用预设的施肥策略进行分析和计算。
根据作物的需求和土壤的状况,确定合适的施肥量和施肥时间。
3. 施肥控制:控制中心将计算得到的施肥量和施肥时间发送给施肥装置。
施肥装置根据指令,将肥料投放到作物的根部或者根际。
4. 数据存储和分析:系统将采集到的数据进行存储和分析,以便后续的决策和优化。
通过对历史数据的分析,可以了解作物的生长趋势和施肥效果,进一步优化施肥策略。
四、系统优势1. 精确施肥:自动化施肥系统能够根据作物的需求和土壤的状况,精确计算施肥量和施肥时间,避免了传统施肥方法中的浪费和过量施肥问题。
2. 节约资源:通过精确施肥,自动化施肥系统可以减少肥料和农药的使用量,降低农业生产成本,节约资源。
AMAZONE ZG-B 5500 6600 撒肥机操作说明书

说明书azZG-B 5500 Special / Super / Drive ZG-B 8200Special / Super / Drive撒肥机MG5614BAG0003.24 08.23 德国印刷首次调试前阅读并遵守本操作说明书!妥善保存以备将来使用!zh2 ZG- B BAG0003.24 08.23阅读和遵守使用说明书是必要且实用的;从其他人那里听说不足以认识到机器的好处,从而购买并相信它能完成所有工作。
出现问题的人员不仅可能会伤害到自己,还可能犯下错误,致使机器出现故障。
为了达到出色的效果,必须深入领会,熟悉掌握机器上的每个装置和操作方法。
只有这样,才能对机器和自己都感到满意。
这就是本使用说明书的目的。
莱比锡Plagwitz 1872 年。
识别数据ZG- B BAG0003.24 08.23 3识别数据生产商:AMAZONEN-WERKE H. DREYER GmbH & Co. KG机器识别号:型号:ZG-B Special, ZG-B Super, ZG-B Drive允许的系统压力 MPa : 最大 1 MPA 生产年份: 生产工厂: 基本重量 kg : 允许的总重量 kg :最大载重量 kg :生产商地址AMAZONEN-WERKE H. DREYER GmbH & Co. KG 邮政信箱 51D-49202 电话: 电子信箱:Hasbergen + 49 (0) 5405 50 1-0 ******************备件订购备件清单请访问备件门户网站 www.amazone.de 。
如需订购,请联系您的 AMAZONE 经销商操作说明书形式 文件编号: MG5614 创建日期:08.23版权所有 AMAZONEN-WERKE H. DREYER GmbH & Co. KG ,2023保留一切权利。
复制以及摘要需经 AMAZONEN-WERKE H. DREYER GmbH & Co. KG 公司批准。
自动化施肥控制系统V1.0开发及操作说明手册

自动化施肥控制系统V1.0 技术开发及操作说明手册一、概述自动化施肥控制系统分为地表水过滤施肥系统及地下水过滤施肥系统。
地表过滤施肥系统采用自动化控制,系统由电动冲肥阀、吸肥阀、过滤施肥控制器及液位开关组成。
施肥及过滤自动化控制逻辑:事先远程设置反冲洗及施肥控制的轮灌组施肥开始和结束的时间,同时设置好过滤器反冲洗控制的压差和时间间隔,一个施肥池只负责一个轮灌组的施肥。
泵站管理人员预先将两个轮灌组的肥料分别倒入施肥池1和施肥池2中,灌溉开始后到达施肥启动时间时冲肥阀自动打开冲肥,当施肥池液位到达上限时,吸阀打开,边冲肥边吸肥,控制电动球阀的开度可以控制冲水及吸肥量。
当吸肥阀打开时,过滤器控制器闭锁反冲洗,防治肥料被反冲走。
当过滤器压差到达设定上限时,控制器自动关闭吸肥阀,过滤器开始反冲洗,当反冲洗结束后,吸肥阀再打开。
施肥池的液位时由液位计来控制的,当肥液位高于上限液位时冲肥阀关闭,低于下位时冲肥阀打开。
液位开关起到液位保护作用,液位开关的安装位置高于液位计设定的上限水位,当液位开关动作时可以控制冲肥球阀关闭。
地下水过滤施肥系统采用自动化控制,系统由电动冲肥阀、潜水施肥泵、过滤施肥控制器及液位开关组成。
施肥及过滤自动化控制逻辑:事先远程设置反冲洗及施肥控制的轮灌组施肥开始和结束的时间,同时设置好过滤器反冲洗控制的压差和时间间隔,一个施肥池只负责一个轮灌组的施肥。
泵站管理人员预先将两个轮灌组的肥料分别倒入施肥池1和施肥池2中,灌溉开始后到达施肥启动时间时冲肥阀自动打开冲肥,当施肥池液位到达上限时,施肥泵打开,边冲肥边注肥,控制电动球阀的开度可以控制冲水量。
当施肥泵打开时,过滤器控制器闭锁反冲洗,防治肥料被反冲走。
当过滤器压差到达设定上限时,控制器自动关闭施肥泵,过滤器开始反冲洗,当反冲洗结束后,施肥泵再打开。
液位开关起到液位保护作用,液位开关的安装位置高于液位计设定的上限水位,当液位开关动作时可以控制冲肥球阀关闭。
佳禾智能施肥控制器说明书
佳禾智能施肥控制器说明书一、产品概述佳禾智能施肥控制器是一款专为农业领域设计的智能化施肥设备,通过智能控制和传感技术,能够实现对作物施肥的精确控制和自动化管理,提高作物的产量和品质,同时减少施肥成本和环境污染。
该控制器可应用于田间作物、果园和蔬菜大棚等农业环境,为农民提供更便捷、高效的施肥解决方案。
二、产品特点1.智能化控制:佳禾智能施肥控制器采用先进的智能控制算法,通过对农田土壤的环境参数进行实时监测和分析,根据作物的生长需求,精确控制施肥量和施肥时间,实现智能化施肥管理。
2.精准施肥:该控制器具有高精度的施肥量控制能力,可实现对不同作物和生长阶段的个性化施肥。
通过根据作物需求调整肥料浓度和施肥时间,最大限度地满足作物的营养需求,提高作物的产量和品质。
3.自动化管理:佳禾智能施肥控制器支持远程监控和控制功能,用户可以通过手机或电脑APP随时随地对施肥过程进行实时监测和调整。
同时,该控制器还具有自动报警和故障诊断功能,能够及时发现施肥设备的异常情况并进行报警提示,提高施肥的安全性和稳定性。
4.节能环保:该控制器能够根据施肥过程中作物的实时需求调整施肥量和施肥时间,减少肥料的浪费和对土壤和环境的污染。
同时,通过减少施肥设备的能耗和提高施肥效率,降低了农民的施肥成本,提高了农业的经济效益。
三、使用方法1.安装:将佳禾智能施肥控制器安装在农田、果园或蔬菜大棚等施肥场所。
按照说明书中的安装步骤进行安装,确保设备安装牢固、稳定。
2.连接传感器:将土壤湿度传感器、温度传感器等传感器与控制器进行连接。
确保传感器的连接正确并稳定。
3.调节参数:根据作物的需求和土壤的基本参数,设置施肥控制器的施肥量控制范围、施肥时间等参数。
确保参数的设置正确和合理。
4.启动控制:将施肥控制器的电源接通,开启施肥控制器的电源开关,启动控制器。
根据显示屏上的提示,进行初始化设置和校准。
6.故障处理:如果在使用过程中出现故障或异常情况,及时进行故障诊断并采取相应的处理措施。
SF-16G智能精准施肥机使用说明书
SF-16G智能水肥一体化施肥机运用解释书河北农哈哈机械团体有限公司尊重的用户:迎接您选购我公司研制临盆的智能水肥一体化施肥机.为了您能安然操纵,更好的施展施肥机效能,合理施肥.高效施肥,延伸运用寿命,运用前请具体浏览产品《运用解释书》,并按照《运用解释书》操纵运用.本产品为河北省科技厅“现代农业科技攻关项目”专项资金支撑项目.产品专利号ZL.2015.2.0668184.9.一.产品构造和机能特色1.产品设计道理:采取变频螺旋定量计量装配,运用水动能和水力切割道理将所施肥料刹时消融,同时运用加压泵的自吸功效经由过程调节液态肥进口阀门将固态肥.液态肥.可施农药精准定量加注到管道中去,实现水肥.药一体化功效.2.装备的重要特色:(1)采取一体化构造设计,体积小.构造紧凑,可移动,便于多井运用.(2)功效壮大,即可用于固态肥也可用于液态肥,并且还可根据情形进行施药.(3)矮化设计,便利肥料装入;(4)半竖直大料斗设计,漏料完全.可一次装入200kg化肥;(5)快接头管路衔接,装配快速轻便;(6)智能化电脑掌握,可根据作物不合发展期主动设定浇灌水量.浇灌方法等,包管肥料重要留存于作物重要根层,防止因施肥时光过早或过晚而造成肥料糟蹋.(7)经由过程智能化电脑掌握,施肥精度精准定量,误差±0.5%.(8)重要部件采取不锈钢材料,防腐耐用,运用寿命10年以上.(9)运用规模广,可普遍运用于管灌.喷灌.滴灌等不合浇灌型式.3.重要机能指标:4.产品构造图:二.现场装配示意图施肥机应装配在机井首部,过滤器后面,进水管在上游,注肥管鄙人流,液肥罐和施肥机尽量接近首部,以免阻力增大,造成施肥效力降低等故障产生.三.装备运用前的装配1.施肥机安顿运用人力或动力将施肥机运抵田间机井旁,距离浇灌体系机井首部较近.且比较平展的地方,稳固放置.2.装配进水衔接收将快接头的一端与主管路的进水阀门段衔接,另一端与施肥机的进水口衔接,并将快接头的拉环向管路中间线偏向拉紧,如图.3.装配注肥管将注肥管一端与主管路三通阀衔接,另一端与施肥机的出肥口衔接,并将快接头的拉环向管路中间线偏向拉紧,如图.4.液态肥.加药管衔接将加药管.液态肥快速接头与施肥机的加液口衔接,并将快接头的拉环向管路中间线偏向拉紧,另一端拔出液态肥储罐或农药桶内,如图5.电源及接地线装配将电源插头拔出施肥机电源接口,另一端与380V电源开关接通,在施肥机标有接地标记的地方,将接地棒与施肥机机体.接地扁线衔接稳固,同时将接地棒拔出地下,灌注盐水包管接地优越.如下图:6.施肥机管路装配完全图四.装备试运行与参数设置在施肥管路.施肥机供电电源.装备接地线装配完毕落后交运行参数设置1.检讨开关状况,通电进入开机换面扭转施肥机面板上的红色急停旋钮,使旋钮处于接通状况,打开电源开关,装备处于通电状况,显示开机画面.2.参数设置在触摸屏上切换画面到参数设置状况,根据现实的浇灌亩数.浇灌时光和本次估计施肥量对施肥前浇灌清水.施肥时光.施肥量.后清水时光进行设置,每项参数设置好后,点击“确认”键完成设置.3.施肥方法选择点击肥料类型图框的指向箭头,鄙人拉菜单中选择肥料类别,完成所有设置后,点击“运行数据”框返回运行数据画面.装入肥料,点击“启动”按钮,进入运行状况,装备在施肥“前清水”时光停止落后入施肥状况.4.施肥信息锁定“体系信息”必须在工程师指点下进行调剂,无治理员许可,操纵人员无法进入.5.液态肥或农药施用施用液态肥或农药,药调剂“固液调节阀”和“流量调节阀”使液肥.农药流量达到实行请求.6.初次施肥操纵初次施肥应扭转主管道加肥口处的三通阀,将加肥泵内的气体全体排出后,方可切换到主管道上.五.罕有故障及处理方法1.溶料桶溢水肥料施不进去(1)检讨扭转主管路上的注肥三通阀,看施肥泵出水情形,排出泵及管路中的气体,然后敏捷转换阀位到注肥状况.(2)检讨肥料下料量设置是否合理.溶料桶是否有脏物堵塞,液位计显示是否准确.(3)经由过程过滤器视窗检讨过滤器的堵塞情形,实时清算过滤器.2.液态肥吸入不进去(1)检讨调节液态肥调节阀门,同时调节液态肥流量调节阀和液肥进口衔接收是否衔接坚固,是否有漏气的地方.(2)调剂液肥储罐的地位,尽量将液肥储罐接近施肥机,看液肥管路是否有堵塞情形.(3)调节主管道长进肥三通阀,排出注肥管道内的气体,然后转换三通阀地位到注肥状况.3.肥料不下料或下料电机故障按下反转按钮,检讨下料电机的正反转是否适合.肥料是否有大的结块.4.液位显示故障卸下液位计.检讨液位计浮球装配是否有问题.六.随机配件及文件1.带快接头注肥管两条(尺度设置装备摆设3m),液肥.加药快接头一个.2.电源线(附带电缆5m).3.智能精准施肥机运用解释书一份.4.产品及格证一份.。