AutomationDesk – Key Features for successful ECU Testing (PDF)
AutomationDesk基础培训教程

ECU
恒润科技公司
29
② 使用自动操作块 II
编辑自动操作块属性
右击块,从弹出上下文菜单选择View Properties
恒润科技公司
30
② 使用自动操作块 III
给自动操作块增加注释
菜单栏Sequence Builder-Block Note-Add 单击工具栏图标
• 生成结果 • 生成报告 • 压缩测试和结果
8
② 启动AutomationDesk
三种启动方法:
方式一:开始-所有程序-dSPACE Tools- AutomationDesk-AutomationDesk
方式二:双击AutomationDesk的桌面图标
方式三:从运行框中输入“AutomationDesk”
一个自动操作块的变量可以通过直接赋值或参 考其他变量来赋值
直接设置的值只属于一个块,一个参考的值可 以在一个工程里被多次使用
恒润科技公司
21
3. 管理工程
① 工程要素介绍 ② 工程管理器的使用 ③ 使用工程档案
恒润科技公司
22
① 工程要素介绍
工程要素包括:
结构元素(文件夹folders) 自动测试序列(序列
Sequences) 工程特有的数据对象
有关数据对象的详细信息 包含特性页的注释条目
Automation Studio使用手册
Fig. 选择要安装的部件
如果要运行PVI,既使用户现在还没有登陆到计算机上,也需选பைடு நூலகம்"PVI manager as service" 选项。 按照安装向导的步骤重启计算机。
Automation Studio™ 基础 TM0
安装
2.1.3 安装 Automation Studio™ 通过菜单上相应的选项来安装Automation Studio™。安装向导将会引导以下步 骤。 在下面窗体中选择需要安装的部件。
Automation Studio™ 用户界面包括以下内容: • 主菜单 B&R Automation Studio™的主菜单可进入所有功能。 • 工具条 工具条中的按纽可快速运行多个命令和功能。 • 工作区 打开项目时在这里显示,项目窗口可调节到最大或合适的窗口大小。 • 信息窗体 信息窗体位于编程窗体的下方,显示编译信息,调试信息等。此外,还显 示搜索功能 "Find in Files"的结果。 • 状态条 状态条位于整个窗体的下方,显示以下信息: • 关于菜单命令或工具条图标的简短帮助 • 编译步骤的简短信息 • 编程设备和目标系统的在线连接状态 • 当前活动窗体的状态数据
10
Automation Studio™ 基础 TM0
运行 Automation Studio™
3 运行 AUTOMATION STUDIO™ 安装完成在开始菜单中创建了一个 Automation Studio 运行键,通过这个运行键 打开 Automation Studio™ 。
Fig. Automation Studio™用户界面
Fig. AS安装路径结构
文 件 夹
..As\gnuinst ..As\Library ..As\System Help GNU 编译器
霍尼韦尔 WEBs-N4 监控器 产品说明书
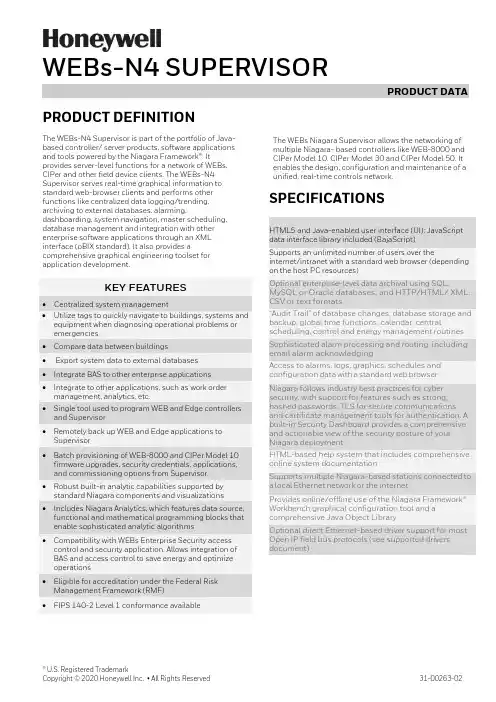
® U.S. Registered TrademarkCopyright © 2020 Honeywell Inc. • All Rights Reserved31-00263-02PRODUCT DEFINITIONThe WEBs-N4 Supervisor is part of the portfolio of Java-based controller/ server products, software applications and tools powered by the Niagara Framework®. Itprovides server-level functions for a network of WEBs, CIPer and other field device clients. The WEBs-N4 Supervisor serves real-time graphical information to standard web-browser clients and performs other functions like centralized data logging/trending, archiving to external databases, alarming,dashboarding, system navigation, master scheduling, database management and integration with other enterprise software applications through an XML interface (oBIX standard). It also provides acomprehensive graphical engineering toolset for application development.KEY FEATURES• Centralized system management• Utilize tags to quickly navigate to buildings, systems and equipment when diagnosing operational problems or emergencies • Compare data between buildings• Export system data to external databases • Integrate BAS to other enterprise applications • Integrate to other applications, such as work order management, analytics, etc. • Single tool used to program WEB and Edge controllers and Supervisor • Remotely back up WEB and Edge applications to Supervisor • Batch provisioning of WEB-8000 and CIPer Model 10 firmware upgrades, security credentials, applications, and commissioning options from Supervisor • Robust built-in analytic capabilities supported by standard Niagara components and visualizations • Includes Niagara Analytics, which features data source, functional and mathematical programming blocks that enable sophisticated analytic algorithms • Compatibility with WEBs Enterprise Security access control and security application. Allows integration of BAS and access control to save energy and optimize operations • Eligible for accreditation under the Federal Risk Management Framework (RMF) • FIPS 140-2 Level 1 conformance availableThe WEBs Niagara Supervisor allows the networking of multiple Niagara- based controllers like WEB-8000 and CIPer Model 10, CIPer Model 30 and CIPer Model 50. It enables the design, configuration and maintenance of a unified, real-time controls network.SPECIFICATIONSHTML5 and Java-enabled user interface (UI); JavaScript data interface library included (BajaScript)Supports an unlimited number of users over theinternet/intranet with a standard web browser (depending on the host PC resources)Optional enterprise-level data archival using SQL,MySQL or Oracle databases, and HTTP/HTML/ XML, CSV or text formats“Audit Trail” of database changes, database storage and backup, global time functions, calendar, centralscheduling, control and energy management routines Sophisticated alarm processing and routing, including email alarm acknowledgingAccess to alarms, logs, graphics, schedules and configuration data with a standard web browserNiagara follows industry best practices for cyber security, with support for features such as strong, hashed passwords, TLS for secure communications and certificate management tools for authentication. A built-in Security Dashboard provides a comprehensive and actionable view of the security posture of your Niagara deploymentHTML-based help system that includes comprehensive online system documentationSupports multiple Niagara-based stations connected to a local Ethernet network or the internetProvides online/offline use of the Niagara Framework® Workbench graphical configuration tool and a comprehensive Java Object LibraryOptional direct Ethernet-based driver support for most Open IP field bus protocols (see supported drivers document )WEBs-N4 SUPERVISOR – PRODUCT DATA31-00263-02 2SOFTWARE & DRIVERSEvery WEBs-N4 Supervisor comes with a Niagara 4 software license, along with multiple open-protocol IP drivers that are compatible with standard control networks. If required, other drivers can be purchase separately. For an up-to-date list of supported drivers, contact customer support.SOFTWARE MAINTENANCEPurchase of a Software Maintenance Agreement (SMA) is required with initial WEBs-N4 Supervisor licensing. The initial SMA is for 18 months, with extended agreements of 3 years and 5 years available for discounted rates. If a Software Maintenance Agreement is not in effect for any period, the price of maintenance for the next period for which it is purchased will be priced at a cost equal to the maintenance fee for the period(s) for whichmaintenance was not purchased, up to a maximum of 5 years, plus the maintenance fee for the next year.ORDERING INFORMATIONPart numberDescriptionWEB-S-0-N4 No Niagara network connections – Devices only. (18mo SMA required)SUP-0-SMA-INIT 18mo initial SMA required (3YR or 5YR can be substituted) WEB-S -1-N4 1 Niagara network connection* (18mo SMA required)SUP-1-SMA-INIT 18mo initial SMA required (3YR or 5YR can be substituted) WEB-S-2-N4 2 Niagara network connections* (18mo SMA required) SUP-2-SMA-INIT 18mo initial SMA required (3YR or 5YR can be substituted) WEB-S-3-N4 3 Niagara network connections* (18mo SMA required) SUP-3-SMA-INIT 18mo initial SMA required (3YR or 5YR can be substituted) WEB-S-10-N4 10 Niagara network connections* (18mo SMA required) SUP-10-SMA-INIT 18mo initial SMA required (3YR or 5YR can be substituted) WEB-S-100-N4 100 Niagara network connections* (18mo SMA required) SUP-100-SMA-INIT 18mo initial SMA required (3YR or 5YR can be substituted) WEB-S-UNL-N4 Unlimited Niagara network connections* (18mo SMA required) SUP-UNL-SMA-INIT 18mo initial SMA required (3YR or 5YR can be substituted) WEB-S-DEMO-N4 Niagara 4 Supervisor demoSUP-UP-1 Adds one additional Niagara connection to Supervisor SUP-UP-100Upgrades small Supervisor to 100 Niagara connectionsWEBs-N4 SUPERVISOR – PRODUCT DATA3 31-00263-02Part numberDescriptionSUP-UP-UNL Upgrades Supervisor 100 to unlimited Niagara connections SUP-DEVICE-10 10 device upgrade (standard drivers included) SUP-DEVICE-25 25 device upgrade (standard drivers included) SUP-DEVICE-50 50 device upgrade (standard drivers included) SUP-DEVICE-100 100 device upgrade (standard drivers included) SUP-DEVICE-200 200 device upgrade (standard drivers included) SUP-DEVICE-500 500 device upgrade (standard drivers included) SUP-DEVICE-1000 1000 device upgrade (standard drivers included)SUP-STATION-5UP Allows running multiple stations with 1 Niagara licenseEach instance of the part purchased increases the limit by 5 stations SP-S-FIPSProvides FIPS 140-2 Level 1 conformance for 4.6 and later SUP-[0-UNL]-SMA-[1,3,5]YRSupervisor [0-UNL] Maintenance – [1,3,5] YR extensions*CIPer Model 10 and the CIPer Model 30 with a 150 points or less based capacity license now count as a 1/10 of a standard Niagara Network connectionCOMPATIBILITYIn any given WEBs Niagara system, the WEBs-N4 Supervisor must be running the highest version of any WEBs-N4 instance in the architecture.When connecting to WEBs controllers that are running older versions of WEBs-N4, these compatibility guidelines apply:• WEBs-AX: WEBs-N4 Supervisors can connect to WEBs JACE running WEBs-AX versions 3.8 and higher.• R2: WEBs-N4 Supervisors can connect to WEBs JACE running R2 through the oBIX XML interface only.PLATFORM REQUIREMENTS FOR NIAGARA SUPERVISORWEBs-N4 Supervisors may run acceptably on lower-rated platforms, or may even require more powerful platforms,depending on the application, number of data points integrated, data poll rate, number of concurrent users, performance expectations, etc.• Processor: Intel® Xeon® CPU E5-2640 x64 (or better), compatible with dual- and quad-core processors• Operating System:o Windows 10 (64-bit) o Windows Server 2016 o Windows Server 2019o Red Hat Enterprise Linux 7.7/8.1 (64-bit)• Mobile operating system: iOS 12, iOS 13, Android 8 Oreo, Android 9 Pie, Android 10.0WEBs-N4 SUPERVISOR – PRODUCT DATAThe material in this document is for information purposes only. The content and the product described are subject to change without notice. Honeywell makes no representations or warranties with respect to this document. In no event shall Honeywell be liable for technical or editorial omissions or mistakes in this document, nor shall it be liable for any damages, direct or incidental, arising out of or related to the use of this document. No part of this document may be reproduced in any form or by any means without prior written permission from Honeywell.Honeywell Building Technologies1985 Douglas DriveGolden Valley MWFor more information:Honeywell Building Controls© 2020 Honeywell, Inc. 31-00263-02 |Rev. 07-21•Browser: Chrome, Firefox, Microsoft Edge•Mobile Browser: Safari on iOS, Chrome on Android•Database: MySQL 5.7, 8.0, 9.0; Oracle Express 11g; Oracle 12, 18, 19c; MSSQL 2012, 2016, 2017, 2019•Memory: 6 GB minimum, 8 GB or more recommended for larger systems•Hard Drive: 4 GB minimum, 10 GB recommended for any Supervisor•Display: Video card and monitor capable of displaying 1024 x 768-pixel resolution, 1080p (1920 x 1080) minimum resolution recommended•Network Support: Ethernet adapter (10/100 Mb with RJ-45 connector), 100 Mbit or 1 Gbit NIC(network interface card) with TCP/IP•Connectivity: Full-time high-speed ISP connection recommended for remote site access (i.e., T1, ADSL, cable modem) and IPv6 compliantPlatform requirements for older versions of WEBs Supervisors are included in the release notes for each particular version.。
800-645-5516 的 Speco Technologies 8通道 HD-TVI 1080p
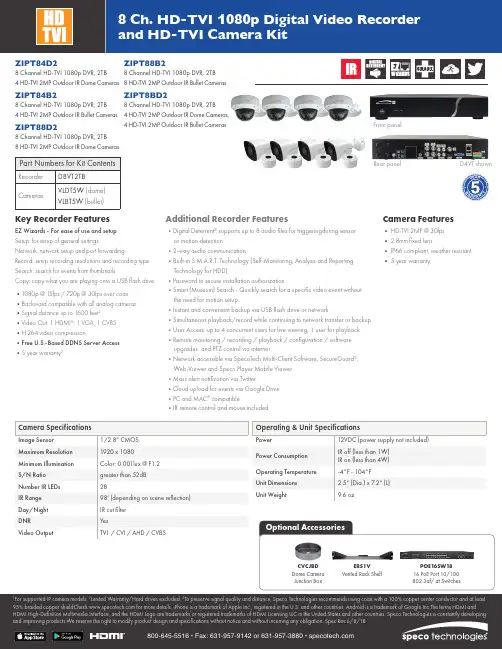
Front panelRear panel ZIPT84D2 8 Channel HD-TVI 1080p DVR, 2TB 4 HD-TVI 2MP Outdoor IR Dome Cameras ZIPT84B28 Channel HD-TVI 1080p DVR, 2TB 4 HD-TVI 2MP Outdoor IR Bullet Cameras ZIPT88D28 Channel HD-TVI 1080p DVR, 2TB8 HD-TVI 2MP Outdoor IR Dome CamerasZIPT88B28 Channel HD-TVI 1080p DVR, 2TB 8 HD-TVI 2MP Outdoor IR Bullet Cameras ZIPT8BD28 Channel HD-TVI 1080p DVR, 2TB4 HD-TVI 2MP Outdoor IR Dome Cameras,4 HD-TVI 2MP Outdoor IR Bullet Cameras D4VT shown1For supported IP camera models. 2Limited Warranty/Hard drives excluded. 3To preserve signal quality and distance, Speco Technologies recommends using coax with a 100% copper center conductor and at least 95% braided copper shieldCheck for more details. iPhone is a trademark of Apple Inc., registered in the U.S. and other countries. Android is a trademark of Google Inc.The terms HDMI and HDMI High-Definition Multimedia Interface, and the HDMI Logo are trademarks or registered trademarks of HDMI Licensing LLC in the United States and other countries. Speco Technologies is constantly developing and improving products.We reserve the right to modify product design and specifications without notice and without incurring any obligation. Spec Rev.6/8/18EZ Wizards - For ease of use and setup Setup: for setup of general settingsNetwork: network setup and port forwardingRecord: setup recording resolutions and recording type Search: search for events from thumbnailsCopy: copy what you are playing onto a USB flash drive •1080p @ 15fps / 720p @ 30fps over coax •Backward compatible with all analog cameras •Signal distance up to 1600 feet¹•Video Out: 1 HDMI ®, 1 VGA, 1 CVBS •H.264 video compression•Free U.S.-Based DDNS Server Access •5 year warranty²• HD-TVI 2MP @ 30fps • 2.8mm fixed lens• IP66 compliant, weather resistant • 5 year warranty•Digital Deterrent ® supports up to 8 audio files for triggeringduring sensor or motion detection•2-way audio communication•Built-in S.M.A.R.T. Technology (Self-Monitoring, Analysis and Reporting Technology for HDD)•Password to secure installation authorization•Smart (Museum) Search - Quickly search for a specific video event without the need for motion setup.•Instant and convenient backup via USB flash drive or network•Simultaneous playback/record while continuing to network transfer or backup •User Access: up to 4 concurrent users for live viewing, 1 user for playback •Remote monitoring / recording / playback / configuration / software upgrades and PTZ control via internet•Network accessible via SpecoTech Multi-Client Software, SecureGuard ®, Web-Viewer and Speco Player Mobile Viewer •Mass alert notification via Twitter•Cloud upload for events via Google Drive •PC and MAC ® compatible•IR remote control and mouse includedKey Recorder FeaturesCamera FeaturesAdditional Recorder FeaturesERS1V Vented Rack ShelfCVCJBD Dome CameraJunction Box1To preserve signal quality and distance, Speco Technologies recommends using coax with a 100% copper center conductor and at least 95% braided copper shield. Please note that specifications and unit exterior design are subject to change without notification. Rev. 6/8/18。
SIMATIC SIMATIC Automation Tool V4.0 SP2 用户指南说明书
SIMATICSIMATIC Automation Tool V4.0 SP2 用户指南应用手册法律资讯警告提示系统为了您的人身安全以及避免财产损失,必须注意本手册中的提示。
人身安全的提示用一个警告三角表示,仅与财产损失有关的提示不带警告三角。
警告提示根据危险等级由高到低如下表示。
危险表示如果不采取相应的小心措施,将会导致死亡或者严重的人身伤害。
警告表示如果不采取相应的小心措施,可能导致死亡或者严重的人身伤害。
小心表示如果不采取相应的小心措施,可能导致轻微的人身伤害。
注意表示如果不采取相应的小心措施,可能导致财产损失。
当出现多个危险等级的情况下,每次总是使用最高等级的警告提示。
如果在某个警告提示中带有警告可能导致人身伤害的警告三角,则可能在该警告提示中另外还附带有可能导致财产损失的警告。
合格的专业人员本文件所属的产品/系统只允许由符合各项工作要求的合格人员进行操作。
其操作必须遵照各自附带的文件说明,特别是其中的安全及警告提示。
由于具备相关培训及经验,合格人员可以察觉本产品/系统的风险,并避免可能的危险。
按规定使用 Siemens 产品请注意下列说明:警告Siemens 产品只允许用于目录和相关技术文件中规定的使用情况。
如果要使用其他公司的产品和组件,必须得到 Siemens 推荐和允许。
正确的运输、储存、组装、装配、安装、调试、操作和维护是产品安全、正常运行的前提。
必须保证允许的环境条件。
必须注意相关文件中的提示。
商标所有带有标记符号 ® 的都是 Siemens AG 的注册商标。
本印刷品中的其他符号可能是一些其他商标。
若第三方出于自身目的使用这些商标,将侵害其所有者的权利。
责任免除我们已对印刷品中所述内容与硬件和软件的一致性作过检查。
然而不排除存在偏差的可能性,因此我们不保证印刷品中所述内容与硬件和软件完全一致。
印刷品中的数据都按规定经过检测,必要的修正值包含在下一版本中。
Siemens AGDigital Industries Ⓟ 02/2021 本公司保留更改的权利Copyright © Siemens AG 2021. 保留所有权利目录1 SIMATIC Automation Tool 入门指南 (11)2 SIMATIC Automation Tool 可以执行哪些操作? (14)2.1 设备操作的概述 (14)2.2 SIMATIC Automation Tool 初始操作示例 (15)3 STEP 7 组态要求 (17)3.1 设置 IP 地址的 STEP 7 要求 (17)3.2 设置 PROFINET 名称的 STEP 7 要求 (18)4 设备操作 (20)4.1 扫描网络 (20)4.2 插入一个或多个设备 (25)4.3 识别设备 (27)4.4 显示设备诊断 (28)4.5 读取设备的服务数据 (29)4.6 设置 CPU 工作模式 (31)4.7 设置 CPU 时间 (32)4.8 设置 IP 地址 (32)4.9 设置 PROFINET 名称 (34)4.10 复位设备 (36)4.10.1 复位通信参数 (36)4.10.2 将设备复位为出厂默认设置 (37)4.10.3 在 CPU 上执行存储器复位 (40)4.11 格式化存储卡 (41)4.12 更新设备固件 (43)4.12.1 通过两步方法更新设备固件 (51)4.13 更新设备程序 (52)4.14 读取和删除数据日志 (60)4.15 备份和恢复设备数据 (62)4.15.1 备份 CPU 或 HMI (62)4.15.2 备份 HMI 配方 (63)4.15.3 备份 HMI 用户管理数据 (63)目录4.15.4 恢复备份文件 (64)5 管理项目和设备文件 (69)5.1 创建、保存和打开 .sat 项目文件 (69)5.2 创建或更改项目密码 (70)5.3 创建和打开项目归档 (71)5.4 从 SIMATIC Automation Tool 导出信息 (72)5.4.1 导出设备信息 (73)5.4.2 导出设备诊断 (78)5.4.3 导出 PC 数据 (79)6 设置、菜单和工具栏 (80)6.1 主菜单 (80)6.1.1 文件菜单 (80)6.1.2 编辑菜单 (82)6.1.3 “视图”(View) 菜单 (82)6.1.4 操作菜单 (85)6.1.5 选项菜单 (88)6.1.5.1 选项菜单 (88)6.1.5.2 SIMATIC Automation Tool 路径名称 (88)6.1.5.3 常规设置 (90)6.1.5.4 通信设置 (91)6.1.5.5 项目设置 (93)6.1.5.6 固件更新设置 (93)6.1.5.7 程序更新设置 (94)6.1.5.8 服务数据设置 (94)6.1.5.9 备份/恢复设置 (95)6.1.5.10 配方设置 (95)6.1.5.11 数据日志设置 (96)6.1.5.12 事件日志设置 (96)6.1.5.13 导出设置 (97)6.1.5.14 SNMP 配置文件 (98)6.1.5.15 调度程序设置 (101)6.1.6 工具菜单 (102)6.1.7 帮助菜单 (102)6.2 工具栏图标 (104)6.3 SIMATIC Automation Tool 程序故障 (105)7 支持的设备 (107)7.1 设备目录 (107)7.2 故障安全 CPU 支持 (108)8 了解不同的许可证版本 (118)目录9 高级功能 (120)9.1 使用卡浏览器处理 CPU 中 SIMATIC 存储卡上的文件 (120)9.2 规划设备操作 (123)9.3 执行规划操作 (125)9.4 高级多线程策略 (130)9.5 使用连接到 CM 或 CP 的设备 (131)9.6 关于路由器后面的设备 (132)10 附加功能 (134)10.1 设备表的强大功能 (134)10.2 复制和粘贴至多个设备表单元格 (138)10.3 刷新设备数据 (141)10.4 显示设备参考 (141)10.5 了解事件日志 (142)11 故障排除事件日志消息 (144)12 用于 .NET framework 的 SIMATIC Automation Tool API (175)12.1 API 入门指南 (175)12.1.1 架构概述 (181)12.1.2 在用户界面应用程序中引用 API (184)12.2 API 软件许可证和版本兼容性 (185)12.3 S7 通信的要求 (186)12.4 为故障安全设备和安全相关操作设计用户界面应用程序 (186)12.4.1 安全相关操作和故障安全设备的 API 支持 (186)12.4.2 安全相关操作的用户界面编程指南 (187)12.4.3 用户界面中的颜色编码安全域 (190)12.4.3.1 对 CPU 设备图标进行颜色编码 (190)12.4.3.2 对设备数据进行颜色编码 (191)12.4.3.3 对 CPU 密码进行颜色编码 (192)12.4.3.4 对程序文件夹进行颜色编码 (193)12.4.3.5 对程序密码进行颜色编码 (194)12.4.4 汉明码 (195)12.5 公共支持类别 (195)12.5.1 EncryptedString 类 (195)12.5.2 Result 类 (196)12.5.3 DiagnosticsItem 类 (200)12.5.4 DataChangedEventArgs 类 (200)12.5.5 ProgressChangedEventArgs 类 (201)目录12.5.6 ExportProgressEventArgs 类 (202)12.5.7 FileProgressChangedEventArgs 类 (202)12.5.8 HealthCheckProgressEventArgs 类 (204)12.6 通用支持接口 (205)12.6.1 IRemoteFile 接口 (205)12.6.2 IRemoteFolder 接口 (205)12.6.3 IRemoteInterface 接口 (206)12.6.4 IHardware 接口 (206)12.6.5 IBaseDevice 接口 (208)12.6.6 IHardwareCollection 接口 (208)12.6.7 IModuleCollection 接口 (209)12.6.8 IScanErrorCollection 类 (209)12.6.9 IScanErrorEvent 类 (210)12.6.10 IHealthCheckErrorEvent 接口 (211)12.6.11 IDiagnosticBuffer 接口 (211)12.6.12 IResult 接口 (212)12.7 网络类 (212)12.7.1 网络构造函数 (212)12.7.2 QueryNetworkInterfaceCards 方法 (213)12.7.3 SetCurrentNetworkInterface 方法 (213)12.7.4 CurrentNetworkInterface 属性 (214)12.7.5 ScanNetworkDevices 方法 (215)12.7.6 SetCommunicationsTimeout 方法 (216)12.7.7 GetCommunicationsTimeout 方法 (217)12.7.8 GetEmptyCollection 方法 (217)12.7.9 ValidateNetworkInterface 方法 (218)12.8 HealthCheck 类 (218)12.8.1 HealthCheck 构造函数 (218)12.8.2 ExportPCData 方法 (218)12.9 IProfinetDeviceCollection 类 (221)12.9.1 迭代集合中的项 (221)12.9.1.1 迭代集合中的项 (221)12.9.1.2 GetEnumerator 方法 (222)12.9.1.3 SortByIP 方法 (222)12.9.1.4 Count 属性 (222)12.9.1.5 [ ] 特性 (223)12.9.2 过滤集合中的项目 (223)12.9.2.1 集合项 (223)12.9.2.2 FilterByDeviceFamily 方法 (224)12.9.2.3 FilterOnlyCPUs 方法 (225)12.9.3 在集合中查找特定设备 (225)12.9.3.1 FindDeviceByIP 方法 (225)12.9.3.2 FindDeviceByMAC 方法 (226)目录12.9.4 设备集合的序列化 (227)12.9.4.1 WriteToStream 方法 (227)12.9.4.2 ReadFromStream 方法 (228)12.9.4.3 ExportDeviceInformation 方法 (229)12.9.4.4 ExportDeviceDiagnostics 方法 (230)12.9.5 手动将项目添加到集合中 (232)12.9.5.1 InsertDeviceByIP 方法 (233)12.9.5.2 InsertDeviceByMAC 方法 (233)12.9.6 从集合中复制数据 (234)12.9.6.1 CopyUserData 方法 (234)12.9.7 从集合中移除设备 (235)12.9.7.1 Clear 方法 (235)12.9.7.2 Remove 方法 (236)12.10 IProfinetDevice 接口 (236)12.10.1 IProfinetDevice 属性 (236)12.10.2 IProfinetDevice 方法 (242)12.10.2.1 FirmwareUpdate 方法 (242)12.10.2.2 FirmwareActivate 方法 (247)12.10.2.3 Identify 方法 (251)12.10.2.4 IsFirmwareUpdateAllowed 方法 (252)12.10.2.5 IsFirmwareUpdate2StepAllowed 方法 (252)12.10.2.6 IsIPAddressOnNetwork 方法 (252)12.10.2.7 IsPROFINETNameOnNetwork 方法 (254)12.10.2.8 IsUploadServiceDataAllowed 方法 (255)12.10.2.9 RefreshStatus 方法 (255)12.10.2.10 ResetCommunicationParameters 方法 (256)12.10.2.11 SetIP 方法 (257)12.10.2.12 SetProfinetName 方法 (259)12.10.2.13 UploadServiceData 方法 (260)12.10.2.14 ValidateIPAddressSubnet 方法 (262)12.10.2.15 ValidatePROFINETName 方法 (263)12.10.3 IProfinetDevice 事件 (264)12.10.3.1 DataChanged 事件 (264)12.10.3.2 ProgressChanged 事件 (265)12.11 IModuleCollection 类和模块属性 (267)12.11.1 模块属性和 IModuleCollection 类 (267)12.11.2 IModule 接口 (268)12.12 ICPU 接口 (270)12.12.1 识别 IProfinetDeviceCollection 中的 CPU 设备 (270)12.12.2 ICPU 属性 (271)12.12.3 ICPU 标志 (272)12.12.3.1 程序更新标志 (272)12.12.3.2 恢复标志 (274)目录12.12.3.3 ICPU 支持和允许的标志 (275)12.12.4 ICPU 方法 (276)12.12.4.1 Backup 方法(ICPU 接口) (276)12.12.4.2 DeleteDataLog 方法 (277)12.12.4.3 DeleteRecipe 方法 (279)12.12.4.4 DetermineConfirmationMessage (280)12.12.4.5 DownloadRecipe 方法 (285)12.12.4.6 FormatMemoryCard 方法 (287)12.12.4.7 GetCurrentDateTime 方法 (289)12.12.4.8 GetDiagnosticsBuffer 方法 (290)12.12.4.9 MemoryReset 方法 (292)12.12.4.10 ProgramUpdate 方法 (293)12.12.4.11 ResetToFactoryDefaults 方法 (297)12.12.4.12 Restore 方法(ICPU 接口) (299)12.12.4.13 SetBackupFile 方法 (303)12.12.4.14 SetBackupFilePassword 方法 (304)12.12.4.15 SetCurrentDateTime 方法 (304)12.12.4.16 SetOperatingState 方法 (305)12.12.4.17 SetPassword 方法 (306)12.12.4.18 SetProgramFolder 方法 (309)12.12.4.19 SetProgramPassword 方法 (310)12.12.4.20 UploadDataLog 方法 (310)12.12.4.21 UploadRecipe 方法 (312)12.12.5 RemoteInterfaces 属性 (314)12.12.5.1 分散式 I/O 模块 (314)12.12.5.2 IRemoteInterface 属性 (315)12.13 ICPUClassic 接口 (318)12.13.1 识别 IProfinetDeviceCollection 中的经典 CPU 设备 (318)12.13.2 GetDiagnosticsBuffer 方法 (319)12.14 IHMI 接口 (321)12.14.1 IHMI 接口 (321)12.14.2 IHMI 属性和标志 (322)12.14.2.1 IHMI 属性 (322)12.14.2.2 程序更新标志 (322)12.14.2.3 恢复标志 (323)12.14.2.4 功能标志 (323)12.14.3 IHMI 方法 (324)12.14.3.1 Backup 方法(IHMI 接口) (324)12.14.3.2 FirmwareUpdate 方法 (325)12.14.3.3 ProgramUpdate 方法(IHMI 接口) (326)12.14.3.4 Restore 方法(IHMI 接口) (328)12.14.3.5 SetBackupFile 方法 (329)12.14.3.6 SetProgramFolder 方法 (329)目录12.14.3.7 SetTransferChannel 方法 (330)12.15 IScalance 接口 (331)12.15.1 IScalance 接口 (331)12.15.2 IScalance 属性 (332)12.15.3 IScalance 方法 (332)12.15.3.1 SetProfile 方法 (332)12.15.3.2 FirmwareUpdate 方法 (333)12.15.3.3 FirmwareActivate 方法 (334)12.16 ISNMPProfile 接口 (334)12.16.1 ISNMPProfile 属性 (334)12.16.2 ISNMPProfile 方法 (335)12.16.2.1 Validate 方法 (335)12.16.3 SNMPProfile 类 (336)12.16.3.1 SNMPProfile 类属性 (336)12.16.3.2 SNMPProfile 类方法 (337)12.17 IScalance 和 ISNMP 固件更新代码示例 (343)12.17.1 示例:SNMP 版本 1 组态 (343)12.17.2 示例:SNMP 版本 2 组态 (345)12.17.3 示例:SNMP 版本 3 组态 (347)12.18 异常 (350)12.18.1 CriticalInternalErrorException (350)12.19 API 枚举 (352)12.19.1 BackupType (352)12.19.2 ConfirmationType (352)12.19.3 DataChangedType (353)12.19.4 DeviceFamily (353)12.19.5 ErrorCode (354)12.19.6 FailsafeOperation (361)12.19.7 FirmwareUpdateType (361)12.19.8 HMITransferChannel (362)12.19.9 Language (362)12.19.10 OperatingState (362)12.19.11 OperatingStateREQ (363)12.19.12 ProgressAction (363)12.19.13 ProtectionLevel (364)12.19.14 RemoteInterfaceType (364)12.19.15 RemoteFolderType (364)12.19.16 ScanErrorType (365)12.19.17 SNMPAuthAlgorithm (365)12.19.18 SNMPPrivAlgorithm (365)12.19.19 SNMPSecurityLevel (366)12.19.20 SNMPVersion (366)目录12.19.21 TimeFormat (366)12.20 网络示例 (367)12.21 CPU 密码访问级别 (369)13 参考信息 (371)13.1 SIMATIC Automation Tool 操作交互 (371)13.2 CPU 密码 (371)13.3 识别网络接口 (372)13.4 键盘快捷键 (374)13.5 安全程序定义 (375)13.6 安全性信息 (375)13.7 服务与支持 (376)索引 (377)SIMATIC Automation Tool 入门指南 1激活 21 天试用版如果未购买 SIMATIC Automation Tool 许可,可激活21 天免费试用许可证。
automation desk中文操作手册

automation desk中文操作手册
Automation Desk是一款强大的自动化测试软件,用于测试电子控制单元(ECU),并支持图形化定义测试序列。
现在,Automation Desk 变得更加强大。
其新颖独特的基于信号的测试描述,能更快速、清晰的创建和执行实时测试。
这正是基于信号的测试擅长的方面。
基于信号的测试提供了一种新的测试描述,就如同在纸上创建一般,简单而直观。
在基于信号的测试中,仿真变量的激励和参考信号可以在类似绘图仪的编辑器中直观地描述。
所执行测试的文档会提供—份报告,其中含信息性绘图和参数信息。
这种新方法的主要优点是提高了透明性。
用户可以在编辑器中创建测试规格,测试报告具有与测试规格相似的布局,因为参考信号和信号行为被显示得更精确。
用户可以总览测试准则和测试结果。
这就是基于信号的测试如此直观的原因。
使用Automation Desk进行基于信号
的测试通常包含七个步骤:
分配变量:仿真模型的哪些变量分配给测试中的哪种信号行为?
指定测试操作∶哪种信号作为激励、测量或参考信号?
日定义刺激信号∶激励信号(例如阶跃、斜坡、正弦信号等)应
该由哪几段组成?
4定义参考信号∶参考信号(例如阶跃、斜坡、正弦信号等)应
该由哪几段组成?激励信号和参考信号使用相同的描述段。
定义参考信号的评估方法∶测量
值必须处于什么范围(公差)才能使测试通过? 定义测试持续时间:最长的测试时间是多少?。
automationdesk使用说明
automationdesk使用说明AutomationDesk是一款广泛应用于自动化测试和验证的工具,被广泛用于开发和测试各种嵌入式系统和控制单元。
本文将为您提供AutomationDesk的使用说明,帮助您更好地使用该工具。
1. 界面概述:AutomationDesk拥有直观、用户友好的界面,以图形化方式呈现测试用例和测试结果。
主要界面包括测试用例编辑器、测试执行器和结果分析器。
2. 创建测试用例:在AutomationDesk中,您可以通过拖放及连接可视化模块的方式创建测试用例。
您可以使用丰富的模块库,包括输入输出模块、控制流模块、数据处理模块等,以及自定义模块,以满足您的测试需求。
3. 参数化和数据管理:AutomationDesk支持参数化测试,您可以为测试用例定义参数,并在测试执行时动态地修改这些参数。
此外,您还可以导入、导出和管理测试数据,确保测试的全面性和可重复性。
4. 测试执行:AutomationDesk提供多种测试执行方式。
您可以逐个执行测试用例,也可以批量执行多个测试用例。
在执行过程中,您可以监控测试进度和实时数据,以及记录测试结果和日志。
5. 结果分析:AutomationDesk提供丰富的结果分析工具。
您可以查看测试结果的统计数据、图表和报告,并与预期结果进行比较。
您还可以自定义评估准则和报告模板,以满足不同的分析需求。
6. 集成和自动化:AutomationDesk支持与其他工具和平台的集成,以实现全面的测试管理和自动化流程。
您可以与数据管理系统、版本控制系统、CI/CD工具等进行连接,实现测试数据和执行的自动化管理。
总结:AutomationDesk是一款功能强大的自动化测试工具,可帮助您快速、高效地开发和执行测试用例。
通过使用AutomationDesk,您可以提高测试效率、降低错误率,并确保软件和系统的质量和稳定性。
希望本文的使用说明对您有所帮助,如有任何问题,请随时咨询。
automouseclicker密钥 -回复
automouseclicker密钥-回复什么是automouseclicker密钥以及其应用在计算机应用领域中,automouseclicker密钥是指用于激活或注册automouseclicker软件的唯一许可证。
Automouseclicker密钥是由开发者生成的一串字符,用于确保只有合法购买者才能使用该软件。
因此,只有拥有正确的automouseclicker密钥才能完全解锁软件的所有功能。
Automouseclicker密钥的主要功能是将软件与购买者的许可证信息绑定。
通过输入automouseclicker密钥,用户可以获得软件的完全访问权限。
此外,automouseclicker密钥还能保证唯一用户的合法许可。
这意味着,无法复制或共享automouseclicker密钥,从而减少非法使用和盗版行为。
使用automouseclicker密钥,用户可以解锁软件的全部功能,享受自动鼠标点击的便利性。
自动鼠标点击器是一种自动化工具,它可以模拟鼠标的点击动作,以执行一系列任务。
这对于需要大量重复性的操作或定时任务非常有用。
比如,自动鼠标点击器可以用于自动填写网页表单、自动点击广告、自动执行游戏操作等。
通过使用automouseclicker密钥,用户可以更加灵活地定制和控制自动鼠标点击器的行为。
有几种方式可以获得automouseclicker密钥。
首先,用户可以通过购买正版软件获得唯一的automouseclicker密钥。
购买正版软件不仅支持软件开发者的创作,还能获得软件更新和技术支持。
此外,用户还可以通过参加软件开发者组织举办的促销活动或免费试用期来获取automouseclicker密钥。
这些举措旨在让用户体验软件的功能,并让用户作出购买决策。
为了使用automouseclicker密钥,用户需要首先将其输入到软件界面的指定位置。
在输入automouseclicker密钥之后,软件将进行验证,以确保该密钥是合法且未过期的。
Automation Engine 用户指南
用户指南Automation Engine Contents1. 关于 Automation Engine (6)1.1 版权声明 (6)1.2 获取帮助 (7)2. 什么是 Automation Engine (9)2.1 Automation Engine Pilot (11)2.1.1 Pilot 的主窗口 (11)2.1.2 视图 (12)2.2 Automation Engine 中的数据管理 (13)2.2.1 容器 (14)2.2.2 作业 (14)2.3 Automation Engine 中的文件处理 (15)2.3.1 任务 (15)2.3.2 任务链 (15)2.3.3 工作流程 (16)2.3.4 标签 (16)3. Automation Engine 入门 (18)3.1 启动 Automation Engine (18)3.1.1 启动 Automation Engine 服务器 (18)3.1.2 启动 Pilot (19)3.2 执行基本配置 (20)3.2.1 创建用户 (20)3.2.2 定义用户访问权限 (20)3.2.3 配置输出设备 (22)3.3 使用 Pilot 上传文件 (24)3.4 对文件启动任务 (25)3.5 检查任务的状态 (26)3.6 在 Viewer 中检查结果 (27)3.7 重新启动任务 (28)3.8 生成输出 (28)4. 服务器管理 (29)4.1 启动和停止服务器 (29)4.2 设置服务器 (30)4.3 备份服务器 (30)4.4 恢复服务器 (31)4.5 管理数据库 (31)4.6 管理SQL服务器 (34)4.7 管理应用程序服务器 (34)Contents5. 将文件上传至 Automation Engine (35)5.1 使用 Pilot 上传文件 (35)5.2 从 FTP 服务器上传文件 (35)5.3 使用常用文件夹上传和处理文件 (36)5.3.1 关于常用文件夹 (36)5.3.2 创建任务常用文件夹 (37)5.3.3 修改常用文件夹设置 (44)5.3.4 更新您的常用任务文件夹 (45)5.4 使用 Shuttle 上传和处理文件 (47)5.4.1 什么是 Shuttle? (47)5.4.2 Shuttle 设置 (47)5.4.3 从 Shuttle 单机版启动文件 (52)5.4.4 从 ArtPro 启动文件 (54)5.4.5 从 PackEdge 或 Plato 启动文件 (58)5.4.6 从 FastImpose 启动文件 (59)5.4.7 从 Neo 启动文件 (60)5.4.8 从 Shuttle 插件启动文件 (61)6. 对文件运行任务 (64)6.1 创建任务标签 (64)6.1.1 从标签视图中创建自定义标签 (64)6.1.2 处理文件时创建自定义标签 (65)6.1.3 使用 中的公共参数 (66)6.1.4 使用智能名称 (74)6.2 对文件启动任务 (75)6.3 检查任务的状态 (78)6.4 重新启动任务 (79)7. 对文件运行工作流程 (80)7.1 构建工作流程 (80)7.1.1 从零开始构建工作流程 (80)7.1.2 使用自定义标签构建工作流程 (84)7.1.3 重用任务链标签构建工作流程 (85)7.1.4 嵌套式工作流程 (89)7.1.5 在工作流程中使用发送 (96)7.1.6 使用 中的公共参数 (105)7.1.7 在工作流程中添加便笺本 (114)7.1.8 检查所有工作流程的参数 (115)7.2 使用工作流程 (116)7.2.1 对文件启动工作流程 (116)7.2.2 一边构建工作流程一边对文件启动它 (118)7.2.3 暂停或取消工作流程 (119)7.3 检查工作流程的处理状态 (120)7.4 使用不同设置重新启动工作流程 (122)Automation Engine8. 在 Automation Engine Viewer 中查看文件 (123)8.1 关于 Viewer (123)8.2 在 Viewer 中检查结果 (123)8.3 比较文件 (124)9. 与其他应用程序集成 (127)9.1 与 WebCenter 集成 (127)9.1.1 WebCenter 设置 (127)9.1.2 Automation Engine 设置 (131)9.1.3 将拼版从 Automation Engine 发送至 WebCenter (132)9.1.4 在 WebCenter 中确认拼版 (137)9.1.5 在 Automation Engine 中检查审批结果 (141)9.1.6 驳回 WebCenter 审批 (145)9.2 与 Nexus 集成 (146)9.2.1 在 Nexus 端设置 (147)9.2.2 在 Automation Engine 端设置 (147)9.2.3 从 Pilot 运行 Nexus 工作流程 (148)9.3 与 Odystar 集成 (150)9.3.1 在 Odystar 端设置 (151)9.3.2 在 Automation Engine 端设置 (154)9.3.3 从 Pilot 运行 Odystar 工作流程 (155)9.4 与i-cut Suite整合 (157)9.4.1 i-cut自动化工作流程 (157)9.5 与 Enfocus PitStop 集成 (158)9.6 使用常用文件夹与第三方应用程序集成 (159)9.7 与 MIS 系统集成 (161)9.7.1 关于 JDF 和 MIS 集成 (161)10. 写脚本程序 (164)10.1 Automation Engine 脚本运行程序 (164)10.2 写脚本程序入门 (165)10.3 使用事例:写脚本程序 (167)11. 使用事例:设置包装工作流程 (170)11.1 创建工作流程 (170)11.1.1 预检文件 (170)11.1.2 规范化文件 (173)11.1.3 陷印文件 (174)11.1.4 查看文件 (175)11.1.5 生成步长和重复 (176)11.1.6 创建报告 (178)11.2 在工作流程中使用 Shuttle (179)11.2.1 什么是 Shuttle (179)11.2.2 什么是公共参数? (180)11.2.3 设置为公共标签 (180)Contents11.2.4 使用 中的公共参数 (181)11.2.5 样本工作流程中的公共参数:包装 (187)11.2.6 将文件启动到工作流程 (188)Automation Engine 1. 关于 Automation Engine最大化生产率通过 Automation Engine,您不仅可以跟踪整个工作流程中的文件,还可以优化和自动化此工作流程,从而提高您的生产率。
ArtiosCAD.7.20en破解及安装方法
TOP 9#
/thread-15575-1-1.html[2009-4-25 12:37:27]
ArtiosCAD 7.20en破解及安装方法 - 包装印刷技术交流区 - 上海印刷论坛 平面设计论坛|印刷招聘 - Powered by Discuz! 管理员
积分
哎,包装软件怎么这么不好下载呢!
初学乍练
积分
9
资源币 200 枚
推广币 0 枚
鲜花
0朵
阅读权限 10
shihuanyu
回复
引用
发表于 2008-2-2 07:24 PM | 只看该作者
没有找到lservrc 文件,谁告诉在哪里呢,我看下载的文件夹里面没有呢.
初学乍练
积分
9
资源币 200 枚
推广币 0 枚
分栏模式
论坛
搜索
插件
帮助
导航
返回列表 1 2 下一页
打印 字体大小:
楼主
管理员
积分
4905
资源币 32339 枚
推广币 4816 枚
鲜花 53 朵
阅读权限 255
性别 男
ArtiosCAD 7.20en破解及安装方法
ArtiosCAD , 破解 ArtiosCAD , 破解
- run setup.exe - unselect ArtiosCAD Documentation -> ripped
我装了起动不了,太可惜了.
渐入佳境
积分
168
资源币 246 枚
推广币 1 枚
鲜花
0朵
阅读权限 30
guise4543
回复
引用
发表于 2007-9-26 11:06 AM | 只看该作者
- 1、下载文档前请自行甄别文档内容的完整性,平台不提供额外的编辑、内容补充、找答案等附加服务。
- 2、"仅部分预览"的文档,不可在线预览部分如存在完整性等问题,可反馈申请退款(可完整预览的文档不适用该条件!)。
- 3、如文档侵犯您的权益,请联系客服反馈,我们会尽快为您处理(人工客服工作时间:9:00-18:30)。
AutomationDesk AutomationServer Cost reduced tool variant without graphical user interface Planning, parameterization and execution of already existing tests Client applications: e.g. batch scripts, Excel, Operator-GUI
Test-Automation can be used for Blackbox-Testing of ECU application SW (controller functions) Whitebox-Testing (by measuring ECU internal variables) Testing diagnostic functions Testing each new SW / HW version (regression testing) Driving test maneuvers precisely Replaying measurement data from test benches or from test drives Æ Æ Æ Æ
AutomationDesk
Link within DOORS
Test specifications (not executable)
Test results (passed / failed)
Test implementation (executable)
DOORS Connect&Sync: Connecting Requirements and Tests
Project Manager for managing tests, data, results, …
…
Custom specific libraries
Sequence Builder Overview
Tool windows
Why use AutomationDesk for HIL testing?
Test Automation Tool Test Program Test Report
9
HIL Simulator
ECU
Tests can be executed at any time Æ over-night, over the weekend Tests are reusable Increased test coverage Æ increased quality Savings in time and cost
1)
on demand 2) in customer projects
Results & Reports
Automatic report generation in HTML and PDF Reports can contain Text Tables Images Plots Hyperlinks
DOORS Requirements
Test structure Traceability Traceability Test cases Improve Improveefficiency efficiency Parameters Consistency Consistency Test description
AutomationDesk Overview
SequenceBuilder for graphical test implementation
LibraryBrowser providing access to Real-time model Failure simulation dSPACE ControlDesk dSPACE CalDesk MATLAB
Batch-Testing using the AutomationDesk COM-API
// initialization // Server = ... Project1 = Server.Projects.Import(“Project1.zip“, 1) Result1 = Project1.Execute(“Result“, “COM API Test“) Project2 = Server.Projects.Import(“Project2.zip“, 1) Result2 = Project2.Execute(“Result“, “COM API Test“) //... //Report1 = Result1. ... //Report2 = Result2. ...
AutomationDesk
COM Loading and executing test projects via an automation interface Automated report generierung Independent from programming language: Python, Visual Basic, C++, ... Test planning and selective / dependable test execution („Batch Execution“) Overnight and week-end tests
AutomationDesk – Key Features for successful ECU Testing
Dr. rer. nat. Sven Burmester dSPACE GmbH · Technologiepark 25 · 33100 Paderborn
Benefits of Test-Automation
AutomationDesk Automation Server
AutomationDesk Standard Development environment for tests Development of libraries Configuration of HIL plattform, diagnostic and other connected tools Test execution
AutomationDesk
Management-View Management-View Process Processintegration integration
Link within DOORS
German Germancustomer customerstatement: statement: ““ Using UsingAutomationDesk AutomationDeskconnected connectedto toDOORS, DOORS,every every responsible can Test implementation responsibleperson, person,e.g. e.g.quality qualitymanagers, managers, canvery veryeasily easily Test results Test specifications identify yet. identifywhat whatfeatures featuresare arenot notcompleted completed yet. (executable) (passed / failed) Thus, our (not executable) Thus, ourdevelopers developerstry tryto tofix fixeach eachproblem problemwe wefind findusing using HIL ”” HILtesting testingas assoon soonas aspossible. possible.
DOORS Connect&Sync: Connecting Requirements and Tests
Tool Interfaces in AutomationDesk
HIL-Simulator dSPACE real-time platforms, ControlDesk, electrical fault simulation units, 3rd party HILs Diagnostic tool support CalDesk, DTS6, DTS7, EDIABAS, VAG-Tester, DiagRA, CAESAR1), samtec1) Measurement and Calibration tooA, CANape, CANoe2), CANalyzer2) Calculation and Evaluation MATLAB Customer specific Extension 3rd party hardware or software
U.S. OEM, test of central body ECU using HIL with AutomationDesk: found 50 errors, 15 would not have been found without HIL and test automation. Commercial vehicle engine ECU test, using HIL with AutomationDesk: 1100 automated tests, saving 4 man-weeks for each variant, damages, fuel, … Ford, Germany, testing body electronics networks using HIL with AutomationDesk: Complete electrics/electronics and function tests reduced from 12 weeks to 1 week.