Octave 中文简明教程
octave 数组
octave 数组(最新版)目录一、Octave 数组的概念与特点二、Octave 数组的创建与操作三、Octave 数组在数据处理与分析中的应用四、Octave 数组的优缺点与未来发展正文一、Octave 数组的概念与特点Octave 数组是一种高维数组,可以用于表示多维数据。
与传统的一维数组或二维数组相比,Octave 数组可以更好地表示复杂的数据结构,如图像、音频和视频等。
Octave 数组具有以下特点:1.灵活性:Octave 数组可以轻松地扩展或修改,方便用户对数据进行操作和处理。
2.存储效率:Octave 数组采用稀疏存储方式,可以有效地存储大量数据,并减少内存占用。
3.易于处理:Octave 数组可以使用各种内置函数进行操作和处理,如求和、乘积、转置等。
二、Octave 数组的创建与操作要创建一个 Octave 数组,可以使用 Octave 语言中的 "octave" 函数。
例如:```octaveA = octave([1, 2, 3; 4, 5, 6; 7, 8, 9])```这将创建一个 3x3 的 Octave 数组 A,其中包含数字 1 到 9。
Octave 数组支持各种数学运算和逻辑运算,如加法、减法、乘法、除法、逻辑与、逻辑或等。
此外,还可以使用 Octave 数组进行矩阵操作,如求逆、求幂、求特征值等。
三、Octave 数组在数据处理与分析中的应用Octave 数组在数据处理和分析中有广泛的应用,如:1.图像处理:利用 Octave 数组可以表示图像数据,进行图像的压缩、增强、滤波等操作。
2.机器学习:Octave 数组可以用于表示训练数据和模型参数,方便进行机器学习算法的实现和优化。
3.数据分析:利用 Octave 数组可以对数据进行统计分析、数据建模等操作,为决策提供支持。
四、Octave 数组的优缺点与未来发展Octave 数组的优点包括:1.高效存储:Octave 数组采用稀疏存储方式,可以有效地存储大量数据,并减少内存占用。
Octave 安装手册说明书
G u i d eCategory: C & I MeteringType: Installation ManualIssue: OperationTable of Contents Octave Installation Manual1 General Information Page1. Introduction 32. Package Contents 33. General Safety 34. Unpacking Instructions 3 2 Technical Data1. Measurement Method 42. Mechanical Data 43. Dimensions and Scaled Drawings 54. Performance Data 55. Pressure Loss Charts 6 3 Installation Requirements1. Pre-Installation 72. Handling the Octave 73. Installation Notes 74. Installation Location & Position 85. Additional Installation Requirements 9 4 Register Display and Output1. Digital Display 102. Pulse Output (Open Drain) 113. Pulse Output (SSR Dry Contact) 124. 4-20 mA (Analog) 135. Encoder Output (Serial) 146. No Output (Manual read) 147. Installation of Output Module 158. Wire Connectivity Chart 161.1 IntroductionThank you for choosing Master Meter’s Octave Ultrasonic Meter. This unique design delivers precise flow measurement without any moving parts for long life, sustained accuracy and exceptional performance. The following information within this guide will help you gain a better understanding of the many features and capabilities your new Octave Ultrasonic meter has to offer.1.2 Package Contents and Documentation• One complete Octave Ultrasonic Flow Meter (meter body with integral electronics), size as indicated on the packaging box.• Octave User Installation Guide• Certificate of calibration data (adhered to the inside of the meter lid)• (Optional) If specified at the time of order; one output module1.3General SafetyPrior to installation of your new Octave Ultrasonic Meter please consider the following;• Do not install, operate or maintain this flow meter without reading, understanding and following the factory-supplied instructions. Otherwise, injury or damage may result.• Read instructions carefully before beginning installation and save them for future reference.• Observe all warnings and instructions marked on the product.• Consider handling and lifting instructions to avoid damage.• If the product does not operate normally, refer to the service instructions or to a qualified Master Meter representative.• There are no operator-serviceable parts inside this product.1.4Unpacking Instructions and InspectionThis product has been thoroughly inspected and tested prior to shipment and is ready for operation. After carefully unpacking the meter, inspect all contents for shipping damage before attempting to install. If here is any indication of physical damage found, immediately contact the responsible transportation service and your local Master Meter representative. Note: The LCD display remains active for the life of the meter. If the display is not on, this may be an indication of damage during shipment.2.1 Measurement MethodThe Octave’s measurement method is based on an ultrasonic, transit time, dual beam sensor array which determines the length of time it takes an ultrasonic sound wave to travel the distance between the two sensors located in the meter’s body. The two sensors function as both the transmitter and the receiver, each one alternating these functions so that the ultrasonic wave travels both with and against the direction of the flow.Ultrasonic waves travel slower against the flow than with the flow, thus the time difference of two waves traveling with and against the flow leads to determining the velocity and volume of the water.Note: These sensors are ultra-sensitive; they are not designed to be modified by the user. Any modifications void warranty on this product.• The Octave ultrasonic flow meter is a battery-powered, precision flow meter designed for linear, bidirectional flow measurement of water.• Flow measurement data is communicated through the output module.• The Octave can be set up for a wide range of applications.2.2 Mechanical DataMaximum Working Pressure 175 PSILiquid Temperature 32.1° F - 122° F (0.1° C to 50° C)Referenced Standards Meets ANSI / AWWA Standard C715-18 & C750-10; ISO 4064 rev. 2005 Configuration Compact - Display built into unitPower Source 2 x D size Lithium Thionyl Chloride batteries - 10 year warranted life timeEnvironmental Protection NEMA 6P (IP68), Ambient operation temperature -13° F to 131° F (- 25° C to 55° C)Data Units Multi-line 12 digit Liquid Crystal Display (LCD) - Programmable USG, Imperial Gallons, Cubic Feet, Cubic Meters, Barrels, Acre Feet or Acre Inch for Volume and GPM, Lt/s,Lt/m or M3/h for rate of flow.Volume Display Options 1. Net Volume (Forward measurement minus reverse)2. Forward Only3. Alternating Flow (Forward and Reverse flow displayed separately)Flanges ANSI / AWWA C702•2” Oval Type – Cast Iron Floating Flange•3” – 8” Round Type – Cast Iron Floating Flange •8 – 12” Round Type – Cast Iron Fixed FlangeMeter Body Construction 2” – 8” Grade 316 Stainless Steel 10” – 12” Ductile Iron Epoxy CoatedOutput (optional) 1. Dual Digital Pulses (Open Drain or Dry Contact)2. 4-20 mA (Powered loop)3. Encoder Output (up to 8 digit encoded readings)Certifications/Listings •UL Certified – Safety US EX29710 on 2” – 8” Stainless Steel Floating Flange•FM Approved on 2” – 12” Stainless Steel and Ductile Iron•ANSI / NSF 372 (AB1953 or NSF61G)2.3 Dimensions2" Octave is offered in 10" length with an optional add-on of a 3", a 5.25" or a 7" spool. Gaskets, nuts, bots, & washers are included in weights of 13", 15.25" and 17".2.4 Performance Data2.5 Pressure Loss Charts3.1 Pre-InstallationPrior to installation check the following:• Flow rate and volume units are correctly programmed.• The flow meter is correctly installed per the installation location and position recommendations.• Output modules are correctly attached.3.2 Handling of OctaveIMPORTANT:•DO NOT use chains or wire cable to lift the Octave. To protect the epoxy coating, onlyuse a nylon lifting strap with appropriate weight capacity.• DO NOT lift the Octave by the electronic housing unit.• DO NOT carry the Octave by its lid.• DO NOT use bolt holes for grip when carrying the Octave.• DO NOT position the flow meter on its electronic housing unit.• When bolting the meter to pipe flanges, use washers on both nuts and bolts toprotect the epoxy coating of the Octave.• When handling the flow meter avoid hard blows, jolts or impact.3.3 Installation NotesThe measuring tube should be completely full at all times for proper flow measurements. When sensors are not wet this will show a loss of signal. Though this will not cause damage to the meter, it will however not measure flow.FLOW DIRECTION: The Octave is a bi-directional flow meter. Note the indicating arrow for forward and backward flows.Master Meter recommends keeping the lid closed in case of direct sunlight exposure. However, no direct damage will occur while the lid is open temporarily.Do not expose the meter to excessive vibration. To prevent this from occurring, support the connection pipe spools on both ends of the flow meter.To avoid measuring errors due to air or an empty pipe, please observe the following precautions:• Installation of the flow meter should be at the lowest point of the system, if possible, since air will be collected at the highest point of a system.• If possible, maintain positive back pressure in meter outlet piping.• In order to avoid cavitation, always install control valves downstream of the flow meter and never install the flow meter on a pump suction side.3.4 Installation Location & PositionProper Installation3.5 Additional installation requirementsTwo (2) pipe diameters before & after elbows (90°)Minimum of two (2) pipe diameters before or after isolation valvesOpen bore valves, such as resilient wedge gate valves can bebolted directly to the meter.Minimum of ten (10) pipe diameters after pump discharge.Minimum of two (2) pipe diameters before tee connections,including test tees.Minimum of two (2) pipe diameters before or after strainers forISO version Octaves (primarily sold outside North AmericanMarket). AWWA length Octaves (primarily sold in NorthAmerican markets) may be bolted directly to a strainer.Two (2) pipe diameters before and after elbows (90°) invertical installationsOctave Installation ManualChapter 4 – Register & Output Mode4.1 Digital DisplayThe Octave meter comes with a factory programmable digital display built to your specifications. At the time of order you can select:• Volume units in US gallons, Imperial gallons, Cubic Feet, Cubic Meters, Barrels, Acre Feet or AcreFeeto US Gallons will display a constant GAL on the LCDo Imperial Gallons will display a constant IGAL on the LCD• Rate of flow measurement in US Gallons per Minute, Imperial Gallons per Minute, Liters perSecond, Liters per Minute or Cubic Meters per Hour• A programmable decimal with flow measurement as low as 1/1000th of a measurement unit.• Single output mode in either encoder (UI1203), digital pulse (open drain or dry contact), 4-20 mA,or no output mode• Dual output mode (optional) in encoder + open drain digital pulse• Volume Display Option in either Net Flow, Forward Only, or Alternating.o Net Volume – The meter measures both forward and reverse flow. If backward flow isdetected, the totalizer will begin to decrease.o Forward Flow Only – The meter measures forward flow only. Reverse flow is disregarded.o Alternating Flow – The totalizer will display only forward flow, then toggle to display onlyreverse flow. The timing of the how long each measurement is displayed is programmable with this software version.Flow DirectionCommunicationVolume UnitsFlow Rate UnitsEmpty Pipe / ErrorPulse ResolutionAccumulation Mode Water TemperatureAlarms / AlertsAdditional Output ModesSleep Mode – After 24 hours of an empty pipe the meter will switch to sleep pipe.Checksum – After 1 minute of no flow, the meter will flash a series of letters and numbers in place of the rate of flow to show the checksum of the software version.4.2 Pulse Output (Open Drain)Pulse Type: Open Drain that allows current loading of 200 mA, and up to 30 VDC.Output TypeOpen drain Cable Length - Supplied 9 feet Maximum Cable Length*1,640 feetMaximum Supply Voltage 30 VDCWire Color Function Long cable Red Pulse Out #1 Green Pulse Out #2 Black Common Bare WireShieldPulse Module Wire ColorsOutput CharacteristicsWarning: Signal connection polarity is mandatory* The maximum cable length depends on: cable type, controller, and electrical noise level.4.3 Pulse Output (SSR Dry Contact)Pulse Type: Dry Contact that allows current loading of 120 mA, and up to 35 volts.Output TypeSSR Dry ContactCable Length - Supplied9 feet Maximum Cable Length* 1,640 feet Output Voltage max. + 400 (V) Output Current max. 120 mA (.12 A) Supply Voltage3-35 VDCWire Color Function Long cableRed Output #1 Orange Output #1 Black Output #2 Brown Output #2 Short cableRed 24V + Black 24V -YellowGROUNDPulse Module Wire ColorsOutput CharacteristicsWarning: Signal Polarity is mandatory on Short Cable wires but is not mandatory on Long Cable wires.* The maximum cable length depends on: cable type, controller, and electrical noise level.4.44-20 mA Output (Analog Communication )The current output is a passive 4-20 mA. Power must be provided by the customer. 4 mA is always “0” (zero) flow and the 20 mA is factory programmable according to the customer’s requirements. (If the customer has not specified the 20 mA at the time of order, the Octave will be programmed with the 20 mA at the max flow of the meter.)Output Type4-20 mA passive current output Cable Length - Supplied 9 feet Maximum Cable Length* 1,640 feet Loop Supply Voltage 12 - 24 VDC Output Impedance25 (m Ω) typ.Wire Color FunctionLong cable Red Current loop + Black Current loop - Bare WireShieldWarning: Signal connection polarity is mandatory4-20 Module Wire Colors Output Characteristics* The maximum cable length depends on: cable type, controller, and electrical noise level.4.5 Encoder Output• UI1203 encoder open communication, with a maximum reading up to 8 digits, depending on the programming of the attached output module• Encoder digits are represented by lines above each digit transmitted to an AMR or AMI on the volume totalizer.• Serial communication collector• Data output line is a solid state switch requiring external pull-up • AMI Type for Encoder is : 0Wire Function Red Power Green Data Black Ground4.6No Output (Manual Read)The Octave meter can be programmed to not send a communication signal at the customer’s request; however Master Meter recommends selecting a communication mode for future migration to AMR or AMI.Output TypeEncoder Cable Length - Supplied9 feetMaximum Supply Voltage 15 Vdc Maximum Power Load.04 VdcOutput CharacteristicsEncoder Module Wire Colors2 Allen Screws 3mm x20mmWasherPic. 13mm Allen Key OctaveModulePic. 2 Pic. 3Pic. 4 Pic. 5Pic. 6 Pic. 7Pic. 8 Pic. 94.7 Output Module Installation (Optional)All Octave water meters are shipped with either a cover plate or communication module installed on the side of each meter. Even if the meter is not going to be read by radio or some other electronic unit, it is important to leave one of these devices installed on the Octave to prevent damage to the communication port.Installing an Octave without a cover plate or communication module would void any warranty.If you received an Output Module separate from your Octave meter, please follow the steps below to ensure proper installation of the module. Read through these instructions before attempting to remove the cover plate. Your module came as a complete installation kit with the supplies shown in Pic. 1.Octave Output Module Installation PartsStep 1: Remove the Sealing Cap from the cover plate (Pic. 2).Step 2: Using the 3mm Allen Key provided, remove the cover plate (Pic.3). Keep the cover plate and 3mm x 15mm screws for future use. Thecommunication port is now exposed. (Pic. 4)Step 3: Place washer around the 4-prong plug of the output module. (Pic.5 & 6)Step 4:Insert Output Module into the communication port (Pic. 7), with thecable pointing down. This will allow the slot inside the communication port toalign with the groove on the module. Do not force the module into thecommunication port. This may cause damage to the pins. Secure into placeusing the 3mm x 20mm screws provided. Tighten until the screws stop. (Pic.8)Step 5: Push the Sealing Cap into the lower screw hole (Pic. 9). Lock theSealing Cap in place by firmly pushing in into place or gently tapping it in witha small hammer.Note: If at any time the module needs to be removed, take caution not toallow dirt or water into the communication port. If the module is going to beremoved for an extended period of time, reinstall the cover plate and the 3mmx 15mm screws.4.8 Wire Connectivity ChartThe following chart is designed to assist in wiring the Octave module to various AMR/AMI Radios. The Octave transmits up to 8 digit output encoder output. Pulse output resolution is available in resolutions of x0.1, x1, x10, x1,000, or x10,000.By default Octave encoder modules are provided with Nicor connectors, however you may also select Itron Connectors, magnetic inductor coils for wall or pit mount, for bare wire. Nicor connectors are factory potted.All other connectors are spliced with water resistant heat shrink wrap.Manufacturer Model CommunicationTypeOctave Red Wire Octave Green Wire Octave Black WireAclara Star 3000 Series Encoder Red White Black Star 3000 Series Pulse Red N/A Black or White Badger Orion Encoder Red Green Black Datamatic Firefly Encoder Red White BlackMosaic Encoder Red Green Black Elster MTU Encoder White Red BlackMTU Pulse Red White Green Hersey Hot Rod Encoder Red Green or White BlackItron 60w Encoder Green Red Unshielded 60wp Pulse Red N/A White100w Encoder Grey Brown YellowKemp Meeks Visu-Link VL-9S Pulse Polarity does not matter - Connect Red and Black Wires to eitherterminal, disregard green wireVisu-Link VL-9 Encoder Red Green Black Master Meter Allegro PT Encoder Red Green Black Universal XTR Encoder Red Green BlackFast Pulse XTR Pulse Red N/A Black Metron Farnier(T2)T2 M2w Encoder Red Green Black Neptune R900 Encoder Black Red Green Sensus MXU Pit Unit Encoder Red Green Black MXU Wall Unit Encoder Red Green BlackTouch Pad Encoder Red Green Black*Note – when connecting to Master Meter’s Allegro PT or 3G XTR, the Octave will typically output an 8 digit reading, unless otherwise specified. When connecting to another manufacturer’s radio or read device, it is recommended to confirm with that provider what the actual reading resolution of the connecting device is.。
Octave教程OctaveTutorial
Octave教程OctaveTutorialOctave教程 Octave Tutorial转载:/pipisorry/article/details/43565653本文教你掌握octave基本知识。
Octave Tutorial Octave教程为什么学习机器学习要学octave等较高级的原型语言?If you want to build a large scale deployment of a learning algorithm, what people will often do is prototype and the language is Octave.Which is a great prototyping language.So you can sort of get your learning algorithms working quickly.prototyping language(原型语言):The most common prototyping language use for machine learning are: Octave, MATLAB,Python, NumPy, and R.Octave is nice because open sourced.And MATLAB works well too, but it is expensive for to many people.If you know Python, NumPy or if you know R.But, people usually end up developing somewhat more slowly, Because the Python, NumPy syntax is just slightly clunkier than the Octave syntax.安装Octaveubuntu下安装octave最新版sudo apt-add-repository ppa:octave/stablesudo apt-get updatesudo apt-get install octave -y #直接安装是3.8版本,添加最新稳定版的源安装的是4.2版本[Octave for Debian systems: Octave's Personal Package Archive (PPA) for Ubuntu][Octave for GNU/Linux]windows下安装octave[][Installation]octave安装拓展包使用octave运行matlab代码时可能出错,因为没有对应的包,如warning: the 'col2im' function belongs to the image package from Octave Forge which seems to not be installed in your system.这时就要安装对应的包了。
第06讲OCTAVE风险评估方法
一个案例
一个中等规模的医院:MedSite医院, 包括几类职能机构:
一个常设的行政管理机构:院长办公室; 一些常设的和临时的业务机构,如业务科
室、实验室和下辖诊所等; 一些常设和临时的后勤机构; 一个小规模(3人)的IT部门,负责网络
OCTAVE
什么是OCTAVE? OCTAVE准则(Criterion) OCTAVE方法(Method)
OCTAVE准则(Criterion)
是OCTAVE的核AVE风险评估的:
原则(Principle) 属性(Attribute) 输出(Output)
OCTAVE
什么是OCTAVE? OCTAVE准则(Criterion) OCTAVE方法(Method)
OCTAVE 方法(Method)
什么是OCTAVE方法?
OCTAVE方法是一种具体的风险评估方法,根据它你 可以执行一次实际的风险评估。
OCTAVE方法完全遵从前面介绍的OCTAVE准则,即 它遵守所有原则,具备所有属性,并且提供规定的输 出。
每个过程中有若干任务(Activity)要执行,执行后会 输出一些信息。对于OCTAVE方法来说,这些信息与 OCTAVE准则中规定的输出是一致的。
OCTAVE 方法(Method)
OCTAVE方法强调人员的交流和协作,依 靠多次的研讨会来获取信息
前3个过程,研讨会参与者主要是评估组和组 织各个管理层次的员工,目的是全面了解资产、 威胁、脆弱性、现有安全措施等信息
Operationally Critical Threat, Asset, and Vulnerability Evaluation
octave层数
octave层数Octave是一种开源的数值计算工具,它提供了丰富的函数库和语法来进行科学计算和数据分析。
它的层数也是其功能的体现,下面将从不同的层数来介绍Octave的特点和用途。
一、第一层:基本语法和数据类型在Octave中,我们首先需要学习基本的语法和数据类型。
Octave 支持常见的数据类型,如整型、浮点型、字符型等,同时也支持矩阵和数组的操作。
通过学习这些基本知识,我们可以进行简单的数值计算和变量操作。
二、第二层:控制结构和函数控制结构和函数是程序设计的基础,Octave提供了丰富的控制结构,如条件语句、循环语句等,以及函数的定义和调用。
通过掌握这些知识,我们可以实现复杂的算法和程序逻辑。
三、第三层:数据处理和统计分析Octave提供了许多函数和工具来进行数据处理和统计分析。
在这一层,我们可以学习如何读取和处理数据文件,如何进行数据清洗和转换,以及如何进行统计分析和可视化。
这对于数据科学和数据挖掘非常重要。
四、第四层:数值计算和优化算法Octave的数值计算功能非常强大,它提供了许多函数和算法来解决数值计算的问题。
在这一层,我们可以学习如何求解线性方程组、矩阵运算、数值积分和微分方程等数学问题,以及如何使用优化算法求解最优化问题。
五、第五层:信号处理和图像处理Octave还提供了丰富的信号处理和图像处理函数,可以用于处理音频信号和图像数据。
在这一层,我们可以学习如何进行信号滤波、频谱分析、图像增强和特征提取等操作,为信号处理和图像处理提供了强大的工具支持。
六、第六层:机器学习和深度学习机器学习和深度学习是当今热门的领域,Octave也提供了丰富的函数和工具来支持这些任务。
在这一层,我们可以学习如何使用Octave进行数据预处理、模型训练和评估,以及如何应用常见的机器学习算法和深度学习框架。
七、第七层:工程应用和科学计算在工程和科学计算中,Octave也有广泛的应用。
在这一层,我们可以学习如何进行数值模拟和仿真,如何进行信号分析和频谱估计,以及如何进行数据可视化和结果展示。
octave入门教程

7 控制语句 7.1 7.2 7.3 7.4
if...else 语句 . . . . . . . . . . . . . . . . . . . . . . . . . . . . . . . . . . . . . . . . . . . . . . 20 switch 语句 . . . . . . . . . . . . . . . . . . . . . . . . . . . . . . . . . . . . . . . . . . . . . . . 21 for 语句 . . . . . . . . . . . . . . . . . . . . . . . . . . . . . . . . . . . . . . . . . . . . . . . . . 22 while 语句 . . . . . . . . . . . . . . . . . . . . . . . . . . . . . . . . . . . . . . . . . . . . . . . 23 23
9 矩阵和向量 9.1 9.2 9.3 9.4 9.5 矩阵乘法 转置算符
矩阵创建函数 . . . . . . . . . . . . . . . . . . . . . . . . . . . . . . . . . . . . . . . . . . . . . . 29 创建复合矩阵 . . . . . . . . . . . . . . . . . . . . . . . . . . . . . . . . . . . . . . . . . . . . . . 30 提取矩阵元 . . . . . . . . . . . . . . . . . . . . . . . . . . . . . . . . . . . . . . . . . . . . . . . 31 31 33 33
octave dataframe函数

octave dataframe函数DataFrame是一个非常常用的数据结构,常常被用来处理机器学习和数据分析中的数据。
他可以被视为一个表格,其中每一列都代表一个变量,而每一行都代表一条记录。
DataFrame提供了丰富的数据操作功能,可以使我们轻松地对数据进行整理和分析。
Octave是一种开源的数值计算软件,也提供了DataFrame函数来处理数据。
DataFrame函数提供了一些基本的数据操作功能,包括读取和保存文件、数据分组、排序等等。
它也支持多个操作,使用户能够快速便捷地完成复杂的数据操作。
DataFrame函数的语法```D = dataframe (filename, rownames, colnames, delimiter)```其中:- filename:需要读取的文件的名称- rownames:行名,可以是一个行向量或一个字符串- colnames:列名,可以是一个列向量或一个字符串- delimiter:文件中的分隔符(空格、逗号、制表符等)DataFrame函数支持多个批量操作,可以实现大规模数据的处理和分析。
下面介绍一些DataFrame常用操作的示例:1.读取文件DataFrame可以轻松地读取各种格式的数据文件。
例如,下面的代码演示了如何读取一个csv文件:其中,data.csv是需要读取的文件名,‘,’是文件中的分隔符。
2.根据列名选择数据使用元素下标,我们可以通过列名来选择DataFrame的数据:```D(:,’colname’);```其中,‘colname’是需要选择的列的名称。
3.根据条件筛选数据我们可以使用条件表达式来筛选数据:其中,‘colname1’和‘colname2’是列名称,可以根据实际情况进行修改。
代码中的第一行创建了一个索引,用于选择满足特定条件的数据,而第二行将索引应用于原始数据来生成一个新的DataFrame D_filtered。
octave gui 实例
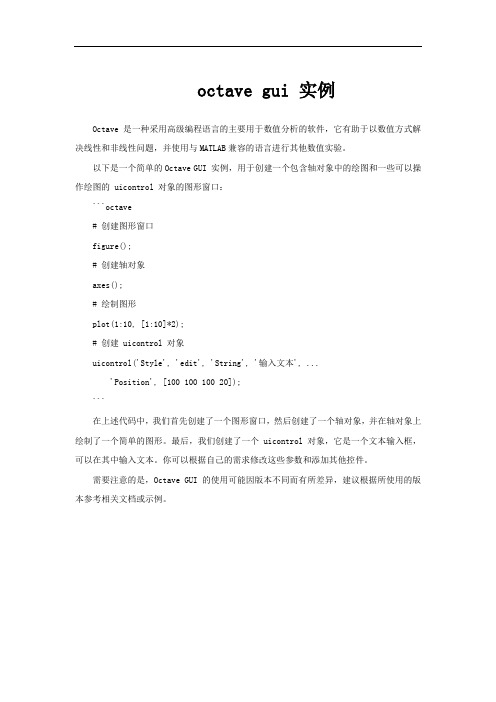
octave gui 实例
Octave是一种采用高级编程语言的主要用于数值分析的软件,它有助于以数值方式解决线性和非线性问题,并使用与MATLAB兼容的语言进行其他数值实验。
以下是一个简单的Octave GUI 实例,用于创建一个包含轴对象中的绘图和一些可以操作绘图的 uicontrol 对象的图形窗口:
```octave
# 创建图形窗口
figure();
# 创建轴对象
axes();
# 绘制图形
plot(1:10, [1:10]*2);
# 创建 uicontrol 对象
uicontrol('Style', 'edit', 'String', '输入文本', ...
'Position', [100 100 100 20]);
```
在上述代码中,我们首先创建了一个图形窗口,然后创建了一个轴对象,并在轴对象上绘制了一个简单的图形。
最后,我们创建了一个 uicontrol 对象,它是一个文本输入框,可以在其中输入文本。
你可以根据自己的需求修改这些参数和添加其他控件。
需要注意的是,Octave GUI 的使用可能因版本不同而有所差异,建议根据所使用的版本参考相关文档或示例。