JBL(CINEMA STV215)回音壁说明书
JBL Cinema SB 400 2.1 声音条说明书
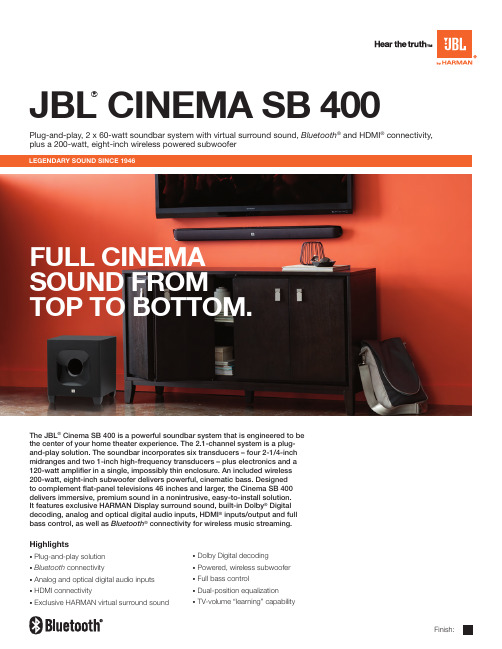
J BL® Cinema SB 400 The JBL® Cinema SB 400 is a powerful soundbar system that is engineered to bethe center of your home theater experience. The 2.1-channel system is a plug-and-play solution. The soundbar incorporates six transducers – four 2-1/4-inchmidranges and two 1-inch high-frequency transducers – plus electronics and a120-watt amplifier in a single, impossibly thin enclosure. An included wireless200-watt, eight-inch subwoofer delivers powerful, cinematic bass. Designedto complement flat-panel televisions 46 inches and larger, the Cinema SB 400delivers immersive, premium sound in a nonintrusive, easy-to-install solution.It features exclusive HARMAN Display surround sound, built-in Dolby® Digitaldecoding, analog and optical digital audio inputs, HDMI® inputs/output and fullbass control, as well as Bluetooth® connectivity for wireless music streaming.Highlights• Plug-and-play solution•B luetooth connectivity• Analog and optical digital audio inputs • HDMI connectivity• Exclusive HARMAN virtual surround sound •D olby Digital decoding•P owered, wireless subwoofer •F ull bass control•D ual-position equalization • TV-volume “learning” capabilityPlug-and-play, 2 x 60-watt soundbar system with virtual surround sound, Bluetooth® and HDMI® connectivity, plus a 200-watt, eight-inch wireless powered subwooferFinish:Movies, TV shows and music, anchored with powerful JBL bass. It’s showtime.k ey Fea tureS JBL ®Cinema SB 400The Cinema SB 400 incorporates left and right midrange and high-frequencytransducers, plus amplifiers and controls, into a single soundbar. It easily connects to any TV with the included cables. Easy to install, the soundbar requires virtually no setup. Just connect and play.The Cinema SB 400 wirelessly streams music from smartphones and tablets, delivering room-filling, full-range sound reproduction with exceptional bass. The On Screen Display indicates Bluetooth connectivity status, alongwith current source, volume and sound mode.Plug-and-play solution Drawing from HARMAN expertise in movietheater audio, the Cinema SB 400 lets you add cinema sound without adding multiple speakers. Employing proprietary HARMAN display surround, it creates a virtual surround-sound experience for multiple listeners – not just one – from a single soundbar.With three HDMI inputs, the Cinema SB 400 provides convenient connection for multiple HDMI source components. It also includes one HDMI output with Audio Return Channel (ARC), which sends the TV sound back to the soundbar. This simplifies switching and makes the system easier to use.The Cinema SB 400 decodes film soundtracks in their native format, which eliminates conver-sion stages that reduce sound quality. This helps the soundbar provide a superb surround-sound experience for multiple listeners.The Cinema SB 400 increases your control over the audio experience. It features a dedicated control that lets you adjust volume, frequency and subwoofer output phase, so you can optimize the sound for each movie or TV show.Nothing draws you into the action like huge bass. The subwoofer’s eight-inch low-frequency transducer and built-in 200-watt amplifier deliver all of your entertainment’simpact, emotion and excitement. And because it’s wireless, there are no unsightly wires between soundbar and subwoofer.Powered, wireless subwoofer The Cinema SB 400 can either be placed on a shelf or tabletop, or wall-mounted with included hardware. A dual-position equalization feature optimizes the soundbar’s performance for either placement, so you can position it where you choose without compromising sound quality.Dual-position equalizationThe Cinema SB 200 comes with a credit-card-sized remote, but you might not need to use it much. That’s because the SB 200 can “learn” the volume control IR code of your existing TV remote control, so you can control the sound-bar and TV volume with the same remote.TV-volume “learning” capabilityWhat’s included:• 1 Cinema SB 400 soundbar • 1 Eight-inch wireless subwoofer • 1 IR remote control • 1 Power cable • 1 Optical audio cable• 1 Analog audio cable • 1 Wall-mounting bracket • 1 Quick-Start GuideSpeCS and inFormationCinema SB 400 SystemFrequency response:38Hz – 20kHzCinema SB 400 SoundbarMidrange transducers:Two 2-1/4" (57mm) cones per channel, video shielded High-frequency transducers: One 1" (25mm) dome per channel, video shielded Amplifier power (@ 1% THD+N): 60 watts per channel Enclosure type:PortedFrequency response: 120Hz – 20kHzPower requirement: 100V – 240V , 50/60Hz, 60WPower consumption: <0.5W (standby); 60W (maximum)Dimensions (H x W x D): 3-3/4" x 43-5/16" x 2-1/2" (95mm x 1100mm x 64mm)Weight:7.3 lb. (3.3kg)Cinema SB 400 SubwooferLow-frequency transducer: One 8" (203mm) cone, down-firing Amplifier power: 100 watts RMS, 200 watts peak Enclosure type:PortedFrequency response: 38Hz – 120HzAudio controls: Volume, phase, crossover frequency Power requirement: 100V – 240V , 50/60Hz, 100WPower consumption: <0.5W (standby); 100W (maximum)Dimensions (H x W x D): 14" x 13" x 12-5/8"(355mm x 329mm x 320mm)Weight:23.1 lb. (10.5kg)go online to register your purchase and access professional tips that’ll show you just how serious sound can get./registermyproductA superstar home theater ensemble cast – in just two components.SpeCiFiCationS JBL ®Cinema SB 400© 2012 HARMAN International Industries, Incorporated. All rights reserved.JBL is a trademark of HARMAN International Industries, Incorporated, registered in the United States and/or other countries. The “Hear the truth” logo is a trademark of HARMAN International Industries, Incorporated. The Bluetooth word mark and logo are registered trademarks owned by Bluetooth SIG, Inc., and any use of such marks by HARMAN International Industries, Incorporated, is under license. Dolby is a registered trademark of Dolby Laboratories. HDMI is a registered trademark of HDMI Licensing, LLC in the United States and/or other countries.Features, specifications and appearance are subject to change without notice.HARMAN International Industries, Incorporated8500 Balboa Boulevard, Northridge, CA 91329 USA 。
JBL 场馆系列音响用户指南说明书

OWNER’S GUIDE®JBL VENUE ™For more than 60 years, JBL has been providing audio equipment for concert halls, recording studios and movie theaters around the world and has become the hands-down choice of leading recording artists and sound engineers.With the JBL Venue Series, innovative technologies such as titanium-laminate-dome tweeters, EOS ™waveguides and PolyPlas ™transducer reinforcement are available to you. Enjoy!UNPACKING THE SPEAKERSIf you suspect damage from transit, report it immediately to your dealer. Keep the shipping carton and packing materials for future use.PLACEMENTNEVER drag the speaker to move it, as this will damage the spikes, the feet and/or the wood cabinet itself. Always lift the speaker and carry it to its new location.CAUTION:Floorstanding (tower) loudspeakers have a high center of gravity and may become unstable and tip over during events such asearthquakes, or if rocked, tipped or improperly positioned. If this is a concern,these speakers should be anchored to the wall behind them, using the same procedures and hardware customary for anchoring bookcases and wall units. The customer is responsible for proper installation and proper selection of hardware.STEREOBefore deciding where to place your speakers, survey your room and think about placement, keeping the following points in mind, using Figure 1 as a guide:•For best results, place the speakers 6'–8' (1.5m–2.5m) apart.•Position each speaker so that the tweeter is approximately at ear level.•Generally, bass output will increase as the speaker is moved closer to a wall or corner.•Refer to “Home Theater” below if you also plan to use the speakers for home theater reproduction.Figure 1. Experiment with speaker placement to obtain the best bass level and stereo imaging in your room.HOME THEATERFor front-channel use, place one speaker on the left and another on the right,along either side of the television monitor. Since the speakers are magnetically shielded, you can place them near the TV without worrying about the field dis-torting the TV picture.For surround-channel use, place speakers on bookshelves or stands alongside the listening position. Tour and Balcony are also wall-mountable. Final place-ment depends on room acoustics, availability of space and your listening pref-erence (Figures 2 and 3).In 6- or 7-channel configurations, place the rear channel(s) behind the listening position, as shown in Figures 2 and 3.NOTE:A JBL powered subwoofer will add impact and realism to both music and film soundtracks. Contact your JBL dealer for recommendations on subwoofer models for your application.Figure 2. This overhead view shows a typical home theater plan. Left/right rearchannels are for a 7-channel system. The center rear channel is for a 6-channel system.Figure 3. This figure shows an alternate layout, which may be more suitable for some rooms. Left/right rear channels are for a 7-channel system. The center rear channel is for a 6-channel system.INSTALLING FEETBalcony,Tour,Monitor,ArenaThe supplied self-adhesive rubber feet may be attached to the bottom corners of your speakers to protect your furniture.Listening PositionLeft Channel Right Channel2WALL-MOUNTINGTourThe Venue Series Tour may be wall-mounted. The customer is responsible for proper selection and use of mounting hardware (available through hardware stores), to properly and safely wall-mount the speakers. These prod-ucts are not intended for ceiling mounting. Adjustable wall-mounting brackets are included.BalconyImportant Safety Notes• Proper selection of mounting hardware and installation of the wall bracketsare the responsibility of the customer.• This product is not intended for ceiling mounting.Two No. 8 round-head or pan-head screws should be used per loudspeaker. The screw head should be between 5/16 inch (8mm) and 1/4 inch (6.3mm) in diameter, and the screw should be at least 2 inches (50mm) in length.When installing screws in any wall, always use properly selected wall anchors. Attach two of the four self-adhesive rubber pads that came with the Balcony loudspeaker to the back of the enclosure in the two bottom corners so that the cabinet is spaced evenly from the wall. Select a suitable mounting location on a wall. (The ceiling is not a suitable mounting location.)Drill two pilot holes, appropriately sized for the specific self-tapping screw or wall anchor that you will be using. The holes should be 8 inches (203mm) apart. See Figure 1. The holes should be 3/4"(19mm)below where you want the top of the enclosure to be positioned. Use a carpenter’s level to ensure that the holes are even and that the speaker will mount on the level.Install the two screws into either a wooden wall stud or anchor, and tighten them until the back of each screw head is about 1/8 inch (3mm) from the wall. See Figure 2. Install the loudspeaker by slowly moving the cabinet toward the screws so that the screw heads clear the larger circular portion of the two keyholes. Once both screw heads have entered the keyholes, the loudspeaker should gently be lowered onto the screw shafts. Check that the loudspeaker is firmly locked onto the screws by gently pulling the speaker down and forward.WIRING THE SYSTEMIMPORTANT:Make sure all equipment is turned off before making any connections. For speaker connections, use a high-quality speaker wire with polarity coding. The side of the wire with a ridge or other coding is usually considered positive polarity (i.e., +).NOTE:If desired, consult your local JBL dealer about speaker wire and connection options.The speakers have coded terminals that accept a variety of wire connectors. The most common connection is shown in Figure 4.To ensure proper polarity, connect each +terminal on the back of the amplifier or receiver to the respective +(red) terminal on each speaker, as shown in Figure 5. Connect the –(black) terminals in a similar way. See the owner’s guides that were included with your amplifier, receiver and television to confirm connection procedures.IMPORTANT:Do not reverse polarities(i.e.,+ to –or –to +) when making connec-tions.Doing so will cause poor imagingand diminished bass response.Figure 4. This figure shows how to connect bare wires to the terminals. STANDARD CONNECTIONFigure 5. Wiring diagram shows polarity connections for one channel of a stereo or home theater system.FINAL ADJUSTMENTSCheck the speakers for playback, first by setting the system volume controlto a minimum level, and then by applying power to your audio system. Play a favorite music or video segment and increase the system volume control toa comfortable level.NOTE:You should hear balanced audio reproduction across the entire fre-quency spectrum. If not, check all wiring connections or consult the author-ized JBL dealer from whom you purchased the system for more help.The amount of bass you hear and the stereo-image quality will be affected by a number of different factors, including the room’s size and shape, the construc-tion materials used to build the room, the listener’s position relative to the speakers, and the position of the speakers in the room.Listen to a variety of music selections and note the bass level. If there is too much bass, move the speakers away from nearby walls. Conversely, if you place the speakers closer to the walls, there will be more bass output. CARE OF YOUR SPEAKER SYSTEM Each JBL Venue Series enclosure has a wood-grain-vinyl finish that does not require any routine maintenance. When needed, use a soft cloth to remove any fingerprints or dust from the enclosure or grille.NOTE:Do not use any cleaning products or polishes on the cabinetor grille.3All features and specifications are subject to change without notice.JBL and Harman International are trademarks of Harman International Industries, Incorporated, registered in the United States and/or other countries. Venue, Pro Sound Comes Home, EOS and PolyPlas are trademarks of Harman International Industries, Incorporated.*The maximum recommended amplifier power rating will ensure proper system headroom to allow for occasional peaks. We do not recommend sustained operation at these maximum power levels.TOURMONITORARENASTAGEFrequency Response (–3dB)70Hz – 20kHz 68Hz – 20kHz 50Hz – 20kHz 47Hz – 20kHz Max. Recommended Amplifier Power*100W 125W 125W 150W Power Handling (Continuous/Peak)50W/100W 60W/240W 70W/280W 80W/320W Sensitivity (2.83V/1m)86dB 86dB 88dB 90dB Nominal Impedance 8 Ohms 8 Ohms 8 Ohms 8 Ohms Crossover Frequency 3000Hz3000Hz4000Hz600Hz, 3500Hz Low-Frequency Transducer 4" (102mm) PolyPlas,™5" (130mm) PolyPlas,™6" (170mm) PolyPlas,™6" (170mm) PolyPlas,™shielded shielded shielded shieldedMidrange Transducer NANANA4" (100mm) PolyPlas,™shieldedHigh-Frequency Transducer3/4" (19mm) Titanium-3/4" (19mm) Titanium-3/4" (19mm) Titanium-3/4" (19mm) Titanium-laminate dome, shielded,laminate dome, shielded,laminate dome, shielded,laminate dome, shielded,EOS ™waveguide EOS ™waveguide EOS ™waveguide EOS ™waveguide Dimensions With Grille (H x W x D)9-1/2" x 6-3/4" x 5-5/8"10-7/8" x 6" x 8-5/8"15" x 9" x 11-1/4"34-3/4" x 9" x 13-1/8"241mm x 171mm x 143mm 275mm x 153mm x 219mm 381mm x 229mm x 286mm 883mm x 229mm x 333mm Weight per Speaker4.6 lb/2.1kg7 lb/3.2kg15 lb/6.8kg31.2 lb/14.5kgSTADIUMVOICEBALCONYFrequency Response (–3dB)36Hz – 20kHz 70Hz – 20kHz 65Hz – 20kHz Max. Recommended Amplifier Power*225W 150W 100W Power Handling (Continuous/Peak)110W/440W 75W/300W 50W/200W Sensitivity (2.83V/1m)91dB 90dB 86dB Nominal Impedance 8 Ohms 8 Ohms 8 Ohms Crossover Frequencies 300Hz, 4000Hz3500Hz2000HzLow-Frequency Transducers Dual 8" (200mm) PolyPlas,™Dual 5" (130mm) PolyPlas,™4" (100mm) PolyPlas,™shieldedshielded shielded Midrange Transducer 4" (100mm) PolyPlas,™NANAshieldedHigh-Frequency Transducer3/4" (19mm) Titanium-3/4" (19mm) Titanium-3/4" (19mm) Titanium-laminate dome, shielded,laminate dome, shielded,laminate dome, shielded,EOS ™waveguide EOS ™waveguide EOS ™waveguide Dimensions With Grille 40-1/4" x 9-7/8" x 15-3/4"6-1/2" x 20-1/4" x 9-5/8"10" x 10-1/8" x 6"(H x W x D)1022mm x 251mm x 400mm 165mm x 514mm x 244mm 254mm x 257mm x 152mm Weight per Speaker43.5 lb/19.8kg9.6 lb/4.4kg8 lb/3.6kgSPECIFICATIONS。
JBL Cinema SB200 功放音箱快速入门指南说明书

CINEMA SB200powered soundbar speakerquICk-StArt guIdEthANk You For ChooSINg thIS JBL®ProduCtThe JBL Cinema SB200 powered soundbar speaker is a complete, integrated sound system that will dramatically improve the sound of programs you watch on your television. It can mount on a wall or sit on a shelf and includes all of the cables you need to connect it to your TV and your cable/satellite tuner or disc player. We’re confident that this JBL system will provide every noteof enjoyment that you expect – and that when you think about purchasing additional audio equipment for your home, car or office, you will once again choose JBL products.This quick-start guide contains all the information you need to set up, connect and adjust your new speaker system. For more in-depth information, go to our Web site: .INCLudEd ItEMS2ConnectorEQ switch: Use this switch to adjust the soundbar’s bass for either wallor table mounting. If you’re mounting the soundbar on a wall with theincluded wall-mount bracket, set the EQ switch to the “Wall” positionfor the most natural-sounding bass performance. If you are placing thesoundbar on a table, set the EQ switch to the “Table” position for themost natural-sounding bass performance.Optical Input connector (digital): If your TV, disc player or cable/satellite tuner has an optical digital output, use the included opticalcable to connect it here.NOTE: You can connect different source components to the analog anddigital connections.Aux Input connection (analog): Use the included stereo 3.5mm tostereo RCA audio cable to connect the stereo analog outputs of yourTV, disc player or cable/satellite tuner here.Power switch: Set this switch to the “On” position to activate thesoundbar. In normal operation, this switch will be left in the “On”position. See Turning the Soundbar On and Off, on page 5, for moreinformation.Power Cord connector: Connect the included power cord here. SeePower Connections, on page 5, for more information.IMPORTANT: Do not connect the power cord to an AC outlet until youhave made and verified all other connections.If you will not be using the soundbar for an extended period – forinstance, if you’re going on vacation – set the Power switch to the “Off”position.ButtonsButton Button ButtonButtonVolume ButtonsSurround ModeButtonPower Button Mute ButtonBass BoostButtonSource ButtonPower button: To turn the soundbar on when it is in the Standbymode, press the Power button on either the soundbar or the remote.(The Power indicator will turn white.) To put the soundbar in theStandby mode, press either Power button while the system is on.(The Power indicator will turn amber.) If you do not press the Powerbutton, the soundbar will automatically go into the Standby modeapproximately 10 minutes after the audio signal ceases.NOTE: If you put the soundbar into the Standby mode by pressingthe Power button, you must manually turn it on by pressing the Powerbutton again.Mute button (remote control only): Press the Mute button to mutethe soundbar. (The Volume +/– indicators both illuminate white.) Whilethe system is muted, press the Mute button again or either Volumebutton to restore the sound.NOTE: Pressing both of the soundbar’s Volume buttons at the sametime while the system is on will mute the system. Pressing eitherVolume button while the system is muted will restore the sound.Surround Mode button: This button turns the soundbar’s HARMANDisplay Surround processing on and off. The Surround button indicatorturns amber when HARMAN Display Surround is active, and turns whitewhen HARMAN Display Surround is not active (normal stereo sound).See Surround Mode Buttons, on page 6, for more information.Volume Up/Down buttons: Press the “+” button to increase thevolume; press the “–” button to decrease the volume. The buttonsilluminate white for a few seconds after being pressed.Source Selector button: This button switches between the sourcesconnected to the Aux (analog) and Optical (digital) inputs. When the Auxinput is active, the Source indicator turns white; when the Optical inputis active, the Source indicator turns amber.Bluetooth button (soundbar only): Press this button to play theaudio stream from a paired Bluetooth device through the soundbar.(The button LED will illuminate blue when a paired Bluetooth device isthe active source.) Press and hold this button to force the soundbar intothe Bluetooth pairing mode. See Bluetooth Operation, on page 5, formore information.Bass Boost button (remote control only): Press the remote’sBass Boost button to enhance low-frequency performance. Pressingthe Bass Boost button again will return the soundbar’s normal low-frequency performance.SOUNDBAR REAR-PANEL CONTROLS ANDCONNECTIONSSOUNDBAR TOP-PANEL CONTROLS ANDREMOTE CONTROL 3SouNdBAr PLACEMENtPLACING THE SOUNDBAR ON A TABLEIf your TV is placed on a table, you can place the soundbar on the table directly in front of the TV stand, centered with the TV screen. As long as the surface of the table is flat, the soundbar will rest on its rubber bumpers.• S et the soundbar’s EQ switch in the “Table” position. See Soundbar Rear-Panel Controls and Connections,on page 2.WALL-MOUNTING THE SOUNDBARIf your TV is attached to a wall, you can use the included wall-mount bracket to mount the soundbar on the wall directly below the TV screen.1. D etermine the location for the soundbar on the wall. Make sure that the top of the soundbar will not block your view of the TV screen when it is mounted on the wall.2. H old the bracket against the wall as a template and mark thelocations of the soundbar wall-mount bracket holes on the wall. The three holes should be evenly spaced 7-1/16" (18cm) apart, and the bracket slots are designed to accept 4mm screws. Make sure thatthe holes are at the same height. See the illustration below.Mark Three Bracket Hole Locations3. M aking sure that the bracket’s flat side is against the wall, attach the wall-mount bracket to the wall at the locations you marked, using hardware that is appropriate for the wall’s construction and materials. Note that the soundbar weighs 7.5 lb (3.4kg). Be sure touse hardware that can support this weight.4. A fter reading the Connections section on page 4, connect all cables to the soundbar.IMPORTANT: Do NOT plug the soundbar’s power cord into an AC outlet at this time.• S et the soundbar’s EQ switch in the “Wall” position, and set the soundbar’s Power switch in the “On” position. See Soundbar Rear-Panel Controls and Connections, on page 2.5. A ttach the soundbar to the bracket by sliding the bracket’s upper tabs into the slots on the back of the soundbar. The soundbar’s slots allow you to adjust the soundbar’s angle on the wall to ensure that itis level.CoNNECtIoNSSOURCE CONNECTIONSAnalog: Use the supplied stereo audio cable to connect the soundbar’s Aux (analog) input to your TV’s stereo audio output. If your TV has two sets of audio output jacks, use the set that has a fixed (not variable) output level. This will let you turn your TV’s speakers all the way off while the TV still supplies a constant audio signal to the soundbar. Digital: If your disc player, cable tuner or satellite tuner has an optical digital output, you can use the supplied optical digital audio cable to connect it to the soundbar’s Optical (digital) input. NOTE: If your disc player, cable tuner or satellite tuner does not have an optical digital output, you can connect its analog audio output to your TV. The TV will send its audio signal to the soundbar through the analogconnection described above.4POWER CONNECTIONSAfter verifying that all of the source connections have been made properly, plug the supplied power cord into the soundbar’s Power Cord connector, and plug the other end into an active, unswitched AC outlet. Do NOT plugthis cord into the accessory outlet found on some audio components.uSINg Your SouNdBAr SYStEMTURNING THE SOUNDBAR ON AND OFFSet the soundbar’s Power switcn to the “On” position.Press the Power button on either the soundbar or the remote to turn the soundbar on. To put the soundbar in the Standby mode, press either Power button while the soundbar is on.Power ButtonIf you do not press the Power button, the soundbar will automatically go into the Standby mode approximately 10 minutes after the audio signal ceases. NOTE: If you have put the soundbar into the Standby mode by pressing the Power button, you must manually turn it on by pressing the Power button again. If the soundbar has automatically gone into the Standby mode 10 minutes after the audio signal has ceased, it will automatically turn itself on when it receives an audio signal at either input connection.If you will be away from home for an extended period of time, or ifyou will not be using the soundbar for an extended period, set the soundbar’s Power switch to the “Off” position.BLUETOOTH OPERATIONTo wirelessly stream audio to the soundbar from a Bluetooth-enabled device:1. C onfirm that the soundbar is in the Bluetooth pairing mode (theBluetooth button LED will be flashing blue). If the LED is not flashingblue, press and hold the Bluetooth button until its LED begins toflash blue.2. P lace the device in the pairing mode. Use the device’s Bluetoothpairing menu to pair it with the soundbar. (The soundbar will appearas “SB200” in the device’s menu.) If the device requires a passcode,use 0000.3. W hen the soundbar’s Bluetooth button LED illuminates constantly,it is paired with the device and you can stream audio via Bluetoothfrom the device to the soundbar.To disconnect the Bluetooth device, press and hold the soundbar’s Bluetooth button until the LED begins flashing. To pair the soundbarwith a different Bluetooth-enabled device, repeat Steps 1 – 3 with thenew device.Notes on Bluetooth operation:• Y ou can manually switch sources to the paired Bluetooth device bypressing the soundbar’s Bluetooth button.• I f you switch the soundbar to a different source while a pairedBluetooth device is streaming to the soundbar, the soundbar willsend a Stop command and the Bluetooth device will stop streaming.SWITCHING SOURCESPress the soundbar’s or remote’s Source button to switch betweenthe devices you connected to the Aux input and Optical input and adevice streaming audio via Bluetooth. When the Aux input is active the soundbar’s Source indicator will illuminate white; when the Optical inputis active the soundbar’s Source indicator will illuminate amber.SourceButton56ADJUSTING THE SYSTEM’S VOLUMEPress the soundbar’s or remote’s Volume + and – buttons to raise and lower the system’s volume one step at a time. Hold down the buttons to continuously raise or lower the volume.Volume ButtonsFor the best sound, we recommend turning your TV’s built-in speakers off. Consult your TV’s owner’s manual to find out how to do this. MUTING THE SYSTEMMomentarily press both of the soundbar’s Volume buttons at the same time, or press the remote’s Mute button to mute the system. (Both Volume indicators illuminate.) Momentarily press either of the soundbar’s Volume buttons or press the remote’s Mute button again to un-mute the system. (The Volume indicators turn off.)Both Volume ButtonsMute CHANGING THE SURROUND MODEPress the soundbar’s or remote’s Surround Mode indicator to switch the sound between normal stereo (the Surround Mode indicator lights white) and HARMAN Display Surround (the Surround Mode indicator lights amber). The HARMAN Display Surround setting will produce a complete surround-sound experience for anyone sitting in front of and several feet away from the soundbar. Although it is particularly effective when watching movies, you can also try the HARMAN Display Surround setting for music.BooStINg thE BASSPress the remote’s Bass Boost button to enhance low-frequency performance, resulting in bass with more impact, which you mayprefer while watching movies or listening to music. There is no harm in experimenting with this control. Pressing the Bass Boost button again will return the soundbar’s normal low-frequency performance.Bass Boost ButtonLEArNINg Your tV rEMotE’S VoLuME ANd MutE CoMMANdSYou can program the soundbar so it will respond to your TV remote’s volume up, volume down and mute commands. This will let you control both the soundbar and your TV with a single remote. Before you begin to program the soundbar, have your TV remote in hand.1. P ress and hold the soundbar’s Surround button until the buttonbegins flashing amber.Press and Hold Until Button Flashes Amber2. H old your TV’s remote approximately 12” (30cm) from the front of thesoundbar and aim the remote directly at the soundbar:• P ress the TV remote’s volume up button while pressing and holding the soundbar’s Volume + button. If the programming was successful the soundbar’s Surround button will change from amber to solidwhite for one second, then will return to flashing amber.A) H old Down Soundbar’s Volume Up Button 7• P ress the TV remote’s volume down button while pressing and holding the soundbar’s Volume – button. If the programming was successful the soundbar’s Surround button will change from amberto solid white for one second, then will return to flashing amber.A) H old Down Soundbar’s B) • P ress the TV remote’s mute button while pressing and holding the soundbar’s Volume + and Volume – buttons at the same time. If the programming was successful the soundbar’s Surround button will change from amber to solid white for one second, then will return toflashing amber.A) H old Down Soundbar’s Mute Button3. W hen you’re finished, press and hold the soundbar’s Surround button until the button stops flashing amber.The soundbar will now respond to your TV remote’s volume and mute commands.SPECIFICAtIoNSCINEMA SB200 POWERED SOUNDBAR SPEAkER Low-frequency transducer:One 3-1/2" (89mm) cone per channel High-frequency transducer:One 1" (25mm) dome per channel Amplifier power:60 watts peak per channel Frequency response:55Hz – 23kHz (-6dB)Power requirement:100V – 240V, 50Hz/60Hz, 60W Power consumption:<0.5W (standby); 60W (maximum)Dimensions (H x W x D):4-9/16" x 35-1/2" x 4-1/16" (116mm x 901mm x 103mm)Weight (shipping):11.5 lb (5.1kg)HARMAN International Industries, Incorporated8500 Balboa Boulevard, Northridge, CA 91329 USA© 2012 HARMAN International Industries, Incorporated. All rights reserved. JBL is a trademark ofHARMAN International Industries, Incorporated, registered in the United States and/or other countries.The Bluetooth word mark and logo are registered trademarks and are owned by the Bluetooth SIG,Inc., and any use of such marks by HARMAN International Industries, Incorporated, is under license.All Rights Reserved. Features, specifications and appearance are subject to change without notice.Part No. 950-0471-001 Rev: A 。
jbl音响说明书

j b l音响说明书(共15页) -本页仅作为预览文档封面,使用时请删除本页-jbl音响说明书篇一:JBL闹钟使用说明JBL闹钟使用说明一、闹钟屏蔽背光调节方法A:背光长亮模式1、按下闹钟顶部按键2、选择DISPLAY选项3、选择BRIGHTNESS选择4、选择所需要的背光亮度或选择AUTOB:背光熄灭模式1、按下闹钟顶部按键2、选择DISPLAY选项3、选择BRIGHTNESS选择4、把背光亮度调整到OFF(选择此模式后需看时间只要按下SNOOZE键即可)二、菜单显示时间:1、长按SNOOZE键3-5秒2、选择菜单延迟时间3、按保存选项篇二:JBL 260卫星音箱操作指南JBL 卫星音箱接线指南:1、 JBL的每只卫星音箱都是直接接到功放,而不是先接到低音炮。
2、 JBL卫星音箱除了中置音箱是横式的以外,2只主音箱和2只环绕音箱都是一样的,随便那2只作主音箱,那2只作环绕音箱都可以。
左音箱: FRONT L右音箱: FRONT R左环绕音箱: SURROUND L右环绕音箱: SURROUND R中置音箱: CENTER低音炮: SUBWOOFER 莲花口3、左环绕、右环绕音箱的确定:以人坐在沙发上,人的左手边的环绕就是左环绕音箱,人的右手边就是右环绕音箱。
4、低音炮接法:最上面的旋钮:SUBWOOFER LEVEL低音炮音量调节,一般可以打到一半,然后再根据每个客户的具体情况来调节大小。
中间有三个莲花输入口:1、 LFE 紫色2、 L 白色3、 R 红色一般接LFE一个接口就可以了,L、R都不用接。
下面的音箱香蕉接线柱都不需要用,那是老式功放才要用的,现在的功放都不用了,现在的功放只需要输出已个低音炮音频信号给低音炮就可以了。
篇三:JBL扬声器※ JBL扬声器扬声器是音响系统的喉舌,直接影响还音的音质,是音响系统最关健的部份。
它如像歌星的嗓子,有了好的歌喉,才能唱出优美动听的歌曲。
因此,如何选择好声音宏亮、音质优美、失真极微、工作可靠的扬声器是广大用户共同关心和追求的目标。
JBL音响产品的新技术说明书

The core philosophy behind JBL’s long history of audio innovation is based onmeticulous attention to every detail of system design. If the wire needed for anew voice coil isn’t available, JBL develops it. If a tool or technology doesn’texist, JBL invents it. This uncompromising commitment to the goal drivesthe development of every new product and technology that bears the JBLlogo. In recent years, audio engineers have developed new work methods andhave migrated to new work environments. Responding to the call for greateraccuracy and dynamic range in this new breed of music and post productionwork spaces, JBL engineers developed the new M2 Master Reference Monitor.Breaking free of the conventional, the M2 incorporates numerous patentedinnovations to deliver unprecedented performance and a trulyremarkable listening experience. Conceived and purposebuilt for modern recording and post production, theM2 was created so you can exercise yourown meticulous attention to detail.The Demand for Next Generation Studio MonitorsToday’s sophisticated music production is carried out in a broad range of spaces. Until now, the availability ofa big, impressive, yet highly accurate monitoring experience, has been limited to purpose-built control rooms. Lacking the space, infrastructure and resources to effectively integrate large systems into their production environments, professional project studios are forced to rely on the use of near-field monitors.As small and medium sized rooms play an increasingly significant role in cinema and broadcast content creation, high dynamic range and accuracy are required from a speaker system with a modest foot print. While JBL Screen Array®speakers are the standard on cinema mix stages, they are too large for use in smaller rooms, but near-field studio monitors don’t provide the required acoustic output or dynamic range for re-mix of dramatic content.Bringing a fresh perspective to the realities of this new production environment, JBL developed newtechnology to take monitoring to the next level.The Solution:The M2 Master Reference MonitorAddressing the growing need for high dynamic range and reference-monitor accuracy in a broad range of studios, JBL has developed the M2 Master Reference Monitor: a free-standing, 2-way system that can be placed in any environment to provide an exceptionally accurate monitoring experience. Leveraging a new generation of JBL high-output, ultra-low distortion transducers, the M2 provides in-room frequency response of 20 Hz to 40 kHz,and an extraordinary 123 dB maximum SPL to meet the demanding music, cinema and broadcast production requirements for impactful dynamic range.In a compact form-factor, the M2 integrates three key components that work in harmony to deliver unparalleled performance. At the heart of the system, JBL’s patented D2 high frequency and 2216Nd low frequency transducers are the engines that make this possible. Using a revolutionary design, the D2 produces smooth, extended high frequency response with ultra-low distortion whether listening at very high or subtle levels. Using patented technology, the remarkable 2216Nd woofer offers deep bass extension and very low power compression,even at its full-rated output. In spite of the M2’s minimal footprint, its exceptional low frequency response eliminates the need for a subwoofer.The unique Image Control waveguide completes the acoustic design. A marvel of engineering in its own right, this new JBL waveguide was designed specifically for the M2. Allowing an acoustically seamless transition between the woofer and high frequency driver, it produces exceptional imaging and delivers rich detail to a broad area of the room.These unique components make possible a two-way design with an unprecedented level of performance, utilizing a single seamless cross-over point that reduces system complexity and allows a compact form-factor for flexibility of placement in the room.Crown® Power Amplifiers with internal floating-point DSP are used to bi-amplify and tune each speaker, optimizing the M2’s performance in any room.The M2 brings a world-class, big monitoring experience with a new level of accuracy to a broad range of production spaces. For rooms wishing to step up, the M2 is a game changer.The Ultimate High Frequency Driver for Critical Reference MonitoringExtended HF Reproduction Smooth Response High Power HandlingMeasurably Lower Distortion Reduced Power Compression Increased Dynamic HeadroomExceptional system performance requires extraordinary components. To achieve their groundbreaking objectives, the M2 design engineers capitalized on new, patented JBL technology in the D2 Dual Driver, a revolutionary device developed by JBL to deliver dramatically superior high frequency response. The D2 dual driver design allows the M2 to meet seemingly opposing objectives: extended high frequency, very low distortion and very high output.Central to this innovative solution are two key developments. First: the use of an annular diaphragm, not subject to the break up modes of a conventional dome diaphragm. Second: the merging of two drivers into a single,compact transducer with a single acoustical output. Instead of the large and heavy metal dome diaphragm ofa conventional compression driver, the D2430K uses two annular low-mass polymer diaphragms offering thesame radiating area as a conventional 3-inch dome. Two separate 3-inch voice coils driven by their own magnet structures share the burden of heat transfer, resulting in a dramatic increase of output and power handling. Theresult is a high frequency transducer that produces smoother, extended high frequency response to 40 kHz andsignificantly lower levels of nonlinear distortion. Well-validated by objective measurements, the D2430K’s superior sound quality has also been verified through exhaustive subjective listening by leading industry experts.D2Dual Diaphragm, Dual Voice-Coil Compression DriverCompared with traditional highfrequency components, theannular design of the D2diaphragms dramaticallyreduce distortion resulting in audibly superior fidelity.Exceptional Low Frequency Extension High OutputVery Low Power Compression Very Low DistortionAchieving extended, rich low frequency performance within the M2 system designparameters required additional JBL engineering innovations, and the 2216Nd in theM2 is no “off-the-shelf” woofer. It employs no less than five patented technologies toallow bass extension to the limits of the audible range, and high output, free of powercompression that is detrimental to a system’s low frequency performance. Echoingthe “dual driver” design of the D2, the 2216Nd utilizes dual neodymium magnetsand two voice coils. To ensure the ultimate performance, even the use of special wire inthe 2216 voice coils is a JBL patented application. Featuring a low thermal coefficient ofresistance wire, this new JBL voice coil design allows the woofer parameters to remainmore stable at high output levels. The result is lower power compression, which allowslower distortion at high system output. In addition, the 2216Nd’s cone, compliance andspider are engineered to allow greater excursion at the woofer’s lowest frequencies.In the M2 system, the 2216Nd produces impressive low frequency output down to 20 Hz.2216NdDifferential Drive ® Woofer FEA Optimized Cone Geometry for Strength and Controlled DirectivityDual Voice Coils Utilizing Low TCR Alloy Edge-Wound WireDual Gap / Dual Neodymium Magnet Motor AssemblyHi-Temp Fiberglass FormerHigh Strength Nomex SpiderImage Control WaveguideImpressive Imaging and Sound Stage Exceptional High Frequency DetailUniform Directivity for Smooth In-Room Response Patent Pending DesignTo support an imperceptible transition between the two drivers, and deliver exceptional imaging, JBL engineers pioneered a new patent-pending waveguide design that enables neutral frequency response, not just on-axis, but off-axis in the vertical and horizontal planes, all the way down to the M2’s 800 Hz crossover point.The unique geometry of this waveguide allows the M2 to deliver remarkable high frequency detail, imaging, and natural balance at nearly any listening position in a broad range of acoustic environments. Since designof this complexity and level of detail is an iterative process, JBL performs Finite Element Analysis, creating virtual simulations of off-axis response, pattern control, and the blend of the high frequency driver and woofer. Because “close” is not good enough, JBL uses in-house rapid prototyping equipment to produce and evaluate physical samples until the design is perfected.With an awareness that today’s audio production is carried out in a wide range of acoustic environments, JBL engineers employ a set of measurements to predict how a loudspeaker will behave in actual roomenvironments. While other manufacturers use a single on-axis frequency response measurement taken at one point in space, LSR Design Protocol requires 72 measurements that encompass all power radiated into the listening room, in every direction. This data reflects 1,296 times the information of a single on-axis response curve. The entire sound field heard by the listener is correlated and studied to optimize the speaker’s response at the listening position. LSR Design Protocol exposes resonance, directivity anomalies and the cause of off-axis coloration. This allows intelligent system design that ensures a wide, accurate sweet-spot, and neutral timbre in a broad range of listening environments. The M2 is the ultimate expression of the LSR Design Protocol.Directivity anomalies, and resulting poor off-axis response can destroy accuracy and neutrality at the listening position and cannot be fixed using room EQ. The measurements below illustrate the M2’s superior directivity.Extended low frequency performance and high SPL can be theformula for unwanted resonance. The M2 enclosure is constructedof rigid 1" MDF and with the aid of JBL’s interferometer, extensivelybraced for rock-solid stability at the system’s full rated power. Theenclosure incorporates a JBL patented Slipstream port design withinternal flares that ensure low frequency efficiency while eliminatingnoise caused by port turbulence. Architecturally elegant, the M2enclosure occupies a relatively small footprint, and can betransported to various working environments,Small FootprintExtended Bass PerformancePatented Low Frequency Port DesignM2 EnclosureLSR Linear Spatial Reference DesignA laser interferometer can detect the source of resonance in a prototype enclosureThe coverage of this speaker is erratic and notuniform at all frequencies. As a component of soundthat reaches the mix position, the off-axis responsenegatively impacts the speaker’s accuracy. The M2s response is exceptionally smooth and consistent across a wide listening window, providing neutral response, and natural balance, not just at the mix position, but virtually anywhere in the room.Room acoustics can play a big part in what you hearat the mix position, particularly in the room-dependentlow frequency bands, where resonance caused by roommodes can give a false impression of bass in the mix.While offering exceptional accuracy “out of the box,”the power of the M2 is fully realized with its intelligentin-room tuning and integration capabilities, ensuringoptimum performance in your listening environment.Room optimization is achieved through the use offloating-point digital signal processing integrated intoCrown iTech HD power amplifiers and BSS SoundwebLondon processors. HARMAN System Architect ™Software is included to provide external control of systemEQ and tuning capabilities. Used in conjunction withexternal measurement hardware and software, thecomplete M2 tuning and room integration systemaddresses non-linearity in the room. This ensures ahigh degree of accuracy whether the monitors arefreestanding, soffit-mounted, or placed adjacent to a wall.HARMAN Crown I-Tech power amplifiers completethe M2 system, providing greater than a kilowatt of cleanpower to the 2216Nd woofer, and more than enoughpower for the D2 driver. Working in concert with theM2’s revolutionary Image Control waveguide, BSS ®OMNIDRIVE HD ™ digital signal processing in the CrownI-Tech allows the implementation of an ideal crossover,while providing the option for storage of EQ presets.For large system configurations, BSS Soundweb London signal processors provide centralized processing of multiple M2 systems and are controlled using supplied London Architect software. When digital inputs and outputs are needed, the Soundweb London BLU-800model can be outfitted with digital I/O cards and synchronized to external word clock sources. The use of BSS Soundweb processors, in combinationwith Crown Macro-Tech ® power amps, provide apowerful, flexible, and cost effective system.System IntegrationTuning and Room IntegrationCrown ® I-Tech 5000HDBSS Soundweb ™ London ProcessingSystem ConfigurationsWith a compact form factor, exibleplacement options, tune-ability, and itsintegrated system approach, the M2 systemeliminates the impediments that haveprevented personal-use studios from havingthe dynamic range and accuracy of a largeformat monitor system. For the rst time, theM2 system enables project studio owners tomake the leap from small near- eld monitorsto a “big”, world-class monitoring experience.Solid MDF enclosures, front porting andoutboard electronics make the M2 sof tmount ready. Eliminating the requirement foroutboard equalization, the Crown poweredM2 system includes all the EQ needed fordetailed room-tuning, and offers the ability tostore multiple EQ curves to meet the needsof the application or client preference.While the M2 provides exceptional dynamicrange and the resolution needed fordemanding remix applications, its compactfoot-print allows placement behind thescreen in smaller rooms. Used as screenchannels, the M2 integrates perfectly intoa system with JBL cinema surrounds,subwoofers and overhead surroundspeakers speci ed in burgeoning theatricalrelease formats. Select models in the BSSSoundweb London processor line canbe tted with digital inputs and externallysynchronized to house word-clockfor an all-digital signal path. Centralizedmanagement of EQ presets allow storageand easy recall of curves such as theX-Curve for specialized applications.System Configurations: Project Studio System Configurations: Commercial Control Room 16:23:42:00Professional Project StudiosMusic Recording Control RoomsPost Production Control RoomsLike all JBL Professional products,the M2 design was subjectedto the extreme JBL Power Testregimen in which a speaker isrequired to operate at full ratedoutput for 100 hours continuously,without failure. This strenuous testensures the speaker will provideyears of reliable performancein the demanding professionalproduction environment.JBL Professional’s sophisticated Rapid Prototype Machines play a key role in the perfection of a system design.Rapid production of acoustically correct mechanical components allows JBL engineers to verify and perfect the design over multiple iterations. The result is not only a shorter design cycle,but better analysis and refinement of the final design, ensuring the final component meets design objectives.Because the room can play a big part in what you hear, JBL’s unique speaker shuffler allows critical evaluation and benchmarking of a speaker design. The shuffler swaps pairs of speakers in the space of 3 seconds, placing each pair in exactly the same position in the room, ensuring the most accurate comparative listening evaluation possible.Power Test ChamberRapid Prototyping Speaker ShufflerSystem Format: High Frequency Model:Low Frequency Model: Crossover Frequency:Frequency Range:Image Control Wave Guide Dispersion: Sensitivity 1W/1m SPL:Continuous/Peak SPL@ 1m: The System Requires:Recommended Amplifi er Power: Input Connectors:Enclosure Construction: Finish: Included:Dimensions (W x H x D):Weight:2-Way Floor Standing or Soffi t MountableD2430K Dual Diaphragm Dual Voice Coil Compression Driver 2216Nd 15 in (381 mm) Differential Drive ® Woofer 800 Hz 20 Hz - 40 kHz 120º H x 100º V 92 dB117 dB /123 dB; 108 dB Peak SPL @ 8mOne Crown ® iTech 5000HD power amp for each speaker,or BSS ® Soundweb London Processor with Crown Macro-Tech ® MA-5000i 1,200 Watts into 8 ohms Spring Terminals 25 mm (1 in) MDF Satin Black LacquerRemovable ABS Grille with Black UL Compliant Fabric 508 mm x 1256 mm x 355.6 mm (20 in x 49.5 in x 14 in)58.5 kg (129 lb)These detailed measurements of the M2 illustrate the system’s exceptional performance.The JBL technologies used in the M2 Master Reference Monitor are protected under one or more of the following patents:BSS and Crown are trademarks of Harman InternationalPerformance and Specifi cationsJBL Pro Patents2216ND Differential Drive ® Woofer 5664023, 5748760, 6768804, 6847726, 6774510Bass Refl ex Port 7890312D2430 Dual Diaphragm, Dual Voice Coil Compression Driver 8280091Image Control Waveguide Patent PendingSystem tuning requires external measurement hardware and software, not supplied as part of an M2 system.Including removable feet Frequency Response DirectivityM2SPECIFICATIONS1231 m m / 48.5 i n1256 m m / 49.5 i n87 m m3.4 i n48 m m 1.9 i n 500 m m / 19.7 i n414 m m / 16.3i n 371 mm / 14.6 in250 mm / 9.8 inHarman GreenEdge systems combine environmentally-friendly design and dramatic energy savings without compromising the excellent performance for which Harman products are known.• Improved Acoustic Effi ciency and Heat Dissipation • Lower System Weight and Packaging • Reduced Power Consumption and Amplifi er Effi ciencyHarman Green Edge Environmental ResponsibilityCAT M2-25 01/13 © 2013 Harman International Industries, Incorporated 8500 Balboa Blvd. Northridge, CA 91329 USA /M2。
JBL产品使用说明书

HARMAN International Industries, Incorporated8500 Balboa BoulevardNorthridge, CA 91329Dear Customer,Congratulations and thank you for choosing the JBL brand. Please take a moment to complete the enclosed profile card. The information we gather will enable us to keep you informed of our latest advancements and will help us to better understand your needs and fulfill your expectations.For more than 60 years, the JBL brand has been the professional’s top choice in music and film recording and reproduction. From the stage to the recording studio to the liv-ing rooms and automobiles of critical audiophiles, the JBL brand sets the standard for accuracy and dynamic musical performance.We’ve maintained this enviable position through rigorous research into analog and digital technologies and psychoacoustics. The results of this research drive the devel-opment of new designs and materials, extracting even greater levels of performance. We’re confident that the JBL products you have chosen will surpass your expectations, and that the next time you consider the purchase of an audio product, you will again think of JBL products.Once again, thank you for selecting JBL equipment.HARMAN International Industries, IncorporatedA Message from the JBL manufacturerand the Consumer Electronics Association:Selecting fine audio equipment, such as the unit you have just purchased, is only the start of your musical enjoyment. Now it is time to consider how you can maximizethe fun and excitement your equipment offers. JBL and the Consumer Electronics Association want you to get the most out of your equipment by playing it at a safe level, one that lets the sound come through loud and clear without annoying blaring or distortion – and, most important, without affecting your sensitive hearing.Sound can be deceiving. Over time your hearing “comfort level” adapts to higher volumes of sound. What sounds “normal” can actually be loud and harmful to your hearing. Guard against this by choosing a safe level BEFORE your hearing adapts.TO ESTABLISH A SAFE LEVEL:• Start your volume control at a low setting.• Slowly increase the sound until you can hear it comfortably, clearly, and without distortion. ONCE YOU HAVE ESTABLISHED A COMFORTABLE SOUND LEVEL:• Do not exceed that level.Taking a moment to do this now will help to prevent hearing damage or lossin the future. After all, we want you listening for a lifetime.JBL Northridge Series Passive All Weather Speaker Systems5-Year Limited WarrantyThis is an important document. Attach your bill of sale to this card and keep it ina safe place. Your bill of sale is your warranty.The JBL warranty remains in effect for five years from the date of the first consumer purchase.WHO IS PROTECTED BY THIS WARRANTYProvided that the JBL product was purchased from an authorized dealer in theUnited States or purchased by military personnel from an authorized militaryoutlet, the JBL warranty protects the original owner, which warranty is not transferable. Any attempt to transfer this warranty shall immediately void it. A copy of the original dated bill of sale must be presented whenever warranty service is required.WHAT IS COVERED BY THIS WARRANTYExcept as specified below, the JBL warranty covers all defects in material and workmanship. The following are not covered: damage caused by accident, misuse, abuse, product modification or neglect; damage occurring during shipment; damagefrom failure to follow instructions contained in the instruction manual; damageresulting from the performance of repairs by someone not authorized by the JBL manufacturer; damage caused by installation of parts that do not conform to JBL specifica-tions; units used for commercial or business use; any claims based on misrepresentations by the seller; products sold on an “as is” or final sale basis; or the cost of installing, removing, or reinstalling the unit. JBL liability is limited to the repair or replacement,at our option, of any defective product and shall not include incidental orconsequential damages. The JBL manufacturer reserves the right to replace a discontinued model with a comparable model. Any replacement units or parts may be new or rebuilt. NOTE: Repair of our product must be done by an authorized dealer or service center. Unauthorized repair will void the warranty and is done at the risk of the consumer.TO OBTAIN WARRANTY SERVICEIf you require warranty service, please contact your dealer for assistance. If this is not possible and you live in the United States, please visit our Web site at or call 800-336-4525 for information on how to obtain service or replacement.If purchased outside the United States, contact your local dealer or distributor for repair or replacement.DO NOT RETURN PRODUCTS TO THE JBL FACTORY WITHOUT AUTHORIZATION; THEY WILL BE RETURNED UNOPENEDYou are responsible for transporting your product for repair or replacement. The JBL manufacturer will pay reasonable return charges for delivery to any location in the con- tinental United States, Alaska or Hawaii if the repair or replacement is covered underthe warranty. Please save the original shipping carton(s), as a charge will be made for additional cartons.Correspondence with JBL Customer Service should be addressed to: JBL Customer Service, 8500 Balboa Boulevard, Northridge, CA 91329. Outside the United States, please contact your local distributor.This warranty gives you specific legal rights. You may also have other rights, which vary from state to state. Some states do not allow the exclusion or limitation of incidentalor consequential damages or limitations on how long an implied warranty lasts, so the above may not apply to you.HARMAN International Industries, Incorporated8500 Balboa Boulevard, Northridge, CA 91329© 2012 HARMAN International Industries, Incorporated. All rights reserved.JBL is a trademark of HARMAN International Industries, Incorporated, registered in the United States and/or other countries. CEA (Consumer Electronics Association) is a registered trademark of the Consumer Electronics Association.Part No. 5YEARWARJBL。
JBL 影音系统说明书
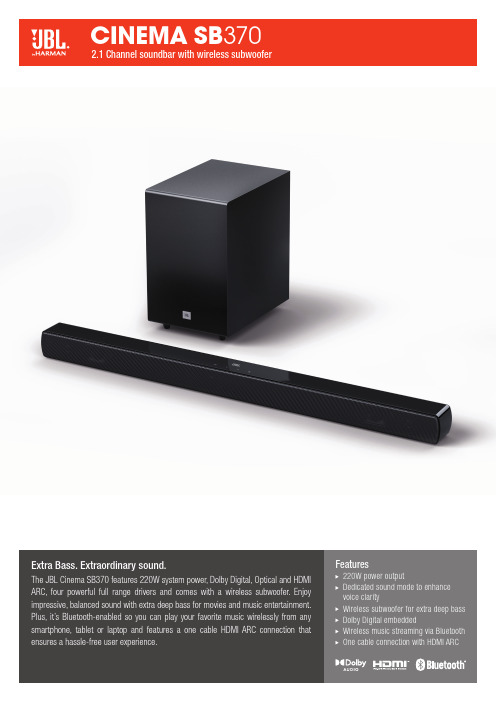
Extra Bass. Extraordinary sound.The JBL Cinema SB370 features 220W system power, Dolby Digital, Optical and HDMI ARC, four powerful full range drivers and comes with a wireless subwoofer. Enjoy impressive, balanced sound with extra deep bass for movies and music entertainment. Plus, it’s Bluetooth-enabled so you can play your favorite music wirelessly from any smartphone, tablet or laptop and features a one cable H DMI ARC connection that ensures a hassle-free user experience.Features220W power outputD edicated sound mode to enhance voice clarityW ireless subwoofer for extra deep bass D olby Digital embeddedW ireless music streaming via Bluetooth O ne cable connection with HDMI ARCHARMAN International Industries, Incorporated 8500 Balboa Boulevard, Northridge, CA 91329 USA © 2021 HARMAN International Industries, Incorporated. All rights reserved. JBL is a trademark of HARMAN International Industries, Incorporated, registered in the United States and/or other countries. The Bluetooth® word mark and logos are registered trademarks owned by Bluetooth SIG, Inc. and any use of such marks by HARMAN International Industries, Incorporated is under license. Other trademarks and trade names are those of their respective owners. The terms HDMI, the HDMI logo, and High-Definition Multimedia Interface are trademarks or registered trademarks of HDMI Licensing LLC in the United States and other countries. Les termes HDMI, le logo HDMI et High-Definition Multimedia Interface sont des marques commerciales ou des marques commerciales déposées de HDMI Licensing LLC aux États-Unis et dans d’autres pays. Dolby, Dolby Audio and the double-D symbol are trademarks of Dolby Laboratories. Dolby, Dolby Audio et le symbole du double D sont des marques commerciales de Dolby Laboratories. Features, specifications and appearance are subject to change without notice.Features and Benefits220W power outputIncredible, powerful sound for an immersive cinematic experience.Dedicated sound mode to enhance voice clarityJust press the “Voice” button on the remote control to enhance voice clarity, and never miss a word of your favorite movie.Wireless subwoofer for extra deep bassEnjoy deep and thrilling bass and clutter-free experience.Dolby Digital embeddedDolby Digital embedded for ultimate movie experience.Wireless music streaming via BluetoothStream and enjoy all your music wirelessly from any mobile device.One cable connection with HDMI ARCThe one cable H DMI ARC connection allows for the simplest set-up and a hassle-free user experience.What’s in the BoxSoundbarWireless subwooferRemote control with batteriesPower cords (up to 8pcs depending on region SKUs)HDMI cableWall-mount bracket kit with screwsQuick start guideWarranty cardSafety sheet Technical SpecificationsP ower supply: 100 – 240VAC, ~ 50/60Hz T otal speaker power output(Max. @THD 1%): 220WS oundbar power output (Max. @THD 1%): 2 x 52WS ubwoofer power output (Max. @THD 1%): 116WS oundbar transducer: 2 x (48 x 90)mm racetrack driver + 2 x 0.5" tweeterO perating temperature: 0°C – 45°CS ubwoofer transducer: 5.25", wireless sub H DMI Video output (With Audio return channel): 1H DMI HDCP version: 1.4M ax SPL: 82dBF requency response: 40Hz – 20kHzA udio inputs: 1 Optical, Bluetooth (USB is for Service only.)B luetooth version: 4.2B luetooth profile: A2DP V1.3/ AVRCP V1.5 B luetooth frequency range:2402MHz – 2480MHzB luetooth Max. transmitting power:<0dbm (EIRP)M odulation Type: GFSK, π/4 DQPSK2.4G Wireless frequency range:2400 – 2483MHz2.4G Max. transmitting power: 3dBmS oundbar dimensions (W x H x D):900 x 62 x 67 (mm) / 35.4" x 2.44" x 2.64" S ubwoofer dimensions (W x H x D):200 x 320 x 280 (mm) / 7.87" x 12.6" x 11" S oundbar weight: 1.65kgS ubwoofer weight: 5kg。
JBL 音箱产品说明书
Raccomandiamo di tenere l’imbottitura e il resto dell’imballaggio, anche dopo aver estratto il prodotto dall’interno del cartone. Harman International Japan non sarà responsabile di eventuali danni causati da un imballaggio non idoneo, con materiali diversi da quelli presenti nella scatola originale durante il trasporto delle unità per spostamenti, riparazioni o altre ragioni.
CONNESSIONI
ATTENZIONE: la connessione degli altoparlanti a un amplificatore deve avvenire previo spegnimento dell’amplificatore stesso. La connessione degli altoparlanti con l’alimentazione ancora accesa può danneggiare l’amplificatore e gli altoparlanti. Questi altoparlanti usano un sistema di colori per i terminali, dove il rosso rappresenta il positivo (+) e il nero rappresenta il negativo (-). Connettere ai terminali sul retro cavi per altoparlanti disponibili sul mercato prestando attenzione alla polarità. *Quando si usano cavi con estremità libere sui quali è stata spelata la guaina protettiva, assicurarsi che le parti metalliche del terminale non forino la guaina protettiva. Ciò può interrompere il flusso sonoro a causa della parziale o mancata connessione. Inoltre, non spelare eccessivamente la guaina protettiva, in quanto si potrebbe verificare un corto circuito qualora le estremità dei cavi si dovessero toccare.