海尔壁挂空调说明书
海尔空调产品说明书.pdf_1718718365.762447
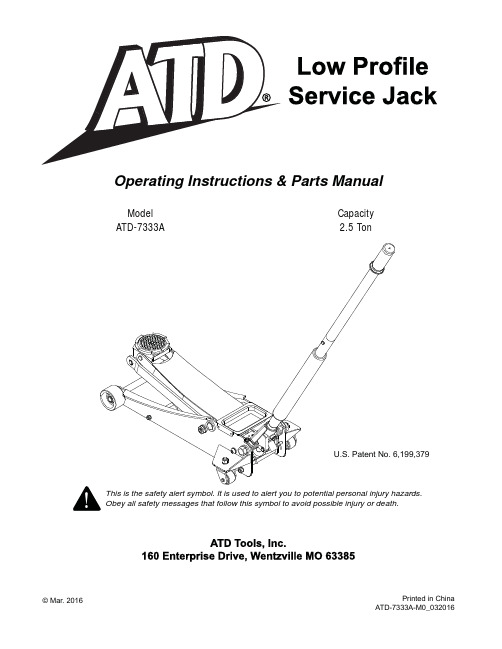
Capacity 2.5 TonModel ATD-7333AOperating Instructions & Parts ManualSAFETY AND GENERAL INFORMATIONSave these instructions. For your safety, read, understand, and follow the information provided with and on this device before using. The owner and/or operator shall have an understanding of the device, its operating characteristics and safety operating instructions before operating the equipment. The owner and/or operator shall be aware that use and repair of this product may require special skills and knowledge. Instructions and safety information shall be read to and discussed with the operator in the operator's native language, making sure that the operator comprehends their contents, before use of this equipment is authorized. If any doubt exists as to the safe and proper use of this device, remove from service immediately.Inspect before each use. Do not use if abnormal conditions such as cracked welds, damaged, loose or missing parts are noted. Any equipment that appears damaged in any way, is found to be worn, or operates abnormally shall be removed from service until repaired. If the equipment has been or is suspected to have been subjected to an abnormal load or shock, immediately discontinue use until inspected by a factory authorized repair facility (contact distributor or manufacturer for list of authorized repair facilities). It is recommended that an annual inspection be made by an authorized repair facility. Labels and operator's manuals are available from the manufacturer. PRODUCT DESCRIPTIONThis hydraulic service jack is designed to lift, but not support, one end of a vehicle. Immediately after lifting, loads must be supported by a pair of appropriately rated jack stands.vehicle with a pair of appropriately rated jack stands.ASSEMBLYAlways secure the handle into the handle sleeve by means of the bolt lock washer and nut provided. Tighten securely to prevent accidental removal of handle while in use. Familiarize yourself with the illustrations in the operator's manual. Know your jack and how it operates before attempting to use.BEFORE USE1. Verify that the product and the application arecompatible, if in doubt call Technical Service (888) 332-6419.2. Before using this product, read the operator's manualcompletely and familiarize yourself thoroughly with the product, its components and recognize the potential hazards associated with its use.3. Open the release valve by turning the handle counter-clockwise (no more than 1/2 full turn).4. With saddle fully lowered, locate and remove theEnsure the oil level is within ~ 3/16" from the inner 5. Check to ensure that jack rolls freely, that the pumpand release valve operate smoothly. Raise and lower the unloaded saddle throughout the advertised lift range before putting into service.6. Replace worn or damaged parts and assemblieswith factory authorized replacement parts only. (See replacement parts section). Lubricate as instructed in Maintenance Section.OPERATIONLifting1. Place vehicle in park, with emergency brake on andwheels securely chocked to prevent inadvertent vehicle movement.2. Locate and close release valve by turning handle3. Verify lift point, then use handle pump to contact liftpoint. To lift, pump handle until load reaches desired height.4. Transfer the load immediately to appropriately ratedjack stands.Lowering1. Raise load high enough to clear the jack stands, thencarefully remove jack stands (always used in pairs).2. Slowly turn the handle counterclockwise, but no morethan 1/2 turn. If the load fails to lower:a. Use another jack to raise the vehicle highenough to reinstall jack stands.b. Remove the affected jack and then the stands.c. Using the other jack, lower the load by turningthe operating handle counter-clockwise, but no more than 1/2 turn.3. After removing jack from under the load, pushsaddle down to reduce ram exposure to rust andcontamination.MAINTENANCEImportant: Use only good grade hydraulic jack oil. Avoid and the potential for sudden and immediate loss of load. We recommend Mobil DTE 13M or equivalent. Adding oil1. With saddle fully lowered set jack in its upright, level2.Fill with oil until ~3/16" above the inner cylinder asplug/screw.Changing oilFor best performance and longest life, replace thescrew.suitable container.Note.local regulations.3. Fill with oil until ~3/16" above the inner cylinder as seen LubricationA periodic coating of light lubricating oil to pivot points, axles and hinges will help to prevent rust and assure that wheels, casters and pump assemblies move freely. CleaningPeriodically check the pump piston and ram for signs of rust or corrosion. Clean as needed and wipe with an oily cloth.Note: Never use sandpaper or abrasive material on these surfaces!StorageWhen not in use, store the jack with saddle fully lowered.REPLACEMENT PARTSNot all components of the jack are replacement items, but are illustrated as a convenient reference of parts location. When ordering parts, give part number and parts description. Call your distributor for current pricing.TROUBLESHOOTINGFigure 4 - Replacement Parts Illustration for Model ATD-7333A.(**) Replacement requires special skills, knowledge, and equipment. Only an authorized service center mayperform the repair and/or replacement of these items.Not all components of the jack are replacement items, but are illustrated as a convenient reference of parts location. When ordering parts, give part number and parts description. Call your distributor for current pricing.123487101191256Replacement parts list for model ATD-7333A.ONE YEAR LIMITED WARRANTYFor a period of one (1) year from date of purchase, ATD Tools, Inc. will repair or replace, at its option, without charge, any of its products which fails due to a defect in material or workmanship under normal usage. This limited warranty is a consumer's exclusive remedy.Performance of any obligation under this warranty may be obtained by contacting your distributor or point of sale for further instructions. Please retain your proof of purchase, as it will be needed for any claim.CONSUMER'S SOLE AND EXCLUSIVE REMEDY SHALL BE THE REPAIR OR REPLACEMENT OF DEFECTIVE PRODUCTS AS DESCRIBED ABOVE. (2) ATD Tools, Inc. SHALL NOT BE LIABLE FOR ANY CONSEQUENTIAL OR INCIDENTAL DAMAGE OR LOSS WHATSOEVER. (3) ANY IMPLIED WARRANTIES, INCLUDING WITHOUT LIMITATION THE IMPLIED WARRANTIES OF MERCHANTABILITY AND FITNESS FOR A PARTICULAR PURPOSE, SHALL BE LIMITED TO ONE YEAR, OTHERWISE THE REPAIR, REPLACEMENT OR REFUND AS PROVIDED UNDER THIS EXPRESS LIMITED WARRANTY IS THE EXCLUSIVE REMEDY OF THE CONSUMER, AND IS PROVIDED IN LIEU OF ALL OTHER WARRANTIES, EXPRESS OR IMPLIED. (4) ANY MODIFICATION, ALTERATION, ABUSE, UNAUTHORIZED SERVICE OR ORNAMENTAL DESIGN VOIDS THIS WARRANTY AND IS NOT COVERED BY THIS WARRANTY.Some states do not allow limitations on how long an implied warranty lasts, so the above limitation may not apply to you. Some states do not allow the exclusion or limitation of incidental or consequential damages, so thehave other rights which vary from state to state.NOTES:。
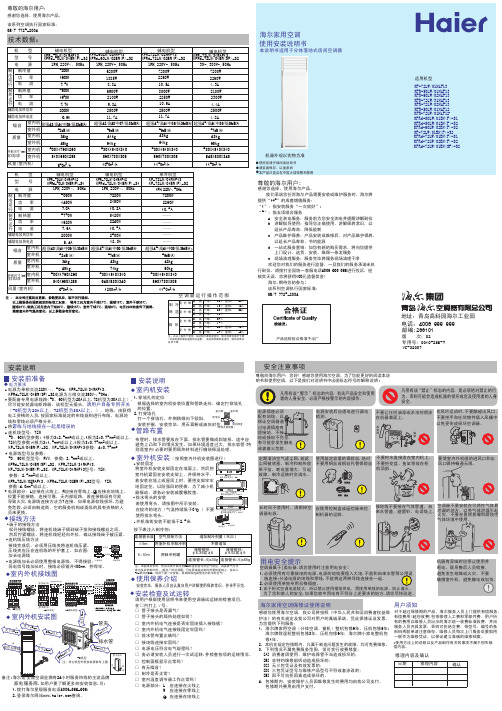
海尔家用空调KFR-50LW 01NAF13 说明书
61kg
68kg
外形尺寸(mm) 室内机 宽X高X深 室外机
500X1760X260 810X680X288
530X1810X310 860X730X308
530X1810X310 860X730X308
530X1810X310 948X830X348
风量(室内机)
950m3/h
1050m3/h
1150m3/h
7220W 2180W 10.2A
制 制热量
热 运
功
率
行电 流
5750W 1620W 7.6A
8120W 2240W 10.5A
辅助电加热功率
2000W
2500W
辅助电加热电流
9.4A
12.0A
噪音 室内机 超强43/高41/中36/低33dB(A) 超强45/高41/中39/低36dB(A)
室外机
地址:青岛高科园海尔工业园 电话:4006 999 999 邮编:266101
版 次:02 专用号:0010528957 VC532007
安装说明
安全注意事项
安装前准备
◆ 电力要求
安装说明
电源为单相交流220V~,50Hz,KFR-72LW/31NAF13、
◆ 室内机安装
要KF配Rd备-7专2L用W/电01源BN线(S路F()-5S02、电6源0机为型三为相2交0A流以3上80,V7~2,机50型Hz为。30A以上),1.穿墙孔的定位 尽可能安装漏电断路器。该机型无插头,请用户自备专用开关 根据选择的室内机安装位置和管路走向,确定打穿墙孔
1150m3/h
机型 型号 电源
辅电机型
KFR-50LW/01NAF12 KFRd-50LW/01BN(F)-S1
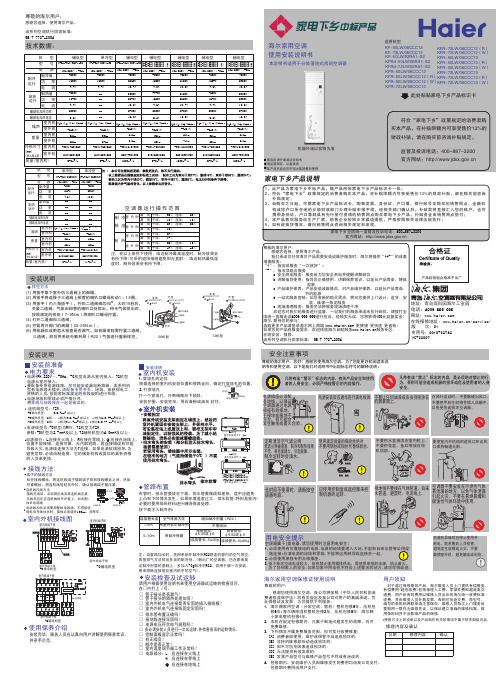
海尔Haier household air conditioner KF-50LW_02RA1-S2 KFRd-72LW_02RA1-S2 安装手册说明书
安全注意事项“警示”标志的内容,有关产品安全和使用者的人身安全,必须严格按警示的内容操作。
尊敬的海尔用户:您好!感谢您使用海尔空调。
为了您能更好的阅读本说明书和使用空调,以下是我们对说明书中出现标志符号的解释说明:尊敬的海尔用户:感谢您选择、使用海尔产品。
该系列空调执行国家标准: GB/T 7725-2004技术数据:安装前准备电力要求◆安装说明室内机安装◆接线方法连机线压线方法接线完成后,必须用压线夹将连机线压紧,压线夹应压在连机线的外护套上。
如右图:加长电源线电源线加长必须使用整根电源线,不得接驳;弱电信号线加长时,接线必须错开100mm,并焊牢。
◆◆室内外机接线图端子的接线方法松开接线螺丝,将连机线端子插到端子排和接线螺丝之间,然后拧紧螺丝,将连机线轻轻向外拉,确认接线端子被压紧。
请用户根据使用说明书来使用空调器试运转的检查项目,在□内打上√号。
安装检查及试运转□ 管子接头是否漏气?□ 管子接头的隔热处理如何?□ 室内外机电气连接是否牢固地插入接线板?□ 室内外机电气连接线固定牢固吗?□ 排水管布置正确吗?□ 接地线连接牢固吗?□ 电源电压符合电气规程吗?□ 务必请安装人员进行一次试运转,并检查各项的运转情况。
□ 控制面板显示正常吗?□ 有无噪音?□ 制冷是否正常?□ 室内温度调节器工作正常吗?□ 电源部分:L 应连接在火线上N 应连接在零线上 应连接在地线上使用保养介绍安装完毕,服务人员应认真向用户讲解使用保养常识,并亲手示范。
◆◆根据选择的室内机安装位置和管路走向,确定打穿墙孔的位置。
1.穿墙孔的定位2.打穿墙孔打一个穿墙孔,外侧稍微向下倾斜。
安装护圈,安装完毕,用石膏粉或油灰封住。
布管时,排水管要放在下面。
排水管要做成斜坡形,途中应避免上凸和下凹情况发生。
如果环境湿度过大,排水软管(特别是室内)必要时要用隔热材料进行缠绕保温处理。
注:当管路加长时,先用系统外制冷剂R22将连机管内的空气排空,再按排气方法排出多余的制冷剂。
海尔空调系列产品技术参数手册说明书

2.2PerformanceRotational speed (50 Hz supply)0 to 2900 r.min-1Rotational speed (60 Hz supply)0 to 3500 r.min-1Total pressure (single-stage backing pump,with gas-ballast) 2 x 10⁻²mbar absolute (2 Pa)Ultimate pressure (single-stage backingpump without gas-ballast, permanent gases) 2 x 10⁻³mbar absolute (2 x 10⁻¹Pa)Total pressure (two-stage backing pumpwith gas-ballast) 1 x 10⁻³mbar absolute (1 x 10⁻¹Pa)Maximum outlet pressure (see Section 1.2.4)1000 mbar absolute (1 x 10⁵Pa)Pressure differential across pump (determined by the hydrokinetic drive)Pump50 Hz60 HzEH2500 to 180 mbar0 to 1.8 x 10⁴Pa0 to 150 mbar0 to 1.5 x 10⁴PaEH500A0 to 110 mbar0 to 1.1 x 10⁴Pa0 to 90 mbar0 to 0.9 x 10⁴PaEH1200/1200C0 to 90 mbar0 to 0.9 x 10⁴Pa0 to 75 mbar0 to 0.75 x 10⁴PaEH2600/2600C0 to 80 mbar0 to 0.8 x 10⁴Pa0 to 67 mbar0 to 0.67 x 10⁴PaEH4200/4200C0 to 60 mbar0 to 0.6 x 10⁴Pa0 to 50 mbar0 to 0.5 x 10⁴Pa 2.3Recommended backing pumpsBecause of the flexibility of the hydrokinetic drive,there is a wide range of backing pumps whichare suitable for use with the EH Mechanical Booster pumps.Contact your supplier or BOCEdwards for advice on suitable backing pumps.2.4Connections2.4.1Vacuum connectionsInlet OutletEH250ISO63ISO40EH500A ISO100ISO63EH1200/1200C ISO160ISO100EH2600/2600C ISO160ISO100EH4200/4200C ISO250ISO1002.4.2Cooling-water connectionsInlet connection3/8inch BSP maleOutlet connection3/8inch BSP male2.4.3Coupling-cover purge connection (EH1200C/2600C/4200C only)Purge connection1/4inch compression fittingEH Mechanical Booster Pumps152.5Electrical dataNote:The motors of EH250and EH500A pumps are supplied configured for‘low voltage’operation (240V and lower),the motors of EH1200/1200C,EH2600/2600C and EH4200/4200C pumps aresupplied configured for ‘high voltage’ operation (380 V and higher): refer to Section 3.6.Number of phases3Supply voltage220-240 V/380-415 V at 50 Hz208-230 V/460 V at 60 HzVoltage tolerance±6%Full load current ratings See Table 2220 V 50 Hz 240 V50 Hz380 V50 Hz415 V50 Hz208 V60 Hz230 V60 Hz460 V60 HzEH250 & EH500A Full load (A) 6.3 5.8 3.7 3.4 6.1 5.5 2.8 Rating (kW) 1.5 1.5 1.5 1.5 1.5 1.5 1.5EH1200Full load (A)11.110.2 6.4 5.911.910.7 5.4 Rating (kW)3333333EH2600 & EH4200 (7.5 kW)Full load (A)19.818.211.510.520.918.99.5 Rating (kW)7.57.57.57.57.57.57.5EH2600 & EH4200 (11 kW)Full load (A)--21.520.7-34.817.4 Rating (kW)--1111-1111EH1200C Full load (A)--6 5.7-105 Rating (kW)--33-33EH2600C & EH4200C Full load (A)--2220-3618 Rating (kW)--1111-1111 Table 2 - Full load current ratings2.6Coupling-cover nitrogen purge supply (EH1200C/2600C/4200C only)Nitrogen supply pressure 1 to 9 bar gauge (2 to 10 bar absolute,2 x 105to 1 x 10⁶Pa)Regulated pressure0.3to0.5bar absolute(3x10⁴to5x104Pa) 16EH Mechanical Booster Pumps。
海尔空调安装和使用说明书

INSTALLATION AND OPERATING INSTRUCTIONSPUMPP/N 88751-509/05Model:DTSE and LTSERAPW WYOTT Foodservice Equipment CompanyP .O.Box 1829Cheyenne,WY 82003+1(307)634-5801Phone +1(800)752-0863Toll Free +1(307)637-8071Fax INSTALLATIONOPERATIONCLEANING1.Clean the pump thoroughly before using it for the first time,according to the cleaning instructions below.To install the lid,hold the pump upright,unscrew the two retaining nuts,and remove the piston rod and spout from the lower half of the pump.3.For the LTSE lever action pump,mount the lever to the lid,and then place that assembly onto the lower half of the pump and hand-tighten the piston retaining nut.Replace the spout and hand-tighten the spout retaining nut.(Make certain you replace the stainless steel ball,O-ring and piston seal.)For the DTSE direct action pump,place the lid on the lower half of the pump,and replace the spout (ensuring the O-ring and ball are in place),and hand-tighten the retaining nut.Replace the piston rod and hand tighten the retaining nut.(Make certain you replace the piston seal.)To operate the pump,press the knob or lever down until it stops,then release it.A brisk,smooth stroke delivers the condiment uniformly.If the pump is used with a heated container,allow it to cool before disassembling or cleaning it.2.Unscrew the piston retaining nut and remove the piston rod,piston seal,spring and ball.(For the lTSE model,the lid is part of this assembly.)3.Clean all parts thoroughly in a detergent solution and then a sanitizing solution,using the brushes provided.Rinse the parts in hot water and allow them to air dry.5.Reassemble using reverse procedure.2.4.1.While holding the pump upright,unscrew the spout retaining nut and remove the spout,ball and O-ring.4.NOTE:Clean the pump daily.Note the way it comes apart so you can reassemble it In reverse order.PARTS LIST&EXPLODED VIEW。
海尔空调产品说明书

1. Load the tableware.
tate freely.
Only clean tableware that is suitable for dish-
2. Add detergent.
washers. Remove large remnants of food from 3. Switch on the appliance .
7. To cancel the programme, press
for
approx. 4 seconds.
The programme is cancelled and ends after ap-
prox. 1 minute.
Cleaning filters
1. After each wash check the filters for
Adding special salt
To avoid damage to the appliance, only add special salt to the dispenser for special salt just before the programme starts. 1. Unscrew the lid of the dispenser for special salt
Setting the water softening sys-
H02
tem
H03
1. Press .
H04
2. To open the basic settings, press
H05
for 3 seconds.
H06
a The display shows Hxx.
H07
a The display shows .
海尔空调产品说明书
15
50930C
BUMPER
16
27303C
BASEPLATE
17
98777C
KIT - COMPR MTG/STUDS/CLIPS/GROMMETS
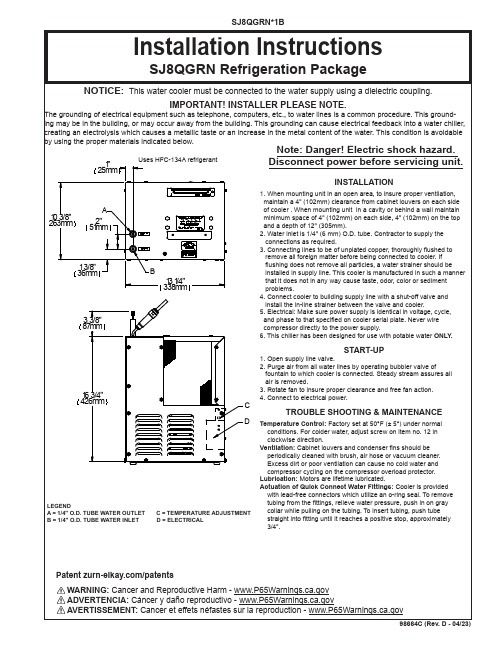
*INCLUDES RELAY & OVERLOAD. IF UNDER WARRANTY, REPLACE WITH SAME COMPRESSOR USED IN ORIGINAL ASSEMBLY. NOTE: All correspondence pertaining to any of the above water cooler or orders for repair parts MUST include model number and serial number of cooler, name and part number of replacement part.
RELEASE TUBE
6
ITEM NO.
115V ITEMIZED PARTS LIST
PART NO.
DESCRIPTION
1 0000000745 KIT - EVAPORATOR TANK ASSY
2
28478C
CABINET
3
98776C
KIT - CONDENSER/DRIER
4
98775C
KIT - FAN MTR/BLADE/SHROUD/SCREWS/NUTS
5
20282C
BRACKET - FAN MOUNTING
6
22300C
PANEL - REAR
7
55996C
IN-LINE STRAINER
8 1000001602 KIT - ELBOW 5/16" x 1/4" (3 PACK)
海尔变频空调使用说明书
The design and specifications are subject to change without prior notice forproduct improvement. Consult with the sales agency or manufacturer for details.CS237U-BP11M916122000A0388320170630Before using your air conditioner, please readthis manual carefully and keep it for future reference.Read This ManualKeep this manual where the operator can easilyfind them. Inside you will find many helpful hintson how to use and maintain your air conditionerproperly. Just a little preventative care on yourpart can save you a great deal of time and moneyover the life of your air conditioner. You'll find manyanswers to common problems in the chart oftroubleshooting tips. If you review the chart ofTroubleshooting Tips first, you may not needto call for service.INVERTER SPLIT TYPE-ROOM AIR CONDITIONERModels:BM09Y18BM12Y19BM18Y19BM24Y17DISPOSAL: Do not dispose of this product as unsorted municipal waste. Collection of such waste separately for special treatment is necessary.It is prohibited to dispose of this appliance in domestic household waste. For disposal, there are several possibilities:A) The municipality has established collection systems, where electronic waste can be disposed of at least free of charge to the user.B) When buying a new product, the retailer will take back the old product at least free of charge.C) The manufacturer will take back the old appliance for disposal at least free of charge to the user.D) As old products contain valuable resources, they can be sold to scrap metal dealers.Wild disposal of waste in forests and landscapes endangers your health when hazardous substances leak into the ground-water and find their way into the food chain. When using this air conditioner in the European countries, please read the following information:This appliance can be used by children aged from 8 years and above and persons with reduced physical, sensory or mental capabilities, or lack of experience and knowledge if they have been given supervision or instruction concerning use of the appliance in a safe way and understand the hazards involved. Children shall not play with the appliance. Cleaning and user maintenance shall not be made by children without supervision.CONTENTSSAFETY PRECAUTIONSNAMES OF PARTSOPERATING INSTRUCTIONSCARE AND MAINTENANCETROUBLESHOOTING TIPSWarning (3)Caution ......................................................................................................................................4.Indoor unit ........... (5)outdoor unit (5)Indication lamp...........................................................................................................................5Special functions .. (6)Operating temperature (7)Manual operation (7)Airflow direction control (8)How the air conditioner works ..................................................................................................9Before maintenance...... .. (10)Cleaning the unit (10)Cleaning the air filter and air freshening filter (10)Replacement of the air filter and air freshening filter (11)Preparation for extended non-operation (11)Pre-season inspection...............................................................................................................11Normal function of the air conditioner (12)Troubleshooting guide (14)SAFETY PRECAUTIONS SAFETY PRECAUTIONS To prevent injury to the user or other people and property damage, the following instructionsThe seriousness is classified by the following indications.Meanings of symbols used in this manual are as shown below.OPERATING INSTRUCTIONS 8. Connecting 9. Connecting cable10. Stop valvepipeOutdoor unit1. Front panel2. Air inlet3. Air filter4. Air outlet5. Horizontal air flow grille6. Vertical air flow louver(inside)7. Display panel Indoor unitIndoor unit Special functions Turbo function enables the unit to reach the preset temperature in the shortest time. When press this button on cooling mode, the unit will blow strong cooling air with super high fan speed. When press this button on heating mode (applicable to the unit adopts Electric heater only), the Electric heater will be energized and bring fast heating operation. TURBO function(optional): SELF CLEAN function(optional): Refrigerant Leakage Detection Vertical swing function(optional): After the AC starts up, users can control the vertical louver swing by the remote controller.RUN indication lampThis lamp illuminates when the airconditioner is in operation.TURBO indication lamp (optional function)This lamp illuminates when TURBO feature is activated.TIMER indication lampLights up during Timer operation.DEFROST i ndication lamp(Applicable to cooling & heating models only):Lights up when the air conditioner startsdefrosting automatically or when the warmair control feature is activated in heatingoperation.Temperature indicatorair conditioner is operational.Displays the malfunction code.With this new technology, the display area will appear EC or the LED indication lamps keep flashing (depending on models) when the outdoor unit detects refrigerant leakage. ,,Function used after the Shut Down of cooling operation to clean the Evaporator and keep it operation with LOW fan speed(applicable to cooling & heating models only) ---FAN ONLY operation--Stop Operation---Turn off. Note: This function is only available under COOL(AUTO COOL, FORCED COOL) and DRY mode. Before select the function, it is recommended to run the air conditioner under Cooling operation for about half an hour. Once the Self Clean function is activated, all TIMER setting will be cancelled.During Self Clean operation, when press the SELF CLEAN button on the remote controller again will stop the operation and turn off the unit automatically. turbo defrost run timer fresh defrost run timer NAMES OF PARTSIndication lampIndication lamp NOTE:All the pictures in this manual are forexplanation purposes only. The actual shape of the indoor unit you purchased may be slightlydifferent on front panel and display window. The actual shape shall prevail.Names of partsLouver Angle Memory Function(optional): Within the scope of safety angle, it will memorize the open angle of horizontal louver. If it exceeds, it will memorize the boundary of safety angle. In the following circumstances, it will return to standard angle: 1) pressing the manual switch, 2)unplug and then plug in the machine. So we strongly suggest that the open angle of the horizontal louver should not be set too small, in case the condensed water forms and drops from the horizontal louver.Anti-mildew function(optional): operating for about 7-10 minutes (depending on models) at LOW fan speed. If turns off on HEAT mode, the unit will continue operating for about 30 seconds at LOW fan speed. This will help to dry up the condensed water inside the evaporator, and prevent the breeding of mildew. NOTE: The display window of the air conditioner you purchased may belook like one of the following: (1)(2)FRESH indication lamp (optional function)This lamp illuminates when CleanAir feature is activated.This air conditioner is equipped with ionizer or Plasma Dust Collector(Depending on specific configuration of the model). With the anions generated by Ionizer, the air circulation of the air conditioner fills the room with refreshing, natural and healthy air. The Plasma Dust Collector generates a high voltage ionization zone, through which the air is converted to plasma. Inside the air most of the dust, smoke, and pollen particles are captured by the electrostatic filter. CLEAN AIR function(optional):OPERATING INSTRUCTIONS Airflow direction control Adjust the air flow direction properly otherwise itOPERATING INSTRUCTIONSNOTE: This manual does not include Remote Controller Operations, see the<<Remote Controller Instruction>> packed with the unit for details.AUTO/COOL (2)Manual switch To restore the remote controller operation,use the remote controller directly.●CARE AND MAINTENANCE Care and Maintenance OPERATING INSTRUCTIONS How the air conditioner worksCooling Heating AUTO operationWhen you set the air conditioner in AUTO mode, it will automatically select cooling, heating(cooling/heatingmodels only), or fan only operation depending on set temperature and the room temperature.The air conditioner will control room temperatureautomatically to the temperature point you set.If you feel uncomfortable in the AUTO mode, you can setyour desired temperature.SLEEP operationWhen you push SLEEP button on remote controllerduring cooling, heating(cooling & heating models only),or AUTO operation , the air conditioner willautomatically increase (cooling) or decrease (heating)O O 1C/2F per hour for the first 2 hours, then holdsteadily for the next 5 hours, after that it will switch off.This mode saves you energy and brings you comfort at night.DRYING operationOptimal operationTo achieve optimal performance, please note thefollowing:Adjust the air flow direction correctly so that it is nottowards people.Adjust the temperature to achieve the highest comfortlevel. Do not adjust the unit to excessive temperaturelevels.Close doors and windows on COOL or HEAT modes,or performance may be reduced.Use TIMER ON button on the remote controller toselect a time you want to start your air conditioner.Do not put any object near air inlet or air outlet, as theefficiency of the air conditioner may be reduced andthe air conditioner may stop running.Clean the air filter periodically, otherwise cooling orheating performance may be reduced.Do not operate unit with horizontal louvre in closedposition.The fan speed will be automatically controlled underdry operation.During the dry operation, if the room temperature isO O lower than 10C(50F), the compressor stops operationand restarts until the room temperature is aboveO O 12C(54F).Before maintenance a soft, dry cloth. Do not use bleach or abrasives.NOTE: Power supply must be disconnected before cleaning the indoor unit.Cleaning the unit wipe the unit with a soft dry cloth only. If the unit is very dirty, wipe it with a cloth soaked in warm water.Cleaning the air filter and air freshening filter A clogged air filter reduces the cooling efficiency of this unit. Please clean the filter once every 2 weeks. 1. Lift the indoor unit panel up to an angle until it stops with a clicking sound. For some models, please use suspension bars to prop up the panel.2. Take hold of the handle of the air filter and lift it up slightly to take it out from the filter holder, then pull it downwards.3. Remove the AIR FILTER from the indoor unit. Clean the AIR FILTER once two weeks. Clean the AIR FILTER with a vacuum cleaner or water, then dry it up in cool place.CARE AND MAINTENANCE4. Remove the Air Freshening Filters from its supportingframe (The solution to disassemble may differ fromeach other for different filters. Refer to and ). Clean the air freshening filter at least once a month,and replace it every 4-5 months.5. Install the air freshening filter back into position.6. Insert the upper portion of air filter back into theunit, taking care that the left and right edges line upcorrectly and place filter into position.12Preparation for extended non-operationPre-season inspectionIf you plan to idle the unit for a long time, performthe following:(1) Clean the indoor unit and filters.(2) Operate the fan for about half a day to dry theinside of the unit.(3) Stop the air conditioner and disconnect power.(4) Remove the batteries from the remote controller. The outdoor unit requires periodic maintenance and cleaning. Do not attempt to do this yourself.Contact your dealer or service provider.Check that the wiring is not broken off or disconnected.Clean the indoor unit and filters.Check that the air filter is installed.Check if the air outlet or inlet is blocked after theair conditioner has not been used for a long time.Replacement of air filter and air freshening filter1. Remove the air filter.2. Remove the air freshening filter.3. Install a new air freshening filter.4. Reinstall the air filter and securely close the frontpanel.The following events may occur during normal operation.1. Protection of the air conditioner. Compressor protection The compressor can't restart for 3-4 minutes after it stops. Anti-cold air (Cooling and heating models only) The unit is designed not to blow cold air on HEAT mode, when the indoor heat exchanger is in one of the following three situations and the set temperature has not been reached. A) When heating has just started. B) Defrosting. C) Low temperature heating. The indoor or outdoor fan stop running when defrosting (Cooling and heating models only).Defrosting (Cooling and heating models only) Frost may be generated on the outdoor unit during heat cycle when outdoor temperature is low During this condition air conditioner will stop heating operation and start defrosting automatically. The time to defrost may vary from 4 to 10 minutes according to the outdoor temperature and the amount of frost built up on the outdoor unit.2. A white mist coming out from the indoor unit A white mist may generate due to a large temperature difference between air inlet and air outlet A white mist may generate due to moisture generated from defrosting process when the air conditioner restarts in HEAT mode operation after defrosting.3. You may hear a low hissing sound when the compressor is running or has just stopped running. You can also hear a low "squeak" sound when the compressor is running or has just stopped running. This is caused by heat expansion and cold contraction of the plastic parts in the unit when the temperature is changing. A noise may be heard due to louver restoring to its original position when power is turned on.4. Dust is blown out from the indoor unit. This is a normal condition when the air conditioner has not been used for a long time or during first use of the unit.5. A peculiar smell comes out from the indoor unit. This is caused by the indoor unit giving off smells permeated from building material, from furniture, or smoke. 6. The air conditioner turns to FAN only mode from COOL or HEAT (For cooling and heating models only) mode. When indoor temperature reaches the temperature setting on air conditioner, the compressor will stop automatically, and the air conditioner turns to FAN only mode. The compressor will start again when the indoor temperature rises on COOL mode or falls on HEAT mode (For cooling and heating models only) to the set point.Normal function of the air conditioner TROUBLESHOOTING TIPSTROUBLESHOOTING TIPS Malfunctions Unit does not start Unit not cooling or heating (Cooling/ heating models only)room very well while air flowing out from the air conditioner Cause Power cut Unit may have become Unplugged.Fuse may have blown.Battery in Remote controller may have been exhausted.The time you have set with timer is incorrect.Wait for power to be restored.Check that plug is securely in wall receptacle.Replace the fuse.Replace the battery.Wait or cancel timer setting.Set temperature correctly. For detailed method please refer to ""Using remote control section.Clean the air filter.Close the doors or windows.Clear obstructions away first, then restart the unit.Wait.Inappropriate temperature setting.Air filter is blocked.Doors or Windows are open.Air inlet or outlet of indoor or outdoor unit has been pressor 3 minutes protection has been activated.If the trouble has not been corrected, please contact a local dealer or the nearest customer service center. Be sure to inform them of the detailed malfunctions and unit model number.Notes: Do not attempt to repair the unit yourself. Always consult an authorized service provider.What should be done?If one of the following faults occurs, s and then connect it in again. If the problem still exists, disconnect the power and contact the nearest customer service center.top the air conditioner immediately, disconnect the power Fuse blows frequently or circuit breaker trips frequently.Other objects or water fall into the air conditioner.The remote controller won't work or works abnormally.Trouble OPERATION indicator or other indicators continue flashing.If one of the following code appears on the display area : E0,E1,E2,E3.....or P0,P1,P2,P3...... TROUBLESHOOTING TIPSTroubleshooting guide 8. Dripping water may generate on the surface of the indoor unit when cooling in a high relatively humidity (relative humidity higher than 80%). Adjust the horizontal louver to the maximum air outlet position and select HIGH fan speed.9. Heating mode (For cooling and heating models only)The air conditioner draws in heat from the outdoor unit and releases it via the indoor unit during heating operation. When the outdoor temperature falls, heat drawn in by the air conditioner decreases accordingly. At the same time, heat loading of the air conditioner increases due to larger difference between indoor and outdoor temperature. If acomfortable temperature can't be achieved by the air conditioner, we suggest you use a supplementary heating device.Auto-restart functionPower failure during operation will stop the unit completely.For the unit without Auto-restart feature, when the power restores, the OPERATION indicator on the indoor unit starts flashing. T o restart the operation, push the ON/OFF button on the remote controller. For the unit with Auto-restart feature, when the power restores, the unit restarts automatically with all the previous settings preserved by the memory function.7. The air conditioner runs function after turning off the unit.When turning off the unit under COOL(AUTO COOL, FORCED COOL) and DRY mode, the air conditioner will run function for 7-10 minutes, then stop the operation and turn off the unit automatically.Anti-mildew Anti-mildew if turns off on HEAT mode, the unit will continue operating for about 30 seconds at LOW fan speed,。
- 1、下载文档前请自行甄别文档内容的完整性,平台不提供额外的编辑、内容补充、找答案等附加服务。
- 2、"仅部分预览"的文档,不可在线预览部分如存在完整性等问题,可反馈申请退款(可完整预览的文档不适用该条件!)。
- 3、如文档侵犯您的权益,请联系客服反馈,我们会尽快为您处理(人工客服工作时间:9:00-18:30)。
海尔壁挂空调说明书篇一:海尔空调安装保养维护如何维护和清洗空调空调机的维护、清洗是空调保养的主要关键,有利于提高制冷效果,有利缩短降温时间,有利空调节能,有利延长空调机使用寿命,是合理使用空调,加强规范管理的重要组成部分。
以前空调用户对空调机维护、清洗重视不够,现在应当加强这一领域工作,促进空调行业发展。
开机前的维护通常家用空调机使用到九月份就关机停用,到次年五月至六月才开机,停用半年多。
所以空调开机前一定要做一次全面的“诊断”,查一查空调设备有否“毛病”,根据清查结果,在专业技术人员指导下,做好维护清洗工作,这次维护清洗要比较到位,含室外机和室内机的外壳、机体、过滤网,然后开始试运行,观测制冷速度和效果。
开机过程中的维护空调开机后视环境条件、气候条件、开机时数,周围灰尘、空气洁净度、房间是否干净等诸多因素决定空调开机过程中的维护次数。
环境条件欠佳,天气炎热,空调机陈旧,空调开机时数长,空调开机过程中的维护次数增多,通常一个半月左右维护一次。
若环境条件好,空调机比较新,空气中灰尘少,空调开机合理,与电风扇交替使用,可以适当延长维护周期,从空调开机到空调关机维护1—2次。
维护应认真、仔细,不留死角。
符合规范,提高制冷速度、制冷效果,达到节能、清新、舒适。
关闭后的维护天气转暖,空调机开启,天气转凉,空调机关闭,这是常年规律。
注意空调机关闭前应对室外机、室内机作一次全面仔细的检查。
保养、维护、清洗要一环扣一环,不能脱节,易漏环节更应扣紧,严格检查,完成上述环节后,套好空调机机罩,防止灰尘污染,防止空调机滴水与进水,保持洁净,准备来年再用,这样做到清洁、节能、延长空调设备的使用寿命。
对知名品牌的优质分体机,柜机要重点保护,充分发挥节能效果。
一般空调保养保养维护1、清除通风口的杂物,保证通风正常。
观察室外机架有无松动现象,清洁室外通风网罩内有无异物。
同时,保持通风口的畅通无阻。
2、室内、外换热器表面清洗,提高换热器的效率。
清理室内换热器时,应小心拿下面板,用柔软的抹布擦洗,使用小毛刷轻轻刷洗完内机的换热器,这样达到清除灰尘和可繁殖病菌的有害积聚物的目的。
但是注意由于散热片是很薄的铝质材料,受力后容易变形,因此要小心刷洗。
3、清洗过滤网上的积灰。
在清洗过滤网的时候,首先切断电源,再打开进风栅;取出过滤网,用水或吸尘器清洗过滤网,水温不要超过40度,用热的湿布或中性洗涤剂清洗,然后用干布擦净,同时不能用杀虫剂或其他化学洗涤剂清洗过滤网。
4、清洗排水部分的污垢和积聚物。
排水部分容易沉积污垢,必须定期进行彻底消毒,保证排水通畅、防止细菌繁殖。
5、检查其他。
包括供电线路、插头插板、开关;检查易耗损件,如导风转板、杀菌除湿、光触媒等部件状况,确保空调状况良好无异常。
特殊时段空调保养在3-5月和9-11月温度适中的季节里,人们一般让空调处于非工作状态。
在不使用空调的季节,首先应当断掉空调器电源,但最好保持一个月开机一次的使用量,以防止长时间不使用导致机内润滑油凝结。
同时,为保证空调的长期高速运转及使用使命的延长,在暂停使用和开始使用空调的时候,还得注意对空调的恰当养护。
1.使用季节结束后。
可在让空调暂停使用之前,在晴天里将空调设为送风状态,开机运转半天左右,使空调内部完全干透;同时还应将滤尘网、室内机、室外机清洗干净。
2.使用季节开始前。
检查室内和室外机组的进风口、出风口有无障碍物,以免降低空调的工作效率;安装好滤尘网,避免因灰尘进入机器内部而损坏机器或引发故障;遥控器的清洗要用干布,不要用玻璃清洗剂或含有化学物质的布,清洁后要装入两节型号相同的新电池。
空调铭牌中的意义空调铭牌例如型号:KFR-26GWK:代表家用空调F:分体式空调(C:代表窗式空调)R:代表热泵加热功能(没有R则代表单冷功能的空调,D代表有辅助电加热功能)26:这个数字代表额定制冷量G:壁挂型空调(L代表落地式空调,也就是通常所说的柜机)W:表示分体式的室外机能效比:2.99能效比就是额定制冷量与额定功率的比值,越大越好。
目前国家规定的家用定速空调能效比3.2-3.6(制冷量CC 内外机之间的电源线和信号线按颜色接就行;细铜管是高压排液管,粗铜管是吸气管,接好后排空气10秒左右然后锁紧。
挂机的话,室内机的水平位置要高于室外机,并且向排水侧稍做倾斜。
连接管弯曲处不要弯直角,要有弧度。
人们在安装空调时,为了美观,总喜欢把空调装在靠近房顶的地方。
其实,空调最好安装在离地面1.7米左右的高度,这样,制冷效果可以达到最佳,对身体比较健康。
空调进风口的设计一般在上半部,出风口在下半部,所以如果空调安装过高,经过热交换的冷空气还没能落到房间下部,就被空调吸回,使得房间的下部热空气得不到很好的冷热交换,使房间下部的温度还是偏高,室内的降温效果就很差。
如果空调安装很低,打开空调以后虽然很快就能凉快,但居住者很可能会d得“空调病”。
中国疾病预防控制中心环境所研究员戴自祝教授指出,人的头部高度是空调安装的一个刻度线,安装高度应在稍稍高于头部近于与头部平行位置为佳。
因为人体最先感觉凉爽的应该先是头部,而不是颈椎。
戴教授指出,空调安装在比头部略高的位置时,头部会感觉非常凉爽,呼吸也会非常通畅,人的身体会处于最佳状态,冷气由上至下慢慢沉淀,逐渐凉爽身体和四肢,这样是身体最自然的凉爽状态。
如果空调安装过低,那么可能颈椎和腰椎最先接触冷气,这两个部位非常柔弱,很容易受凉,导致关节炎等症状。
所以空调最好安装在1.7米左右最为合适。
参考资料/北京空调维修加氟清洗保养中心网址:/篇二:海尔空调故障大全海爾空調故障大全KFR-35GW/VKFR-25GW/VE2E3E4E5 IPME6 ACE7 CBDE8E9E10E11E12E13E14E15E16E17E18E19E20E21E22E23室内热敏电阻异常热交热敏电阻异常室外EEPROM 故障保护电流过流保护或电流传感器坏(室外控制板)与模块通讯故障压机过温\压力过高保护电源过压/欠压保护压机堵转吐出温度保护外风机异常保护室外除霜电阻异常室外吸气电阻异常室外环境电阻异常室外吐气电阻异常压机吸气过高内机、外机通讯异常室内EEPROM异常内风机异常压机运行失步压机脱离位置位置检测回路故障压机损坏室内故障室内故障室外控制板故障室外模块故障室外模块故障室外控制板故障室外控制板故障室外模块故障室外模块故障室外控制板故障室外控制板故障室外控制板故障室外控制板故障室外控制板故障室外控制板故障室外控制板故障内外通讯故障室内故障室内故障室外模块故障室外模块故障室外模块故障E24室内过负荷停机室内故障E25室内防冰霜停机室内故障E26室内TC不正常室内故障E27压机振动过大室外模块故障压机启动异常室外模块故障三菱重工海尔柜机故障代码机型FDF505HES无显示室内机和室外机电源OFF、电源被关断、操作开关电路板不良。
E1操作开关线断、室内机电路板不良。
E2室内机位置编号重复、室内机电路板不良。
E3无对应室外机号码内外信号线断、室外机电源OFF室外机号码设定不正确(设定了48或49)E4室内机号码设定不正确(设定了48或49)室内机电路板不良。
E5室内机、室外机通讯异常、室外机电源部分异常(室外机室内机电源分开时)、室外机电路板不良。
E6室内机热交换器热敏电阻不良、室内机电路板不良。
E7室内机吸气热敏电阻不良、室内机电路板不良。
E8内机热交换器温度高(暖气时)、室内机热交换用热敏电阻短路、室内机电路板不良。
E10 操作开关多台控制时台数超过。
E31 室外机号码重复、室外机电路板不良。
E32 电源反相或缺T相(初级)、室外机电路板不良。
E33 压缩机过电流、压缩机缺S相或R相(初级52C 的次级配线)缺相、室外机电路板不良。
E3452C的次级缺T相、室外机电路板不良。
E35室外机热交换器温度高(冷气时)、室外机热交换器用热敏电阻不良(短路)、室外机电路板不良。
E36压缩机出口冷媒管温度过高、压缩机出口冷媒管温度热敏电阻不良、室外机电路板不良。
E37 室外机热交换器热敏电阻不良、室外机电路板不良。
E38 室外机气温热敏电阻不良、室外机电路板不良。
E39压缩机出口冷媒管热敏电阻不良、室外机电路板不良。
E40 室外机安全设备工作、室外机电路板不良。
面板有显示的还有以下几个:E57 制冷剂不足E28 控制面板上SW13—6设置错误处理方法:将SW13—6设置为OFFE9、E40室外机异常海尔KFR-71QW/A故障代码(KFR-120QW/A)运行灯闪 1下室内环温坏2 室内管温坏3 室外环温坏4 室外管温坏海尔KFR-60LW/BPF故障代码E1 室温传感器故障E2 室内盘管传感器故障E3 室外环温传感器故障E4 室外盘管传感器故障E5 过电流保护E6 管路压力保护E7 室外低电压保护E8 面板与主板通讯故障E9 室内外通讯故障E0 室内室外通讯故障LED 灯显示L1 L2室温传感器坏:闪 1 灭室内盘管传感器坏:闪 2 灭制热过载:闪 4 灭制冷接冰:闪 5 灭通信故障:闪 7 灭风机故障:闪 8 灭模块故障:灭闪 1无负载:灭闪 2压缩机过热:灭闪 4总电流过流:灭闪 5室外环温传感器坏:灭闪 6 室外管温传感器坏:灭闪 7 ROM坏:灭闪 8电源过压保护:灭闪 10 制冷过载:灭闪 12E2ROM错:灭闪 14海尔KTR-280QW/BP变频中央空调室外故障代码显示内容故障原因04 变频信号回路,TRS电路故障Ab 压力传感器(Pd,pS)误配线故障 AA 高压压力传感器(Pd)电路故障AE 变频压缩机低频运转时排气温度TD1保护 A0 变频压缩机排气温度传感器TD1电路故障 A1 变频压缩机排气温度传感器TD2电路故障 A2 吸气温度传感器TS保护动作A6 变频压缩机排气温度传感器TD1保护动作A7 吸气温度传感器TS保护动作BB 变频压缩机排气温度传感器TD2保护动作 BD Mg.ws1触点粘接,控制电路故障 BE 制冷系统低压保护B4 制冷系统低压传感器PS电路故障 18 室外管温传感器TE电路故障22 制冷系统高压传感器Pd电路故障 95 室内外通迅电路故障96 室内外地址错误89 室内外机组过载保护IC 接口电路板故障E1 定频压缩机高压电路故障E5 变频侧IOL电路故障E6 定频侧IOL,OL电路,电源相序错海尔KTR-280QW/BP变频中央空调INV室外显示内容故障原因21 变频侧高压开关电路故障篇三:海尔空调海尔变频空调维修故障代码1、KFR-26GW/BPF、KFR-26GW/A(BPF)、KFR-26GW/C(BPF)、KFR-28GW/BPA、KFR-28GW/BPF、KFR-28GW/A (BPF)、KFR-28GW/C(BPF)、KFR-40GW/BPF 、KFR-40GW/A(BPF)、 KFR-28GW /DBPF、KFR-36GW/DBPF、KFR-28GW/M(BPF)、KFR-36GW/M(BPF)、KFR-25GW*2/BP、KFR-25GW*2/BPF、KFR-25GW*2/BPJF、KFR-26GW*2/BPF、KFR-30GW*2/BPF、KFR-30GW*2/BPKF、KR-(32G/AF.40G/F)60W/BP、KR-(32G/AF.50L/F)70W/BP 室内机显示灯故障原因电源定时运转闪灭灭室内环温传感器闪亮亮室内热交传感器亮亮闪室外除霜传感器闪亮灭压机排气温度传感器闪灭亮室外传感器异常闪灭亮压机运转异常闪闪亮 1.DC电流检知2.过电流保护动作3.功率模块温度过高保护4.功率模块低电压检知室内机显示灯故障原因电源定时运转闪闪灭过电流保护动作AC电流检知闪闪闪制热时,蒸发器温度上升(68度以上),或室内风机风量小闪灭闪 CT断线保护亮闪亮功率模块异常灭灭闪通讯异常灭闪灭排气管温度超过120度灭闪亮电压不足解释原因,让用户断电10-15分钟后重新上电开机灭亮闪控制基板异常灭亮闪室内机EEPROM异常闪亮闪室外机EEPROM异常2、KFR-35GW/BPF、KFR-35GW/ABPF、KFR-36GW/BP、KFR-36GW/BPF 、KFR-36GW/ABPF、KFR-50GW/BPF、KFR-50LW/BP、KFR-50LW/BPF故障现象故障原因定时灯闪烁1次功率模块过热、过流、短路定时灯闪烁2次电流传感器感应电流太小定时灯闪烁4次制热时压机温度传感器温度超过120度保护定时灯闪烁5次过电流保护定时灯闪烁6次室外环温传感器故障定时灯闪烁7次室外热交传感器故障定时灯闪烁10次电源超、欠压定时灯闪烁11次瞬时断电保护定时灯闪烁12次制冷时室外热交传感器温度超过70度保护定时灯闪烁14次单片机读入EEPROM数据有错误定时灯闪烁15次瞬时断电时单片机复位故障现象故障原因电源灯闪烁1次室内环温传感器故障电源灯闪烁2次室内热交传感器故障电源灯闪烁4次制热时室内热交传感器温度超过72度保护电源灯闪烁5次制冷时室内热交传感器温度低于0度保护电源灯闪烁6次瞬时断电时单片机复位电源灯闪烁7次通讯回路故障电源灯闪烁8次室内风机故障电源灯闪烁9次瞬时断电保护3、KFR-36GW/B(BPF)、KFR-36GW/BPJF、KFR-28GW/BPJF、KFR-28GW/@ KFR-36GW/@室内机显示故障原因E1 室内环境温度传感器E2 室内热交温度传感器F21 室外除霜温度传感器F25 室外排气温度传感器F6 室外环境温度传感器E07 通讯异常室内机显示故障原因F24 CT断线F4 排气温度超过120℃,排气管温度过升保护F22 AC电流过电流保护F23 DC电流过电流保护E9 制热时,蒸发器温度上升(68℃以上),或室内电机运转但风量小F11 压机运转异常4.KFR-60LW/BPF故障显示故障原因E1 室温传感器故障E2 室内盘管传感器故障E3 室外环温传感器故障E5 过电流保护E6 压机过热保护E7 室外低电压保护E8 面板与主板通讯故障E9 室内外通讯故障5. KFR-48LW/@(BPJXF)、KFR-48LW/@(BPF)、KFR-50LW/BPJXF、KFR-51LW/BPJXF、KFR-51LW/BPJF、KFR-51LW/N(BPF)、KFR-51LW/T(BPJXF)、KFR-51LW/@(BPJXF)、KFR-52LW/BPJXF、KFR-52LW/BPJF、KFR-52LW/E (BPJXF)、KFR-52LW/N(BPJXF)、KFR-58LW/T(BPJXF)、KFR-58LW/@(BPF)、KFR-58LW/@(BPJXF)、KFR-60LW/BPJXF、KFR-58LW/BPJXF、KFR-58LW/E(BPJXF)、KFR-58LW/N(BPJXF)、KFR-58LW/N(BPF)、KFR-60LW/BPJF、KFR-60LW/BPXF、KFR-60LW/E(BPJXF)、KFR-68LW/BPJXF、KFR-68LW/E(BPJXF)、KFR-68LW/@(BPJXF)等故障代码故障原因E1 功率模块过热、过流、短路E2 电流传感器感应电流太小E4 制热时压机温度传感器温度超过120℃E5 过电流保护E6 室外温度传感器故障Ea 电源超欠压Ec 制冷时室外热交传感器温度超过70℃保护Ee 单片机读入EEPROM数据有错误F1 室温传感器故障F2 室内盘管传感器故障F4 制热时室内盘管传感器超过72℃保护F5 制冷时室内盘管温度传感器低于0℃以下保护F7 室内主板与控制面板通讯故障海尔定频空调维修故障代码KFR-26GW/B(JF)、KFR-26GW/(JF)、KFR-36GW/B(JF)、KFR-36GW/C(F)KFR-40GW/A(JF)故障代码故障原因E1 室内环境传感器断路、短路、接触不良E2 室内盘管传感器断路、短路、接触不良E21 除霜温度传感器异常E4 单片机读入EEPROM数据错误E8 面板和主控板间通讯故障E14 室内风机故障E16 里离子集尘故障E24 CT电流互感器断保护电路板CT电流互感器线圈不良,更换电路板、压缩机未启动,压缩机电流小,漏气海尔定频柜机维修故障代码KFRD-52LW/JXF、KFRD-62LW/F、KFRD-62LW/JXF、KFRD-71LW/F、KFRD-71LW/SDF、KFRD-71LW/JXF、KFRD-120LW/F故障代码故障原因E1 室温传感器故障E2 室内盘管传感器故障E3 室外环温传感器故障E4 室外盘管传感器故障E5 过电流保护E6 管路压力保护E7 室外低电压保护E8 面板与主板通讯故障E9 室内外通讯故障三菱重工—海尔柜机维修故障代码故障现象检测灯(黄色)故障代码故障原因E1 面板与室内主板通讯故障闪亮1次E6 室内环温传感器故障传感器阻值错、内板坏闪亮2次E7 室内盘管传感器故障闪亮4次E9、E40 室外机异常电压低、压力过高、高压开关动作闪亮5次E57 制冷剂不足检测压力闪亮6次E8 室外机过负荷保护制冷剂过多、短路E28 控制面板上SW13-6设置错误将SW13-6设置为关(OFF)。