多看安装及升级说明
kindle 3 玩家宝典

Kindle3玩家宝典(1.0版)霓裳爱读独家发布原系统玩家宝典1、原系统下附赠20部字典目录(支持划词翻译)1.Collaborative International Dictionary2.Webster's Revised unabridged Dictionary3.NCCE-EC新世纪英汉科技大词典ngDao-EC-GB朗道英汉字典5.21shiji21世纪英汉汉英双向词典6.Merriam Wester Colegiate7.OALD4-CN牛津高阶英汉双解词典8.法汉字典9.新德汉10.oxford-gb牛津现代英汉双解词典11.American Heritage Dictionary,4th Edition12.Britannica Concise Encyclopedia13.Kingsoft English-Chinese Bilingual Dictionary14.Collins Cobuild V315.Shorter Oxford English Dictionary(Fifth Edition)16.WordNet2.017.牛津现代英汉双解词典18.Longman Dictionary of Contemporary English(4th Ed)20.Webster's Revised Unabridged Dictionary1913如何将其中一个字典设为首要字典?按home键-然后按menu键-选择settings-然后再按menu键-选择Change Primary Dictionary就会出现字典的列表,选择您所需要的字典,就可以设为首要字典。
2、原系统上网教程按home键-然后按menu键-选择search就会出现网页输入框。
输入网址之后,选择go to web就行了。
有很多朋友说源系统上网只浏览网页用处不大,我找了3个很实用的网站,可以下载杂志、国学书籍和rss新闻链接,给大家推荐一下。
普通电脑安装mac系统安装全套教程和问题详解

Mac OS X for pc之菜鸟安装作者: 来源: osx86china日期: 2006-9-2,8:43Mac OS X for pc之菜鸟安装自从Tiger出来后不久,就被高手破解了,用于安装在pc上,记得好像差不多有一年时间了,当时AMD的还不支持sse2指令集,所以只能安装在奔腾4上,奔腾5那时候还没有的。
某天,cc刘给了我一个bt地址,哈哈!全球下载呀!好像同时下的有几千人,2小时就下好了。
那时候,我在用850E的架构,马上体验,从安装到结束,大概1个多小时吧,装好后发现,硬件都不认,(关键是声卡不认,)忍了好几天,天天和哑巴机器打交道,实在不爽,想想以后还会升级的,到时候认了就好办了,实在是自己也没这个实力做驱动,所以放弃了。
去年底,Tiger又升级了,相应的破解又马上出来了,而且驱动支持得越来越多。
我又心动了,下了破解和原版cd,打算按部就班的做一个,结果……呵呵,失败!总结原因就是我用的是硬盘是scsi raid,(raid卡比较bt,windows xp下的驱动至今都还没有,自己凑合了一个,)VMWare无法写入,所以又只好放弃了,不久以后,就有人做好破解版的光盘在流传了。
赶紧下,(唉!网络状态大不如前了,那段时间,正是网络服务商严打bt时期,那个慢呀!难以忍受!)刚下好Mac OS X10.4.3的,Mac OS X10.4.4的就来了……其实,我真正开始体验的还是Mac OS X10.4.5版的,(以下简称吧!打字真麻烦)。
自己做破解安装盘的教程外面已经很多了,这里不再赘述,本文只讲述破解版光盘安装的过程和一些安装完毕后的设置心得。
首先,先查看你的硬件,主要是cpu,用cpu|-z看一下,或者简单判断,只要你的cpu支持sse2就可以了,不管是intel还是amd的都可以,具体的硬件支持,可以参考(/index.php/HCL),另外(/),这个网站是专门讨论Mac for pc的,建议多看看。
多语言快速安装指南说明书
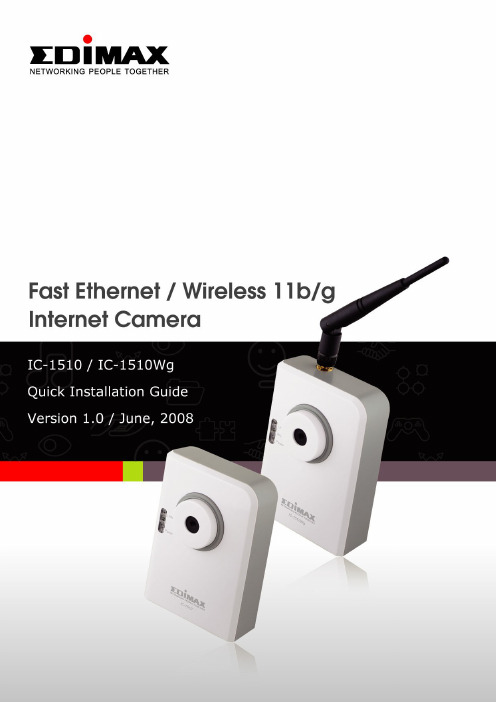
Multi-Languages QIG in Driver CD================================================== Český:Českého průvodce rychlou instalací naleznete na přiloženém CD sovladačiDeutsch: Finden Sie bitte das deutsche QIG beiliegend in der Treiber CD Español: Incluido en el CD el QIG en EspañolFrançais:Veuillez trouver l‟français QIG ci-joint dans le CDItaliano: Incluso nel CD il QIG in ItalianoMagyar: A magyar telepítési útmutató megtalálható a mellékelt CD-n Nederlands: De nederlandse QIG treft u aan op de bijgesloten CDPolski: Skrócona instrukcja instalacji w języku polskim znajduje się na załączonej płycie CDPortuguês: Incluído no CD o QIG em PortuguesРусский: Найдите QIG на pусскoм языке на приложеном CD Romana: Cd-ul cuprinde Ghid de instalare rapida in limba romanaSlovensky: Anglického sprievodcu rýchlou inštaláciou nájdete na priloženom CD s ovládačmi.Türkçe: Ürün ile beraber gelen CD içinde Türkçe Hızlı Kurulum Kılavuzu'nu bulabilirsinizCopyright by Edimax Technology Co, LTD. all rights reserved. No part of this publication may be reproduced, transmitted, transcribed, stored in a retrieval system, or translated into any language or computer language, in any form or by any means, electronic, mechanical, magnetic, optical, chemical, manual or otherwise, without the prior written permission of this Company.This company makes no representations or warranties, either expressed or implied, with respect to the contents hereof and specifically disclaims any warranties, merchantability or fitness for any particular purpose. Any software described in this manual is sold or licensed "as is". Should the programs prove defective following their purchase, the buyer (and not this company, its distributor, or its dealer) assumes the entire cost of all necessary servicing, repair, and any incidental or consequential damages resulting from any defect in the software. Further, this company reserves the right to revise this publication and to make changes from time to time in the contents hereof without obligation to notify any person of such revision or changes.The product you have purchased and the setup screen may appear slightly different from those shown in this QIG. For more detailed information about this product, please refer to the User's Manual on the CD-ROM. The software and specifications could be subjected to change without notice. Please visit our web site for the update. All right reserved including all brand and product names mentioned in this manual are trademarks and/or registered trademarks of their respective holders .Content1.Product Information (1)2.Check your package contents (1)3.System Requirement (1)4.Hardware Installation (2)4.1.LED and Focusing (2)4.2.Camera Ports (3)4.3.Installation Procedure (4)5.Locate the IP Address (5)6.Web Management Interface (9)7.Software Installation (12)work Configuration (18)work Setting (19)8.1.2.Wireless Settings (IC-1510Wg Only) (21)9.Firmware Upgrade (24)1. Product Information⏹Complies with IEEE802.3, 802.3u standards⏹Complies with Wireless 802.11b/g standards with WEP, WPA and WPA2encryption (IC-1510Wg only)⏹Supports high speed hardware-based Motion-JPEG compression⏹Supports video resolution :640x480 (VGA), 320x240 (CIF) and160x120(QCIF)⏹Supports Snapshot-to-Email on events and predetermined schedulerecordings in AVI format⏹Supports Auto Brightness/Contrast/Hue Control⏹Built-in manual focus lens2. Check your package contents⏹One Internet Camera⏹One Power Adapter⏹One Camera Stand⏹One 100cm Category 5 Ethernet Cable⏹One Quick Installation Guide⏹One CD (Including User‟s Manual/ Multi-Language QIG/ Utility & Viewer) ⏹One Antenna(* IC-1510Wg Only)If any of the above items are missing, please contact your supplier.3. System RequirementSystem requirement for PC, MAC or Notebook PC to access the Internet Camera as following:⏹OS System: Windows 98, ME, 2000, XP + SP2, Server 2003⏹CPU: Intel Pentium III 750MHz above or Intel Celeron 1GHz above⏹Memory Size: 128MB (256MB recommended)⏹VGA Card Resolution: 800 x 600 or above4.Hardware Installation4.1.LED and FocusingThe Camera head and its focus ring allow you to modify the aim and focus of the Camera. To adjust the Camera‟s focus, rotate the dark focus ring.There are three LEDs indicating the camera status and networking status. • PowerWhen the camera is power on and ready for access, the LED will light. • LANWhen the Internet Camera is linking to wired network, the LED is lighting. The LED is flashing when video is transmitted or received through wired network. • WLANWhen the Internet Camera is linking to wireless network, the LED islighting. The LED is flashing when video is transmitted or received through wireless network.4.2. Camera PortsThe Camera features two ports and a Reset button. • Antenna connectorThe Standard reverse SMA connector is for any antennas with reverseSMA connector can connect to the Internet Camera.•PowerThe Power port is where you can connect the power adapter. •LANThe LAN port is where you can connect the Ethernet network cable. •Reset1. If problems occur with your Internet Camera, press the reset buttonwith a pencil tip (for less than 2 seconds) and the Internet Camera will reboot itself with your configurations.2. If problems persist or you experience extreme problems or you forgotyour password, press the reset button for longer than 5 seconds. The Internet Camera will reset itself to the factory default settings (warning: your original configurations will be replaced with the factorydefault settings).4.3. Installation Procedure1. Unpack the Internet Camera package and verify that all the items listed inthe Chapter 1 are provided.2. Connect the Internet Camera to your network by attached the networkcable from the switch/router to the LAN port of the Internet Camera.3. Connect the power adapter to the Internet Camera and plug the poweradapter to power outlet. The Internet Camera will be powered on. When the Internet Camera is ready, the Ready LED will light.Note: It is highly recommended to use the power adapter shipped with the Internet Camera, do NOT use any other power adapter from any sources.5. Locate the IP AddressDefault IP address of this IP camera is 192.168.2.3. If you wish to assign another IP address to this IP camera, you have to log onto the web configuration interface of the camera first.If the left three fields of the IP address of your computer is not 192.168.2.XXX , you‟ll have to change the IP address of your computer first:1. Click …Start‟ -> …Control Panel‟2. Double-click …Network Connections‟ icon.3. Right-click …Local Area Connection‟, and click …Properties‟.4. Select …Internet Protocol (TCP/IP)‟, and then click …Properties‟.5. In …IP address‟ field, please fill in any IP address begins with …192.168.2‟,and ends with a value greater than 2 and less than 254 (You can use the example in the picture …192.168.2.239‟). In Subnet mask field, please fill …255.255.255.0‟. Please keep all other fields empty, and click …OK‟.If you changed the IP address of this IP camera and you forget it, there‟re 2 methods to recover it:a. Press and hold the …Reset‟ button located at the bottom of this IPcamera, to clear all settings of the IP camera and reset the IP address back to 192.168.2.3. You‟ll lose all settings in the IP camera.b. Ask network administrator to check the DHCP release table, if thecamera was set to obtain the IP address by DHCP, a new record will be added to DHCP release table on DHCP server when the IP camera isconnected to the local area network6. Web Management InterfaceMake sure the IP camera is correctly powered (Power LED is on), and then launch Internet Explorer and type the IP address of the IP camera in address bar of Internet Explorer. You should be prompted to input the user name and password:Default user name is …admin‟ (in lower case) and password is …1234‟. Click …OK‟ to continue after user name and password has entered.If you‟re rejected, maybe the password has been modified previously. This should not happen if this is a newly-purchased camera, however, if you get the camera from someone else, the password would be changed. Please try to obtain the correct user name / password, or you‟ll have to reset the ca mera. After logged on, you should see the following messages at the top of Internet Explorer:This IP camera requires a special ActiveX control (A.K.A. …Plugin‟) to work. Please click on the message, and select …Install ActiveX Control…‟:When y ou‟re prompted, click …Install‟ to continue.You should be able to see the image from camera now:Note: If you see one of these messages (or both):ORYour computer may not have the display capability that this IP camera requires, or you don’t have Microsoft DirectX® installed. Please download Microsoft DirectX® from Microsoft’s website (), and try again. In some cases, your computer is able to display the image from IP camera correctly, but you’ll still see these messages. If this happens, just ignore them.7. Software InstallationFollow the simple steps below to run the Install Wizard to guide you quickly through the Installation process. The following installation is implemented in Windows XP. The installation procedures in Windows 2000/XP/Server 2003 /Vista are similar.1. Insert the CD shipped along with the Internet Camera into your CD-ROMdrive. The “Autorun.exe” program should be executed automatically. If not, run “Autorun.exe” manually from “Autorun” folder in the CD.2. The Install Wizard will show four selections, select the program you want toinstall or click “Exit” to install the program later. The following installation steps are the demonstration of “Setup Utility”3. The system will start the installation procedures. Click “Next” to continueinstallation.4. If you wish to install the software program in an alternate location, click“Change”; otherwise click “Next” to move on to the next step.5. Click “Install” to start installing the program.6. The system will install the program automatically.7. Click “Finish” to complete the software installation.8. When the installation is completed. The system will auto run ”Administrator Utility “. On the Internet Camera first page, the cameras found in thenetwork are listed in the left window. Choose the one you want to configure and click “Setting Wizard” to precede.If the camera is new and is not configured with your network, please go to next section “8 Network configurations”to set up the configuration9. Please enter the default password “1234” and click “OK” to login to the IPsetup page.10. Internet Camera is working through the network (TCP/IP Protocol). The IPaddress setting must be correct, or you cannot access to the camera. The wizard program will detect the IP address status of your networkautomatically and suggest a free IP address for the Camera. You canaccept the suggested value or enter the value manually. If you enter the value manually, please be aware that the “Subnet Mask” must be the same for both the camera and the PC. Click “Finish” to apply the configuration.11. This wizard will pop up a window to ask you if you want to run the “CameraViewer” and see the video of the Camera immediately. Select “OK” to run “Camera Viewer”.12. The “Camera Viewer” will show the video automatically. Congratulations,you can use the camera through the network to view the video from now on.8. Network ConfigurationsWhen you click the “Detail Setting”, a screen will pop up for you to enter the “Administrator Name” and “Password”. The default value is as follows. Name: “Admin”Password: “1234”If the name and password you enter are correct, you can start to setup the network configuration of this IP camera.8.1.1.Network SettingInternet Camera Name recommended to name a meaningful name for the camera.IP Address Enter an unused IP Address within the IP address range used on your LAN. If the IP Address of your LAN is from the 192.168.2.1 to 192.168.2.254, you can set an unused IP Address from the range for the camera, for example: 192.168.2.250.Subnet Mask The Subnet Mask field must match the subnet setting on your LAN. For example: 255.255.255.0.Gateway The Gateway is used to forward frames to destinations in a different subnet on the Internet. The Gateway setting must be the same with the gateway used by the PCs on your LAN.DNS Server DNS Server (Domain Name Server) that translates names to IP addresses. Set the same DNS Server as the PCs on your LAN.Video Port video streaming in the network. The default port setting is “4321”. If you want to view the video from the camera, the port setting should be correct.Web Port This camera support web connection, the default web port is 80. Since the web server may use port 80, you can use a different port for the camera. If you change the web port from 80 to 8080, you must type http://192.168.2.3:8080 to connect the camera through the web browser.8.1.2. Wireless Settings (IC-1510Wg Only)You must configure the wireless settings from wired environment. Then you can remove the wired cable and start wireless connection.Utility will site survey automatically or you can press “Refresh” button to survey the AP router manually.After site survey procedure, there will show existing AP SSID.Then press “Connect” to connect AP router or press “Add to Profile” to configure the Wireless WEP and WPA encryption.There are WEP (Open System/Shared Key) ,WPA-PSK,WPA2-PSK and WPANone encryption settings. You can choose one to match AP router wireless settings.After set the profile, Please remove the LAN cable then IP Camera will connect to AP router automatically.LED Status DiagramWired Setting EnvironmentWireless Setting Environment9. Firmware UpgradeHere provides several tools to upgrade the firmware of this IP camera, clear all settings, or switch LED notification off.The descriptions of every setting in this menu will be given below:After all settings are completed, click …OK‟ to save settings, or click …Cancel‟ to abort and discard changes.R&TTE Compliance StatementThis equipment complies with all the requirements of DIRECTIVE 1999/5/EC OF THE EUROPEAN PARLIAMENT AND THE COUNCIL of March 9, 1999 on radio equipment and telecommunication terminal Equipment and the mutual recognition of their conformity (R&TTE)The R&TTE Directive repeals and replaces in the directive 98/13/EEC (Telecommunications Terminal Equipment and Satellite Earth Station Equipment) As of April 8, 2000.SafetyThis equipment is designed with the utmost care for the safety of those who install and use it. However, special attention must be paid to the dangers of electric shock and static electricity when working with electrical equipment. All guidelines of this and of the computer manufacture must therefore be allowed at all times to ensure the safe use of the equipment.EU Countries Intended for UseThe ETSI version of this device is intended for home and office use in Austria, Belgium, Denmark, Finland, France, Germany, Greece, Ireland, Italy, Luxembourg, Bulgaria, Cyprus, Czech Republic, Estonia, Hungary, Latvia, Lithuania, Malta, Poland, Romania, Slovakia, Slovenia, the Netherlands, Portugal, Spain, Sweden, and the United Kingdom.The ETSI version of this device is also authorized for use in EFTA member states: Iceland, Liechtenstein, Norway, and Switzerland.EU Countries not intended for useNonePlease check the declaration of conformity on 。
多普达900刷机完全图解详尽说明

xe后,软件会调用GetDeviceDataexe来获取手机的rom信 息,等。然后出现如图十提示,上半部分是当前手机rom 版本信息,下半部分就是升级后的Rom版本信息,
你可以和在第一步介绍的相关知识对照。 点Update键后,开始正式刷新rom。刷的顺序是先更新 radio,这个过程最慢,要耐心,如图十一;然后更新 extend rom
和电脑连上,屏幕上serial字消失,显示usb,这个说明成 功进入boot模式,用数据线把手机和电脑连好,运行 MaUpgradeUt_noIDexe开始刷机。(其实,更
简单的是根本不用按任何键。看看第二步的解说, EnterBLexe就是给刷机程序调用,可以直接由软件进入 boot模式。是否更简单?)运行MaUpgradeUt_noIDe
在出现图五的画面后,去C盘的临时文件夹中找到一个新 生成的目录,如图六、图七。 目录里面的内容如图八所示,看出端倪了吧:除了刷机 软件外,ms_nbf是手
机厂家程序集extend Rom;nknbf是微软wm系统rom; radio_nbf是无线协议rom;其他是刷机程序。现在复制 ms_nbf nknbf radio_nb
注意不要断电。有笔记本用笔记本刷。刷机时候保持电 脑系统稳定,如果突然死机什么,就----- 我也不 知道了。呵呵、ftp:xda:xda@ftpxda-developer
s 这个是国外一个很有名的dopod资源网站的FTP,有时间 可以自己常常去看下,有新的rom都会在FTP里面看到, 根据第一步判别ROM版本的方法,可以看出最新ROM。 刷
f,放到和第二步的刷机软件同一目录。简单的办法,也 是我用的办法:用winrar软件打开下载的exe文件,如图 九,可以直接看到三个nbf文件,解压出来备用就是。 第
2015款 27吋Retina 5K iMac MK472(中配)升级M.2 MVMe SSD + SATA 3 SSD

胆⼤⼼细,2015款 27吋Retina 5K iMac MK472(中配)升级M.2 NVMe SSD + SATA 3 SSD·CZCZYX·⼀、目标2016年购入2015款 27吋Retina 5K iMac MK472(中配),原配256G SATA-e SSD,无机械硬盘,买了AC,未发生过故障。
购机后就自己增加过16G内存(共24G)。
平时喜欢折腾,经常感觉SSD容量太小,捉襟见肘。
很早就萌生了升级M.2 NVMe SSD的想法。
好不容易捱过了保修期,就做了些准备,开始动手了。
折腾的目标是把原配的SSD换成M.2 NVMe 1T SSD,一是增加了容量,二是体验NVMe 的高速。
另外,既然拆机了,就顺便在原机械硬盘位添加一块SATA3 1T SSD。
至于CPU就不升级了,感觉无此必要。
⼆、我准备的器材和⼯具1、970 Pro 1TB V-NAND 2bit MLC SSD一块2、1TB 3D Nand 2.5 Inch SATA III SSD一块3、适用于2012及更新款的27吋iMac HDD升级套件,包括:(1)HDD升级用串联数字温度热传感器电缆(不包括SATA III数据/电源电缆)(2)iMac屏幕拆卸专用滚轮(3)OEM屏幕胶条(4)屏幕玻璃吸盘2只(5)T8S、T10S螺丝起子各一把(6)撬棒(7)清洁布4、适用于2015年27吋A1419 iMac的 SATA III 硬盘数据/电源线一套5、M.2 NVMe SSD 2280转接卡一块(长卡),M2.5x8螺丝一只,M2.5垫片一片(说明:网购的转接卡一般只配M2x6螺丝一只,无法用于iMac)6、M.2 固态硬盘2280散热片(2~3mm厚纯紫铜质最好)及导热硅胶垫片、橡皮筋一套7、2.5吋转3.5吋硬盘金属托架一块,M3x5螺丝4只8、M3x8螺丝4只;直径约4.5mm的废圆珠笔芯塑料管,剪成每段约2mm长的4段(自制硬盘金属托架固定螺丝用)9、T5、T20螺丝起子各一把(我是用的以前网购的组合套件)10、直径2mm十字螺丝刀一支11、重要!一个macOS系统安装U盘。
ELAND一体化车牌识别系统安装说明书(硬件篇)硬件安装接线说明书

ELAND一体车牌识别识别系统硬件安装1、车牌识别布线原理图:2、车牌识别一体识别摄像机(以下简称车牌摄像机)的安装及接线:上图可以看出,车牌摄像机的安装类似安装普通的摄像机,主要是以下几个步骤,(1)、选点打孔,施工人员现场规划确定好车牌摄像机安装位置后,将摄像机支架立于此,记号笔描点。
然后用打孔工具套用直径为12mm转头地面打孔,深度根据固定支架的膨胀螺丝长度+1cm而定(膨胀螺丝推荐直径10mm)。
(2)、穿线、固定支架,固定孔转好后,清理干净灰尘,将布线原理图中所示的网线、220V电源线、道闸控制线穿进摄像机支架管道里再从支架顶部孔位穿出预留1米左右长度余线。
然后将摄像机支架对准膨胀孔位,用膨胀螺丝固定;(推荐用直径10mm的膨胀螺丝,相应打孔转头推荐直径12mm)如图(3)、固定摄像机,用所配的摄像机套架,连接头(又称鸭嘴舍)如图,经历三个步骤,套架固定于立柱(一般高度在离地130cm处),鸭嘴舍固定于套架上,摄像机固定于鸭嘴舍上面;这3个连接点可以配合使用调节车牌摄像机角度,调好后拧紧各固定点的螺钉即可;(4)、车牌摄像机接线,摄像机固定好以后,打开摄像机盖子,即可看到车牌摄像机里面接线柱如下图3、车位显示屏的安装及接线(主推L型显示屏,带语音)(1)、显示屏安装:显示屏拆封后,找到相应固定配件,将显示屏固定于车牌摄像机立柱支架上适合的高度,如图(2)、显示屏接线显示屏固定好后,可以看到有3根线从屏里面输出,具体接线如下图介绍:4、道闸机的安装及接线(1)、安装:打开道闸机,看底部,用相应的膨胀螺丝将其固定于指定位置即可如下图固定孔位打孔用合适尺寸的膨胀路上固定即可;(2)、接线: 摄像机固定好以后,接线主要看道闸机控制盒上面,一般主要接三种线,即道闸机电源线,道闸控制线,地感线。
具体标识如下图:(3)、调试:把道闸杆子上好(必要时要根据需要调节一下里面的联动弹簧),确保道闸机接线无误后,通电可用所配遥控器控制道闸机升降进行测试;5、岗亭接线(岗亭里面主要连线有两种线):(1)、网线:电脑的网线,外面车道安装的一体车牌摄像机拉进来的网线,都连接在同一个交换机或者路由器的LAN口上面,另外给管理电脑固定IP地址:192.168.1.***段的IP即可。
oppoMP4DM工具升级说明(升级必读)
一、DM工具简介1、什么是DM工具?DM工具是在电脑上实现对机器进行升级的软件,无需安装即可使用。
从2009年6月11日新发布的固件开始,S9、S19、S11、G11都将使用DM工具升级的方式(2009年6月11日前发布的固件仍然使用机器升级的方式)。
为保证整机系统稳定性,请勿使用除DM升级工具外的其他升级方式。
后期OPPO还将推出“OPPO小助手”客户端软件,整合DM工具的功能,包括固件下载、歌词显示等,功能更全面,操作更简洁。
2、为什么要使用DM工具升级?1)优化了系统升级方式,提升了整机系统的可靠性。
2)保护机器,避免MP4电量过低或者误操作造成的升级故障。
3)与机器升级相比,操作简单,快捷方便。
二、DM工具升级方法1、升级前请确认MP4中的文件是否备份,升级将格式化机器内的所有文件。
2、用数据线连接机器与电脑,双击软件包中的exe文件,如:OPPO S19 DM工具.exe,显示DM升级工具对话框。
DM工具将自动搜索到需要升级的固件。
点击“升级”,升级时间持续1分钟左右,升级完毕后退出程序即可。
升级过程如下图所示:图1(打开DM工具后,显示对话框,点击升级)图2(选择升级,系统提示将格式化磁盘,请确认备份好数据,选择“是”)图3(升级完毕后,系统提示升级成功)备注:如果PC提示“未发现USB设备”,说明电脑未安装DM升级所需的USB驱动。
请仔细查看以下操作说明,按提示安装驱动后,再按以上升级方法升级。
三、USB驱动安装方法PC提示“未发现USB设备”后,请不要退出对话框,不要断开机器连接,按以下图示安装USB 驱动。
USB驱动软件在文件包的“USB Driver”文件夹中。
请按以下图示说明安装USB驱动。
USB 安装成功之后,即可按照第一部分的升级方法来升级。
(同一台电脑上USB驱动只需安装一次,此后升级无需重新安装)图1(鼠标右击“我的电脑”,选择“管理”,在弹出对话框中选择“设备管理器”)图2(选择“其他设备”中的“USB Device”)图3(选中USB driver后,右击鼠标选择“更新驱动程序”)图4图5(按弹出对话框操作,选择“从列表或指定位置安装”)图6(选择“在搜索中包括这个位置”,选择软件包中的文件名为“USB Driver”的文件夹)图7图8图9图10(按操作提示点击“下一步”安装USB驱动,点击完成后USB驱动升级成功)四、备注1、升级过程中请勿将机器断开连接。
Kindle 3 科普及常规操作指南
Kindle 3 科普及常规操作指南有新的更新,将在/article-70.html 首先更新亚马逊最新发布Kindle 3 电子书使用的仍是6寸E-ink屏幕,但刷新率有了显著提高,相比Kindle2提高了20%。
Kindle3有两种颜色可供选择,一种是与Kindle DX一样的黑色,另一种是Kindle2的白色. 除了颜色的改变外,Kindle3有两个版本,分别是:Wifi版,3G版。
亚马逊宣称新款Kindle3运行速度更快、屏幕对比效果更好。
Kindle3内存提升到4G,待机时间更长,不上网情况待机1个月,上网的话可使用10天。
其它方面,从Kindle3的机器图片上你可清楚看到,Kindle3没再延续使用Kindle2的5维导向杆,而是使用了5维按键。
另外Home键和Back键也移动了键盘底部,更方便操作。
最新技术的电子墨水屏幕,更佳的显示效果全新、墨水屏幕- 50%的对比度高反差比其他任何e-reader,在明亮的阳光下阅读,无眩光.新的和改进的字体—新明快,深色的字体.新的圆滑设计;21%的小身体保持相同的6 寸大小阅读的区域.重量只有241克.电池寿命达一个月.可存储- 3500书籍.内置的无线网络-商店和下载书籍少于60秒.快20% -无缝阅读。
加强读者与词典查找PDF格式,新WebKit-Based浏览器浏览网页,在无线网络(实验)关于3G版本的疑问Kindle3 的3G版本已内置无线模块,在国内使用,不需要再插手机卡即可免费接入中国联通的网络,在一定的流量内是免费的kindle 3和kindle 2相比1、kindle 3比kindle 2 外形减小21%,仍旧是6寸屏。
2、kindle 3比kindle 2 重量减少了17%。
3、kindle 3比kindle 2 对比度增强了50%。
4、kindle 3比kindle 2 更多字体。
5、kindle 3比kindle 2 翻页速度提升20%,更快更安静。
各个软件的安装使用说明
1.腾讯通
首先,查看计算机用户的账户类型是不是计算机管理员,只有管理员才可以安装腾讯通软件。
如果要安装腾讯通,却不是计算机管理员请联系技术部。
可根据自己的选择安装:
为了不影响开机速度,建议如下选择:
安装完成
第一:配置腾讯通的服务器地址(192.168.14.9)
选择接受文件的存放位置,为了方便工作,建议选择在桌面
选择好后,点击“应用”——再点击“确定”
输入用户名及密码,同时为配合保密工作,不要选择此下三项
2.布谷鸟
首次安装先安装“布谷鸟2010客户端”
安装好后提示重启电脑可以重启,重启后提示错误直接点击“关闭”
然后安装“Client”。
亚马逊Kindle3 使用指南一览
亚马逊 Kindle3 E-ink电纸书新手资料汇总重点跳转:开箱注册激活原版系统介绍多看系统介绍资源汇总10月11日新增内销版亚马逊Mighty Bright阅读灯,这款灯可以满足夜间基本阅读的要求,现在有3折的价格!看起来是生产厂自销。
推荐身在国内有需求的朋友购买。
淘宝地址10月7新增关于国内上官网买书和官方邮件提示。
最近此类问题很多,特此释疑~很多国内买家买了正规可注册的K3之后,陆续收到亚马逊的邮件提示,包括Important Reminder About International Delivery Fees,还可能有提醒你在美国之外买了书的,甚至有的人的购书功能会被锁定。
其实不需紧张!不会被永久封机或者扣费的。
首先要知道,你注册Kindle时候不是必须绑定信用卡的。
如果没绑定信用卡的话,当然不可能被扣费。
这种情况下,亚马逊不提供任何收费服务,包括买付费书刊和用3G中转文件等。
即使你绑定了信用卡,也是你自己购买了书刊或服务才会扣费的。
关于在美国之外购书的问题:官方对此存在一个注册地址+实际位置双重判定。
应对办法,先是要把账户里自己所在地设置成美国,其次如果你在国内的话,推荐用PC挂上代理(在线代理/SSH/VPN均可),再上官网登录帐号买书,这样官方就不会再锁定你购书功能或发信问你了。
即使机器购书功能现在被锁了,PC挂上代理一样可以买。
当然,如果你是爬墙高手,在国内有自带VPN的WIFI环境,那直接用Kindle买书也没问题。
总之,绕过限制政策还是很容易的。
另外有些人觉得自己是3G在国内就不用挂代理了,这是错的哦。
3G版人家也一样从基站判断你在哪漫游...一样会被警告被锁定。
最后,会英文的朋友不要费心去给他们回信解释了,费口舌没用地,记住地址填美国,买书挂代理即可。
10月8日新增网友crazy7写的网页,可在K3上实现中文云输入搜索,/S.htm10月9日新增自带游戏介绍: 原生系统先按home,再按shift+alt+m进入扫雷,上下左右移动光标,确认键开雷,M键标记,R重玩。
- 1、下载文档前请自行甄别文档内容的完整性,平台不提供额外的编辑、内容补充、找答案等附加服务。
- 2、"仅部分预览"的文档,不可在线预览部分如存在完整性等问题,可反馈申请退款(可完整预览的文档不适用该条件!)。
- 3、如文档侵犯您的权益,请联系客服反馈,我们会尽快为您处理(人工客服工作时间:9:00-18:30)。
声明:
对于在Kindle3上安装“多看”系统,我们已尽可能做了大量测试,均可升级成功。
尽管从原理上讲没有问题,但因为我们只有一台机器,测试的数量有限,所以请用户慎重升级,我们不能保证没有意外事情发生,因而无法承担因升级软件带来的责任。
Kindle3的升级步骤:
1.第一次安装时:把解压后文件夹中名为DK_System、DK_Documents和
DK_Pictures的三个文件夹拷贝到kindle根目录。
安装过多看系统:只需将当前系统切换到原Kindle系统,然后将升级包中新的DK_System文件夹替换旧的DK_System文件夹。
2.在升级包文件夹下找到“K3升级包”,将update_duokan_06.bin、
update_duokan_08.bin、update_duokan_0a.bin这个三个升级包考到kindle根目录下,升级时系统会自动识kindle3的升级文件
(已测试过通过的kindle3原系统版本为:3.0.0/3.0.1/3.0.2/3.0.3);
3在HOME界面按MENU键,弹出菜单后选择“settings”,如下图:
再次按MENU键,选择“Update Your Kindle”选项,如下图:
点击“Update Your Kindle”后系统会自动升级,当出现如下图时说明升级成功。
稍后系统会自动重启,系统会自动进kindle,在HOME界面按MENU键,选择Setting如图:
进入Setting界面再次点击MENU选择Restart如图:
稍后系统会自动重启,重启的过程比较慢,大概三四分钟后会出现系统切换界面,按“Q”进入多看系统,按“W”进入kindle系统(动作要快)。
几秒后出现多看系统启动界面,如下图:
缓冲完毕后,系统自动进入多看系统的目录界面,至此升级完成。
其它使用技巧:
一.多看系统结构介绍:
DK_System:多看系统文件。
DK_Documents:存放电子书的文件夹,该文件夹内可以直接放电子书也可以建立相应的文件夹。
在DK_Documents文件夹中的第一级文件夹,即为系统中对应的书籍分类名。
DK_Pictures:存放图片的文件夹,该文件夹内可以放多层次的图片文件夹。
music:存放音乐的文件夹。
二.安装多看系统后如何在原Kindle系统和多看系统进行切换:
如果您当前运行的系统是多看系统,在多看系统的“系统设置”界面,点击“B.切回到原kindle”,系统就会自动回到原kindle系统。
1.如果您当前运行的系统是Kindle系统,在kindle系统的Home界面按MENU 键弹出菜单后,选择“Settings”选项,再次按MENU键弹出菜单后,选择
“Restart”,待Kindle启动到系统切换界面时,如下图:
此时点击字母键“Q”即可进入多看系统。
1、在系统切换界面,如果不进行任何操作,系统会自动进入重启前的系统。
三.关于卸载多看系统的说明:
如果想卸载多看系统,只需将Kindle根目录下的DK_System、DK_Documents和DK_Pictures这三个文件夹删除即可,原Kindle系统依然可以正常运行。
版权说明:
Copyright 2010 DuoKan & . All Rights Resevered
版权所有 DuoKan & 。
本软件由 DuoKan Dev Team 开发。
多看软件系统未经许可不得商业贩卖。
作者对有商业贩卖行为的单位和个人保留追究其法律责任的权利。