R软件入门实例
pathfinder 疏散软件入门教程 教程实例
403 Poyntz Avenue, Suite BManhattan, KS 66502USA+1.785.770.8511SFPE Example 2Pathfinder 2011SFPE Example 2This is the second example in the SFPE Engineering Guide - Human Behavior in Fire (SFPE, 2003). The example determines the total movement time for a 5-story building with the following characteristics:1.There are 200 people on each floor above the ground floor.2.Each floor is served by two 44 inch (1.12 m) wide stairways. The doors leading into and from thestairway are 32 inches wide (0.81 m). The stair design uses 7 inch/11 inch risers and treads.3.The floor to floor distance is 12 feet. Floor to landing distance is 6 feet.ndings between the floors are 4 x 8 feet (1.22 x 2.44 m).5.Handrails are provided on both sides of the stairways 2.5 inches (64 mm) from the wall.The model is shown in Figure 1. Obviously, a real building would have a different arrangement of landings, but this model captures the geometry as described in the example. Consistent with the SFPE description of the problem, additional exits are provided on the first floor such that the flow of 400 people (each stairway takes ½ the occupants) from the upper floors through each stairway is the controlling component.In the problem description we use the floor naming convention with the first floor meaning the main floor at Z=0.Figure 1: SFPE Example 2 geometry and occupantsCreate GeometryTo select English measurements:1.On the View menu, click Units and select EN to display measurements using the English system. To specify snap grid spacing:1.On the View menu, click Edit Snap Grid....2.In the Specify snap grid spacing menu, type 2.0. By default, length units will be in feet,however, you can type a value followed by a unit (e.g.: "in" or "m") and the length will beconverted to feet.3.Click OK.To define the default floor height:1.In the Floor Height box, type 12.0.To create the room:1.In the View toolbar, click Top View ( ).2.In the Tools toolbar, click Add a Rectangular Room ().3.In the Z Plane box, type 0.0.4.In the coordinate boxes enter the following values: X1:0.0, Y1:0.0, X2:60.0, Y2:40.0.5.Click Create.Replicate the room to create five floors.1.In the View toolbar, click the Selection Tool icon .2.Select the room.3.In the Tools toolbar, click the Move Objects icon .4.Select Copy Mode.5.In the Copies box type 4.6.In the Move Z box, type 12.0.7.Click Copy/Move.8.Click the Zoom Fit icon to rescale the view.Your model should now look like Figure 2.Figure 2: The floors in the modelTo define the landings:1.Create the first landing at Z=6.0 ft. In the View toolbar, click Top View ( ). In the Tools toolbar,click Add a Rectangular Room (). In the Z Plane box, type 6.0. In the coordinate boxes enter the following values: X1:-13.5, Y1:16.0, X2:-9.5, Y2:24.0. Click Create.2.Replicate the landing. In the View toolbar, click the Selection Tool icon . Select the landing. Inthe Tools toolbar, click the Move Objects icon . Select Copy Mode. In the Copies box type 3.In the Move Z box, type 12.0. Click Copy/Move.3.Repeat for the landing on the opposite side. In the View toolbar, click Top View ( ). In theTools toolbar, click Add a Rectangular Room (). In the Z Plane box, type 6.0. In thecoordinate boxes enter the following values: X1:69.5, Y1:16.0, X2:73.5, Y2:24.0. ClickCreate.4.Replicate the landing. In the View toolbar, click the Selection Tool icon . Select the landing. Inthe Tools toolbar, click the Move Objects icon . Select Copy Mode. In the Copies box type 3.In the Move Z box, type 12.0. Click Copy/Move.Your model should now look like Figure 8.4Figure 3: The floors and landings in the modelTo add the first stairway on the left side of the building:1.In the Tools toolbar, click Create Stairs between two edges ().2.In the Stair Width box, type 44.0 in. In the Door 1 Width box and the Door 2 Width box, type32.0 in.3.Click on the lower landing and position the stair towards the front side of the landing. Click onthe lower floor to create the stairs from the landing to the lower floor, Figure 4.e the Move Objects tool to make three copies of the stair, separated by 12 ft in the Zdirection.5.Add the stairs that go up from the landing. Click on the lower landing and position the stairopposite the first stairs. Click on the second floor to create the stairs from the landing to thesecond floor.e the Move Objects tool to make three copies of the stair, separated by 12 ft in the Zdirection.7.Repeat on the other side of the model. This time, position the first stairs on the back side of thelanding.Figure 4: First stairs on left side of buildingAdd the exit doors:1.Select the door tool () and in the Max Width box, type 120.0 in.2.Place a door adjacent to both stairs on the lowest floor. These doors are wide enough that exitfrom the first floor does not affect the egress time. the doors Right Exit and Left Exit to aid in later plotting of the exit rates througheach door, Figure 8.7.Figure 5: The Left ExitThe SFPE problem description assumes that evacuation of the first floor does not affect evacuation from the higher floors. Therefore, we add four more exits to the first floor, Figure 6.Figure 6: Additional exits on first floorDefine ProfilesProfiles describe the characteristics of the occupants, including the walking speed, delay times before movement, size, display image, and base color. We will use a different color for each floor, so that we can identify occupants in the graphical display of their egress. To define the profiles:1.On the Model menu click Edit Profiles. Click Rename and change the name of the default profileto Floor 1.2.Click the Color box, click the Palette tab, and select a red color. Click OK. Click Apply.3.Click New to create a new profile, give it the name Floor 2, and give it an orange color.4.Repeat for floors 3, 4, and 5, giving colors yellow, green, and blue.Add OccupantsTo add occupants:1.Select the first (lowest) floor. On the Model menu click Add Occupants. For the Profile selectFloor 1. For Occupant Count select By Number and type 200. Click OK.2.Repeat for each floor, selecting the corresponding profile for each floor.When finished, your model should look like Figure 7.Figure 7: Pathfinder model with occupantsRun SimulationTo run the simulation:1.Save your document to a new folder. Use the name sfpe2.pth.1.On the toolbar, click Run Simulation (). By default, the problem will be solved using theSteering behavior mode.2. A summary report is provided in the analysis dialog. It provides FIRST IN and LAST OUT times foreach room and door. The total time required for evacuation is approximately 410 seconds. View ResultsWhen the simulation is finished, the 3D Pathfinder results window will display.To view results:1.Click the Play button. This will display the occupants as cylinders with their direction indicatedby a triangle.2.At any time click the Pause or Stop button. You can drag the time line to control the animation.3.To view occupants as people, click the Stop button, on the Agents menu, click Show as People,then click the Play button, Figure 8.Detailed information for each room is provided in comma-separated value (CSV) files that can be imported to a spreadsheet.Figure 8: Display of resultsAnother useful way to view the data is to plot either floor occupancy or door flow rates. These options are available under the Results menu. Figure 9 shows a graph of floor occupancy as a function of time This is a good time to recognize the naming floors can help in their later selection.Figure 9: Display of floor occupancySelect SFPE ModePathfinder provides the option to select different simulation modes. By default, the occupants act as agents with a steering behavior that seeks to reach a goal while avoiding other occupants and boundaries. The SFPE movement mode is consistent with the assumptions used in the SFPE Engineering Guide - Human Behavior in Fire (SFPE, 2003). Assumptions include:1.The occupants move toward the exits using the shortest path2.The maximum occupant speed is a function of room density3.Occupants move independently and can occupy the same space as other occupants4.Queues form at doors, with the flow rate through the door as specified by SFPE guidelines.Because multiple occupants can occupy the same space, a queue may appear as a singleoccupant.To select the SFPE mode:1.On the Simulation menu, click Simulation Parameters....2.Click the Behavior tab.3.In the Behavior Mode box, select SFPE.4.In the Door Boundary Layer box, type 6 in.5.Click OK.Before running the analysis, save the model using the name sfpe2_sfpe_mode.pth. The total time for all occupants to exit is approximately 607 sec.Compare Results to SFPE Calculation The SFPE solution to this problem is given below.The Pathfinder solution gives the time to exit the stairs as 607 sec, compared to the SFPE solution of 617 sec (10.29 minutes).Adding Collision Avoidance to the SFPE ModeThe SFPE mode does not prevent multiple occupants from occupying the same space. A collision handling option can be added to the SFPE calculation. Flow rates through doors and walking speeds are still calculated using the SFPE To run with this movement option:1.Open the sfpe2_sfpe_mode.pth model created above. On the File menu, click Save As...and give the name as sfpe2_collision.pth.2.On the Simulation menu, click Simulation Parameters....3.Click the Behavior tab.4.In the Behavior Mode box select SFPE.5.Click to select Add Basic Collisions.6.Click OK to close the Simulation Parameters dialog.7.Run the simulation.In the new solution, the time to exit the stairs is 632 sec. These times are similar to the standard SFPE solution, but the appearance of the solution is improved, since the occupants form queues at the doors.References[SFPE, 2003] Engineering Guide - Human Behavior in Fire. June, 2003. Society of Fire Protection Engineers. 7315 Wisconsin Avenue, Suite 620E Bethesda Maryland USA 1-301-718-2910.。
Visual Basic菜鸟入门经典实例
Visual Basic菜鸟入门经典实例这个专题是为爱好者准备的,如果你是专业人士,那么你可以放过不看,如果你想了解和学习编程,进而可以自娱自乐的设计一些小软件,那么就跟我来吧。
第一课:Hello World几乎所有程序语言都是从“Hello World”开始,所以我们也从这里开始我们的VB学习之旅。
VB入门之“Hello World”[文章信息] 作者: 时间: 2004-02-14 出处: VB大世界责任编辑: 方舟[文章导读] Visual Basic入门的第一课,介绍如何使用vb开发工具没学过编程的人常常会问,编程难不难,这个问题很难回答。
难,的确很难,要编一个好的程序尤其是这样,并且有些程序还要用到一些其他专业的知识,比如说一个图形处理程序,就要对图像的格式有所了解,甚至一些美术知识;但编程也很容易,就拿VB来说,编一个自娱自乐的小工具还是一件相当惬意的事情呢,当然它没法完全代替人工,譬如说完成你的家庭作业、向学校发射导弹……作为第四代计算机语言,VB的特点是显而易见的。
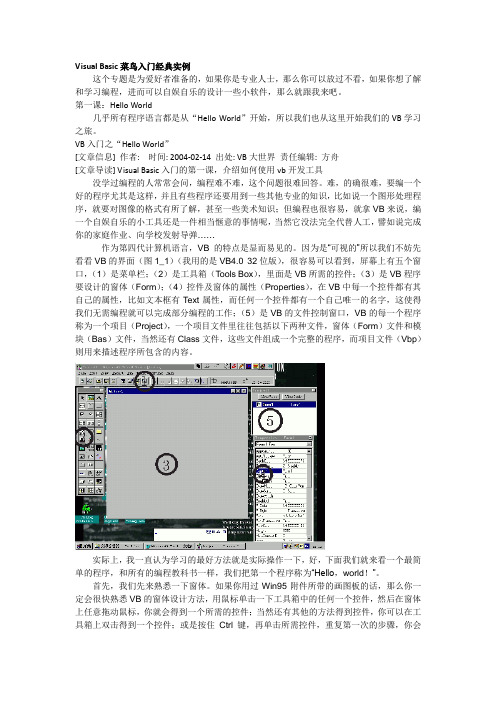
因为是“可视的”所以我们不妨先看看VB的界面(图1_1)(我用的是VB4.0 32位版),很容易可以看到,屏幕上有五个窗口,(1)是菜单栏;(2)是工具箱(Tools Box),里面是VB所需的控件;(3)是VB程序要设计的窗体(Form);(4)控件及窗体的属性(Properties),在VB中每一个控件都有其自己的属性,比如文本框有Text属性,而任何一个控件都有一个自己唯一的名字,这使得我们无需编程就可以完成部分编程的工作;(5)是VB的文件控制窗口,VB的每一个程序称为一个项目(Project),一个项目文件里往往包括以下两种文件,窗体(Form)文件和模块(Bas)文件,当然还有Class文件,这些文件组成一个完整的程序,而项目文件(Vbp)则用来描述程序所包含的内容。
实际上,我一直认为学习的最好方法就是实际操作一下,好,下面我们就来看一个最简单的程序,和所有的编程教科书一样,我们把第一个程序称为“Hello,world!”。
Photoshop制作像素画入门实例详解

Photoshop制作像素画⼊门实例详解⾸先声明我是菜鸟,近些⽇⼦做了⼀些像素图,得到了⼀些朋友的好评,在这向你们表⽰感谢对我的⽀持。
很多朋友希望我做⼀个类似教程的东西想了解像素的绘制⽅法,我也是刚接触像素,教程谈不上,只是向朋友介绍⼀下我所了解的知识。
1、什么是像素。
画这个⾃然要知道什么是像素图。
电脑中的图形分⽮量图和位图(像素图)两种。
⽮量图:像素图:区别在于⽮量图根据的是数学公式,所以可以⽆限放⼤。
像素图是由点组成,因此放⼤后你就能看到放⼤的点[ ],这些点成为像素[pixel],像素图创作需要的是点绘。
2、优点就因为它由很⼩的点组成,我认为它最适合运⽤到带液晶屏的电⼦设备上。
具体如下:掌上游戏机,别怀疑所有的掌上游戏机,gameboy什么的都是像素图,当然我的⽂曲星也属于这类。
电脑屏幕:桌⾯图标、⽹页gif、QQ秀、字体等。
⼿机:⼿机上的⼿机电池、信号等图都是。
玩具:有没有感觉乐⾼玩具都像是像素⼀样。
3、⼯具不像⽮量图需要专门的⼯具。
像素只需要[开始]>[所有程序]>[附件]>[画图],不是开玩笑的。
最简单的就是最有效的,这⼀款免费的⽆需安装的及破解的绿⾊软件。
要是复杂的创作还是选⽤photoshop吧,功能上很多优势,最低版本都可以。
当然像素也分很多类,需要不同的⼯具,我只介绍上⾯这两种软件。
像素不需要技术,需要的是细⼼。
4、基本元素举例在ps⾥⼯具就是铅笔⼯具。
快捷键是,导航器最好放⼤到400%点:线:⾓:⾯:友情提⽰:常⽤的线条可以设置为画笔,选中线条>编辑>定义画笔预设。
之后⽤铅笔⼯具时就右键就会看到在列表的最后。
5、字体⾃然在图形中需要出现字体。
这个就不需要你费事了,有专门的字体,推荐⼏个。
英⽂中⽂友情提⽰:如果字体不想变形,⼀定要成倍放⼤。
如英⽂字体上⾯举例的都是8号,放⼤就要变成16号,依此类推,当然图形也是如此。
6、下⾯举⼀些实例来说明例1:先教⼤家画⼀个MP3,以后有时间再写点“教程”,没有固定的⽅法,看⾃⼰的习惯,仅演⽰我做的过程。
PKPM结构设计软件应用实例

PKPM结构设计软件入门与应用实例—钢结构目录第一章门式刚架1.1设计条件(工程实例) (4)1.2平面建模 (9)1.3计算分析 (34)1.4设计成果判断 (35)1.5施工图绘制 (49)1.6维护结构设计 (57)1.7吊车梁设计 (68)1.8支撑设计 (78)1.9三维建模与刚架二维设计 (86)第一章门式刚架门式刚架是目前应用较多的一种结构形式,PKPM系列软件的STS模块能很好的完成该结构的分析与设计。
下面就以一个具体实例,简单介绍PKPM软件在实际应用中的操作流程和对计算结果的判断方法。
1.1设计条件(工程实例)某厂房位于北京郊区,该厂房长91.5m,宽54.5m,檐口高度8.1m,女儿墙高0.6m。
屋面为双坡屋面,坡度1:15,室内外高差为0.3米。
厂房为三连跨,单跨跨度18米,每跨有2台吊车,柱距7米。
厂房端部有夹层。
本工程建筑图具体见图1.1-1、图1.1-2、图1.1-3、图1.1-4、图1.1-5和图1.1-6。
本厂房耐火等级二级,生产类别为戊类。
结构类型:门式刚架屋面材料:采用压型钢板轻钢屋面墙面材料:±0.000到1.200m采用页岩砖,1.2m以上采用压型钢板。
主体结构钢材:采用Q345-B,焊接材料采用E50系列。
维护结构钢材:采用Q235冷弯薄壁型钢。
结构的重要性:二类建筑物设计使用年限:50年本地设防烈度:8度,场地土类别II类基本风压:0.45kN/m2基本雪压:0.40 kN/m2不上人屋面活荷载:0.5 kN/m2夹层部分活荷载:2.0 kN/m2楼梯间活荷载:3.5 kN/m2本工程的刚架布置图见图1.1-7,支撑布置图见图1.1-8。
图1-2 A~K立面图图1-3 K~A立面图图1-4 1-1剖面图图1.1-7 刚架布置图图1.1-8 支撑布置图1.2平面建模L编者按:门式刚架的结构分析在设计中多以平面分析为主,相应的软件模型也为平面建模为主。
软件使用入门教程

软件使用入门教程一、软件使用入门教程:概述在当今数字化时代,软件的应用已经渗透到我们生活的各个方面。
从日常办公到娱乐休闲,软件的使用成为了不可或缺的一部分。
然而,对于刚接触某个软件或者对某个软件不熟悉的人来说,往往会遇到一些困惑和问题。
因此,本篇文章将分章节介绍几款常见软件的使用方法,包括微软办公套件,图像编辑和处理软件,以及数据分析与可视化软件。
二、微软办公套件:Word、Excel和PowerPoint1. Microsoft Word(微软Word)Microsoft Word是一款常用的文字处理软件,本节将从界面介绍、基本操作和格式化等方面入门。
在启动软件后,我们可以看到界面上有菜单栏、功能区和文档编辑区。
通过菜单栏和功能区可以进行字体、段落、插入图片等操作。
在进行编辑时,可使用常用的快捷键如Ctrl+C复制、Ctrl+V粘贴等。
而对于格式化,我们可以选择字体、加粗、选取对齐方式等。
2. Microsoft Excel(微软Excel)Microsoft Excel是一款电子表格软件,非常适用于数据分析和计算。
在使用Excel之前,首先需要了解单元格、工作表和公式的概念。
在创建一个新的工作表后,我们可以输入各种数据,并应用不同的公式进行计算。
例如,利用SUM函数可以求和,AVERAGE函数可以计算平均值。
此外,还可以使用图表功能对数据进行可视化。
3. Microsoft PowerPoint(微软PowerPoint)Microsoft PowerPoint是一款幻灯片制作软件,常用于演讲和展示。
在创建一个新的幻灯片之前,我们可以选择不同的模板或者自定义幻灯片的布局。
随后,我们可以在每一页上插入文本、图像、音频和视频等内容。
在演示时,可以利用自动放映功能进行全屏展示。
三、图像编辑和处理软件:Adobe Photoshop和GIMP1. Adobe Photoshop(适用于专业图像编辑)Adobe Photoshop是一款用于图像编辑和处理的专业软件。
Proteus简易入门教程

这是我们写作计划的一部分,希望能对PROTEUS初学者有所帮助。
同时也望得到你们的反馈意见,以帮助我们改进.版权所有:重庆电专动力系唐前辉丁明亮(转载请注明出处)建议读者先阅读靠后的实例一,实例二,以快速入门。
-----工具是生产力水平的标志,让我们一起飞翔目录第一章概述................................................................................................................ 错误!未定义书签。
一、进入Proteus ISIS ............................................................................................ 错误!未定义书签。
二、工作界面........................................................................................................ 错误!未定义书签。
三、基本操作........................................................................................................ 错误!未定义书签。
图形编辑窗口........................................................................................ 错误!未定义书签。
预览窗口(The Overview Window) .................................................. 错误!未定义书签。
对象选择器窗口.................................................................................... 错误!未定义书签。
UML建模工具软件StarUML从入门到精通——如何应用StarUML创建接口及实现类的应用示例
3、实现接口
或者
(1)接口的实现 接口与对它进行实现的模型元素(实现类)之间用一条直线 相连(它们之间是一对一的关联关系);
或者
(2)调用该接口的类与接口之间用带箭头的虚线连接,它们之 间是依赖关系
3、在项目中再添加一个名称为“USB设备接口及实现”的 类图
பைடு நூலகம்
4、在该类图中添加一个名称为USBDevice的接口
如何应用StarUML 创建接口及实现类的应用示例
1、接口
(1)接口是一组外部可访问的操作,也是一个类提供给另一个 类的一组操作,它描述类的部分行为,用于为类或组件提供服务 。 (2)可以将接口看成是不含属性的特殊抽象类,其操作也没有 方法。
2、接口的UML图示形式
接口在类图中表示为一个带接口名称的小园,并标有接口 名(棒糖式接口);
(1)添加一个名称为USBDevice的接口
(2)设置该接口的显示方式为“Icon with Label”的形式, 从而显示出<interface>构造形。
(3)在名称为USBDevice的接口中添加readData和writeData成 员方法
(4)在接口中显示出这些方法——在Format工具栏中选择 “Suppress Operations”按钮
或者或者22调用该接口的类与接口之间用带箭头的虚线连接它们之间是依赖关系33在项目中再添加一个名称为usb设备接口及实现的类图44在该类图中添加一个名称为usbdevice的接口11添加一个名称为usbdevice的接口22设置该接口的显示方式为iconwithlabel的形式从而显示出interface构造形
5、在该类图中再添加USBDevice接口的其它实现类 (1)实现类MP4
Microsoft Project入门实例教程
软件项目管理(Microsoft Project)实验指导1、实验内容本次实验是通过使用Microsoft Project完成项目管理的一些工作,目的是了解Microsoft Project工具的使用和项目管理的相关知识。
实验内容和步骤如下:1.1 建立项目管理文件在开始制定项目计划之前,要明确定义项目的一些基本属性信息,或者对项目有一个基本的定义,例如项目的名称、内容、开始时间、结束时间等。
例如有一个《校园网站》项目,内容是通过网站介绍学校的基本情况,发布一些及时的信息,同时有论坛等讨论区域。
然后开始在Project2003中创建项目,实验步骤如下:1、新建项目选择[程序]-〉Microsoft Office ——〉Microsoft Office Project进入Project2003。
选择[文件]-〉[新建]菜单命令,打开Project的“新建项目”向导,如图1,单击“空白项目”将出现“任务”导向,如图2。
图1:新建项目图2:文件向导2、定义项目项目创建完成之后,需要定义项目。
单击图2中的“定义项目”,将显示“定义项目”导向,利用向导可以很容易完成定义项目的操作。
分三步:1)输入项目的开始时间,如图3,将日期调整为项目的预计开始日期;2)输入项目工作组选项,如图4,询问是否使用Project Server和Project WebAccess ,本项目比较小,不需要Project Server的协调,选择“否”;3)保存文件,将文件保存为SchoolWebside.mpp。
图3:定义项目-a项图4:定义项目-b项图5:文件保存3、设置环境信息项目的环境信息包括工期、项目的日历等。
选择[工具]-〉[选项],弹出“选项”对话框,选择“选项”对话框中的“日历”选项卡可以输入、查看或者修改日期、时间等设置,如图6。
选择“日程”选项卡可以输入、查看和修改排定任务日程的首选项。
如图7。
图6:“日历”选项卡图7:“日程”选项卡1.2 创建项目任务创建一个新的项目文件后,接下来需要进行任务的创建,任务是构成项目的基本单元,所有的任务完成了,项目才可以完成。
powermill后处理入门与应用实例精析 概述及解释说明
powermill后处理入门与应用实例精析概述及解释说明1. 引言1.1 概述:本文旨在深入探讨PowerMill后处理的基础知识和应用实例,并解释其在制造领域中的重要性。
PowerMill是一款专业的计算机辅助制造(CAM)软件,广泛应用于数控编程和加工路径生成。
1.2 文章结构:本文按照以下结构来进行论述和说明:- 引言:介绍文章的目的、概述和文章结构。
- PowerMill后处理入门:详细阐述了PowerMill的概述、后处理定义和作用,以及后处理流程的简介。
- PowerMill后处理应用实例精析:通过三个实例,详细说明了如何生成NC程序代码、如何修复刀轨迹中的错误与瑕疵,以及如何优化加工效率和质量。
- 结论:对全文进行总结,回顾主要内容和立场,并展望未来PowerMill后处理的发展方向,并提出建议。
1.3 目的:本文旨在为读者提供关于PowerMill后处理方面的全面指导。
通过阐明PowerMill后处理入门知识和应用示例,读者将能够更好地理解并应用此功能来提高其制造过程中的效率和质量。
通过对文章内容进行总结并展望未来的发展,读者将能够更好地规划和使用PowerMill后处理技术。
2. PowerMill后处理入门:2.1 PowerMill概述:PowerMill是一款专业的数控加工软件,广泛应用于制造业中。
它拥有强大的后处理功能,可以将CAD模型转化为可执行的数控(NC)程序代码,从而实现机床上的自动加工。
PowerMill的后处理功能可以根据机床类型、刀具路径和加工要求等参数生成符合标准的NC代码。
2.2 后处理的定义和作用:后处理是指将由CAD/CAM软件生成的刀具路径数据转化为特定机床所需的NC程序代码。
在数控加工过程中,后处理起着至关重要的作用。
它不仅决定了刀具路径是否顺畅、安全有效,还确保了最终零件的精度和质量。
因此,良好的后处理是保证数控加工成功的必备条件之一。
2.3 后处理流程简介:PowerMill后处理流程通常包括以下步骤:1. 导入CAD模型:首先需要将设计好的三维CAD模型导入PowerMill软件中进行进一步操作。
COMSOL3.5快速入门案例1——导电体的热效应
COMSOL Multiphysics快速入门实例: 导电体的热效应导电体的热效应该模型的目的在于给出一个多物理场模型的概念并给出采用COMSOL Multiphysics求解这类问题的方法。
该实例研究了热和电流平衡之间的耦合作用现象。
装置中通有直流电流。
由于装置的有限电导率,在电流流过装置的过程中会出现发热现象,装置的温度将会显著上升,从而也将改变材料的导电率。
这种作用过程是双向耦合的过程;即电流平衡影响到热平衡,而热平衡又反过来影响到电流平衡。
模型的过程包含以下两个基本过程:• 绘制装置的结构图• 定义物理环境,设置材料属性和边界条件• 绘制网格• 选择一个合适的求解器并开始求解过程• 后处理结果COMSOL Multiphysics 包含一个非常易用的CAD工具,在该模型中将会得到介绍。
你可能更习惯于采用其它的CAD工具来绘制几何图形,然后将其导入到COMSOL Multiphysics中; 如果是采用这种方式,则可以跳过下面的几何结构绘制过程介绍,而通过导入一个CAD文件到COMSOL Multiphysics 中来作为分析模型,在安装目录下有为该模型准备的分析CAD几何模型文件。
简介图 2-1显示了装置的几何结构, 该结构实际上是IC卡的支撑结构的一部分,并被焊接到一个印刷电路板上。
结构由两条腿焊接到pc电路板上,上部通过一个很薄的导电薄膜连接到IC上。
两个导体部分(腿结构)是由铜制成,焊点由 60% 锑 和 40%铅组成的合金制成.模型假定导体部分必须将1A的电流通过焊点流入到IC电路板中,计算在这个过程中温度的变化情况。
图 2-1: 装置的几何结构模型定义电流平衡条件由下列方程式来描述其中 σmetal 表示电导率(S/m), V 表示电势(V). 电导率是温度相关函数,用下列表达式来描述:其中 ρ0 表示在参考温度T 0 (K)下的参考电阻 (Ω·m), a 表示温度因变量的比例系数 (K -1)。