LaTeX_表格的处理

LaTeX 表格的处理
LaTeX 表格处理概述
一般三线表的处理
带表格注释的三线表
固定列宽和自动伸缩列宽
固定列宽与对齐方式
自动伸缩列宽
跨页表格
表格旋转和后置
表格旋转
表格后置
辅助转换工具
LaTeX 表格处理概述
与 word 不同,LaTeX 通过一定的语法规则将表格写成纯文本形式。基本规则包括:表格从上到下,每一行从左到右,单元格内容使用&分隔,用\\换行。最基本的表格环境是tabular环境。下面是一个简单的表格代码和实际效果:
\begin{tabular}[t]{l|c}
\hline
姓名 & 年龄 \\
\hline
张三 & 32 \\
李四 & 12 \\
王五 & 24 \\
\hline
\end{tabular}
一般三线表的处理
学术论文普遍使用三线表。三线表的特点主要是:整个表格通常只有三条横线,首尾两条横线较粗,中间一条较细,一般不使用竖线。LaTeX 处理三线表相当简单方便。用到的宏包主要是booktabs。下面是普通三线表的代码和效果:
\begin{table}[htbp]
\caption{\label{tab:test}示例表格}
\begin{tabular}{lcl}
\toprule
姓名 & 年龄 & 地址\\
\midrule
张三 & 32 & 中华人民共和国\\
李四 & 12 & 中华人民共和国\\
王五 & 24 & 中华人民共和国\\
\bottomrule
\end{tabular}
\end{table}
带表格注释的三线表
三线表有时候还需要加上注释以便给出表格的资料来源等信息。解决这一问题可以使用下面三个办法之一:
?使用ctable宏包。该宏包用法简单,下面是典型代码和效果:
\ctable[%
caption=The Skewing Angles,
label=tab:nowidth,
]{lcc}
{\tnote{for the abstraction reaction,
$Mu+HX \rightarrow MuH+X$.}
\tnote[b]{1 degree${} = \pi/180$ radians.}
\tnote[c]{this is a particularly long note, showing that footnotes are set in raggedright mode as we don't like hyphenation in table footnotes.}
}
{\FL & $H(Mu)+F_2$ & $H(Mu)+Cl_2$ \ML
$\beta$(H) & $80.9$\tmark[b] & $83.2$ \NN
$\beta$(Mu) & $86.7$ & $87.7$ \LL
}
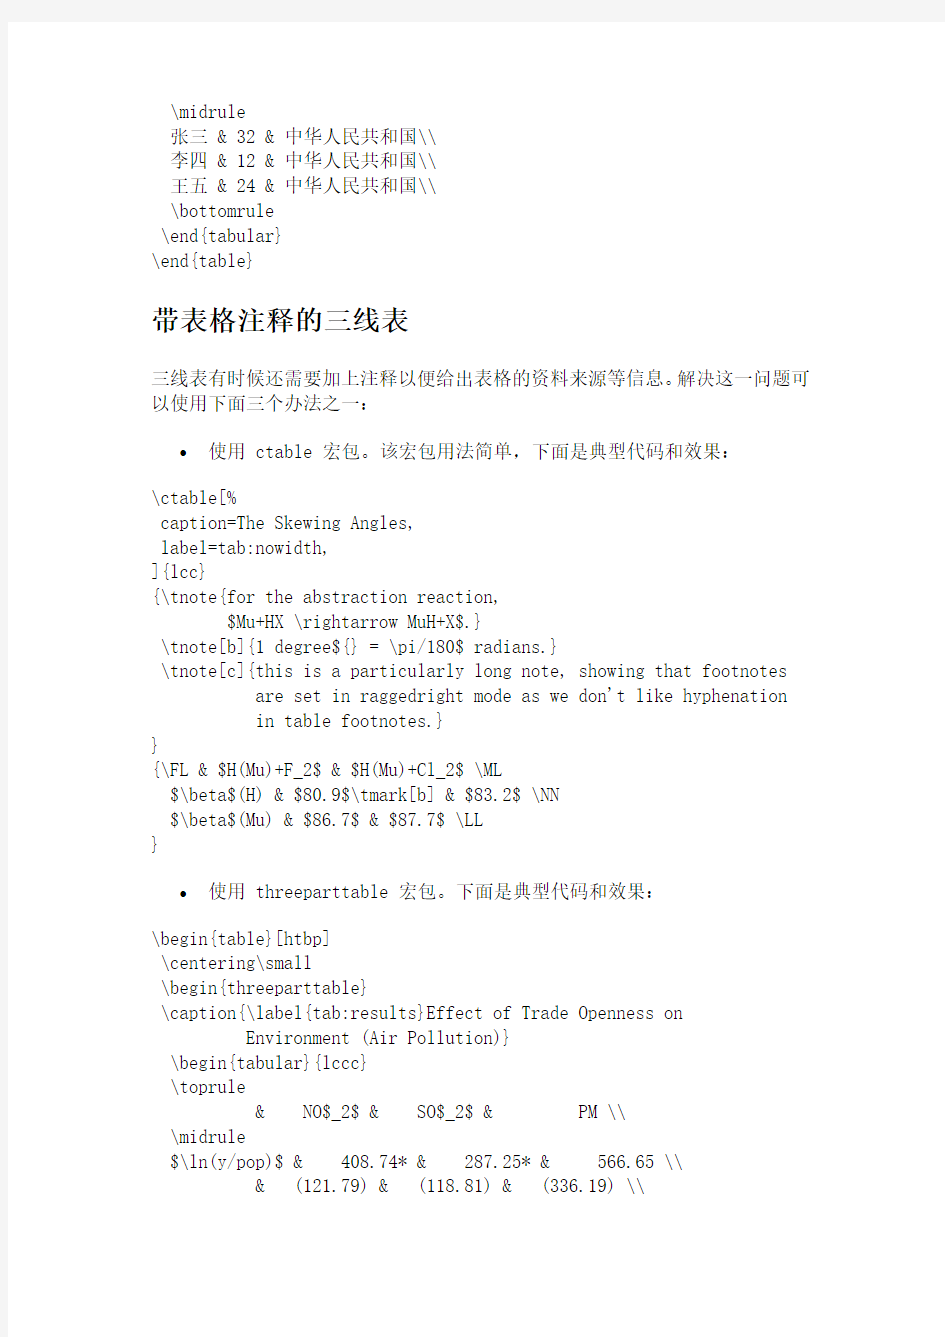
?使用threeparttable宏包。下面是典型代码和效果:
\begin{table}[htbp]
\centering\small
\begin{threeparttable}
\caption{\label{tab:results}Effect of Trade Openness on
Environment (Air Pollution)}
\begin{tabular}{lccc}
\toprule
& NO$_2$ & SO$_2$ & PM \\
\midrule
$\ln(y/pop)$ & 408.74* & 287.25* & 566.65 \\
& (121.79) & (118.81) & (336.19) \\
$\ln(y/pop)^2$ & $-$22.85* & $-$16.58* & $-$35.57** \\
& (6.90) & (6.78) & (19.06) \\
$(X+M)/Y$ & $-$.29** & $-$.31* & $-$.37 \\
& (.17) & (.08) & (.34) \\
$Polity$ & $-$3.20* & $-$6.58* & $-$6.70** \\
& (1.47) & (2.05) & (3.42) \\
$\ln(LandArea/pop)$ & $-$5.94 & $-$2.92* & $-$13.02* \\ & (5.93) & (1.39) & (6.29) \\
Obs. & 36 & 41 & 38 \\
$R^2$ & 0.16 & 0.68 & 0.62 \\
\bottomrule
\end{tabular}
\small
Note: Robust standard errors in parentheses. Intercept
included but not reported.
\begin{tablenotes}
\item[*] significant at 5\% level
\item[**] significant at 10\% level
\end{tablenotes}
\end{threeparttable}
\end{table}
固定列宽和自动伸缩列宽
有时三线表需要固定某列的列宽,或者指定整个表格的总宽度,指定某几列自动伸缩。
固定列宽与对齐方式
固定列宽可以使用array宏包的p{2cm}系列命令,如果需要指定水平对齐方式,可以使用下面的形式>{\centering}p{2cm}实现,但如果使用这种方式,缺省情况下不能使用\\换行,需要使用\tabularnewline代替。为了仍然使用\\换行,需要在导言区加上下面的代码:
\usepackage{array}
\newcommand{\PreserveBackslash}[1]{\let\temp=\\#1\let\\=\temp}
\newcolumntype{C}[1]{>{\PreserveBackslash\centering}p{#1}}
\newcolumntype{R}[1]{>{\PreserveBackslash\raggedleft}p{#1}}
\newcolumntype{L}[1]{>{\PreserveBackslash\raggedright}p{#1}}
使用C{3cm}命令即可指定该列宽度为 3cm,并且文字居中对齐,左对齐和右对齐命令分别是L{2cm}和R{2cm}。
下面是一个的例子:
\begin{table}[htbp]
\centering\caption{\label{tab:test}2000 和~2004 年中国制造业产品的出口份额}
\begin{tabular}{l*{2}{R{2cm}}}
\toprule
& 2000 & 2004 \\
\midrule
钢铁 & 3.1 & 5.2 \\
化学制品 & 2.1 & 2.7 \\
办公设备及电信设备 & 4.5 & 15.2 \\
汽车产品 & 0.3 & 0.7 \\
纺织品 & 10.4 & 17.2 \\
服装 & 18.3 & 24\\
\bottomrule
\end{tabular}
\end{table}
自动伸缩列宽
使用tabularx宏包可以实现自动伸缩列宽。下面是一个简单的例子。与普通的tabular环境不同之处在于:(1)需要指定整个表格的总宽度;(2)需要用X 指定至少一列为自动伸缩列。
\begin{table}[htbp]
\centering\caption{\label{tab:test}2000 和~2004 年中国制造业产品的出口份额}
\begin{tabularx}{10cm}{Xrr}
\toprule
& 2000 & 2004 \\
\midrule
钢铁 & 3.1 & 5.2 \\
化学制品 & 2.1 & 2.7 \\
办公设备及电信设备 & 4.5 & 15.2 \\
汽车产品 & 0.3 & 0.7 \\
纺织品 & 10.4 & 17.2 \\
服装 & 18.3 & 24\\
\bottomrule
\end{tabularx}
\end{table}
跨页表格
普通的表格不能跨页。如果需要跨页表格,需要使用longtable或supertabular等宏包。此处以longtable为主介绍。
下面是一个例子。
\begin{longtable}{p{1.2cm}p{8cm}p{5cm}}
\caption{\label{tab:test}WTO 英语缩写}\\
\toprule
缩写 & 原\hspace{1em}文 & 解\hspace{1em}释\\
\midrule
\endfirsthead
{\bf 续表~\ref{tab:test}}\\
\toprule
缩写 & 原\hspace{1em}文 & 解\hspace{1em}释\\
\midrule
\endhead
\endfoot
\bottomrule
\endlastfoot
WTO & World Trade Organization & 世界贸易组织\\
TRIMs & Trade-Related Investment Measures & 与贸易有关的投资措施\\ TPR & Trade Policy Review & 贸易政策审议\\
....
\end{longtable}
表格旋转和后置
表格旋转
如果表格过宽,可以将表格旋转 90 度横放。使用rotating宏包即可实现此功能。与普通表格的不同之处是:需要将table环境替换成sidewaystable环境。
表格后置
使用endfloat宏包可以将文章中的所有图表置于文章末尾,以满足某些杂志的排版要求。
辅助转换工具
?calc2latex 或 excel2latex 可以将电子表格文件数据转换为 latex 表格。
?dat2latex.pl 这是 perl 脚本,可将 gnuplot 的文本数据文件转换为latex 表格。点击此处下载。
11月13日
latex中的距离
固定长度
cm 厘米
mm 毫米
in 英寸(1in = 2.54cm)
pt 点(1in = 72.27pt)
bp 大点(1in = 72bp)
pc pica (1pc = 12pt) 十二点活字
dd didot (1157dd = 1238pt) 迪多点制
cc cicero (1cc = 12dd) 西塞罗
em 字体相关尺寸,相当于大写字母M的宽度
ex 字体相关尺寸,相当于字母x的高度
要想给长度赋值,用命令\setlength{长度命令}{已定义的长度}
E.G. \setlength{\textwidth}{12.5cm}
橡皮长度
有些命令的参数是橡皮长度,一个橡皮长度的基本命令是:
正常值plus 伸展值minus 收缩值 e.g. \setlength{\parskip}{1ex plus 0.5ex minus 0.2ex} \fill:正常长度为零,但可以伸展到任意长度。
有用的距离
\mathindent: 公式缩进
\columnsep: 两列之间的间距
\columnseprule: 两列间竖线的宽度
\parskip: 两个段落之间的距离。以ex为单位,橡皮长度
\parindent: 段落第一行的缩进
\baselinestretch: 度量两条基线之间的正常间距的数值。初始化值为1,
用\renewcommand{\baselinestretch}{因子}修改
\baselineskip: 行间距,字体尺寸* \baselinestretch
页面样式的距离:
\headheight: 页眉高度
\headsep: 页眉基线到正文顶部的距离
\topskip: 正文顶部到正文第一行的距离
\textwidth: 文本行宽度
\textheight: 文本高度
\footskip: 正文底部到页脚底部的距离
\paperwidth, \paperheight
广义列表中的距离
\topsep
\partopsep
\parsep
\itemsep
表格中的距离
\tabcolsep tabular和tabular*中两列间距的一半
\arraycolsep array中列间距的一半
\arrayrulewidth 表格中水平线和竖直线的粗细
\doublerulesep 双直线时两线之间的距离
\arraystretch 表格中的行间距
图形中距离
\unitlength 单位长度
任意的间距
\hspace{} \hfill
\vspace{} \vfill
\quad \qquad: 当前字体的尺寸
\dotfill & \hrulefill
\\[距离]
长度命令
\setlength{\长度命令}{长度指定}
\addtolength{\长度命令}{长度指定}
\settowidth{\长度命令}{文本}
\settoheight{\长度命令}{文本}
\settodepth{\长度命令}{文本}
\newlength{\新长度命令}
最近在网上找到不错的latex技巧。
LaTeX的一些代码样式2007年01月12日星期五 17:36把自己总结的用了很久的一些LaTeX的代码样式发上来,这些样式平时用得很多。对我来说非常珍贵呀。
%%%%%%%%%%%%%%%%%%%%%%%%%%%%%%%%%%%%%%%%%%%%
%一些最基本的环境%%%%%%%%%%%%%%%%%%%%%%%%%%%%%%%%%%%%%%%%%%%%
%居中环境
\begin{center}
\end{center}
%左对齐环境
\begin{flushleft}
\end{flushleft}
%右对齐环境
\begin{flushright}
\end{flushright} %%%%%%%%%%%%%%%%%%%%%%%%%%%%%%%%%%%%%%%%%%%%
%小页环境(可嵌入上面那三种环境中形成组合)
\begin{minipage}{**cm}
\end{minipage}
% %%%%%%%%%%%%%%%%%%%%%%%%%%%%%%%%%%%%%%%%%%%%
%%%%%%%%%%%%%%%%%%%%%%%%%%%%%%%%%%%%%%%%%%%%
%列举样式%%%%%%%%%%%%%%%%%%%%%%%%%%%%%%%%%%%%%%%%%%%%
% itemize 列举样式1:· · · ·
\begin{itemize}
\vspace{-2.8mm}\item
\vspace{-2.8mm}\item
\end{itemize} %%%%%%%%%%%%%%%%%%%%%%%%%%%%%%%%%%%%%%%%%%%%
%%%%%%%%%%%%%%%%%%%%%%%%%%%%%%%%%%%%%%%%%%%%
% itemize 列举样式2:* * * *
\begin{itemize}
\vspace{-2.8mm}\item[*]
\vspace{-2.8mm}\item[**]
\end{itemize} %%%%%%%%%%%%%%%%%%%%%%%%%%%%%%%%%%%%%%%%%%%%
%%%%%%%%%%%%%%%%%%%%%%%%%%%%%%%%%%%%%%%%%%%%
% itemize 列举样式3:任意符号
\begin{itemize}
\renewcommand\labelitemi{}%这里面写符号
\vspace{-2.8mm}\item
\vspace{-2.8mm}\item
\end{itemize} %%%%%%%%%%%%%%%%%%%%%%%%%%%%%%%%%%%%%%%%%%%%
%%%%%%%%%%%%%%%%%%%%%%%%%%%%%%%%%%%%%%%%%%%%
% itemize 列举样式4:彩色符号
\begin{itemize}
\setlength\baselineskip{12pt} %用这个命令来调整间距应该比较具有通用性 \item[\textcolor{black}{$\spadesuit$}] 文字。。。
\item[\textcolor{red}{$\heartsuit$}] 文字。。。
\item[\textcolor{black}{$\clubsuit$}] 文字。。。
\item[\textcolor{red}{$\diamondsuit$}] 文字。。。
\end{itemize}
% %%%%%%%%%%%%%%%%%%%%%%%%%%%%%%%%%%%%%%%%%%%%
%%%%%%%%%%%%%%%%%%%%%%%%%%%%%%%%%%%%%%%%%%%%
% enumerate 列举样式1:1. 2. 3. 4.
\begin{enumerate}
\vspace{-2.8mm}\item
\vspace{-2.8mm}\item
\end{enumerate}
% %%%%%%%%%%%%%%%%%%%%%%%%%%%%%%%%%%%%%%%%%%%
%%%%%%%%%%%%%%%%%%%%%%%%%%%%%%%%%%%%%%%%%%%%
% enumerate 列举样式2:(1)(2)(3)(4)
\begin{enumerate}
\renewcommand\labelenumi{ \theenumi }%就在前面那个括号的空格处加符号%\setlength\itemindent{}%这个会使列举的左移或右移指定的距离
\vspace{-2.8mm}\item
\vspace{-2.8mm}\item
\end{enumerate}
% %%%%%%%%%%%%%%%%%%%%%%%%%%%%%%%%%%%%%%%%%%%
%%%%%%%%%%%%%%%%%%%%%%%%%%%%%%%%%%%%%%%%%%%%%%
%图形插入样式%%%%%%%%%%%%%%%%%%%%%%%%%%%%%%%%%%%%%%%%%%%%%%
%图形排版样式1:定点
%图形排版时名称一般都在下方
\begin{center}
\includegraphics[width=10cm,height=6cm]{*.eps}%就在前面括号中写图片名
\renewcommand{\figurename}{图}
\caption{}
\label{}
\end{center}
% %%%%%%%%%%%%%%%%%%%%%%%%%%%%%%%%%%%%%%%%%%%
%%%%%%%%%%%%%%%%%%%%%%%%%%%%%%%%%%%%%%%%%%%%%%
%图形排版样式2:浮动
%图形排版时名称一般都在下方
\begin{figure}
\begin{center}
\includegraphics[width=10cm,height=6cm]{*.eps}%就在前面括号中写图片名
\renewcommand{\figurename}{图}
\caption{}
\label{}
\end{center}
\end{figure}
% %%%%%%%%%%%%%%%%%%%%%%%%%%%%%%%%%%%%%%%%%%%
%%%%%%%%%%%%%%%%%%%%%%%%%%%%%%%%%%%%%%%%%%%%%%
%图形排版样式3:两个图片并列,统一取名
%图形排版时名称一般都在下方
\begin{figure}
\begin{center}
\begin{minipage}[c]{0.5\textwidth}
\centering\includegraphics[width=5cm,height=3cm]{*.eps}%就在前面括号中写图片名\end{minipage}%
\begin{minipage}[c]{0.5\textwidth}
\centering\includegraphics[width=5cm,height=3cm]{*.eps}%就在前面括号中写图片名\end{minipage}
\renewcommand{\figurename}{图}
\caption{}
\label{}
\end{center}
\end{figure}
% %%%%%%%%%%%%%%%%%%%%%%%%%%%%%%%%%%%%%%%%%%%
%%%%%%%%%%%%%%%%%%%%%%%%%%%%%%%%%%%%%%%%%%%%%%
%图形排版样式4:两个图片并列,分别取名
%图形排版时名称一般都在下方
\begin{figure}
\begin{center}
\begin{minipage}[c]{0.5\textwidth}
\centering\includegraphics[width=5cm,height=3cm]{}%就在前面括号中写图片名
\renewcommand{\figurename}{图}
\caption{ }
\label{}
\end{minipage}%
\begin{minipage}[c]{0.5\textwidth}
\centering\includegraphics[width=5cm,height=3cm]{}%就在前面括号中写图片名
\renewcommand{\figurename}{图}
\caption{ }
\label{}
\end{minipage}
\end{center}
\end{figure}
% %%%%%%%%%%%%%%%%%%%%%%%%%%%%%%%%%%%%%%%%%%%
%%%%%%%%%%%%%%%%%%%%%%%%%%%%%%%%%%%%%%%%%%%%%%
%图形排版样式5:两个图片作为子图并列,分别取名。四个可形成图形阵列。在下方有一个总名称
\begin{figure}
\centering
\subfigure[子标题]{\includegraphics[width=0.45\textwidth]{*.eps}}
%\mbox{\hspace{0.5cm}}
\subfigure[子标题]{\includegraphics[width=0.45\textwidth]{*.eps}}
\\
\subfigure[子标题]{\includegraphics[width=0.45\textwidth]{*.eps}}
%\mbox{\hspace{0.5cm}}
\subfigure[子标题]{\includegraphics[width=0.45\textwidth]{*.eps}}
\renewcommand{\figurename}{图}
\caption{总标题}
\label{}
\end{figure}
% %%%%%%%%%%%%%%%%%%%%%%%%%%%%%%%%%%%%%%%%%%%
%%%%%%%%%%%%%%%%%%%%%%%%%%%%%%%%%%%%%%%%%%%%%%
%图形排版样式6:图片在盒子中
\begin{figure}
\begin{center}
\fbox{\includegraphics[width=10cm,height=6cm]{*.eps}}%就在前面括号中写图片名
\renewcommand{\figurename}{图}
\caption{}
\label{}
\end{center}
\end{figure}
% %%%%%%%%%%%%%%%%%%%%%%%%%%%%%%%%%%%%%%%%%%%
%%%%%%%%%%%%%%%%%%%%%%%%%%%%%%%%%%%%%%%%%%%%%%
%图形排版样式7:图文混排,段落插入图片用picins宏包和\parpic命令%%%%%%%%%%%%%%%%%%%%%%%%%%%%%%%%%%%%%%%%%%%%%%%%%%%%%%%%%%%%%%%%
%
\parpic{%
\includegraphics[width=3.0cm]%
{*.eps}}
% %%%%%%%%%%%%%%%%%%%%%%%%%%%%%%%%%%%%%%%%%%%
%%%%%%%%%%%%%%%%%%%%%%%%%%%%%%%%%%%%%%%%%%%
% 表格样式%%%%%%%%%%%%%%%%%%%%%%%%%%%%%%%%%%%%%%%%%%%
% 基本表格样式
% 在下面那个括号中,用|表示画竖线,而l表示单元格中的内容在单元格中左对齐,% c表示单元格中的内容在单元格中中对齐,r表示单元格中的内容在单元格中右对齐。% 如|c|c|c|就表示画一个3列有竖线的表,当然|也可略,就不画竖线出来;
% 用\hline画横线,一般是表的一行内容输入完并强制换行(\\)后,在后面写
% \hline,然后后面再写下一行内容。当然\hline也可略,就不画横线出来;
% 下面这个表格是一个3行3列的表格
\begin{tabular}{|c|c|c|}
\hline
*** & *** & ***\\
\hline
*** & *** & ***\\
\hline
*** & *** & ***\\
\end{tabular}
% %%%%%%%%%%%%%%%%%%%%%%%%%%%%%%%%%%%%%%%%%%%
% 下面这种形式可以指定表格的宽度。在下面那个括号中写上0.5\textwidth
% 就可得到一个半张纸宽的一个表格;
% 写上\textwidth就可得到一个整张纸宽的一个表格。
\begin{tabular*}{***}{|c|c|c|}
\hline
*** & *** & ***\\
\hline
*** & *** & ***\\
\hline
*** & *** & ***\\
\end{tabular*}
% %%%%%%%%%%%%%%%%%%%%%%%%%%%%%%%%%%%%%%%%%%%
%%%%%%%%%%%%%%%%%%%%%%%%%%%%%%%%%%%%%%%%%%%
% 表格样式1:标题在图表上方,去掉了冒号
\begin{table}
\begin{center}
%\makeatletter\def\@captype{table}\makeatother
\renewcommand{\tablename}{表}
\caption{}
\label{}
\begin{tabular}{}
\end{tabular}
\end{center}
\end{table}
% %%%%%%%%%%%%%%%%%%%%%%%%%%%%%%%%%%%%%%%%%%%%%
%%%%%%%%%%%%%%%%%%%%%%%%%%%%%%%%%%%%%%%%%%%%%
%表格样式2:用tabularx宏包
\begin{center}
\begin{tabularx}{350pt}{|c|X|c|X|}
\hline
\multicolumn{2}{|c|}{Multicolumn entry!}& THREE& FOUR\\
\hline
one&
\raggedright\arraybackslash\setlength\baselineskip{12pt}
The width of this column depends on the width of the table.& three&
\raggedright\arraybackslash\setlength\baselineskip{12pt}
Column four will act in the same way as column two, with the same width. \\
\hline
\end{tabularx}
% %%%%%%%%%%%%%%%%%%%%%%%%%%%%%%%%%%%%%%%%%%%%%
%%%%%%%%%%%%%%%%%%%%%%%%%%%%%%%%%%%%%%%%%%%%%
%表格样式3:高级表格控制
\begin{table}
\begin{center}
\scriptsize
\renewcommand{\arraystretch}{1.3}
\caption{Quasi-normal frequencies for the scalar perturbation in
the stationary Schwarzschild background. \label{tab:1}}
\begin{tabularx}{380pt}{*{5}{>{\centering\arraybackslash}X|}>{\centering\arrayb ackslash}X}
\hline &&\multicolumn{2}{c|}
{\textbf{Exact solution}}&\multicolumn{2}{c}{\textbf{Numerical solution}} \\ \hline
$\sqrt{M}$&$m$&$\omega_R$&$\omega_I$&$\omega_R$&$\omega_I$ \\
\hline
0.2&1&1&-0.4&1.002&-0.400 \\
0.4&1&1&-0.8&0.965&-0.799 \\
0.4&2&2&-0.8&2.003&-0.800 \\
0.4&3&3&-0.8&3.004&-0.800 \\
0.4&4&4&-0.8&4.005&-0.800 \\
0.5&2&2&-1&1.999&-1.000 \\
0.5&3&3&-1&2.993&-1.000 \\
0.5&4&4&-1&4.007&-1.000 \\
1&4&4&-2&4.004&-2.001 \\
2&10&10&-4&10.014&-4.001 \\
3&10&10&-6&10.028&-6.011 \\
4&10&10&-8&9.973&-7.983 \\
\hline
\end{tabularx}
\end{center}
\end{table}
% %%%%%%%%%%%%%%%%%%%%%%%%%%%%%%%%%%%%%%%%%%%%
%%%%%%%%%%%%%%%%%%%%%%%%%%%%%%%%%%%%%%%%%%%% %公式样式
%%%%%%%%%%%%%%%%%%%%%%%%%%%%%%%%%%%%%%%%%%%% %摘引环境1:段摘引
\begin{verbatim}
\end{verbatim}
% %%%%%%%%%%%%%%%%%%%%%%%%%%%%%%%%%%%%%%%%%%%%
%%%%%%%%%%%%%%%%%%%%%%%%%%%%%%%%%%%%%%%%%%%% %摘引环境2:行内摘引
\verb|*********|
% %%%%%%%%%%%%%%%%%%%%%%%%%%%%%%%%%%%%%%%%%%%%
%%%%%%%%%%%%%%%%%%%%%%%%%%%%%%%%%%%%%%%%%%%% %程序清单样式
\lstset{language=matlab}
\begin{lstlisting}[frame=trBL]{}
clf;
k=-80:80;
a(k~=0)=sin(pi*k(k~=0)/2)./(k(k~=0)*pi);
a(k==0)=0.5;
stem(k,a);
t=-3:0.01:3
\end{lstlisting}
% %%%%%%%%%%%%%%%%%%%%%%%%%%%%%%%%%%%%%%%%%%%%%%
%%%%%%%%%%%%%%%%%%%%%%%%%%%%%%%%%%%%%%%%%%%%%%%%%%%%%%%%%%%%%%%% % 参考文献样式%%%%%%%%%%%%%%%%%%%%%%%%%%%%%%%%%%%%%%%%%%%%%%%%%%%%%%%%%%%%%%%% \small
\renewcommand\refname{\hei 参考文献}
\begin{thebibliography}{99}
\setlength{\parskip}{0pt} %段落之间的竖直距离
\bibitem{tang}
\bibitem{liu}
\end{thebibliography} %%%%%%%%%%%%%%%%%%%%%%%%%%%%%%%%%%%%%%%%%%%%%%
% 参考文献结束%%%%%%%%%%%%%%%%%%%%%%%%%%%%%%%%%%%%%%%%%%%%%%
latex,两个表格并排
竭诚为您提供优质文档/双击可除latex,两个表格并排 篇一:latex表格排版——多行多列合并 latex多列表格合并单元格排版 效果如下图所示: 复制下面代码直接可以运行 \begin{table}[!h] \centering \caption{parametersofsRoi}\label{tab2} \begin{tabular}{cccccccc} \hline \multicolumn{1}{c}{\multirow{2}{1.2cm}{number}} &\multicolumn{5}{c}{(Frequency,scale)} &\multicolumn{1}{c}{\multirow{2}{1.6cm}{directionnu mber}} &\multicolumn{1}{c}{\multirow{2}{1.6cm}{directionin crement}}
\\ \cline{2-6} \multicolumn{1}{c}{} &\multicolumn{1}{c}{1}&{2}&{3}&{4}&{5} &\multicolumn{1}{c}{} \\ \hline Filterbank1&(0.50,61)&(0.50,67)&(0.55,61)&(0.55,66) &(0.60,51)&8&$\pi/8$\\ Filterbank2&(0.20,63)&(0.35,71)&(0.35,89)&(0.37,105 )&(0.40,103)&8&$\pi/8$\\ Filterbank3&(0.20,79)&(0.25,94)&(0.30,75)&(0.30,107 )&(0.35,54)&8&$\pi/8$\\ \hline \end{tabular} \end{table} 篇二:latex并列图和子图的代码 1.两个并列的图 \begin{figure}[h]
LaTeX表格制作
目录 第一章表格环境的定义4第二章表格环境参数格式4§2.1位置可选参数 (4) §2.2列必选参数 (5) 第三章表格文本行中的命令5§3.1\tabularnewline命令 (5) §3.2\hline命令 (5) §3.3\cline{n-m}命令 (6) §3.4\vline命令 (6) §3.5\multicolumn{数}{列}{文本}命令 (6) §3.6@表达式:@文本 (6) 第四章表格样式参数命令7§4.1\tabcolsep命令 (7) §4.2\arrayrulewidth命令 (7) §4.3\doublerulesep命令 (7) §4.4\arraystretch命令 (7) 第五章表格示例8§5.1无线表格 (8) §5.2带竖线的表格 (8) §5.3带水平及竖线的表格 (8) §5.4复杂的表格 (10)
表格 1无线表格 (8) 2带竖线的表格 (9) 3带水平及竖线的表格 (9) 4利用@表达式生成表格 (9) 5一张复杂的表格 (10)
第一章表格环境的定义 环境tabular和tabular*是生成表格的基本工具1,其定义(语法)如下: \begin{tabular}[位置]{列} 行 \end{tabular} \begin{tabular*}{宽度}[位置]{列} 行 \end{tabular*} tabular环境可以用来排版带有横线和竖线的表格,L A T E X自动确定表格的宽度;tabular*环境与tabular环境类似,只是可以用参数指定表格的整体宽度,另外列参数必须在第一 列后面的某个地方包含一个合适的表达式(见下面说明)。通常,为了使表格在页面上居中,要利用center环境: \begin{center}表格\end{center} 第二章表格环境参数格式 §2.1位置可选参数 该参数表示表格相对于外部文本行基线的位置,又称为垂直定位参数,有三种情况:?t:表格顶部与当前外部文本行的基线重合 ?b:表格底部与当前外部文本行的基线重合 ?缺省(不使用):表格按照外部文本行的基线垂直居中 1在数学模式下使用的array环境的语法和参数的意义与tabular环境中的完全一样
Latex排版——复杂表格制作
Latex排版——复杂表格制作 %多行或多列合并的情况 %(1)多行合并代码如下 \documentclass{article} \usepackage{multirow} %使用multirow必须加载该package \begin{document} \begin{table}[tbp] \centering \begin{tabular}{|ccccc|ccccc|} \hline Case & Structural \ State & Damage \ Location & Damage \ extent & Excitation \ Level(V) \\ \hline % \hline 在该行下面画一整条横线 32 & \multirow{6}{*}{Damaged States (DS3)} & 1C and 3A & DB0 & 2 \\ % * 表示由系统自动调整文字 33 & & 1C and 3A & DB0 & 5 \\ 34 & & 1C and 3A & DB0 & 8 \\ 35 & & 1C and 3A & DBB & 2 \\ 36 & & 1C and 3A & DBB & 5 \\ 37 & & 1C and 3A & DBB & 8 \\ \hline \end{tabular} \caption{List of unknown states} \end{table} % (2)多行多列同时合并 \begin{table} \begin{tabular}{|c|c|c|c|c|} \hline \hline \multirow{2}{*}{multi-rows} & \multicolumn{2}{|c|}{multi-columns} & \multicolumn{2}{|c|}{\multirow{2}{*}{multi-row and col}} \\ \cline{2-3} % \cline用于画横线 \cline{i-j}表示从第i列画到第j列 & column-1 & column-2 & \multicolumn{2}{|c|}{} \\ \hline label-1 & label-2 & label-3 & label-4 & label-5 \\
LaTeX入门教程
LaTeX入门教程 里面的图好多都刷不出来,于是我就自己运行了一遍,至少验证了这个教程的正确性O(∩_∩)O哈哈~ CTEX - 在线文档- TeX/LaTeX 常用宏包 资料下载: LaTeX2e插图指南LaT eX2e使用手册TeX语言CTeX FAQ 常见问题集 Contents ?TEX/L A TEX是什么? ?为什么要用TEX/L A TEX? ?安装 ?开始使用 ?数学符号 o行内公式与行间公式 o上标与下标 o常见的数学公式 o行列式与矩阵 o方程组与分段函数 ?使用中文 ?文章的各个部分 ?表格 ?插图 ?罗列 ?分割长文档 ?学习资料 ?幻灯片制作简介 ?重要建议 ?Bibliography T E X/L A T E X是什么? T E X 是一个非常优秀的排版软件,L A T E X 是基于T E X 之上的一个宏包集。因为L A T E X 的出现,使得人们使用T E X 更加容易,目前大部分人们使用的T E X 系统都是L A T E X 这个宏集。 为什么要用T E X/L A T E X? 我们为什么要用T E X/L A T E X 来排版我们的论文、书籍呢?因为它 ?排版的效果非常整齐漂亮; ?排版的效率高; ?非常稳定,从95年到现在,T E X 系统只发现了一个bug。由此可见它的稳定性; ?排版科技文献,尤其是含有很多数学公式的文献特别方便、高效。现今没有一个排版软件在排版数学公式上面能和T E X/L A T E X 相媲美; 安装 我们可以从https://www.360docs.net/doc/f730951.html,上下载最新的中文T E X 套装,Windows 用户请下载CT E X 套装,Linux 用户可以下载TeXlive 来安装。安装过程就不用我多说了吧!
LaTeX画表格
竭诚为您提供优质文档/双击可除 LaTeX画表格 篇一:latex排版——表格插入 latex排版——表格插入 标签:分类:办公与排版 latex tabel 杂谈 %看以下代码: \documentclass{article} \begin{document} structuralhealthmonitoring(shm)isafast-developing,i nterdisciplinaryfieldofresearchduetothefactthatshmi sheavilystimulatedbytheengineeringproblemsofmainten anceandsafeoperationoftechnicalinfrastructure. $$\sum_{i=1}^{n}$$ thecoreproblemofshmisthedamageidentification,whichc
anbedividedintofivelevels %表格 \begin{table}[tbp] \centering%表居中 \begin{tabular}{lccc}%{lccc}表示各列元素对齐方式,left-l,right-r,center-c\hline player2)localizationofdamage;3)identificationofdama getype;4)quantificationofdamageextent;and5)damagepr ognosis. \end{document} %编译后如下格式 %将红色代码tbp改为htbp,编译后显示为 篇二:latex制作复杂表格之multirow,multicolum和cline综合使用简介 latex制作复杂表格之multirow,multicolum和cline 综合使用简介已有2283次阅读20xx-5-1817:04|个人分类:table|系统分类:科研笔记|关键 词:latex,table,multirow,multicolum,cline 在复杂表格制作中,有时候会遇到一列横跨多行,或者一行横跨多列的情况,那么这个时候就要分别用到 \multirow,\multicolum的命令,标准语法如下:
LATEX中表格的制作
LATEX中表格的制作 一,基本表格制作 标准 LaTeX 提供有 array 和 tabular 两个制表环境,它们的完整格式如下:\begin{array}[表格位置]{列样式} \end{array} \begin{tabular}[表格位置]{列样式} \end{tabular} \begin{tabular*}{表格总宽度}[表格位置]{列样式} \end{tabular*} 这两个环境的选项和参数定义是相同的,不过 array 主要用于数组矩阵的排版,且只能用在数学环境中,如 equation 等。 array 宏包扩展了 array 和 tabular 环境功能,主要增加和增强了列样式选项,甚至可编程定义新的列样式;还增加了许多细部微调功能,如改变垂直表格线的粗细和自动调整表格间隙等。使用该宏包可以排印出外形美观、功能丰富的表格。 该宏包没有任何选项,扩展后的两个环境的列样式选项: 选项说明 l 该列左对齐排列 c该列居中排列 r该列右对齐排列 p{列宽}设置该列宽度,文本顶对齐 @{声明}该列每行插入声明中文本 m{列宽}设置该列宽度,文本居中对齐 b{列宽}设置该列宽度,文本底对齐 >{声明}声明可以是命令或插入列元素之前的文本 <{声明}声明可以是命令或插入列元素之后的文本 |列边或列间加入一条垂直线 !{声明}用声明要求的样式取代列间垂直线
应用举例: 列样式还可设置为:>{\setlength{\parindent}{26pt }}p{ 列宽},对该列文本行或段落缩排。 Frank Mittelbach et al 它定义了三条划线命令:\toprule、\midrule 和 \bottomrule,可分别对表格顶部、中部和底部使用不同粗细的水平线,见下例:
latex各种命令使用帮助
+---------------------------------+ |TeX各版本概述及基本约定,特殊字符| +---------------------------------+ tex提供300多条基本排版命令 由D.E.Knuth1978年开发 plain tex:在tex基础上新定义600多条复合命令 AMS-TEX:美国数学会开发(amsmath宏包)排版的数学公式 LATEX:https://www.360docs.net/doc/f730951.html,mport(1985)编写,适合排版普通文章和书籍 LATEX2e:可加载amsmath宏包,目前最流行的TEX宏包 版本:LATEX2.09-->LATEX2e-->LATEX3(开发中) 中文排版: CCT:科学院张林波 TY(天元):华师大肖刚、陈志杰教授开发 CJK:德国W.Lemberg开发,处理中日韩三国文字。 发行版CTEX:集成了CCT,TY,CJK的MikTEX系统。 ChinaTEX:内容涵盖MiKTeX系统及中文支持、常用外围软件、TeX\LaTeX文档和模板选萃等 TeX中的长度 mm毫米 cm厘米 in英寸=2.54cm=72.27pt pt点 em大写字母M的宽度 ex小写字母x的高度 弹性长度:根据需要自动伸缩 正常值plus伸展值minus收缩值 实际长度可超过正常值和伸展值之和,但不能小于正常值和收缩值之差 \documentclass[11pt]{article}%11pt字体,普通文章 %导言区,全局命令 \usepackage{CJK}%使用CJK宏包 \begin{document}%主环境 \begin{CJK}{GBK}{song}%汉字必须放入CJK环境 %其它字体:song,kai,fs,hei,li,you %CJK的两种环境CJK和CJK* %GBK是采用的字符集:GB,GBK,Bg5,Gbt Hi,This is my first \LaTeX file 祝贺你,MikTex和CJK安装成功了 \end{CJK} \ent{document}
latex使用教程升级版
%EXTERNAL FILES: %Name of language file: \cfile=. %Name of included files: \jfile=physjour,.mbs. head,\MBopta} \from{physjour.mbs}{\MBopta} \from{merlin.mbs}{tail,\MBopta}} \def\MBopta{% %<