JANSF2N7550T1中文资料
ht7550中文资料_数据手册_参数
Production stops After this specified date no more devices will be manufactured and last deliveries made. At this point the device can be said to have reached their end of life status.
H T75X X
. ro n t V ie w
V O U T G N D V IN
B o tto m V ie w
HT75XX Output Voltage
3.0V±5% 3.3V±5% 3.6V±5% 4.4V±5% 5.0V±5%
Order No./ Marking
HT7530 HT7533 HT7536 HT7544 HT7550
HT7530/33/36/44/50 EOL Notification
EOL Notification
Holtek hereby formally gives End Of Life (EOL) notification that the HT7530, HT7533, HT7536, HT7544 and HT7550 (hereinafter denoted as HT75XX) 100mA Voltage Regulator will be phased out of production with a latest purchase date of July 31st 2003. The suggested replacement device will be known as the HT7530-1, HT7533-1, HT7536-1, HT7544-1 and HT7550-1 (hereinafter denoted as HT75XX-1) and will offer superior performance by providing lower output voltage tolerance of 3% in addition to having an additional SOT25 packaging type.
NC-1000型雕铣机系统厂商手册-R12.06
运输与储存 注意
本产品必须按其重量正确运输; 堆放产品不可超过规定数量; 不可在产品上攀爬或站立,也不可在上面放置重物; 不可用与产品相连的电缆或器件对产品进行拖动或搬运; 储存和运输时应注意防潮。
开箱检查 注意
确认是否是您所购买的产品; 检查产品在运输途中是否有损坏; 对照清单,确认各部件、附件是否齐全,有无损伤; 如存在产品不符、缺少附件或运输损坏等情况,请及时与我公司联系。
专业 专心 专注
A3
上海维宏电子科技股份有限公司
Shanghai Weihong Electronic Technology Co., Ltd.
接线注意事项 注意
参加接线与检查的人员,必须具有完成此项工作的能力。 系统中的强电设备金属外壳(伺服驱动器、变频器、步进驱动器开关电源、电机)可靠接地,实 现主动屏蔽。 数控装置必须可靠接地,接地电阻应小于 4 欧姆。切勿使用中性线代替地线。否则可能会因受干 扰而不能正常地工作。 接线必须正确、牢固,否则可能产生误动作。 任何一个接线插头上的电压值和正负(+/-)极性,必须符合说明书的规定,否则可能发生短路 或设备永久性损坏等故障。 在插拔插头或拨动开关前,手指应保持干燥,以防触电或损坏数控装置。 连接电线不能有破损,不能受挤压,否则可能发生漏电或短路。 不能带电插拔插头或打开数控装置机箱。
运行与调试注意事项 注意
运行前,应先检查参数设置是否正确。错误设定会使机器发生意外动作。 参数的修改必须在参数设置允许的范围内,超过允许的范围可能会导致运转不稳定及损坏机器的 故障。
使用注意事项 注意
插入电源前,确保开关在断电的位置上,避免偶然起动。 为避免或减少电磁干扰对数控装置的影响,进行电气设计时,请确定电磁兼容性。系统附近如有 其他电子设备,则可能产生电磁干扰,应接入一个低通滤波器以削弱其影响。 不可对系统频繁通、断电。停电或断电后,若需重新通电,推荐的间隔时间至少为 1 分钟。
PowerFlex755变频器 操作说明
目录一、POWERFLEX 750 变频器面板简介 (3)1、人机接口模块(HIM)简介 (3)1.1、View 软键 (4)1.2、REF 软键 (4)1.3、EDIT 软键 (4)1.4、P AR# 软键 (4)1.5、状态屏幕下的语言切换软键 (4)1.6、启动和停止按键 (4)1.7、功能键 (4)1.8、文件夹按键 (5)2、复位到出场设置 (5)3、调整面板亮度 (7)4、设置时间 (8)5、备份参数/删除备份参数 (9)5.1、使用CopyCat功能 (9)5.2、创建CopyCat文档 (10)5.3、删除CopyCat文档 (11)6、带电拔插操作面板 (12)7、快速访问参数 (13)8、使用启动向导 (13)设置电机控制模式 (15)输入电机铭牌数据 (16)设置速度反馈装置 (18)设定速度限制 (20)方向测试、自整定和惯量测试 (20)组态速度参考和斜坡速率 (24)组态输入和输出 (25)二、POWERFLEX 750 变频器接线 (27)1、P OWER F LEX753典型接线图 (27)2、P OWER F LEX753主板内置I/O位置 (28)3、P OWER F LEX755典型接线图 (29)4、P OWER F LEX755主板内置I/O位置 (30)5、PF750系列变频器扩展I/O模拟量跳线 (31)6、PF750系列变频器端口的说明 (31)三、POWERFLEX 750 变频器参数 (32)1、PF750变频器常用参数简单说明 (32)1.1、PF750变频器常用参数(00号端口) (32)1.2、安全速度卡相关参数(Safe Speed Monitor) (34)1.3、双通道编码器反馈卡相关参数(Dual Encoder) (35)1.4、24VDC扩展I/O卡相关参数(I/O Module 24V) (35)1.5、13号端口PF755内置以太网参数 (35)1.6、14号端口PF750内置DeviceLogix (35)1.7、数字量输入组态举例 (35)1.8、数字量输出组态举例 (35)1.9、使用模拟量输入作为速度源组态举例 (36)四、POWERFLEX 750 变频器故障处理 (37)五、其他 (38)1、变频器相关参考资料 (38)附件一:POWERFLEX755变频器和POWERFLEX700变频器比较 (39)1.P OWER F LEX755和P OWER F LEX700电气性能比较 (39)2.P OWER F LEX755和P OWER F LEX700功能比较 (40)3.P OWER F LEX755和P OWER F LEX700外形尺寸比较 (40)4.P OWER F LEX755和P OWER F LEX700接线图的比较 (41)5.P OWER F LEX755和P OWER F LEX700参数的比较 (43)一、PowerFlex 750 变频器面板简介1、人机接口模块(HIM)简介下图显示了20-HIM-A6面板的按键。
PowerFlex 755TS 电机驱动器 DC 电源条套件和框架 6 和 7说明书

Installation InstructionsOriginal InstructionsPowerFlex 755TS Drives DC Bus Bar Kits, Frames 6 and 7Catalog Numbers 20-750-DCBB3-F6, 20-750-DCBB3-F7The DC bus bars kit provides DC input and dynamic brake terminals for PowerFlex® 755TS frame 6 drives and DC input terminals for PowerFlex 755TS frame 7 drives.ATTENTION: Only qualified personnel, who are trained and approved to install PowerFlex 755TS products and are familiar with associated machinery, should plan or implement the installation, startup, and subsequent maintenance of the system. Failure to comply can result in personal injury and/or equipmentdamage.ATTENTION: The information that is contained in this publication is merely a guide for proper installation. Rockwell Automation, Inc. cannot assume responsibility for the compliance or the noncompliance with any code, national, local, or otherwise for the proper installation of this drive or associated equipment. A hazard of personal injury and/or equipment damage exists if codes are ignored during installation.Next StepPage Cat. No. 20-750-DCBB3-F6 Kit Contents and Installation 2Cat. No. 20-750-DCBB3-F7 Kit Contents and Installation6L1L2L31342Rockwell Automation Publication 750-IN127A-EN-P - March 2022PowerFlex 755TS Drives DC Bus Bar Kits, Frames 6 and 7 Installation Instructions457Cat. No. 20-750-DCBB3-F6 Kit ContentsItem Quantity Description 15M6 hex nut with external conical washer (10 mm)23M8 hex nut with external conical washer (13 mm)31DC+ aluminum bus bar 41DC– aluminum bus bar56M4 x 16 mm thread-forming torx screw (T20)61BR1 brake option bus bar (U-shaped)71BR2 brake option bus bar6231Rockwell Automation Publication 750-IN127A-EN-P - March 20223PowerFlex 755TS Drives DC Bus Bar Kits, Frames 6 and 7 Installation Instructions66A - Dynamic Brake Option OnlyAC Input Drive with Dynamic Brake Option Shown20-750-DCBB3-F67PowerFlex 755TS Drives DC Bus Bar Kits, Frames 6 and 7 Installation Instructions4Rockwell Automation Publication 750-IN127A-EN-P - March 2022PowerFlex 755TS Drives DC Bus Bar Kits, Frames 6 and 7 Installation Instructions 9Rockwell Automation Publication 750-IN127A-EN-P - March 20225PowerFlex 755TS Drives DC Bus Bar Kits, Frames 6 and 7 Installation InstructionsCat. No. 20-750-DCBB3-F7 Kit ContentsItem Quantity Part14M6 hex nut with external conical washer (10 mm)22M5 x 16 mm thread-forming torx screw (T25)31DC+ aluminum bus bar41DC– aluminum bus bar51DC bus bar support connections label34215PowerFlex 755TS Drives DC Bus Bar Kits, Frames 6 and 7 Installation InstructionsRockwell Automation Publication 750-IN127A-EN-P - March 202278Rockwell Automation Publication 750-IN127A-EN-P - March 2022PowerFlex 755TS Drives DC Bus Bar Kits, Frames 6 and 7 Installation InstructionsYou can view or download publications at rok.auto/literature .ResourceDescriptionPowerFlex 750TS Products with TotalFORCE® Control Installation Instructions, publication 750-IN119Provides the basic steps to install PowerFlex 755TS drives.PowerFlex 750TS Products with TotalFORCE Control Technical Data publication 750-TD104Provides detailed information on:•Drive specifications •Option specifications•Fuse and circuit breaker ratingsPowerFlex 755TS Products with TotalFORCE Control Hardware Service Manual, publication 750-TG101Provides detailed information on:•Preventive maintenance•Component testing•Hardware replacement procedures Wiring and Grounding Guidelines for Pulse Width Modulated (PWM) AC Drives,publication DRIVES-IN001Provides basic information to properly wire and ground PWM AC drives.Safety Guidelines for the Application, Installation, and Maintenance of Solid-state Control,publication SGI-1.1Designed to harmonize with NEMA Standards Publication No. ICS 1.1-1987 and provides general guidelines for the application, installation, and maintenance of solid-state control in the form of individual devices or packaged assemblies incorporating solid-state components.Industrial Automation Wiring and Grounding Guidelines, publication 1770-4.1Provides general guidelines for installing a Rockwell Automation industrial system.Product Certifications website, rok.auto/certifications .Provides declarations of conformity, certificates, and other certification details.PowerFlex 755TS Drives DC Bus Bar Kits, Frames 6 and 7 Installation Instructions Notes:Rockwell Automation Publication 750-IN127A-EN-P - March 20229Publication 750-IN127A-EN-P - March 2022Copyright © 2022 Rockwell Automation, Inc. All rights reserved. Printed in the U.S.A.Rockwell Otomasyon Ticaret A.Ş. Kar Plaza İş Merkezi E Blok Kat:6 34752 İçerenköy, İstanbul, Tel: +90 (216) 5698400 EEE Yönetmeli ğine UygundurPN-658458Allen-Bradley, expanding human possibility, PowerFlex, Rockwell Automation, and TotalFORCE are trademarks of Rockwell Automation, Inc.Trademarks not belonging to Rockwell Automation are property of their respective companies.*PN-658458*PN-658458Waste Electrical and Electronic Equipment (WEEE)Rockwell Automation maintains current product environmental compliance information on its website at rok.auto/pec .At the end of life, this equipment should be collected separately from any unsorted municipal waste.Rockwell Automation SupportUse these resources to access support information.Documentation FeedbackYour comments help us serve your documentation needs better. If you have any suggestions on how to improve our content, complete the form at rok.auto/docfeedback .Technical Support Center Find help with how-to videos, FAQs, chat, user forums, and product notification updates.rok.auto/support KnowledgebaseAccess Knowledgebase articles.rok.auto/knowledgebase Local Technical Support Phone Numbers Locate the telephone number for your country.rok.auto/phonesupport Literature LibraryFind installation instructions, manuals, brochures, and technical data publications.rok.auto/literature Product Compatibility and Download Center (PCDC)Download firmware, associated files (such as AOP, EDS, and DTM), and access product release notes.rok.auto/pcdc。
PowerFlex 755 驱动器软件版本2.006 发行说明书

Release NotesPowerFlex® 755 Drives (revision 2.006)These release notes correspond to major revision 2, minor revision 6 offirmware for PowerFlex® 755 drives.Introduction The following information is included in this document:Determining Firmware Revision Level This section describes procedures to determine the firmware revision of your PowerFlex 755 drive.Using the Drive LCD HIM1.Access the Status screen, which is displayed on HIM power up. Figure 1 Status ScreenFor information about:See page: Determining Firmware Revision Level1Using the Drive LCD HIM1Using DriveExplorer Lite/Full2Using DriveExecutive3Firmware Flashing3Installing the Flash Kit4Using DriveExplorer Lite/Full to Flash Update4Using DriveExecutive to Flash Update5Using ControlFLASH to Flash Update7Using HyperTerminal to Flash Update9 Enhancements14Corrected Anomalies14Restrictions16Rockwell Automation Support16Host Drive480V 2.1A20G...D2P12PowerFlex® 755 Drives (revision 2.006)e the or key to scroll to Port 00 for the Host Drive.3.4.5.Device Version .6.Figure 2 Device Version Information ScreenUsing DriveExplorer Lite/FullImportant:You need DriveExplorer version 6.01 or later to interfacewith the PowerFlex 755 drive. To obtain the latest version,visit the Allen-Bradley Web Updates site located at/support/abdrives/webupdate .unch DriveExplorer and go online with the PowerFlex 755 drive. To connect to the drive, use a 1203-USB converter, a 1203-SSS converter, or an EtherNet/IP network connection.2.In the Devices hardware view, select the PowerFlex 755 drive.Once selected, information regarding the PowerFlex 755 drive is shownin the right panel including the current firmware revision number.PowerFlex 755 480V 2.1A Product Revision 2.003Product Serial Number SN –Main Control Board FW Revision 2.003APowerFlex® 755 Drives (revision 2.006)3Using DriveExecutiveImportant:You need DriveExecutive version 5.01 or later to interface with the PowerFlex 755 drive. To obtain the latest version, visit the Allen-Bradley Web Updates site located at /support/abdrives/webupdate unch DriveExecutive and go online with the PowerFlex 755 drive. To connect to the drive, use a 1203-USB converter, a 1203-SSS converter, or an EtherNet/IP network connection.2.In the Drives hardware view, select the PowerFlex 755 drive ( in Figure 3on page 3).3.Click the information icon ( in Figure 3) to display the drive’s Properties dialog box.In the Properties dialog box the “Revision:” field ( in Figure 3) will show the drive’s current firmware revision number.Figure 3 Accessing the PowerFlex 755 Drive Firmware Revision Number Firmware Flashing This section describes procedures to flash upgrade your drive firmware.Flash kits for drives are provided on the Allen-Bradley Web Updates site located at /support/abdrives/webupdate .Flashing can be performed using a 1203-USB or 1203-SSS converter. For information on connecting either converter to your drive, refer to the 1203-USB USB Converter User Manual, publication DRIVES-UM001 or the 1203-SSS Smart Self-powered Serial Converter User Manual, publication 20COMM-UM001.4PowerFlex® 755 Drives (revision 2.006)Installing the Flash Kit1.Install the flash kit utility from the Allen-Bradley Web Updates site for the PowerFlex 755 drive, which includes the latest version of theControlFLASH utility and deploys firmware files for usingHyperTerminal on your computer.2.You are now ready to use DriveExplorer, DriveExecutive,ControlFLASH or HyperTerminal to update the drive. Refer to the respective section below and follow the instructions.Using DriveExplorer Lite/Full to Flash Update1.With the Flash Kit installed (see Installing the Flash Kit ), launchDriveExecutive and go online (via a 1203-USB or 1203-SSS converter) with the PowerFlex 755 drive.2.In the Devices hardware view, select the PowerFlex 755 drive ( in Figure 4).3.Click the information icon ( in Figure 4) to display the drive’s Properties dialog box.4.In the Properties dialog box, click the Component Details tab ( in Figure 4).Figure 4 Accessing the Component Details Tab of the Properties Dialog Box 5.With the Main Control Board selected, click Flash Update .Important:Flash updating the device firmware may cause the device toload defaults. It is recommended that you save the setting toyour PC before proceeding.PowerFlex® 755 Drives (revision 2.006)5 6.From the list of available updates, select “v2.004.xxx” and click Next >.7.Follow the remaining prompts until the flash update procedurecompletes and displays the new firmware revision.Using DriveExecutive to Flash Update1.With the Flash Kit installed (see Installing the Flash Kit), launchDriveExecutive and go online (via a 1203-USB or 1203-SSS converter) with the PowerFlex 755 drive.2.In the Drives hardware view, select the PowerFlex 755 drive ( inFigure 3on page3).3.Click the information icon ( in Figure 3) to display the drive’sProperties dialog box.4.In the Properties dialog box, click the Component Details tab ( inFigure 3).5.With the PowerFlex 755 drive selected, click Flash Update.6PowerFlex® 755 Drives (revision 2.006)6.From the list of available devices, select the PowerFlex 755 drive andclick Next >.Important:Flash updating the device firmware may cause the device toload defaults. It is recommended that you save the setting toyour PC before proceeding.7.From the list of available updates, select “v2.004.xxx” and click Next >.8.Follow the remaining screen prompts until the flash update procedurecompletes and displays the new firmware revision.PowerFlex® 755 Drives (revision 2.006)7Using ControlFLASH to Flash Update1.With the Flash Kit installed (see Installing the Flash Kit on page4),launch ControlFLASH by selecting Start > (All) Programs > Flash Programming Tools > ControlFLASH.2.On the ControlFLASH Welcome screen, click Next >.3.The Catalog Number dialog box appears. From the list, choose thecommunication device you will use to update the PowerFlex 755 drive.In the figure below, the embedded EtherNet device is selected.Once the appropriate communication device is selected, click Next >.8PowerFlex® 755 Drives (revision 2.006)4.Now that the correct communication device has been selected, you mustselect which device is being updated. With the Select the PowerFlex…dialog box displayed, follow these steps.a.Expand the hardware view for the communication path you are using( in Figure 5).b.Select the drive icon that represents the PowerFlex 755 drive you areupdating ( in Figure 5).c.Click OK ( in Figure 5).Figure 5 Selecting the Correct Drive to Flash5.In the Multiple Assemblies Found display box, select“Port x-PowerFlex 755” from the list and click OK .PowerFlex® 755 Drives (revision 2.006)9 6.In the Firmware Revision dialog box, select “v2.004…” from the list ofavailable updates and click Next >.7.Follow the remaining prompts until the flash procedure completes anddisplays the new firmware revision.Using HyperTerminal to Flash UpdateImportant:The HyperTerminal process takes at least one hour tocomplete.1.With the Flash Kit installed (see Installing the Flash Kit on page4),access and launch HyperTerminal as shown below.10PowerFlex® 755 Drives (revision 2.006)2.A New Connection dialog box appears.a.Enter the connection device name in the Name field or select an iconfrom the library.b.Click OK once you have finished.3.A Connect To dialog box appears,e the “Connect using:” drop-down menu to select the appropriateconnection device.b.Click OK once you have finished.PowerFlex® 755 Drives (revision 2.006)114.A Properties dialog box will appear for the selected connection device.e any of the drop-down menus to change the various port settings.b.Click OK once you have finished.5.After you click OK, you will get a blank screen.Press Enter on your computer keyboard so the following test screen appears.6.From the Main Menu, select the flash upgrade ( in Figure 6) bypressing the number 3 key on your computer keyboard.7.Additonal text appears. From the Flash Upgrade menu, select thePowerFlex 775 drive ( in Figure 6) by pressing the number 0 key on your computer keyboard.8.Additonal text appears. After reading the conditions, select Yes ( inFigure 6) to proceed by pressing the letter Y key on your computerkeyboard.12PowerFlex® 755 Drives (revision 2.006)Figure 6 HyperTerminal Test Screen DialogueThe terminal program will start displaying the letter “C”. This signals theXMODEM protocol that the download may proceed.Important:You have one minute to complete steps 9…14 orHyperTerminal will return to step 5, where you must repeatsteps 5…8.TIP: To cancel the flash update at any time, press CTRL-X .9.Select Transfer > Send File to display the Send File dialog box.10.Click Browse and navigate to one of the following locations:•For PowerFlex 755 drive frames 2…7, go toC: > Program Files > ControlFLASH > 0001 > 0086 > 0890•For PowerFlex 755 drive frames 8 and larger, go toC: > Program Files > ControlFLASH > 0001 > 0086 > 0C90PowerFlex® 755 Drives (revision 2.006)13 11.Search within the appropriate subfolder until the“PF755_LP_App_v2_004_xxx.dpi” file appears in the Select File to Send list.12.With the file name highlighted, click Open so it appears in the Filenamedata field in the Send File dialog box.13.In the Protocol box, select “Xmodem.”14.Click Send.A dialog box appears and reports the update progress, which takesabout one hour for HyperTerminal to complete. When it is complete, the message “Flash Complete” appears.15.Press any key to continue.16.Press the Enter key to return to the main menu.14PowerFlex® 755 Drives (revision 2.006)Enhancements There are no new enhancements in this firmware revision.Corrected Anomalies This section describes the anomalies corrected in this revision.Communications Losses with DriveExecutive and EtherNet/IPWhen a drive was controlled over an EtherNet/IP network, using theembedded EtherNet/IP, port and a connection from DriveExecutive wasmade to the drive communication faults could occur. These communicationfaults could break the connection between DriveExecutive and the drive orbetween the controller and the drive. This anomaly would occur undercertain conditions and with certain configurations.DPI Port LockupWhen a Human Interface Module (HIM) was disconnected and reconnectedrepeatedly in a short period of time, the drive would experience a HIM Port0 error. This would make the HIM port non-functional.Fault Restart DisplayWhen executing an automatic restart after a fault, the drive would notcorrectly display the count down to the restart properly. It would correctlydisplay the tens digit, but it would not display the ones digit.The following table illustrates an example.Time Remaining (seconds)1211109876543210 How it should display countdown1211109876543210 How it did display countdown1_1_1_____________________Non Volatile Storage (NVS)Executing the homing function too frequently or changing certain parametervalues too frequently would cause the drive to stop operating (due to anF918-Control Task Overload, F919-System Task Overload or F920-5 msecTask Overload fault). The Human Interface Module (HIM) would display“Port 0 Comm Loss.” Recovery from this condition required cycling poweron the drive. After power was cycled, the drive would report a F101-PwrDnNVS Blank, F103-PwrDn NVS Incomp or F117-PwrDn NVS Chksm fault,and drive parameter values would be set to their default values.This occurred because the drive was attempting to write to NVS too quickly,and the requests for NVS writes were over-running the buffer for NVSwrites.The drive would attempt to write to NVS when executing the homingfunction. It would also write to NVS when certain parameters in the SpeedRegulator, Inertia Compensation and (Position) Torque Boost parametergroups were modified. Controlling these parameters via datalink couldcreate a situation where attempts to write to NVS would occur toofrequently.PowerFlex® 755 Drives (revision 2.006)15Option Card Version DisplayDisplay of firmware version for option modules on the Human Interface Module (HIM) or in configuration software (DriveExplorer, DriveExecutive or RSLogix 5000) would be incorrect.Port Loss Due to Lost Client Server MessageUnder certain conditions, a certain combination of DPI messages would lock up a DPI port.Position Feedback ErrorWhen using position control, the value of parameter 857 [Psn Fdbk] could be in error from the actual machine position by one encoder count. This could cause a final position error in your system.Position Torque Boost Coordinate OrderingThe drive would accept Position Torque Boost coordinates out of order. The values for parameters 1520 [PsnTrqBst Ps X1], 1521 [PsnTrqBst Ps X2], 1522 [PsnTrqBst Ps X3], 1523 [PsnTrqBst Ps X4] and 1524 [PsnTrqBst Ps X5] must be in ascending order. The older firmware revision would accept them if they were not in ascending order.Pump JackThe time interval used for calculations of the “virtual pump position” changed from 2 mS to 2.048 mS, which is the actual task interrupt time for the calculation.Sleep Wake ModeIf there was a Sleep Cfg alarm caused by the sleep level being higher than the wake level and the condition was corrected while the other permissives were present, the control would require one of the permissives to be reset for the drive to start.With the new firmware, permissives need not be reset for the drive to start.Interpolator Output UnstableWhen the drive was in Integrated Motion on EtherNet/IP (CIP Motion) mode and in a position control configuration, the output of the Velocity Interpolator would oscillate. This would cause poor performance in some position control applications that use Integrated Motion on EtherNet/IP (CIP Motion).Position Feedback RolloverWhen the drive was in Integrated Motion on EtherNet/IP (CIP Motion) mode and in a position control configuration, there could be a spike in torque output when the position feedback count rolled over.Publication 750-RN010B-EN-E – May 2012Supersedes Publication 750-RN010A-EN-E – January 2011Copyright © 2012 Rockwell Automation, Inc. All rights reserved. Printed in USA.U.S.Allen-BradleyDrivesTechnicalSupport-Tel:(1)262.512.8176,Fax:(1)262.512.2222,Email:*****************,Online:/support/abdrives Corporate HeadquartersRockwell Automation, 777 East Wisconsin Avenue, Suite 1400, Milwaukee, WI, 53202-5302 USA, Tel: (1) 414.212.5200, Fax: (1) 414.212.5201Headquarters for Allen-Bradley Products, Rockwell Software Products and Global Manufacturing SolutionsAmericas: Rockwell Automation, 1201 South Second Street, Milwaukee, WI 53204-2496 USA, Tel: (1) 414.382.2000, Fax: (1) 414.382.4444Europe/Middle East/Africa: Rockwell Automation SA/NV, Vorstlaan/Boulevard du Souverain 36, 1170 Brussels, Belgium, Tel: (32) 2 663 0600, Fax: (32) 2 663 0640Asia Pacific: Rockwell Automation, 27/F Citicorp Centre, 18 Whitfield Road, Causeway Bay, Hong Kong, Tel: (852) 2887 4788, Fax: (852) 2508 1846Headquarters for Dodge and Reliance Electric ProductsAmericas: Rockwell Automation, 6040 Ponders Court, Greenville, SC 29615-4617 USA, Tel: (1) 864.297.4800, Fax: (1) 864.281.2433Europe/Middle East/Africa: Rockwell Automation, Brühlstraße 22, D-74834 Elztal-Dallau, Germany, Tel: (49) 6261 9410, Fax: (49) 6261 17741Asia Pacific: Rockwell Automation, 55 Newton Road, #11-01/02 Revenue House, Singapore 307987, Tel: (65) 6356-9077, Fax: (65) 6356-9011Restrictions With this firmware revision, the drive’s embedded EtherNet/IP port requiresthe EtherNet/IP scanner to use a compatible method of specifying Qualityof Service (QoS). The following table details the compatible products andfirmware revisions.Rockwell AutomationSupport To assist you, Rockwell Automation provides technical information on the web. At /support , you can find technicalmanuals, a knowledge base of Frequently Asked Questions (FAQs),technical and application notes, sample code and links to software servicepacks, and a MySupport feature you can customize to best use these tools.If you experience a problem, please review product documentation. Forfurther help, contact a Customer Support representative:TechConnect Support programs are available for an additional level oftechnical phone support for installation, configuration, and troubleshooting.For more information, contact your local distributor or Rockwell Automationrepresentative, or visit /support .ProductCat. patible Rev. No.Armor Block single port1732E-xxx Update not available ArmorPoint adapter1738-AENT Rev. 3.001Block I/O1791ES-xxx Rev. 1.007CompactLogix1768-ENBT Rev. 2.0011769-L2x /L3x Rev. 17.03ControlLogix1756-ENBT Rev. 4.0051756-EN2T (F) (XT)No update needed DriveLogix embedded EtherNet port5730Rev. 3.004Flex adapter1794-AENT Rev. 4.1FlexLogix1788-ENBT Rev. 2.004Kinetix ServosNo update needed Point adapter1734-AENT Rev. 3.001SoftLogix I/O messaging No update neededUnited States(1) 262.512.8176 • Monday – Friday, 7am – 6pm CST Outside United States Please contact your local Rockwell Automation representative for anytechnical support issues.。
7550-1常用电路

7550-1常用电路English Answer:The 7550-1 integrated circuit is a CMOS dual 2-input multiplexer/demultiplexer with tri-state outputs. It is designed for use in high-speed data transmission and switching applications. The 7550-1 has a wide operating voltage range (3V to 15V) and can operate at frequencies up to 50MHz.The 7550-1 consists of two independent 2-input multiplexers/demultiplexers. Each multiplexer/demultiplexer has two data inputs (A and B), a select input (S), and atri-state output (Y). When the select input is low, the output is connected to the A input. When the select inputis high, the output is connected to the B input. The tri-state output allows the 7550-1 to be used in bus applications.The 7550-1 is a versatile IC that can be used in avariety of applications. It is commonly used in data transmission, switching, and routing applications. The 7550-1 can also be used in digital signal processing and control applications.Here are some of the key features of the 7550-1:CMOS dual 2-input multiplexer/demultiplexer.Wide operating voltage range (3V to 15V)。
ST7540资料

ST ST7540动力线调制解调方案2008-7-30 14:14 来源:STST公司的ST7540是FSK动力线收发器,半双工异步/同步FSK调制解调器. ST7540集成了线路驱动器和5V 和3.3V线性稳压器,单电源7.5 到13.5 V工作.器件通过内部的寄存器来控制工作,可通过同步串行接口进行可编程.其它的功能包括看门狗,时钟输出,输出电流和电压控制,载波/前导检测,发送停止和信道在用与热关断等.ST7540可以采用八个不通的信道(60, 66, 72,76, 82.05, 86, 110, 132.5 kHz)进行通信,有四种不同的波特率(600, 1200, 2400, 4800)和两种精度(1 和0.5).本文介绍了ST7540的主要性能,方框图,参考设计的主要特性和评估板电路图以及所用的材料清单(BOM).ST ST7540 FSK powerline transceiverST7540 transceiver uses Frequency Shift Keying (FSK) modulation to perform a half-duplex communication on a powerline network. It operates from a 7.5 to 13.5 V single supply voltage (Vcc) and integrates a power amplifier (PA), which is able to drive low line impedance, and two linear regulators providing 5 V and 3.3 V.The ST7540 can communicate using eight different communication channels (60, 66, 72,76, 82.05, 86, 110, 132.5 kHz), four baud rates (600, 1200, 2400, 4800) and two deviations (1 and 0.5). Additional functions are included, such as watchdog, automatic control on PA output voltage and current, carrier/preamble detection and band-in-use signaling, transmission time-out, and thermal shutdown.The transceiver, which is dedicated only to physical communication, operates with a microcontroller whose aim is to manage the communication protocol stack. A reset output (RSTO) and a programmable clock (MCLK) can be provided to the microcontroller by theST7540 in order to simplify the external logic and circuitry.The host controller can exchange data with the transceiver through a serial interface, programmable to operate either in UART (CLR/T data clock not used) or in SPI mode.Communication on the power line can be either synchronous or asynchronous to the dataclock that is provided by the transceiver at the programmed baud rate.When in transmission mode (i.e. RxTx line at low level), the ST7540 samples the digitalsignal on the TxD line at the programmed baud rate and modulates it in a FSK sinusoidaloutput on the Tx_OUT line. This signal is then externally fed into the power amplifier to add current capability. The power amplifier can also introduce gain and active filtering to the signal, just using few external passive components. The resulting signal on the PA_OUT line is coupled to the power line.When in receiving mode (i.e. RxTx line at high level), an incoming FSK signal on the Rx_IN line is demodulated and the digital output is available for the microcontroller on the RxD pin.The device also recovers the synchronism of the received signal using an internal PLL. The recovered clock is present on CLR/T output.The ST7540 operating parameters can be set by means of an internal control register,accessible only through the SPI host interface.ST7540通用特性:■Half-duplex frequency shift keying (FSK) transceiver■Integrated power li ne driver with programmable voltage and current control■Programmable mains access:SynchronousAsynchronous■Single supply voltage (from 7.5V up to 13.5V)■Very low power consumption (Iq = 5mA)■Integrates 5V voltage regulator (up to 50mA) with short circ uit protection■Integrated 3.3V voltage regulator (up to 50mA) with short circuit protection■3.3V or 5V digital supply■8 Programmable transmission frequencies■Programmable baud rate up to 4800BPS■Receiving sensitivity up to 250VRMS■Suitable fo r applications in accordance with EN 50065 Cenelec specification■Carrier or preamble detection■Band in use detection■Programmable control register■Watchdog timer■8 or 16 Bit header recognition■ST7537 and ST7538 compatible■UART/SPI host interface图1.ST7540方框图The ST7540 reference design has been developed as a useful tool to demonstrate how a small, high-performance powerline node can be built using the ST7540 FSK transceiver.With this reference design, it is possible to evaluate the ST7540 features, in particular, its transmitting and receiving performances through actual communication on the power line.The ST7540 reference design may be considered to be composed of three main sections:Power supply section, specifically tailored to match powerline coupling requirementsand to operate within a wide range of the input mains voltageModem and crystal oscillator sectionLine coupling interface sectionThe coupling interface is designed to allow the ST7540 FSK transceiver to transmit and receive on the mains using 72 kHz carrier frequencies, within the European CENELEC standard A-band specified for automatic meter reading.The complete evaluation system for the ST7540 powerline communication consists of:a PC using the ST7540 Power Line Modem Demo Kit software toolone EVALCOMMBOARD hosting the ST7 microcontrollerone ST7540 reference design board (EVALST7540-1).The correct procedure for connecting the EVALST7540-1 and theEVALCOMMBOARD is as follows:1.Connect the EVALST7540-1 and the EVALCOMMBOARD2.Connect the ac mains cable to the EVALST7540-1 and the USB cable to the EVALCOMMBOARD3.Connect the EVALST7540-1 to the ac mains supply4.Connect the EVALCOMMBOARD to the PC via the USB cable.图2.包括PC, EVALCOMMBOARD和EVALST7540-1板的完整评估系统图3.EVALST7540-1板的调制解调器和耦合接口电路图图4.EVALST7540-1板电源电路图图5.Rx和Tx 滤波器电路图图6.三相架构原理框图图7.110 kHz通路的线路耦合接口电路图7.132.5 kHz通路的线路耦合接口电路材料清单(BOM):/stonline/products/literature/ds/12176/st7540.pdf和/stonline/products/literature/an/12791/evalst7540-1.pdf。
艾тон电子变频驱动器产品介绍说明书

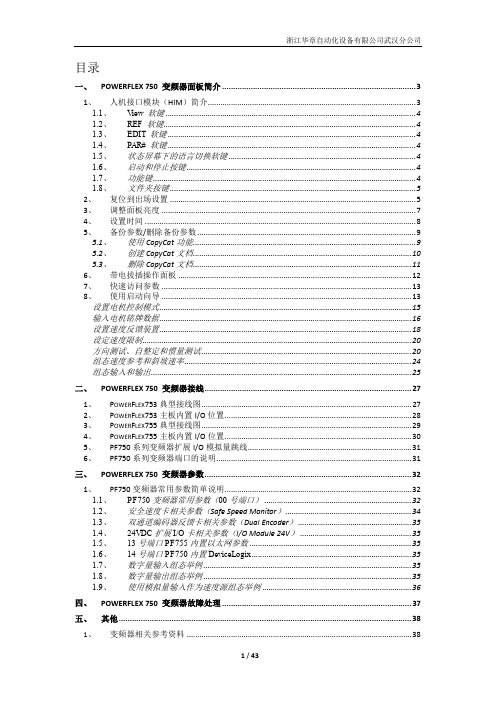
V/Hz Energy Savings Percentage
Eaton - Active Energy Control Competitor 1 Competitor 2 Competitor 3
35
40
45
50
55
Frequency (Hz)
• Active Energy Control - minimizes energy losses in your motor by dynamically adjusting V/Hz curve to optimize efficiency
• Compare Functionality • PC Control Online Operate
Mode
© 2013 Eaton Corporation. All rights reserved.
13
Energy Saving Functionality
Percentage
10.0% 8.0% 6.0% 4.0% 2.0% 0.0% -2.0% 30 -4.0%
• Easy to Use PC Based Drive Software Configuration Tool
• Provides Parameter Description, Min, Max, and Default Values
• Monitoring and Data Logging Capabilities
© 2013 Eaton Corporation. All rights reserved.
Electrical Wholesalers
End Users Maintenance, Repair, and Operations (MRO) Opportunities
- 1、下载文档前请自行甄别文档内容的完整性,平台不提供额外的编辑、内容补充、找答案等附加服务。
- 2、"仅部分预览"的文档,不可在线预览部分如存在完整性等问题,可反馈申请退款(可完整预览的文档不适用该条件!)。
- 3、如文档侵犯您的权益,请联系客服反馈,我们会尽快为您处理(人工客服工作时间:9:00-18:30)。
Table 1. Electrical Characteristics @ Tj = 25°C, Post Total Dose Irradiation ÄÅ
Parameter
100K Rads(Si)1 300KRads(Si)2 Units Min Max Min Max
Test Conditions
BVDSS Drain-to-Source Breakdown Voltage -100 — -100
—
V
VGS(th) Gate Threshold Voltage
-2.0 -4.0 -2.0 -5.0
IGSS IGSS
Gate-to-Source Leakage Forward — -100 — -100 nA Gate-to-Source Leakage Reverse — 100 — 100
— 6110 — — 1574 — pF
— 115 —
VGS = 0V, VDS = -25V f = 1.0MHz
Source-Drain Diode Ratings and Characteristics
Parameter
Min Typ Max Units
Test Conditions
IS ISM VSD trr QRR
from package) with Source wires internally
bonded from Source Pin to Drain Pad
Ciss Coss Crss
Input Capacitance Output Capacitance Reverse Transfer Capacitance
Continuous Source Current (Body Diode) Pulse Source Current (Body Diode) À Diode Forward Voltage Reverse Recovery Time Reverse Recovery Charge
— — -45 A — — -180 — — -5.0 V — — 200 ns — — 1.6 µC
VGS EAS IAR EAR dv/dt
Gate-to-Source Voltage Single Pulse Avalanche Energy Á Avalanche Current À Repetitive Avalanche Energy À Peak Diode Recovery dv/dt Â
5 TECHNOLOGY
Product Summary Part Number Radiation Level RDS(on) IRHMS597160 100K Rads (Si) 0.05Ω IRHMS593160 300K Rads (Si) 0.05Ω
ID -45A -45A
QPL Part Number JANSR2N7550T1 JANSF2N7550T1
Absolute Maximum Ratings
Parameter
ID @ VGS = -12V, TC=25°C ID @ VGS = -12V, TC=100°C
IDM PD @ TC = 25°C
Continuous Drain Current Continuous Drain Current Pulsed Drain Current À Max. Power Dissipation Linear Derating Factor
VGS = 0V, TJ = 125°C VGS = -20V VGS = 20V
VGS =-12V, ID = -45A VDS = -50V
— 35 — 100 ns — 100
VDD = -50V, ID = -45A VGS =-12V, RG = 1.2Ω
— 100
6.8 — nH Measured from Drain lead (6mm /0.25in. from package) to Source lead (6mm /0.25in.
—
Rise Time
—
Turn-Off Delay Time
—
Fall Time
—
Total Inductance
—
Typ Max Units ——V -0.13 — V/°C
Test Conditions VGS = 0V, ID = -1.0mA Reference to 25°C, ID = -1.0mA
300 (0.063in./1.6mm from case for 10s)
9.3 (Typical)
g
For footnotes refer to the last page
1
12/13/07
元器件交易网
IRHMS597160, JANSR2N7550T1
Features:
n Single Event Effect (SEE) Hardened n Identical Pre- and Post-Electrical Test Conditions n Repetitive Avalanche Ratings n Dynamic dv/dt Ratings n Simple Drive Requirements n Ease of Paralleling n Hermetically Sealed n Electically Isolated n Ceramic Eyelets n Light Weight n High Electrical Conductive Package
Low-Ohmic TO-254AA
International Rectifier’s R5TM technology provides high performance power MOSFETs for space applications. These devices have been characterized for Single Event Effects (SEE) with useful performance up to an LET of 80 (MeV/(mg/cm2)).The combination
Thermal Resistance
Parameter
RthJC RthCS RthJA
Junction-to-Case Case-to-Sink Junction-to-Ambient
Min Typ Max Units
— — 0.6 — 0.21 — — — 48
°C/W
Test Conditions Typical socket mount
Gate-to-Source Leakage Forward
—
Gate-to-Source Leakage Reverse
—
Total Gate Charge
—
Gate-to-Source Charge
—
Gate-to-Drain (‘Miller’) Charge
—
Turn-On Delay Time
TJ TSTG
Operating Junction Storage Temperature Range Lead Temperature Weight
Pre-Irradiation
Units
-45
-28.5
A
-180
208
W
1.67
W/°C
±20
V
480
mJ
-45
A
20.8
mJ
-6.0
V/ns
-55 to 150 °C
PRraed-IirartaiodniaCtiohnaracteristics
IRHMS597160, JANSR2N7550T1
International Rectifier Radiation Hardened MOSFETs are tested to verify their radiation hardness capability. The hardness assurance program at International Rectifier is comprised of two radiation environments. Every manufacturing lot is tested for total ionizing dose (per notes 5 and 6) using the TO-3 package. Both pre- and post-irradiation performance are tested and specified using the same drive circuitry and test conditions in order to provide a direct compa94283E
RADIATION HARDENED POWER MOSFET THRU-HOLE (Low-Ohmic TO-254AA)
IRHMS597160 JANSR2N7550T1