php上传图片
php 实现批量上传图片

move_uploaded_file($tmp_name, $uploadfile);
}
}
}
?>
Trackback: /TrackBack.aspx?PostId=1798572
[收藏到我的网摘] [发送Trackback] leo发表于 2007年09月24日 15:42:00
'application/x-shockwave-flash',
'image/x-png');
$max_file_size=5000000; //上传文件大小限制, 单位BYTE
$destination_folder="upload/"; //上传文件路径
$watermark=1; //是否附加水印(1为加水印,其他为不加水印);
<a href="index.php">返回</a>
</form>
<?php
if($_SERVER['REQUEST_METHOD']=='POST'){
if (!is_uploaded_file($_FILES["upfile"][tmp_name])){//是否存在文件 ຫໍສະໝຸດ php 图片上传附加水印代码
PHP上传图片到数据库并显示的实例代码

PHP上传图⽚到数据库并显⽰的实例代码PHP上传图⽚到数据库并显⽰1、创建数据表CREATE TABLE ccs_image (id int(4) unsigned NOT NULL auto_increment,description varchar(250) default NULL,bin_data longblob,filename varchar(50) default NULL,filesize varchar(50) default NULL,filetype varchar(50) default NULL,PRIMARY KEY (id))engine=myisam DEFAULT charset=utf82、⽤于上传图⽚到服务器的页⾯ upimage.html<!doctype html><html><head><meta charset="UTF-8"><meta name="viewport"content="width=device-width, user-scalable=no, initial-scale=1.0, maximum-scale=1.0, minimum-scale=1.0"><meta http-equiv="X-UA-Compatible" content="ie=edge"><style type="text/css">*{margin: 1%}</style><title>Document</title></head><body><form method="post" action="upimage.php" enctype="multipart/form-data">描述:<input type="text" name="form_description" size="40"><input type="hidden" name="MAX_FILE_SIZE" value="1000000"> <br>上传⽂件到数据库:<input type="file" name="form_data" size="40"><br><input type="submit" name="submit" value="submit"></form></body></html>3、处理图⽚上传的php upimage.php<?phpif (isset($_POST['submit'])) {$form_description = $_POST['form_description'];$form_data_name = $_FILES['form_data']['name'];$form_data_size = $_FILES['form_data']['size'];$form_data_type = $_FILES['form_data']['type'];$form_data = $_FILES['form_data']['tmp_name'];$dsn = 'mysql:dbname=test;host=localhost';$pdo = new PDO($dsn, 'root', 'root');$data = addslashes(fread(fopen($form_data, "r"), filesize($form_data)));//echo "mysqlPicture=".$data;$result = $pdo->query("INSERT INTO ccs_image (description,bin_data,filename,filesize,filetype) VALUES ('$form_description','$data','$form_data_name','$form_data_size','$form_data_type')"); if ($result) {echo "图⽚已存储到数据库";} else {echo "请求失败,请重试";注:图⽚是以⼆进制blob形式存进数据库的,像这样4、显⽰图⽚的php getimage.php<?php$id =2;// $_GET['id']; 为简洁,直接将id写上了,正常应该是通过⽤户填⼊的id获取的$dsn ='mysql:dbname=test;host=localhost';$pdo = new PDO($dsn,'root','root');$query = "select bin_data,filetype from ccs_image where id=2";$result = $pdo->query($query);$result = $result->fetchAll(2);// var_dump($result);$data = $result[0]['bin_data'];$type = $result[0]['filetype'];Header( "Content-type: $type");echo $data;5、到浏览器查看已经上传的图⽚,看是否可以显⽰以上就是本次介绍的全部相关知识点,感谢⼤家的学习和对的⽀持。
php上传2M以上文件限制问题

php上传2M以上⽂件限制问题
最近在项⽬中碰到了⼀个问题,客户反映不能上传2M以上的图⽚,因为是接⼿的⽼项⽬,对代码不是很熟悉,先是看代码,⼜在⽹上查了不少资料,知道要改配置⽂件,但是仍是花了⼀天的多时间才解决,回头思考该问题,有⼀些经验,分享给⼤家,希望能给碰到该问题的朋友⼀些帮助。
不能上传2M以上⽂件原因分析:
1、程序内做了限制;(主要是接⼿⽼项⽬时需要考虑,不过,此项排查放在最后,因为看别⼈的代码真的很慢)
2、php.ini内使⽤的是默认配置;
3、linux系统本⾝限制了上传⽂件的⼤⼩;
解决办法:
1、检查程序,去掉⼤⼩限制;(最后使⽤)
2、修改php.ini⽂件内的以下各项的值:
post_max_size
upload_max_filesize
memory_limit
如果⽹络速度较慢或者上传⼤于8M的⽂件需要考虑以下两项配置:
max_execution_time=600;//如果等于0,表⽰没有限制
max_input_time = 600 ; 这两项的单位都是秒,作⽤⼤概可以理解为运⾏或上传的时间等。
3、修改/usr/local/nginx/conf/nginx.conf ⽂件,查找 client_max_body_size 将后⾯的值设置为你想设置的值(我⽤的是nginx);
如果⽤的是apache2可以去/etc/httpd/conf.d/access.conf/下⾯看php.conf ⽂件,修改limitrequestbody 524288的值(未测试)。
4、***千万记得要【重启服务】(nginx和php服务都需要重启)。
Swoft图片上传与处理

Swoft图⽚上传与处理上传在Swoft下通过\Swoft\Http\Message\Server\Request -> getUploadedFiles()['image']⽅法可以获取到⼀个 Swoft\Http\Message\Upload\UploadedFile 对象或者对象数组(取决于上传时字段是image还是image[])打印改对象输出:object(Swoft\Http\Message\Upload\UploadedFile)#1813 (6) {["clientFilename":"Swoft\Http\Message\Upload\UploadedFile":private]=>string(25) "蒙太奇配置接⼝.txt"["clientMediaType":"Swoft\Http\Message\Upload\UploadedFile":private]=>string(10) "text/plain"["error":"Swoft\Http\Message\Upload\UploadedFile":private]=>int(0)["tmpFile":"Swoft\Http\Message\Upload\UploadedFile":private]=>string(55) "/var/www/swoft/runtime/uploadfiles/swoole.upfile.xZyq0d"["moved":"Swoft\Http\Message\Upload\UploadedFile":private]=>bool(false)["size":"Swoft\Http\Message\Upload\UploadedFile":private]=>int(710)}都是私⽤属性,⽆法访问,但是可以通过对应⽅法访问到getClientFilename() //得到⽂件原名称getClientMediaType() //得到⽂件类型getSize() //获取到⽂件⼤⼩通过⽅法moveTo() //将⽂件从临时位置转移到⽬录上⾯⽅法返回为NULL,在移动⽂件到指定位置时最好判断⼀下⽂件夹是否存在,不存在创建图⽚处理借助⼯具完成ubuntu下⼀键安装I. 安装ImageMagicksudo apt-get install imagemagickII. 安装imagemagick 的lib 供php调⽤sudo apt-get install libmagick++-devIII. 调⽤当前的pecl安装imagickpecl install imagickIV. 修改php.ini.重启nginx服务器在php.ini中添加: extension = imagick.so在安装完成后修改完 /etc/php/7.0/cli/php.ini 后发现 phpinfo 页⾯打印出来没有出现下⾯信息,于是⼜修改了/etc/php/7.0/fpm/php.ini 才出现下⾯信息安装 Intervention Imagecomposer require intervention/image安装完成后可以直接在页⾯useuse Intervention\Image\ImageManager;$manager = new ImageManager(array('driver' => 'imagick'));//宽缩⼩到300px,⾼⾃适应$thumb = $manager->make($path)->resize(300, null, function ($constraint) { $constraint->aspectRatio();});$thumb->save($path);完整代码namespace App\Controllers\Api;use Intervention\Image\ImageManager;use Swoft\Http\Message\Server\Request;use Swoft\Http\Message\Upload\UploadedFile;use Swoft\Http\Server\Exception\NotAcceptableException;use Swoft\Http\Server\Bean\Annotation\Controller;use Swoft\Http\Server\Bean\Annotation\RequestMapping;use Swoft\Http\Server\Bean\Annotation\RequestMethod;class FileController{//图⽚可接受的mime类型private static$img_mime = ['image/jpeg','image/jpg','image/png','image/gif']; /*** ⽂件上传* @RequestMapping(route="image",method=RequestMethod::POST)*/public static function imgUpload(Request $request){$files = $request->getUploadedFiles()['image'];if(!$files){throw new NotAcceptableException('image字段为空');}if(is_array($files)){$result = array();foreach ($files as$file){self::checkImgFile($file);$result[] = self::saveImg($file);}}else{self::checkImgFile($files);return self::saveImg($files);}}/*** 保存图⽚* @param UploadedFile $file*/protected static function saveImg(UploadedFile $file){$dir = alias('@upload') . '/' . date('Ymd');if(!is_dir($dir)){@mkdir($dir,0777,true);}$ext_name = substr($file->getClientFilename(), strrpos($file->getClientFilename(),'.'));$file_name = time().rand(1,999999);$path = $dir . '/' . $file_name . $ext_name;$file->moveTo($path);//修改移动后⽂件访问权限,⽂件默认没有访问权限@chmod($path,0775);//⽣成缩略图$manager = new ImageManager(array('driver' => 'imagick'));$thumb = $manager->make($path)->resize(300, null, function ($constraint) {$constraint->aspectRatio();});$thumb_path = $dir. '/' . $file_name . '_thumb' .$ext_name;$thumb->save($dir. '/' . $file_name . '_thumb' .$ext_name);@chmod($thumb_path,0775);return ['url' => explode(alias('@public'),$path)[1],'thumb_url' => explode(alias('@public'),$thumb_path)[1]];}/*** 图⽚⽂件校验* @param UploadedFile $file* @return bool*/protected static function checkImgFile(UploadedFile $file){if($file->getSize() > 1024*1000*2){throw new NotAcceptableException($file->getClientFilename().'⽂件⼤⼩超过2M'); }if(!in_array($file->getClientMediaType(), self::$img_mime)){throw new NotAcceptableException($file->getClientFilename().'类型不符');}return true;}}使⽤FileController::imgUpload($request);说明当前保存⽂件路径为 alias("@upload"),需要在 /config/define.php ⼿动填上该路径$aliases = ['@root' => BASE_PATH,'@env' => '@root','@app' => '@root/app','@res' => '@root/resources','@runtime' => '@root/runtime','@configs' => '@root/config','@resources' => '@root/resources','@beans' => '@configs/beans','@properties' => '@configs/properties','@console' => '@beans/console.php','@commands' => '@app/command','@vendor' => '@root/vendor','@public' => '@root/public', //public⽬录,也是nginx设置站点根⽬录 '@upload' => '@public/upload' //上传⽬录];Swoft 不提供静态资源访问,可以使⽤nginx托管配置nginxvim /etc/nginx/sites-avaiable/defaultserver {listen 80 default_server;listen [::]:80 default_server;# 域名设置server_name ;#设置nginx根⽬录root /var/www/html/swoft/public;# 将所有⾮静态请求转发给 Swoft 处理location / {proxy_set_header X-Real-IP $remote_addr;proxy_set_header Host $host;proxy_set_header X-Forwarded-For $proxy_add_x_forwarded_for; proxy_set_header Connection "keep-alive";proxy_pass http://127.0.0.1:9501;}location ~ \.php$ {proxy_pass http://127.0.0.1:9501;}# 静态资源使⽤nginx托管location ~* \.(js|map|css|png|jpg|jpeg|gif|ico|ttf|woff2|woff)$ {expires max;}}。
Thinkphp框架+Layui实现图片文件上传功能分析

Thinkphp框架+Layui实现图⽚⽂件上传功能分析本⽂实例讲述了Thinkphp框架+Layui实现图⽚/⽂件上传功能。
分享给⼤家供⼤家参考,具体如下:在项⽬中⽤到了,再⽹上找了现成的代码都是借⼝异常或者⾮法上传,所以在⼀番摸索搞定之后拿来和⼤家分享。
html:<form class="layui-form layui-form-pane" action="" style="margin-top:20px;" enctype="multipart/form-data"><center><div class="layui-upload-drag" id="uploadBanner"><img class="layui-upload-img" id="upload-photo"><i class="layui-icon" id="upload-icon"> </i><p>点击上传,或将⽂件拖拽到此处</p><p>建议尺⼨1920*512</p></div><input type="hidden" id="res" name="banner_photo" value="" lay-verify="required" /><div class="layui-form-item" style="margin-top:10px;"><button class="layui-btn" lay-submit="" lay-filter="sub">提交</button></div><div id="demoText"></div></center></form>JS:e('upload', function(){var $ = layui.jquery,upload = layui.upload;//普通图⽚上传var uploadInst = upload.render({elem: '#uploadBanner',url: "{:U('Api/doUploadPic')}",before: function(obj){//预读本地⽂件⽰例,不⽀持ie8obj.preview(function(index, file, result){$('#upload-photo').attr('src', result); //图⽚链接(base64)$('#upload-photo').attr('style', 'height:10rem;');$('#upload-icon').attr('style','display:none;');});},done: function(res, index, upload){//如果上传失败if(res.code > 0){return layer.msg('上传失败');}//上传成功console.log("成功啦!" + obj2string(res) + " " + index + " " + upload);},error: function(){//演⽰失败状态,并实现重传var demoText = $('#demoText');demoText.html('<span style="color: #FF5722;">上传失败</span> <a class="layui-btn layui-btn-xs demo-reload">重试</a>');demoText.find('.demo-reload').on('click', function(){uploadInst.upload();});}});});PHP接⼝:public function doUploadPic()//上传模块{$upload = new \Think\Upload();$upload->maxSize = 3145728;$upload->exts = array('jpg', 'gif', 'png', 'jpeg');$upload->rootPath = './Public/'; // 设置附件上传根⽬录$upload->savePath = 'upload/'; // 设置附件上传⼦⽬录$info = $upload->upload();if(!$info){$this->error($upload->getError());}else{foreach($info as $file){$data = '/Public'.$file['savepath'] . $file['savename'];$file_a=$data;echo '{"code":0,"msg":"成功上传","data":{"src":"'.$file_a.'"}}';}}}图⽚就上传到/Public/upload⽂件夹下了:更多关于thinkPHP相关内容感兴趣的读者可查看本站专题:《》、《》、《》、《》、《》、《》及《》。
PHP使用curl请求实现post方式上传图片文件功能示例

PHP使⽤curl请求实现post⽅式上传图⽚⽂件功能⽰例本⽂实例讲述了PHP使⽤curl请求实现post⽅式上传图⽚⽂件功能。
分享给⼤家供⼤家参考,具体如下:在调⽤第三⽅api接⼝时,有时会遇到通过http协议上传图⽚,以下是⼀个微信公众平台新增永久素材的例⼦;php代码:/* 使⽤curl函数 */$url = "https:///cgi-bin/material/add_material?access_token=ACCESS_TOKEN&type=image";$post_data = array('media' => '@bag03.jpg',);$response = curl_http($url, 'POST', $post_data);$params = array();$params = json_decode($response,true);if (isset($params['errcode'])){echo "error:" . $params['errcode'];echo "msg :" . $params['errmsg'];exit;}var_dump( $params );/*** http请求⽅式: 默认GET*/function curl_http($url, $method="GET", $postfields){$ch = curl_init();curl_setopt($ch, CURLOPT_SSL_VERIFYPEER, FALSE);curl_setopt($ch, CURLOPT_RETURNTRANSFER, TRUE);curl_setopt($ch, CURLOPT_URL, $url);switch ($method) {case "POST":curl_setopt($ch, CURLOPT_POST, true);if (!empty($postfields)) {$hadFile = false;if (is_array($postfields) && isset($postfields['media'])) {/* ⽀持⽂件上传 */if (class_exists('\CURLFile')) {curl_setopt($ch, CURLOPT_SAFE_UPLOAD, true);foreach ($postfields as $key => $value) {if (isPostHasFile($value)) {$postfields[$key] = new \CURLFile(realpath(ltrim($value, '@')));$hadFile = true;}}} elseif (defined('CURLOPT_SAFE_UPLOAD')) {if (isPostHasFile($value)) {curl_setopt($ch, CURLOPT_SAFE_UPLOAD, false);$hadFile = true;}}}$tmpdatastr = (!$hadFile && is_array($postfields)) ? http_build_query($postfields) : $postfields;curl_setopt($ch, CURLOPT_POSTFIELDS, $tmpdatastr);}break;default:curl_setopt($ch, CURLOPT_CUSTOMREQUEST, $method); /* //设置请求⽅式 */break;}$ssl = preg_match('/^https:\/\//i',$url) ? TRUE : FALSE;curl_setopt($ch, CURLOPT_URL, $url);if($ssl){curl_setopt($ch, CURLOPT_SSL_VERIFYPEER, FALSE); // https请求不验证证书和hostscurl_setopt($ch, CURLOPT_SSL_VERIFYHOST, FALSE); // 不从证书中检查SSL加密算法是否存在}$response = curl_exec($ch);curl_close($ch);if(empty($response)){exit("错误请求");}return $response;}function isPostHasFile($value){if (is_string($value) && strpos($value, '@') === 0 && is_file(realpath(ltrim($value, '@')))) {return true;}return false;}也可以使⽤php内置的系统函数,如果使⽤过程中出现问题,建议查看是否启⽤相应的系统函数。
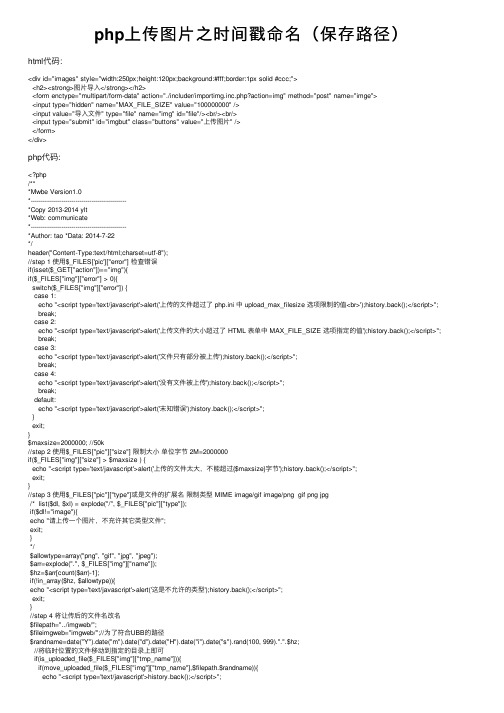
php上传图片之时间戳命名(保存路径)

php上传图⽚之时间戳命名(保存路径)html代码:<div id="images" style="width:250px;height:120px;background:#fff;border:1px solid #ccc;"><h2><strong>图⽚导⼊</strong></h2><form enctype="multipart/form-data" action="./includer/importimg.inc.php?action=img" method="post" name="imge"><input type="hidden" name="MAX_FILE_SIZE" value="100000000" /><input value="导⼊⽂件" type="file" name="img" id="file"/><br/><br/><input type="submit" id="imgbut" class="buttons" value="上传图⽚" /></form></div>php代码:<?php/***Mwbe Version1.0*-----------------------------------------------*Copy 2013-2014 ylt*Web: communicate*-----------------------------------------------*Author: tao *Data: 2014-7-22*/header("Content-Type:text/html;charset=utf-8");//step 1 使⽤$_FILES['pic']["error"] 检查错误if(isset($_GET["action"])=="img"){if($_FILES["img"]["error"] > 0){switch($_FILES["img"]["error"]) {case 1:echo "<script type='text/javascript'>alert('上传的⽂件超过了 php.ini 中 upload_max_filesize 选项限制的值<br>');history.back();</script>"; break;case 2:echo "<script type='text/javascript'>alert('上传⽂件的⼤⼩超过了 HTML 表单中 MAX_FILE_SIZE 选项指定的值');history.back();</script>"; break;case 3:echo "<script type='text/javascript'>alert('⽂件只有部分被上传');history.back();</script>";break;case 4:echo "<script type='text/javascript'>alert('没有⽂件被上传');history.back();</script>";break;default:echo "<script type='text/javascript'>alert('末知错误');history.back();</script>";}exit;}$maxsize=2000000; //50k//step 2 使⽤$_FILES["pic"]["size"] 限制⼤⼩单位字节 2M=2000000if($_FILES["img"]["size"] > $maxsize ) {echo "<script type='text/javascript'>alert('上传的⽂件太⼤,不能超过{$maxsize}字节');history.back();</script>";exit;}//step 3 使⽤$_FILES["pic"]["type"]或是⽂件的扩展名限制类型 MIME image/gif image/png gif png jpg/* list($dl, $xl) = explode("/", $_FILES["pic"]["type"]);if($dl!="image"){echo "请上传⼀个图⽚,不充许其它类型⽂件";exit;}*/$allowtype=array("png", "gif", "jpg", "jpeg");$arr=explode(".", $_FILES["img"]["name"]);$hz=$arr[count($arr)-1];if(!in_array($hz, $allowtype)){echo "<script type='text/javascript'>alert('这是不允许的类型');history.back();</script>";exit;}//step 4 将让传后的⽂件名改名$filepath="../imgweb/";$fileimgweb="imgweb/";//为了符合UBB的路径$randname=date("Y").date("m").date("d").date("H").date("i").date("s").rand(100, 999).".".$hz;//将临时位置的⽂件移动到指定的⽬录上即可if(is_uploaded_file($_FILES["img"]["tmp_name"])){if(move_uploaded_file($_FILES["img"]["tmp_name"],$filepath.$randname)){echo "<script type='text/javascript'>history.back();</script>";session_start();$_SESSION['images'] = $fileimgweb.$randname;}else{echo "<script type='text/javascript'>alert('上传失败');history.back();</script>";}}else{echo"<script type='text/javascript'>alert('不是⼀个上传⽂件');history.back();</script>"; }}>。
PHP上传文件方法及获取文件后缀名函数

functionuploadfile($type,$name,$ext,$size,$error,$tmp_name,$targetname,$upload_ dir){$MAX_SIZE = 2000000;$FILE_MIMES =array('image/pjpeg','image/jpeg','image/jpg','image/gif','image/png','image/x -png');$FILE_EXTS = array('.jpg','.gif','.png','.JPG','.GIF','.PNG');$file_path = $upload_dir.$targetname;if(!is_dir($upload_dir)){if(!mkdir($upload_dir))die("文件上传目录不存在并且无法创建文件上传目录");if(!chmod($upload_dir,0755))die("文件上传目录的权限无法设定为可读可写");}if($size>$MAX_SIZE)die("上传的文件大小超过了规定大小");if($size == 0)die("请选择上传的文件");if(!in_array($type,$FILE_MIMES) || !in_array($ext,$FILE_EXTS))die("请上传符合要求的文件类型");if(!move_uploaded_file($tmp_name, $file_p ath))die("复制文件失败,请重新上传");switch($error){case 0:echo "图片上传成功...<br/>";echo "3秒钟后自动跳转...如果没有跳转,<a href='uploadFile.php'>请点击这里</a>";return ;case 1:die("上传的文件超过了php.ini 中upload_max_files ize选项限制的值");case 2:die("上传文件的大小超过了HTML 表单中MAX_FILE_SIZE 选项指定的值");case 3:die("文件只有部分被上传");case 4:die("没有文件被上传");}}似乎PHP没有自带获取文件后缀名的函数,翻书也没找到,网上搜索也没有,就自己写了个函数,很轻松就可以获取了。
- 1、下载文档前请自行甄别文档内容的完整性,平台不提供额外的编辑、内容补充、找答案等附加服务。
- 2、"仅部分预览"的文档,不可在线预览部分如存在完整性等问题,可反馈申请退款(可完整预览的文档不适用该条件!)。
- 3、如文档侵犯您的权益,请联系客服反馈,我们会尽快为您处理(人工客服工作时间:9:00-18:30)。
上传图片原理:首先判断文件类型是否为图片格式,若是则上传文件,然后重命名文件(一般都是避免上传文件重名,现在基本上都是以为时间来命名),接着把文件上传到指定目录,成功上传后输出上传图片的预览。
1.首先我们开始判断文件类型是否为图片类型
用到的函数
{
strrchr:查找字符串在另一个字符串中最后一次出现的位置,并返回从该位置到字符串结尾的所有字符。
substr: 取部份字符串。
$HTTP_POST_FILES['file']['name']:获取当前上传的文件全称。
}
图片类型就是“.”后面的字符(比如:一个文件名称为XXX.JPG 那么它的类型就是“.”后面的JPG)。
我们可以用PHP中的函数来截取上传者文件名字的。
我们来写个获取文件类型的函数
<?
function type()
{
return substr(strrchr($HTTP_POST_FILES['file']['name'],'.'),1);
}
?>
2.若是则上传文件,然后重命名文件
用到的函数
{
strtolower:把字符串的字母全部转换为小写字母.
in_array:函数在数组中搜索给定的值。
implode:函数把数组元素组合为一个字符串
random:随机生成的数
$_FILES['userfile']['name']:上传文件名称
$uploaddir:自己定义的变量。
比如在同一个文件夹里面,你想把上传的文件放到这个文件夹的FILE文件夹下,你可以这样定义$uploaddir="./file/";注意写法
}
这边会出现很多问题,第一先写一个能上传类型的数组。
第二判断文件合法性。
第三给文件重名。
*(这边判断文件大小就不写了)
先定义允许上传文件的类型数组:$type=array("jpg","gif","bmp","jpeg","png");
第二用一个IF。
else。
写一个判断文件合法性的控制流语句。
if(!in_arry(strtolower(type()),$type))//如果不存在能上传的类型
{
$text=implode('.',$type);
echo "您只能上传以下类型文件: ",$text,"<br>";
}
下面就是给他们重新命名了,
else
$filename=explode(".",$_FILES['userfile']['name']);//把上传的文件名以“.”好为准做一个数组。
$time=date("m-d-H-i-s");//去当前上传的时间
$filename[0]=$time;//取文件名t替换
name=implode(".",$filename); //上传后的文件名
$uploadfile=$uploaddir.$name;//上传后的文件名地址
}
3.最后把文件上传到指定目录,成功上传后输出上传图片的预览
用到的函数
{
move_uploaded_file:执行上传文件
}
if(move_uploaded_file($_FILES['userfile']['tmp_name'],$uploadfile))
{
echo "<center>您的文件已经上传完毕上传图片预览: </center><br><center><img src='$uploadfile'></center>";
echo"<br><center><a href='javascrīpt:history.go(-1)'>继续上传</a></center>";
}
else
{
echo"传输失败!";
}
这样就OK 一个简单的上传图片的程序写完。
假如你还想完善你的功能你可以自己添加!
下面是完整的代码;
<form enctype="multipart/form-data" action="" method="post">
<input type="hidden" name="max_file_size" value="200000">
<input name="userfile" type="file">
<input type="submit" name="submit" value="上传文件">
</form>
<?php
$type=array("jpg","gif","bmp","jpeg","png");
$uploaddir = "./file/";
if(isset($_POST['submit']))
{
function texttype($name)
{
return substr(strrchr($name,'.'),1);
}
if(!in_array(strtolower(texttype($_FILES['userfile']['name'])),$type))
$text=implode(",",$type);
echo "您只能上传以下类型文件: ",$text,"<br>";
}
else
{
if($_FILES['userfile']['size']<="200000")
{
$filename=explode(".",$_FILES['userfile']['name']);
$time=date("m-d-H-i-s");
$filename[0]=$time;
$name=implode(".",$filename);
$uploadfile=$uploaddir.$name;
if(move_uploaded_file($_FILES['userfile']['tmp_name'],$uploadfile))
{
echo "<center>您的文件已经上传完毕上传图片预览: </center><br><center><img src='$uploadfile'></center>";
echo"<br><center><a href='javascrīpt:history.go(-1)'>继续上传</a></center>";
}
else
{
echo"传输失败!";
}
}
else
{
echo "图片太大";
}
}
}
?>。
