K.Pack. Automated false track identication in Proc
LTE信令流程详解

L T E信令流程详解集团标准化工作小组 #Q8QGGQT-GX8G08Q8-GNQGJ8-MHHGN#LTE信令流程目录概述本文通过对重要概念的阐述,为信令流程的解析做铺垫,随后讲解LTE中重要信令流程,让大家熟悉各个物理过程是如何实现的,其次通过异常信令的解读让大家增强对异常信令流程的判断,再次对系统消息的解析,让大家了解系统消息的特点和携带的内容。
最后通过实测信令内容讲解,说明消息的重要信元字段。
第一章协议层与概念1.1控制面与用户面在无线通信系统中,负责传送和处理用户数据流工作的协议称为用户面;负责传送和处理系统协调信令的协议称为控制面。
用户面如同负责搬运的码头工人,控制面就相当于指挥员,当两个层面不分离时,自己既负责搬运又负责指挥,这种情况不利于大货物处理,因此分工独立后,办事效率可成倍提升,在LTE网络中,用户面和控制面已明确分离开。
1.2接口与协议接口是指不同网元之间的信息交互时的节点,每个接口含有不同的协议,同一接口的网元之间使用相互明白的语言进行信息交互,称为接口协议,接口协议的架构称为协议栈。
在LTE中有空中接口和地面接口,相应也有对应的协议和协议栈。
信令流数据流图1 子层、协议栈与流图2 子层运行方式LTE系统的数据处理过程被分解成不同的协议层。
简单分为三层结构:物理层、数据链路层L2和网络层。
图1阐述了LTE系统传输的总体协议架构以及用户面和控制面数据信息的路径和流向。
用户数据流和信令流以IP包的形式进行传送,在空中接口传送之前,IP包将通过多个协议层实体进行处理,到达eNodeB后,经过协议层逆向处理,再通过S1/X2接口分别流向不同的EPS实体,路径中各协议子层特点和功能如下:1.2.1NAS协议(非接入层协议)处理UE和MME之间信息的传输,传输的内容可以是用户信息或控制信息(如业务的建立、释放或者移动性管理信息)。
它与接入信息无关,只是通过接入层的信令交互,在UE和MME之间建立起了信令通路,从而便能进行非接入层信令流程了。
卡巴斯基安全中心事件追踪器集成指南说明书

Integrate Kaspersky Security Center EventTracker v9.0 and aboveAbstractThis guide will facilitate a Kaspersky Security Center user to send logs to EventTracker.ScopeThe configurations detailed in this guide are consistent with EventTracker 9.x or later and Kaspersky Security Center 10.AudienceAdministrators who want to monitor the Kaspersky Security Center using EventTracker.The information contained in this document represents the current view of Netsurion on theissues discussed as of the date of publication. Because Netsurion must respond to changingmarket conditions, it should not be interpreted to be a commitment on the part of Netsurion, andNetsurion cannot guarantee the accuracy of any information presented after the date ofpublication.This document is for informational purposes only. Netsurion MAKES NO WARRANTIES, EXPRESSOR IMPLIED, AS TO THE INFORMATION IN THIS DOCUMENT.Complying with all applicable copyright laws is the responsibility of the user. Without limiting therights under copyright, this paper may be freely distributed without permission from Netsurion, ifits content is unaltered, nothing is added to the content and credit to Netsurion is provided.Netsurion may have patents, patent applications, trademarks, copyrights, or other intellectualproperty rights covering subject matter in this document. Except as expressly provided in anywritten license agreement from Netsurion, the furnishing of this document does not give you anylicense to these patents, trademarks, copyrights, or other intellectual property.The example companies, organizations, products, people and events depicted herein are fictitious.No association with any real company, organization, product, person or event is intended orshould be inferred.© 2019 Netsurion. All rights reserved. The names of actual companies and products mentionedherein may be the trademarks of their respective owners.Table of Contents1.Introduction (3)1.1.Pre-requisites (3)1.2.Enabling Kaspersky Event Logs and Sending logs to EventTracker (3)2.EventTracker Knowledge Pack (6)2.1.Categories (6)2.2.Alerts (7)2.3.Report (7)3.Importing Kaspersky Security Center knowledge pack into EventTracker (9)3.1.Category (9)3.2.Alerts (10)3.3.Flex Reports (11)3.4.Token Templates (12)4.Verifying Kaspersky Security Center knowledge pack in EventTracker (15)4.1.Categories (15)4.2.Alerts (15)4.3.Reports (16)4.4.Token Template (17)5.Sample Dashboards (18)1.I ntroductionKaspersky Lab offers consumer security products, such as anti-virus, anti-malware and firewall applications, in addition to security systems designed for small businesses, corporations and large enterprises. Corporate solutions include protection for workstations, file servers, mail servers, payment gateways, banking servers, mobile devices, and internet gateways managed through a centralized administration kit. These applications are also available in bundled security suites scaled to fit the requirements of organizations of varying sizes. 1.1.Pre-requisites•EventTracker 9.x or later should be installed.•EventTracker Agent to be installed on Kaspersky Security Center administrative server.•Advance licensed Kaspersky is required to forward the syslog.1.2.Enabling Kaspersky Event Logs and Sending logs to EventTracker1.Open Kaspersky Security Center 10 and go to Administration Server.Figure 12.In Admin Administration Server, select Events in the right frame.3.Click on Configure notifications and event export.Figure 24.Select Configure export to the SIEM system.Figure 35.Select the check box Automatically export events to the SIEM system database.Figure 46.Choose the SIEM system. Specify the EventTracker Manager address.7.Click OK.Figure 52.E ventTracker Knowledge PackOnce Kaspersky Security Center events are enabled and Kaspersky Security Center events are received in EventTracker, Alerts, and Reports can be configured in EventTracker.The following Knowledge Packs are available in EventTracker to support the Kaspersky Security Center monitoring.2.1.Categories•Kaspersky Security Center: Report management: This category provides information related to report management when a report is added, deleted or modified on Kaspersky Security Center.•Kaspersky Security Center: Task management: This category provides information related to task management when a task is added, deleted or modified on Kaspersky Security Center.•Kaspersky Security Center: Policy management: This category provides information related to policy management when a policy is added, deleted or modified on Kaspersky Security Center.•Kaspersky Security Center: Group task management: This category provides information related to group task management when a group task is added, deleted or modified on Kaspersky Security Center.•Kaspersky Security Center: Administrative group management: This category provides information related to administrative group management when an administrative group is added, deleted or modified on Kaspersky Security Center.•Kaspersky Security Center: Malicious object scan status: This category provides information related to the malicious object which has been detected and untreated on Kaspersky Security Center.•Kaspersky Security Center: Application privilege management: This category provides information related to applications that have been added to the trusted group on Kaspersky Security Center.•Kaspersky Security Center: Application settings change: This category provides information related to applications where their settings are changed on Kaspersky Security Center.•Kaspersky Security Center: Blocked files: This category provides information related to files which are being blocked by Kaspersky Security Center.•Kaspersky Security Center: Device Control:This category provides information related to devices which have been blocked when inserted into the Kaspersky Security Center system.•Kaspersky Security Center: Malware detected:This category provides information related to malwares which have been detected in the system of Kaspersky Security Center.•Kaspersky Security Center: Object quarantine:This category provides information related to malware objects which are added into the quarantine list in Kaspersky Security Center.•Kaspersky Security Center: Task management:This category provides information related to task management of Kaspersky Security Center.•Kaspersky Security Center: Vulnerability detected: This category provides information related to a vulnerability which has been detected in Kaspersky Security Center.2.2.Alerts•Kaspersky Security Center: Attack Detected: This alert is generated when an Alert is detected in the Kaspersky Security Center.•Kaspersky Security Center: Suspicious Object Found: This alert is generated when a malicious/Suspicious object is detected in Kaspersky Security Center.•Kaspersky Security Center: Virus Found: This Alert is generated when one of the files or web Viruses is detected in the Kaspersky Security Center.2.3.Report•Kaspersky Security Center- Suspicious Object Found: This report provides information related to malware detected in the web for which the user tries to access an unidentified object.Logs consideredJan 14 05:04:28 ccc-app9CEF:0|KasperskyLab|SecurityCenter|10.3.407|GNRL_EV_SUSPICIOUS_OBJECT_FOUND|Probably infected object detected|4|msg=Result: Detected: not-a-virus:WebToolbar.Win32.Asparnet.gen\r\nUser:CCCNTR\\CCC5055$ (Initiator)\r\nObject: C:\\Program Files(x86)\\askpartnernetwork\\toolbar\\updater\\tbnotifier.exe\r\n rt=1547463838 dhost=CCC5055dst=192.168.6.242 cs2=KES cs2Label=ProductName cs3=10.2.4.0 cs3Label=ProductVersionfilePath=C:\Program Files (x86)\AskPartnerNetwork\Toolbar\Updater\TBNotifier.exe cs1=not-a-virus:WebToolbar.Win32.Asparnet.gen cs1Label=VirusName duser=CCCNTR\CCC5055$Sample Report•Kaspersky Security Center-Task Status Updated: This report provides information related to task management where the task is started or stopped.Logs consideredJan 14 05:07:58 ccc-app9CEF:0|KasperskyLab|SecurityCenter|10.3.407|KLPRCI_TaskState|Completed|1|rt=1547464052 dhost=CCC-RD-HOST11 dst=192.168.0.101 cs2=WSEE cs2Label=ProductName cs3=10.0.0.0 cs3Label=ProductVersioncs5=Server Database Update cs5Label=TaskName cs4=204 cs4Label=TaskId cn2=4 cn2Label=TaskNewState cn1=1 cn1Label=TaskOldStateSample Report3.I mporting Kaspersky Security Center knowledge pack into EventTrackerunch the EventTracker Control Panel.2.Double click Export Import Utility, and then click the Import tab.Import Token Templates/Category/Alert/Tokens/ Flex Reports as given below.Note: Importing should be in the same order as mentioned above.Figure 63.1.Category1.Click the Category option, and then click the browse button.Figure 72.Locate All Kaspersky Security Center group of Categories.iscat file, and then click the Open button.3.To import categories, click the Import button.EventTracker displays a success message.Figure 84.Click OK, and then click the Close button.3.2.Alerts1.Click Alerts option, and then click the browse button.Figure 92.Locate All Kaspersky Security Center group of Alerts.isalt file, and then click the Open button.3.To import alerts, click the Import button.EventTracker displays a success message.Figure 104.Click OK, and then click the Close button.3.3.Flex Reports1.Click the Report option, and then click the browse button.Figure 112.Locate All Kaspersky Security Center group of Flex Report.issch file, and then click the Open button.3.To import reports, click the Import button.EventTracker displays a success message.Figure 124.Click OK, and then click the Close button.3.4.Token Templates1.Click the Admin menu, and then click Parsing rule.2.Select the Template tab, and then click on ‘Import’ option.Figure 133.Click on the Browse button.Figure 144.Locate All Kaspersky Security Center group of template.ettd file, and then click the Open button.Figure 155.Now select the check box and then click on ‘Import’ option.EventTracker displays a success message.Figure 166.Click on the OK button.4.V erifying Kaspersky Security Center knowledge pack in EventTracker4.1.Categories1.Logon to EventTracker.2.Click the Admin menu, and then click Categories.3.In Category Tree to view imported categories, scroll down and expand the Kaspersky Security Centergroup folder to view the imported categories.Figure 174.2.Alerts1.Logon to EventTracker.2.Click the Admin menu, and then click Alerts.3.In the Search field, type ‘Kaspersky Security Center', and then click the Go button.Alert Management page will display all the imported Kaspersky Security Center alerts.Figure 184.To activate the imported alerts, select the respective checkbox in the Active column.EventTracker displays a message box.Figure 195.Click OK, and then click the Activate Now button.NOTE:You can select alert notification such as Email, and Message, etc. For this, select the respective checkbox in the Alert management page, and then click the Activate Now button.4.3.Reports1.Logon to EventTracker.2.Click the Reports menu, and then select Configuration.3.In Reports Configuration pane, select the Defined option.EventTracker displays the Defined page.4.In search box enter ‘Kaspersky Security Center’, and then click the Search button.EventTracker displays Flex reports of Kaspersky Security Center.Figure 204.4.Token Template1.Logon to EventTracker.2.Click the Admin menu, and then click Parsing Rules.Figure 215.S ample Dashboards•Kaspersky Security Center- Suspicious object Found by HostFigure 22 •Kaspersky Security Center- Suspicious object Found on IP AddressFigure 23•Kaspersky Security Center- Suspicious object Found by ThreatFigure 24 •Kaspersky Security Center- Suspicious object Found by userFigure 25•Kaspersky Security Center- Suspicious object Found by Task StatusFigure 26 •Kaspersky Security Center- Suspicious object Found by SystemFigure 2720。
Native Instruments MASCHINE MK3 用户手册说明书

The information in this document is subject to change without notice and does not represent a commitment on the part of Native Instruments GmbH. The software described by this docu-ment is subject to a License Agreement and may not be copied to other media. No part of this publication may be copied, reproduced or otherwise transmitted or recorded, for any purpose, without prior written permission by Native Instruments GmbH, hereinafter referred to as Native Instruments.“Native Instruments”, “NI” and associated logos are (registered) trademarks of Native Instru-ments GmbH.ASIO, VST, HALion and Cubase are registered trademarks of Steinberg Media Technologies GmbH.All other product and company names are trademarks™ or registered® trademarks of their re-spective holders. Use of them does not imply any affiliation with or endorsement by them.Document authored by: David Gover and Nico Sidi.Software version: 2.8 (02/2019)Hardware version: MASCHINE MK3Special thanks to the Beta Test Team, who were invaluable not just in tracking down bugs, but in making this a better product.NATIVE INSTRUMENTS GmbH Schlesische Str. 29-30D-10997 Berlin Germanywww.native-instruments.de NATIVE INSTRUMENTS North America, Inc. 6725 Sunset Boulevard5th FloorLos Angeles, CA 90028USANATIVE INSTRUMENTS K.K.YO Building 3FJingumae 6-7-15, Shibuya-ku, Tokyo 150-0001Japanwww.native-instruments.co.jp NATIVE INSTRUMENTS UK Limited 18 Phipp StreetLondon EC2A 4NUUKNATIVE INSTRUMENTS FRANCE SARL 113 Rue Saint-Maur75011 ParisFrance SHENZHEN NATIVE INSTRUMENTS COMPANY Limited 5F, Shenzhen Zimao Center111 Taizi Road, Nanshan District, Shenzhen, GuangdongChina© NATIVE INSTRUMENTS GmbH, 2019. All rights reserved.Table of Contents1Welcome to MASCHINE (25)1.1MASCHINE Documentation (26)1.2Document Conventions (27)1.3New Features in MASCHINE 2.8 (29)1.4New Features in MASCHINE 2.7.10 (31)1.5New Features in MASCHINE 2.7.8 (31)1.6New Features in MASCHINE 2.7.7 (32)1.7New Features in MASCHINE 2.7.4 (33)1.8New Features in MASCHINE 2.7.3 (36)2Quick Reference (38)2.1Using Your Controller (38)2.1.1Controller Modes and Mode Pinning (38)2.1.2Controlling the Software Views from Your Controller (40)2.2MASCHINE Project Overview (43)2.2.1Sound Content (44)2.2.2Arrangement (45)2.3MASCHINE Hardware Overview (48)2.3.1MASCHINE Hardware Overview (48)2.3.1.1Control Section (50)2.3.1.2Edit Section (53)2.3.1.3Performance Section (54)2.3.1.4Group Section (56)2.3.1.5Transport Section (56)2.3.1.6Pad Section (58)2.3.1.7Rear Panel (63)2.4MASCHINE Software Overview (65)2.4.1Header (66)2.4.2Browser (68)2.4.3Arranger (70)2.4.4Control Area (73)2.4.5Pattern Editor (74)3Basic Concepts (76)3.1Important Names and Concepts (76)3.2Adjusting the MASCHINE User Interface (79)3.2.1Adjusting the Size of the Interface (79)3.2.2Switching between Ideas View and Song View (80)3.2.3Showing/Hiding the Browser (81)3.2.4Showing/Hiding the Control Lane (81)3.3Common Operations (82)3.3.1Using the 4-Directional Push Encoder (82)3.3.2Pinning a Mode on the Controller (83)3.3.3Adjusting Volume, Swing, and Tempo (84)3.3.4Undo/Redo (87)3.3.5List Overlay for Selectors (89)3.3.6Zoom and Scroll Overlays (90)3.3.7Focusing on a Group or a Sound (91)3.3.8Switching Between the Master, Group, and Sound Level (96)3.3.9Navigating Channel Properties, Plug-ins, and Parameter Pages in the Control Area.973.3.9.1Extended Navigate Mode on Your Controller (102)3.3.10Navigating the Software Using the Controller (105)3.3.11Using Two or More Hardware Controllers (106)3.3.12Touch Auto-Write Option (108)3.4Native Kontrol Standard (110)3.5Stand-Alone and Plug-in Mode (111)3.5.1Differences between Stand-Alone and Plug-in Mode (112)3.5.2Switching Instances (113)3.5.3Controlling Various Instances with Different Controllers (114)3.6Host Integration (114)3.6.1Setting up Host Integration (115)3.6.1.1Setting up Ableton Live (macOS) (115)3.6.1.2Setting up Ableton Live (Windows) (116)3.6.1.3Setting up Apple Logic Pro X (116)3.6.2Integration with Ableton Live (117)3.6.3Integration with Apple Logic Pro X (119)3.7Preferences (120)3.7.1Preferences – General Page (121)3.7.2Preferences – Audio Page (126)3.7.3Preferences – MIDI Page (130)3.7.4Preferences – Default Page (133)3.7.5Preferences – Library Page (137)3.7.6Preferences – Plug-ins Page (145)3.7.7Preferences – Hardware Page (150)3.7.8Preferences – Colors Page (154)3.8Integrating MASCHINE into a MIDI Setup (156)3.8.1Connecting External MIDI Equipment (156)3.8.2Sync to External MIDI Clock (157)3.8.3Send MIDI Clock (158)3.9Syncing MASCHINE using Ableton Link (159)3.9.1Connecting to a Network (159)3.9.2Joining and Leaving a Link Session (159)3.10Using a Pedal with the MASCHINE Controller (160)3.11File Management on the MASCHINE Controller (161)4Browser (163)4.1Browser Basics (163)4.1.1The MASCHINE Library (163)4.1.2Browsing the Library vs. Browsing Your Hard Disks (164)4.2Searching and Loading Files from the Library (165)4.2.1Overview of the Library Pane (165)4.2.2Selecting or Loading a Product and Selecting a Bank from the Browser (170)4.2.2.1[MK3] Browsing by Product Category Using the Controller (174)4.2.2.2[MK3] Browsing by Product Vendor Using the Controller (174)4.2.3Selecting a Product Category, a Product, a Bank, and a Sub-Bank (175)4.2.3.1Selecting a Product Category, a Product, a Bank, and a Sub-Bank on theController (179)4.2.4Selecting a File Type (180)4.2.5Choosing Between Factory and User Content (181)4.2.6Selecting Type and Character Tags (182)4.2.7List and Tag Overlays in the Browser (186)4.2.8Performing a Text Search (188)4.2.9Loading a File from the Result List (188)4.3Additional Browsing Tools (193)4.3.1Loading the Selected Files Automatically (193)4.3.2Auditioning Instrument Presets (195)4.3.3Auditioning Samples (196)4.3.4Loading Groups with Patterns (197)4.3.5Loading Groups with Routing (198)4.3.6Displaying File Information (198)4.4Using Favorites in the Browser (199)4.5Editing the Files’ Tags and Properties (203)4.5.1Attribute Editor Basics (203)4.5.2The Bank Page (205)4.5.3The Types and Characters Pages (205)4.5.4The Properties Page (208)4.6Loading and Importing Files from Your File System (209)4.6.1Overview of the FILES Pane (209)4.6.2Using Favorites (211)4.6.3Using the Location Bar (212)4.6.4Navigating to Recent Locations (213)4.6.5Using the Result List (214)4.6.6Importing Files to the MASCHINE Library (217)4.7Locating Missing Samples (219)4.8Using Quick Browse (221)5Managing Sounds, Groups, and Your Project (225)5.1Overview of the Sounds, Groups, and Master (225)5.1.1The Sound, Group, and Master Channels (226)5.1.2Similarities and Differences in Handling Sounds and Groups (227)5.1.3Selecting Multiple Sounds or Groups (228)5.2Managing Sounds (233)5.2.1Loading Sounds (235)5.2.2Pre-listening to Sounds (236)5.2.3Renaming Sound Slots (237)5.2.4Changing the Sound’s Color (237)5.2.5Saving Sounds (239)5.2.6Copying and Pasting Sounds (241)5.2.7Moving Sounds (244)5.2.8Resetting Sound Slots (245)5.3Managing Groups (247)5.3.1Creating Groups (248)5.3.2Loading Groups (249)5.3.3Renaming Groups (251)5.3.4Changing the Group’s Color (251)5.3.5Saving Groups (253)5.3.6Copying and Pasting Groups (255)5.3.7Reordering Groups (258)5.3.8Deleting Groups (259)5.4Exporting MASCHINE Objects and Audio (260)5.4.1Saving a Group with its Samples (261)5.4.2Saving a Project with its Samples (262)5.4.3Exporting Audio (264)5.5Importing Third-Party File Formats (270)5.5.1Loading REX Files into Sound Slots (270)5.5.2Importing MPC Programs to Groups (271)6Playing on the Controller (275)6.1Adjusting the Pads (275)6.1.1The Pad View in the Software (275)6.1.2Choosing a Pad Input Mode (277)6.1.3Adjusting the Base Key (280)6.1.4Using Choke Groups (282)6.1.5Using Link Groups (284)6.2Adjusting the Key, Choke, and Link Parameters for Multiple Sounds (286)6.3Playing Tools (287)6.3.1Mute and Solo (288)6.3.2Choke All Notes (292)6.3.3Groove (293)6.3.4Level, Tempo, Tune, and Groove Shortcuts on Your Controller (295)6.3.5Tap Tempo (299)6.4Performance Features (300)6.4.1Overview of the Perform Features (300)6.4.2Selecting a Scale and Creating Chords (303)6.4.3Scale and Chord Parameters (303)6.4.4Creating Arpeggios and Repeated Notes (316)6.4.5Swing on Note Repeat / Arp Output (321)6.5Using Lock Snapshots (322)6.5.1Creating a Lock Snapshot (322)6.5.2Using Extended Lock (323)6.5.3Updating a Lock Snapshot (323)6.5.4Recalling a Lock Snapshot (324)6.5.5Morphing Between Lock Snapshots (324)6.5.6Deleting a Lock Snapshot (325)6.5.7Triggering Lock Snapshots via MIDI (326)6.6Using the Smart Strip (327)6.6.1Pitch Mode (328)6.6.2Modulation Mode (328)6.6.3Perform Mode (328)6.6.4Notes Mode (329)7Working with Plug-ins (330)7.1Plug-in Overview (330)7.1.1Plug-in Basics (330)7.1.2First Plug-in Slot of Sounds: Choosing the Sound’s Role (334)7.1.3Loading, Removing, and Replacing a Plug-in (335)7.1.3.1Browser Plug-in Slot Selection (341)7.1.4Adjusting the Plug-in Parameters (344)7.1.5Bypassing Plug-in Slots (344)7.1.6Using Side-Chain (346)7.1.7Moving Plug-ins (346)7.1.8Alternative: the Plug-in Strip (348)7.1.9Saving and Recalling Plug-in Presets (348)7.1.9.1Saving Plug-in Presets (349)7.1.9.2Recalling Plug-in Presets (350)7.1.9.3Removing a Default Plug-in Preset (351)7.2The Sampler Plug-in (352)7.2.1Page 1: Voice Settings / Engine (354)7.2.2Page 2: Pitch / Envelope (356)7.2.3Page 3: FX / Filter (359)7.2.4Page 4: Modulation (361)7.2.5Page 5: LFO (363)7.2.6Page 6: Velocity / Modwheel (365)7.3Using Native Instruments and External Plug-ins (367)7.3.1Opening/Closing Plug-in Windows (367)7.3.2Using the VST/AU Plug-in Parameters (370)7.3.3Setting Up Your Own Parameter Pages (371)7.3.4Using VST/AU Plug-in Presets (376)7.3.5Multiple-Output Plug-ins and Multitimbral Plug-ins (378)8Using the Audio Plug-in (380)8.1Loading a Loop into the Audio Plug-in (384)8.2Editing Audio in the Audio Plug-in (385)8.3Using Loop Mode (386)8.4Using Gate Mode (388)9Using the Drumsynths (390)9.1Drumsynths – General Handling (391)9.1.1Engines: Many Different Drums per Drumsynth (391)9.1.2Common Parameter Organization (391)9.1.3Shared Parameters (394)9.1.4Various Velocity Responses (394)9.1.5Pitch Range, Tuning, and MIDI Notes (394)9.2The Kicks (395)9.2.1Kick – Sub (397)9.2.2Kick – Tronic (399)9.2.3Kick – Dusty (402)9.2.4Kick – Grit (403)9.2.5Kick – Rasper (406)9.2.6Kick – Snappy (407)9.2.7Kick – Bold (409)9.2.8Kick – Maple (411)9.2.9Kick – Push (412)9.3The Snares (414)9.3.1Snare – Volt (416)9.3.2Snare – Bit (418)9.3.3Snare – Pow (420)9.3.4Snare – Sharp (421)9.3.5Snare – Airy (423)9.3.6Snare – Vintage (425)9.3.7Snare – Chrome (427)9.3.8Snare – Iron (429)9.3.9Snare – Clap (431)9.3.10Snare – Breaker (433)9.4The Hi-hats (435)9.4.1Hi-hat – Silver (436)9.4.2Hi-hat – Circuit (438)9.4.3Hi-hat – Memory (440)9.4.4Hi-hat – Hybrid (442)9.4.5Creating a Pattern with Closed and Open Hi-hats (444)9.5The Toms (445)9.5.1Tom – Tronic (447)9.5.2Tom – Fractal (449)9.5.3Tom – Floor (453)9.5.4Tom – High (455)9.6The Percussions (456)9.6.1Percussion – Fractal (458)9.6.2Percussion – Kettle (461)9.6.3Percussion – Shaker (463)9.7The Cymbals (467)9.7.1Cymbal – Crash (469)9.7.2Cymbal – Ride (471)10Using the Bass Synth (474)10.1Bass Synth – General Handling (475)10.1.1Parameter Organization (475)10.1.2Bass Synth Parameters (477)11Working with Patterns (479)11.1Pattern Basics (479)11.1.1Pattern Editor Overview (480)11.1.2Navigating the Event Area (486)11.1.3Following the Playback Position in the Pattern (488)11.1.4Jumping to Another Playback Position in the Pattern (489)11.1.5Group View and Keyboard View (491)11.1.6Adjusting the Arrange Grid and the Pattern Length (493)11.1.7Adjusting the Step Grid and the Nudge Grid (497)11.2Recording Patterns in Real Time (501)11.2.1Recording Your Patterns Live (501)11.2.2The Record Prepare Mode (504)11.2.3Using the Metronome (505)11.2.4Recording with Count-in (506)11.2.5Quantizing while Recording (508)11.3Recording Patterns with the Step Sequencer (508)11.3.1Step Mode Basics (508)11.3.2Editing Events in Step Mode (511)11.3.3Recording Modulation in Step Mode (513)11.4Editing Events (514)11.4.1Editing Events with the Mouse: an Overview (514)11.4.2Creating Events/Notes (517)11.4.3Selecting Events/Notes (518)11.4.4Editing Selected Events/Notes (526)11.4.5Deleting Events/Notes (532)11.4.6Cut, Copy, and Paste Events/Notes (535)11.4.7Quantizing Events/Notes (538)11.4.8Quantization While Playing (540)11.4.9Doubling a Pattern (541)11.4.10Adding Variation to Patterns (541)11.5Recording and Editing Modulation (546)11.5.1Which Parameters Are Modulatable? (547)11.5.2Recording Modulation (548)11.5.3Creating and Editing Modulation in the Control Lane (550)11.6Creating MIDI Tracks from Scratch in MASCHINE (555)11.7Managing Patterns (557)11.7.1The Pattern Manager and Pattern Mode (558)11.7.2Selecting Patterns and Pattern Banks (560)11.7.3Creating Patterns (563)11.7.4Deleting Patterns (565)11.7.5Creating and Deleting Pattern Banks (566)11.7.6Naming Patterns (568)11.7.7Changing the Pattern’s Color (570)11.7.8Duplicating, Copying, and Pasting Patterns (571)11.7.9Moving Patterns (574)11.7.10Adjusting Pattern Length in Fine Increments (575)11.8Importing/Exporting Audio and MIDI to/from Patterns (576)11.8.1Exporting Audio from Patterns (576)11.8.2Exporting MIDI from Patterns (577)11.8.3Importing MIDI to Patterns (580)12Audio Routing, Remote Control, and Macro Controls (589)12.1Audio Routing in MASCHINE (590)12.1.1Sending External Audio to Sounds (591)12.1.2Configuring the Main Output of Sounds and Groups (596)12.1.3Setting Up Auxiliary Outputs for Sounds and Groups (601)12.1.4Configuring the Master and Cue Outputs of MASCHINE (605)12.1.5Mono Audio Inputs (610)12.1.5.1Configuring External Inputs for Sounds in Mix View (611)12.2Using MIDI Control and Host Automation (614)12.2.1Triggering Sounds via MIDI Notes (615)12.2.2Triggering Scenes via MIDI (622)12.2.3Controlling Parameters via MIDI and Host Automation (623)12.2.4Selecting VST/AU Plug-in Presets via MIDI Program Change (631)12.2.5Sending MIDI from Sounds (632)12.3Creating Custom Sets of Parameters with the Macro Controls (636)12.3.1Macro Control Overview (637)12.3.2Assigning Macro Controls Using the Software (638)12.3.3Assigning Macro Controls Using the Controller (644)13Controlling Your Mix (646)13.1Mix View Basics (646)13.1.1Switching between Arrange View and Mix View (646)13.1.2Mix View Elements (647)13.2The Mixer (649)13.2.1Displaying Groups vs. Displaying Sounds (650)13.2.2Adjusting the Mixer Layout (652)13.2.3Selecting Channel Strips (653)13.2.4Managing Your Channels in the Mixer (654)13.2.5Adjusting Settings in the Channel Strips (656)13.2.6Using the Cue Bus (660)13.3The Plug-in Chain (662)13.4The Plug-in Strip (663)13.4.1The Plug-in Header (665)13.4.2Panels for Drumsynths and Internal Effects (667)13.4.3Panel for the Sampler (668)13.4.4Custom Panels for Native Instruments Plug-ins (671)13.4.5Undocking a Plug-in Panel (Native Instruments and External Plug-ins Only) (675)13.5Controlling Your Mix from the Controller (677)13.5.1Navigating Your Channels in Mix Mode (678)13.5.2Adjusting the Level and Pan in Mix Mode (679)13.5.3Mute and Solo in Mix Mode (680)13.5.4Plug-in Icons in Mix Mode (680)14Using Effects (681)14.1Applying Effects to a Sound, a Group or the Master (681)14.1.1Adding an Effect (681)14.1.2Other Operations on Effects (690)14.1.3Using the Side-Chain Input (692)14.2Applying Effects to External Audio (695)14.2.1Step 1: Configure MASCHINE Audio Inputs (695)14.2.2Step 2: Set up a Sound to Receive the External Input (698)14.2.3Step 3: Load an Effect to Process an Input (700)14.3Creating a Send Effect (701)14.3.1Step 1: Set Up a Sound or Group as Send Effect (702)14.3.2Step 2: Route Audio to the Send Effect (706)14.3.3 A Few Notes on Send Effects (708)14.4Creating Multi-Effects (709)15Effect Reference (712)15.1Dynamics (713)15.1.1Compressor (713)15.1.2Gate (717)15.1.3Transient Master (721)15.1.4Limiter (723)15.1.5Maximizer (727)15.2Filtering Effects (730)15.2.1EQ (730)15.2.2Filter (733)15.2.3Cabinet (737)15.3Modulation Effects (738)15.3.1Chorus (738)15.3.2Flanger (740)15.3.3FM (742)15.3.4Freq Shifter (743)15.3.5Phaser (745)15.4Spatial and Reverb Effects (747)15.4.1Ice (747)15.4.2Metaverb (749)15.4.3Reflex (750)15.4.4Reverb (Legacy) (752)15.4.5Reverb (754)15.4.5.1Reverb Room (754)15.4.5.2Reverb Hall (757)15.4.5.3Plate Reverb (760)15.5Delays (762)15.5.1Beat Delay (762)15.5.2Grain Delay (765)15.5.3Grain Stretch (767)15.5.4Resochord (769)15.6Distortion Effects (771)15.6.1Distortion (771)15.6.2Lofi (774)15.6.3Saturator (775)15.7Perform FX (779)15.7.1Filter (780)15.7.2Flanger (782)15.7.3Burst Echo (785)15.7.4Reso Echo (787)15.7.5Ring (790)15.7.6Stutter (792)15.7.7Tremolo (795)15.7.8Scratcher (798)16Working with the Arranger (801)16.1Arranger Basics (801)16.1.1Navigating Song View (804)16.1.2Following the Playback Position in Your Project (806)16.1.3Performing with Scenes and Sections using the Pads (807)16.2Using Ideas View (811)16.2.1Scene Overview (811)16.2.2Creating Scenes (813)16.2.3Assigning and Removing Patterns (813)16.2.4Selecting Scenes (817)16.2.5Deleting Scenes (818)16.2.6Creating and Deleting Scene Banks (820)16.2.7Clearing Scenes (820)16.2.8Duplicating Scenes (821)16.2.9Reordering Scenes (822)16.2.10Making Scenes Unique (824)16.2.11Appending Scenes to Arrangement (825)16.2.12Naming Scenes (826)16.2.13Changing the Color of a Scene (827)16.3Using Song View (828)16.3.1Section Management Overview (828)16.3.2Creating Sections (833)16.3.3Assigning a Scene to a Section (834)16.3.4Selecting Sections and Section Banks (835)16.3.5Reorganizing Sections (839)16.3.6Adjusting the Length of a Section (840)16.3.6.1Adjusting the Length of a Section Using the Software (841)16.3.6.2Adjusting the Length of a Section Using the Controller (843)16.3.7Clearing a Pattern in Song View (843)16.3.8Duplicating Sections (844)16.3.8.1Making Sections Unique (845)16.3.9Removing Sections (846)16.3.10Renaming Scenes (848)16.3.11Clearing Sections (849)16.3.12Creating and Deleting Section Banks (850)16.3.13Working with Patterns in Song view (850)16.3.13.1Creating a Pattern in Song View (850)16.3.13.2Selecting a Pattern in Song View (850)16.3.13.3Clearing a Pattern in Song View (851)16.3.13.4Renaming a Pattern in Song View (851)16.3.13.5Coloring a Pattern in Song View (851)16.3.13.6Removing a Pattern in Song View (852)16.3.13.7Duplicating a Pattern in Song View (852)16.3.14Enabling Auto Length (852)16.3.15Looping (853)16.3.15.1Setting the Loop Range in the Software (854)16.4Playing with Sections (855)16.4.1Jumping to another Playback Position in Your Project (855)16.5Triggering Sections or Scenes via MIDI (856)16.6The Arrange Grid (858)16.7Quick Grid (860)17Sampling and Sample Mapping (862)17.1Opening the Sample Editor (862)17.2Recording Audio (863)17.2.1Opening the Record Page (863)17.2.2Selecting the Source and the Recording Mode (865)17.2.3Arming, Starting, and Stopping the Recording (868)17.2.5Using the Footswitch for Recording Audio (871)17.2.6Checking Your Recordings (872)17.2.7Location and Name of Your Recorded Samples (876)17.3Editing a Sample (876)17.3.1Using the Edit Page (877)17.3.2Audio Editing Functions (882)17.4Slicing a Sample (890)17.4.1Opening the Slice Page (891)17.4.2Adjusting the Slicing Settings (893)17.4.3Live Slicing (898)17.4.3.1Live Slicing Using the Controller (898)17.4.3.2Delete All Slices (899)17.4.4Manually Adjusting Your Slices (899)17.4.5Applying the Slicing (906)17.5Mapping Samples to Zones (912)17.5.1Opening the Zone Page (912)17.5.2Zone Page Overview (913)17.5.3Selecting and Managing Zones in the Zone List (915)17.5.4Selecting and Editing Zones in the Map View (920)17.5.5Editing Zones in the Sample View (924)17.5.6Adjusting the Zone Settings (927)17.5.7Adding Samples to the Sample Map (934)18Appendix: Tips for Playing Live (937)18.1Preparations (937)18.1.1Focus on the Hardware (937)18.1.2Customize the Pads of the Hardware (937)18.1.3Check Your CPU Power Before Playing (937)18.1.4Name and Color Your Groups, Patterns, Sounds and Scenes (938)18.1.5Consider Using a Limiter on Your Master (938)18.1.6Hook Up Your Other Gear and Sync It with MIDI Clock (938)18.1.7Improvise (938)18.2Basic Techniques (938)18.2.1Use Mute and Solo (938)18.2.2Use Scene Mode and Tweak the Loop Range (939)18.2.3Create Variations of Your Drum Patterns in the Step Sequencer (939)18.2.4Use Note Repeat (939)18.2.5Set Up Your Own Multi-effect Groups and Automate Them (939)18.3Special Tricks (940)18.3.1Changing Pattern Length for Variation (940)18.3.2Using Loops to Cycle Through Samples (940)18.3.3Using Loops to Cycle Through Samples (940)18.3.4Load Long Audio Files and Play with the Start Point (940)19Troubleshooting (941)19.1Knowledge Base (941)19.2Technical Support (941)19.3Registration Support (942)19.4User Forum (942)20Glossary (943)Index (951)1Welcome to MASCHINEThank you for buying MASCHINE!MASCHINE is a groove production studio that implements the familiar working style of classi-cal groove boxes along with the advantages of a computer based system. MASCHINE is ideal for making music live, as well as in the studio. It’s the hands-on aspect of a dedicated instru-ment, the MASCHINE hardware controller, united with the advanced editing features of the MASCHINE software.Creating beats is often not very intuitive with a computer, but using the MASCHINE hardware controller to do it makes it easy and fun. You can tap in freely with the pads or use Note Re-peat to jam along. Alternatively, build your beats using the step sequencer just as in classic drum machines.Patterns can be intuitively combined and rearranged on the fly to form larger ideas. You can try out several different versions of a song without ever having to stop the music.Since you can integrate it into any sequencer that supports VST, AU, or AAX plug-ins, you can reap the benefits in almost any software setup, or use it as a stand-alone application. You can sample your own material, slice loops and rearrange them easily.However, MASCHINE is a lot more than an ordinary groovebox or sampler: it comes with an inspiring 7-gigabyte library, and a sophisticated, yet easy to use tag-based Browser to give you instant access to the sounds you are looking for.What’s more, MASCHINE provides lots of options for manipulating your sounds via internal ef-fects and other sound-shaping possibilities. You can also control external MIDI hardware and 3rd-party software with the MASCHINE hardware controller, while customizing the functions of the pads, knobs and buttons according to your needs utilizing the included Controller Editor application. We hope you enjoy this fantastic instrument as much as we do. Now let’s get go-ing!—The MASCHINE team at Native Instruments.MASCHINE Documentation1.1MASCHINE DocumentationNative Instruments provide many information sources regarding MASCHINE. The main docu-ments should be read in the following sequence:1.MASCHINE Getting Started: This document provides a practical approach to MASCHINE viaa set of tutorials covering easy and more advanced tasks in order to help you familiarizeyourself with MASCHINE.2.MASCHINE Manual (this document): The MASCHINE Manual provides you with a compre-hensive description of all MASCHINE software and hardware features.Additional documentation sources provide you with details on more specific topics:▪Controller Editor Manual: Besides using your MASCHINE hardware controller together withits dedicated MASCHINE software, you can also use it as a powerful and highly versatileMIDI controller to pilot any other MIDI-capable application or device. This is made possibleby the Controller Editor software, an application that allows you to precisely define all MIDIassignments for your MASCHINE controller. The Controller Editor was installed during theMASCHINE installation procedure. For more information on this, please refer to the Con-troller Editor Manual available as a PDF file via the Help menu of Controller Editor.▪Online Support Videos: You can find a number of support videos on The Official Native In-struments Support Channel under the following URL: https:///NIsupport-EN. We recommend that you follow along with these instructions while the respective ap-plication is running on your computer.Other Online Resources:If you are experiencing problems related to your Native Instruments product that the supplied documentation does not cover, there are several ways of getting help:▪Knowledge Base▪User Forum▪Technical Support▪Registration SupportYou will find more information on these subjects in the chapter Troubleshooting.1.2Document ConventionsThis section introduces you to the signage and text highlighting used in this manual. This man-ual uses particular formatting to point out special facts and to warn you of potential issues. The icons introducing these notes let you see what kind of information is to be expected:This document uses particular formatting to point out special facts and to warn you of poten-tial issues. The icons introducing the following notes let you see what kind of information can be expected:Furthermore, the following formatting is used:▪Text appearing in (drop-down) menus (such as Open…, Save as… etc.) in the software and paths to locations on your hard disk or other storage devices is printed in italics.▪Text appearing elsewhere (labels of buttons, controls, text next to checkboxes etc.) in the software is printed in blue. Whenever you see this formatting applied, you will find the same text appearing somewhere on the screen.▪Text appearing on the displays of the controller is printed in light grey. Whenever you see this formatting applied, you will find the same text on a controller display.▪Text appearing on labels of the hardware controller is printed in orange. Whenever you see this formatting applied, you will find the same text on the controller.▪Important names and concepts are printed in bold.▪References to keys on your computer’s keyboard you’ll find put in square brackets (e.g.,“Press [Shift] + [Enter]”).►Single instructions are introduced by this play button type arrow.→Results of actions are introduced by this smaller arrow.Naming ConventionThroughout the documentation we will refer to MASCHINE controller (or just controller) as the hardware controller and MASCHINE software as the software installed on your computer.The term “effect” will sometimes be abbreviated as “FX” when referring to elements in the MA-SCHINE software and hardware. These terms have the same meaning.Button Combinations and Shortcuts on Your ControllerMost instructions will use the “+” sign to indicate buttons (or buttons and pads) that must be pressed simultaneously, starting with the button indicated first. E.g., an instruction such as:“Press SHIFT + PLAY”means:1.Press and hold SHIFT.2.While holding SHIFT, press PLAY and release it.3.Release SHIFT.Unlabeled Buttons on the ControllerThe buttons and knobs above and below the displays on your MASCHINE controller do not have labels.。
射频卡协议ISO4443(中文)

3.16 帧 frame ...................................................................................................................3
3.3
无触点集成电路卡 Contactless integrated circuit(s) card ...................................... 3
3.4
接近式卡 Proximity card(PICC) ........................................................................ 3
3.19 唯一识别符 Unique identifier(UID) .................................................................. 4
3.7
二进制移相键控 Binary phase shift keying ............................................................ 3
3.8
调制指数 Modulation index .................................................................................... 3
3.11 防冲突环 anticollision loop ..................................................................................... 3
惠普彩色激光打印机 Pro M454 和惠普彩色激光多功能一体机 Pro M479 维修手册说明书
Table -1 Revision history Revision number 1
Revision date 6/2019
Revision notes HP LaserJet Pro M454 HP LaserJet Pro MFP M479 Repair manual initial release
Additional service and support for HP internal personnel HP internal personnel, go to one of the following Web-based Interactive Search Engine (WISE) sites: Americas (AMS) – https:///wise/home/ams-enWISE - English – https:///wise/home/ams-esWISE - Spanish – https:///wise/home/ams-ptWISE - Portuguese – https:///wise/home/ams-frWISE - French Asia Pacific / Japan (APJ) ○ https:///wise/home/apj-enWISE - English ○ https:///wise/home/apj-jaWISE - Japanese ○ https:///wise/home/apj-koWISE - Korean ○ https:///wise/home/apj-zh-HansWISE - Chinese (simplified)
Find information about the following topics ● Service manuals ● Service advisories ● Up-to-date control panel message (CPMD) troubleshooting ● Install and configure ● Printer specifications ● Solutions for printer issues and emerging issues ● Remove and replace part instructions and videos ● Warranty and regulatory information
关于如何使用插件规避检测机制的提示

关于如何使用插件规避检测机制的提示插件在软件开发中扮演着重要的角色,它们可以增强软件的功能和性能。
然而,有些软件会对插件进行检测,以确保其安全性和合法性。
本文将介绍一些方法,帮助您规避这些检测机制,以便更好地使用插件。
1. 修改插件标识一种常见的检测插件的方法是通过检查插件的标识来识别其真实身份。
因此,您可以尝试修改插件的标识,以隐藏插件的真实身份。
您可以通过修改插件的配置文件或源代码中的标识信息来实现。
这样,即使软件对插件进行检测,也无法轻易地识别插件的真实身份。
2. 混淆插件代码另一种常见的检测插件的方法是通过分析插件的代码来识别其真实用途。
为了规避这种检测机制,您可以尝试对插件的代码进行混淆。
混淆代码可以使代码变得难以阅读和理解,从而增加检测的难度。
您可以使用一些工具或技术来实现代码混淆,如重命名变量和函数名、删除无用代码、添加噪音代码等。
3. 动态加载插件有些软件会在启动时检查插件的存在和完整性。
为了规避这种检测机制,您可以尝试延迟插件的加载时间,即在软件启动后再加载插件。
通过动态加载插件,可以使软件无法在启动时检测到插件的存在,从而规避检测。
4. 使用反调试技术有些软件会使用调试器来检测插件的运行状态。
为了规避这种检测机制,您可以尝试使用反调试技术。
反调试技术是一种通过检测和干扰调试器的行为来阻止软件进行调试的方法。
您可以在插件的代码中添加反调试代码,以使调试器无法正常运行,从而规避检测。
5. 加密插件代码加密插件代码是一种常用的规避检测机制的方法。
通过加密插件代码,可以使软件无法直接读取和理解插件的代码,增加检测的难度。
您可以使用一些加密算法对插件代码进行加密,如对称加密算法、非对称加密算法等。
同时,您需要在插件中添加解密代码,以使插件在运行时能够解密自身的代码。
总结起来,为了规避检测机制,您可以尝试修改插件标识、混淆插件代码、动态加载插件、使用反调试技术和加密插件代码等方法。
这些方法可以增加检测的难度,使您能够更好地使用插件。
卡巴斯基ksc9.0如何制作跳过检测不兼容的独立安装包
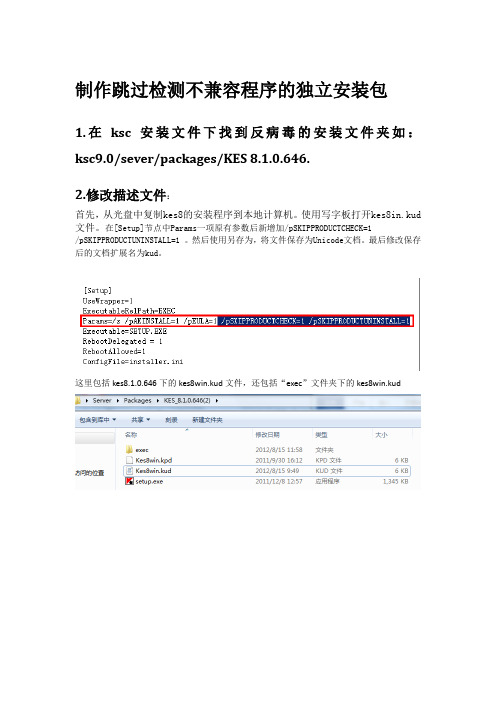
制作跳过检测不兼容程序的独立安装包
1.在ksc安装文件下找到反病毒的安装文件夹如:ksc9.0/sever/packages/KES 8.1.0.646.
2.修改描述文件:
首先,从光盘中复制kes8的安装程序到本地计算机。
使用写字板打开kes8in.kud 文件。
在[Setup]节点中Params一项原有参数后新增加/pSKIPPRODUCTCHECK=1
/pSKIPPRODUCTUNINSTALL=1 。
然后使用另存为,将文件保存为Unicode文档。
最后修改保存后的文档扩展名为kud。
这里包括kes8.1.0.646下的kes8win.kud文件,还包括“exec”文件夹下的kes8win.kud
首先用写字板打开kes8win.kud
修改之后另存为:
保存之后,将原文件kes8win.kud删除,在将kes8win.txt改成后缀名kud即kes8win.kud 3.通过管理工具制作新的安装包
通过安装包创建向导创建新的安装包,选择描述文件时选之前修改的描述文件,按照提示完成安装包创建。
3.1在ksc新建安装包
3.2输入新你安装包名称点下一步
3.3为程序选择安装文件,点浏览选择kes8win.kud文件,点击打开
3.4默认,点下一步下一步
4
4.创建独立安装包
选择创建完成的安装吧,右键菜单中选择创建独立安装包,根据向导完成创建。
变色龙嗅探密钥的使用方法

变色龙嗅探密钥的使用方法在信息时代,保护个人隐私和数据安全变得尤为重要。
加密技术作为一种重要的手段,被广泛应用于数据传输和存储过程中。
而密钥作为加密解密的关键,其安全性和保密性就显得尤为重要。
为了确保密钥的安全,变色龙嗅探密钥成为了一种常用的方法。
变色龙嗅探密钥是一种基于嗅探技术的密钥获取方式。
它通过对密钥传输过程中的信号进行嗅探和分析,从中提取出密钥的信息。
下面将详细介绍变色龙嗅探密钥的使用方法。
为了进行变色龙嗅探密钥,我们需要准备相关的设备和软件。
设备方面,我们需要一台嗅探设备,如嗅探器或嗅探网卡。
软件方面,我们需要使用一款专门的嗅探软件,如Wireshark或Cain & Abel。
这些设备和软件可以帮助我们捕获密钥传输过程中的数据包,并进行分析。
接下来,我们需要选择一个目标进行密钥嗅探。
可以是一个无线网络,一个加密通信软件,或者其他需要密钥传输的场景。
对于无线网络,我们可以选择自己的家庭网络或者公共场所的无线网络。
对于加密通信软件,我们可以选择一些常见的即时通讯软件或者电子邮件软件。
当我们确定了目标后,就可以开始进行密钥的嗅探。
首先,我们需要使用嗅探设备监听目标网络的数据包。
对于无线网络,我们可以使用嗅探网卡进行监听。
对于加密通信软件,我们可以使用嗅探软件进行监听。
在监听的过程中,我们可以看到目标网络中的所有数据包,包括密钥传输过程中的数据包。
接下来,我们需要对捕获到的数据包进行分析。
首先,我们可以筛选出与密钥传输相关的数据包。
可以根据传输协议、源地址、目的地址等信息进行筛选。
然后,我们可以进一步分析选定的数据包,提取出其中的密钥信息。
对于使用对称加密算法的密钥,我们可以通过分析数据包中的加密算法和密钥长度来确定密钥的具体数值。
对于使用非对称加密算法的密钥,我们可以通过分析数据包中的公钥和私钥信息来获取密钥的相关信息。
我们需要验证提取出的密钥是否正确。
可以使用提取出的密钥进行解密操作,或者与目标设备进行通信,验证密钥的有效性。
- 1、下载文档前请自行甄别文档内容的完整性,平台不提供额外的编辑、内容补充、找答案等附加服务。
- 2、"仅部分预览"的文档,不可在线预览部分如存在完整性等问题,可反馈申请退款(可完整预览的文档不适用该条件!)。
- 3、如文档侵犯您的权益,请联系客服反馈,我们会尽快为您处理(人工客服工作时间:9:00-18:30)。
Automated False Track IdentificationKenneth PackScience Applications International Corporation 400 Virginia Avenue SW, Suite 800Washington DC 20024Abstract1Suboptimized real-time surveillance systems trade off reporting all targets in the surveillance volume against minimizing the number of false tracks. Analysis of archived data can identify false tracks. By automating the analysis, system optimization can be done sooner. Automated analysis identifies candidate false tracks using track characteristics over the life of the track. These characteristics depend on the sensor data and operational environment. This paper discusses automated false track identification of ASDE-X (Airport Surface Detection Equipment Model X ) tracks collected at multiple airports. These tracks are supported by radar and multilateration sensor data.IntroductionMany real-time systems, including ASDE-X, fuse multiple detections from one or more sensors to form target tracks. Sometimes, ASDE-X displays a non-existent, or false target. When a vehicle or aircraft transmits a Mode-A or ICAO2 identifier, ASDE-X uses the identifier to tag the target. For this paper, the false track definition is extended to include tracks having a wrong position3, and tagged tracks having a wrong identifier.The ASDE-X system1 has one or more surface movement radars (SMR) and a multilateration subsystem. At airports where an ASDE-3 radar is available, ASDE-X uses the ASDE-3 radar instead of installing a new SMR radar. ASDE-X integrates data from the airport surveillance radar (ASR) with its own sensor data to detect, identify 1 This work was partially supported by the Federal Aviation Administration under FAA Contract DTFA01-01-0-0021.2 ICAO: International Civil Aviation Organization. Mode-S transponders transmit ICAO identifiers.3 For example, a plane with its transponder on might generate a multipath track on a taxiway.and track aircraft and ground vehicles in the surveillance volume. The multilateration subsystem uses signals from aircraft Mode-A and Mode-S transponders to identify and locate aircraft and transponder equipped vehicles. The multilateration subsystem locates the transponders, using the time difference of arrival of the transponder's signal received at multiple sensors. The ASDE-X surveillance volume includes the airport taxiways, runways, and approach corridors.In ASDE-X, target tracks can be either displayed or not displayed. The system is configured to not display targets in the gate area. For false track analysis, the gate area is considered outside the surveillance volume. Undisplayed tracks and sensor position estimates, called plots, are available for analysis throughout the surveillance volume and the gate area. All displayed tracks are updated once a second. If there are no new supporting plots, the track's position is updated based on its previous location, course, and speed.During system optimization, analysts adjust configuration parameters to minimize the number of false targets without losing real targets. The optimization process uses archived data collected 24 hours a day, seven days a week for several months. With archived data, the entire track history of each target can be reviewed multiple times by several analysts. Details of track initiation, movement, track features, and track death are kept in the archives. Since truth about the real targets present is not available, differentiating between real and false targets can be a time consuming process. Rule Development for Identifying False TracksFor targets of opportunity, false track identification is based on events or features that deviate significantly from those of a typical real target. Fortunately, at airports, airplane and ground1vehicle tracks have predictable events and identifiable features. These targets enter and leave the surveillance volume along its edge. Tracks of real targets tend to be contiguous. During their track life, aircraft typically travel on a runway. On the runway, they either decelerate or accelerate to a relatively high speed. Landing and departing aircraft have surface radar, ASR radar, and multilateration support during their track life. Ground vehicles travel along the taxiways, runways and access roads in the airport movement area. Parked vehicles in the movement area eventually move when maintenance personnel have finished their work.At a mid-sized airport, during the busiest hours of a day, the average number of aircraft arriving can be 10 to 20 per hour. At a large busy airport, the average number of aircraft arriving can be more than one per minute for over 10 hours. On average, the same number of aircraft leave as arrive. In addition to aircraft, maintenance vehicles travel throughout the movement area.Because it takes time to identify false tracks, analysts developed rules to improve their productivity. These rules evolved over time. The relative usefulness of the rules changed as ASDE-X changed. For example, searching for tracks that existed a long time without sensor support was once a good rule for finding false tracks. However, the default configuration now terminates unsupported tracks more quickly.When a new rule is coded into either a MATLAB script or a compiled program, it is evaluated using a binary hypothesis test. The two possible outcomes are:(1)The rule identifies a track as false whenthere is a consensus among analysts thetrack is false.(2)The rule identifies a track as false whenthere is a consensus among analysts thetrack is real.Since a false track can theoretically be missed, a set of tracks is sometimes manually searched for false tracks missed by all the coded rules.Often a false track identification rule classifies a track as false when it is real. Some rules have fewer misclassifications than others. Todifferentiate between rules with better prediction rates than those more likely to misclassify a real target, the program assigns a low or high confidence to each false track prediction. When an analyst has time, all the predicted false tracks can be evaluated; otherwise, only the high confidence predictions are evaluated.The features used by the false track identification algorithm can be categorized into:(1)track life,(2)track proximity,(3)sensor specific features, and(4)track dynamics.Track life features include how long the track existed, how long the track was displayed, and the time between when the track was initiated and when it was first displayed.Track proximity features include the number of tracks that were close to the track of interest, and whether the track initiated or terminated close to another track. Track proximity features for pairs of tracks that were once close to each include the number of times the two tracks were near each other. Rules based on track proximity find radar splits and duals. A radar split occurs when an aircraft is detected by the surface radar as two or more plots, and ASDE-X creates a track for each plot. A dual occurs when two sensors, such as multilateration and a radar each detect the same target, but ASDE-X creates a separate track for each sensor.Sensor-specific features include identifying which sensors supported a track, and when each sensor first supported that track. The ASR and multilateration systems associate a Mode-A code with the tracks they report. These codes tend to be unique, so two tracks should not simultaneously have the same code4. The multilateration system associates ICAO codes with Mode-S equipped targets. These codes are unique. The surface radar provides target extent. The larger a target is in range and azimuth, the less likely it is to be a multipath false track.4 There are cases where multiple transponders are either assigned a non-discrete code or the pilot has entered the wrong Mode-A code in the transponder.2Track dynamic features include the distance the track traveled over its lifetime, where the track started, where it ended, whether it was ever in a near runway region, whether it was ever on a runway, and whether it ever traveled fast. If the track was on a runway, the speed at which the track entered and exited the runway are included in the dynamic feature set.As with the rules, the features were identified by analysts searching for clues as to why a track should or should not be classified as false. In general, the more relevant features identified, the more likely a track is correctly classified by the automated false track identification program.During rule development, analysts identified rules that are more relevant in one region of the airport than in another. Currently, the rules use three regions: called runway, near runway, and nuisance. Each region is made up of one or more polygons. The polygons do not have to be connected. For example, the runway region covers each runway. The near runway region typically covers each runway and extends 500 feet from the runway edges. This region can be modified to adjust the sensitivity of the rules that depend on it. For example, many rules expect real targets, while in a near runway region, to have tracks that are updated each cycle with supporting plots. The third region is the nuisance region. This region is used to identify construction zones, where barricades and construction equipment make it difficult to identify false tracks.It is possible the automated false track program will miss one or more false tracks. The analyst must choose between reviewing every detail of the archived data for a limited time period, or to examine as much data as the analyst's schedule permits. It takes time for all combinations favorable to false track formation to manifest themselves at an airport. False tracks formation depends on the relative geometry of aircraft, vehicles, fixed structures, radar, and multilateration sensor units. The traffic flow in one direction sets up false track conditions different from those in the opposite direction. Multipath conditions can depend on large aircraft parking at a particular gate. Whereas weak transponders are difficult to detect, powerful ones at the same location can generate multilateration false plots. Some aircraft have only a bottom mountedantenna connected to their transponder. Multipath MLAT tracks tend to form more often on signals from these aircraft than with aircraft having top mounted antennas or dual antennas. Some transponders possibly do not meet their specifications2. False track formation also depends on rain, snow, and sometimes, grass that needs to be mowed.RulesAs previously mentioned, candidates identified by some rules are more likely to be false tracks than those predicted by other rules. The purpose of false track analysis is to improve ASDE-X's performance. False track analysis was automated so more data could be analyzed, reducing the time to optimize each new installation and evaluate upgrades at existing sites.The composite rule set is designed to find as many false tracks as possible while minimizing the number of real targets incorrectly tagged false. Due to the interaction between analysis and development, lessons learned from false track analysis generate ASDE-X software and adaptation changes. It is expected that many of the current high confidence rules used in the automated false track identification software will be modified or replaced in the future. Historically, the most likely modification is to add more tests to each rule.The prediction rules are listed below. Each rule is summarized by the type of false track it is designed to identify.(1) Static SMR MPThis rule is designed to identify false tracks due to static multipath. Multipath can be either static or dynamic. When the multipath track remains stationary, it is static. If the multipath track moves, it is dynamic. Static multipath can be due to fixed structures or parked aircraft in the gate area. This problem is worse when an airport terminal is between the SMR radar and the airport movement area, than for other geometries. The rule also finds false tracks due to snow banks, pooled rain water on the movement area, and other non-vehicle reflectors. In the spring and summer, it has found false tracks from tall grass growing along a taxiway.3A track is predicted to be static SMR MP if:•it has SMR support,•it is a small target,•it ends near where it starts, and•its average speed is less than a slow speed threshold.If the track has SMR support, ends near where it starts, and its average speed is below the slow mover threshold, but it is not a small target, then the rule predicts the track is false, but assigns a low confidence to the prediction.Alternatively, if three or more tracks "pass through" a track, the program predicts the passed through track is a multipath false track. The pass through criteria is that the tracks come within 80 feet of each other.(2) Dynamic SMR MPThis rule is designed to identify false tracks created by dynamic SMR multipath. Dynamic multipath occurs when at least one of the reflectors moves. Dynamic multipath tracks often occur when either the primary reflector is in a region masked out by the radar processor or the system has underestimated the extent of the primary reflector. The primary reflector is a reflector between the radar and the false track. In either case, the operational system fails to identify the false track as multipath.A track is predicted to be dynamic SMR MP if:•it has SMR support•it is a small target•it is unsupported for multiple consecutive track updates,•at least one of the unsupported updates is ina near runway region, and•it is either unsupported for most of its life or its life is short.This rule illustrates that not all false tracks are treated the same. Those closer to or on a runway are more serious than those far from a runway. This rule misses dynamic SMR multipath tracks occurring outside the near runway region. Depending on time constraints, the analyst can expand or contract the near runway region to coverall taxiways or concentrate on the movement area closer to the runways.(3) MLAT MP CriteriaThis rule is designed to identify false tracks created when the position estimate is corrupted by multipath signals at one or more of the multilateration receivers.A track is predicted to be MLAT multipath if:•it has had MLAT support,•it does not have a long period withconsecutive MLAT supported updates, •after the first MLAT supported update, less than a third of the track updates haveMLAT support, and•for much of its life, the track is unsupported by any sensor.(4) Duplicate IDThis rule identifies when two tracks have the same aircraft identifier (ACID). Duplicate identifiers occur when one track steals the ACID of another.The rule is invoked when either:•two tracks have the same ACID at the same time, or•one track ends within a couple seconds of the second track's start, and•both tracks have the same ACID.(5) Multiple ACIDThis rule identifies when a track has more than one ACID during its lifetime. Multiple ACIDs occur when a track misassociates with the multilateration or ASR support for another target.(6) Arriver DualThis rule is designed to identify handoff failures between the ASR and surface radar for an arriving aircraft.This rule has three parts:•Unsupported Arriver,•Track Initiated on Runway, and•Pairing4A track is tagged an unsupported arriver if either•it enters a runway region,•it has multiple ASR supported updates,•it travels over 10,000 feet,•it is tracked for at least a minute,•its last support is from an ASR, and•its last update is unsupported by anysensors,or•it has multiple ASR supported updates,•it travels over 10,000 feet,•it is tracked for at least a minute, and•its average speed is above a high speed threshold.A second track is tagged as initiated on a runway if•its initial report is on a runway,•it lives long enough, and• a sufficient percentage of its updates have sensor support.For this rule, the minimum time an initiated on runway track needs to live is 45 seconds. The longer a target lives, the more unsupported updates it may have and still be used in the pairing rule.The second track is identified as a dual and paired with the first if•both tracks are ever in a near runwayregion,•the second track starts within 30 seconds after the first track enters a near runwayregion, and•the first track, when it entered the nearrunway region, is near where the secondtrack starts.(7) Coasted DepartureThough this rule sometimes finds duals formed on departure, it more often finds aircraft departing without their transponder on and small aircraft that bank too sharply for the tracker to associate new reports with the existing target track.A track is flagged as having a coasted departure if•it travels a long distance in its lifetime,•it lives over a minute,•it has few or no plots with ASR support,•it dies without sensor support, that is itcoasted,•it leaves a runway at a high speed, and•it has multiple updates when it is travelling above a high speed threshold.(8) ASR DualThis rule is designed to detect an ASR/MLAT dual when an airplane is flying.Two tracks are flagged as duals when at least one of the tracks has 25 or more updates where •both tracks are travelling at a high speed,•neither track has an invalid Mode-A code or ICAO code,•neither track has SMR support, and•the tracks are near each other.(9) ASR MisassociationThis rule is designed to detect when an ASR plot associates with the wrong track.A track is predicted to be false if•it initiates with non-ASR sensor support,•it has multiple updates before getting any ASR supported updates,•it has only a few ASR supported updates,•most of its updates are unsupported.(10) ASR MultipathThis rule is designed to detect when ASR multipath plots form a track.A track is predicted to be false if•it initiates with ASR support•it has only a few ASR supported updates, and•most of its updates are unsupported.(11) MLAT DualThis rule is designed to detect SMR/MLAT duals. This rule first searches for pairs of tracks that were close to each other. If the pair were close to5each for a significant number of updates, then the pair is flagged as potential split track pair.The pair is flagged as a dual if•one of the tracks has multiple unsupported updates and its last update is unsupported, •one of the tracks starts within 300 feet of where the two tracks were first close toeach other, and•after the tracks have been within 100 feet of each other for at least 20 updates, they aremore often within 100 feet of each otherthan apart by more than 100 feet,•one of the tracks has multilaterationsupport, and•the first MLAT supported update occurs within five seconds of the first time thetracks are close to each other.(12) Radar SplitThis rule is designed to detect false targets due to the radar reporting multiple plots for an aircraft. The rule first searches pairs of tracks. If either track has many updates close to the other, the pair becomes a potential split track pair.The pair is flagged as a split if•one of the tracks has multiple unsupported updates and its last update is unsupported, •one of the tracks starts within 300 feet of where the two tracks were first close toeach other, and•after the tracks have been within 100 feet of each other for at least 20 updates, they aremore often within 100 feet of each otherthan apart by more than 100 feet, and •neither track has MLAT support.(13) MisassociationThis rule identifies when a sensor plot from one target associates with the track of another target and causes the second track's position to be wrong.The rule first searches pairs of tracks. If either track has many updates close to the other, the pair becomes a potential split track pair.The rule then checks each potential split using the following three tests. If the pair meets all thecriteria of any one test, the pair is flagged as a misassociation.(1) The pair is flagged as a misassociation if•one of the tracks has multiple unsupported updates and its last update is unsupported, •one of the tracks starts within 300 feet of where the two tracks were first close toeach other, and•after the tracks have been within 100 feet of each other for at least 20 updates, they aremore often within 100 feet of each otherthan apart by more than 100 feet.(2) The pair is flagged as a misassociation if•one of the tracks has multiple unsupported updates and its last update is unsupported,and•the two tracks are close to each other forover a hundred updates.(3) The pair is flagged as a misassociation if•either track is a landing or departingaircraft.(14) ClutterIf a track is in multiple potential split track pairs, it is categorized as clutter.(15) No SMR SupportThis rule predicts tracks that never had SMR support are false.(16) Initiated on RunwayThis rule is designed to detect tracks having non-normal behavior and not categorized by other rules. This rule predicts a track is false if it initiates on a runway. Sometimes tracks tagged via this rule are matched with arrivers having no support; together the pair form a dual.(17) Late DisplayThis rule is designed to detect tracks having non-normal behavior and not categorized by other rules. This rule predicts a track is false if the track is on a runway shortly after it started. The6effectiveness of this rule depends on how close the runways are to the terminal area, and the minimum time threshold that determines whether or not the track reached the runway too quickly.(18) Dropped TrackThis rule is designed to detect tracks having non-normal behavior and not categorized by other rules. These tracks are sometimes created by a misassociation, but were not caught by the misassociation logic.A track is predicted to be false if•it did not travel at a high speed•it lived over a minute•it traveled more than a minimum distance•it ended in a near runway region. SummaryThis paper presents an approach used to find false tracks in ASDE-X data collected during site optimization. The data consists of targets of opportunity and false tracks. Rules, used in an automated false track identification program, are provided. These rules were developed based on a profile of normal aircraft and vehicle tracks. The candidate tracks output by the program are reviewed by an analyst to verify whether or not they are false.AcknowledgementIt is a pleasure to acknowledge the hard work done by Hong Kaing building the software and regression testing the algorithms. I am also grateful to insights provided by George Go, cataloging the different types of radar false tracks and characteristics useful for identifying them. I wish to thank Karim Belamqaddam, Matias Palavecino, and Mark Scheufler for their evaluations of the tracks identified by the false track identification software.2007 ICNS Conference1-3 May 20071 National Airspace System (NAS) SubsystemLevel Specification for Airport Surface DetectionEquipment Model X (ASDE-X), FAA-E-2942Department of Transportation, Federal Aviation Administration, Version 1.1, August 13, 20012 Talotta, Nicholas J., et al, "A Field Study of Transponder Performance in General Aviation Aircraft",U.S. Department of Transportation, Federal Aviation Administration, DOT/FAA/CT-97, December 5, 19977。