SettingsLuckyStar桌面cartoonexe.
Win7梦幻桌面的安装和卸载方法

Win7梦幻桌面的安装和卸载方法(附个性化加载页面失败的解决办法)记得刚测试时装了WIN7,用着一直不错,就是很多程序不支持。
在遇到强行关机会导致系统进不去的BUG后又装回了XP(现在这个BUG有补丁)前几天感觉XP不好看就又装回了WIN7 (用的这个版本7600.16385.090713-1255_x86fre_client_en-us_Retail_Ultimate-GRMCULFRER_EN_DVD.iso)然后装上了梦幻桌面(工具在我的网盘下载)WIN7是不支持梦幻桌面的,需要使用VISTA的,但发现装上后桌面文字模糊,个性化的选项变成了英文,用着不习惯。
于是想删除了梦幻桌面,结果没找到卸载程序,只好手工一个个根据安装程序删除了。
现在将安装和卸载的方法记录下来,希望对遇到同样问题的朋友有所帮助!个性化加载页面失败时只要将压缩文件里提供的文件放到指定位置即可,具体方法见压缩文件。
因为我里面介绍的很简单(直接安装就能使用了),现转载一个详细的安装方法给大家看!DreamScene的中文名称叫做梦幻桌面,它其实早在Vista时代就被官方做为了旗舰版产品的增值程序,不过由于其并没有大张旗鼓的进行宣传,加之此增值程序包在梦幻桌面后也就没有再推出新的重量更新,因此梦幻桌面一直处于一个相对低调的位置。
Vista的这个旗舰版增值程序包全称叫做Vista Ultimate Extras,不知道您还记不记得Windows 95下的PLUS!,那是Windows 95的一个升级包,里面具备许多娱乐组件,而对于Ultimate Extras,我们可以把它理解为vista的PLUS!,或者可以说是一套服务组件,而且只有Windows vista Ultimate的用户才可以享用它不过不知道为什么,在最新的Windows 7中我们并没有看到这个功能的相关选项,莫非微软认为现在的Windows 7已经足够华丽而去除了这一功能?!答案当然是否定的。
星网锐捷软件监控工作站操作说明

3.
软件系统简介 ................................................................................................................ 5
3.1 3.2 3.3 3.4 3.5 3.6 GPS 监控工作站 ...................................................................................................... 5 GPS 定位技术.......................................................................................................... 5 GPRS 移动通讯系统 ................................................................................................ 5 CDMA 通讯系统 ...................................................................................................... 6 GIS 地理信息系统.................................................................................................... 6 加密狗 .................................................................................................................... 6
统信UOS桌面操作系统-桌面日常使用与配置手册 -word版

1.5
控制中心 ............................................................................................................................91
1.5.1
首页介绍 .................................................................................................................. 91
1.3.8
使用智能助手 ........................................................................................................... 82
1.3.9
查看日期时间 ........................................................................................................... 85
1.3.2
切换显示模式 .......................................................................................................... 81
1.3.3
设置任务栏位置 ...................................................................................................... 81
Sharpdesk 用户指南
viewme-um004_-zh-e说明书

WIN7 设置梦幻桌面教程
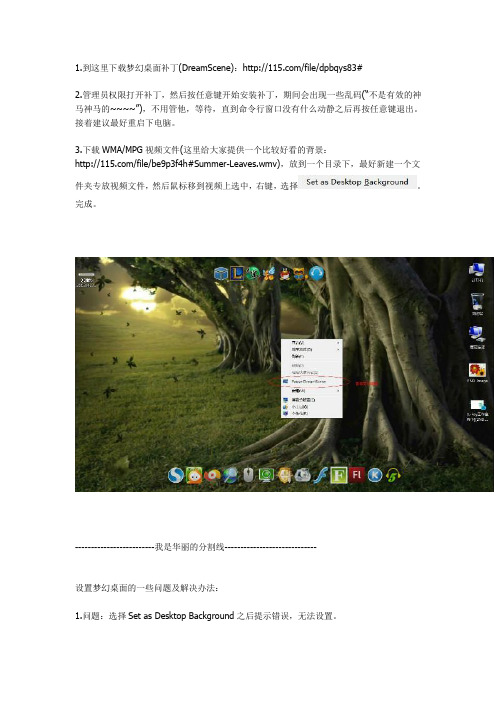
1.到这里下载梦幻桌面补丁(DreamScene):/file/dpbqys83#
2.管理员权限打开补丁,然后按任意键开始安装补丁,期间会出现一些乱码(“不是有效的神马神马的~~~~”),不用管他,等待,直到命令行窗口没有什么动静之后再按任意键退出。
接着建议最好重启下电脑。
3.下载WMA/MPG视频文件(这里给大家提供一个比较好看的背景:
/file/be9p3f4h#Summer-Leaves.wmv),放到一个目录下,最好新建一个文件夹专放视频文件,然后鼠标移到视频上选中,右键,选择。
完成。
-------------------------我是华丽的分割线-----------------------------
设置梦幻桌面的一些问题及解决办法:
1.问题:选择Set as Desktop Background之后提示错误,无法设置。
解决办法:右键我的电脑-属性-高级系统设置-性能设置-将视觉效果改为“调整为最佳外观”即可,或者查看“启用Aero Peek”选项有无选中,若没有选中请选中。
2.设置完成之后字体模糊。
解决办法:鼠标右键-个性化-桌面背景-全选背景-右键选择“属性”-选中“只读”,接着将图片位置改为“填充”或者”拉伸“。
保存即可。
(Pass:若无法更改,重启下电脑试试。
)
-------------------------我是华丽的分割线-----------------------------
下面附上效果视频:
若视频无法观看请复制
/fad189fd-3d2e-4840-9ea6-6ef637da42df.swf
粘贴到地址栏直接观看。
Fiery XF 7 说明书

Fiery XF 7© 2018 Electronics For Imaging, Inc. 此产品的《法律声明》适用于本出版物中的所有信息。
2018 年 12 月 19 日目录Fiery Command WorkStation 概述 (11)Job Center (11)用于管理队列中作业的命令 (12)工具栏图标 (12)作业搜索 (13)Job Editor (14)Server Manager (14)系统维护 (14)配置 Command WorkStation (16)登录到多个 Fiery 服务器 (16)移除 Fiery server (16)添加更多打印机 (16)配置网络打印机 (17)配置通过 USB 连接的打印机 (17)配置打印到文件输出 (18)承印材料和工作流程 (18)配置承印材料 (19)配置工作流程 (19)配置用户帐户 (23)登录到 Command WorkStation (24)注销 Command WorkStation (24)导入作业 (25)直接导入作业到 Job Center (25)在导入时自动处理作业 (26)热文件夹和虚拟打印机 (26)配置热文件夹 (27)配置虚拟打印机 (27)Fiery XF Universal Driver (28)安装 Universal Driver (28)登录到 Universal Driver 并打印 (28)Universal Driver 设定 (29)配置打印机设定 (30)开始打印 (30)取消作业处理 (31)PostScript 和 PDF 作业 (32)切换到不同的 PDF 打印引擎 (32)EPS 作业检测 (33)为 EPS 作业检测设置时间推移或更改输入分辨率 (33)采用 RIP 自动分色 (33)设置 Command WorkStation 如何处理 in-RIP 信息 (34)页面框定义 (34)指定页面框 (35)工作色彩空间 (35)应用工作色彩空间 (35)在合成作业中套印 (36)在合成作业中模拟套印 (36)管理 PDF 作业中的非嵌入字体 (36)将多页 PDF 作业作为单页加载 (36)编辑作业 (38)旋转作业 (38)翻转作业 (38)缩放作业 (38)对齐印张上的作业 (39)裁切作业 (39)撤销作业编辑 (40)将作业设定另存为工作流程 (40)可视辅助工具 (40)更改测量单位 (41)放大 (41)打开对齐 (42)设置标尺坐标 (42)使用参考线 (42)显示可视辅助工具 (42)作业标签 (43)创建或编辑作业标签 (43)打印作业标签 (43)调整作业标签的大小 (44)控制栏 (45)选择控制栏 (45)创建动态楔入 (45)跨两行打印作业标签 (46)嵌入 (47)嵌入所有作业 (47)强制嵌入以打印 (48)嵌入所选作业 (48)添加、移除或删除套叠式作业 (48)克隆套叠式作业 (49)重命名嵌入 (49)排列套叠式作业 (49)在印张上将所有套叠式作业对齐 (49)编辑套叠式作业 (50)缩放套叠式作业 (50)在印张的固定位置锁定套叠式作业 (50)添加套叠式作业周围的边距 (51)打印多页 PDF 的所选页面 (51)平铺 (52)创建平铺 (52)创建具有重叠效果的图素 (53)打印具有粘合区域的图素 (53)调整图素大小 (54)将图素边缘锁定到固定位置 (54)合并或拆分图素 (54)显示和保存平铺预览 (55)拆分图素以进行打印 (55)对平铺作业进行后期编辑 (56)步骤和重复 (57)创建步骤和重复 (57)修改步骤和重复 (58)作业合并 (59)设置自动作业合并的工作流程 (59)手动合并作业 (60)校准和生成特性档工具 (61)启动 Color Tools (61)校准打印机 (61)非 EFI 宽幅打印机的校准过程 (62)EFI 宽幅打印机的校准过程 (68)打印机优化 (75)为承印材料特性档优化进行设定 (76)选择一个 L*a*b* 优化文件。
海康威视网络录像机快速入门指南说明书

Network Video RecorderQuick Start GuideTABLE OF CONTENTSChapter1 Panels Description (8)1.1 Front Panel (8)1.2 Rear Panel (9)NVR-100H-D and NVR-100MH-D Series (9)NVR-100H-D/P and NVR-100MH-D/P Series (10)Chapter 2 Installation and Connections (11)2.1 NVR Installation (11)2.2 Hard Disk Installation (11)2.3 HDD Storage Calculation Chart (13)Chapter 3 Menu Operation (14)3.1 Startup and Shutdown (14)3.2 Activate Your Device (14)3.3 Set the Unlock Pattern for Login (15)3.4 User Login (16)3.5 Network Settings (16)3.6 Add IP Cameras (17)3.7 Live View (18)3.8 Recording Settings (18)3.9 Playback (19)Chapter 4 Accessing by Web Browser (21)Quick Start GuideCOPYRIGHT ©2019 Hangzhou Hikvision Digital Technology Co., Ltd.ALL RIGHTS RESERVED.Any and all information, including, among others, wordings, pictures, graphs are the properties of Hangzhou Hikvision Digital Technology Co., Ltd. or its subsidiaries (hereinafter referred to be “Hikvision”). This user manual (hereinafter referred to be “the Manual”) cannot be reproduced, changed, translated, or distributed, partially or wholly, by any means, without the prior written permission of Hikvision. Unless otherwise stipulated, Hikvision does not make any warranties, guarantees or representations, express or implied, regarding to the Manual.About this ManualThis Manual is applicable to Network Video Recorder (NVR).The Manual includes instructions for using and managing the product. Pictures, charts, images and all other information hereinafter are for description and explanation only. The information contained in the Manual is subject to change, without notice, due to firmware updates or other reasons. Please find the latest version in the company website (/en/).Please use this user manual under the guidance of professionals.Trademarks Acknowledgementand other Hikvision’s trademarks and logos are the properties of Hikvision in various jurisdictions. Other trademarks and logos mentioned below are the properties of their respective owners.The terms HDMI and HDMI High-Definition Multimedia Interface, and the HDMI Logoare trademarks or registered trademarks of HDMI Licensing Administrator, Inc. in the United States and other countries.Legal DisclaimerTO THE MAXIMUM EXTENT PERMITTED BY APPLICABLE LAW, THE PRODUCT DESCRIBED, WITH ITS HARDWARE, SOFTWARE AND FIRMWARE, IS PROVIDED “AS IS”, WITH ALL FAULTS AND ERRORS, AND HIKVISION MAKES NO WARRANTIES, EXPRESS OR IMPLIED, INCLUDING WITHOUT LIMITATION, MERCHANTABILITY, SATISFACTORY QUALITY, FITNESS FOR A PARTICULAR PURPOSE, AND NON-INFRINGEMENT OF THIRD PARTY. IN NO EVENT WILL HIKVISION, ITS DIRECTORS, OFFICERS, EMPLOYEES, OR AGENTS BE LIABLE TO YOU FOR ANY SPECIAL, CONSEQUENTIAL, INCIDENTAL, OR INDIRECT DAMAGES, INCLUDING, AMONG OTHERS, DAMAGES FOR LOSS OF BUSINESS PROFITS, BUSINESS INTERRUPTION, OR LOSS OF DATA OR DOCUMENTATION, IN CONNECTION WITH THE USE OF THIS PRODUCT, EVEN IF HIKVISION HAS BEEN ADVISED OF THE POSSIBILITY OF SUCH DAMAGES.REGARDING TO THE PRODUCT WITH INTERNET ACCESS, THE USE OF PRODUCT SHALL BE WHOLLY AT YOUR OWN RISKS. HIKVISION SHALL NOT TAKE ANY RESPONSIBILITES FOR ABNORMAL OPERATION, PRIVACY LEAKAGE OR OTHER DAMAGES RESULTING FROM CYBER ATTACK, HACKER ATTACK, VIRUS INSPECTION, OR OTHER INTERNET SECURITY RISKS; HOWEVER, HIKVISION WILL PROVIDE TIMELY TECHNICAL SUPPORT IF REQUIRED.SURVEILLANCE LAWS VARY BY JURISDICTION. PLEASE CHECK ALL RELEVANT LAWS IN YOUR JURISDICTION BEFORE USING THIS PRODUCT IN ORDER TO ENSURE THAT YOUR USE CONFORMSTHE APPLICABLE LAW. HIKVISION SHALL NOT BE LIABLE IN THE EVENT THAT THIS PRODUCT IS USED WITH ILLEGITIMATE PURPOSES.IN THE EVENT OF ANY CONFLICTS BETWEEN THIS MANUAL AND THE APPLICABLE LAW, THE LATER PREVAILS.Regulatory InformationFCC InformationPlease take attention that changes or modification not expressly approved by the party responsible for compliance could void the user’s authority to operate the equipment.FCC compliance: This equipment has been tested and found to comply with the limits for a Class A digital device, pursuant to part 15 of the FCC Rules. These limits are designed to provide reasonable protection against harmful interference when the equipment is operated in a commercial environment. This equipment generates, uses, and can radiate radio frequency energy and, if not installed and used in accordance with the instruction manual, may cause harmful interference to radio communications. Operation of this equipment in a residential area is likely to cause harmful interference in which case the user will be required to correct the interference at his own expense.FCC ConditionsThis device complies with part 15 of the FCC Rules. Operation is subject to the following two conditions:1. This device may not cause harmful interference.2. This device must accept any interference received, including interference that may cause undesired operation.EU Conformity StatementThis product and - if applicable - the supplied accessories too are marked with "CE" and comply therefore with the applicable harmonized European standards listed under the EMC Directive 2014/30/EU, the LVD Directive 2014/35/EU, the RoHS Directive 2011/65/EU.2012/19/EU (WEEE directive): Products marked with this symbol cannot be disposed of as unsorted municipal waste in the European Union. For proper recycling, return this product to your local supplier upon the purchase of equivalent new equipment, or dispose of it at designated collection points. For more information see: 2006/66/EC (battery directive): This product contains a battery that cannot be disposed of as unsorted municipal waste in the European Union. See the product documentation for specific battery information. The battery is marked with this symbol, which may include lettering to indicate cadmium (Cd), lead (Pb), or mercury (Hg). For proper recycling, return the battery to your supplier or to a designated collection point. For more information see: Industry Canada ICES-003 ComplianceThis device meets the CAN ICES-3 (A)/NMB-3(A) standards requirements.Applicable ModelsThis manual is applicable to the models listed in the following table.Series ModelNVR-100H-D NVR-104H-D NVR-108H-DNVR-100H-D/P NVR-104H-D/4P NVR-108H-D/8PNVR-100MH-D NVR-104MH-D NVR-108MH-DNVR-100MH-D/P NVR-104MH-D/4P NVR-108MH-D/8PSymbol ConventionsThe symbols that may be found in this document are defined as follows.Symbol DescriptionProvides additional information to emphasize or supplementimportant points of the main text.Indicates a potentially hazardous situation, which if not avoided,could result in equipment damage, data loss, performancedegradation, or unexpected results.Indicates a hazard with a high level of risk, which if not avoided, willresult in death or serious injury.Safety Instructions●Proper configuration of all passwords and other security settings is the responsibility of theinstaller and/or end-user.●In the use of the product, you must be in strict compliance with the electrical safetyregulations of the nation and region. Please refer to technical specifications for detailedinformation.●Input voltage should meet both the SELV (Safety Extra Low Voltage) and the Limited PowerSource with 100~240 VAC, 48 VDC or 12 VDC according to the IEC60950-1 standard. Please refer to technical specifications for detailed information.●Do not connect several devices to one power adapter as adapter overload may causeover-heating or a fire hazard.●Please make sure that the plug is firmly connected to the power socket.●If smoke, odor or noise rise from the device, turn off the power at once and unplug the powercable, and then please contact the service center.●If the POE ports of device do not comply with Limited Power Source, the additional equipmentconnected to POE ports shall have fire enclosure.●The USB interface of the /P devices can be connected with the mouse and U-flash disk storagedevice only.Preventive and Cautionary TipsBefore connecting and operating your device, please be advised of the following tips:●Ensure unit is installed in a well-ventilated, dust-free environment.●Unit is designed for indoor use only.●Keep all liquids away from the device.●Ensure environmental conditions meet factory specifications.●Ensure unit is properly secured to a rack or shelf. Major shocks or jolts to the unit as a result ofdropping it may cause damage to the sensitive electronics within the unit.●Use the device in conjunction with an UPS if possible.●Power down the unit before connecting and disconnecting accessories and peripherals.● A factory recommended HDD should be used for this device.●Improper use or replacement of the battery may result in hazard of explosion. Replace withthe same or equivalent type only. Dispose of used batteries according to the instructionsprovided by the battery manufacturer.Power Supply InstructionsUse only power supplies listed in the user instructions.NVR Models Standard Power Supply Models ManufacturerNVR-104H-D NVR-108H-D NVR-104MH-D NVR-108MH-D EuropeanMSA-C1500IC12.0-18P-DE MOSO Power Supply Technology Co., LtdADS-26FSG-12 12018EPG Shenzhen HONOR Electronic Co., LtdKL-AD3060VA Xiamen Keli Electronics Co., LtdKPD-018-VI Channel Well Technology Co., Ltd BritishADS-25FSG-12 12018GPB Shenzhen HONOR Electronic Co., LtdMSA-C1500IC12.0-18P-GB MOSO Power Supply Technology Co., LtdADS-26FSG-12 12018EPB Shenzhen HONOR Electronic Co., LtdNVR-104H-D/4PNVR-108H-D/8P NVR-104MH-D/4P NVR-108MH-D/8P UniversalMSP-Z1360IC48.0-65W MOSO Power Supply Technology Co., LtdMSA-Z1040IS48.0-65W-Q MOSO Power Supply Technology Co., LtdMSA-Z1360IS48.0-65W-QMOSO Power Supply Technology Co., Ltd●The power supplies list above is for EU countries only.●The power supplies list is subject to change without prior notice.Chapter1 Panels Description 1.1 Front PanelFigure 1-1NVR-100H-D (/P) SeriesFigure 1-2NVR-100MH-D (/P) SeriesTable 1-1Description of Front Panel No. Icon Description1 Indicator turns red when NVR is powered up.2 Indicator lights in red when data is being read from or written to HDD.3 Indicator blinks blue when network connection is functioning properly.1.2 Rear PanelNVR-100H-D and NVR-100MH-D SeriesFigure 1-3NVR-100H-D Rear PanelFigure 1-4NVR-100MH-D Rear PanelNo. Item Description1 Power Supply 12 VDC power supply.2 VGA Interface DB9 connector for VGA output. Display local videooutput and menu.3 HDMI Interface HDMI video output connector.4 USB Interface Universal Serial Bus (USB) ports for additional devicessuch as USB mouse and USB Hard Disk Drive (HDD).5 LAN Network Interface 10/100 Mbps self-adaptive Ethernet interface.6 Ground Ground (needs to be connected when NVR starts up).NVR-100H-D/P and NVR-100MH-D/P SeriesFigure 1-5NVR-100H-D/P Rear PanelFigure 1-6NVR-100MH-D/P Rear PanelTable 1-3Description of Rear Panel No. Item Description1 Power Supply 12 VDC power supply.2 VGA Interface DB9 connector for VGA output. Display local videooutput and menu.3 HDMI Interface HDMI video output connector.4 USB Interface Universal Serial Bus (USB) ports for additional devicessuch as USB mouse and USB Hard Disk Drive (HDD).5 LAN Network Interface 10/100 Mbps self-adaptive Ethernet interface.6 Ground Ground (needs to be connected when NVR starts up).7 Network Interfaces withPoE functionNetwork interfaces for the cameras and to providepower over Ethernet.4 interfaces for /4P models and 8 interfaces for /8Pmodels.Chapter 2 Installation and Connections2.1 NVR InstallationDuring installation of the NVR:●Use brackets for rack mounting.●Ensure ample room for audio and video cables.●When routing cables, ensure that the bend radius of the cables are no less than five times thanits diameter.●Connect the alarm cable.●Allow at least 2cm (≈0.75-inch) of space between racks mounted devices.●Ensure the NVR is grounded.●Environmental temperature should be within the range of -10 to +55º C, +14 to +131º F.●Environmental humidity should be within the range of 10% to 90%.2.2 Hard Disk InstallationBefore you start:Disconnect the power from the NVR before installing a hard disk drive (HDD). A factory recommended HDD should be used for this installation.Tools Required: Screwdriver.Step 1Remove the cover from the device by unfastening the screws on the bottom.Figure 2-1Remove the CoverStep 2Place the HDD on the bottom of the device and then fasten the screws on the bottom to fix the HDD.Figure 2-2Fix the HDDStep 3Connect one end of the data cable to the motherboard of NVR and the other end to the HDD.Step 4Connect the power cable to the HDD.Figure 2-3Connect CablesStep 5Re-install the cover of the NVR and fasten screws.2.3 HDD Storage Calculation ChartThe following chart shows an estimation of storage space used based on recording at one channel for an hour at a fixed bit rate.Bit Rate Storage Used96K42M128K56M160K70M192K84M224K98M256K112M320K140M384K168M448K196M512K225M640K281M768K337M896K393M1024K450M1280K562M1536K675M1792K787M2048K900M4096K 1.8G8192K 3.6G16384K 7.2GPlease note that supplied values for storage space used is just for reference. The storage values in the chart are estimated by formulas and may have some deviation from actual value.Chapter 3 Menu Operation3.1 Startup and ShutdownProper startup and shutdown procedures are crucial to expanding the life of the NVR.To start your NVR:Step 1Check the power supply is plugged into an electrical outlet. It is HIGHLY recommended that an Uninterruptible Power Supply (UPS) be used in conjunction with the device. The Powerbutton) on the front panel should be red, indicating the device is receiving the power.Step 2Press the power switch on the panel. The Power LED should turn blue. The unit will begin to start.After the device starts up, the wizard will guide you through the initial settings, including modifying password, date and time settings, network settings, HDD initializing, and recording.To shut down the NVR:Step 1Go to Menu > Shutdown.Figure 3-1ShutdownStep 2Select Shutdown.Step 3Click Yes.3.2 Activate Your DevicePurpose:For the first-time access, you need to activate the device by setting an admin password. No operation is allowed before activation. You can also activate the device via Web Browser, SADP or client software.Step 1Input the same password in Create New Password and Confirm New Password.Step 2(Optional) Use customized password to activate and add network camera(s) connected to the device.1)Uncheck Use Channel Default Password.2)Enter a password in IP Camera Activation.Figure 3-2Set Admin PasswordSTRONG PASSWORD RECOMMENDED–We highly recommend you create a strong password of your own choosing (Using a minimum of 8 characters, including at least three of the following categories: upper case letters, lower case letters, numbers, and special characters.) in order to increase the security of your product. And we recommend you reset your password regularly, especially in the high security system, resetting the password monthly or weekly can better protect your product.Step 3Click OK.3.3 Set the Unlock Pattern for LoginAdmin can use the unlock pattern for device login.For devices with PoE function, you can draw the device unlock pattern after activation. For other devices, the unlock pattern interface will show after the first-time login.Step 1Use the mouse to draw a pattern among the 9 dots on the screen. Release the mouse when the pattern is done.Figure 3-3Draw the Pattern●Connect at least 4 dots to draw the pattern.●Each dot can be connected for once only.Step 2Draw the same pattern again to confirm it. When the two patterns match, the pattern is configured successfully.3.4 User LoginPurpose:If NVR has logged out, you must login the device before operating the menu and other functions. Step 1Select the User Name in the dropdown list.Figure 3-4LoginStep 2Input Password.Step 3Click OK.In the Login dialog box, if you enter the wrong password 7 times, the current user account will be locked for 60 seconds.3.5 Network SettingsPurpose:Network settings must be properly configured before you operate NVR over network.Step 1Enter the general network settings interface.Menu > Configuration > Network > GeneralFigure 3-5Network SettingsStep 2Configure the following settings: NIC Type, IPv4 Address, IPv4 Gateway, MTU and DNS Server.Step 3If the DHCP server is available, you can check the checkbox of DHCP to automatically obtain an IP address and other network settings from that server.Step 4Click Apply.3.6 Add IP CamerasPurpose:Before you can get live video or record the video files, you should add the network cameras to the connection list of the device.Before you start:Ensure the network connection is valid and correct, and the IP camera to add has already been activated. Please refer to the User Manual for activating the inactive IP camera.You can select one of the following three options to add the IP camera.OPTION 1:Step 1Click to select an idle window in the live view mode.Step 2Click in the center of the window to pop up the Add IP Camera interface.Figure 3-6Add IP CameraStep 3Select the detected IP camera and click Add to add it directly, and you can click Search to refresh the online IP camera manually.Or you can choose to custom add the IP camera by editing the parameters in thecorresponding text field and then click Add to add it.3.7 Live ViewIcons are provided on screen in Live View mode to indicate camera status. These icons include: Live View IconsIn the live view mode, there are icons at the upper-right corner of the screen for each channel, showing the status of the record and alarm in the channel for quick reference.Alarm (video loss, tampering, motion detection, VCA or sensor alarm)Record (manual record, continuous record, motion detection, VCA or alarm triggered record)Alarm and RecordEvent/Exception (event and exception information, appears at the lower-left corner of the screen.)3.8 Recording SettingsBefore you start:Make sure that the disk has already been installed. If not, please install a disk and initialize it. You may refer to the user manual for detailed information.Purpose:Two kinds of record types are introduced in the following section, including Instant Record andAll-day Record. And for other record types, you may refer to the user manual for detailed information.After rebooting all the manual records enabled are canceled.Step 1On the live view window, right lick the window and move the cursor to the Start Recording option, and select Continuous Record or Motion Detection Record on your demand.Figure 3-7Start Recording from Right-click MenuStep 2Click Yes in the pop-up Attention message box to confirm the settings. All the channels will start to record in the selected mode.3.9 PlaybackThe recorded video files on the hard disk can be played back in the following modes: instant playback, all-day playback for the specified channel, and playback bynormal/event/smart/tag/sub-periods/external file search.Step 1Enter playback interface.Click Menu > Playback or from the right-click menuStep 2Check the checkbox of channel(s) in the channel list and then double-click to select a date on the calendar.Step 3You can use the toolbar in the bottom part of Playback interface to control playing progress.Figure 3-8 Playback InterfaceStep 4 Select the channel(s) to or execute simultaneous playback of multiple channels.Chapter 4 Accessing by Web BrowserYou shall acknowledge that the use of the product with Internet access might be under network security risks. For avoidance of any network attacks and information leakage, please strengthen your own protection. If the product does not work properly, please contact with your dealer or the nearest service center.Purpose:You can get access to the device via web browser. You may use one of the following listed web browsers: Internet Explorer 6.0, Internet Explorer 7.0, Internet Explorer 8.0, Internet Explorer 9.0, Internet Explorer 10.0, Internet Explorer 11.0, Apple Safari, Mozilla Firefox, and Google Chrome. The supported resolutions include 1024*768 and above.Step 1Open web browser, input the IP address of the device and then press Enter.Step 2Login to the device.If the device has not been activated, you need to activate the device first before login.Figure 4-1Set Admin Password1)Set the password for the admin user account.2)Click OK.STRONG PASSWORD RECOMMENDED–We highly recommend you create a strong password of your own choosing (using a minimum of 8 characters, including upper case letters, lower case letters, numbers, and special characters) in order to increase the security of your product. And we recommend you reset your password regularly, especially in the high security system, resetting the password monthly or weekly can better protect your product.If the device is already activated, enter the user name and password in the login interface, and click Login.Figure 4-2LoginStep 3Install the plug-in before viewing the live video and managing the camera. Please follow the installation prompts to install the plug-in.You may have to close the web browser to finish the installation of the plug-in.After login, you can perform the operation and configuration of the device, including the live view, playback, log search, configuration, etc.03041041090702。