snort2953_centos6x
Centos6.6安装Snort+Barnyard+Pulledpork+Snorby

Installing Snort, Barnyard, Pulledpork and Snorby on CentOS 6.6Snort is an open source network intrusion prevention system, capable ofperforming real-time traffic analysis and packet logging on IP networks. It canperform protocol analysis, content searching/matching, and can be used todetect a variety of attacks and probes, such as buffer overflows, stealth portscans, CGI attacks, SMB probes, OS fingerprinting attempts, and much more.Snort output is in binary format(unified2), so we need a tool to parse thisbinary format. For this task we use Barnyard2, which is an open sourceinterpreter for Snort unified2 binary output files. Its primary use is allowingSnort to write to disk in an efficient manner and leaving the task of parsingbinary data into various formats to a separate process that will not cause Snortto miss network traffic. Snort needs rules and periodically have to update them.Here comes Pulledpork, a perl script that keeps Snort’s rules updated. Finallywe need a nice front-end in order to analyze easier the alerts that Snortproduces. For this purpose we will install Snorby, a ruby on rails web application for network security monitoring that interfaces with current popular intrusion detection systems (Snort, Suricata and Sagan). The basic fundamental concepts behind Snorby are simplicity, organization and power(you can find a demo here usrername: demo@ password: snorby).We will install 2.9.7.2 version of Snort which is the latest version. Configuring Snort and all the other stuff that is required is a boring job.So @petkoutroumpis and I made a simple bash script that automate all the process. You can find the bash script at github. Nevertheless below is step by step the full installation.Before begin with the installation disable selinuxvi /etc/selinux/config and change the lineSELINUX=enforcingtoSELINUX=disabledandrebboot.Install some prerequisite packages.yum -y install vim wget man make gcc flex bisonzlibzlib-devellibpcaplibpcap-develpcrepcre-develtcpdumpgcc-c++ mysql-servermysqlmysql-devellibtoolperl-libwww-perlperl-Archive-Tarperl-Crypt-SSLeaygitgcc libxml2 libxml2-devellibxsltlibxslt-develhttpdcurl-develhttpd-develapr-develapr-util-devellibXrenderfontconf iglibXext ruby-devel unzip xzNow we will install libdnet and daq from source:cd /usr/local/srcwget/projects/libdnet/files/libdnet/libdnet-1.11/libdnet-1.11.tar.gztar -zxvf libdnet-1.11.tar.gzcd libdnet-1.11./configure --with-picmakesudo make installcd /usr/local/srcwget https:///downloads/snort/daq-2.0.4.tar.gz tar -zxvf daq-2.0.4.tar.gzcd daq-2.0.4./configuremakesudo make installIt’s time to install Snort:cd /usr/local/srcwget https:///downloads/snort/snort-2.9.7.2.tar.gz tar -zxvf snort-2.9.7.2.tar.gzcd snort-2.9.7.2./configure --enable-sourcefiremakesudo make installIssue the commands below to config snort properly:sudomkdir -p /etc/snort/rulessudomkdir -p /var/log/snort/eth0sudomkdir /var/log/barnyard2sudomkdir -p /usr/local/lib/snort_dynamicrulessudomkdir /etc/snort/rules/iplistssudo touch /etc/snort/rules/iplists/default.blacklistsudo touch /etc/snort/rules/black_list.rulessudo touch /etc/snort/rules/white_list.rulessudo touch /etc/snort/rules/local.rulessudo touch /var/log/snort/eth0/barnyard2.waldosudo touch /etc/snort/sid-msg.mapcd /usr/local/src/snort-2.9.7.2sudocpetc/* /etc/snortsudogroupadd -g 40000 snortsudouseradd snort -u 40000 -d /var/log/snort -s /sbin/nologin -c SNORT_IDS -g snortcd /etc/snortsudochown -R snort:snort *sudochown -R snort:snort /var/log/snortWe have to modify the following variables in our /etc/snort/snort.conf file. This assumes that the network we are going to monitor is 192.168.0.0/24.∙var RULE_PATH /etc/snort/rules∙ipvar HOME_NET 192.168.1.0/24∙ipvar EXTERNAL_NET !$HOME_NET∙var SO_RULE_PATH /etc/snort/so_rules∙var PREPROC_RULE_PATH /etc/snort/preproc_rules∙var WHITE_LIST_PATH /etc/snort/rules∙var BLACK_LIST_PATH /etc/snort/rulesOr you can give the following two commands to changethe /etc/snort/snort.conf file:sudosed -i -e '/^include \$RULE_PATH/s/^/#/' -e '/^varRULE_PATH/s/\.\.\/rules/\/etc\/snort\/rules/' -e '/^varSO_RULE/s/\.\.\/so_rules/so_rules/' \-e '/^var PREPROC/s/\.\.\/.*/preproc_rules/' -e '/^varWHITE/s/\.\..*/\/etc\/snort\/rules/' -e '/^varBLACK/s/\.\..*/\/etc\/snort\/rules/' \-e '/# unified2/a output unified2: filename snort.log, limit 128' -e '/^dynamicdetection/s/^/#/' -e '/^ipvarHOME_NET/s/any/192.168.0.0\/24/' \-e '/^ipvar EXTERNAL_NET/s/any/!\$HOME_NET/'/etc/snort/snort.confsudosed -i -e '/#include.*local\.rules/s/#//'/etc/snort/snort.confContinue with some more configurations for snort:cd /usr/local/srcsudochown -R snort:snort daq-2.0.4sudochown -R snort:snort snort-2.9.7.2sudochown -R snort:snortsnort_dynamicsrcsudochmod -R 700 daq-2.0.4sudochmod -R 700 snort-2.9.7.2sudochmod -R 700 snort_dynamicsrccd snort-2.9.7.2sudocp rpm/snortd /etc/init.d/snortsudocp rpm/snort.sysconfig /etc/sysconfig/snortsudochmod 700 /etc/init.d/snortsudochmod 700 /etc/sysconfig/snortcd /usr/sbinsudo ln -s /usr/local/bin/snort snortsudocp /etc/sysconfig/snort /etc/sysconfig/snort_default sudosed -i -e '/PASS_FIRST/s/^/#/' -e '/^ALERTMODE/s/^/#/' -e '/^DUMP_APP/s/^/#/' -e '/^BINARY_LOG/s/^/#/' -e'/^NO_PACKET_LOG/s/^/#/' -e '/^PRINT_INTERFACE/s/^/#/'/etc/sysconfig/snortcd /var/logsudochmod 700 snortsudochown -R snort:snort snortcd /usr/local/libsudochown -R snort:snort snort*sudochown -R snort:snortsnort_dynamic*sudochown -R snort:snortpkgconfigsudochmod -R 700 snort*sudochmod -R 700 pkgconfigcd /usr/local/binsudochown -R snort:snortdaq-modules-configsudochown -R snort:snort u2*sudochmod -R 700 daq-modules-configsudochmod 700 u2*cd /etcsudochown -R snort:snort snortsudochmod -R 700 snortAt this point we are ready to see if Snort starts up and reads the rules.cd /usr/local/bin./snort -T -i eth0 -u snort -g snort -c /etc/snort/snort.conf Check /var/log/message to catch any fatal errors or crashes.Before install Barnyard2 we have to set up mysql root password. Issue the following command:mysqladmin -u root password NEWPASSWORDwhere NEWPASSWORD is whatever you want.Next step is to install Barnyard2.Give the following commands in order to install and configure Barnyard2:cd /usr/local/srcgit clone https:///firnsy/barnyard2.gitcd barnyard2./autogen.sh./configure --with-mysql -with-mysql-libraries=/usr/lib64/mysql makesudo make installsudocpetc/barnyard2.conf /etc/snortsudocp rpm/barnyard2 /etc/init.dsudochmod 700 /etc/init.d/barnyard2sudocp rpm/barnyard2.config /etc/sysconfig/barnyard2sudocp /etc/init.d/barnyard2 /etc/init.d/barnyard2_default sudosed -i -e '/BARNYARD_OPTS=/s/$SNORTDIR\/${INT}/$SNORTDIR/' -e '/BARNYARD_OPTS=/s/-L \$SNORTDIR\/\${INT}/-l $SNORTDIR/' -e'/"b.*2"/s/barnyard2/\/usr\/local\/bin\/barnyard2/' -e '/touch \/var/s/\$prog/barnyard2/' /etc/init.d/barnyard2sudosed -i 's#$SNORTDIR/${INT}#$SNORTDIR#g'/etc/init.d/barnyard2sudocp /etc/sysconfig/barnyard2 /etc/sysconfig/barnyard2_default sudosed -i '/CONF=/s/barnyard.conf/barnyard2.conf/'/etc/sysconfig/barnyard2sudosed -i '/LOG_FILE=/s/"snort_unified.log"/"snort.log"/'/etc/sysconfig/barnyard2Now at the end of /etc/snort/barnyard2.conf file put the following config: output database: log, mysql, user=root password=NEWPASSWORD dbname=snorby host=localhostwhere NEWPASSWORD is your mysql root password.Time to install Pulledpork.cd /usr/local/srcwgethttps:///files/pulledpork-0.7.0.tar.gztar -zxvf pulledpork-0.7.0.tar.gzcd pulledpork-0.7.0sudocp pulledpork.pl /usr/local/bin/pulledporksudochmod 700 /usr/local/bin/pulledporksudocpetc/* /etc/snortsudocp /etc/snort/pulledpork.confpulledpork.conf_default sudosed -i[conf] -e'/^local_rules=/s/\/usr.*/\/etc\/snort\/rules\/local.rules/' -e'/^rule_path/s/\/usr.*/\/etc\/snort\/rules\/snort.rules/' \-e '/sid_msg=/s/\/usr.*/\/etc\/snort\/sid-msg.map/' -e'/config_path=/s/\usr.*/\etc\/snort\/snort.conf/' -e'/black_list=/s/\/usr.*/\/etc\/snort\/rules\/iplists\/default. blacklist/' \-e '/IPRV/s/\/usr.*/\/etc\/snort\/rules\/iplists/'/etc/snort/pulledpork.confOne more thing to set up for pulledpork is the oinkcode. Oinkcode is a unique key, which is associated with a user account in . If you have a subscription you will get the latest rules, otherwise you will receive the free rule package. When you create an account on copy your oinkcode and replace “<oinkcode>” with yours in the following linesof/etc/snort/pulledpork.conf file:rule_url=https:///reg-rules/|snortrules-snapshot. tar.gz|<oinkcode>rule_url=https:///reg-rules/|opensource.gz|<oinkc ode>Next step is to install Snorby.Before install Snorby we have to install five prerequisite package:∙yaml∙ruby 1.9.x∙rails∙imagemagick∙wkhtmltopdfcd /usr/local/srcwget /download/libyaml/yaml-0.1.6.zipunzip yaml.zipcd yaml./configuremakesudo make installcd /usr/local/srcwget /pub/ruby/1.9/ruby-1.9.3-p547.tar.gz tar -zxvf ruby-1.9.3-p547.tar.gzcd ruby-1.9.3-p547./configuremakesudo make installsudo gem install railssudo gem install nokogiri -- --use-system-librariessudo gem install bundlercd /usr/local/srcwget /download/ImageMagick.tar.gztar -zxvf ImageMagick.tar.gzcd ImageMagick*./configuremakesudo make installcd /usr/local/srcwget/projects/wkhtmltopdf/files/archive/0.12.0/wkht mltox-linux-amd64_0.12.0-03c001d.tar.xztar xJ wkhtmltox-linux-amd64_0.12.0-03c001d.tar.xzcd wkhtml*sudo mv bin/wkhtmltopdf /usr/local/binFinally it’s time to install and configure Snorby.cd /usr/local/srcgit clone https:///Snorby/snorby.gitcd snorbysudo bundle install --deploymentsudocp /usr/local/src/snorby/config/database.yml.example/usr/local/src/snorby/config/database.ymlsudocp /usr/local/src/snorby/config/snorby_config.yml.example/usr/local/src/snorby/config/snorby_config.ymlOpen /usr/local/src/snorby/config/database.yml file and changepassword: "Enter Password Here" # Example: password: "s3cr3tsauce" topassword: "NEWPASSWORD" # Example: password: "s3cr3tsauce" where NEWPASSWORD is your mysql root passwordNow issue the following commands:cd /usr/local/src/snorbybundle exec rake snorby:setupIn order to have access to Snorby front-end from anywhere we willinstall Phusion Passenger. Phusion Passenger is a free web server and application server with support for Ruby, Python and Node.js. It is designed to integrate into the Apache HTTP Server or the nginx web server, but also has a mode for running standalone without an external web server.Installing Phusion Passenger:gem install passengerpassenger-install-apache2-module --autoAt the end of the installation, passenger will show us some lines to add inthe/etc/httpd/conf/httpd.conf file. We copy-paste them at the endof /etc/httpd/conf/httpd.conf file and we change DocumentRoot to pointat /usr/local/src/snorby/public directory. Similar wechange <Directory> to <Directory /usr/local/src/snorby/public> .One last thing is to modify iptables in order to allow traffic to port 80.sudocp /etc/sysconfig/iptables/etc/sysconfig/iptables_default sudosed -i '/22/a -A INPUT -m state --state NEW -m tcp -p tcp --dport80 -j ACCEPT' /etc/sysconfig/iptablessudo /etc/init.d/iptables restartNow we can download new rules with pulledpork:/usr/local/bin/pulledpork -c /etc/snort/pulledpork.conf -C/etc/snort/snort.conf -P -I security -e /etc/snort/enablesid.conf -i /etc/snort/disablesid.conf -M /etc/snort/modifysid.conf -v Finally start all the necessary services:/etc/init.d/mysqld restart/etc/init.d/httpd restart/etc/init.d/snort start/etc/init.d/barnyard2 startIn case you have problems with the snorby worker you can run the following commands:cd /usr/local/src/snorbysudo RAILS_ENV=production script/rails r "Snorby::Worker.stop" sudo RAILS_ENV=production script/rails r "Snorby::Worker.start" sudo RAILS_ENV=production script/rails r "Snorby Cache Jobs" sudo RAILS_ENV=production script/rails r"Snorby::Jobs::SensorCacheJob.new(true).perform"sudo RAILS_ENV=production script/rails r"Snorby::Jobs::DailyCacheJob.new(true).perform"sudo RAILS_ENV=production script/rails r"Snorby::Jobs.clear_cache"sudo RAILS_ENV=production script/rails r "Snorby::Jobs.run_now" sudo RAILS_ENV=production script/rails r"Snorby::Jobs::GeoipUpdatedbJob.new(true).perform"。
Snort配置笔记

在官网下载了最新版的windows平台下的snort安装包Snort_2.9.2.3_Installer.exe和规则文件库snort-2.9.2.3.tar.zip(也有需要付费的规制库),查阅了网上的资料终于把基本的安装和IDS模式配置完成了,写成学习笔记以便加强记忆。
------------------------------------------------------------1、由于我本机已经安装了WinPcap_4_1_2.exe,可满足当前Snort版本对WinPcap版本的要求,所以只下载了Snort。
首先安装Snort_2.9.2.3_Installer.exe,过程比较简单,由于只是自己测试,我没有进行过多的设置一路Next安装完毕,默认路径C:\Snort,最后弹出Snort has successfullly been installed.窗口,点击“确定”安装成功;之后同样步骤完成了WinPcap_4_1_2.exe的安装。
2、配置环境变量(我感觉我不配置也可以啊),如下图所示:3、运行cmd,输入“snort -?”可以查看snort相关命令行,如下图所示:4、导入规则文件库(需网站注册),解压下载下来的snort-2.9.2.3.tar.zip,得到四个文件夹:将文件夹下的文件复制到snort安装目录下对应的文件中,我安完snort安装目录下没有so_rules文件夹,就直接复制过去了。
5、然后启用ids模式,执行以下命令:snort -dev -l c:\snort\log -c c:\snort\etc\snort.conf这时遇到了很多问题,主要都是由于snort.conf配置文件的错误,找了一些资料及snort官网的论坛,终于解决了,可能有些解决的办法不一定是很好的,不管怎样终于可以运行起来了。
第一个错误:ERROR:c:\Snort\etc\snort.conf(39) Unknown rule type:ipvar解决办法:把snort.conf文件中的ipvar改为var(可能不是根本的解决办法)解决之后重复执行上图的运行命令,会弹出第二个错误,以下依次类推。
CentOS6.5的安装详解(图文详解)
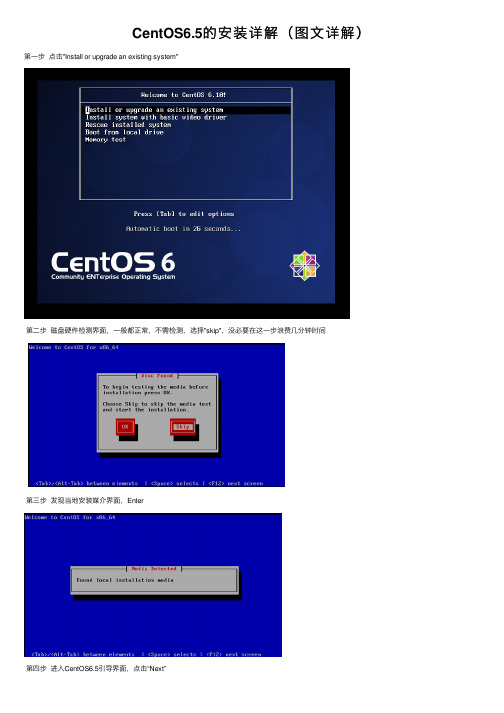
CentOS6.5的安装详解(图⽂详解)第⼀步点击"Install or upgrade an existing system"
第⼆步磁盘硬件检测界⾯,⼀般都正常,不需检测,选择"skip",没必要在这⼀步浪费⼏分钟时间
第三步发现当地安装媒介界⾯,Enter
第四步进⼊CentOS6.5引导界⾯,点击“Next”
第五步安装语⾔选择界⾯,最好是选择"English(English)",点击“Next”。
当然你也可以选择中⽂,但是,博主我,强烈建议你选英⽂,既然你搞⼤数据,就要顺应⼤众
第六步键盘语⾔选择界⾯,选择“U.S English”,点击“Next”
第七步安装哪种设备类型选择界⾯,选择“Basic Storage Devices”,点击“Next”
第⼋步存储设备警告界⾯,选择“Yes,discard any data”,点击"Next"。
这个好⽐我们在安装windows⼀样,安装系统把C盘给格式化。
第九步
第⼗步选择对应的时区,这⾥我们选择上海,系统时间选择UTC
第⼗⼀步输⼊root密码,两次⼀样,然后next下⼀步
第⼗⼆步选择创建⾃定义布局,你也可以使⽤所有空间,这个看需求
然后创建分区
再建⽴⼀个swap分区,建议⼤⼩是你主机内存1.5倍,然后OK,next
最后建⽴根分区 / 使⽤磁盘剩余所有空间
分区完毕后,检查看下是否按我们的要求分配,选择next
将要对分区进⾏格式化操作,选择格式化
警告我们所有数据将会丢失,选择将改写写⼊磁盘
开始安装系统
最后,系统安装结束,reboot重启,登录系统。
实训-Snort安装与配置

Snort安装与配置Snort是免费NIPS及NIDS软件,具有对数据流量分析和对网络数据包进行协议分析处理的能力,通过灵活可定制的规则库(Rules),可对处理的报文内容进行搜索和匹配,能够检测出各种攻击,并进行实时预警。
Snort支持三种工作模式:嗅探器、数据包记录器、网络入侵检测系统,支持多种操作系统,如Fedora、Centos、FreeBSD、Windows等,本次实训使用Centos 7,安装Snort 2.9.11.1。
实训任务在Centos 7系统上安装Snort 3并配置规则。
实训目的1.掌握在Centos 7系统上安装Snort 3的方法;2.深刻理解入侵检测系统的作用和用法;3.明白入侵检测规则的配置。
实训步骤1.安装Centos 7 Minimal系统安装过程不做过多叙述,这里配置2GB内存,20GB硬盘。
2.基础环境配置根据实际网络连接情况配置网卡信息,使虚拟机能够连接网络。
# vi /etc/sysconfig/network-scripts/ifcfg-eno16777736TYPE="Ethernet"BOOTPROTO="static"DEFROUTE="yes"IPV4_FAILURE_FATAL="no"NAME="eno16777736"UUID="51b90454-dc80-46ee-93a0-22608569f413"DEVICE="eno16777736"ONBOOT="yes"IPADDR="192.168.88.222"PREFIX="24"GATEWAY="192.168.88.2"DNS1=114.114.114.114~安装wget,准备使用网络下载资源:# yum install wget –y将文件CentOS-Base.repo备份为CentOS-Base.repo.backup,然后使用wget下载阿里yum 源文件Centos-7.repo:# mv /etc/yum.repos.d/CentOS-Base.repo /etc/yum.repos.d/CentOS-Base.repo.backup#wget –O /etc/yum.repos.d/CentOS-Base.repo /repo/Centos-7.repo更新yum源,并缓存:# yum clean all# yum makecache# yum -y update3.安装Snort安装epel源:# yum install -y epel-release安装依赖:经过前面的设置阿里源、源更升级后,将能够很顺利的安装完依赖。
windows下Snort的配置与使用
windows下Snort的配置与使用实验1:Snort的配置与使用1实验目的和要求学习Snort的配置与使用,要求:1)掌握Snort入侵检测环境的搭建;2)掌握Snort的配置与使用;3)熟悉Snort的工作原理。
2实验设备及材料1)系统环境:Windows XP/Windows 20032)软件安装:JDK:jdk-6u17-windows-i586.exe(可选)TOMCAT:apache-tomcat-5.5.30.exe(可选)MySQL:mysql-5.5.15-win32.msiWinPcap:WinPcap_4_1_2.exeSnort:Snort_2_9_1_Installer.exeIDSCenter:idscenter109b21.zip3实验内容3.1软件安装与配置3.1.1 JDK安装与配置软件版本:jdk-6u17-windows-i586.exe双击jdk-6u17-windows-i586.exe安装JDK,安装完后设置环境变量:变量名变量值java_home C:\Program Files\Java\jdk1.6.0_17classpath C:\Program Files\Java\jdk1.6.0_17\jre\libpath C:\Program Files\Java\jdk1.6.0_17\binjava –version // 查看软件版本信息,确定软件是否安装成功3.1.2 Tomcat安装与配置软件版本:apache-tomcat-5.5.30.exe、apache-tomcat-5.5.30-admin.zip 1)安装apache-tomcat-5.5.30.exe安装过程中会要求指定JRE的安装目录,确定端口,用户名和密码(用于可视化配置界面登录)。
启动Tomcat:验证安装是否成功:http://localhost:8088/http://127.0.0.1:8088/2)安装pache-tomcat-5.5.30-admin.zip首先解压apache-tomcat-5.5.30-admin.zip,用解压后的文件替换以下tomcat 文件。
snort配置步骤doc资料

s n o r t配置步骤1.在Windows环境下安装snort。
(1)安装Apache_2.0.46①双击apache_2.0.46-win32-x86-no_src.msi,安装在文件夹C:\apache下。
安装程序会在该文件夹下自动产生一个子文件夹apache2。
②为了避免Apache Web服务器的监听端口与Windows IIS中的Web服务器的80监听端口发生冲突,这里需要将Apache Web服务器的监听端口进行修改。
打开配置文件C:\apache\apache2\conf\httpd.conf,将其中的Listen 80,更改为Listen50080。
如图3.34所示。
图3.34修改apache的监听端口③单击“开始”按钮,选择“运行”,输入cmd,进入命令行方式。
输入下面的命令:C:\>cd apache\apache2\binC:\apache\apache2\bin\apache –k install这是将apache设置为以Windows中的服务方式运行。
如图3.35所示。
图3.35 Apache以服务方式运行(2)安装PHP①解压缩php-4.3.2-Win32.zip里面的文件至C:\php\。
②复制C:\php下php4ts.dll至%systemroot%\System32,复制C:\php下php.ini-dist至%systemroot%\,然后修改文件名为:php.ini。
③添加gd图形库支持,把C:\php\extensions\ php_gd2.dll拷贝到%systemroot%\System32,在php.ini中添加extension=php_gd2.dll。
如果php.ini有该句,将此语句前面的“;”注释符去掉。
如图3.36所示图3.36修改php.ini配置文件④添加Apache对PHP的支持。
在C:\apache\apache2\conf\httpd.conf中添加:LoadModule php4_module "C:/php/sapi/php4apache2.dll"AddType application/x-httpd-php .php如图3.37和图3.38所示。
snort安装与使用

ERROR! LuaJIT library not found. Go get it from / (or) Try compiling without openAppId using '--disable-open-appid' 2.再安装snort #cd ~/snort_src #wget https:///downloads/snort/snort-2.9.17.tar.gz #tar -xvzf snort-2.9.17.tar.gz #cd snort-2.9.17 #./configure --enable-sourcefire #make #sudo make install 更新共享库 #sudo ldconfig Snort安装会将Snort二进制文件放在/usr/local/bin/snort,因此,创建到/usr/sbin/snort的符号链接 #sudo ln -s /usr/local/bin/snort /usr/sbin/snort 安装后输入snort -V看到以下内容 root@kali:/usr/sbin# snort -V
Preprocessor Object: SF_FTPTELNET Version 1.2 <Build 13>
Preprocessor Object: SF_DCERPC2 Version 1.0 <Build 3>
Preprocessor Object: SF_SSLPP Version 1.1 <Build 4>
Centos6离线搭建安装配置Cloudera Manager5.9.3超详细

Centos6 离线搭建安装配置 Cloudera Manager5.9.3
3. 配置 ntp 从服务器 ........................................................................................................ 16 4. 启动所有服务器上的服务 ............................................................................................ 16 5. 验证 ntp 服务器是否开启 ............................................................................................ 17 四、配置 yum 源.................................................................................................................... 17 1. 配置网络 yum 源为阿里云源 ....................................................................................... 17 2. 搭建本地 yum 源........................................................................................................... 18 五、安装 Mysql 数据库 ......................................................................................................... 20 1. 安装 Mysql ..................................................................................................................... 20 2. 配置 Mysql ..................................................................................................................... 21 3.开启远程登陆 .................................................................................................................. 23 4. 将 Mysql 驱动包放入 Java 共享目录 .......................................................................... 25 5. 创建数据库及用户并添加权限 .................................................................................... 26 六、安装 Cloudera Manager.................................................................................................. 26 1. 安装 Cloudera Manager................................................................................................. 27 2. 配置 Mysql 数据库 ........................................................................................................ 28 3. 为 Cloudera Manager 配置 Mysql 数据库 .................................................................... 30 七、Cloudera Manager 添加大数据服务组件 ...................................................................... 33 八、部署完成 ......................................................................................................................... 53
- 1、下载文档前请自行甄别文档内容的完整性,平台不提供额外的编辑、内容补充、找答案等附加服务。
- 2、"仅部分预览"的文档,不可在线预览部分如存在完整性等问题,可反馈申请退款(可完整预览的文档不适用该条件!)。
- 3、如文档侵犯您的权益,请联系客服反馈,我们会尽快为您处理(人工客服工作时间:9:00-18:30)。
Getting SNORT working in CentOS 6.3/6.4and VirtualBox 4.2.x/4.1.xLast Revised on July31,2013The document below uses the following color codes for items/steps the user should be aware of during the configuration and installation of DAQ-2.0.x and Snort-2.9.5.x:Blue-informational messages and commentsOrange–These are commands that the user types at the shell promptRed–Read carefully before proceeding.This document describes the configuration, compiling,and installation of DAQ 2.0.x and SNORT2.9.5.x using the Hardware and Operating System(s) listed below:Microsoft Windows 7 Ultimate Edition w/SP1as the HOST operating system VirtualBox 4.2.x or 4.1.x with Oracle Extension Pack 4.2.x or 4.1.x(I use version 4.2.16) CentOS 6.3/6.4(64-bit version)as the GUEST operating system (which runs SNORT) SNORT 2.9.5.x, DAQ 2.0.x, and a set of snort rules ()The hardware in the HOST system listed above is a quad-core processor (AMD) @2.8Ghz, 8GB of DDR2 1066Mhz RAM, and a onboard Realtek PCIe Gigabit Ethernet Family Controller.*** NOTE ***Before replacing a WORKING production copy of Snort with a new version of Snort and updated Snort rules, it is STRONGLY recommended that users set up a test environment to install the latest versions of DAQ and Snort (along with updated Snort rule snapshots) and to fully test any potential modifications in this environment.I prefer to use a Virtual Machine inside of VirtualBox 4.2.x when installing and/or upgrading Snort, so if something goes wrong, I can simply remove the virtual machine and reload the operating environment from scratch, without damaging any production systems that may be running Snort or other critical services.*** NOTE ***In the CentOS 6.3/6.4Virtual Machine, you will need to set the NETWORK section to BRIDGED mode to allow the assignment of a static IP to your CentOS 6.3/6.4VM (if you are using a standalone system running CentOS 6.3/6.4you can ignore this step). Configure your Static IP, Network Mask, DNS, and Gateway on the desktop by clicking System| Preferences| Network Connections(requires root access)for CentOS 6.3/6.4(in my case, I used ethernet 0(eth0) as the port to monitor traffic on with an assigned IP address of 192.168.1.90).After completing the step above, ensure your network connectivity is working (try ping , you should get a response), also try surfing a few web pages from CentOS 6.3/6.4, would be a good site to visit(shameless plug here). Make sure the following packages are installed in your CentOS 6.3/6.4 system via System|Administration| Add/Remove Software(requires ‘root’ privileges): gcc version (4.4.6including libraries), flex(2.5.35), bison(2.4.1), zlib(1.2.3including zlib-devel), libpcap(1.0.0including libpcap-devel), pcre(7.84including pcre-devel),libdnet(1.11 or 1.12 including libdnet-devel) and tcpdump(4.1.0).Versions of these packages already installed may be newer than what is listed here, but should NOT cause any issues when compiling DAQ and/or SNORT.When upgrading to the newest version of SNORT, it is strongly recommended to back up local.rules, snort.conf, threshold.conf, white_list.rules, and black_list.rules before any snort upgrade is installed.Note: The steps in this document should apply to compiling DAQ 2.0.x and SNORT2.9.4.x without any changes in actual configuration or makefiles (except the paths to the actual source files, etc).To obtain the CentOS 6.3/6.4(64-bit) versions of libpcap-devel, libdnet, and libdnet-devel, the filenames I used for the packages (via a google search) were:libpcap-devel-1.0.0-6.20091201git117cb5.el6.x86_64.rpmlibdnet-devel-1.12-6.el6.x86_64.rpmlibdnet-debuginfo-1.12-6.choon.centos6.x86_64.rpmusing ‘rpm –i’ to install the ‘libpcap’ and ‘libdnet-debuginfo’ RPM’sThe libdnet-devel package failed to install due to dependency issues, so I downloaded libdnet-1.11.tar.gz and used it to build working dnet libraries and header files (more on this below).Obtain SNORT(version 2.9.5.x), DAQ(version 2.0.x), and snort rules from and download them to your CentOS 6.3/6.4box.The steps below will require 'root' access and terminal/console access in order to successfully complete the compilation, installation,and running of SNORT on your CentOS 6.3/6.4box.Type the following commands in a terminal window(if you were able to find a suitable libdnet-devel RPM for CentOS 6.3/6.4, skip unpacking of the libdnet tarball below):cd /usr/local/src<enter>tar -zxvf <path to>libdnet-1.11.tar.gz<enter>tar -zxvf <path to>daq-2.0.x.tar.gz<enter>tar -zxvf <path to>snort-2.9.5.x.tar.gz<enter>If you were able to find a suitable libdnet-devel RPM for CentOS 6.3/6.4, skip the section below and go to the next section to configure/compile/install DAQ-2.0.x.First, let’s configure, compile, and install libdnet:cd /usr/local/src/libdnet-1.11<enter>./configure–with-pic<enter>make<enter>make install<enter>Note any errors which may cause the 'configure' step to abort, also, you can check the file ‘config.log’ which is generated from the ‘configure’ line above.cd /usr/local/lib<enter>ldconfig –v /usr/local/lib<enter>Now we will configure, compile, and install DAQ:cd /usr/local/src/daq-2.0.x<enter>./configure<enter>make<enter>make install<enter>Note any errors which may cause the 'configure' step to abort, also, you can check the file ‘config.log’ which is generated from the ‘configure’ line above.cd /usr/local/lib<enter>ldconfig –v /usr/local/lib<enter>Do the following to compile SNORT on your CentOS 6.3/6.4system:Note: Joel Esler at Sourcefire rcommends the use of the --enable-sourcefire optioncd /usr/local/src/snort-2.9.5.x<enter>./configure --enable-sourcefire<enter>make<enter>make install<enter>cd /usr/local/lib<enter>ldconfig –v /usr/local/lib<enter>Note any errors which may cause the 'configure' step to abort, also, you can check the file ‘config.log’ which is generated from the ‘configure’ line above.In order to download snort rules from , you must be a registered user or have a paid subscription to download rule sets or VRT rules. Information can be found at on how to become a registered user. Registered users will be able to download rule sets which are approximately one month behind what is available to paid subscription holders.Issue the commands below:cd /etc<enter>mkdir -p snort<enter>cd snort<enter>cp /usr/local/src/snort-2.9.5.x/etc/* .<enter>tar -zvxf <path to>snortrules-snapshot-<nnnn>.tar.gz<enter>cp ./etc/* .<enter>touch /etc/snort/rules/white_list.rules /etc/snort/rules/black_list.rules<enter>Note -this will place the configuration files from the snort 2.9.5.x unpack and the rules snapshot under the /etc/snort directory. If the rules snapshot file is newer, this is not an issue (since rules are updated on a periodic basis by the snort team).Also, the configuration files (e,g, -snort.conf, threshold.conf, etc) are residing in/etc/snort/and the rules files will be in /etc/snort/rules and for the so_ and preprocessor rules, these will be located in /etc/snortAdd a user and group for snort in your system (using the commands below):groupadd -g 40000 snort<enter>useradd snort-u 40000-d /var/log/snort -s /sbin/nologin-c SNORT_IDS–g snort<enter> cd /etc/snort<enter>chown -R snort:snort *<enter>chown -R snort:snort /var/log/snort<enter>Locate and modify the following variables in your snort.conf file(in directory /etc/snort) as follows (usually between lines 40 and 120):This assumes the network you are going to monitor is 192.168.1.0/24var RULE_PATH /etc/snort/rulesipvar HOME_NET 192.168.1.0/24ipvar EXTERNAL_NET !$HOME_NETvar SO_RULE_PATH /etc/snort/so_rulesvar PREPROC_RULE_PATH /etc/snort/preproc_rulesvar WHITE_LIST_PATH /etc/snort/rulesvar BLACK_LIST_PATH /etc/snort/rulesThe following commands should be used to take ownership of directories and change file permissions that are related to SNORT and/or DAQ.cd /usr/local/src<enter>chown -R snort:snort daq-2.0.x<enter>chmod -R 700 daq-2.0.x<enter>chown -R snort:snort snort-2.9.5.x<enter>chmod -R 700 snort-2.9.5.x<enter>chown -R snort:snort snort_dynamicsrc<enter>chmod -R 700 snort_dynamicsrc<enter>The snort initialization script on the next page is something which was put together from an existing script in CentOS 6.3/6.4’s /etc/init.d directory. It is still a work in progress, but it will allow you to start, stop, restart, and give the status of snort on your system. As improvements are made to the script, it will be updated in this document. Also, if anyone has improvements to the script they would like to have incorporated into this document, please email me at the address at the bottom of this document.Note –some users have reported problems with the script below, but fortunately, the snort-2.9.5/2.9.4.x source code tree has a directory called ‘RPM’ which has a shell script called ‘snortd’ which can be copied to /etc/init.d and named ‘snort’ (with appropriate permissions, of course) which will allow snort to be started from /etc/init.d.Also, at /docs there are a set of initialization scripts which are available for various operating systems, including CentOS 6.3/6.4. These scripts are available due to the fact that some users have reported problems copying and pasting the script below when it is in the form of a PDF document.This script can also be added to the existing scripts CentOS 6.3/6.4knows about via the ‘chkconfig’ command, to do so issue the command below:chkconfig --add snort<enter>Doing this will set automatic startup in runlevels 2, 3, 4, and 5 on your CentOS 6.3/6.4 system.Place the shell script below into the /etc/init.d directory on your CentOS 6.3/6.4box: -----CUT HERE -----#!/bin/bash## snort Start up the SNORT Intrusion Detection System daemon## chkconfig: 2345 55 25# description: SNORT is a Open Source Intrusion Detection System# This service starts up the snort daemon.## processname: snort# pidfile: /var/run/snort_eth0.pid### BEGIN INIT INFO# Provides:snort# Required-Start: $local_fs $network $syslog# Required-Stop: $local_fs $syslog# Should-Start: $syslog# Should-Stop: $network $syslog# Default-Start: 2 3 4 5# Default-Stop: 0 1 6# Short-Description: Start up the SNORT Intrusion Detection System daemon# Description: SNORT is an application for Open Source Intrusion Detection.# This service starts up the Snort IDS daemon.### END INIT INFO# source function library. /etc/rc.d/init.d/functions# pull in sysconfig settings[ -f /etc/sysconfig/snort ] && . /etc/sysconfig/snortRETVAL=0prog="snort"lockfile=/var/lock/subsys/$prog# Some functions to make the below more readableSNORTD=/usr/local/bin/snort#OPTIONS="-A fast -b -d -D -i eth0 -u snort -g snort -c /etc/snort/snort.conf -l/var/log/snort"#PID_FILE=/var/run/snort_eth0.pid# Convert the /etc/sysconfig/snort settings to something snort can# use on the startup line.if [ "$ALERTMODE"X = "X" ]; thenALERTMODE=""elseALERTMODE="-A $ALERTMODE"fiif [ "$USER"X = "X" ]; thenUSER="snort"fiif [ "$GROUP"X = "X" ]; thenGROUP="snort"fiif [ "$BINARY_LOG"X = "1X" ]; thenBINARY_LOG="-b"elseBINARY_LOG=""fiif [ "$LINK_LAYER"X = "1X" ]; thenLINK_LAYER="-e"elseLINK_LAYER=""fiif [ "$CONF"X = "X" ]; thenCONF="-c /etc/snort/snort.conf"elseCONF="-c $CONF"fiif [ "$INTERFACE"X = "X" ]; thenINTERFACE="-i eth0"PID_FILE="/var/run/snort_eth0.pid"elsePID_FILE="/var/run/snort_$INTERFACE.pid" INTERFACE="-i $INTERFACE"fiif [ "$DUMP_APP"X = "1X" ]; thenDUMP_APP="-d"elseDUMP_APP=""fiif [ "$NO_PACKET_LOG"X = "1X" ]; thenNO_PACKET_LOG="-N"elseNO_PACKET_LOG=""fiif [ "$PRINT_INTERFACE"X = "1X" ]; thenPRINT_INTERFACE="-I"elsePRINT_INTERFACE=""fiif ["$PASS_FIRST"X = "1X" ]; thenPASS_FIRST="-o"elsePASS_FIRST=""fiif [ "$LOGDIR"X = "X" ]; thenLOGDIR=/var/log/snortfi# These are used by the 'stats' optionif [ "$SYSLOG"X = "X" ]; thenSYSLOG=/var/log/messagesfiif [ "$SECS"X = "X" ]; thenSECS=5fiif [ ! "$BPFFILE"X = "X" ]; thenBPFFILE="-F $BPFFILE"firunlevel=$(set --$(runlevel); eval "echo \$$#" )start(){[ -x $SNORTD ] || exit 5echo -n $"Starting $prog: "daemon --pidfile=$PID_FILE $SNORTD $ALERTMODE $BINARY_LOG $LINK_LAYER $NO_PACKET_LOG $DUMP_APP -D $PRINT_INTERFACE$INTERFACE -u $USER -g $GROUP $CONF -l $LOGDIR $PASS_FIRST $BPFFILE $BPF && success || failureRETVAL=$?[ $RETVAL -eq 0 ] && touch $lockfileechoreturn $RETVAL}stop(){echo -n $"Stopping $prog: "killproc $SNORTDif [ -e $PID_FILE ]; thenchown -R $USER:$GROUP /var/run/snort_eth0.* &&rm -f /var/run/snort_eth0.pi*fiRETVAL=$?# if we are in halt or reboot runlevel kill all running sessions# so the TCP connections are closed cleanlyif [ "x$runlevel" = x0 -o "x$runlevel" = x6 ] ; thentrap '' TERMkillall $prog 2>/dev/nulltrap TERMfi[ $RETVAL -eq 0 ] && rm -f $lockfileechoreturn $RETVAL}restart() {stopstart}rh_status() {status -p $PID_FILE $SNORTD}rh_status_q() {rh_status >/dev/null 2>&1}case "$1" instart)rh_status_q && exit 0start;;stop)if ! rh_status_q; thenrm -f $lockfileexit 0fistop;;restart)restart;;status)rh_statusRETVAL=$?if [ $RETVAL -eq 3 -a -f $lockfile ] ; thenRETVAL=2fi;;*)echo $"Usage: $0 {start|stop|restart|status}"RETVAL=2esacexit $RETVAL-----CUT HERE -----To make the symbolic link(symlink)for snort, issue the commands below:cd /usr/sbin<enter>ln -s /usr/local/bin/snort snort<enter>The file below should be named 'snort' and placed into the/etc/sysconfig directory on your CentOS 6.3/6.4system:-----CUT HERE -----# /etc/sysconfig/snort# $Id: snort.sysconfig,v 1.8 2003/09/19 05:18:12 dwittenb Exp $#### General ConfigurationINTERFACE=eth0CONF=/etc/snort/snort.confUSER=snortGROUP=snortPASS_FIRST=0#### Logging & AlertingLOGDIR=/var/log/snortALERTMODE=fastDUMP_APP=1BINARY_LOG=1NO_PACKET_LOG=0PRINT_INTERFACE=0-----CUT HERE -----Note: The above file should be owned by user/group 'snort'with permissions '700'If the directory ‘/var/log/snort’ does not exist on your system, issue the following commands as the‘root’user(permissions should be 700), the commands below will also change the ownership of the directories and files to user ‘snort’ and group ‘snort’.cd /var/log<enter>mkdir snort<enter>chmod 700 snort<enter>chown -R snort:snort snort<enter>cd /usr/local/lib<enter>chown -R snort:snort snort*<enter>chown -R snort:snort snort_dynamic*<enter>chown -R snort:snort pkgconfig<enter>chmod -R 700 snort*<enter>chmod -R 700 pkgconfig<enter>cd /usr/local/bin<enter>chown -R snort:snort daq-modules-config<enter>chown -R snort:snort u2*<enter>chmod -R 700 daq-modules-config<enter>chmod 700 u2*<enter>cd /etc<enter>chown -R snort:snort snort<enter>chmod -R 700 snort<enter>At this point, you should be ready to do some testing of SNORT to see if it actually starts up and reads in the rules (you can check /var/log/messages to catch any fatal errors or crashes).If you want to test SNORT startup, issue the following commands:cd /usr/local/bin<enter>./snort -T -i eth0 -u snort -g snort -c /etc/snort/snort.conf<enter>The above command will cause SNORT to start up in self-test mode,checking all the supplied command line switches and rules files that are passed to it and indicating that everything is ready to proceed. If all the tests are passed, you should see the following: Snort successfully validated the configuration!Snort exitingHere are some common errors that snort may return when running on CentOS6.x: ERROR: snort.conf(253) Could not stat dynamic module path"/usr/local/lib/snort_dynamicrules": No such file or directory.Fatal Error, Quitting.Solution below:mkdir -p /usr/local/lib/snort_dynamicrules<enter>chown -R snort:snort /usr/local/lib/snort_dynamicrules<enter>chmod -R 700 /usr/local/lib/snort_dynamicrules<enter>Copy any dynamic rulesets you have or are using to the above directory.Another method would be to comment out that line in snort.conf if you have no dynamic rules in use.ERROR: /etc/snort/rules/web-misc.rules(555) Cannot use the fast_pattern content modifier for a lone http cookie/http raw uri /http raw header /http raw cookie /status code / status msg /http method buffer content.Fatal Error, Quitting.Solution below:The fast_pattern option cannot be used with the http_method string. Edit the web-misc.rules file and remove it from the snort rule. Do a search for "2010-0388" and remove the alert option fast_pattern from the alert rule.ERROR: /etc/snort/snort.conf(244) => 'compress_depth' and 'decompress_depth' should be set to max in the default policy to enable 'unlimited_decompress'Fatal Error, Quitting.Solution below:Edit the /etc/snort/snort.conf file and set the http_inspect compress_depth and decompress_depth to 65535from 20480.If no errors are returned, proceed with the steps below (otherwise check/var/log/messages for more information):To manually start snort, issue the following commands:cd /usr/local/bin<enter>(if you are already in this directory, skip this command)./snort -A fast -b -d -D -i eth0 -u snort -g snort -c /etc/snort/snort.conf -l /var/log/snort <enter>Make sure that snort initializes properly before proceeding below, you can check/var/log/messages for more information in the event of an error in initialization.To see if snort is actually running on your system, issue the following command:ps aux | grep -i "snort"<enter>If snort is working, it should return something that looks like the output below: 19235 ? Ssl 0:06 /usr/sbin/snort -A fast -b -d -D -i eth0 -u snort -g snort -c/etc/snort/snort.conf -l /var/log/snortTips to improve the security of SNORT while running on Linux(all flavors):Here are some suggestions to lessen the impact that a vulnerability discovered in SNORT would give potential unauthorized access to a privileged account:1. When running SNORT in daemon (-D) mode, the '-u' (user)and '-g' (group)switches should be used. This will allow SNORT to run as a given user and group after it is initialized. Typically, most system administrators prefer to add the 'snort' user and group to their systems, and that the 'snort' user should be unable initiate a login or shell privileges. Here is an example of a 'snort' user on a Linux system:snort:x:501:501:SNORT_IDS:/var/log/snort:/sbin/nologinIn the above example, the line is broken down as follows:Columns 1-5 (the username, in this case 'snort')Column 7 (the 'x' indicates that the password is encrypted)Columns 9-11(the user id (UID) 501)Columns 13-15(the group id (GID)501, in this case the group is 'snort')Columns 17-26(the full name of the user, in this case 'SNORT_IDS')Columns 28-41(the default directory for this user, in this case ‘/var/log/snort’)The /sbin/nologin at the end of the line shows that logins are disabled for the 'snort' user on this system.2. The source code for SNORT/DAQ, binaries, logging directories, shared/static libraries, and configuration files should all be owned by the ‘snort’user and group with appropriate permissions (mode 700 is preferred).3. All binaries which are produced by the compiling and installation process of SNORT and DAQ should be verified using a hash function (i.e. -MD5, SHA-1, etc) and the output stored on removable media. A cron job could be used to run this process on a regular basis with results emailed to a system administrator. Another alternative would be the use of a utility called 'tripwire' for auditing installed software on a given computer.I have separated the information for mirroring and/or copying packets from a home router to a snort sensor to a separate document located at the following URL:/docsUnder the section marked ‘Deployment Guides’ and the link is marked:How to make some home routers mirror traffic to SnortFinally, if you have SNORT working in test mode (-T option),try starting SNORT with /etc/init.d/snort start(you should get a running message if all is well).If there is a problem, check the output in /var/log/messages for additional details as to why snort failed to start.Also, you can check the status of snort by issuing the command below (while still in/etc/init.d):./snort status<enter>If it's working, you should see the output below:Checking for service snort runningNext, change directory to /var/log/snort and issue the command 'ls -al'if everything is working properly, you should see two (or more) files,one marked 'alert' and 'snort.*’ files (which are binary captures which can be read with tcpdump or wireshark). If you use 'tail -f alert' in your terminal/console window, you should see alerts coming into your snort IDS (as they occur).Next, change directory to /var/log/snort and issue the command 'ls -al'if everything is working properly, you should see two (or more) files, one marked 'alert' and 'snort.*’ files (which are binary captures which can be read with tcpdump or wireshark). If you use 'tail -f alert' in your terminal/console window, you should see alerts coming into your snort IDS (as they occur).If you have any questions, comments, or suggestions, please email me at:wp02855@(wp02855 at gmail dot com)Bill Parker。