ElearnSource_ViewEss_1IntroducingVMwareView_VV3.0_v1
VMWare Workspace ONE解决方案
16
Workspace ONE 主要功能
易于使用、企业级安全性
可对云计算、移动、 Windows 应用进行消费级 自助访问
可自主选择使用任何设备; BYOD(自带设备)或 企业所有设备
安全的生产力工具: 邮件、日历、文档和 社交应用
借助合规性检查条件访问 保证数据安全
实时应用交付和自动化
17
确保所有关键应用的安全性
身份管理 云应用 (SaaS) Web 应用(内部) 移动应用(非纳管) 生产力工具 (邮件、日历、聊天、社交平台、浏览器、内容) 内部开发的移动应用(SDK/打包) 移动应用安全性 合规性策略实施 设备管理和配置 + 虚拟应用和桌面
27
VMware 终端用户计算解决方案
移动商务
数字化工作空间 应用交付和管理 统一的终端管理
原生
Windows, 移动和 内联网应用
云端
2
企业面对终端变革的P.A.D 困境
• People – 员工想要随时使用应用和访问后台数据
– 员工想使用自己的设备
– 员工要更好的使用体验 – IT管理员想要简单便捷的管理 – 领导想要实现企业信息化的治理和安全
• APP
– SaaS、Mac、Windows应用、IOS、Android应用的管理 – 老旧windows应用延寿; • Device – 手机和平板 – 传统PC和笔记本电脑 – 智能售货机、汽车
VMWare Workspace ONE解决方案
Workspace™ ONE™
VMware Workspace™ ONE™ 是一 个交付和管理任何应用到任何平台的 企业数字化平台,具有简单和安全的 特点,其中整合了身份认证、应用管 理和企业移动化管理的所有功能。
Dell PowerVault MD系列VMware存储复制适配器(SRA)安装和配置手册(Web客

Dell PowerVault MD Series VMware Storage Replication Adapter (SRA)Installation and Configuration Manual (Web Client)Notes, cautions, and warningsNOTE: A NOTE indicates important information that helps you make better use of your computer.CAUTION: A CAUTION indicates either potential damage to hardware or loss of data and tells you how to avoid the problem.WARNING: A WARNING indicates a potential for property damage, personal injury, or death.Copyright © 2015 Dell Inc. All rights reserved. This product is protected by U.S. and international copyright and intellectual property laws. Dell™ and the Dell logo are trademarks of Dell Inc. in the United States and/or other jurisdictions. All other marks and names mentioned herein may be trademarks of their respective companies.2015 - 09Rev. A01Contents1 VMware Site Recovery Manager overview (4)2 New features and changes (6)3 System requirements (7)4 Storage recommendations (8)NVSRAM settings (8)5 Licensing requirements (9)6 Configuration procedures (10)7 Installation procedure (11)Configuring storage arrays (12)Configuring protection groups (14)Configuring recovery plans (15)8 Upgrade procedure (17)9 Troubleshooting information (18)10 Flow diagram (21)discoverArrays (21)discoverLUNs (21)testFailover (Start) (22)testFailover (Stop) (22)SyncOnce (23)Failover (23)11 Getting help (24)Documentation matrix (24)Dell documentation (24)VMware documentation (24)Contacting Dell (24)Locating your system Service T ag (25)31 VMware Site Recovery Manager overviewVMware vCenter Site Recovery Manager (SRM) interacts with the storage arrays by using the Storage Replicator Adaptor (SRA) to discover and replicate storage Logical Unit Numbers (LUNs), or virtual disks, between Disaster Recovery (DR) sites. Also, the SRA interacts with the storage array to provide failover and test failover capabilities to the SRM allowing automated failover between DR sites. SRAs are developed and provided by the storage array vendors.Figure 1. SRM ArchitectureThere are several tasks that you must complete to configure SRM. Some of these tasks are completed only for vSphere Replication (VR) or for array-based replication. If your environment uses both types of replication, consider all tasks, but if not, you may have to only complete a subset of the total possible set of tasks.The set of tasks are as follows:41.Obtain the latest SRM software and any required patches.2.Configure the SRM databases at each site.3.Install SRM at the protected site.4.Install SRM at the recovery site.5.Pair sites.If you are using array-based replication, complete the following tasks at both sites:1.Install SRAs2.Configure array managersAfter you have established the required infrastructure, complete the following steps:1.Configure inventory mappings.2.Configure placeholder datastores.3.If you are using VR, configure datastore mappings.4.Create protection groups.5.Protect virtual machines (VMs).6.Create recovery plans.52 New features and changesThe Dell Modular Disk (MD) SRA was updated to work with VMware’s vCenter Site Recovery Manager (SRM) 6.0. The new features of the 08.20 firmware make this version of the SRA work with vCenter Server 5.1, 5.5, and 6.0, with VMware SRM 5.1, 5.5, 5.8, and 6.0. This SRA does not work with prior versions of vCenter Server or SRM. Also, this version of the Dell SRA only works with the MD storage arrays.See the latest Support Matrix available at /support for compatibility versions.This version of the SRA supports the following features:•TestFailover•Failover•Reprotect•"Failback" (ability to failover VMs from the recovery site to the original protected site)•Full management from a single SRM server (no need to switch between protected and recovery)•Synchronous and Asynchronous Remote Replication Groups63 System requirementsThe process of implementing Dell MD SRA is described in the following sections.For more information about the server operating systems (OSs), MD storage arrays, and SRM versions supported with the Dell MD SRA, see the latest Support Matrix available at /support.74 Storage recommendationsFor information about recommended storage array configurations and customized settings, see the Dell Modular Disk Storage Replication Adapter Best Practices Guide (Web Client).NVSRAM settingsYou must change the following nonvolatile random-access memory (NVSRAM) setting to allow the mapping of LUNs to multiple hosts or host groups to support test failover within SRM. During test failover, snapshots are created on the recovery site storage array. You might have to map these snapshots to multiple hosts or host groups within the vSphere environment. T o facilitate this process, complete the following procedure to configure multiple LUN mappings.1.In the Dell MD Storage Replication Adapter window, click T ools → Execute Script from the drop-down menu.2.Enter the following commands in the script editor window:show RAID Controller Module [0] NVSRAMByte[0x3b];set RAID Controller Module [0] NVSRAMByte[0x3b]=2;show RAID Controller Module [0] NVSRAMByte[0x3b];reset RAID Controller Module [0];3.Click T ools → Verify and Execute from the drop-down menu.4.T o apply the changes to the RAID Controller Module 1, repeat steps 2 and 3, substituting [1] for [0].5.Exit the script editor after completing the changes for the RAID Controller Module 1.NOTE: It takes several minutes for the controllers to reset and the execution message to complete.85 Licensing requirementsThe Dell MD SRA uses either a Synchronous Replication premium feature or an Asynchronous Replication premium feature, or both, along with the Snapshot premium feature to facilitate failover and test Failover. Also, based on your environment, enable the storage partitioning, sufficient for the number of hosts connected to the storage array. VMware vCenter SRM and the Dell MD SRA do not operate without these features enabled on the MD storage array.96 Configuration proceduresThe only configuration procedure required after the initial installation is to modify the SraConfigurationData.xml file, located in the config subdirectory of the SRA installation, if your environment uses storage array passwords. If the MD storage arrays do not use passwords, modifications are not required.To enable password prompting for MD storage arrays, edit the SraConfigurationData.xml file, in the /config directory of the SRA installation. Locate the PasswordRequiredForArrayAccess tag and change the value from “false” to “true”. This change prompts for a password when adding new array managers from within SRM manager.<!--configure how array access is performed.when true, a password will be prompted for once andthen used for all array access--><PasswordRequiredForArrayAccess>true</PasswordRequiredForArrayAccess>NOTE: For important best practices on configuring virtual disk replication, adjusting SRM settings, and hostconfigurations, see Dell Modular Disk Storage Replication Adapter Best Practices Guide (Web Client).107 Installation procedureT o install the Dell MD SRA, download the latest version from the VMware downloads SRM and verify the md5sum of the installation package. T o install the SRA, perform the following:1.Ensure that the SRM Server has been installed at both sites that are participating in DR.2.At each site on the SRM server, run the SRAInstaller-xx.xx.xxxx.xxxx.exe package.3.To accept the End User License Agreement and installation paths, follow the prompts through the installation wizard.4.To view the latest README notes for the SRA, select Yes or No, and then close the wizard.5.Ensure that the SRAsvc service has been installed and is running from the services.msc console.6.Ensure that the SRA has been installed to C:\Program Files\VMware\VMware vCenter Site Recovery Manager\storage\sra\Dell MD Storage Replication Adapter. This is the SRA scripts directory.7.Repeat the same process for the peer site for this SRM server.8.After you install the SRA at both locations, open a vSphere Client (SRM 5.1 and SRM 5.5) or vSphere Web Client (SRM 5.8 andSRM 6.0) connection to one of the vCenter Servers.9.On the Home screen, in the SRM interface, access the SRM, and then click Site Recovery.10.Pair the two sites within SRM Sites’ manager by selecting the Pair Site icon or from the drop-down menu.11.In the left pane, click the protected site, the Monitor tab, and then SRAs. Ensure that the SRA status and version information iscorrect. Rescan if necessary.Figure 2. SRA Information12.On the Manage tab, configure resource mappings for both sites, including network mappings, folder mappings, and placeholderdatastores.Figure 3. SRM Resource Mappings13.Select Advanced Settings, and then select Storage Provider. Click Edit and modify the following storage provider settings:•storageProvider.fixRecoveredDatastoreNames:Enabled•storageProvider.hostRescanDelaySec: 30•storageProvider.hostRescanRepeatCnt: 2•storageProvider.hostRescanTimeoutSec: 900Figure 4. Advanced SRM Settings14.Select the recovery site and repeat step 13.15.Click Permissions and verify list of authorized users for SRM for protected and recovery sites.Configuring storage arrays1.On the Related Objects tab, click Array Based Replication.Figure 5. Site's Related Objects tab2.Click the Add Array Manager icon.3.In the Add Array Manager wizard, (Figure 6), click the Add a pair of array managers’ option button (default).4.Verify the location information, and then click Next.5.Select the Dell MD SRA, and then click Next.6.T ype the display name for the selected site MD storage array.Figure 6. Add Array Managers7.Under Array Connections Params, type the IP addresses for the local site’s MD storage array.8.Under Peer Array Connection Params, type the IP addresses for the remote site’s MD storage array.9.Click Next.10.Ensure that the array was added successfully.11.Click Next.12.Repeat step 7 for the peer site’s storage array.13.Ensure that the array pair check box is selected, and then click Next.14.Verify the summary information, and then click Finish.Not all the SRM setup procedures are complete, just the SRA portion. Create Protection Groups and Recovery Plans for your environment to complete the process. For more information about configuration steps, see the VMware Site Recovery Manager Administrator Guide.https:///support/pubs/srm_pubs.htmlConfiguring protection groups1.From the Sites list, select one of the site names to configure.2.On the Related Objects tab, click Protection Groups, and then click the Create Protection Group icon.3.In the Create Protection Group wizard, type a name for the protection group that you want to create.4.Verify the protection group type settings, and then click Next.5.T o add to the protection group and verify the VMs for the protection group, select the Datastore Groups.Figure 7. Create Protection Group6.T ype a description for this protection group, if necessary.7.Review summary information, and then click Finish.8.Repeat steps 1-6 for any other protection groups that you require.Figure 8. Protection Group Status9.Ensure that protection group status is correct or resolve any mapping issues.Configuring recovery plans1.From the Sites list, select one of the site names to configure.2.On the Related Objects tab, click Recovery Plans, and then click the Create Recovery Plan icon.3.In the Create Recovery Plan wizard, type a name for the new recovery plan, and then click Next.4.Select the recovery site location option button for this recovery plan, and then click Next.5.Select the check box next to the protection groups that you want to use with this recovery plan, and then click Next.6.T o use for the test failover workflow, and then click Next, select the network.7.Type a description for the recovery plan, if necessary, and then click Next.8.Review summary information, and then click Finish.8 Upgrade procedureThe Dell MD SRA version 05.xx.xxxx.xxxx is not compatible with the earlier LSI SRA version 01.01.xx.xx. If upgrading an SRM 4.1 environment to SRM 5.0, 5.1, 5.5, or 5.8, uninstall the LSI SRA adapter and install the Dell MD SRA version 05.60.3000.xxxx. SRM 5.8 and 6.0 use VMware vSphere Web Client to manage SRM.9 Troubleshooting informationAll logging for the Dell MD SRA is output to the SRM log files at C:\ProgramData\VMware\VMware vCenter Site Recovery Manager \Logs along with SRA logs at C:\Program Files\VMware\VMware vCenter Site Recovery Manager\storage\sra\ Dell MD Storage Replication Adapter \logs. Any errors encountered during any procedure are logged to these files. T o resolve an issue, contact Dell technical support and provide the following information:• A detailed description of the issue encountered.•All software version numbers (vCenter Server, ESXi hosts, SRM Servers, and SRAs)•Export of the SRM System Logs from both sites.Figure 10. SRM Log CollectionsAn export of the failed recovery plan and one (if any) successful runs before it.Storage array support bundle from each storage array.(Optional) A screen capture of a mapped volume showing path configuration.Figure 13. Storage Array Mapping View10 Flow diagramdiscoverArraysFigure 14. Discover Arrays FunctiondiscoverLUNsFigure 15. discoverLUNs FunctiontestFailover (Start)Figure 16. testFailover (Start) Function testFailover (Stop)Figure 17. testFailover (Stop) FunctionSyncOnceFigure 18. SyncOnce Function FailoverFigure 19. Failover Function Flow Diagram11 Getting helpDocumentation matrixThe documentation matrix provides information about documents that you can refer to for setting up and managing your system. Dell documentation•For all PowerEdge and PowerVault documentation, go to /support and enter the system Service T ag to get your system documentation.•For all Virtualization documents, go to /virtualizationsolutions.•For all operating system documents, go to /operatingsystemmanuals.•For all storage controllers and PCIe SSD documents, go to /storagecontrollermanuals.•For Dell Support Forums, go to /support-forums/default.aspx.•For Dell Advanced Search, go to /index.aspx.VMware documentation•For vCenter SRM 6.0 documentation, go tohttps:///support/pubs/srm_pubs.html•For vSphere 6.0 Documentation (ESXi, ESX, and vCenter Server), go tohttps:///support/pubs/vsphere-esxi-vcenter-server-6-pubs.html•For information about VMware Knowledge Base (Searchable Support Issues), go to/selfservice/microsites/microsite.do•For information about VMware Communities (Help Forums), go tohttps:///welcome•For VMware Compatibility Guide, go to/resources/compatibility/search.php?deviceCategory=ioContacting DellDell provides several online and telephone-based support and service options. If you do not have an active internet connection, you can find contact information on your purchase invoice, packing slip, bill, or Dell product catalog. Availability varies by country and product, and some services may not be available in your area. To contact Dell for sales, technical assistance, or customer-service issues:1.Go to /support.2.Select your country from the drop-down menu on the bottom right corner of the page.3.For customized support:a.Enter your system Service T ag in the Enter your Service T ag field.b.Click Submit.The support page that lists the various support categories is displayed.4.For general support:a.Select your product category.b.Select your product segment.c.Select your product.The support page that lists the various support categories is displayed.Locating your system Service TagYour system is identified by a unique Express Service Code and Service Tag number. The Express Service Code and Service T ag are found on the front of the system by pulling out the information tag. This information is used by Dell to route support calls to the appropriate personnel.。
Winpower for VMware ESXi 商业版用户手册说明书
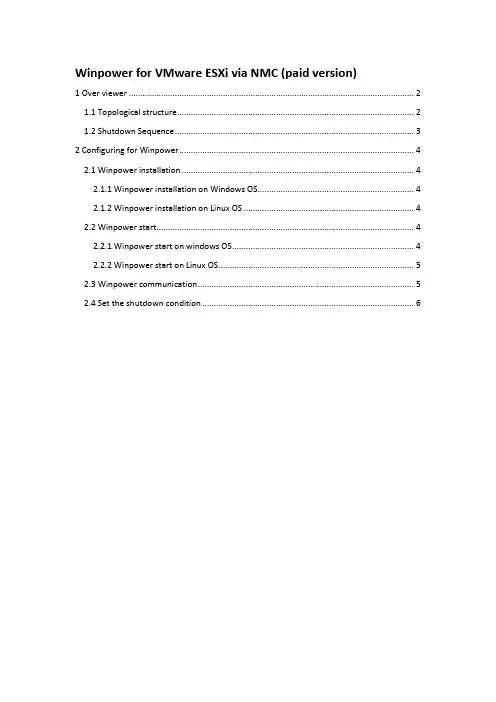
Winpower for VMware ESXi via NMC (paid version)1 Over viewer (2)1.1 Topological structure (2)1.2 Shutdown Sequence (3)2 Configuring for Winpower (4)2.1 Winpower installation (4)2.1.1 Winpower installation on Windows OS (4)2.1.2 Winpower installation on Linux OS (4)2.2 Winpower start (4)2.2.1 Winpower start on windows OS (4)2.2.2 Winpower start on Linux OS (5)2.3 Winpower communication (5)2.4 Set the shutdown condition (6)1 Over viewer1.1 Topological structure●Case 1:Winpower can be installed on any of the Guest OS, just as windows, Linux, Mac OSX, Solaris.Please make sure the “VMware tools” are installed for all the Guest OS.The guest OS that is installed Winpower is the Critical VM.●Case 2:Winpower can be installed on the other physical Computer at the same network with VMware ESXi, just like Windows, Linux, Mac OSX, Solaris.Please make sure the “VMware tools” are installed for the all the Guest OS.1.2 Shutdown SequenceCase 1(Case 1 has two Instances ):● Winpower shut down the VMs and Hosts(Host disable Autostart)Winpower only shut down the Hosts(Host enable Autostart)Case 2:In the Case 2, Local physical PC shut down should be via USB/RS232 or via SPS, check Winpower and SPS User manual for more information.2 Configuring for Winpower2.1 Winpower installationWinpower can be installed on any of the OS, just like Windows, Linux, MACOSX, SolarisFor more simply, We just give the windows and Linux(AMD64) samples.Please check the Winpower user manual for more information.2.1.1 Winpower installation on Windows OS●Right click the “setup.exe”, choose “Run as administrator” to complete the installation.●The Winpower agent will be running automatically when the Windows boots2.1.2 Winpower installation on Linux OS●Download the software (Winpower_setup_LinuxAMD64.tar.gz) from the Website or fromthe CD attached. Upload the software from Windows to the Linux using WinSCP tools.●Extract the software, there are two files including LinuxAMD64 and InstallerData.●Enter the LinuxAMD64 and then enter the following command to install the software:cd LinuxAMD64./setup.bin (if the Linux is GUI Mode)./setup_console.bin (if the Linux is CUI mode)●Go to the installation path and enter the following command to start the Winpower agentmanually:cd /opt/MonitorSoftware./agent startNote:The Winpower agent will be running automatically when the Linux boots.2.2 Winpower start2.2.1 Winpower start on windows OS●Winpower agent will be started automatically, you can right click the green icon choose“start monitor” to start the Winpower manager.2.2.2 Winpower start on Linux OS●Winpower agent will be start automatically, you can input the command “./monitor” underthe “/opt/MonitorSoftware” to start the Winpower manager2.3 Winpower communication●Click “SNMP”->”Search Device”, Input the start IP and end IP, search the SNMP devices.The devices will be added to “SNMP” tree.●Click “VMotion”->”Add”, Choose “VMware ESX/ESXi” on the “Product” down-up list.●Input the ESX/ESXi IP address, user name and password, the ESX/ESXi will be add to thetable2.4 Set the shutdown condition●Choose ESX/ESXi, Click “Shutdown Settings”, set the shutdown parameters for thecorresponding ESX/ESXi●Set the UPS supplied source to ESX/ESXi at the “Powered by UPS” up-down list.●Choose the checkbox “Enable Remote Shutdown”, set the UPS discharge timer forESX/ESXi shutdownFor the below image: The ESX/ESXi will start to shut down after UPS AC fail for 600s.If you have disabled the “Autostart” as below image:Please choose “Shutdown VMs” checkbox, so Winpower will shut down the VMs firstly then shut down the host.Note: When the Winpower is installed on the guest OS, the guest OS hosting Winpower will be judged to critical guest OS, so the critical VM will be shut down at the last.If you have enable the “Autostart” as below image:Please don’t choose “Shutdown VMs” checkbox, so Winpower only shut down the host.The guest OS will be shutdown via “autostart” function.。
实验2 VMWareThinApp虚拟应用程序的配置
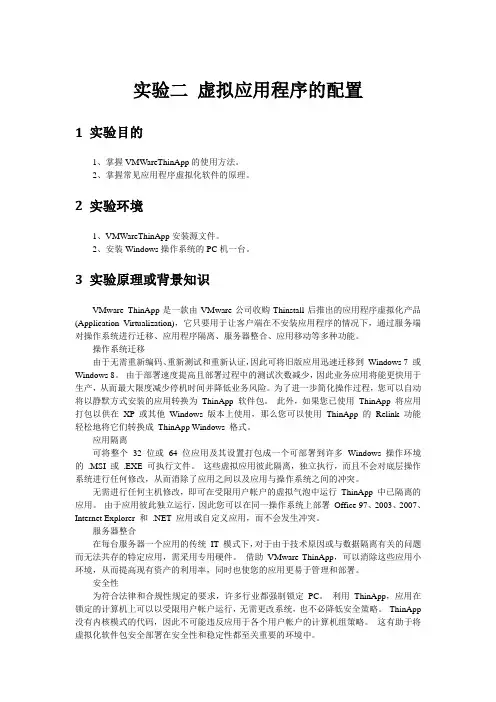
实验二虚拟应用程序的配置1 实验目的1、掌握VMWareThinApp的使用方法。
2、掌握常见应用程序虚拟化软件的原理。
2 实验环境1、VMWareThinApp安装源文件。
2、安装Windows操作系统的PC机一台。
3 实验原理或背景知识VMware ThinApp是一款由VMware公司收购Thinstall后推出的应用程序虚拟化产品(Application Virtualization),它只要用于让客户端在不安装应用程序的情况下,通过服务端对操作系统进行迁移、应用程序隔离、服务器整合、应用移动等多种功能。
操作系统迁移由于无需重新编码、重新测试和重新认证,因此可将旧版应用迅速迁移到Windows 7 或Windows 8。
由于部署速度提高且部署过程中的测试次数减少,因此业务应用将能更快用于生产,从而最大限度减少停机时间并降低业务风险。
为了进一步简化操作过程,您可以自动将以静默方式安装的应用转换为ThinApp 软件包。
此外,如果您已使用ThinApp 将应用打包以供在XP 或其他Windows 版本上使用,那么您可以使用ThinApp 的Relink 功能轻松地将它们转换成ThinApp Windows 格式。
应用隔离可将整个32 位或64 位应用及其设置打包成一个可部署到许多Windows 操作环境的.MSI 或.EXE 可执行文件。
这些虚拟应用彼此隔离,独立执行,而且不会对底层操作系统进行任何修改,从而消除了应用之间以及应用与操作系统之间的冲突。
无需进行任何主机修改,即可在受限用户帐户的虚拟气泡中运行ThinApp 中已隔离的应用。
由于应用彼此独立运行,因此您可以在同一操作系统上部署Office 97、2003、2007、Internet Explorer 和.NET 应用或自定义应用,而不会发生冲突。
服务器整合在每台服务器一个应用的传统IT 模式下,对于由于技术原因或与数据隔离有关的问题而无法共存的特定应用,需采用专用硬件。
适用于 VMware 的 Dell Storage Compellent 集成工具管理员指南说明书
适用于 VMware 的 Dell Storage Compellent 集成工具管理员指南版本 3.1注、小心和警告注: “注”表示可以帮助您更好地使用计算机的重要信息。
小心: “小心”表示可能会损坏硬件或导致数据丢失,并说明如何避免此类问题。
警告: “警告”表示可能会造成财产损失、人身伤害甚至死亡。
© 2016 - 2018 Dell Inc. 或其子公司。
保留所有权利Dell、EMC 和其他商标为 Dell Inc. 或其子公司的商标。
其他商标均为其各自所有者的商标。
2018 - 01Rev. A01前言 (5)修订历史记录 (5)读者对象 (5)相关出版物 (5)联系 Dell 支持 (6)1 安装 CITV (7)CITV 简介 (7)安装要求 (7)部署 CITV (7)设置 CITV (8)在 CITV 虚拟设备上配置时间 (8)登录 CITV (9)配置 CITV 设置 (9)更新 CITV (10)显示 CITV 的当前版本 (10)检查 CITV 更新 (11)为 CITV 安装更新 (11)在非联网站点更新 CITV (12)重新引导 CITV (13)2 VASA Provider (14)配置 VASA Provider 设置 (14)注册 VASA Provider (14)向 VMware vCenter 注册 VASA Provider (15)在 VASA Provider 和 VMware vCenter 之间同步存储数据 (15)验证供应商提供程序详细信息 (15)使用 VASA Provider 信息 (16)配置文件驱动的和基于策略的存储 (16)查看 Dell VASA Provider 存储功能 (16)3 Replay Manager Service for VMware (18)配置 RMSV (18)4 Dell Storage vSphere Web Client 插件 (19)安装 Dell Storage vSphere Web Client 插件 (19)在升级安装后注册 vSphere Web Client 插件 (19)移除 vSphere Web Client 插件 (20)附录 A: CITV 应用程序故障排除 (21)查看 VASA 警报和事件 (21)VASA Provider 故障排除 (21)目录3重新启动 VASA Provider (22)保存 VASA Provider 日志文件 (22)RMSV 故障排除 (22)重新启动 RMSV (23)保存 RMSV 日志文件 (23)vSphere Web Client 插件故障排除 (23)Dell 存储图标缺失 (23)插件摘要和监测页面似乎已禁用 (24)快照和快照计划创建失败 (24)无法启用实时卷以进行自动故障转移 (24)创建 NFS 数据存储时出现故障 (24)管理在插件外部创建的 NFS 数据存储 (24)查看 vSphere Web Client 日志文件 (24)4目录前言本指南提供有关安装 Compellent Integration T ools for VMware (CITV) 以及配置以下应用程序的说明:•Dell VASA Provider•Dell Replay Manager Service for VMware (RMSV)•Dell Storage vSphere Web Client 插件主题:•修订历史记录•读者对象•相关出版物•联系 Dell 支持修订历史记录文档编号:680-079-004表. 1: 修订历史记录读者对象本指南的目标读者是拥有 Dell Storage Center、Enterprise Manager 和 Replay Manager 的中级到专家级知识的信息技术专业人员。
VMware Horizon 2111 升级指南说明书
Horizon 升级指南VMware Horizon 2111您可以从 VMware 网站下载最新的技术文档:https:///cn/。
VMware, Inc.3401 Hillview Ave. Palo Alto, CA 94304 威睿信息技术(中国)有限公司北京办公室北京市朝阳区新源南路 8 号启皓北京东塔 8 层 801/cn上海办公室上海市淮海中路 333 号瑞安大厦 804-809 室/cn广州办公室广州市天河路 385 号太古汇一座 3502 室/cn版权所有© 2021 VMware, Inc. 保留所有权利。
版权和商标信息Horizon 升级指南目录将 VMware Horizon 升级至此版本51VMware Horizon 升级概述62卸载不再支持和已弃用的功能8将安全服务器替换为 Unified Access Gateway 设备9卸载 JMP Server9从 Horizon 中移除 View Composer103升级客户端应用程序124VMware Horizon Server 升级的系统要求13各种版本的 VMware Horizon 组件的兼容性列表13Horizon 连接服务器的要求14Horizon Connection Server 的硬件要求14Horizon 连接服务器支持的操作系统14Horizon 连接服务器的升级要求14有关 Horizon Agent 的要求和注意事项155升级 VMware Horizon Server 组件16升级 Horizon Connection Server16准备连接服务器以进行升级17升级副本组中的连接服务器18在不同计算机上升级到最新版本的连接服务器20将连接服务器恢复到快照后创建副本组21并行升级连接服务器22对连接服务器升级和安装过程中出现的错误进行故障排除23升级注册服务器24升级 Cloud Pod 架构环境24升级 VMware Horizon Server 以允许使用 HTML Access24升级 vCenter Server25接受默认 TLS 证书的指纹26使用 Horizon 组策略管理模板文件276升级 ESXi 主机及其虚拟机287升级已发布的桌面和虚拟桌面30Horizon 升级指南升级 Horizon Agent30将 vCenter Server 升级到 vSphere 6.7 或更高版本时升级即时克隆桌面池32升级提供基于会话桌面的 RDS 主机338在 VMware Horizon 环境中单独升级 vSphere 组件35将 VMware Horizon 升级至此版本《Horizon 升级指南》提供了有关从 VMware Horizon™ 7.x 和 VMware Horizon 2xxx 的最新主要版本或维护版本升级至此版本的说明。
VMware vRealize Network Insight 5.3 安装指南说明书
安装 vRealize Network InsightVMware vRealize Network Insight 5.3您可以从 VMware 网站下载最新的技术文档:https:///cn/。
VMware, Inc.3401 Hillview Ave. Palo Alto, CA 94304 威睿信息技术(中国)有限公司北京办公室北京市朝阳区新源南路 8 号启皓北京东塔 8 层 801/cn上海办公室上海市淮海中路 333 号瑞安大厦 804-809 室/cn广州办公室广州市天河路 385 号太古汇一座 3502 室/cn版权所有© 2020 VMware, Inc. 保留所有权利。
版权和商标信息安装 vRealize Network Insight目录关于《vRealize Network Insight 安装指南》41系统建议和要求52vRealize Network Insight 安装程序9安装工作流10部署 vRealize Network Insight 平台 OVA11使用 vSphere Web Client 进行部署11使用 vSphere Windows 本机客户端进行部署13激活许可证14生成共享密钥14设置 Network Insight 收集器 (OVA)15使用 vSphere Web Client 的部署15使用 vSphere Windows 本机客户端进行部署16对于 VMware SD-WAN 在 AWS 中设置 Network Insight 收集器 (AMI)17在现有设置中部署其他收集器193使用评估许可证访问 vRealize Network Insight20添加 vCenter Server20分析流量流22生成报告224计划纵向扩展部署23计划纵向扩展平台群集23计划纵向扩展收集器24增加设置的块大小255升级 vRealize Network Insight26联机升级27一键式脱机升级29CLI 升级316卸载 vRealize Network Insight34在 vCenter 中启用 Netflow 时移除收集器 IP34在 NSX 中启用 Netflow 时移除收集器 IP35关于《vRealize Network Insight 安装指南》《vRealize Network Insight 安装指南》面向负责安装 vRealize Network Insight 的管理员或专业人员。
vmware桌面虚拟化解决方案
vmware桌面虚拟化解决方案《VMware桌面虚拟化解决方案》随着移动办公和远程工作的兴起,企业对于灵活的IT解决方案的需求也日益增加。
在这种情况下,桌面虚拟化技术成为了许多企业的首选,而VMware作为业界领先的虚拟化解决方案供应商,其桌面虚拟化解决方案备受企业青睐。
VMware的桌面虚拟化解决方案主要包括VMware Horizon和VMware View两个产品。
这些解决方案可以帮助企业实现虚拟桌面的部署和管理,为员工提供高效、安全的远程办公环境。
首先,VMware桌面虚拟化解决方案能够将桌面操作系统和应用程序与硬件进行解耦,将它们统一部署在数据中心的虚拟机上。
这样一来,员工可以在任何设备上,通过互联网随时随地访问自己的虚拟桌面,极大地提升了工作的灵活性和便捷性。
其次,VMware的桌面虚拟化解决方案还可以为企业提供更加强大的安全性和管理性。
企业可以通过中心化管理工具轻松地管理和监控所有虚拟桌面,确保数据的安全性和合规性。
同时,员工在访问虚拟桌面时,数据都是在安全的数据中心环境中进行处理和存储,大大减少了数据泄露和安全漏洞的风险。
此外,VMware的桌面虚拟化解决方案还能够帮助企业降低IT 成本。
通过虚拟化技术,企业可以有效减少硬件设备的采购和维护成本,降低能耗和占用空间,提高IT资源的利用率和管理效率。
综合来看,VMware的桌面虚拟化解决方案是一款强大的IT工具,能够帮助企业实现远程办公、提升工作效率、加强数据安全,并且降低成本。
未来,随着移动办公和远程工作的普及,相信VMware桌面虚拟化解决方案将会在企业IT领域发挥越来越重要的作用。
VMware View畅享桌面云——VMware助力新风机械厂构建桌面云平台
室 副 主 任 马骁 铖
针 对以 上问题 , 新 风 机 械 厂 着 眼 于 企 业 未 来 发展, 对 I T 系 统 进 行 了全 面 的 优 化 升 级 , 全 面 部 署虚拟化 解决 方案来提 升 I T 系统性 能、 安全性 、 可 靠性以 及 I T 资源的利 用效率 , 同时 降低 I T 管 理 人 员的 工 作 强 度 , 提升 I T服 务的质量 。
求, 而 I T管 理 人 员有 限 , 信 息 系统 运行 缓慢 , 管
理维 护工作量 大 , 导致 I T 服 务 质量 受 到 影 响 , 远 程办 公需求得 不到充分 满足 。
( 2 ) 安全性方面
VM wa r e Vi e w 将 数 据 和 敏 感 信 息 安 全 地
保存在数据 中心 , 保持 了对它们的控 制能力,
VMwa r e Vi e w 是 目前 市 场上 功能 全 、 部 署广 的
企业 桌面 虚 拟 化 产 品及 桌 面 管 理 系 统 , 它 采 用 以 用
翘 首以盼
户 为 中心 的计 算 、 按需 向 用 户提 供 I T资 源 , 既 不 改
在 该厂 以往 的发 展 中 , 新 凤 机 械 厂 高 度 重 视 变用 户 的使 用 习惯 、 保证 用 户 获得 足 够 的 自由度 , 同 信 息化 建设 , 积 累 了可 观的 I T 资 产 。 随 着 企 业 时 又可 满 足 集 中 管理 和数 据 安 全 的 要 求 。VMwa r e 规 模 的 日益 扩 大 和 业 务 的 不 断 拓 展 , 企业原 有 I T 所 提 供 的 渐进 式 的 云计 算 实 施 途 径 和 特 色 功 能 , 有
VMware 2012巡展官方文档--在苹果笔记本上搭建iPad虚拟桌面演示环境--之VMwareFusion篇
目
第1章 第2章 1. 2. 3. 4. 5. 6. 7. 8.
录
环境搭建................................................................................................................. 2 安装配置................................................................................................................. 5
-1-
如何在您的笔记本上搭建View (iPad) 演示环境
第 1 章 环境搭建
本指南搭建的View环境,共需要使用3台虚拟机,硬盘空间需要25G左右,内 存为1.5G,如果你的笔记本内存低于4G时,可能会出现运行速度不理想等问 题。
第一台为活动目录控制器,其划分的资源如下:
-2-
如何在您的笔记本上搭建View (iPad) 演示环境
-8-
如何在您的笔记本上搭建View (iPad) 演示环境
3. View Connection Server 安 装
步骤1:设置View Connection Server为固定IP地址,并指向正确的DNS。
本 次 测 试 中 View Connection Server 的 IP 为 192.168.1.202\DNS 192.168.1.201。 步骤2:将View Connection Server加入域。本次测试的Connection Server 为。
- 1、下载文档前请自行甄别文档内容的完整性,平台不提供额外的编辑、内容补充、找答案等附加服务。
- 2、"仅部分预览"的文档,不可在线预览部分如存在完整性等问题,可反馈申请退款(可完整预览的文档不适用该条件!)。
- 3、如文档侵犯您的权益,请联系客服反馈,我们会尽快为您处理(人工客服工作时间:9:00-18:30)。
介绍 VMware View 安装和配置 View Manager 的关键组件 使用 VMware View 组件
ElearnSource_ViewEss_1IntroducingVMwareView_VV3.0_v1
版权所有 2008, VMware, Inc. 保留所有权利
降低桌面存储成本
使组织可以创建更少的桌面映像
只需一次封装应用程序,就可将应 用程序交付到不同操作系统环境中 的任何位置
View Connection Server
由于可以将应用程序映像与桌面隔 离,因此部署桌面更快
兼容性测试更具时效性 无需放弃控制权利,就可向最终用 户授权 减少应用程序之间的冲突
客户端
用于虚拟机的数据存储
虚拟机的定制规范
桌面源的管理方式
非 View Manager 部署、但由 VirtualCenter 管理的 虚拟机
这种桌面源指的是由 VirtualCenter Server 管理、但不是 View Manager 部署的虚拟机 要添加这种桌面源,需要具备以下条件:
用于管理虚拟机的 VirtualCenter Server
用户工作流程:用户签入桌面
View Manager Connection Server
通信、缓存和安全
最初的签出时间将比后续签入和 签出的时间长 有可用的网络连接时,脱机系统 将轮询 View Connection Server
View Connection Server
通信、缓存和安全
通过策略,加密每个脱机系统中的 数据并控制缓存生命周期 如果删除了用户访问权限,当缓存 过期时将无法访问客户端系统
单个桌面和自动桌面池
单个桌面
自动桌面池
25
手动桌面池和 Microsoft Terminal Services 桌面池
手动桌面池
Microsoft Terminal Services 桌面池
桌面源的管理方式
由 View Manager 部署及 VirtualCenter Server 管理的虚拟机
Offline Desktop
Offline Desktop – 签入,签出
Offline Desktop 最终用户可以从 View Connection Server 下载或者“签出” 其桌面虚拟机副本,以便在本地计算机上使用,然后再进行“签入” 管理员能够将数据中心的安全策略和加密策略应用到最终用户的本地计算机
客户端 View Manager
管理客户端与托管桌面之间的连接
VMware Infrastructure 平台
托管的虚拟桌面
带链接的克隆
ThinApp Internet 访问权限
DMZ
将应用程序 虚拟化
主桌面映像
View Composer
VirtualCenter Active Directory(用户身份验证)
刀片 PC 或 网络共享主机 VMware View 或 瘦客户端 物理 PC ACE 或 独立主机
其他 ThinApp 资源
VMware ThinApp 基本知识课程
VMware ThinApp Reviewers Guide (VMware ThinApp 审阅指南): /files/pdf/thinapp_ 4_reviewers_guide.pdf
VMware View
View Composer
Offline Desktop
Unified Desktop Access
ThinApp
Virtual Printing
View Composer 简介
使用带链接的克隆技术创建桌面映像
该组件安装到 VirtualCenter Server 上
允许管理员通过单个中央基础映像克隆和 部署多个桌面 只要升级主映像,就可修补多个桌面
为最终用户提供灵活性,以安全访问安装在以下环 境中的个性化桌面:
VMware Virtual Infrastructure 环境
Windows Terminal Server 环境 来自单一界面的刀片 PC
Unified Desktop Access
桌面交付模式简介
[View Administrator Console(View Administrator 控制台)] > [Desktops and Pools (桌面和池)] 按钮 > [Desktops and Pools(桌面和池)] 选项卡 > [Add(添加)] 按钮
View Composer + 用户数据磁盘
存储设备 1
存储设备 2
View Composer 主要优势
可以降低高达 90% 的存储 成本及管理开销。
最后,当管理员更新、修 补或升级公司内部版本时, 诸如服务包、应用程序更 新乃至 Vista 升级程序, 可以保留用户设置。
View Composer
使用 VMware View Manager 组件
安装 View Manager 和 View Composer 配置 View Manager 管理任务 最终用户任务
45 分钟
20 分钟
单元成果
介绍 VMware View 的学习目标:
识别 VMware View 解决方案的主要组件
描述 VMware View 工作原理 论述 VMware View 的主要功能和优势以及使用方法
VMware View 的主要优势
创建通用的客户端,让用户在 任何地点的任何设备中通过单 独的个性化视图访问他的所有 应用程序和数据。 降低的整体桌面运算成本高达 45%
提高安全性
提供更强的管理和控制能力 增强业务灵活性和用户灵活度 有助于保持业务连续性和灾难 恢复 降低电力消耗
VMware View 的主要功能
View Manager
Offline Desktop – 签出桌面的功能
下载 Offline Desktop 后,它可像联机桌面一样利用本地资源
View Manager
用户工作流程:用户签出桌面
View Manager Connection Server
用户工作流程:用户脱机工作
View Manager Connection Server
课程内容
单元名称 主题
VMware View 体系结构及工作原理 VMware View 主要功能和优势 用户如何使用 VMware View VMware View 目标客户和用户 View Manager 组件和概念
持续时间
介绍 VMware View
70 分钟
安装和配置 VMware View Manager 的 关键组件
ThinApp 的工作原理
创建并封装不受操作系统制约的虚拟 应用程序 VMware ThinApp 使用构建进程,将 含有压缩的嵌入式文件系统和注册表 的虚拟操作系统(即 VOS)“连接” 到单个可执行文件中 这个可执行文件无需安装即可运行, 也无需从磁盘和任何数据源解压缩 文件
ThinApp 和 VMware View
VMware ThinApp 简介
VMware ThinApp 是一种应用程序虚拟化解决 方案,可以将应用程序快速交付给物理机或虚 拟桌面 VMware ThinApp 可以降低存储成本并简化桌 面应用程序的部署 它包含在 VMware View Premier Edition 产品 套件中
VMware ThinApp
通过相同的管理架构管 理本地运行的桌面或者 数据中心中的桌面
让用户本地运行受管 的虚拟桌面,以在虚拟 桌面环境中获得 最佳用户体验
Unified Desktop Access 简介
用户可以访问由多个后端交付的桌面
启用 View Manager 交付和管理不受 VirtualCenter Server 管理的虚拟机
Virtual Printing 的主要优势
可以从虚拟桌面自动查找、 连接并打印至客户端定义 的任何本地或网络打印机
包括压缩设置,可以提供 高性能的优质打印效果, 弥补了网络打印机质量 不佳的缺点
ThinApp.exe 应用程序
Windows XP 模板 Windows XP 虚拟机 (有限的应用程序安装)
ThinApp 的优势
简化应用程序的管理,并在升级和刷新操 作系统时帮助保留用户数据和设置 简化应用程序的升级和修补 使应用程序的运行不受主机操作系统或修 补程序级别的制约,减少了平台支持,缩 短了发行周期 通过集中管理并压缩应用程序,它还可以 减少虚拟桌面需要的额外存储空间
但这不会影响用户设置、数据或应用程序
View Composer
主虚拟机、带链接的复制和桌面克隆
用于修补的体系结构、扩展和成本
操作系统克隆可以放在非用户 数据磁盘的其他存储设备上 用户数据可以在冗余的高度可 用存储设备中运行 可让系统管理员快速地将新的 修补程序移出到操作系统进行 修补,而不会丢失用户数据和 设置
由 View Manager 部署并由 VirtualCenter Server 管理的 虚拟机 要添加这种桌面源,需要具备以下条件:
部署和管理虚拟机的 VirtualCenter Server
如果您正在使用 View Composer,则需要用于部署虚拟机的 模板或快照 在 VirtualCenter 清单层次结构中用来添加虚拟机的位置
可以将自动桌面部署的速 度从数分钟提高到数秒。
而且,管理员可以在数秒 钟之间重新部署公司标准 的内部版本,并可以通过 单个中央映像管理成百上 千的桌面。
再次,管理员可以在几分 钟之内移出成百上千个桌 面,并在数秒钟之内提供 所需的桌面。
Offline Desktop 简介