msil入门说明
MSIL指令集(包括所有指令和详解)

Conv_I 将位于计算堆栈顶部的值转换为 native int。
Conv_I1 将位于计算堆栈顶部的值转换为 int8,然后将其扩展(填充)为 int32。
Conv_I2 将位于计算堆栈顶部的值转换为 int16,然后将其扩展(填充)为 int32。
Jmp 退出当前方法并跳至指定方法。
Ldarg 将参数(由指定索引值引用)加载到堆栈上。
Ldarg_0 将索引为 0 的参数加载到计算堆栈上。
Ldarg_1 将索引为 1 的参数加载到计算堆栈上。
Ldarg_2 将索引为 2 的参数加载到计算堆栈上。
Ldarg_3 将索引为 3 的参数加载到计算堆栈上。
Conv_U8 将位于计算堆栈顶部的值转换为 unsigned int64,然后将其扩展为 int64。
Cpblk 将指定数目的字节从源地址复制到目标地址。
Cpobj 将位于对象(&、* 或 native int 类型)地址的值类型复制到目标对象(&、* 或 native int 类型)的地址。
Box 将值类转换为对象引用(O 类型)。
Br 无条件地将控制转移到目标指令。
Br_S 无条件地将控制转移到目标指令(短格式)。
Break 向公共语言结构 (CLI) 发出信号以通知调试器已撞上了一个断点。
Brfalse 如果 value 为 false、空引用(Visual Basic 中的 Nothing)或零,则将控制转移到目标指令。
Calli 通过调用约定描述的参数调用在计算堆栈上指示的方法(作为指向入口点的指针)。
Callvirt 对对象调用后期绑定方法,并且将返回值推送到计算堆栈上。
MSI MS-98L1(v1.x)工业计算机板用户指南说明书

(v1.x) Industrial Computer BoardiMS-98L1MS-98L1MS-98L11Thank you for choosing the MS-98L1, an excellent industrial computerboard.Based on the innovative Intel®Coffee Lake-S/ Coffee Lake-S RefreshProcessor, the MS-98L1 is engineered to provide reliable performancefor a wide variety of industrial applications.1-1-1MS-98L11-4MS-98L1LVDS Inverter Box Header LVDS Inverter Power JumperLVDS Box HeaderPCIe Slot PCIe Jumper1-61-7MS-98L1HDMI (DP by option)DisplayPort USB 3 2 Gen 2USB 3 2 Gen 1Line-Out Mic-In SKU2 (Q370)HDMI (DP by option)DisplayPort GbE LANUSB 3 2 Gen 2USB 3 2 Gen 1Line-In Line-Out Mic-In SKU3 (H310)HDMI (DP by option)DisplayPort GbE LAN USB 3 2 Gen 1USB 2 0GbE LANLine-In Line-Out Mic-In SKU4 (H310)HDMI (DP by option)DisplayPort GbE LANUSB 3 2 Gen 1USB 2 0Line-In Line-Out Mic-In2This chapter provides you with the information about hardwaresetup procedures. While doing the installation, be careful in holdingthe components and follow the installation procedures. For somecomponents, if you install in the wrong orientation, the components willnot work properly.Use a grounded wrist strap before handling computer components. Staticelectricity may damage the components.2-2-12-2MS-98L12-4HDMI(DP by option)DisplayPort USB 3 2 Gen 2USB 3 2 Gen 1Line-OutMic-InSKU2 (Q370)HDMI(DP by option)DisplayPort GbE LANUSB 3 2 Gen 2USB 3 2 Gen 1Line-InLine-Out Mic-InSKU3 (H310)HDMI(DP by option)DisplayPort GbE LANUSB 3 2 Gen 1USB 2 0GbE LANLine-InLine-Out Mic-InSKU4 (H310)HDMI(DP by option)DisplayPort GbE LANUSB 3 2 Gen 1USB 2 0Line-InLine-Out Mic-InMS-98L12-16MS-98L12-18MS-98L12-20MS-98L12-223This chapter provides information on the BIOS Setup program and allowsusers to configure the system for optimal use.Users may need to run the Setup program when:■An error message appears on the screen at system startup and requests users to run SETUP.■Users want to change the default settings for customized features.Important• Please note that BIOS update assumes technician-level experience.• As the system BIOS is under continuous update for better system performance, the illustrations in this chapter should be held forreference only.2-3-13-2MainUse this menu for basic system configurations, such as time, date, etc. AdvancedUse this menu to set up the items of special enhanced features.BootUse this menu to specify the priority of boot devices.SecurityUse this menu to set supervisor and user passwords.ChipsetThis menu controls the advanced features of the onboard chipsets.PowerUse this menu to specify your settings for power management.Save & ExitThis menu allows you to load the BIOS default values or factory default settings into the BIOS and exit the BIOS setup utility with or without changes.System DateThis setting allows you to set the system date. The date format is <Day>, <Month> <Date> <Year>.System Timesetting allows you to set the system time. The time format is <Hour> <Minute> <Second>.SATA Mode SelectionThis setting specifies the SATA controller mode.Full Screen Logo DisplayThis BIOS feature determines if the BIOS should hide the normal POST messages with the motherboard or system manufacturer’s full-screen logo.When it is enabled, the BIOS will display the full-screen logo during the boot-up sequence, hiding normal POST messages.When it is disabled, the BIOS will display the normal POST messages, instead of the full-screen logo.Please note that enabling this BIOS feature often adds 2-3 seconds of delay to the booting sequence. This delay ensures that the logo is displayed for a sufficient amount of time. Therefore, it is recommended that you disable this BIOS feature for a faster boot-up time.Bootup NumLock StateThis setting is to set the Num Lock status when the system is powered on. Setting to [On] will turn on the Num Lock key when the system is powered on. Setting to [Off] will allow users to use the arrow keys on the numeric keypad.Option ROM Messagesitem is used to determine the display mode when an optional ROM initialized during POST. When set to [Force BIOS], the display mode used AMI BIOS is used. Select [Keep Current] if you want to use the display mode ofIntel Virtualization TechnologyVirtualization enhanced by Intel Virtualization Technology will allow a platform to run multiple operating systems and applications in independent partitions.virtualization, one computer system can function asActive Processor CoresThis setting specifies the number of active processor cores.Hyper-ThreadingThe processor uses Hyper-Threading technology to increase transaction rates and reduces end-user response times. The technology treats the two cores inside the processor as two logical processors that can execute instructions simultaneously. In this way, the system performance is highly improved. If you disable the function, the processor will use only one core to execute the instructions. Please disable this item if your operating system doesn support HT Function, or unreliability and instability may occur.Intel(R) SpeedStep(tm)(Enhanced Intel SpeedStep Technology) allows the systemadjust processor voltage and core frequency, which can result in decreasedSerial Port 1/ 2/ 3/ 4/ 5/ 6This setting enables/disables the specified serial port.Change SettingsThis setting is used to change the address & IRQ settings of the specified Mode SelectSelect an operation mode for the specified serial port.This setting controls the FIFO data transfer mode.Shared IRQ ModeThis setting provides the system with the ability to share interrupts among its Watch Dog TimerYou can enable the system watch-dog timer, a hardware timer that generates a reset when the software that it monitors does not respond as expected each time the watch dog polls it.Smart Fan ConfigurationCPUFAN1, SYSFAN1enables/disables the Smart Fan function. Smartexcellent feature which will adjust the CPU/system fan speed automatically depending on the current CPU/system temperature, avoiding the overheating to damage your system.This setting specifies the fan type.PCI/PCIE Device ConfigurationLegacy USB SupportSet to [Enabled] if you need to use any USB 1.1/2.0 device in the operating system that does not support or have any USB 1.1/2.0 driver installed, such as DOS and SCO Unix.Audio ControllerThis setting enables/disables the onboard audio controller.GPO0 ~ GPO7These settings control the operation mode of the specified GPIO.CSM Supportsetting enables/disables the support for Compatibility Support Module, part of the Intel Platform Innovation Framework for EFI providing the capability to support legacy BIOS interfaces.Boot Option Prioritiessetting allows users to set the sequence of boot devices where attempts to load the disk operating system.。
MSI筆記型電腦使用手冊说明书

目錄版權與商標聲明 ............................................................................................................1-4發行版本 .......................................................................................................................1-4FCC-B 無線電頻率干擾聲明 .........................................................................................1-5FCC 法規......................................................................................................................1-5CE 規定 ........................................................................................................................1-5電池規範 .......................................................................................................................1-6WEEE 聲明...................................................................................................................1-6化學物質資訊 ...............................................................................................................1-6升級及保固 ...................................................................................................................1-7取得替換零件................................................................................................................1-7安全指南 .......................................................................................................................1-8限用物質含有情況標示聲明書.....................................................................................1-10MSI 獨家功能 .............................................................................................................1-11簡介 ...............................................................................................2-1打開包裝 .......................................................................................................................2-2產品檢視 .......................................................................................................................2-3頂蓋開啟檢視圖 ......................................................................................................2-3前端檢視圖 ..............................................................................................................2-5右側檢視圖 ..............................................................................................................2-6左側檢視圖 ..............................................................................................................2-7後端檢視圖 ..............................................................................................................2-8底部檢視圖 ..............................................................................................................2-9如何使用鍵盤..............................................................................................................2-10Windows 鍵 ...........................................................................................................2-10快速啟動按键.........................................................................................................2-11開啟或關閉觸控板..................................................................................................2-11進入睡眠模式.........................................................................................................2-11切換顯示器 ............................................................................................................2-12使用多個顯示器 .....................................................................................................2-12調整顯示器亮度 .....................................................................................................2-12調整喇叭音量.........................................................................................................2-12調整鍵盤背光亮度(選配搭載).................................................................................2-13教學影音:如何使用[Fn]功能鍵 .............................................................................2-13產品規格 .....................................................................................................................2-14使用手冊使用入門 ........................................................................................3-1開始使用筆記型電腦 .....................................................................................................3-2如何舒適使用筆記型電腦..............................................................................................3-3如何管理電源供應器 .....................................................................................................3-4 AC/DC 變壓器 .........................................................................................................3-4電池 .........................................................................................................................3-4如何在 Windows 10 設定電源計劃 ...............................................................................3-6選擇或自訂電源計劃 ................................................................................................3-6建立電源計劃...........................................................................................................3-9如何使用觸控板 ..........................................................................................................3-11關於硬碟和固態硬碟 ...................................................................................................3-12關於固態硬碟插槽.......................................................................................................3-12如何連接網際網路.......................................................................................................3-13無線網路 ................................................................................................................3-13有線網路 ................................................................................................................3-15如何設定藍牙連線.......................................................................................................3-20啟動藍牙連線.........................................................................................................3-20如何連接外部裝置.......................................................................................................3-23如何使用 RAID 功能 ...................................................................................................3-24如何在 BIOS 選擇 Boot Mode ...................................................................................3-25教學影音:如何將MSI筆記型電腦的作業系統還原為Windows 10 .............................3-26教學影音:如何使用 MSI One Touch Install 一鍵安裝程式 .......................................3-27版權與商標聲明著作權 ©Micro-Star International Co., Ltd.微星科技股份有限公司。
MSIL指令集详解
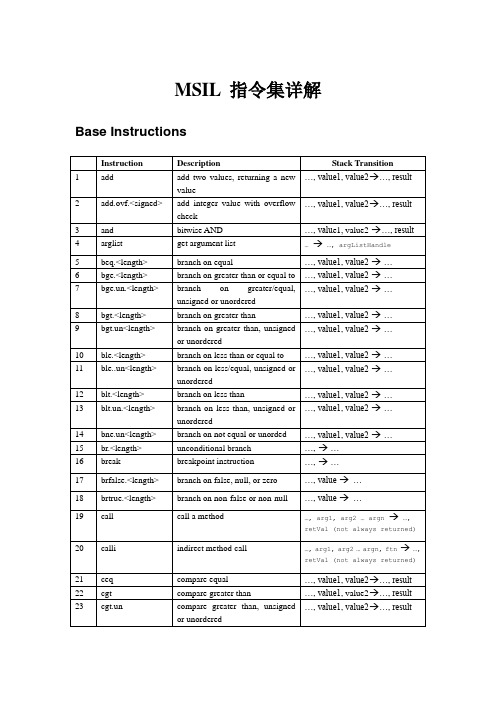
MSIL 指令集详解Base InstructionsInstruction Description Stack Transition1 add add two values, returning a new…, value1, value2→…, resultvalue2 add.ovf.<signed> add integer value with overflow…, value1, value2→…, resultcheck3 and bitwise AND …, valu e1, value2 →…, result4 arglist get argument list … →…, argListHandle5 beq.<length> branch on equal …, value1, value2 →…6 bge.<length> branch on greater than or equal to …, value1, value2 →…7 bge.un.<length> branch on greater/equal,…, value1, value2 →…unsigned or unordered8 bgt.<length> branch on greater than …, value1, value2 →…9 bgt.un<length> branch on greater than, unsigned…, value1, value2 →…or unordered10 ble.<length> branch on less than or equal to …, value1, value2 →…11 ble..un<length> branch on less/equal, unsigned or…, value1, value2 →…unordered12 blt.<length> branch on less than …, value1, value2 →…13 blt.un.<length> branch on less than, unsigned or…, value1, value2 →…unordered14 bne.un<length> branch on not equal or unorded …, value1, value2 →…15 br.<length> unconditional branch …, →…16 break breakpoint instruction …, →…17 brfalse.<length> branch on false, null, or zero …, value →…18 brtrue.<length> branch on non-false or non-null …, value →…19 call call a method …, arg1, arg2 … argn →…,retVal (not always returned) 20 calli indirect method call …, arg1, arg2 … argn, ftn →…,retVal (not always returned)21 ceq compare equal …, value1, value2→…, result22 cgt compare greater than …, value1, value2→…, result23 cgt.un compare greater than, unsigned…, value1, value2→…, resultor unordered24 ckfinite check for a finite real number …, value →…, value25 clt compare less than …, value1, value2→…, result26 clt.un compare less than, unsigned orunordered…, value1, value2→…, result27 conv.<to type> data conversion …, value →…, result28 conv.ovf<to type> data conversion with overflowdetection…, value →…, result29 conv.ovf.<totype>.un unsigned data conversion withoverflow detection…, value →…, result30 cpblk copy data from memory tomemory…, destaddr, srcaddr, size →…31 div divide values …, value1, value2→…, result32 div.un divide integer values, unsigned …, value1, value2→…, result33 dup duplicate the top value of thestack…, value →…, value, value34 endfilter end filter clause of SEH …, value →…35 endfinally end the finally or fault clause ofexception block… →…36 initblk initialize a block of memory to avalue…, addr, value, size →…37 jmp jump to method …→…38 ldarg.<length> load argument onto the stack … →…, value39 ldarga.<length> load an argument address …, →…, address of argumentnumber argNum40 ldc.<type> load numeric constant … →…, num41 ldftn load method pointer … →…, ftn42 ldind.<type> load value indirect onto the stack …, addr →…, value43 ldloc load local variable onto the stack … →…, value44 ldloca.<length> load local variable address … →…, address45 ldnull load a null pointer … →…, null value46 leave.<length> exit a protected region of code …, →47 localloc allocate space in the localdynamic memory poolsize → address48 mul multiply values …, value1, value2 →…, result49 mul.ovf<type> multiply integer values withoverflow check…, value1, value2 →…, result50 neg negate …, value →…, result51 nop no operation …, →…,52 not bitwise complement …, value →…, result53 or bitwise OR …, value1, value2 →…, result54 pop remove the top element of the…, value →…stack55 rem compute the remainder …, value1, valu e2 →…, result56 rem.un compute integer remainder,…, value1, value2 →…, resultunsigned57 ret return from method retVal on callee evaluationstack (not always present) →…, retVal on caller evaluationstack (not always present) 58 shl shift integer left …, value, shiftAmount →…,result59 shr shift integer right …, value, shiftAmount →…,result60 shr.un shift integer right, unsigned …, value, shiftAmount →…,result61 starg.<length> store a value in an argument slot …, value →…,62 stind.<type> store value indirect from stack …, addr, val →…63 stloc pop value from stack to local…, value →…variable64 sub substract numeric values …, value1, value2 →…, result65 sub.ovf.<type> substract integer values, checking…, value1, value2 →…, resultfor overflow66 switch table switch on value …, value →…,67 xor bitwise XOR ..., value1, value2 → ...,resultObject Model InstructionsInstruction Description Stack Transition 1 box convert value type to objectreference…, valueType →…, obj2 callvirt call a method associated, aruntime, with an object …, obj, arg1, … argN →…, returnVal (not always returned)3 cast class cast an object to a class …, obj →…, obj24 cpobj copy a value type …, destValObj, srcValObj →…,5 initobj Initialize a value type…,addrOfValObj →…,6 isinst test if an object is is an instanceof a class or interface…, obj →…, result7 ldelem.<type> load an element fo an array …,array, index →…, value8 ldelema load address of an element of anarray…, arr ay, index →…, address9 ldfld load field of an object …,obj →…, value10 ldflda load field address …,obj →…, address11 ldlen load the length of an array …, array →…, length12 ldobj copy value type to the stack …, addrOfValObj →…, valObj13 ldsfld load static field of a class …, →…, value14 ldsflda load static field address …, →…, address15 ldstr load a literal string …, →…, string16 ldtoken load the runtime representationof metadata token… →…, RuntimeHandle17 ldvirtfn load a virtual method pointer … object →…, ftn18 mkrefany push a typed reference on thestack…, ptr →…, typedRef19 newarr Create a zero-base,on-dimensional array…, numElems →…, array20 newobj create a new object …, arg1, … argN →…, obj21 refanytype load the type out of a typedreference…,TypedRef →…, type22 refanyval load the address out of a typedreference…,TypedRef →…, address23 rethrow rethrow the current exception …, →…,24 sizeof load the size in bytes of a valuetype …, →…, size (4 b ytes, unsigned)25 stelem.<type> store an element of an array …, array, index, value →…,26 stfld store into a field of an object …, obj, value →…,27 stobj store a value type from the stackinto memory…, addr, valObj →…,28 stsfld store a static field of class …, val →…,29 throw throw an exception …, object →…,30 unbox convert boxed value type to itsraw form。
IXL Neo模块使用指南说明书

User GuideModules - Heat • Vent • LightModel: 33132 Neo Light Small Silver - HardwiredModel: 33141 Neo Light Large White - HardwiredModel: 33142 Neo Light Large Silver - HardwiredModel: 34101 Neo Vent n Lite White - HardwiredModel: 34102 Neo Vent n Lite Silver - Hardwired Model: 33131 Neo Light Small White - HardwiredElectrical Rating: 230~240 V. 50 Hz.Model: 35101 Neo Vent White - Hardwired Model: 35102 Neo Vent Silver - Hardwired Model: 36111 Neo Heat White - Hardwired Model: 36112 Neo Heat Silver - HardwiredModel : 33131, 33132, Neo Li g ht Smal l Model : 33141, 33142, Neo Li g ht Large Model : 36111, 36112, Neo Heat Model : 34101, 34102, Neo Vent n Li t e Model :35101, 35102, Neo VentWelcomeThank you for buying this IXL Neo Module. Even if you have used a Neo before, there are very good reasons to read this user guide before using this one:• You and your family, property and home will be safe from harm.• You will learn how this appliance may differ from others.• By using the Neo Module fully and properly, you will get maximum life and value from it.• Our warranty depends on you using the Neo Module according to this user guide.It will only take you a few minutes, so please read on!Contents.........................................................Neo Module Range Pg 3-4Safety ................................................................................Pg 5How it Works ....................................................................Pg 6Ventilation Requirements ................................................Pg 7Overview ...........................................................................Pg 7Heat Lamp Replacement ..............................................Pg 8-9LED Replacement ...........................................................Pg 10Replacement Lamps .......................................................Pg 11Cleaning & Maintenance ................................................Pg 11Frequently Asked Questions (FAQ).................................Pg 12Products ..........................................................................Pg 13Warranties ................................................................Pg 14-15Record Your Model .........................................................Pg 1633131 Neo Light Small – White3 x 7 W LED Downlights Hardwired Cutout 332mm x 86mm Hardwired Cutout 332mm x 86mm 3 x 7 W LED Downlights4 x 7 W LED Downlights Hardwired Cutout 620mm x 86mm33142 Neo Light Large – Silver Model: 33131 Neo Light Small – White Model: 34102 Neo Vent n Light – Silver 4 x 7 W LED Downlights Hardwired Cutout 620mm x 86mm34101 Neo Vent n Lite – White 3 x 7 W LED Downlights Hardwired Cutout 332mm x 214mm 170mm Ducted Blower, 375 m³/hr or 104 l/s34102 Neo Vent n Lite – Silver33132 Neo Light Small – Silver33141 Neo Light Large – White 3 x 7 W LED Downlights Hardwired Cutout 332mm x 214mm 170mm Ducted Blower, 375 m³/hr or 104 l/sModel: 33141 Neo Light Large – WhiteModel: 35101 Neo Vent - White Model: 36112 Neo Heat - Silver 35101 Neo Vent – WhiteCutout 332mm x 214mm 170 mm Ducted Blower, 375 m³/hr or 104 l/s Hardwired Cutout 332mm x 214mm 170 mm Ducted Blower, 375 m³/hr or 104 l/s Hardwired 1 x 800 W Tungsten Halogen Heat Lamp Hardwired Cutout 332mm x 292mm36112 Neo Heat – Silver1 x 800 W Tungsten Halogen Heat Lamp Hardwired Cutout 332mm x 292mm35102 Neo Vent – Silver36111 Neo Heat – WhiteNOTE: Neo Heat Module must only be installed horizontally in ceiling. Do not look directly into heat lamps when in use.Neo Heat products are not tanning lamps.Make sure the lamps have cooled and power is off to the Neo Heat Module before removing lamps for replacement. Do not operate this appliance without the fascia or glass panels in position.This appliance is not intended for use by persons (including children) with reduced physical, sensory or mental capabilities, or lack of experience and knowledge, unless they have been given supervision or instruction concerning use of the appliance by a person responsible for their safety. Young children should be supervised to ensure they do not play with the appliance.This appliance must be mounted with the lowest point at least 2.3 metres from the floor.If the supply cord is damaged, it should be replaced by IXL Appliances or its service agent or a similarly qualifed person in order to avoid a hazard. This appliance must not be mounted immediately below a socket outlet.WARNING: Curtains or combustible material may ignite if in contact with the heater.Do not allow insulation material to rest against the sides or top of the Neo Module unit when installed. The Neo Heat Module must be installed horizontally in the ceiling. The Neo Vent Module is the only module with an IP rating (IPX4).NOTE: This product must be installed by a qualified person.Read through these instructions completely before commencing installation.The tungsten halogen lamps heat by direct radiation rather than by heating the air in the room, so the Neo Heat should be located directly over where drying off occurs.Locate the Neo Modules in accordance with the requirements of the current Australian/New Zealand Wiring Rules AS/NZS 3000 relating to damp situations.In some installations this may mean that no part of the Module may be located directly above any part of a bath or shower recess or enclosure.For unenclosed showers refer to Wiring Rules conditions.Switches and other controls must not be located where they can be touched by a person in the bath or shower.SAFETY FEATURES Thermal Switch (Heat Module only)When for any reason the temperature inside the unit reaches 65°C,power to the Tastic Neo. When the temperature drops, the thermal switch will automatically resetand reconnect the power.the thermal switch will cut offDOWN LIGHTSThe LED down lights in Neo Modules are designed to provide directional lighting in your bathroom. For specific tasks like shaving or putting make-up on, you may need extra lighting to suit your individual needs.The heat lamps can also be used to provide additional bright illumination for your bathroom. Lighter coloured walls and decor also help brighten your bathroom by reflecting more light.VENTILATIONTo ensure optimum performance of the exhaust fan, it is essential that there is adequate air flow into your bathroom to help the Neo’s efficient exhaust fan to remove steam while you shower, venting directly outside. Your Neo works by drawing steam-laden air from the room, and as with all exhaust fans it is essential that sufficient air inlets are provided. Ensure adequate inlets exist through windows, vents or under the door. Air flow path from inlet to fan should ideally pass over the steam source.The Vents are suitable for use on their own in bathrooms (with shower) up to 18m³ in size. If your bathroom is bigger than this, a secondary extraction unit may be required, depending on bathroom layout.The IXL free operation. To ensure you get the most from your Module there are a few simple points to keep in mind.Neo Module range has been designed to exacting standards to give you many years of trouble-HEAT LAMPSThe IXL Neo Heat Module uses 800W tungsten halogen heat lamps in conjunction with reflective elements, for a more efficient dispersion of radiant heat. The tungsten halogen lamps provide instantaneous heat, and are designed to heat you and not your bathroom - that’s the efficient way infra red heat works. To get the full benefit of Neo’s tungsten halogen warmth, stand directly under the heat lamps. IXL’s exclusive halogen lamps have been designed specifically for this application, and concentrate their heat for maximum effectiveness.Make sure you have the Neo model that suits your bathroom ceiling height. This Neo is manufactured to offer peak performance with bathroom ceiling heights up to 2.4 m. If your bathroom ceiling is higher than 2.4m, more than one heat module may be required, depending on desired comfort levels.Sufficient air inlet into roomSteam will only be removed if there is sufficient flow of air through the room. Ensure generous inlets exist through windows, vents or under the door. Air flow path from inlet to fan should ideally pass over the steam sources (see Fig.1).Bathrooms which have high ceilings, are larger than average, or have an open shower may all require additional ventilation. We recommend that you visit our website for further details and suggestions on effectively ventilating your bathroom.For maximum efficiency and fan performance there are a few key points to keep in mind when installingyour Neo Vent.Fig. 1: Ideal placement of Neo Vent.Sufficient air inlets into room are requiredFig. 2: Layout of Neo Vent and Vent n Lite.OverviewFilamentSocketHeat LampRefectorPreparingTurn the heat lamp off and let it cool for at least 5 minutes. the isolating switch.Position a sturdy ladder of sufficient height to let you safely and comfortably reach the Tastic Neo. Ask someone to hold the ladder if you can.For extra safety, switch the power off at Removing Glass ShieldWith one hand gently press the glass shield (at a point close to the curved side of the reflector) 5 mm towards the ceiling and carefully slide it towards the curved side.Hold your other hand below the other end of the shield to catch it when it drops.®If the shield chips, cracks or breaks, do not use the heat lamp without it. Replace it with IXL Tastic Neo Tempered Glass Shield Part 12200, not normal household glass.Removing Old Heat LampA spring-loaded socket holds each end of the heat lamp.Gently grasp the heat lamp and push it towards one socket.When it is free of the other socket, carefully pull the heat lamp down towards you.The heat lamp is not recyclable. Dispose of it like a normal incandescent light globe (i.e. unbroken, with your general waste, wrapped in any paper or cloth you used).PartsShieldHeat LampSocketFitting New Heat LampNatural skin oils and salts damage new halogen lamps and shorten their life. Only handle a new heat lamp with soft, dry, clean, lint-free cloth or paper. You can wear gloves, cover your fingers or wrap the heat lamp until it is installed (so long as you remove all cloth or paper when finished).If your skin touches a new heat lamp, wipe it gently it with alcohol-moistened cloth or paper.The heat lamp is half coated with a white reflector. When you grasp the heat lamp, face the back of the reflector to the ceiling (so you can see the heat lamp’s filament). Not doing this will reduce performance.Fit one end of the heat lamp into a socket and gently push it away from the other socket.When there is enough room, fit the other end of the heat lamp into its socket.Gently rotate the heat lamp to ensure it is correctly seated (i.e. it looks like the old one did before you removed it).Replace the shield by reversing the directions for removing it.Switch the power on and test the heat lamp.Step 1 – Figure 8Tilt the lamp ring.Step 2 – Figure 9Grip the lamp ring and pull lamp fitting away from fascia.Step 3 – Figure 10Twist the lamp holder to separate from the lamp.Step 4 – Figure 11Remove the lamp from the lamp ring.Step 5Reverse the steps above to re-fit the lamp.Fig. 8Fig. 9Fig. 10Fig. 11NOTE: Replacement with any other lamps other than those listed below may cause damage to the Neo Module and void the warranty.Heat LampsThe IXL Tastic lamps have been specially developed for best performance.R7s, 258mm long, 800W max. IXL Cat No. 11380NOTE: Replace only with genuine IXL approved infra red halogen heat lamps.Light BulbGU10 7W LED Cat No. 12253Light bulb is not covered by manufacturer’s warranty.NOTE: These lamps can not be replaced with Halogen lamps. Maximum lamp wattage is 7W.WARNING: Always make sure the unit is turned off and allow all bulbs to cool before cleaning. Maintenance of the Neo Module is required to ensure the quality of the product and functions are maintained.It is recommended that the Neo Module body, fascia and globes be checked and cleaned every 2 years. To clean the fascia and air inlet of dust and lint use a vacuum with a brush attachment, alternatively a damp cloth with liquid glass cleaner can also be used.Cleaning and maintenance will help to preserve the life-span and performance of the Neo Module.ServiceNOTE : Do not remove the Neo Module from the ceiling. home.If service is required, please contact IXL’s Service Centre on 1300 727 421.Your Neo Module will be serviced in your Frequently asked questionsQ Will my Neo Heat Module heat my bathroom?A – No your Neo Heat Module is designed to provide infra red radiant heat to warm the body while drying, when standing directly underneath. It is not designed as a room heater.Q – Can I install my Tastic Neo directly above a shower recess?A – A Neo Vent Module can be installed directly above a shower recess. However, for safety reasons it is not recommended to install any other Neo Modules above shower recess. Please refer to the current Australian/New Zealand Wiring Rules AS/NZS 3000 relating to damp situations for further details.Q – What is the maximum recommended light globe wattage that I can install in my Neo Module?A – 7W GU10 downlights can be installed in a Neo Module.Q – Why is my Neo Vent making noise?A – All Neo’s create some noise due to the rapid movement of air through the Neo.Q – Can I retro fit a remote control to my existing hardwired Neo Module?A – No, unfortunately this is not possible.Q - My Tastic unit’s extraction fan doesn’t seem to be removing all the moisture and steam from my bathroom?A – There are a number of factors that will influence the exhaust fan’s performance. Firstly you can improve your cross ventilation via an open door or window; refer to page 7 of the instructions for details on improving the room’s air flow.If you live in a traditionally cooler climate, in the winter months during hot showers, you may notice that there is more moisture and condensation build up. If this is the case, you may wish to improve your natural ventilation or invest in an additional exhaust fan.Bathrooms which have high ceilings, are larger than average, or have an open shower may all require additional ventilation. We recommend that you visit our website for further details and suggestions on effectively ventilating your bathroom.– Q – Can I vent and terminate my Tastic vertically through the roof?A – Yes, you can use rigid 150mm diameter duct with appropriate fixings, termination and flashing - this must only be performed by a qualified person.IXL Range: Tastic and VentilationWithin the IXL Tastic and ventilation range there are a number of products and optional accessories available, these include: Tastic 3 in 1: Heat, Light and Fan Tastic 2 in 1: Heat and Light Ducted Tastics Ventilation Fans Ventilation and Light Units Eco Tastics Easy Duct Thermal Transfer System Tastic Neo Neo ModulesFor more information, .auplease contact Sampford IXL on 1300 727 421 or visit the website at IXL Range: AccessoriesGenuine IXL Heat Lamps Centre Globes In line Ducting Grilles and FasciasLimitations to Your IXL Warranty6.Subject to Point 1, this Warranty:a.will only be provided to the original purchaser where the original purchase was made from a Sampford IXL Authorised Dealer or Reseller and proof of such purchase can be presented at the time of service;b.only applies to Sampford IXL Tastic products purchased in Australia from a Sampford IXL Authorised Dealer or Reseller and installed by a qualified person where a Certificate of Compliance in accordance with State/Territory laws is provided;c.will not apply where the defect in or failure of the product is attributable to misuse,abuse, accident or non-observation of the manufacturer’s instructions. This product must be used in accordance with the manufacturer’s instructions;This Warranty against defects for your newly purchased Tastic product is proudly prepared by Sampford IXL Pty Ltd, phone 1300 727 421.1.Sampford IXL Tastic products come with guarantees that do not exclude the following consumer entitlements under the Australian Consumer Law:a.replacement or refund for a major failure and compensation for any other reasonably foreseeable loss or damage; andb.to have the goods repaired or replaced if goods fail to be of acceptable quality and the failure does not amount to a major failure.2.Sampford IXL warrants that your product and related supply will be free from defects in materials and workmanship during the warranty term. Your warranty term is five years with a two year replacement warranty on the heat lamps and inline blower, commencing from the date of purchase. Sampford IXL acknowledges this productrequires professional installation and product removal is hazardous to consumers, accordingly any necessary inspections and services will be carried out on site. You should not attempt to uninstall this product.3.Subject to Point 1, Sampford IXL will repair any defects in materials and workmanship during the warranty term and if the product is deemed irreparable provide a replacement of an equivalent current model where the balance of the warranty period from the original date of purchase will take effect. Also subject to Point 1, where the inline blower unit is installed into an environment that has limited access and the unit needs to be serviced or replaced under warranty, a replacement blower will be supplied free of charge by Sampford IXL however, all associated reinstallation charges will be borne by the owner.4.To the fullest extent permitted by law and subject always to Point 1, Sampford IXL will not be liable for:a.any loss or damage arising from loss of use, loss of profits or revenue; orb.for any indirect or consequential loss or damage resulting from any breach of this warranty against defects.5.Defective Sampford IXL Tastic products may be repaired using refurbished parts or if required, completely replaced by a refurbished product of the same type.PrivacyThe privacy of your personal information has always been important to us. To learn more about we collect, keep and use your personal information, please obtain a copy of our privacy statement by visiting our website at .au or by contacting us via email on ********************.auorbytelephoneon1300727421.how How to make a Claim under Your IXL Warranty7. a.contact Sampford IXL service department on 1300 727 421 or*************************.autoprovidedetailsandregisteryourclaimenabling a Sampford IXL assessment;b.submit proof of purchase with your claim eg. tax invoice or purchase receipt;c.where a property has been constructed by a builder/developer and it is fitted with IXL products, please submit proof of purchase by way of the certificate of occupancy,with your claim.8.Sampford IXL will contact you to make arrangements for service on site.9.Subject to Point 1, you will be responsible for any costs relating to the provision of your product to a Sampford IXL Authorised Service Dealer.10.Subject to Point 1, in the event you live more than 50 km from a Sampford IXL Authorised Service Dealer you may be subject to travel or transport costs to facilitate the repairing or replacement of your IXL product.11.Sampford IXL and its Authorised Service Dealers reserve the right to seek reimbursement of any costs incurred by them should your IXL product be found to be in good working order.To make a claim under this Warranty you will need to:d.will not cover faults due to normal wear and tear with reasonable use nor consumable components such as globes, filters, glass items, etc;e.will not cover any damages or problems caused to this product by natural forces eg. storm,fire, food, and earthquake; or by intrusion or accumulation (or both) of foreign matters eg. dust, soil, and moisture. Sampford IXL recommends that you take out appropriate insurances to protect your product to this end;f.will not apply if this product is installed in a mobile dwelling eg. caravan or boat;g.will not apply if this product is removed from the location where it was first installed;h.is immediately void if the serial or model number label is removed or defaced;i.is immediately void if the product is serviced or repaired by a unauthorised/unqualified personnel;j.covers use of this product for domestic use only;k.will not be restarted or extended upon repair or replacement of the product or a part.P a r t n u m b e r 611027_A .For comments, questions or warranty matters:Sampford IXL Pty Ltd Service Department Phone: 1300 727 421 Fax: 1300 727 425*************************.au ********************.au .auApproved by the appropriateelectrical supply authorities.Installed By ............................................................................Suburb................................................................................Date of Purchase........................................................................Model No................................... . . . . . .Serial No ..............................RECORD THE DETAILS OF YOUR MODEL AND KEEP THE FOLLOWING INFORMATIONDO NOT SEND THIS TO IXL。
promega+msi分析系统, 1.2 版本+产品使用说明说明书

技术手册MSI Analysis System, Version 1.2 MSI分析系统, 1.2版本MD1641产品使用说明MSI 分析系统,1.2 版本1. 产品介绍 (2)1.A. MSI 分析系统 .............................................................................................................................................. 2 1.B. 微卫星不稳定性(MSI )简介 ................................................................................................................. 4 1.C. 内标(Internal Lane Standard 600, ILS 600) ........................................................................................ 4 2. 产品组分和储存条件 ............................................................................................................................................ 5 3. DNA 提取方法 ......................................................................................................................................................... 5 4. 用MSI 分析系统进行DNA 扩增 .. (6)4.A. 扩增体系的建立 ......................................................................................................................................... 6 4.B. 扩增循环参数的设置 ................................................................................................................................. 7 5. 使用ABI PRISM® 310遗传分析仪检测扩增片段 (9)5.A. Matrix 生成(或光谱校正) ...................................................................................................................... 9 5.B. 样品准备 ................................................................................................................................................... 10 5.C. 仪器准备 ................................................................................................................................................... 10 6. 用ABI PRISM® 3100遗传分析仪,用1.0.1或1.1版本的数据收集软件,检测扩增片段 (11)6.A. 光谱校正 ................................................................................................................................................... 11 6.B. 样品准备 ................................................................................................................................................... 12 6.C. 仪器准备 ................................................................................................................................................... 12 7. 使用ABI PRISM® 3100或3100-Avant 遗传分析仪,2.0版本的数据收集软件,或使用Applied Biosystems 3130或3130xl 遗传分析仪,检测扩增片段 ................................................................................................... 14 7.A. 光谱校正 ................................................................................................................................................... 15 7.B. 样品准备 ................................................................................................................................................... 15 7.C. 仪器准备 ................................................................................................................................................... 16 8. 数据分析 .. (17)8.A. MSI 分析概述 ............................................................................................................................................. 17 8.B. 将Panels 和Bins 文件导入GeneMapper®软件(4.0和4.1版本) ..................................................... 20 8.C. 用GeneMapper®软件(4.0和4.1版本)创建数据分析方法 .............................................................. 20 8.D. 创建片段大小标准(Size Standard ) ..................................................................................................... 22 8.E. 数据处理 ................................................................................................................................................... 23 8.F. 复审片段大小标准(Size Standard ) ...................................................................................................... 23 8.G. 复审样本数据分析 ................................................................................................................................... 23 9. 常见问题与解决方案 .......................................................................................................................................... 24 10. 附录 . (26)10.A. 相关产品 ................................................................................................................................................. 26 10.B. 单核苷酸重复基因座的等位基因频率 . (27)所有技术文献的英文原版均可在/protocols 获得。
MSI Optix G271 游戏显示器说明说明书

PATH TO THE FUTUREInspired by the rigorous quality testing in the production ofMSI Optix G series, MSI Optix G series’ design is full ofsymbols of sturdiness and durability. Additionally, to providequality user experience, Optix G series has really simpleinstallation process and a friendly user interface, and will bethe best choice for entry level gamers to step into the gameworld.Selling PointsIPS Panel – nejlepší technologie obrazu se skvělouvěrností barevRozlišení FHD poskytuje velkou herní i pracovní plochu144Hz obnovovací frekvence a 1ms odezva pro conejintenzivnější zážitek z hraníSe širokým gamutem barev uvidíte barvy her i filmůtak jak tvůrci zamýšleliAMD FreeSync® zabraňuje trhání obrazu a pomáháplynulosti hryFunkce Night Vision – získejte náskok před vašimisoupeřiDesign bez rámečkůTechnologie Anti-Flicker a omezení modréhosvětla – hrajte déle s nižší únavou očí178° široký úhel pohledu Picture and logos: Pictures Monitor1.5-way joystick navigator2.1x DC jack3.2x HDMI (1.4b)4.1x Display Port (1.2a)5.1x Earphone out6.1x Kensington lockSpecificationSKU Number0Color ID1/Black-BlackScreen Size27" (69 cm)Active Display Area (mm)597.888(H)x336.312(V) Curvature FlatPanel Type IPSResolution1920x1080 (FHD)Pixel pitch0.3114(H)X0.3114(V)Aspect Ratio16:9Dynamic Refresh Rate technology FreeSyncActivated Range48Hz-144HzHDR (High dynamic range)NASDR Brightness (nits)250Contrast Ratio1000:1DCR (Dynamic Contrast Ratio)100000000:1Signal Frequency30~180 KHz(H) / 47~145 Hz(V) Refresh Rate144HZResponse Time (MPRT)1ms(MPRT)Response Time (GTG)4msResponse Time (Tr + Tf)7.5msView Angles178°(H)/178°(V)NTSC (CIE1976 area percentageoverlap)104.9%/83.7%NTSC (CIE1931 area percentageoverlap)84.2%/77.1%sRGB (CIE1976 area percentageoverlap)120.3%/99.4%sRGB (CIE1931 area percentageoverlap)118.9%/99.9%Adobe RGB (CIE1976 area percentageoverlap)103.1%/89.3%Adobe RGB (CIE1931 area percentageoverlap)88.1%/82.3%DCI-P3 (CIE1976 area percentageoverlap)95.8%/92.4%DCI-P3 (CIE1931 area percentageoverlap)87.7%/86.7%Rec.709 (CIE1976 area percentageoverlap)120.3%/99.4%Rec.709 (CIE1931 area percentageoverlap)118.9%/99.9%Surface Treatment Anti-glareDisplay Colors16.7MColor bit8 bits (6 bits + FRC)Note_DP1920 x 1080 (up to 144Hz) Note_HDMI1920 x 1080 (up to 144Hz) Note_DVI N/AHDMI2HDMI version 1.4bHDMI HDCP version NADisplayPort1DisplayPort version 1.2aDisplayPort HDCP version NAThunderbolt version NAThunderbolt HDCP version NAUSB Type C (DisplayPort Alternate)NADVI NAD-Sub NAMic-in NAHeadphone-out1Audio Combo NAUSB 2.0 Type B NAUSB 3.2 Gen 1 Type B NALock type Kensington LockPower Type External Adaptor 20V 2.25A Power Input100~240V, 50/60HzAdapter's KC safety Number N/APower Cord Type C5QC Output NAQC Output Power NAPD Output NAPD Output Power NAAdjustment (Tilt)-5° ~ 20°Adjustment (Swivel)NAAdjustment (Height)NAAdjustment (Pivot)NAVESA Mounting100x100mmFrameless Design YesOuter Carton Dimension (WxDxH) (mm)780 x 198 x 498Outer Carton Dimension (WxDxH) (inch)30.71 x 7.8 x 19.61Product Dimension with Stand (WxDxH) (mm)612.5 x 219.6 x 454.3Product Dimension with Stand (WxDxH) (inch)24.11 x 8.65 x 17.89612.5 x 63.5 x 368.8Product Dimension without Stand (WxDxH)(mm)24.11 x 2.5 x 14.52Product Dimension without Stand (WxDxH)(inch)Thunderbolt NAUSB 2.0 Type A NAUSB 2.0 Type C NAUSB 3.2 Gen 1 Type A NAUSB 3.2 Gen 1 Type C NAUSB 3.2 Gen 2x2 Type C NAUSB 3.2 Gen 2x2 Type A NACard Reader NAStand Dimension (WxDxH) (mm)461.1 x 219.6 x 267.5Stand Dimension (WxDxH) (inch)18.15 x 8.65 x 10.53Feature Gaming ModeAdaptive Sync (Freesync)5 Ways Joystick Navigator ControlFrameless designMSI Gaming OSDNight VisionInside Carton Dimension (WxDxH) (mm)765 x 183 x 473Inside Carton Dimension (WxDxH) (inch)30.12 x 7.2 x 18.62Weight (Net kg) 4.1Weight (Gross kg) 6.4DisplayPort Cable0HDMI Cable1DVI Cable0USB Type A to Type B Cable0USB Type C to Type A Cable0USB Type C to Type C Cable0Thunderbolt Cable0VGA Cable03.5mm audio Cable03.5mm combo audio Cable0Warranty36MPower Cord1AC Adaptor1Quick Guide1Warranty Card1EAN4719072688363。
MSI 笔记本电脑产品说明说明书
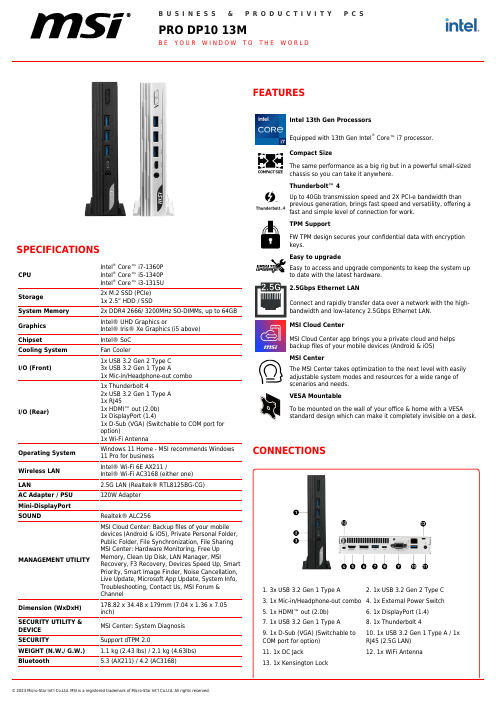
© 2023 Micro-Star Int'l Co.Ltd. MSI is a registered trademark of Micro-Star Int'l Co.Ltd. All rights reserved.SPECIFICATIONSCPU Intel ®Core™ i7-1360P Intel ® Core™ i5-1340P Intel ® Core™ i3-1315U Storage2x M.2 SSD (PCIe)1x 2.5” HDD / SSDSystem Memory 2x DDR4 2666/ 3200MHz SO-DIMMs, up to 64GB Graphics Intel® UHD Graphics orIntel® Iris® Xe Graphics (i5 above)ChipsetIntel® SoC Cooling System Fan CoolerI/O (Front)1x USB 3.2 Gen 2 Type C 3x USB 3.2 Gen 1 Type A1x Mic-in/Headphone-out comboI/O (Rear)1x Thunderbolt 42x USB 3.2 Gen 1 Type A 1x RJ451x HDMI™ out (2.0b)1x DisplayPort (1.4)1x D-Sub (VGA) (Switchable to COM port for option)1x Wi-Fi AntennaOperating System Windows 11 Home - MSI recommends Windows 11 Pro for businesskeys.Easy to upgradeEasy to access and upgrade components to keep the system up to date with the latest hardware.2.5Gbps Ethernet LANConnect and rapidly transfer data over a network with the high-bandwidth and low-latency 2.5Gbps Ethernet LAN.MSI Cloud CenterMSI Cloud Center app brings you a private cloud and helps backup files of your mobile devices (Android & iOS)MSI CenterThe MSI Center takes optimization to the next level with easily adjustable system modes and resources for a wide range of scenarios and needs.VESA MountableTo be mounted on the wall of your office & home with a VESAstandard design which can make it completely invisible on a desk.CONNECTIONS1. 3x USB 3.2 Gen 1 Type A 3. 1x Mic-in/Headphone-out combo© 2023 Micro-Star Int'l Co.Ltd. MSI is a registered trademark of Micro-Star Int'l Co.Ltd. All rights reserved.VESA Mount Support 75 x 75 mmCertificatesFCC, CB/CE, UL & CUL, VCCI, RCMAccessories1x User Manual (Optional)1x Quick Guide 1x Warranty Card 1x Adpator 1x Power Cord1x External power switch (optional)1x Wi-Fi Antenna1x SATA Cable (if the model is with SSD only)G e n e r a t e d 2023-11-15, c h e c k f o r t h e l a t e s t v e r s i o n w w w .m s i .c o m /d a t a s h e e t . T h e i n f o r m a t i o n p r o v i d e d i n t h i s d o c u m e n t i s i n t e n d e d f o r i n f o r m a t i o n a l p u r p o s e s o n l y a n d i s s u b j e c t t o c h a n g e w i t h o u t n o t i c e .。
- 1、下载文档前请自行甄别文档内容的完整性,平台不提供额外的编辑、内容补充、找答案等附加服务。
- 2、"仅部分预览"的文档,不可在线预览部分如存在完整性等问题,可反馈申请退款(可完整预览的文档不适用该条件!)。
- 3、如文档侵犯您的权益,请联系客服反馈,我们会尽快为您处理(人工客服工作时间:9:00-18:30)。
介绍微软中间语言 (MSIL) 是一种语言,是许多编译器(C#,等)的输出. ILDasm (中间语言反汇编器)程序和.Net Framework SDK(FrameworkSDK\Bin\ildasm.exe)打包在一起,让用户以人可阅读的格式查看MSIL代码。
通过该工具,我们可以打开任何.net可执行文件(exe或dll)并查看其MSIL代码。
ILAsm 程序(中间语言编译器)从MSIL语言生成可执行文件。
我们可以在WINNT \ \Framework \vn.nn.nn目录中找到这个程序。
许多Visual C++程序员开始.net开发是因为他们对.NET框架的底层发生了一些什么感兴趣。
学习MSIL给了用户理解某些对C#程序员或程序员来说是透明的东西的机会。
通晓MSIL给.NET程序员更多的能力。
我们从不需要直接用MSIL编写程序,但是在某些情况下是非常有用的,我们可以用ILDasm打开程序的MSIL代码,查看它到底做了一些什么。
一个Doc格式的MSIL参考对.NET开发人员来说比较有用,它也许可以在Framework SDK 目录下找到:FrameworkSDK\Tool Developers Guide\docs\Partition II Metadata.doc (元数据定义和术语). 在这个文件中,我发现了所有MSIL指令的说明,例如.entrypoint, .locals等. FrameworkSDK\Tool Developers Guide\docs\Partition III CIL.doc (CIL命令集)包含了一个MSIL命令的完整列表。
在工作中,我也用到了一个MSDN的ILDAsm教程,一篇2001年5月由John Robbins发表在MSDN杂志的优秀的文章: "ILDASM is Your New Best Friend"。
我想学习一门语言最好的途径就是用它写一些程序,所以我决定写一些小的MSIL程序。
实际上,我们有写这些代码——是C#编译器生成的,我只是做一了一些小的更改,并加了许多注释以描述MSIL是如何工作的。
通过阅读附在本文的例子可以帮助.NET程序员理解中间语言,帮助其在需要的时候更易读懂MSIL代码。
一般信息在MSIL中,所有的操作都在栈上完成。
当调用一个函数的时候,其参数和局部变量都被分配到栈上。
函数的代码从该栈开始,把一些值压入栈,对这些值进行一些操作,从栈上取出值。
执行MSIL名利和函数由3个步骤完成:1. 把命令操作数和函数参数压入栈。
2. 执行命令或者调用函数。
命令或函数从栈中取出他们的操作数(参数)并把他们压入结果栈(返回值)。
3. 从栈中读取结果值。
步骤1~3是可选的,例如,void函数不会压入一个结果值到栈。
栈包含值类型对象和引用类型对象的引用。
引用类型对象本身保存在堆中。
用来把一个值压入栈中的MSIL命令是ld... (装载),用来从栈中取出值的命令是st... (存储),因为值都存在变量中。
我们可以把入栈操作叫做装载,出栈操作叫做存储。
示例项目本文附上的代码中包含了许多用MSIL写的控制台程序. 如果需要编译他们,请确定ILAsm程序可以通过PATH访问。
每个项目都是一个Visual Studio解决方案,IL源文件可以用VS的文本编辑器打开,Build命令运行ILAsm 程序在项目所在目录生成exe文件,run命令执行该文件。
在每个程序的末尾,我加了几行代码,他们可以用C#来写:Console.WriteLine("Press Enter to continue");Console.Read();这样,当从Windows Explorer运行的时候,就可以看到程序的输出。
下面是所含项目的列表:1. 打印字符串—打印字符传到控制台。
2. 赋值—给一个int变量赋值并把它打印到控制台。
3. 运算—从控制台读取2个数字,惊醒+,-和乘的操作,并显示结果。
4. 数组—分配一个int类型的数组,给他的元素赋值,打印其元素和数组的长度。
5. 比较—输入2个数字并打印出最小的那个。
6. 数组2—用循环填充数组元素并打印某些元素。
7. 不安全代码—使用unsafe指针访问数组元素。
8. PInvoke—调用Win32 API。
9. 类—和类一起工作。
10. 异常—异常处理。
我假设你以在这所说的顺序阅读这些项目。
在下面的项目描述中,我用程序来解释每一条MSIL命令,并给出一些代码片段。
打印字符串PrintString 就是MSIL版的 Hello, World在代码中用到的MSIL指令如下:.entrypoint—定义程序的入口点(该函数在程序启动的时候由.NET 运行库调用).maxstack—定义函数代码所用堆栈的最大深度。
C#编译器可以对每个函数设置准确的值,在例子中,我把他设为8。
用到的MSIL命令如下:ldstr string—把一个字符串常量装入堆栈。
call function(parameters)—调用静态函数。
函数的参数必须在函数调用前装入堆栈。
pop—取出栈顶的值。
当我们不需要把值存入变量时使用。
ret—从一个函数中返回。
调用静态函数很简单。
我们把函数的参数压入堆栈,调用函数,然后从堆栈中读取函数的返回值(如果是非void函数)。
Console.WriteLine 就是一个这样的函数。
下面是代码:.assembly PrintString {}/*Console.WriteLine("Hello, World)"*/.method static public void main() il managed{.entrypoint // 该函数是程序的入口.maxstack 8// *****************************************************// Console.WriteLine("Hello, World)";// *****************************************************ldstr "Hello, World" // 把字符串压入堆栈// 调用静态的System.Console.Writeline函数// (函数移除栈顶的字符串)call void [mscorlib]System.Console::WriteLine(class System.String)// *****************************************************ldstr "Press Enter to continue"call void [mscorlib]System.Console::WriteLine(class System.String)// 调用 System.Console.Read 函数call int32 [mscorlib]System.Console::Read()// pop 指令移除栈顶元素// (移除由Read()函数返回的数字pop// *****************************************************ret}赋值该程序给一个变量赋与int值并把它打印到控制台窗口。
命令:ldc.i4.n—把一个 32位的常量(n从0到8)装入堆栈stloc.n—把一个从堆栈中返回的值存入第n(n从0到8)个局部变量代码:.assembly XequalN {}// int x;// x = 7;// Console.WriteLine(x);.method static public void main() il managed{.entrypoint.maxstack 8.locals init ([0] int32 x) // 分配一个局部变量// *****************************************************// x = 7;// *****************************************************ldc.i4.7 // 把常量装入堆栈stloc.0 // 把堆栈中的值存入第0个变量// *****************************************************// Console.WriteLine(x);// ***************************************************** ldloc.0 // 把第0个变量转入堆栈call void [mscorlib]System.Console::WriteLine(int32)ret}数据运算本程序从控制台读取2个数字,对它们进行简单的运算,然后显示结果。
命令:add—2个值相加。
命令的参数必须在调用前装入堆栈,该函数从堆栈中移除参数并把运算后的结果压入堆栈。
sub— 2个值相减。
mul— 2个值相乘。
代码片段:.assembly Operations {}/*// 程序的C#代码:int x, y, z;string s;Console.WriteLine("Enter x:");s = Console.ReadLine();x = Int32.Parse(s);Console.WriteLine("Enter y:");s = Console.ReadLine();y = Int32.Parse(s);z = x + y;Console.Write("x + y = ");Console.Write(z);Console.WriteLine("");z = x - y;Console.Write("x - y = ");Console.Write(z);Console.WriteLine("");z = x * y;Console.Write("x * y = ");Console.Write(z);Console.WriteLine("");*/.method static public void main() il managed{.entrypoint.maxstack 8.locals init ([0] int32 x,[1] int32 y,[2] int32 z,[3] string s)// ***************************************************** // Console.WriteLine("Enter x:");// ***************************************************** ldstr "Enter x:" // 把字符装入堆栈call void [mscorlib]System.Console::WriteLine(string)// ***************************************************** // s = Console.ReadLine();// ***************************************************** call string [mscorlib]System.Console::ReadLine()stloc.3 // 把值存入第3个变量// ***************************************************** // x = Int32.Parse(s);// ***************************************************** ldloc.3 // 把第3个变量装入堆栈// 调用 System.Int32::Parse(string)函数// 把字符串从堆栈中移除并把解析的结果——int值压入堆栈call int32 [mscorlib]System.Int32::Parse(string)stloc.0 // 把值存入第0个变量// ***************************************************** // 和变量y的一些运算// ***************************************************** ldstr "Enter y:"// 装入字符串call void [mscorlib]System.Console::WriteLine(string)// 调用call string [mscorlib]System.Console::ReadLine()// 调用stloc.3//把值存入第3个变量ldloc.3//把第3个变量装入堆栈call int32 [mscorlib]System.Int32::Parse(string)// 调用stloc.1//把值存入第1个变量// ***************************************************** // z = x + y;// ***************************************************** ldloc.0 //把第0个变量装入堆栈ldloc.1 //把第1个变量装入堆栈// 把这2个值从堆栈中移除,把结果压入堆栈addstloc.2 //把值存入第2个变量// ***************************************************** // Console.Write("x + y = ");// ***************************************************** ldstr "x + y = " // load string onto stackcall void [mscorlib]System.Console::Write(string)// ***************************************************** // Console.Write(z);// ***************************************************** ldloc.2 //把第2个变量装入堆栈call void [mscorlib]System.Console::Write(int32)// ***************************************************** // Console.WriteLine("");// ***************************************************** ldstr "" //装入字符串call void [mscorlib]System.Console::WriteLine(string)//相减和相乘运算过程与上面相同ret}数组本程序分配一个int型的数组并给他的元素赋值,然后打印出元素和数组的长度。