Cisco IP Phone 使用说明(英文)
思科IP电话用户使用手册

思科IP话机用户使用手册IP话机常用功能使用方法注:如果在屏幕中找不到下文提到按钮,请按翻页1,拨打电话1)摘机输入号码2)在免提状态下,直接按输入号码。
此时扬声器打开,如果不需要扬声器,可直接摘机3)在免提状态下,直接按,听到拨号音后输入号码2,接听电话1)在未摘机情况下,摘机接听2)已摘机情况下,在屏幕左下角按接听3,电话保留在通话过程中按保留,就可以将这路电话保留。
此时,对方处于听音乐状态。
如要取消保留,继续按即可。
4,转接电话在通话状态中按,>输入目标电话号码>再按,目标电话将响铃。
5,呼叫前转(又叫“呼叫转移”)在未摘机状态下,按>听到“嘟嘟”两声提示音>输入目标号码(前转至座机或者手机,请按照拨打该号码的方式输入,如市话加拨0),然后稍等一会,系统会自动跳回原来的待机屏幕,并显示前转号码。
6,取消前转在待机状态下,按。
7, 创建电话会议1)Ad-hoc方式。
在通话过程中,如果此时你想让某人加入讨论,按,然后输入与会者号码,再按下。
2) 如果你已经在两个通话中(一路电话被保留,另一路正常),你也可以按,然后再利用方向选择键,往上或者下选择另一路通话,并且再按,即可建立三方会议。
3) Meet-me 方式。
会议主持人,先按,输入18后,再拨自己分行站点号及分机号,然后通知其他要参加会议的人直接拨打这个10位号码,其他人不用按8,查看电话记录按, 就可以选择查看未接呼叫,已接通话, 已拨呼叫9,查看语音留言按语音按钮,然后按照提示输入密码,就可以收听语音留言。
在电话使用过程中如有问题,请致电话机按键介绍编号图标功能描述1预设按钮 根据配置设计不同,该按钮有不同的功能,如话路选择(一个话机有多个号码的情况),快速拨号等按钮会根据当前通话状态改变颜色 并保持,表示正在进行的通话并闪烁,表示挂起的通话并保持,表示拒绝呼叫开启或者该线路已加入组等并保持,表示远端线路忙并闪烁,表示该线路有呼叫进入并保持,表示远端线路忙。
思科IP电话用户使用手册

思科IP话机用户使用手册IP话机常用功能使用方法注:如果在屏幕中找不到下文提到按钮,请按翻页1,拨打电话1)摘机输入号码2)在免提状态下,直接按输入号码。
此时扬声器打开,如果不需要扬声器,可直接摘机3)在免提状态下,直接按,听到拨号音后输入号码2,接听电话1)在未摘机情况下,摘机接听2)已摘机情况下,在屏幕左下角按接听3,电话保留在通话过程中按保留,就可以将这路电话保留。
此时,对方处于听音乐状态。
如要取消保留,继续按即可。
4,转接电话在通话状态中按,>输入目标电话号码>再按,目标电话将响铃。
5,呼叫前转(又叫“呼叫转移”)在未摘机状态下,按>听到“嘟嘟”两声提示音>输入目标号码(前转至座机或者手机,请按照拨打该号码的方式输入,如市话加拨0),然后稍等一会,系统会自动跳回原来的待机屏幕,并显示前转号码。
6,取消前转在待机状态下,按。
7, 创建电话会议1)Ad-hoc方式。
在通话过程中,如果此时你想让某人加入讨论,按,然后输入与会者号码,再按下。
2)如果你已经在两个通话中(一路电话被保留,另一路正常),你也可以按,然后再利用方向选择键,往上或者下选择另一路通话,并且再按,即可建立三方会议。
3)Meet-me方式。
会议主持人,先按,输入18后,再拨自己分行站点号及分机号,然后通知其他要参加会议的人直接拨打这个10位号码,其他人不用按8,查看电话记录按,就可以选择查看未接呼叫,已接通话,已拨呼叫9,查看语音留言按语音按钮,然后按照提示输入密码,就可以收听语音留言。
在电话使用过程中如有问题,请致电话机按键介绍编号图标功能描述并保持并闪烁并保持并保持并保持13 方向按钮方向键用以在菜单中卷动屏幕,在不同栏中移动选择.14 键盘用以输入电话号码,用户名等信息,字母键的使用同手机键盘15 软按键对应屏幕最下方的软按键选项16 听筒灯条提示有呼叫进入或者有新语音留言话机电缆连接1 直流变压器端口(DC48V) 6 听筒端口2 交流电源7 头戴式耳机端口3 AC 电源线8 支架按钮4 网络端口(10/100 SW) 9 辅助端口(AUX)5 接入端口(10/100 PC)屏幕上软键定义说明。
Cisco_IP_Phone_User_Guide
page 4 / 2011年12月22日星期四
电话拨打操作介绍
3.内部各 内部各Site之间 之间VOIP电话拨打 内部各 之间 电话拨打 拨打8 编号+ 拨打8+3位Site编号+5位分机号码 编号 – 各Site编号请参阅以下链接 编号请参阅以下链接 /SiteCodeBuildingList.asp – 或从 或从Outllook中查询 中查询: 中查询
page 5 / 2011年12月22日星期四
如何Hold电话以及Resume通话
1) Hold电话 当您正在通话时,如要Hold电话只需要按一下电话屏幕中的Hold键即 可,话机会自动由Connect状态转换为Hold状态并在屏幕左下方 显示为Resume。随后您可以New Call某位同事或讨论完后再按下 Resume 2) Resume电话 当您需要恢复通话时,只需要按下屏幕左下方的Resume即可。话机 会自动转换为Connect状态
page 2 / 2011年12月22日星期四
如何正确理解电话拨入拨出图标含义
正在通话中。。。。 电话振铃。。。。 正在通话中。。。。同时有另一个来电振铃 多方会议开启 电话Hold状态
page 3 / 2011年12月22日星期四
电话拨打操作介绍
1)按下 NewCall 或Speaker 键 ) 2)待听到等待音后,键入相对应的电话号码 )待听到等待音后, 电话号码总共分为三类: 电话号码总共分为三类: 1. 拨打外线 本地固话号码或本地手机号码; 本地电话 9+本地固话号码或本地手机号码 本地固话号码或本地手机号码 城市区号+外地固话号码 国内电话 9+0+外地手机号码 或 9+城市区号 外地固话号码 外地手机号码 城市区号 国家编号+城市区号 国际电话 9+国家编号 城市区号 所在城市电话号码 国家编号 城市区号+所在城市电话号码 长途电话需要密码可问HR处获得 长途电话需要密码可问 处获得 2. RN2大楼内部分机号码拨打 大楼内部分机号码拨打 只需拨打最后5位数字 只需拨打最后 位数字
Cisco IP Phone Manual Phone Registration说明书
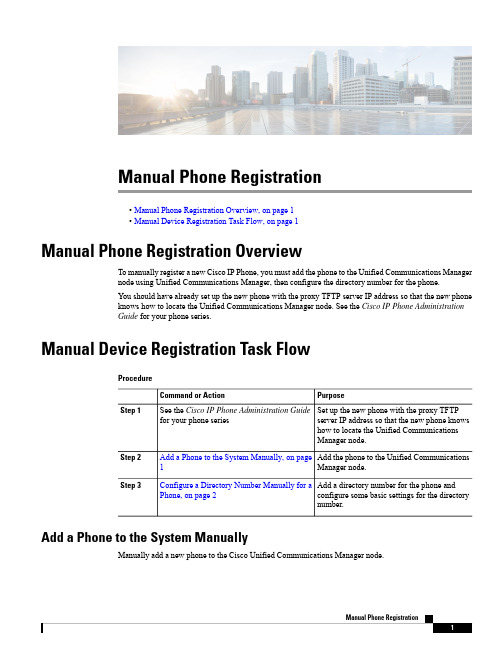
Manual Phone Registration•Manual Phone Registration Overview,on page 1•Manual Device Registration Task Flow,on page 1Manual Phone Registration OverviewTo manually register a new Cisco IP Phone,you must add the phone to the Unified Communications Manager node using Unified Communications Manager,then configure the directory number for the phone.You should have already set up the new phone with the proxy TFTP server IP address so that the new phone knows how to locate the Unified Communications Manager node.See the Cisco IP Phone Administration Guide for your phone series.Manual Device Registration Task Flow ProcedurePurpose Command or ActionSet up the new phone with the proxy TFTPserver IP address so that the new phone knows See the Cisco IP Phone Administration Guide for your phone seriesStep 1how to locate the Unified CommunicationsManager node.Add the phone to the Unified Communications Manager node.Add a Phone to the System Manually,on page 1Step 2Add a directory number for the phone and configure some basic settings for the directorynumber.Configure a Directory Number Manually for a Phone,on page 2Step 3Add a Phone to the System ManuallyManually add a new phone to the Cisco Unified Communications Manager node.ProcedureStep 1In Cisco Unified Communications Manager Administration,select Device >Phone ,then click Add New .Step 2In the Add a New Phone window,select your phone model in the Phone Type field,then click Next .Step 3In the Phone Configuration window,select the protocol type for your device in the Select the device protocol field,then click Next .Step 4In the Device Information area,perform the following actions.a)Enter a name in the Device Name field.The name entered here must match the Device Name that is configured on your phone.See thedocumentation that supports your endpoint device for more information.b)Select a device pool for the phone from the list of device pools.c)Select the phone button template to use from the list of phone button templates.Step 5In the Protocol Specific Information area,select the non-secure profile for your type of phone in the Device Security Profile field.Step 6Click Save .What to do nextConfigure a Directory Number Manually for a Phone,on page 2Configure a Directory Number Manually for a PhoneThere are multiple ways to manually add and configure a directory number (DN)using Cisco UnifiedCommunications Manager Administration.•From the Directory Number Configuration window using Call Routing >Directory Number .•From the Phone Configuration window using Device >Phone when you select either Line [1]-Adda new DN or Line [2]-Add a new DN link in the Association Information area.•From the Phone Configuration window using Call Routing >Phone after you add the phone undercall routing.•From the CTI Route Point Configuration window when you configure a CTI route point using Device >CTI Route Point .This procedure assumes that you are configuring a DN for a new phone using the Phone Configurationwindow that appeared after you added the new phone to the Unified Communications Manager node.Only the settings that apply to your phone model display using thismethod.You can configure phone features at the same time that you add the new DN for the phone.To see all availableDN settings,you must access the Directory Number Configuration window from call routing in the user interface.Tip Manual Phone RegistrationConfigure a Directory Number Manually for a PhoneBefore you beginThe phone is added to the node.The Phone Configuration window should still be visible for the new phone that you are registering.If your system uses partitions,collect the route partition and calling search space information to use for the new phone.ProcedureStep 1Click Line [1]-Add a new DN in the Association area of the Phone Configuration window.If the Phone Configuration window is not already visible,select Device >Phone ,then click Findand select the phone from the list of phones.Tip Step 2In the Directory Number Configuration window,enter a dialable phone number in the Directory Number field.Step 3(Optional)Select a partition in the Route Partition field.Step 4(Optional)Select a calling search space in the Calling Search Space field in the Directory Number Settings area.Step 5(Optional)Configure other directory number features as applicable for the new phone,then click Save .For example,if you already know the user name for the new phone,you can enter that in the Display (Caller ID)field.See the online help for field descriptions.Manual Phone RegistrationConfigure a Directory Number Manually for a PhoneManual Phone Registration Configure a Directory Number Manually for a Phone。
Cisco IP SoftPhone 说明书
Cisco IP SoftPhone 用户指南版本 1.3公司总部Cisco Systems, Inc.170 West Tasman DriveSan Jose, CA 95134-1706USA电话: 408 526-4000800 553-NETS (6387)传真: 408 526-4100文本部件号: OL-2379-01本手册中有关产品的规范和信息如有更改,恕不另行通知。
我们认为本手册中的所有声明、信息和建议都是正确的,但对此并不作任何明确或隐含的保证。
用户必须自己承担所有与使用任何产品相关的责任。
适用于相关产品的软件授权和有限保障在随该产品发布的信息包中阐述,但在此处也包括这些信息以供参考。
如果您找不到软件授权或有限保障,请与 CISCO 代表联系,以便获取一份。
TCP 标头压缩的 Cisco 实施方案是在美国加利福尼亚大学伯克利分校 (UCB) 作为 UNIX 操作系统的 UCB 公共领域版本的一部分而开发的程序的改写版本。
保留所有权利。
(C) 1981, Regents of the University of California 版权所有。
除了此处不作任何其他保证以外,这些供应商的所有文档文件和软件均以“原样”提供。
Cisco 和上面提到的供应商否认作出过任何明确或含蓄的保证,包括但不仅限于适销性、对特定目的的适用性以及由于处理、使用或买卖本产品而带来或伴随的损害。
在任何情况下,Cisco 或其供应商对任何间接、特殊、伴随或偶然的损害均不承担任何责任,包括但不仅限于由于使用本手册或者由于本手册的不可靠性而导致的损失利润、丢失数据或数据损坏,即使 Cisco 或其供应商已经被告知可能会产生这种损坏。
CCIP、Cisco Powered Network 标记、Cisco Systems Verified 徽标、Cisco Unity、Fast Step、Follow Me Browsing、FormShare、Internet Quotient、iQ Breakthrough、iQ Expertise、iQ FastTrack、iQ 徽标、iQ Net Readiness Scorecard、Networking Academy、ScriptShare、SMARTnet、TransPath 和 Voice LAN 是 Cisco Systems, Inc. 的商标;Changing the Way We Work, Live, Play, and Learn、Discover All That誷Possible、The Fastest Way to Increase Your Internet Quotient 和 iQuick Study 是 Cisco Systems, Inc. 的服务商标;Aironet、ASIST、BPX、Catalyst、CCDA、CCDP、CCIE、CCNA、CCNP、Cisco、Cisco Certified Internetwork Expert 徽标、Cisco IOS、Cisco IOS 徽标、Cisco Press、Cisco Systems、Cisco Systems Capital、Cisco Systems 徽标、Empowering the Internet Generation、 Enterprise/Solver、EtherChannel、EtherSwitch、GigaStack、IOS、IP/TV、LightStream、MGX、MICA、Networkers 徽标、Network Registrar、Packet、 PIX、Post-Routing、Pre-Routing、RateMUX、Registrar、SlideCast、StrataV iew Plus、Stratm、SwitchProbe、TeleRouter 和 VCO 是 Cisco Systems, Inc. 和/或其子公司在美国和其他国家(地区)的注册商标。
思科IP电话用户使用手册

思科IP话机用户使用手册IP话机常用功能使用方法注:如果在屏幕中找不到下文提到按钮,请按翻页1,拨打电话1)摘机输入号码2)在免提状态下,直接按输入号码。
此时扬声器打开,如果不需要扬声器,可直接摘机3)在免提状态下,直接按,听到拨号音后输入号码2,接听电话1)在未摘机情况下,摘机接听2)已摘机情况下,在屏幕左下角按接听3,电话保留在通话过程中按保留,就可以将这路电话保留。
此时,对方处于听音乐状态。
如要取消保留,继续按即可。
4,转接电话在通话状态中按,>输入目标电话号码>再按,目标电话将响铃。
5,呼叫前转(又叫“呼叫转移”)在未摘机状态下,按>听到“嘟嘟”两声提示音>输入目标号码(前转至座机或者手机,请按照拨打该号码的方式输入,如市话加拨0),然后稍等一会,系统会自动跳回原来的待机屏幕,并显示前转号码。
6,取消前转在待机状态下,按。
7, 创建电话会议1)Ad-hoc方式。
在通话过程中,如果此时你想让某人加入讨论,按,然后输入与会者号码,再按下。
2)如果你已经在两个通话中(一路电话被保留,另一路正常),你也可以按,然后再利用方向选择键,往上或者下选择另一路通话,并且再按,即可建立三方会议。
3)Meet-me方式。
会议主持人,先按,输入18后,再拨自己分行站点号及分机号,然后通知其他要参加会议的人直接拨打这个10位号码,其他人不用按8,查看电话记录按,就可以选择查看未接呼叫,已接通话,已拨呼叫9,查看语音留言按语音按钮,然后按照提示输入密码,就可以收听语音留言。
在电话使用过程中如有问题,请致电话机按键介绍编号图标功能描述并保持并闪烁并保持并保持并保持13 方向按钮方向键用以在菜单中卷动屏幕,在不同栏中移动选择.14 键盘用以输入电话号码,用户名等信息,字母键的使用同手机键盘15 软按键对应屏幕最下方的软按键选项16 听筒灯条提示有呼叫进入或者有新语音留言话机电缆连接1 直流变压器端口(DC48V) 6 听筒端口2 交流电源7 头戴式耳机端口3 AC 电源线8 支架按钮4 网络端口(10/100 SW) 9 辅助端口(AUX)5 接入端口(10/100 PC)屏幕上软键定义说明。
Cisco IP Phone 7800 Series用户指南说明书
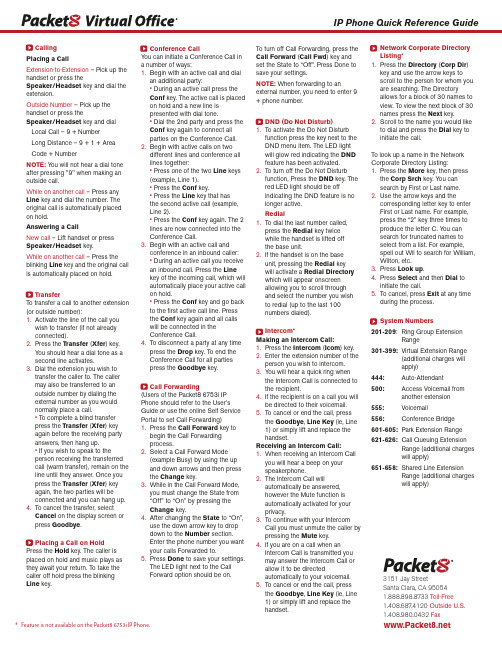
CallingPlacing a CallExtension-to-Extension – Pick up the handset or press theSpeaker/Headset key and dial the extension.Outside Number – Pick up the handset or press theSpeaker/Headset key and dialLocal Call – 9 + NumberLong Distance – 9 + 1 + AreaCode + NumberNOTE: Y ou will not hear a dial tone after pressing "9" when making an outside call.While on another call – Press any Line key and dial the number. The original call is automatically placed on hold.Answering a CallNew call – Lift handset or press Speaker/Headset key.While on another call – Press the blinking Line key and the original call is automatically placed on hold.TransferTo transfer a call to another extension (or outside number):1.Activate the line of the call youwish to transfer (if not alreadyconnected).2.Press the Transfer (Xfer) key.Y ou should hear a dial tone as asecond line activates.3.Dial the extension you wish totransfer the caller to. The callermay also be transferred to anoutside number by dialing theexternal number as you wouldnormally place a call.• To complete a blind transferpress the Transfer (Xfer) keyagain before the receiving partyanswers, then hang up.• If you wish to speak to theperson receiving the transferredcall (warm transfer), remain on the line until they answer. Once youpress the Transfer (Xfer) keyagain, the two parties will beconnected and you can hang up.4.To cancel the transfer, selectCancel on the display screen orpress Goodbye.Placing a Call on HoldPress the Hold key. The caller is placed on hold and music plays as they await your return. To take the caller off hold press the blinking Line key.Conference CallY ou can initiate a Conference Call ina number of ways:1.Begin with an active call and dialan additional party:• During an active call press theConf key. The active call is placedon hold and a new line ispresented with dial tone.• Dial the 2nd party and press theConf key again to connect allparties on the Conference Call.2.Begin with active calls on twodifferent lines and conference alllines together:• Press one of the two Line keys(example, Line 1).• Press the Conf key.• Press the Line key that hasthe second active call (example,Line 2).• Press the Conf key again. The 2lines are now connected into theConference Call.3.Begin with an active call andconference in an inbound caller:• During an active call you receivean inbound call. Press the Linekey of the incoming call, which willautomatically place your active callon hold.• Press the Conf key and go backto the first active call line. Pressthe Conf key again and all callswill be connected in theConference Call.4.To disconnect a party at any timepress the Drop key. To end theConference Call for all partiespress the Goodbye key.Call Forwarding(Users of the Packet8 6753i IPPhone should refer to the User’sGuide or use the online Self ServicePortal to set Call Forwarding)1.Press the Call Forward key tobegin the Call Forwardingprocess.2.Select a Call Forward Mode(example Busy) by using the upand down arrows and then pressthe Change key.3.While in the Call Forward Mode,you must change the State from“Off” to “On” by pressing theChange key.4.After changing the State to “On”,use the down arrow key to dropdown to the Number section.Enter the phone number you wantyour calls Forwarded to.5.Press Done to save your settings.The LED light next to the CallForward option should be on.To turn off Call Forwarding, press theCall Forward (Call Fwd) key andset the State to “Off”. Press Done tosave your settings.NOTE: When forwarding to anexternal number, you need to enter 9+ phone number.DND (Do Not Disturb)1.To activate the Do Not Disturbfunction press the key next to theDND menu item. The LED lightwill glow red indicating the DNDfeature has been activated.2.To turn off the Do Not Disturbfunction, Press the DND key. Thered LED light should be offindicating the DND feature is nolonger active.Redial1.To dial the last number called,press the Redial key twicewhile the handset is lifted offthe base unit.2.If the handset is on the baseunit, pressing the Redial keywill activate a Redial Directorywhich will appear onscreenallowing you to scroll throughand select the number you wishto redial (up to the last 100numbers dialed).Intercom*Making an Intercom Call:1.Press the Intercom (Icom) key.2.Enter the extension number of theperson you wish to intercom.3.Y ou will hear a quick ring whenthe Intercom Call is connected tothe recipient.4.If the recipient is on a call you willbe directed to their voicemail.5.To cancel or end the call, pressthe Goodbye, Line Key (ie, Line1) or simply lift and replace thehandset.Receiving an Intercom Call:1.When receiving an Intercom Callyou will hear a beep on yourspeakerphone.2.The Intercom Call willautomatically be answered,however the Mute function isautomatically activated for yourprivacy.3.To continue with your IntercomCall you must unmute the caller bypressing the Mute key.4.If you are on a call when anIntercom Call is transmitted youmay answer the Intercom Call orallow it to be directedautomatically to your voicemail.5.To cancel or end the call, pressthe Goodbye, Line Key (ie, Line1) or simply lift and replace thehandset.Network Corporate DirectoryListing*1.Press the Directory (Corp Dir)key and use the arrow keys toscroll to the person for whom youare searching. The Directoryallows for a block of 30 names toview. To view the next block of 30names press the Next key.2.Scroll to the name you would liketo dial and press the Dial key toinitiate the call.To look up a name in the NetworkCorporate Directory Listing:1.Press the More key, then pressthe Corp Srch key. Y ou cansearch by First or Last name.e the arrow keys and thecorresponding letter key to enterFirst or Last name. For example,press the “2” key three times toproduce the letter C. Y ou cansearch for truncated names toselect from a list. For example,spell out Wil to search for William,Wilton, etc.3.Press Look up.4.Press Select and then Dial toinitiate the call.5.To cancel, press Exit at any timeduring the process.System Numbers201-209: Ring Group ExtensionRange301-399:Virtual Extension Range(additional charges willapply)444:Auto-Attendant500:Access Voicemail fromanother extension555: Voicemail556:Conference Bridge601-605:Park Extension Range621-626: Call Queuing ExtensionRange (additional chargeswill apply)651-658:Shared Line ExtensionRange (additional chargeswill apply)IP Phone Quick Reference Guide3151 Jay StreetSanta Clara, CA 950541.888.898.8733 Toll-Free1.408.687.4120 Outside U.S.1.408.980.0432Fax* Feature is not available on the Packet8 6753i IP Phone.。
ciscoipphone怎么设置
cisco ip phone怎么设置
cisco ip phone怎么设置?店铺整理了相关资料,供您参考!
一.每个路由器都有初始配置界面, 1先把网络调试通(与网通商联系),电话线接在分线盒上,按照分线盒的提示将线插在正确的位置,3个口分别是:
1》. line :终端入口
2》. adsl :与电脑网卡链接位置
3》. phone :电话链接口(最好是主机电话,而不是分机)
2. 路由器上一般有4个或4个以上的网线接口
1》. wan :代表是与外网的接口,也就是与猫连接的网线口
2》. lan :是属于内网接口位置,也就是你家的电脑链接口。
这样你的电脑在物理上已经正确的组成了局域网络1 :在网络开通的情况下,在任意电脑上打开IE浏览器输入
192.168.0.1 或者 192.168.1.1 用于登录你的路由器的设置界面正确访问路由器后会有登录用户名和密码的对话框出现
默认的名字是admin 密码 admin (或者密码是空的)
2 :在路由器的设置界面里一概可以看到配置向导,按照向导的提示一步一步的进行,选择链接是adsl宽带链接,并输入网通给的拨号账号和密码
看看复选框的选项,找到自动链接选项,并“∨”选。
3.计算机的网络配置:控制面板----网络链接------本地链接属性-----tcp/ip协议-----ip地址和dns-----自动。
其他的有关设置请详细参阅说明书,比如防火墙的设置等。
好了,以上就是小编为大家带来的CISCO IP PHONE怎么设置方法介绍,希望可以帮到大家哦!。
- 1、下载文档前请自行甄别文档内容的完整性,平台不提供额外的编辑、内容补充、找答案等附加服务。
- 2、"仅部分预览"的文档,不可在线预览部分如存在完整性等问题,可反馈申请退款(可完整预览的文档不适用该条件!)。
- 3、如文档侵犯您的权益,请联系客服反馈,我们会尽快为您处理(人工客服工作时间:9:00-18:30)。
Tip Operating your phone’s LCD screen is easy. Use the Navigation button, softkeys, and the keypad to make your selections.
Tip To exit out of a menu on your phone’s LCD screen, press the Exit softkey.
This document will show you how to make and receive a call. Change any phone settings, forward or put a call on hold and log into your Unity Voicemail box.
Received Calls (2)
Placed Calls (3)
To dial from a call record:
Step 1 Follow the steps above to open your
Missed, Received, or Placed Calls directory.
Step 2 Use the Navigation button to select
Step 2 Place a call to another number or
extension.
Step 3 When the call connects, press
Confrn again to add the new party to the
conference call.
Repeat these steps to add parties to the
(highlight) a particular record.
Step 3 If necessary, use the EditDial
softkey to add digits to the front of the
number.
Step 4 Lift the handset or press the Dial
Adjust the Ringer Volume?
Press the up or down Volume button when the handset is not in use (in the handset cradle).
Use the Speaker?
To activate the speaker: During a call, press the Speaker button, then hang up the handset. To switch from the speaker to the handset: Just pick up the handset. To turn off the speaker and hang up: Press the Speaker button. To adjust the speaker volume: Press the up or down Volume button when the speaker is in use. Press the Save softkey to save your change.
Tip
A call on hold remains active even though you and the other party cannot hear each other. You can answer or place another call while a call is on hold.
conference call.
To answer the new call, press the Answer
softkey. When you do so, the original call is
put on hold.
To return to the original call, select it (using
3 - Document located within technology services on
How Do I:
How Do I? Place a Call?
Put a Call on Hold?
Solution Lift the handset and dial the number OR Press the NewCall softkey and dial the number (Enter the number with the phone on-hook, then press the Dial softkey or lift the receiver) Press the Redial softkey Press the Hold softkey button. The call will display a paused symbol To return to the call, press the Resume button
the directional pad) and press the Resume
softkey. You can use the Hold and Resume
softkeys and directional pad to switch
between the calls.
Tip Your phone’s LCD display will indicate if you have missed a call.
5
Use Voice Mail?
5
Байду номын сангаас
View my Missed Calls?
6
Set Up a Conference Call?
6
Use Call Waiting?
6
Transfer a Call?
6
Forward All Calls?
7
Use a Headset
8
Where to Find More Information
Adjust the LCD Contrast?
Use Unity Voice Mail?
Press the Settings button. Select User Preferences (7942 only) Select Contrast from the menu. Press the Up or Down softkeys to set the desired contrast. Press the Save softkey to accept your changes. Set up voice mail: Press the Messages button on your Cisco IP Phone or dial 85555 and enter your PIN (12345) when prompted. Allows you to:
4 - Document located within technology services on
How Do I? Operate the LCD Screen?
Solution To control the cursor: Press the >> softkey to re-position the cursor. Press the << softkey to delete a character or digit in an entry. To select a menu item:
Adjust the Handset Volume?
Press the up or down Volume button when the handset is in use. Press the Save softkey to save your change.
Note as there is no hold music please keep the caller informed
3
How Do I:
4
Place a Call?
4
Put a Call on Hold?
4
Adjust the Handset Volume?
4
Adjust the Ringer Volume?
4
Use the Speaker?
4
Operate the LCD Screen?
5
Adjust the LCD Contrast?
softkey.
To turn a two-party call into a
conference call:
Step 1 During a call, press the Confrn
softkey. Doing so automatically activates a
new line and puts the first party on hold.
8
2 - Document located within technology services on
Introduction:
This document has been written to help you get up and running with the new Cisco 7940 & 7942 IP Phones.
Press the Navigation button to select (highlight) a menu item. Then press the Select Softkey. OR Press the number key on your phone’s dial pad that corresponds to the item number in the menu.