PMA 1080R说明书
洛雷克1080p高清安全摄像头系统说明书

VIEW YOUR WORLD IN TRUE HDExperience true High Definition TV quality video. Stay connected where ever you go with smart phone and tablet apps.1080P2TBHDD8/16Channels8/12CamerasNight Vision130/90FT40/28MDVR FEATURES:•Real time 1080p recording on all cameras 1•Real-time recording at 30fps per channel•24/7 security-grade hard drive•Continuous, scheduled and motion recording•PTZ cameras supported, remote control through App 1•H.264 video compression 2•HDMI output (HDMI cable included) for simple connection to HDTVs 3•Accurate time stamps with NTP & daylight savings time•Click and drag digital zoom in live view and playback•2 video outputs (HDMI & VGA) to connect multiple monitors •Instant USB backup of live video from selected camera •Automatic firmware upgrade•FLIR Cloud™ app with 3-Step setup 4•PC and Mac compatible 4•Instant mobile viewing on smartphones and tablets 5•Advanced apps with live viewing, playback, video recording, and snap shot •Motion push notifications and email alerts•Dual streaming to conserve bandwidthIndoor/outdoor1080P ResolutionNight Vision 130/90FT 40/28MVIEW YOUR WORLD IN HDKeep an eye on your home or business day or night with this high definition HD security camera.TRUE HIGH DEFINITION 1080p SECURITY CAMERA SYSTEM•True HD 1080p Image Sensor 1•Infrared cut filter ensures accurate color representation •Night vision range up to 130ft (40m) in ambient lighting & 90ft (28m) in total darkness 2 •Close up recognition in the dark with SmartIR •Anti-glare feature ensures clear images under strong lighting conditions•ClearNight imaging for superior low light performance, improving recording efficiency•Split glass design minimizes IR reflection•Weatherproof for outdoor & indoor installation (IP66 Rated) 3CAMERA FEATURES:•Extreme temperature performance (–22° ~ 140°F / –30° ~ 60°C) •70° field of view•Vandal resistant design with cable pass-through bracket •Lightweight and durable polycarbonate housing •Versatile ceiling or wall mounting options •Residential and business friendly compact designSYSTEMOperating System Linux (embedded)Pentaplex SimultaneousView, Record, Playback, Backup & Remote Monitoring Number of Channels 4/8/16ch — 1080p MPX, 720p HD, or analogcameras supportedINPUTS/OUTPUTSVideo IN 4/8/16 x 1Vp-p, CVBS, 75ohms, BNCVideo OUT NoVGA OUT Y esHDMI Y esAudio IN 1 line IN (RCA) for service only - audio recording not supported Audio OUT 1 line IN (RCA) for service only - audio recording not supported USB Port 1 at the back, 1 at the frontAlarm IN NoneAlarm OUT NoneVideo Output Resolution 1920x1080 HDMI, 1280x1024, 1024x768PTZ control RS-485 Pelco D & P ProtocolDISPLA YLive Display 4 ch: 1, 48 ch: 1, 4, 8, 916 ch: 1, 4, 8, 9, 16Live Display Speed 4 ch: 120 NTSC, 100 P AL8 ch: 240 NTSC, 200 P AL16 ch: 480 NTSC, 400 P ALOSD ON/OFFSystem Navigation USB Mouse, IR Remote Controller, Front PanelMotion Area Setting Adjustable grid (22x18)Sensitivity levels 100Firmware Upgrade Automatic over the Internet & via USB device and NetworkUser Authority By user groupTime Synchronization Auto time sync by NTP serverRECORDINGVideo Compression H.264Audio Compression G.711Recording Resolution NTSC:1080p (1920x1080), 720p (1280x720), 960x480, 704x480,352X480, 704x240, 352x240P AL:1080p (1920x1080), 720p (1280×720), 960×576, 704×576, 352×288Recording Frame Rate NTSC:4 ch: 60fps@1080p / 120fps @720p8 ch: 120fps @1080p / 240fps @720p16 ch: 240fps @ 1080p / 480p @ 720pP AL:4 ch: 48fps@1080p / 100fps @720p8 ch: 96fps @1080p / 200fps @720p16 ch: 192fps @ 1080p / 400fps @ 720pRecording Resolution Setting Per camera for different resolutionsRecording Quality Control 6 levelsRecording Schedule By hour, by day, by recording mode, by motion, by channelPre Recording Max.30 SecsPost Recording Max.5 MinutesReliability W atch-Dog, Auto-recovery after power failureCovert Video Y es PLA YBACKPlayback Channel 4 ch: 1 / 48 ch: 1 / 4 / 816 ch: 1 / 4 / 9 / 16Playback Speed V ariableMax 4xPlayback Players Backup PlayerSearch By time & eventLog Search Up to 1,000 lines for motion detected, configurationchanges, connects/disconnects and video lossAudio Play Y esSTORAGE & ARCHIVEStorage LHV2104 / LHV2108 / LHV2116: Up to 1 HDD’s(SA T A)LHV2216: Up to 2 HDD’s (SA T A)Maximum Capacity LHV2104 / LHV2108 / LHV2116: Up to 1x4TBLHV2216: Up to 2x4TBBackup Media USB Flash Drive & HDDBackup File Format DA V or ASF fileCONNECTIVITYCloud Connection Flir Cloud ™Supported Operating Systems Windows™Mac OSXRemote Software Client Software (PC) & Safari (Mac)Email notification T extwith snapshotInstant Smart Phone iPad®, iPhone®, Android™& T ablet Support †DDNS Free Lorex DDNSSystem Configuration Full setup configuration over networkPorts Programmable by UserNetwork Protocol HTTP, IPv4/IPv6, TCP/IP, UPNP, RTSP, UDP, SMTP, NTP,DHCP, DNS, PPPOE, DDNS, FTP, IP FilterNetwork Interface 10/100-Base-TX, RJ-45Network Speed Control 48Kb ~ 8MB/sec. per cameraGENERALPower Consumption Approx. 10 watts (no HDD included)Supply V oltage LHV2104 / LHV2108: 100V AC-240V AC,12VDC, 2A, 50/60HzLHV2116: 100V AC-240V AC, 12VDC, 3A,50/60HzLHV2216: 100V AC-240V AC, 12VDC, 5A, 50/60Hz Unit Dimensions LHV2104 / LHV2108 / LHV2116:12.8” x 10.0” x 2.2” / 325mm x 255mm x 55mmLHV2216: 14.8” x 11.5” x 1.8” /375mm x 292mm x 46mmUnit W eight (KGs) LHV2104 / LHV2108 / LHV2116:3.3lbs / 1.5kgLHV2216: 3.9lbs / 1.8kgOperating temperature 32° ~ 104° F / 0° ~ 40° CHumidity10 ~ 90% RHLHV2000 Series DVRLBV2521 Series CameraImage Sensor: 1/2.7” 1080p, 2 Megapixel Image SensorVideo Format: NTSC (LBV2521) / P AL (LBV2521P)Effective Pixels: H: 1930 V: 1088Resolution: 1080p @ 30FPS / 25FPSScan System: ProgressiveI nternalSync System:S/N Ratio: 53dB (AGC Off)Iris: AESAES Shutter Speed: 1/60 (1/50) ~ 1/100,000 Sec.Min. Illumination: 0.2 Lux without IR LED0 Lux with IR LEDVideo Output: MPXLens / Lens Type: 3.6mm F2.1 / FixedFOV (Diagonal): 70°T ermination: BNC TypeIR LED Qty / Type: 12 pieces /850nmNight Vision Range: 130ft (40m) / 90ft (28m)Power Requirement: 12V DC ±10%220mA (w/IR)Power Consumption: Max.Operating T emp. Range: –22° ~ 122°F / –30° ~ 50°COperating Humidity Range: < 95% RHEnvironmental Rating: Both (IP66)W eight (including stand): 0.3lbs / 0.1kgDVR Disclaimers:1. Compatible with Lorex 1080p and 720p wired HD cameras only. For a list of compatible cameras, please visit /support. Recording time may vary based on recording resolution and quality, lighting conditions and movement in the scene.2. Recording time may vary based on recording resolution & quality, lighting conditions and movement in the scene.3. HDMI output (1920x1080) HD for high definition multi-channel live viewing only. 1080p Recording resolution is limited to a maximum of 1920x1080 per channel. Image quality and resolution is dependent on the type of camera connected to the DVR.4. Requires a high speed internet connection and a router (not included). A minimum upload speed of 1Mbps is required for the best video performance. Up to 2 devices may connect to the system at the same time.5. For the latest list of supported apps and devices, please visit /supportCamera Disclaimers:1. Compatible with Lorex MPX series DVRs only.2. Stated IR illumination range is based on ideal conditions in typical outdoor night time ambient lighting and in total darkness. Actual range and image clarity depends on installation location, viewing area and light reflection / absorption level of object.3. Not intended for submersion in water. Installation in a sheltered location recommended.All trademarks belong to their respective owners. No claim is made to the exclusive right to use the trademarks listed, other than the trademarks owned by Lorex Technology Inc. We reserve the right to change models, configurations or specifications without notice or liability. Product may not be exactly as shown. Images are simulated.MODEL CONFIGURATION PACKAGE W x D x H Inches & mm WEIGHT CUBE UPC Code LHV8288 channel HD DVR with 2TB HDD & 8 x 1080p Cameras (LBV2521PK4B)Retail Box424mm x 307mm x 360mm 16.7” x 12.1” x 14.2” 20 lbs / 9 kg1..6cft / 0.04cbm6-95529-00328-3LHV1621216 channel HD DVR with 2TB HDD & 12 x 1080p Cameras (LBV2521PK4B)Retail Box 500mm x 383mm x 449mm19.7” x 15.1” x 14.924 lbs / 10.8 kg 3.04cft / 0.08cbm 6-95529-00334-4DVR Includes HD DVR with Pre-Installed HDD, HDMI Cable, Remote Control, Power Adapter, Mouse, Ethernet Cable, Quick Start GuidesLBV2521 Camera Inludes8, or 12 x Cameras, 8, or 12 x Mounting kits with Allen key, 8, or 12 x 60ft/18m BNC / power extension cables, 2 or 4 x 4-in-1 Power adaptersProduct Information:DVR Inputs and Outputs4 Channel DVRDVR Dimensions:8 Channel DVR16 Channel DVR (LHV2116)16 Channel DVR (LHV2216)325mm/12.8”LHV2104 / LHV2108 / LHV2116:46mm/1.8”LHV2216:375mm/14.8”Camera Dimensions:LBV2521B:。
AC1080专业运动动作相机用户手册说明书

AC1080 Professional Sports Action CameraUser ManualTABLE OF CONTENTS1) Precaution-----------------------------------------------------------------------12) Accessories---------------------------------------------------------------------23) Camera structure---------------------------------------------------------------34) Camera features----------------------------------------------------------------45) Two-way remote control------------------------------------------------------56) Overview------------------------------------------------------------------------67) Basic operation-----------------------------------------------------------------78) Photo and video-----------------------------------------------------------------89) Advanced menu settings-------------------------------------------------------910) Uploading files----------------------------------------------------------------1011) Firmware update--------------------------------------------------------------1112) Battery -------------------------------------------------------------------------1213) Syncing the remote control--------------------------------------------------1314) Camera and accessory assembly--------------------------------------------1415) Specifications sheet-----------------------------------------------------------1516) Troubleshooting---------------------------------------------------------------16PRECAUTIONFailure to follow these steps each time may result in damage to your camera, and could possibly destroy your camera. Your warranty does not cover accidental damage or issues caused by user error.*The camera is not drop resistant, therefore please avoid unnecessary roughness when handling the camera. Try to avoid dropping or damaging the camera in any way.*Don’t keep the camera in moist circumstances for long periods of time.*Don’t keep the camera in high temperatures as it may cause damage of external and internal components.*Use a specialized cloth to clean the camera lens and wipe away fingerprints or dust.*For the best and most efficient usage of your battery, we suggest using it in 0-40 °C.*When inserting or removing the micro SD card, please keep the camera turned off to avoid damage of the card or saved files.*Store the camera in a dry place and remove the micro SD card if storing for long periods of time.About the SD card:*Please use a Class 4 or higher speed micro SD card.*Please use genuine micro-SD cards. The non-genuine or OEM cards may cause issues, such as the failure of buttons, invalid video/photo issues, turning the camera off during recording, causing the camera to die, and so on.About the waterproof case:*Please keep the rubber seal clean, even a single hair or grain of sand can cause a leak. It is best to clean it with a dusting cloth.*For every use of the case in salt water, you will need to rinse the outside of the housing with fresh water and dry the case. Failure to do this will eventually cause corrosion of the hinge pin, and salt will build up in the seal, which can cause failure.*Please do not to remove or reset the seal. Doing so may cause leaks and damage your camera.About adhesive mounts:*Please mount on clean and smooth surfaces only. Only attach a mount in room temperature conditions 24 hours before use.ACCESSORIESX-gamecam+LCD waterproof case Remote controller USB cable1/4 tripod mountBattery Flat adhesive mount Vented adhesivemount Manual*Headbelt mount*Helmet mount*Bike mount*Surfboard mount*Chest harnessmount *Car suction cupmountNoted: *marked are optional accessories.1、Video button2、Photo button3、Micro SD card slot4、Microphone5、Lens6、Speaker7、A V OUT8、HDMI9、Right button10、U SB11、P ower/playback12、R ed/status indicator13、G reen/power indicator14、U p button15、L eft button16、O peration buttons17、D own button18、M enu/deleteCAMERA FEATURES* Mini size 2.6 x 1.8 x 1.3 inches, about 90g* FULL HD 1080P recording* Integrated 1.5 inch LCD screen* Waterproof case 60M (196 FT), shockproof 2M and dustproof* Waterproof remote controller, remote distance 15-20M* Fast forward, Slow-motion* Digital Image Stabilizer (DIS)* Contrast, ISO, Metering adjustment* One button back to pre-record mode* Pause and seamless recording* 180 degree upside down video/image* Sound-recognition* 4x digital zoom under 720p* View angle: 170 degree* Video: HD resolution1080p: 1920x1080, 30fps720p: 1280x720, 60fps;720p: 1280*720, 30fps*12M picture* Lithium battery: max 2.5 hours, 1000mAh* H.264 advanced compression, HDMI output*OSD Language: English, German, French, Italian, Russian, Spanish, Portuguese, Japanese, KoreanTWO-WAY REMOTE CONTROLThe remote control has a red indicator. It sends out signal but also gets signal feedback from the camera as well. When the remote controls sends out signal, it will flash once. When the camera receives signal (executive command) successfully, the red indicator will flash again. If the camera does not get signal, the remote control will only flash once. Using this information, you can check the camera status by following the indicator, usually when you cannot see the camera easily.OVERVIEWMain Buttons:Power/playback button Menu/delete button PHOTO button Video button Photo mode Video mode Advanced setting mode USB modeVideo resolution, Default 1080p Photo resolutiondefault 5MMicro SD card inside Metering statusDefault centralSelf-shot White balance Time stamp PowerTime on LCD (for example):02:46:48 ----- The remaining video record time2014-1-1 08:09:10 ----- Actual real-time clockBASIC OPERATIONSWhen using the camera for the first time:A. Insert a micro SD card. Without the micro SD card, the green indicator will flash.The camera is compatible with high speed micro SD cards (class 4 or higher)B. Insert the battery into the camera (Located on the bottom of the camera).C. Turn the camera on.Press and hold the POWER button for 3 seconds, you will see the startup screen, and the green LED indicator will turn on.Press and hold the POWER button for 3 seconds when your camera is on to turn it off.In standby mode, the red LED indicator is off.D. Recording video.When the camera is on, press the VIDEO button and your camera will begin to record video.The red LED indicator will flash. It also can be controlled by the VIDEO button on the remote controller.Note: During recording, you can only use the PHOTO button after pressing the VIDEO button on the remote controller.E. Taking photos.When your camera is on, press the PHOTO button and the camera will take a photo.The red LED indicator will flash once. You can also take a photo by pushing the PHOTO button on the remote controller.F. One button back mode.When you are setting options in the menu or reviewing files, just press the VIDEO button once, and your camera will go back to the pre-record mode.G. Playback mode and delete.By pressing the playback button, you can see all video files.Press the PHOTO button to switch between seeing videos and photos.The data in the top right corner shows the file number.Choose the video or photo you would like to view by using the 4 directional buttons.When viewing videos or photos, press the M button to delete the file.H. Pausing and seamless recording.During recording, pressing the UP button will allow you to see the recording time. The LCD will actually pause, but the red indicator will stay on.When you press the UP button again, the camera will start recording again. Doing this in succession allows you to record seamless footage as one file.PHOTO AND VIDEOPhoto*Press the MENU (M) button; you will see the photo icon.*Press the OK button to go into the photo’s setting menu.*Press M or VIDEO button to go back.Photo settings Size:3M5M8M12M Self shotOff5 sec10sec20sec Triple shot ON/OffTime lapse OFF/2/3/5/20/30/60 secIf choosing a Timelapse interval, when you press the PHOTO button once, it will take photos continuously.The red indicator will flash once each time a photo is taken.Press the PHOTO button again to stop.Video*Press the MENU (M) button; you will see the video icon.*Press the OK button to go into the video settings menu.*Press the M or VIDEO button to go back.Video setting Resolution1080P/30fps720P/60fps720P/30fpsWVGA/60fpsWVGA/30fpsVGA/30fps Motion detection OFF/on Video durationAny duration30sec180sec300secLoop recording Off/ON Upside down Off/ONNote: Enabling “upside down” will cause the LCD to go black for a few seconds, which is normal.*Sound recognition:When the camera begins to record, you will only hear one *beep* noise.When the camera stops recording, you will hear two *beep* noises.This helps recognize the recording status easily.*4x digital zoom:During 720p recording, you can zoom the video by using the LEFT and RIGHT buttons.*Fast forward, Slow-motion:When playing back video, press the LEFT button to choose slow motion.Press the RIGHT button to fast forward.PlaybackPressing the PLAYBACK button allows you to view your files. Press the directional buttons to choose your video. Press the OK button for a preview and press the MENU/DELETE buttons for your deletion options. When playing video, press the LEFT/RIGHT buttons to fast-forward and rewind.Press the PHOTO button to switch between photos and videos.ADVANCED MENU SETTINGSMenu settings:Using the SETUP feature, you can customize the camera's functions based on your personal preferences.*Press the MENU button; navigate to the Settings icon (third from the left).*Press the OK button to go into the settings menu.*Press the M or VIDEO button to go back.Advanced setting Firmware versionTime setup year/month/day, timeLCD offoff5sec10sec2minV olume 11 10 9 8 7 6 5 4 3 2 1 0Default Yes/NoFormat No/YesLanguageEnglish, German, French, Italian,Russian, Spanish, Portuguese,Japanese, KoreanTV standard NTSC /PAL TVDate/time stamp On/ OffBeep sound on/ offScene modeAuto, Night, Sports, LandscapePortraitFrequency 50HZ/60HZ Contrast Standard Hard softAE ISO Auto 100200 400 800Metering mode Standard Hard SoftAuto power offoff 1min 2min 5minUPLOADING FILESWhen connecting the USB with the camera successfully, there will be a visible ‘connection’ iconon the screen.Note: Before inserting the USB cable, please turn on the camera. When the camera is off, the cable is for charging only.FIRMWARE UPDATE*Usually the software can be updated by using a micro SD card.*Copy the software into card’s root folder, then insert the card into the camera and turn it on.*Choose YES, and the camera will refresh automatically. Restart the camera, and it will update successfully. BATTERYThe lithium-ion battery included in the packaging comes only partially charged. For a full charge, whenthe camera is off, connect the camera to a computer using the USB cable for charging.*Active battery time runs about 2.5 hours.*The battery will charge up to 80% in 1-2 hours, and should reach 100% in 4 hours.*When the camera is off, the red indicator is turned on during charging. After becoming fully charged, the green indicator will be on.* You can also charge the camera using a car charger or USB power bank.SYNC THE REMOTE CONTROL:* Open the remote controller (RC) and take off the battery.* Press and hold the PHOTO button of the remote controller, then install the RC's battery. Next, turn on the camera (when turning on the camera, you will still need to press the PHOTO button).* After turning on the camera, release the PHOTO button.CAMERA AND ACCESSORY ASSEMBLYTo assemble the waterproof case, please follow the below steps outlined in the image.Note that the buckle will not move after fixing the thumb screw.To attach your camera to the mount, you only need to slide it in to install and slide it out to uninstall.Tips:*Clean the surface first. Wax, oil, dirt, and other debris will reduce adhesion which can result in a weak bond or even losing your camera.*Please also keep your waterproof case's rubber door clean.*Only attach a mount in room temperature conditions. It will not bond well in very cold or damp environments.*The adhesive mounts can only be mounted to a smooth surface.*For best results, please attach your mount at a minimum of 24 hours before usage. SPECIFICATIONS SHEETVideo resolution 1080P(1920*1080)720P(1280*720)WVGA(848*480)QVGA(320*240)frames 1080P/30fps,720P/60fps,720P/30fps,WVGA/60fps, WVGA/30fps, QVGA/60fpsVideo format MOV(H.264 advanced compression)LCD size 1.5''Remote distance 15-20MWaterproof IP68,60M (196 FT)Storage Micro SD/MMC(Max 32GB SDHC)Storage capacity (32GBmicro SDcard) Photos: 3M(26080) 5M(15280) 8M(11180) 12M(8940)Video: H.264 1080p: about 5.5 hours;H.264 720p: about 5.5hoursZoom 4xdigital zoom(720P mode)A V OUT Support NTSC/PAL, HDMI outputPC port USB2.0(U-disk)Microphone Built-in MIC and SpeakerConsumption **********(MAX)Battery capacity 1000mAhBattery life About 2.5 hoursBattery charge About 2.5 hoursOperation system(1080P) Windows XP SP2/Vista or Above/Mac OS/Win 7/APPCPU >=Pentium 4 1.5GHZRAM >=1GBDimensions 68*46*33mmCamera weight 90g(with LCD)Storage temperature -20°C–50°CWorking temperature -10°C—50°CWorking humidity 15~85%RHTROUBLESHOOTING:Please refer to the below solutions if there are problems under normal operation.* Can’t record photos or videos.Check the memory left on your Micro SD card.* “File error” shows up when playing back photos and videos.Caused by corrupted storage, we recommend formatting your Micro SD card. Formatting the card will delete the data in micro SD card permanently, including protected files. Therefore, please copy important data before formatting.* Dim Videos.Try using a specialized cloth to remove away blots, fingerprints, and dust before recording.* The micro SD card is not compatible with the camera.Try formatting your micro SD Card using a computer. Formatting the card will delete the data in micro SD card permanently, including protected files. Therefore, please copy important data before formatting.*Cannot upload data to the PC when using a USB cable.Please check to see if the camera is turned on. When the camera is off, it is only charging, and will not transfer files or recordings.For any other questions or inquiries, please don’t hesitate to contact us directly:Foscam Digital Technologies LLCE-mail: *****************Phone: Toll Free – 1-800-930-0949。
PMA-50 - 操作说明书
PMA-50INTEGRATED AMPLIFIER操作说明书可在单页纸张上打印多个PDF页面。
附件4功能5高音效5高性能5部件名称和功能6前面板6显示屏8后面板9遥控器10连接连接方法11安装本机12水平安装12垂直安装13使用遥控器前15遥控器的操作范围16连接扬声器17扬声器连接18连接带有模拟音频输出端子的设备19连接带有数字音频输出端子的设备20连接PC或Mac21连接电源线22播放基本操作24接通电源24选择输入源25调节主音量26切换显示屏亮度26播放设备27在计算机上播放音乐(USB-DAC)27通过数字连接(COAXIAL/OPTICAL-1/OPTICAL-2)聆听音乐35通过模拟接线聆听音乐(AUX)36在蓝牙设备上聆听音乐37设置步骤菜单图45 Source Direct47 Bass47 Treble47 Balance47 H/P AMP Gain47 Bluetooth48 Auto Standby48提示提示50故障诊断51重置为出厂设置58保修和修理59附录可播放的数字音频输入信号类型60数模转换器60播放蓝牙设备60蓝牙通信60术语解释61商标信息62规格63索引66感谢您购买本Denon产品。
为了确保正确操作,请在使用本品前认真阅读本操作说明书。
阅读后,请务必妥善保存本说明书以供将来参考。
附件请检查确认本品随附以下部件。
功能高音效0配备一个高质量D类放大器放大器部分采用CSR的DDFA®技术。
输出级电路采用离散结构,可比常规D类放大器实现更高的信噪比和更低的失真。
此外,超出外壳大小的50W/4Ω(欧姆)高输出使您可以欣赏Denon 营造的理想音频播放环境,具有“细腻而强劲的声音”。
0Advanced AL32 Processing配有高级AL32处理,Denon自有的模拟波形再现技术。
通过将16位数字数据扩展到32位,增强了弱信号的再现。
高性能0支持高分辨率音频文件的播放支持DSD信号和高达192kHz/24位的PCM信号。
PMA-800A型使用说明书最新版
4. 液晶显示及操作说明PMA-800A快切装置使用的液晶为240⨯128点阵,可显示15⨯8行的汉字,或30⨯16行字符。
装置采用汉字显示,操作简便直观。
4.1 主菜单开机后自动进入测量显示菜单,按Q(取消)键进入主菜单,画面如下:主菜单测量显示方式设置定值设置手动切换事件管理切换试验异常报告打印定值其它设置信息显示22 :20 :12按动“↑”“↓”“←”“→”按键,使手形图标“”指向对应子菜单相,按“确认”键进入子菜单。
4.2 子菜单4.2.1 测量显示PMA-800A型快切装置采用图形方式显示系统图,并在图上标注有关的测量参数,如母线、工作电源、备用电源上的电压及频率,母线与后备间频率差、相角差,分支电流等模拟量,以及与开关对应的位置信息,具体如下。
图中除实时测量值外,1DL工作开关,3DL备用开关,及PT 隔离开关位置均可以实时显示。
4.2.2 方式设置“方式设置”子菜单如下图,采用滚屏显示,屏幕右下角有提示图标。
当有“”时表示下面还有内容,当出现“”图标时,表示上面还有内容,而出现“”图标则表明可以向上及向下翻动屏幕:方式设置,请输入密码?00 00 OK控制方式:就地保护切换方式:串联失压切换方式:串联就地手动切换方式:并联远方并联切换方式自动失压起动:投入快速切换:投入同捕越前相角:退出同捕越前时间:投入残压切换:退出低频起动:投入后备失电闭锁:退出出口投退:投入方式设置过程:✧选择“方式设置”菜单,按“确认”键。
✧输入正确的密码,按“确认”键后,应出现“OK”。
装置出厂默认密码“1000”✧按上下箭头键将光标移至要设定的项目。
✧按+或-键切换至要设定的方式,再按确认键,显示“OK”后即可。
方式设置的有关参数定义请参见《PMA-800A微机厂用电快速切换装置技术说明书》4.2.3 定值设置“定值设置”菜单共三屏,刷屏显示。
与“方式设置”菜单类似,有提示图标。
如下图:定值设置,请输入密码?0 0 OK 正常并联切换频差= 0.05Hz正常并联切换相差= 10.0D.正常并联跳闸延时= 0.20s快速切换频差= 0.5Hz快速切换相差= 10.0D.同捕切换频差= 4.0Hz同捕恒定越前相角= 10.0D.同捕恒定越前时间= 80ms残压切换电压幅值= 30%失压起动电压幅值= 60%后备失电电压幅值= 80%”,按“确认”开始切换,此时“事件管理动作事件追忆异常事件追忆动作事件打印事件总清4.2.5.1 “动作事件追忆”二级子菜单本装置最多可记录十组动作事件,依次为0~9次,其中的0为最近一次动作。
MAXREFDES1080高光度LED驱动器说明书
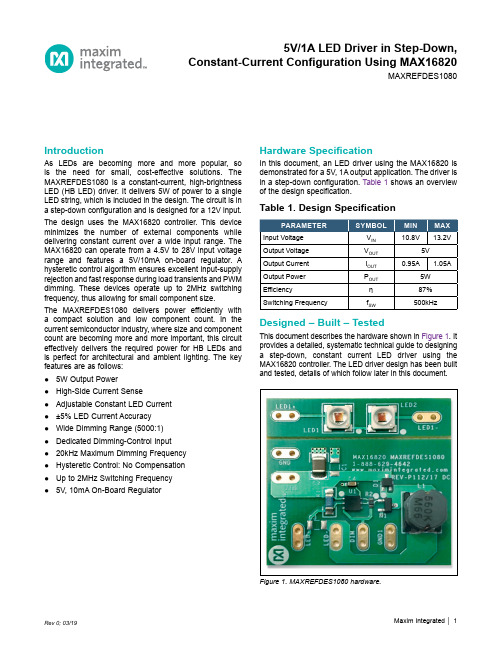
IntroductionAs LEDs are becoming more and more popular, so is the need for small, cost-effective solutions. The MAXREFDES1080 is a constant-current, high-brightness LED (HB LED) driver. It delivers 5W of power to a single LED string, which is included in the design. The circuit is in a step-down configuration and is designed for a 12V input. The design uses the MAX16820 controller. This device minimizes the number of external components while delivering constant current over a wide input range. The MAX16820 can operate from a 4.5V to 28V input voltage range and features a 5V/10mA on-board regulator. A hysteretic control algorithm ensures excellent input-supply rejection and fast response during load transients and PWM dimming. These devices operate up to 2MHz switching frequency, thus allowing for small component size.The MAXREFDES1080 delivers power efficiently with a compact solution and low component count. In the current semiconductor industry, where size and component count are becoming more and more important, this circuit effectively delivers the required power for HB LEDs and is perfect for architectural and ambient lighting. The key features are as follows:●5W Output Power●High-Side Current Sense●Adjustable Constant LED Current●±5% LED Current Accuracy●Wide Dimming Range (5000:1)●Dedicated Dimming-Control Input●20kHz Maximum Dimming Frequency●Hysteretic Control: No Compensation●Up to 2MHz Switching Frequency●5V, 10mA On-Board Regulator Hardware SpecificationIn this document, an LED driver using the MAX16820 is demonstrated for a 5V, 1A output application. The driver is in a step-down configuration. Table 1 shows an overview of the design specification.Table 1. Design SpecificationFigure 1. MAXREFDES1080 hardware.Designed – Built – TestedThis document describes the hardware shown in Figure 1. It provides a detailed, systematic technical guide to designing a step-down, constant current LED driver using the MAX16820 controller. The LED driver design has been built and tested, details of which follow later in this document.5V/1A LED Driver in Step-Down,Constant-Current Configuration Using MAX16820MAXREFDES1080Step-Down TopologyThe step-down converter, as seen in Figure 2, is the most commonly used type of switching regulator topology. A step-down converter steps down the voltage from input to output. Most conventional step-down converters consist of two switches (or a switch and a diode), an inductor, a capacitor, and a load (LEDs, in this case). The converter usually also requires a controller to regulate the output. This design uses the MAX16820.Transistor Switch ‘On’ PeriodWhen the transistor switch is on (t ON ), it supplies the output load with current. Initially current flow to the load is restricted, as energy is also being stored in the induc-tor. The current in the load and the charge on the output capacitor, therefore, build up relatively slow in comparison with the switch-on time of the MOSFET. During the ‘on’ period, there is a large voltage across the diode, which causes it to be reverse biased.Transistor Switch ‘Off’ PeriodWhen the transistor switch is off (t OFF ), the energy that had been stored in the inductor’s magnetic field is released. The voltage across the inductor is now in reverse polarity, and sufficient stored energy is available to maintain current flow while the transistor is open. The reverse polarity of the inductor allows current to flow in the circuit through the load and the diode, which is now forward biased. Oncethe inductor has been drained of the majority of its stored energy, the load voltage begins to fall. The charge stored in the output capacitor then becomes the main source of current. This leads to the ripple waveform seen in Figure 3.In this reference design, the circuit is modified to a reverse buck converter topology, as seen in Figure 4. This allows the circuit to operate off of a low-cost, n-channel MOSFET, which reduces BOM cost. The same basic theory is maintained in this topology, except the MOSFET and inductor come after the load.When the MOSFET Q1 is turned ON, current flows through the LEDs and inductor L1, and out through the MOSFET. Energy is stored in the magnetic field generated in the inductor. The current flowing through R SENSE is monitored by the MAX16820 at the CSN pin.Figure 2. Conventional step-down converter topology.Figure 3. Step-down converter waveforms.Figure 4. Reverse buck converter topology.When the MOSFET Q1 is turned OFF, the magnetic field in the inductor begins to collapse and the polarity of the inductor reverses. At the same time the inductor releases its remaining energy to the LEDs and the diode. This maintains constant current in the LEDs.In order to derive the duty cycle equation, first we look at t on , using:L di V Ldt=If integrated between 0 and t on :Lon L onI V Lt ∆=When the switch is on:V L = V IN – V OUTFill into the equation above:IN OUT ONLon(V V )t I L−=∆Now we look at t off , using:L diV Ldt=If integrated between 0 and t off :Lon L offI V Lt ∆=When the switch is off:V L = –V OUTFill into the equation above:OUT OFFLoff(V )t I L−=∆Because the average voltage across the inductor for an entire switching cycle is zero:ΔI Lon = –ΔI LoffFill in the equations above:IN OUT ON OUT OFFIN OUT OUT IN OUT OUT OUT OUT IN(V V )t (V )t L L (V V )DT (V )(1D)TV D V D V V DV D V −−=−−=−−−−=−=Design ProcedureNow that the principle operation of the buck regulator is understood, a practical design example can be illustrat-ed. The converter design process can be divided into three stages: power stage design, MAX16820 controller setup, and current regulation. This document is primarily concerned with the power stage design and the current setting. The design parameters in Table 2 will be used throughout.Step 1: Choosing Inductor L1In the MAXREFDES1080, the minimum inductor value for the circuit is the larger value of:IN LED LED LED LED3.33(V V )L 1.05I or 3.33(V )L 1.05I ×−=××=×L is calculated in μH.The inductor chosen for this design is 56μH.Step 2: Choosing R SENSE to Set theLED CurrentThe MAX16820 features a programmable LED current using a resistor connected between IN and CSN. Use the following equation to calculate the sense resistor:SNSHI SNSLO SENSE LED(V V )1R ()2I +Ω=Typically, V SNSHI = 210mV and V SNSLO = 190mV. For furtherdetails about V SNSHI and V SNSLO , see the Electrical Characteristics in the MAX16820 data sheet .The resistor chosen for this design is a 1%, 0.2Ω resistor.Table 2. Design ParametersStep 3: Determining the Switching FrequencyThe MAX16820 regulates the LED output current using an input comparator with hysteresis. As the current through the inductor ramps up and the voltage across the sense resistor reaches the upper threshold, the voltage at DRV goes low, turning off the external MOSFET. The MOSFET turns on again when the inductor current ramps down through the freewheeling diode until the voltage across the sense resistor equals the lower threshold. Use the following equation to determine the operating frequency:IN LED LED SENSE sw IN SNSHI SNSLO (V V )V R f V (V V )L−××=×−×Where V LED is the forward voltage drop across all LEDs in a string together, and f sw is the switching frequency.Step 4: MOSFET SelectionThe MAX16820’s gate driver is capable of sourcing 0.5A and sinking 1A of current. MOSFET selection is based on the maximum input operating voltage V IN , output current I LED , and operating switching frequency. For better effi-ciency, choose a MOSFET that has a higher breakdown voltage than the maximum input voltage, low R DS(ON), and low total charge. The MOSFET threshold voltage must be adequate if operated at the low end of the input-voltage operating range.The MOSFET chosen for this design is the Fairchild Semiconductor FDN359BN n-channel MOSFET.Design ResourcesDownload the complete set of Design Resources including the schematics, bill of materials, PCB layout, and test files.Step 5: Freewheeling Diode SelectionThe forward voltage of the freewheeling diode should be as low as possible for better efficiency. A Schottky diode is a good choice as long as the breakdown voltage is high enough to withstand the maximum operating voltage. The forward current rating of the diode must be at least equal to the maximum LED current.The diode chosen for this design is the Fairchild Semiconductor FBR130 Schottky diode.Step 6: LED Current RippleThe LED current ripple is equal to the inductor current rip-ple. In cases when a lower LED current ripple is needed, a capacitor can be placed across the LED terminals.Step 7: DIM InputThe MAX16820 allows dimming with a PWM signal at the DIM input. A logic level below 0.6V at DIM forces the MAX16820’s DRV output low, turning off the LED current. To turn the LED current on, the logic level at DIM must be at least 2.8V.NoteThe MAXREFDES1080 board is not thermally optimized for the LED components used.Revision HistoryMaxim Integrated cannot assume responsibility for use of any circuitry other than circuitry entirely embodied in a Maxim Integrated product. No circuit patent licenses are implied. Maxim Integrated reserves the right to change the circuitry and specifications without notice at any time. The parametric values (min and max limits) shown in the Electrical Characteristics table are guaranteed. Other parametric values quoted in this data sheet are provided for guidance.© 2019 Maxim Integrated Products, Inc. All rights reserved. Maxim Integrated and the Maxim Integrated logo are trademarks of Maxim Integrated Products, Inc., in the United States and other jurisdictions throughout the world. All other marks are the property of their respective owners.Maxim Integrated。
洛雷斯1080P天气抗性夜视安全摄像头快速开始指南说明书

Weight (including stand)
0.8lbs / 0.36kg
* Compatible with Lorex MPX series DVRs only.
** Stated IR illumination range is based on ideal conditions in typical outdoor night time ambient lighting and in total darkness. Actual range and image clarity depends on installation location, viewing area and light reflection / absorption level of object.
Installation Tips
• Point the cameras where there is the least amount of obstructions (i.e. tree branches).
• Install the cameras where they are difficult for vandals to reach. • Secure cabling so that it is not exposed or easily cut. • Cameras rated for outdoor use. Installation in a sheltered location
53dB (AGC Off)
Iris
AES
AES Shutter Speed
1/60 (1/50) ~ 1/100,000 Sec.
Min. Illumination
AM可可集团的油雾分离器系列说明书

AM150C to 550C AM650/850Mist SeparatorSeries AMCan remove oil mist in compressed air and remove particles such as rust or carbon of more than 0.3 μm.Note) Max. flow at 0.7 MPa.Max. flow varies depending on the operating pressure.Refer to “Flow Characteristics” (page 21) and “Maximum Air Flow” (page 22).Note) Refer to “Made to Order” (page 67) for high flow type of AM850 or more.Specifications0.05 MPa 1.5 MPa FluidMax. operating pressure Min. operating pressure ∗Proof pressureAmbient and fluid temperature Nominal filtration rating Element lifeCompressed air1.0 MPa 5 to 60°C0.3 μm (Filtration efficiency: 99.9%)Oil mist density at outlet Max. 1.0 mg/m 3 (ANR) (≈0.8 ppm)∗2 years or when pressure drop reached 0.1 MPa∗ With auto drain: 0.1 MPa (N.O. type) or 0.15 MPa (N.C. type)∗ Oil mist density at 30 mg/m 3 (ANR) blown out by compressor.SymbolAMModular connection is possible with AM150C to 550C.(For details, refer to page 61.)Made to Order(For details, refer to page 67.)CautionBe sure to read this before handling.Refer to back pages 1 and 2 for Safety Instructions, “Precautions for Handling Pneumatic Devices” (M-03-E3A) for Common Precautions, and back pages 3 through to 7 for Specific Product Precautions.o u r t e s y o f C M A /F l o d y n e /H y d r a d y n e ▪ M o t i o n C o n t r o l ▪ H y d r a u l i c ▪ P n e u m a t i c ▪ E l e c t r i c a l ▪ M e c h a n i c a l ▪ (800) 426-5480 ▪ w w w .c m a f h .c o mHow to OrderOptionsCombinations”.Series AMo u r t e s y o f C M A /F l o d y n e /H y d r a d y n e ▪ M o t i o n C o n t r o l ▪ H y d r a u l i c ▪ P n e u m a t i c ▪ E l e c t r i c a l ▪ M e c h a n i c a l ▪ (800) 426-5480 ▪ w w w .c m a f h .c o mHow to OrderAuto Drain Specifications/Option Combinations∗2∗2 Refer to “Auto Drain Specifications/OptionCombinations”.∗3Body size 850 is equipped with a ball valve(Rc3/8 female threaded). Mount a pipingadapter IDF-AP609 (page 62) to the ball valve if NPT3/8 female threaded is required.∗4Drain piping and piping for a stop valvesuch as ball valve are required.: Available Mist Separator SeriesAMo u r t e s y o f C M A /F l o d y n e /H y d r a d y n e ▪ M o t i o n C o n t r o l ▪ H y d r a u l i c ▪ P n e u m a t i c ▪ E l e c t r i c a l ▪ M e c h a n i c a l ▪ (800) 426-5480 ▪ w w w .c m a f h .c o mAM150C AM250C AM550CAM350C AM450CAM850AM650Note) Compressed air over max. flow line in the table below may not meet the specifications of the product.It may cause damage to the element.Flow Characteristics (Element oil saturation)P r e s s u r e d r o p (M P a )Air flow rate (l /min (ANR))P r e s s u r e d r o p (M P a )Air flow rate (l /min (ANR))P r e s s u r e d r o p (M P a )Air flow rate (l /min (ANR))P r e s s u r e d r o p (M P a )Air flow rate (l /min (ANR))P r e s s u r e d r o p (M P a )Air flow rate (l /min (ANR))P r e s s u r e d r o p (M P a )Air flow rate (l /min (ANR))P r e s s u r e d r o p (M P a )Air flow rate (m 3/min (ANR))Max. flow lineMax. flow lineMax. flow lineMax. flow lineMax. flow lineMax. flow lineMax. flow lineSeries AMo u r t e s y o f C M A /F l o d y n e /H y d r a d y n e ▪ M o t i o n C o n t r o l ▪ H y d r a u l i c ▪ P n e u m a t i c ▪ E l e c t r i c a l ▪ M e c h a n i c a l ▪ (800) 426-5480 ▪ w w w .c m a f h .c o mAM150C to 550C, AM650AM850ConstructionMaximum Air FlowMax. flow lineModel SelectionM a x . a i r f l o w r a t e (m 3/m i n (A N R ))Select a model in accordance with the following procedure taking the inlet pressure and the max. air flow rate into consideration.(Example) Inlet pressure: 0.6 MPaMax. air flow rate: 5 m 3/min (ANR)1.Obtain the intersecting point A of inlet pressure and max. air flow rate in the graph.2. The AM650 is obtained when the max. flow line is above the inter-secting point A in the graph.Note) Sight glass is indicated in the figure for easy understanding ofcomponent parts. However, it differs from the actualconstruction. Refer to dimensions on pages 23 through to 25 for details.∗ Element assembly: With gasket (1 pc.) and O-ring (1 pc.)∗ Refer to back page 6 for replacement of auto drain.∗ Element assemblies for Made to Order (X6, X12, X15, X17, X20, X26, X37) are same as those for standard (see the above table).Note)Make sure to select a model that has the max. flow line abovethe obtained intersecting point. With a model that has the max. flow line below the obtained intersecting point, the flow rate will be exceeded, thus leading to a problem such as being unable to satisfy the specifications.OUTIN Mist Separator SeriesAMo u r t e s y o f C M A /F l o d y n e /H y d r a d y n e ▪ M o t i o n C o n t r o l ▪ H y d r a u l i c ▪ P n e u m a t i c ▪ E l e c t r i c a l ▪ M e c h a n i c a l ▪ (800) 426-5480 ▪ w w w .c m a f h .c o mDimensionsAM150C to 550CC: With auto drain (N.C.)D: With auto drain (N.O.)OptionJ: Drain guide 1/4 female threadedCombination of D: With auto drain (N.O.) S, U: With differential pressure switch (with indicator)T: With element service indicatorSeries AMo u r t e s y o f C M A /F l o d y n e /H y d r a d y n e ▪ M o t i o n C o n t r o l ▪ H y d r a u l i c ▪ P n e u m a t i c ▪ E l e c t r i c a l ▪ M e c h a n i c a l ▪ (800) 426-5480 ▪ w w w .c m a f h .c o m1807085324.5121361601601502025315401133410311205537M a i n t e n a n c e s p a c eDrainDimensionsAM650T: With element service indicatorAuto drainD: With auto drain (N.O.)OptionJ: Drain guide 1/4 female threaded201/4 female threaded34Drain cock: Blackø10 one-touch fitting(Accessory)Bracket Mist Separator SeriesAMOUTINOUTINo u r t e s y o f C M A /F l o d y n e /H y d r a d y n e ▪ M o t i o n C o n t r o l ▪ H y d r a u l i c ▪ P n e u m a t i c ▪ E l e c t r i c a l ▪ M e c h a n i c a l ▪ (800) 426-5480 ▪ w w w .c m a f h .c o m22011022018024120424615861818422015133034846410Rc 3/8 female threadedM a i n t e n a n c e s p a c e Bracket (Accessory)DimensionsAM850Auto drainD: With auto drain (N.O.)for AM850OptionT: With element service indicator233/8 female threadedSeries AMDrainOUTIN OUTIN o u r t e s y o f C M A /F l o d y n e /H y d r a d y n e ▪ M o t i o n C o n t r o l ▪ H y d r a u l i c ▪ P n e u m a t i c ▪ E l e c t r i c a l ▪ M e c h a n i c a l ▪ (800) 426-5480 ▪ w w w .c m a f h .c o m。
洛雷技术1080P无线无线电视记录器用户手册说明书
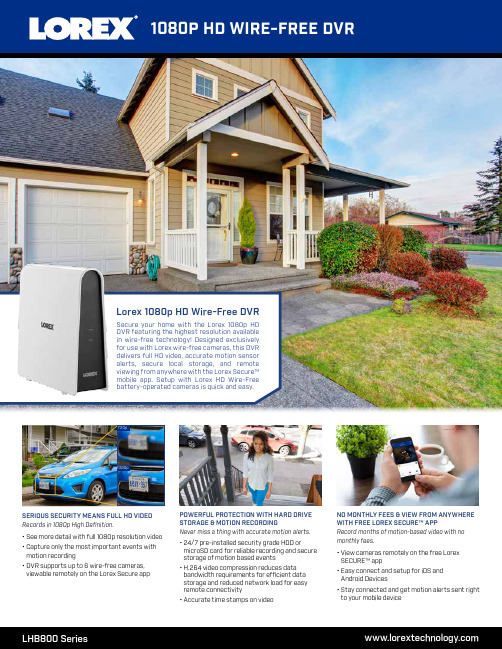
1080P HD WIRE-FREE DVRPOWERFUL PROTECTION WITH HARD DRIVE STORAGE & MOTION RECORDINGNever miss a thing with accurate motion alerts. • 24/7 pre-installed security grade HDD ormicroSD card for reliable recording and secure storage of motion based events• H.264 video compression reduces data bandwidth requirements for efficient data storage and reduced network load for easy remote connectivity• Accurate time stamps on videoNO MONTHLY FEES & VIEW FROM ANYWHERE WITH FREE LOREX SECURE™ APPRecord months of motion-based video with no monthly fees.• View cameras remotely on the free Lorex SECURE™ app• Easy connect and setup for iOS and Android Devices• Stay connected and get motion alerts sent right to your mobile deviceSERIOUS SECURITY MEANS FULL HD VIDEO Records in 1080p High Definition.• See more detail with full 1080p resolution video • Capture only the most important events with motion recording• DVR supports up to 6 wire-free cameras, viewable remotely on the Lorex Secure app720p1080pLHB800 Series Lorex 1080p HD Wire-Free DVRSecure your home with the Lorex 1080p H D DVR featuring the highest resolution available in wire-free technology! Designed exclusively for use with Lorex wire-free cameras, this DVR delivers full HD video, accurate motion sensor alerts, secure local storage, and remote viewing from anywhere with the Lorex Secure™ mobile app. Setup with Lorex H D Wire-Freebattery-operated cameras is quick and easy.Specifications1.For a list of compatible wire-free cameras please visit /compatibilityRecording time may vary based on recording resolution and motion / manual recordings.2. Accessing your security system remotely requires a high-speed Internet connection. Ensure yourDVR has a wired connection to a router (not included). An upload speed of 3.5Mbps is recommendedfor optimal video performance. Up to 3 devices may connect to the system at the same time. For thelatest list of supported apps and devices, please visit /compatibility.3. HDMI output (1920 x 1080) HD for high definition multi-channel live viewing only. 1080p recordingresolution is limited to a maximum of 1920 x 1080 per channel. Image quality and resolution isdependent on the type of camera connected to the DVR.*Frames Per Second (FPS) is affected by factors including signal strength, signal obstructions,range and the number of wireless/wire-free cameras installed in the same environment (maximum6 recommended).DisclaimersMODEL CONFIGURATION PACKAGE W x D x H(Inches & mm)WEIGHT CUBE UPC CODELHB8061T6CH 1080p HD Wire-free DVR with 1TB HDD Brown Box15.16 × 3.74 × 10.83”385 × 95 × 275mm4.4lb / 2.0kg0.35cft / 0.01cbm6-95529-01272-8LHB8061TP6CH 1080p HD Wire-free DVR with 1TB HDD Brown Box15.16 × 3.74 × 10.83”385 × 95 × 275mm4.4lb / 2.0kg0.35cft / 0.01cbm6-95529-01273-5LHB80616G6CH 1080p HD Wire-free DVR with 16GB HDD Brown Box15.16 × 3.74 × 10.83”385 × 95 × 275mm4.4lb / 2.0kg0.35cft / 0.01cbm6-95529-01373-2LHB80632G6CH 1080p HD Wire-free DVR with 32GB HDD Brown Box15.16 × 3.74 × 10.83”385 × 95 × 275mm4.4lb / 2.0kg0.35cft / 0.01cbm6-95529-01287-2CONTENTS Wire-free DVR, Mouse, Ethernet Cable, HDMI Cable, Power Adapter, Quick Setup Guides.DimensionsDVR Inputs & Outputs6 Channel DVR (LHB800 Series)。