51CTO学院-Citrix Provisioning Services 7.1 管理
Citrix 服务器虚拟化之二十二 桌面虚拟化之Provisioning Services创建标准映像实现无盘部署
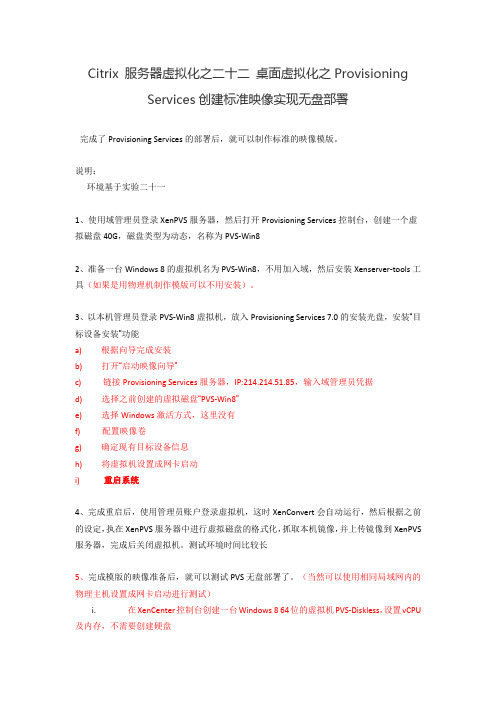
Citrix 服务器虚拟化之二十二桌面虚拟化之Provisioning Services创建标准映像实现无盘部署完成了Provisioning Services的部署后,就可以制作标准的映像模版。
说明:环境基于实验二十一1、使用域管理员登录XenPVS服务器,然后打开Provisioning Services控制台,创建一个虚拟磁盘40G,磁盘类型为动态,名称为PVS-Win82、准备一台Windows 8的虚拟机名为PVS-Win8,不用加入域,然后安装Xenserver-tools工具(如果是用物理机制作模版可以不用安装)。
3、以本机管理员登录PVS-Win8虚拟机,放入Provisioning Services 7.0的安装光盘,安装“目标设备安装”功能a)根据向导完成安装b)打开“启动映像向导”c)链接Provisioning Services服务器,IP:214.214.51.85,输入域管理员凭据d)选择之前创建的虚拟磁盘“PVS-Win8”e)选择Windows激活方式,这里没有f)配置映像卷g)确定现有目标设备信息h)将虚拟机设置成网卡启动i)重启系统4、完成重启后,使用管理员账户登录虚拟机,这时XenConvert会自动运行,然后根据之前的设定,执在XenPVS服务器中进行虚拟磁盘的格式化,抓取本机镜像,并上传镜像到XenPVS 服务器,完成后关闭虚拟机。
测试环境时间比较长5、完成模版的映像准备后,就可以测试PVS无盘部署了。
(当然可以使用相同局域网内的物理主机设置成网卡启动进行测试)i.在XenCenter控制台创建一台Windows 8 64位的虚拟机PVS-Diskless,设置vCPU 及内存,不需要创建硬盘ii.虚拟机设置成从网络启动iii.启动PVS-Diskless虚拟机,记下MAC地址iv.使用域管理员登录XenPVS服务器,添加PVS-Diskless虚拟机这台虚拟机到设备集合中,并绑定PVS-Win8虚拟磁盘。
Citrix服务器虚拟化解决方案

Citrix服务器虚拟化解决方案引言:随着信息技术的不断发展,企业对于服务器虚拟化解决方案的需求日益增加。
Citrix作为一家领先的虚拟化技术供应商,提供了一套全面的Citrix服务器虚拟化解决方案,旨在帮助企业实现高效、安全和可靠的服务器虚拟化。
一、概述Citrix服务器虚拟化解决方案是一种基于虚拟化技术的解决方案,旨在通过将物理服务器转化为虚拟服务器,提高服务器资源的利用率,降低硬件成本,并提供灵活性和可扩展性。
该解决方案包括Citrix Hypervisor、Citrix Virtual Apps and Desktops、Citrix ADC等关键组件。
二、Citrix HypervisorCitrix Hypervisor是一款基于开源虚拟化技术的虚拟化平台,可将物理服务器划分为多个虚拟机,每个虚拟机可独立运行不同的操作系统和应用程序。
Citrix Hypervisor提供了强大的虚拟化管理功能,包括资源分配、负载均衡、故障恢复等,以确保服务器资源的高效利用和可靠性。
三、Citrix Virtual Apps and DesktopsCitrix Virtual Apps and Desktops是一款应用和桌面虚拟化解决方案,可将应用程序和桌面环境从物理设备中解耦,提供给用户的任何终端设备。
通过Citrix Virtual Apps and Desktops,用户可以随时随地访问其个人工作环境,提高工作效率和灵活性。
该解决方案支持多种操作系统和设备类型,并提供安全的远程访问和数据传输功能。
四、Citrix ADCCitrix ADC是一款高级应用交付控制器,可提供安全、可靠和高性能的应用交付。
通过Citrix ADC,企业可以实现负载均衡、应用加速、安全访问控制等功能,以确保应用程序的可用性和性能。
该解决方案还提供了灵活的扩展性和集中管理功能,以适应不断变化的业务需求。
五、Citrix服务器虚拟化解决方案的优势1. 提高资源利用率:Citrix服务器虚拟化解决方案可以将物理服务器划分为多个虚拟机,实现服务器资源的共享和利用率的提高。
Citrix服务器虚拟化解决方案
Citrix服务器虚拟化解决方案一、引言在当今数字化时代,企业面临着不断增长的IT需求和复杂的应用环境。
为了提高效率、降低成本并确保数据安全,许多企业转向虚拟化技术。
Citrix服务器虚拟化解决方案是一种先进的技术,可以帮助企业实现高度集中、灵活和安全的应用交付。
二、解决方案概述Citrix服务器虚拟化解决方案基于Citrix Hypervisor(以前称为XenServer)和Citrix Virtual Apps and Desktops(以前称为XenApp和XenDesktop)技术。
该解决方案提供了一种灵活的方法,通过虚拟化技术将应用程序和桌面交付到任何设备上,无论是在本地还是远程。
三、解决方案的优势1. 高度集中的管理:Citrix服务器虚拟化解决方案允许管理员集中管理和部署应用程序和桌面。
通过集中管理,管理员可以更轻松地进行软件更新、补丁管理和安全策略实施。
2. 灵活的应用交付:该解决方案允许用户从任何设备上访问其应用程序和桌面。
无论是在办公室、家庭还是在路上,用户都可以通过云端访问其工作环境,提高工作效率和灵活性。
3. 数据安全和隔离:Citrix服务器虚拟化解决方案提供了强大的安全性和隔离性。
通过将应用程序和桌面隔离在虚拟机中,可以防止恶意软件和数据泄露。
此外,管理员可以根据用户角色和权限进行访问控制,确保数据的安全性。
4. 成本节约:通过使用虚拟化技术,企业可以降低硬件和维护成本。
Citrix服务器虚拟化解决方案允许多个虚拟机在一台物理服务器上运行,最大限度地提高硬件利用率。
此外,集中管理和自动化功能可以减少IT资源的需求。
四、解决方案的技术细节1. Citrix Hypervisor:Citrix Hypervisor是一款高性能的虚拟化平台,可在物理服务器上运行多个虚拟机。
它提供了强大的性能和可靠性,支持Windows和Linux 操作系统。
2. Citrix Virtual Apps and Desktops:Citrix Virtual Apps and Desktops是一种应用和桌面交付解决方案,可将应用程序和桌面交付到任何设备上。
citrix认证体系介绍 -回复

citrix认证体系介绍-回复Citrix认证体系介绍引言:随着信息技术的不断发展,虚拟化技术在企业中的应用越来越广泛。
作为虚拟化技术的领先提供商,Citrix Systems, Inc.(以下简称Citrix)拥有完善的认证体系,以确保其产品和解决方案的质量和可靠性。
本文将详细介绍Citrix的认证体系,包括认证类型、认证等级和认证流程。
一、认证类型:1. 售前技术认证(Sales Engineering Certifications):售前技术认证是为Citrix的销售工程师和解决方案架构师提供的一种认证方式。
该认证旨在确保销售人员具备足够的技术知识和专业能力,能够理解并推广Citrix的产品和解决方案。
2. 支持技术认证(Support Engineering Certifications):支持技术认证是为Citrix的技术支持人员提供的一种认证方式。
该认证旨在确保技术支持人员具备足够的技术知识和解决问题的能力,能够有效地支持Citrix的产品和解决方案。
3. 实施技术认证(Implementation Engineering Certifications):实施技术认证是为Citrix的实施工程师提供的一种认证方式。
该认证旨在确保实施工程师具备足够的技术知识和实施能力,能够顺利地部署和配置Citrix的产品和解决方案。
4. 开发人员认证(Developer Certifications):开发人员认证是为Citrix的软件开发人员提供的一种认证方式。
该认证旨在确保开发人员具备足够的编程能力和开发经验,能够开发出高质量、高性能的Citrix应用程序和解决方案。
二、认证等级:Citrix的认证体系按照不同等级进行划分,包括基础级、专业级和专家级。
1. 基础级(Associate Level):基础级认证是Citrix认证体系中的入门级别认证,旗下包括CCP-V (Virtualization)、CCP-N(Networking)和CCP-M(Mobility)三个认证。
CitrixTroubleShootingTips

CitrixTroubleShootingTipsSupport ForumBasic Trouble Shooting TipsFollowing are a few basic trouble shooting tips to help in diagnosing problems with your Citrix environment. Usually these are some of the initial questions a support engineer may ask if you call in.LicensingMost problems are related to Citrix and Microsoft licensing issues. First, verify that the server is running in Application Server mode not Remote Administration. Second, check that the Terminal services licensing server is running and that licenses are activated. Third, check the Citrix licensing server that the correct amount of licenses are installed. Fourth, establish a Remote Desktop Connection using both an administrator account and a regular domain users account.No Terminal Server Licenses when attempting RDP to server from client workstation: Delete HKLM\software\microsoft\mslicensing\store\license000 registry keyIMA ServiceVerify the IMA service is started and running in Services. Check that the service is live by doing a telnet on port 1494. For example: telnet 127.0.0.1 1494If the service is answering, you will see ICA? repeat continuously.FirewallTCP port 1494 needs to be open for external users to connect using the standard Citrix client. Though not necessary, having TCP port 3389 open for Terminal services may help to isolate problems in the trouble shooting process. Additionally, to support session reliability with Presentation Server 4.0 or later, TCP port 2598 should be open.Create Web Interface not an optionIf when running Access Suite Console for Presentation Server 4.0 and the option to Create a web interface is not present, the most likely cause is that Microsoft .NET Framework 2.0 is installed. The resolution is either to un-install .NET Framework or to add the following file in C:\Windows\System32\mmc.exe.config<?xml version ="1.0"?><configuration><startup><requiredRuntime version="v1.1.4322"/><supportedRuntime version="v1.1.4322"/></startup></configuration>Remove this file if upgrading to Citrix 4.5 Access Management ConsoleChanging XML service portHow to change the XML service port used by Citrix Presentation Server:1. Go to a command prompt2. Type ctxxmlss /u and press ENTER (this will unregister the XML service)3. Stop the Citrix XML Service in the Services in Windows Services4. Type ctxxmlss /rnnn and press ENTER (for example to change the port to 8080 type ctxxmlss /r8080)5. Refresh services and start the Citrix XML Service in the Services in Windows Services6. Type telnet localhost 8080 and press ENTER twice (instead of 8080 use the port # specified in step 3)HTTP/1.1 400 Bad requestServer: Citrix Web PN ServerDate: Tue, 16 Oct 2005 14:02:41 GMTConnection: CloseConnection to host lost.Web Interface unable to loginThe supplied credentials could not be validated. Either they are incorrect, or there is a problem with the authentication system. Try again, or contact your help desk or system administrator for help.1. Type telnet localhost 80 and press ENTER twice (instead of 80 use the XML service port number)If output similar to the following appears, then the XML service is running correctly:HTTP/1.1 400 Bad requestServer: Citrix Web PN ServerDate: Tue, 16 Oct 2005 14:02:41 GMTConnection: CloseConnection to host lost.Otherwise, consider changing the XML service port for the Presentation Server and reconfigure the XML port in the Manage Server Farms module of the Web Interface configuration management console.Secure Ticket AuthorityHow to verify the Citrix secure ticket authority (STA) is running correctly:Enter the following into a web browser running on the Presentation Serverhttp://localhost:port/ctxsta.dll or http://localhost:port/scripts/ctxsta.dllhttp://localhost:8080/ctxsta.dll (this example is if the XML service is running on port 8080)If the test is successful, the output will be a blank screen or say Error 405 - resource not allowed.If the test fails, then the output will most likely be a 404 Error (The page cannot bedisplayed)Web Interface Client DownloadHow to add a link to Web Interface 4.5.1 or higher to download a Citrix client from the local webserver:Edit WebInterface.conf on Web Interface server:Generally: C:\Inetpub\wwwroot\Citrix\AccessPlatform\conf or C:\Inetpub\wwwroot\Citrix\XenApp\confEdit Win32Client=DefaultVer 4.x: Win32Client=Citrix Windows Client Download&/Citrix/AccessPlatForm/Clients/ica32web.msiCopy ica32web.msi to C:\Inetpub\wwwroot\Citrix\AccessPlatform\Clients\If running Web Interface 4.x and a Citrix client is not detected, the main page will display thedownload link.Edit Win32Client=DefaultVer 4.x: Win32Client=Citrix Windows Client Download&/clients/OnlinePlugin.exe# This will download version 12 client from Citrix Nerds websiteVer 5.x: Win32Client=Citrix Windows Client Download&/Citrix/XenApp/Clients/XenAppWeb.msiCopy XenAppWeb.msi to C:\Inetpub\wwwroot\Citrix\XenApp\Clients\*Files are located in the \clients\ica32\ folder on the Citrix Components CDFor Web Interface 5.x a redirect to a download page will occur.XenApp 6: Edit C:\Inetpub\wwwroot\Citrix\XenApp\conf\WebInterface.conf# ClientDefaultURL=/download - Unremark this line and add correct URLClientDefaultURL=/common_clientsCopy Citrix Receiver and Plug-ins from installation media to C:\Program Files (x86)\Citrix\Web Interface\5.3.0\Clients\# ClientIcaMac=Filename:Citrix online plug-in (web).dmg,Directory:Mac,Mui:Yes#ClientIcaWin32=Filename:CitrixOnlinePluginWeb.exe,Directory:Windows,Mui:Yes,ClassID :238f6f83-b8b4-11cf-8771-00a024541ee3#ClientStreamingWin32=Filename:CitrixOfflinePlugin.exe,Directory:Windows,Mui:Yes,Class ID:4384F3C5-4A9E-4E81-9AAE-4251C2813861If filenames need to be modified, then edit the above lines for MAC and WindowsOnline/Offline clientsProgram Neighborhood AgentHow to verify the Citrix Program Neighborhood Agent is running correctly:Enter the following into a web browser running on the Presentation Serverhttp://localhost/Citrix/PNAgent/config.xmlIf output similar to the following appears, then the PNAgent is running correctly:<?xml version="1.0" encoding="UTF-8" ?><!DOCTYPE PNAgent_Configuration (View Source for full doctype...)>- <PNAgent_Configuration xmlns:xsi="/2000/10/XMLSchema-instance">How to securely access PNagent from the Internet using SSL:In the \inetpub\wwwroot\Citrix\PNAgent\conf folder edit the WebInterface.conf file AlternateAddress=OnCitrix Web Interface 5.x compatibility with legacy editions of Presentation Server or MetaframeXPEdit webinterface.conf changing RequireLaunchReference=on to offFor Xenapp : c:\intetpub\wwwroot\citrix enapp\confFor PNAgent : c:\inetpub\wwwroot\citrix\pnagent\confForce Uninstall Citrix Presentation ServerIf the Citrix IMA service is not started and you want to uninstall Citrix do the following:1. Go to a command prompt and change to the installation files directory on the installation media or CD2. cd\Citrix Presentation Server3. Type msiexec /x mps.msi CTX_MF_FORCE_SUBSYSTEM_UNINSTALL=Yes and press ENTEROnly administrators have permission to add, remove, or configure server software during a terminal services remote sessionAdd the following registry key:Key: HKEY_LOCAL_MACHINE\Software\Policies\Microsoft\Windows\InstallerName: EnableAdminTSRemoteType: DWORDValue: 1Please provide a valid server installation type on the command line when executing the MSI or use Autorun to execute the installation insteadIn XenApp for Windows 2008, there is no longer a default installation typeSet the CTX_MF_SERVER_TYPE property regardless of what type of installation you are performingExample: msiexec.exe /i mps.msi CTX_MF_SERVER_TYPE="P"P = Platinum, E = Enterprise, A = AdvancedThin Client Intermittent Connection Dropping - Checksum OffloadingIf you experience intermittent communication failure between Thin Client devices and Windows 2003 Server Terminal Services (RDP) and/or Citrix (ICA):1. Click Start, click Run, type regedit, and then click OK.2. Locate and then click the following registry subkey:HKEY_LOCAL_MACHINE\SYSTEM\CurrentControlSet\Services\Tcpip\Parameters3. In the right pane, make sure that the DisableT askOffload registry entry exists. If this entry does not exist, follow these steps to add the entry:a. On the Edit menu, point to New, and then click DWORD Value.b. Type DisableT askOffload, and then press ENTER.4. Click DisableT askOffload.5. On the Edit menu, click Modify.6. Type 1 in the Value data box, and then press ENTER.7. Exit Registry Editor.Ref: Microsoft KB904946* This problem may occur with certain Dell Servers specifically designed for virtualization that come with Citrix XenTools pre-installedThe server was unable to allocate from the system nonpaged pool because the pool was emptyWindows 2003 Server Enterprise 32bit running more than 4GB RAM. Collecting pooltag data using Pool Monitor indicates a large amount of non-paged pool memory in the ICA Pool tag. If servers are rebooted on daily basis this issue has a lesser likelihood of occurring.Citrix CTX230540 post R06 hotfix PSE450R06W2K3035 - January 12, 2011 addresses this issue.Best Practices Printer Policy1. Start the Citrix Presentation Server Console2. Right click on Policies, click create policy, enter a policy name and click OK3. Right click on the Policy name and select properties4. Expand the Printing folder and the Client Printers folder5. Select Auto-Creation - Check Enabled and select Auto-Create all client printers6. Expand the Drivers folder7. Select Native Printer Driver auto-install - Check Enabled and select Do not automatically install drivers8. Select Universal driver - Check Enabled and select Use universal driver only if requested driver is unavailable9. Click Apply and OK10. Right click on the Policy name and select Apply this policy to11. Select Servers and check the Filter based on servers to apply the policy to all servers and click OKMigrating SQL databasesIf during the initial Citrix installation the default database was selected and you want to change it from Master to something else, here are the steps that should be taken:Create a Citrix database called CTX, create a SQL user called citrix and grant the user dbo database access.First Citrix Server:1. From a command prompt cd\program files\citrix\independent management architecture2. copy mf20.dsn mast.dsnContents of mast.dsn:[ODBC]DRIVER=SQL ServerUID=saDATABASE=masterWSID=CTXSERVERNAMEAPP=Citrix IMASERVER=SQLSERVERNAMEDescription=CitrixThis assumes the sa SQL account was used to connect to the database. If DATABASE isn't a part of this configuration then Citrix knows to default to master.WSID=Name of the serverSERVER=Name of SQL server3. edit mf20.dsnContents of mf20.dsn:[ODBC]DRIVER=SQL ServerDATABASE=ctxWSID=CTXSERVERNAMEAPP=Citrix IMASERVER=SQLSERVERNAMEDescription=Citrix4. dsmaint config /user:sa /pwd:sapassword /dsn:"c:\program files\citrix\independent management architecture\mast.dsn"If the datastore is using an Access database with the default settings use the following credentials:/user:citrix /pwd:citrix (omitting these will use the defaults)This tells Citrix what DSN to use. For this example we're telling it to temporarily use the MAST.dsn5. dsmaint migrate /srcdsn:"%ProgramFiles%\Citrix\Independent Management Architecture\MAST.dsn" /srcuser:sa /srcpwd:sapassword /dstdsn:"%ProgramFiles%\Citrix\Independent Management Architecture\MF20.DSN" /dstuser:citrix /dstpwd:citrixpasswordThis copies the necessary tables from the source DSN to the destination DSN. The MAST.dsn looks at the master database in SQL and the MF20.dsn goes to the CTX database.6. dsmaint config /user:citrix /pwd:citrixpassword /dsn:"c:\program files\citrix\independent management architecture\mf20.dsn"This tells Citrix what DSN to use. For this example we're telling it to use the MF20.dsn which will be used for production.7. Stop IMA service8. dsmaint recreatelhcFlushes all the local host cache info out and pulls in a fresh copy from SQL9. Start IMA serviceOther Citrix Servers:1. Copy the MF20.dsn from the first server to other servers and edit the WSID so that it's the same as the server name2. dsmaint config /user:citrix /pwd:citrixpassword /dsn:"c:\program files\citrix\independent management architecture\mf20.dsn"3. Stop IMA service4. dsmaint recreatelhc5. Start IMA serviceMaster Database Cleanup:This is so it's not used accidentallyrename keytable _keytablerename indextable _indextablerename deletetracker _deletetrackerrename datatable _datatableTo test that everything worked properly, published a test application like Freecell using the Citrix Management Console and launch it from servers in the farm and if installed from the web interface. To make 100% sure everything works, reboot the servers and confirm no errors are in the event logs.Copying SQL databasesHow to copy a SQL database to a different server:Create a Citrix database in SQL Server called CTX, create a SQL user called citrixima and grant the user dbo database access.1. Copy MF20.DSN to MFBAK.DSN in C:\Program Files\Citrix\Independent Management ArchitectureContents of mfbak.dsn:[ODBC]DRIVER=SQL ServerUID=citriximaDATABASE=CTXWSID=CTXSERVERNAMEAPP=Citrix IMASERVER=SQLSERVERNAMEDescription=Citrix2. dsmaint migrate /srcdsn:"%ProgramFiles%\Citrix\Independent Management Architecture\mf20.dsn" /srcuser:ctxprodusrname /srcpwd:ctxprodusrpassword /dstdsn:"%ProgramFiles%\Citrix\Independent Management Architecture\MFBAK.DSN" /dstuser:ctxbakusrname /dstpwd:ctxbakpasswordExample:REM: Performed on Citrix server named citrix01REM: SQL Servername is SQLREM: Current UserID is citriximaREM: Current Password is Citrixima123$REM: Backup UserID is citrixbakREM: Backup Password is Citrixbak123$MF20.DSN[ODBC]DRIVER=SQL ServerUID=citriximaDATABASE=citrixWSID=citrix01APP=Citrix IMASERVER=sqlDescription=CitrixMFBAK.DSN[ODBC]DRIVER=SQL ServerUID=citrixbakDATABASE=citrixbakWSID=citrix01APP=Citrix IMASERVER=sqlDescription=Citrix3. dsmaint migrate /srcdsn:"%ProgramFiles%\Citrix\Independent Management Architecture\mf20.dsn" /srcuser:citrixima /srcpwd:Citrixima123$ /dstdsn:"%ProgramFiles%\Citrix\Independent Management Architecture\MFBAK.DSN" /dstuser:citrixbak /dstpwd:Citrixbak123$More coming soon...。
CitrixLicense服务器安装说明
Citrix License服务器安装说明
胡金堂:2006年9月11日
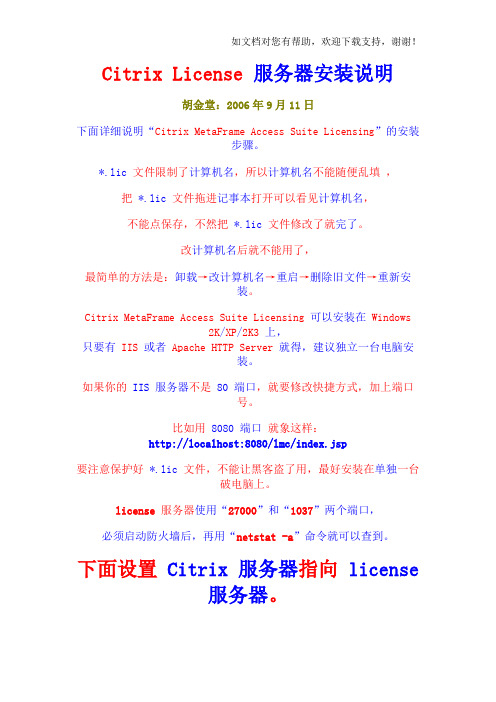
下面详细说明“Citrix MetaFrame Access Suite Licensing”的安装
步骤。
*.lic 文件限制了计算机名,所以计算机名不能随便乱填,把*.lic文件拖进记事本打开可以看见计算机名,
不能点保存,不然把*.lic文件修改了就完了。
改计算机名后就不能用了,
最简单的方法是:卸载→改计算机名→重启→删除旧文件→重新安
装。
Citrix MetaFrame Access Suite Licensing可以安装在Windows
2K/XP/2K3上,
只要有IIS或者Apache HTTP Server就得,建议独立一台电脑安
装。
如果你的IIS 服务器不是80 端口,就要修改快捷方式,加上端口
号。
比如用8080 端口就象这样:
http://localhost:8080/lmc/index.jsp
要注意保护好*.lic 文件,不能让黑客盗了用,最好安装在单独一台
破电脑上。
license服务器使用“27000”和“1037”两个端口,必须启动防火墙后,再用“netstat -a”命令就可以查到。
下面设置Citrix 服务器指向license
服务器。
如果安装的Citrix版本不配合*.lic文件,那就按照上图改一改就
得。
玩完~。
Citrix应用部署Provisioning服务介绍
Target Device 2
Network Storage
A
Target Device 3
A single vDisk is streamed to many target devices Any session changes are not written back to the base vDisk On reboot, a “clean” image is streamed down to the target devices
- Includes overflow to disk when RAM is exhausted
Client Disk Cache - Low network traffic
- Required for full system dumps
- Most common in deployments - Can be secured through encryption
Device-Side RAM Cache
Where do the "writes" go when using Standard Image mode?
9
Write Cache Considerations
RAM Cache - Best performance for single applications - Possibility of overflow errors due to limited RAM - Perform Server-based cache to estimate size requirement
Citrix应用部署Provisioning服务介绍
CITRIX 维护手册
公司服务器虚拟化操作
1.首先在Citrix网站下载Citrix Xencenter 管理软件。
/file/bepydq4o#下载地
址,下载后安装。
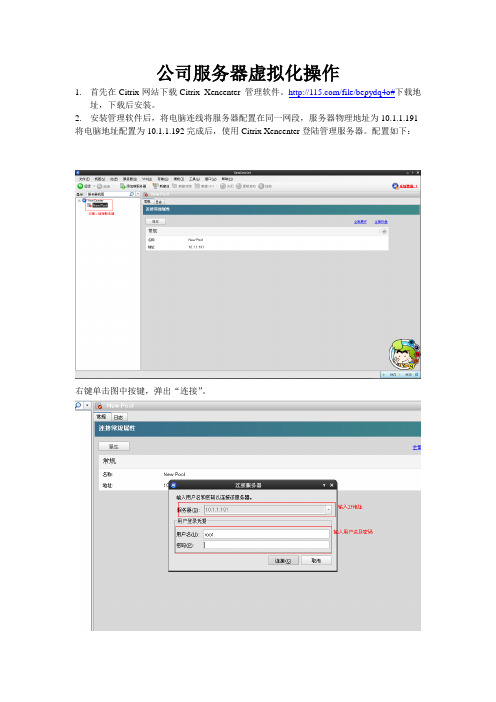
2.安装管理软件后,将电脑连线将服务器配置在同一网段,服务器物理地址为10.1.1.191 将电脑地址配置为10.1.1.192完成后,使用Citrix Xencenter登陆管理服务器。
配置如下:
右键单击图中按键,弹出“连接”。
在对话框内,填写如下信息:服务器IP地址:10.1.1.191 用户名:root 密码:
建立连接后,如下图,可以对服务器状况进行查看。
服务器常见问题解决办法:
1、由于服务器的硬盘问题,经常会出现硬盘假死现象,此时服务器无法写入数据。
解决办
法:关闭服务器,将服务器中SATA硬盘更换位置,启动服务器,如无法启动,继续更换槽位,更换建议在1-3槽位中进行。
2、网络:该服务器的网络借口对应,物理服务器的网口对应。
- 1、下载文档前请自行甄别文档内容的完整性,平台不提供额外的编辑、内容补充、找答案等附加服务。
- 2、"仅部分预览"的文档,不可在线预览部分如存在完整性等问题,可反馈申请退款(可完整预览的文档不适用该条件!)。
- 3、如文档侵犯您的权益,请联系客服反馈,我们会尽快为您处理(人工客服工作时间:9:00-18:30)。
Citrix Provisioning Services 7.1 管理
适用人群
中级IT从业人员
课程简介
Citrix Provisioning Services 是一个极富创意的产品,它将操作系统和应用程序重新封装,通
过流的方式分发,大大地降低了管理和服务成本,同时它还与虚拟化技术紧密切结,无论是服务器,桌面,应用程序虚拟化,结合PVS,充分释放虚拟化技术的无限潜能,本课程将从PVS 的最小模型开始,深入浅出,为大家一一说明PVS 的原理和应用场景。
课程
1
课程简介
[免费观看]
5分钟
在这一节当中,我们将为大家介绍本课程的模块和章节安排,说明如何获取相关的软件。
2
快速部署
[免费观看]
43分钟
在这一节中,我们将通过构建PVS 的最小运行环境,向大家说明PVS 的运行环境和相关组件,并展示PVS 的最基本功能,为大家建立起PVS 这个产品和技术的第一印像。
3
场景和原理
17分钟
在这一节中,我们将从实际运维的角度来为大家解析PVS 的应用场景和商业价值,称道PVS
技术的的创意无限。
4
设备管理
27分钟
当我们构建了一个PVS 的运行环境后,我们就要考虑如何将实际生产环境中的计算机导入到P VS 中进行管理,我们将为说明和展示如何手动和批量的导入计算机设备,实现PVS 环境和生产环境的第一次亲密接触,使PVS 环境更加饱满和丰富。
5
vDisk 虚拟磁盘管理
32分钟
完成了计算机资源导入后,接下来我们就需要考虑软件资源的导入,在PVS 环境中,软件资源以是vDisk 的形式封装,从而实现单一文件的交付,那么这一节中,我们将为大家介绍vDisk 文件的类型,创建和导入过程,运行模式等关键特性,进一步丰满PVS 的运行环境,使PVS 环境可以独立运行。
6
虚拟磁盘更新一
22分钟
IT 运维是一个动态的过程,软硬件的更新周期和业务需求的变更,都要求IT 管理员能够快速的响应并且变更IT 运行环境,在这一节当中,我们将第一次为大家展示PVS 的强大之处,通过单一更新,实现统一更新。
7
虚拟磁盘更新二
15分钟
在这一节当中,我们将为大家介绍第二种更新的方式,更加简化vDisk 文件更新的方式,通过测试生产等流程化地处理方式,实现软件环境的更新。
8
虚拟磁盘更新三
13分钟
在这一节中,我们将为大家介绍第三种vDisk 更新的方式,如果我们的环境己经实现了虚拟化基础架构,实现了SCCM 或是WSUS 的环境,那么就可以在PVS 环境中实现完全自动化的更新过程。
9
PVS 管理单元
20分钟
实现完成PVS 的核心功能后,我们便可以通过PVS 中,通过配置相应的管理单元,实现更加组织化和结构化的逻辑结构,充分地在PVS 的环境中体现生产环境的组织架构。
10
服务器和打印管理
20分钟
到这一步,我们己经构建起了一个完整的PVS 运行环境,并完整地结合生产环境做了最基本功能的完善,那么在这一节中,我们将从更宽广的视角,去说明PVS 中提供的功能,包括打印机管理,与Active Directory 集成等
11
高可用性管理
21分钟
在这一节中,我们将为大家介绍PVS 服务器的高可用性,从客户端计算机启动开始,到正常登录到系统环境中,整个过程中,所有涉及到的角色和功能的高可用性,并重点说明vDisk 文件的负载平衡和高可用性。