cVW_91101_BEIBLATT_1.071101
阿里巴巴平头哥 RISC-V 处理器架构和玄铁 CPU IP 介绍说明书

扫码注册平头哥OCC 官网观看各类视频及课程阿里云开发者“藏经阁”海量电子手册免费下载平头哥芯片开放社区交流群扫码关注获取更多信息平头哥RISC-V 系列课程培训扫码登录在线学习目录RISC-V处理器架构 (5)1.RISC-V架构起源 (5)2.RISC-V架构发展 (5)3.RISC-V架构与X86、ARM在商业模式上的区别 (6)4.RISC-V架构现状和未来 (7)5.RISC-V处理器课程学习 (9)平头哥玄铁CPU IP (10)1.概述 (10)2.面向低功耗领域CPU (10)3.面向中高端服务器CPU (16)4.面向高性能领域CPU (23)5.玄铁CPU课程学习 (26)无剑平台 (27)1.无剑100开源SoC平台 (27)2.无剑600SoC平台 (28)平头哥RISC-V工具链 (34)1.RISC-V工具链简介 (34)2.剑池CDK开发工具 (37)3.玄铁CPU调试系统 (44)4.HHB (51)5.剑池CDK开发工具课程学习 (54)平头哥玄铁CPU系统 (55)1.YoC (55)2.Linux (56)3.Android (62)RISC-V玄铁系列开发板实践 (67)1.基于玄铁C906处理器的D1Dock Pro开发实践 (67)2.基于玄铁E906处理器的RVB2601开发实践 (82)RISC-V应用领域开发示例 (100)1.基于D1Dock Pro应用开发示例 (100)2.基于RVB2601应用开发示例 (106)RISC-V未来探索 (116)1.平头哥开源RISC-V系统处理器 (116)2.平头哥对RISC-V基金会贡献 (117)3.高校合作 (117)RISC-V处理器架构1.RISC-V架构起源RISC-V架构是一种开源的指令集架构。
最早是由美国伯克利大学的Krest教授及其研究团队提出的,当时提出的初衷是为了计算机/电子类方向的学生做课程实践服务的。
MathWorks推出用于MATLAB的LTESystemToolbox
w a t e r ma r k i n g [ J ] .S i g n a l P r o c e s s i n g :I m a g e C o mm u n i c a t i 0 n .
2 o o 3 , 1 8 ( 4 ) : 2 6 3 — 2 8 2 .
水 印 提 取 时 ,在 命 令 行 输 入 指 令 : f f m p e g . e x e— i ma r k e d .
o f d i g i t a l v i d e o w a t e r ma r k i n g [ C ] / / N a t u r a l C o mp u t a t i o n
( I C NC) ,2 0 1 1 S e v e n t h I n t e r n a t i . S h a n g h m, 2 01 1 : 6 1 - 6 5 .
l l I 傩 一 \
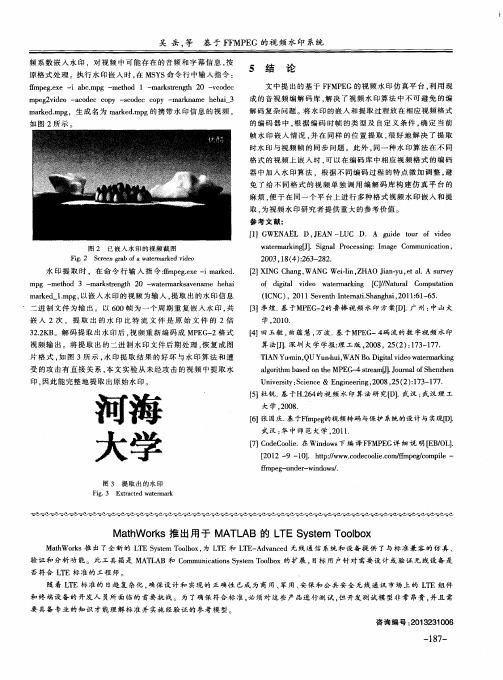
格式 的视频上嵌入 时 , 可 以在 编码 库 中 相 应 视 频 格 式 的 编 码
器 中 加 入 水 印 算 法 ,根 据 不 同 编 码 过 程 的特 点 微 加 调 整 , 避
免 了 给 不 同 格 式 的 视 频 单 独 调 用 编 解 码 库 构 建 仿 真 平 台 的 麻烦 , 便 于在 同 一 个 平 台上 进 行 多 种 格 式 视 频 水 印嵌 入 和 提 取, 为 视 频 水 印研 究 者 提 供 重 大 的参 考 价 值 。
ma r k e d _ 1 . m p g , 以 嵌 入 水 印 的视 频 为 输 入 , 提 取 出的 水 印 信 息
二进 制 文 件 为 输 出 。 以 6 0 0帧 为一 个 周 期 重 复嵌 入 水 印 , 共
vlcup函数 -回复

vlcup函数-回复什么是vlcup函数?vlcup函数是一个非常流行的Python函数,它是由开发者Vladimir Lenin 创建的。
这个函数的名称"vlcup"是基于Vladimir的名字的缩写,而"cup"则代表"快速统计"。
vlcup函数的主要目的是为用户提供一个简单而高效的方法来进行数据统计和分析。
vlcup函数的使用步骤:步骤1:安装vlcup函数库在开始使用vlcup函数之前,首先需要确保已经在Python环境中安装了vlcup函数库。
可以通过在终端或命令行中运行以下命令来安装vlcup函数库:pip install vlcup这将自动下载和安装最新版的vlcup函数库。
步骤2:导入vlcup函数库一旦安装了vlcup函数库,就可以在Python代码中导入它。
可以使用以下代码将vlcup函数库导入到Python脚本中:pythonimport vlcup这样,就可以在代码中使用vlcup函数库中的所有函数和方法。
步骤3:使用vlcup函数进行数据统计一旦成功导入了vlcup函数库,就可以开始使用它来进行数据统计和分析。
vlcup函数库提供了许多强大的函数和方法,用于不同类型的数据统计。
首先,我们需要加载要进行统计的数据。
可以使用vlcup函数库中的`load_data()`函数来加载数据。
例如,如果要加载名为"data.csv"的CSV 文件,可以执行以下代码:pythondata = vlcup.load_data("data.csv")一旦数据加载到变量"data"中,就可以使用vlcup函数库的其他函数和方法来进行各种统计操作。
例如,如果要计算数据的均值,可以使用`mean()`函数:pythonmean_value = vlcup.mean(data)如果要计算数据的标准差,可以使用`std_dev()`函数:pythonstd_dev_value = vlcup.std_dev(data)还可以使用vlcup函数库中的其他函数来计算中位数、众数、四分位数等。
cVW_91101_BEIBLATT_1.071101
2007年11月汽车环境标准汽车零件,材料,燃料避免有害物质,大众汽车康采恩的特殊技术要求VW911 01附录 1 标准中心97 21 0共 2 页第 1 页翻译曹哲日期2008.09.20校对日期打字牛红珍日期2008.10.15 主题词:有害物质,环境,材料一览表以前版本1996-08;2001-05修订同VW 911 01标准附件1比较:2001-05版本进行了如下修改:— 删除了有害材料一览表— 添加了第3条目录1适用范围2概念3技术要求3.1 木材3.2 放射性3.3 1.3 – 二邻甲苯基胍4相关参考文献1适用范围环境-目标的确定:大众汽车康采恩关于有害物质的禁令,其内容要胜过VW 911 01 标准中作出的规定。
该标准对大众汽车康采恩工业产品就其被确定要申报的和不同意申报的材料、备件、制品及其使用等方面的情况,进行了说明。
注意:有申报义务的材料,必须在国际材料数据系统(IMDS)中有数据输入的情况下才会有输出。
2概念参见VW 911 01标准第2条3技术要求3.1 木材所采用的木材,都是经过申报手续的木材,并且带有相关标准DIN 4076给定的缩写符号。
汽车环境标准汽车零件,材料,燃料避免有害物质,大众汽车康采恩的特殊技术要求VW911 01附录 1共 2 页第2页3.2 放射性在VW 911 01标准第1条中提及的物质、配置品和产品,都不得有电离的辐射,并且也要避开自然辐射。
3.31.3–二邻甲苯基胍二邻甲苯基胍(标准的、N-双(2-甲基·苯基、硫甲基苯基)胍,硫酸胺高纯.Nr 97-39-2)的使用,作为硫化促进剂,是有申报义务的。
4相关参考文献下面是本标准引用过的文献,为了使用好本标准,这些文献是必须阅读的VW 911 01 汽车环境保护;汽车零件,材料,燃料,避免有害物质DIN 4076 木材制品方面的区分符和缩写符号。
National Instruments LabWindows CVI 7.0发布说明说明书

CVI™, DataSocket™, LabVIEW™, Measurement Studio™, National Instruments™, NI™, ™, NI-DAQ™, andNI Developer Zone™ are trademarks of National Instruments Corporation. Product and company names mentioned herein are trademarks or trade names of their respective companies. For patents covering National Instruments products, refer to the appropriate location: Help»Patents in your software, the patents.txt file on your CD, or/patents.July 2003 323607A-01LabWindows/CVI Release NotesVersion 7.0These release notes introduce LabWindows/CVI version 7.0. Refer to thisdocument for system requirements, installation and activation instructions,and information about new features in LabWindows/CVI 7.0. ContentsMinimum System Requirements (2)Installation Instructions (2)Activation Instructions (2)New Features (3)Workspace Window (3)NI-DAQmx Library (4)DAQ Assistant (4)Instrument I/O Assistant (4)Tree Control in the User Interface Library (4)Graph Control Enhancements (4)Conversion from Function Panels to XML Documents (4)Data Binding in Controls (5)HTML Display for Function Panel Help (5)Function Panel Customization (5)Reassignable Shortcut Keys (5)Name Completion in Source Windows (5)Function Prototype Display (5)Function Tree Generation from a Header File (5)Enhanced Multiple File Searching (6)Changing the Point of Execution (6)TCP/IP Support in LabVIEW Real-Time (6)Editable Data Tooltips (6)Enhancements to the ActiveX Server Wizard (6)64-Bit Integer Support (6)Quick Searching (7)Custom Control Enhancements (7)™™© 1994–2003 National Instruments Corp. All rights reserved.Printed in Ireland.LabWindows/CVI Release Notes Embedded User Interface Resource Files (7)New Toolslib Items..........................................................................7LabWindows/CVI Resources (7)Minimum System RequirementsTo run LabWindows/CVI, you must have the following items:•Personal computer using a Pentium 600 or higher microprocessor •Windows 2000/NT SP6/XP/Me/98•800 × 600 resolution (or higher) video adapter •Minimum of 128 MB of RAM, 256 MB recommended •150 MB free hard disk space for full installation •Microsoft-compatible mouse •Microsoft Internet Explorer 5.0 or later, typical installation Note Support for Windows NT/Me/98 will be discontinued in 2004.Installation Instructions1.Insert the CD into the CD drive. If the CD does not run automatically,open Windows Explorer, right-click the CD drive icon, and select AutoPlay .2.On installation startup, the National Instruments LabWindows/CVI 7.0 screen appears. Click Install LabWindows/CVI .3.Continue to follow the instructions on the screen.Activation InstructionsAfter installation, activate LabWindows/CVI by launching the NI License Wizard. Use either of the following methods to launch the wizard.•Launch LabWindows/CVI after installing the product and click theActivate License button from the LabWindows/CVI—Unlicensed Version screen.•Launch the NI License Manager from Start»Programs»National Instruments»NI License Manager . Right-click theLabWindows/CVI product you want to activate in the left pane of the NI License Manager and select Activate License.The NI License Wizard will step you through the activation process. Youcan select one of the following methods to acquire an activation code.•Auto—The NI License Wizard transmits your information to NI. Youractivation code will be generated and installed automatically on yourmachine.•Web—You can enter your information at /license togenerate an activation code that you can enter into the NI LicenseWizard. If your computer is not connected to the Internet, you canenter your information from another computer with a Web connectionto use this method.•Email—The NI License Wizard automatically creates an emailwith the required activation information and sends the email to**************. You must have a default mail client configuredthrough your browser to use this option. You will receive an activationcode that you can enter into the NI License Wizard.•Phone/Fax—You can call or fax a National Instruments customerservice representative to receive an activation code that you can enterinto the NI License Wizard. The hours during which you can use thismethod are limited to regular business hours at the NationalInstruments office or your local branch.Refer to the License Activation Instructions for National InstrumentsSoftware Note to Users document included in the LabWindows/CVIsoftware kit for more information about activating LabWindows/CVI. New FeaturesThis section includes information about changes and enhancements inLabWindows/CVI 7.0.Workspace WindowThe Project window has been replaced by a Workspace window containingfour areas: a Project Tree, a Library Tree, a Window Confinement Region,and an Output Window Region. The Project Tree contains a list of files foreach project in a workspace. From the Project Tree, you can access files inprojects and modify projects. The Library Tree contains a tree view of thefunctions in LabWindows/CVI libraries and loaded instruments. Use theLibrary Tree to access function panels and help for classes and functions.The Window Confinement Region contains Source windows, UserInterface Editor windows, and Function Tree Editor windows. The OutputWindow Region provides lists of errors, debug output, and searchresults.For more information, refer to Workspace Window in theLabWindows/CVI Help index.© National Instruments Corporation3LabWindows/CVI Release NotesNI-DAQmx LibraryLabWindows/CVI 7.0 includes support for the NI-DAQmx Library, whichcontains functions for communicating with and controlling DAQ devices.After you install NI-DAQmx, refer to Library Reference»NI-DAQmxLibrary in the LabWindows/CVI Help for more information about usingNI-DAQmx Library functions.DAQ AssistantLaunch the DAQ Assistant from LabWindows/CVI by selecting Tools»Create/Edit DAQmx Tasks. The DAQ Assistant helps you configuretasks, channels, and scales using a graphical interface. You can use theDAQ Assistant to generate code from a task or channel for use in yourapplication. For more information, refer to DAQ Assistant in theLabWindows/CVI Help index.Instrument I/O AssistantLabWindows/CVI 7.0 includes the Instrument I/O Assistant, a tool you canuse to configure instrument control tasks. You can send instrumentcommands, view the instrument output, and interactively parse the outputwith the Instrument I/O Assistant. The Instrument I/O Assistant generatessource code for the instrument control task that you can run from yourLabWindows/CVI program. For more information, refer to InstrumentI/O Assistant in the LabWindows/CVI Help index.Tree Control in the User Interface LibraryAdd tree controls to graphical user interfaces you create. SelectCreate»Lists & Tables to access the tree control. You also can createa tree control programmatically. For more information, refer to TreeControl Overview in the LabWindows/CVI Help index.Graph Control EnhancementsLabWindows/CVI 7.0 includes a set of new features that you can use ingraph controls. This set of new features includes a built-in plot legend, asecond x-axis, anti-aliased plots, and additional grid line divisions. You canaccess these new features programmatically or through the Edit Graphdialog box. For more information, refer to Programming with GraphControls in the LabWindows/CVI Help index.Conversion from Function Panels to XML DocumentsYou can convert function panel files to XML documents by selectingOptions»Save in XML Format in the Function Tree Editor or LabWindows/CVI Release Function Panel Editor. For more information, refer to .fpx Files inthe LabWindows/CVI Help index.Data Binding in ControlsYou can bind a control to a DataSocket source from within theLabWindows/CVI environment. For more information, refer toDSBindCtrl in the LabWindows/CVI Help index.HTML Display for Function Panel HelpThe function panel help in LabWindows/CVI 7.0 is HTML-based for animproved display.Function Panel CustomizationYou can associate a control in a function panel to a callback function in aDLL to provide customized input selections for controls in function panelsthat you create. For more information, refer to Function PanelCustomization in the LabWindows/CVI Help index.Reassignable Shortcut KeysYou can reassign shortcut keys to match your preference by selectingOptions»Change Shortcut Keys. For more information, refer toChanging Shortcut Keys in the LabWindows/CVI Help index.Name Completion in Source WindowsLabWindows/CVI 7.0 includes the Show Completions option, which youcan use to view a list of potential matches for the function, variable, ormacro you are typing. For more information, refer to Show Completionsin the LabWindows/CVI Help index.Function Prototype DisplayThe Editor Preferences dialog box contains the Show function prototypesand struct/union fields while typing option. If you enable this option,LabWindows/CVI shows the prototype of the function when you typethe open parenthesis after a function. For more information, refer toDisplaying Function Prototype in the LabWindows/CVI Help index.Function Tree Generation from a Header FileLabWindows/CVI includes the Generate Function Tree option, whichyou can use to generate a function tree from a header file. For moreinformation, refer to Generate Function Tree in the LabWindows/CVIHelp index.© National Instruments Corporation5LabWindows/CVI Release NotesEnhanced Multiple File SearchingThe Find command has been modified to enhance multiple file searching.When you enable the Multiple Files option, you can specify the fileextension(s) of the file types you want to search. You also can specify anentire directory to search and choose to list the search results in the OutputWindow Region. For more information, refer to Finding Text in SourceWindows in the LabWindows/CVI Help index.Changing the Point of ExecutionLabWindows/CVI 7.0 includes the Set Next Statement command, whichyou can use to change the next statement to execute while you aredebugging. This command is useful if you want to skip over code you knowis going to fail or if you executed code that failed and you want to go backand investigate that code. For more information, refer to Set NextStatement in the LabWindows/CVI Help index.TCP/IP Support in LabVIEW Real-TimeTCP/IP is supported in the LabVIEW Real-Time platform inLabWindows/CVI 7.0. For more information, refer to Target Settingsfor DLLs in the LabWindows/CVI Help index.Editable Data TooltipsYou now can edit the value of a variable in tooltips. If the value in thetooltip is bold, you can change the value. For more information, refer toTooltips in the LabWindows/CVI Help index.Enhancements to the ActiveX Server WizardThe LabWindows/CVI 7.0 Create ActiveX Server Wizard includes theImport from Function Tree (.fp file) option, which you can use tocreate server interfaces and objects based on a function panel file. InLabWindows/CVI 7.0, you also can incorporate events into your ActiveXservers using this wizard. For more information, refer to the BuildingActiveX Servers in LabWindows/CVI application note in the bin folder ofthe LabWindows/CVI installation.64-Bit Integer SupportLabWindows/CVI 7.0 supports 64-bit integers. You can use the __int64and unsigned __int64 data types in LabWindows/CVI 7.0. LabWindows/CVI Release Quick SearchingLabWindows/CVI 7.0 includes the Quick Search command, which youcan use to perform an incremental search in a source file. When you selectthis command and begin typing, Quick Search finds matches of the lettersyou typed. For more information, refer to Quick Search in theLabWindows/CVI Help index.Custom Control EnhancementsYou now can add initialization and callback configuration code tothe custom controls you create in the User Interface Editor.LabWindows/CVI 7.0 also includes a full set of built-in Toolslib customcontrols. Select Create»Custom Controls»Toolslib Controls to accessthese controls in the User Interface Editor. For more information, refer toCustom Controls in the LabWindows/CVI Help index.Embedded User Interface Resource FilesLabWindows/CVI 7.0 allows you to embed user interface resource (.uir)files in an executable or DLL, thus eliminating the need to deploy themwith the application. For more information, refer to Target Settings in theLabWindows/CVI Help index.New Toolslib ItemsThe Tools Library includes the following new items: the XML API, whichcontains functions you can use to create and modify XML documents; thehot ring control instrument driver, which contains functions you can use tocreate and modify ring controls that have the quick-typing feature enabled;the path control, which you can use to select file and directory paths; theMeasurement Studio 3D Graph, a full-featured ActiveX control; the radiobutton group control, which you can use to represent mutually exclusivechoices; the file browser, which is a tree-based method of browsing andselecting files in your computer; and NI-DAQmx IO controls, which youcan use to enumerate tasks, channels, scales, and different devices inyour PC. For more information about these items, refer to the functionpanel help for each instrument.LabWindows/CVI ResourcesHow do I get started?Read the Getting Started with LabWindows/CVI manual, which provides atutorial of the LabWindows/CVI environment.© National Instruments Corporation7LabWindows/CVI Release NotesAre there known issues or late-breaking information?LabWindows/CVI installs a Readme, which you can access fromStart»Programs»National Instruments»LabWindows CVI 7.0»LabWindows CVI Readme. The Readme contains information about known issues.Where can I find reference information?The LabWindows/CVI Help contains complete reference information. The help file includes the following sections:•Using LabWindows/CVI describes the LabWindows/CVI development environment and features.•Library Reference provides information about functions you can call in LabWindows/CVI.•Programmer Reference provides information to help you develop applications.•Example Programs contains LabWindows/CVI sample programs you can launch and run from the help topic.•Tools Library provides information about the LabWindows/CVI Toolslib controls.Where can I find examples?Find examples with the NI Example Finder, which you can access by selecting Help»NI Example Finder.Is there a list of LabWindows/CVI documentation?The LabWindows/CVI Bookshelf contains all the LabWindows/CVI documentation, including manuals, application notes, and white papers, in electronic format. You need Adobe Acrobat + Search to search the Bookshelf. You can launch the Bookshelf from Start»Programs»National Instruments»LabWindows CVI 7.0»LabWindows CVI Bookshelf. Where else can I go for LabWindows/CVI information?Visit the LabWindows/CVI Web site and NI Developer Zone at for the most up-to-date information about LabWindows/CVI.*323607A-01*323607A-01Jul03。
HP Data Protector A.06.11 Microsoft Windows 7和Wind

HP Data Protector A.06.11 disasterrecovery support for Microsoft Windows7 and Windows Server 2008 R2Technical white paperTable of contentsIntroduction (2)Installation (2)Preparing for Disaster Recovery (2)Prerequisites (2)Limitations (3)Related documentation (4)2Introduction This white paper describes specific prerequisites and steps needed for a successful Enhanced Automated Disaster Recovery (EADR) and One Button Disaster Recovery (OBDR) of Microsoft Windows 7 and Window Server 2008 R2 systems using Data Protector A.06.11. Additionally, limitations which you need to be aware of are described. For general disaster recovery preparation and procedures, see the HP Data Protector A.06.11 Disaster Recovery Guide . In this white paper, only the specifics applicable to Microsoft Windows 7 and Windows Server 2008 R2 are described. Note In the HP Data Protector A.06.11 Disaster Recovery Guide , all specifics which are described for Microsoft Windows Vista and Windows Server 2008, apply also to Windows 7 and Windows Server 2008 R2 and are not separately described in this white paper. Installation The market release version of Data Protector A.06.11 does not support EADR or OBDR for Windows 7 and Windows Server 2008 R2. To enable support for these two versions of the Windows operating system, install this patch on the target systems (backup system and the system on which you will create the disaster recovery ISO image). Before you install this patch, check the General Release Patches installation instructions and prerequisites. Preparing for Disaster Recovery Follow the EADR and OBDR procedures for Windows Vista and Windows Server 2008, as described in the HP Data Protector A.06.11 Disaster Recovery Guide . Additional Windows 7 and Windows Server 2008 R2 prerequisites and steps are listed below.Prerequisites Install Windows Automated Installation Kit (WAIK) 2.0 on the system on which you will createan ISO image. Older versions of WAIK (1.1) are not supported. The system reserved volume (the volume from which the Windows operating system boots) must have a drive letter assigned or at least it should be mounted to an NTFS directory. Note Backup of unmounted volumes is not supported in Data Protector 6.11 and they are not displayed by the Data Protector GUI.Perform a full backup of the client system. The backup must include the:CONFIGURATION object System reserved volume (a new requirement for Windows 7 and Windows Server 2008 R2) For how to perform a full backup of the client system, se e the online Help index: “backup, Windows specific” and “backup, configuration”.All backups must be performed with the following filesystem backup options selected:Detect NTFS hardlinksUse Shadow CopyThe option Allow fallback must be cleared.See the selected options in the figure:Due to a Microsoft limitation it is not possible to consistently back up a mounted virtual hard disk (VHD) volumes. Therefore, you should unmount all VHD volumes of a VHD file before backup to enable successful restore afterwards. Their corresponding VHD files are then backed up as part of their parent volume backup.If you accidentally leave the VHD volumes mounted and you back them up as all other volumes, you need to perform additional manual steps during restore of the VHD files:1.Create a dummy VHD file of equal or greater size of the original file.2.Re-create VHD volumes, matching the size and structure of the original VHD file.3.Start a manual filesystem restore to restore data into the previously created VHD volumes.e the same object version as was included in the full client backup.During restore, Minor errors are reported. On the other hand, you can avoid this behavior by manually editing the SRD file prior to performing disaster recovery. Remove all references to VHD volumes from the SRD file. In this case, you must identify the drive letters that represent the VHD volumes.LimitationsThe Data Protector A.06.11 original GUI does not support disaster recovery options onWindows 7 and Windows Server 2008 R2 clients because their identification string in the34cell_info file is higher than 6.0. All disaster recovery options in the GUI are therefore unavailable for selection.Use one of the following workarounds to enable the disaster recovery options: Use the Data Protector Java GUIinstead (for EADR). Temporarily modify the cell_info file to enable the options in the original GUI. For example, change the parameter -os "microsoft i386 wNT-6.1-W" to -os "microsoft i386 wNT-6.0-W". Use the free Windows Enabler tool, which can arbitrarily enable or disable the GUIoptions. One Button Disaster Recovery (OBDR) functionality is missing in the Data Protector Java GUI. Ifyou want to use the OBDR options in the GUI, use the original Data Protector GUI. VHD volumes cannot be restored by the disaster recovery procedure. If they are backed up as files during the backup of their parent volumes, they can be mounted following the disaster recovery procedure. Alternatively, you can recreate them anew and restore the data from the corresponding backupby using the recovered version of the Data Protector.Cluster shared volumes are not supported. The database is not restored for Active Directory – this is a known Disk Agent issue that was resolved by the original (Data Protector A.06.11) disaster recovery module (DRM), as the original DRM automatically restored part of the missing data. This functionality is still available for the module that is released as a patch, but it is no longer enabled by default. You must manually enable it during the recovery process by using the option Restore DAT [Pre]. Related documentationFor more information on disaster recovery concepts, prerequisites, and procedures, see: TheHP Data Protector A.06.11 Disaster Recovery Guide The disaster recovery topics in the HP Data Protector A.06.11 online HelpThe HP Data Protector A.06.11 Command Line Interface Reference.© Copyright 2010 Hewlett-Packard Development Company, L.P. The information contained herein is subject to change without notice. The only warranties for HP products and services are set forth in the express warranty statements accompanying such products and services. Nothing herein should be construed as constituting an additional warranty. HP shall not be liable for technical or editorial errors or omissions contained herein.Share with colleagues。
Matlab的第三方工具箱大全(强烈推荐)

Matlab ToolboxesADCPtools - acoustic doppler current profiler data processingAFDesign - designing analog and digital filtersAIRES - automatic integration of reusable embedded softwareAir-Sea - air-sea flux estimates in oceanographyAnimation - developing scientific animationsARfit - estimation of parameters and eigenmodes of multivariate autoregressive methods ARMASA - power spectrum estimationAR-Toolkit - computer vision trackingAuditory - auditory modelsb4m - interval arithmeticBayes Net - inference and learning for directed graphical modelsBinaural Modeling - calculating binaural cross-correlograms of soundBode Step - design of control systems withmaximized feedbackBootstrap - for resampling, hypothesis testing and confidence interval estimationBrainStorm- MEG and EEG data visualization and processingBSTEX - equation viewerCALFEM - interactive program for teaching the finite element methodCalibr - for calibrating CCD camerasCamera CalibrationCaptain - non-stationary time series analysis and forecastingCHMMBOX - for coupled hidden Markov modeling using maximum likelihood EMClassification - supervised and unsupervised classification algorithmsCLOSIDCluster - for analysis of Gaussian mixture models for data set clusteringClustering - cluster analysisClusterPack - cluster analysisCOLEA - speech analysisCompEcon - solving problems in economics and financeComplex - for estimating temporal and spatial signal complexitiesComputational StatisticsCoral - seismic waveform analysisDACE - kriging approximations to computer modelsDAIHM - data assimilation in hydrological and hydrodynamic modelsData VisualizationDBT - radar array processingDDE-BIFTOOL- bifurcation analysis of delay differential equationsDenoise - for removing noise from signalsDiffMan- solving differential equations on manifoldsDimensional Analysis -DIPimage - scientific image processingDirect - Laplace transform inversion via the direct integration methodDirectSD - analysis and design of computer controlled systems with process-oriented modelsDMsuite - differentiation matrix suiteDMTTEQ - design and test time domain equalizer design methodsDrawFilt - drawing digital and analog filtersDSFWAV - spline interpolation with Dean wave solutionsDWT - discrete wavelet transformsEasyKrigEconometricsEEGLABEigTool - graphical tool for nonsymmetric eigenproblemsEMSC - separating light scattering and absorbance by extended multiplicative signal correctionEngineering VibrationFastICA- fixed-point algorithm for ICA and projection pursuitFDC - flight dynamics and controlFDtools - fractional delay filter designFlexICA - for independent components analysisFMBPC - fuzzy model-based predictive controlForWaRD - Fourier-wavelet regularized deconvolutionFracLab - fractal analysis for signal processingFSBOX - stepwise forward and backward selection of features using linear regressionGABLE - geometric algebra tutorialGAOT - genetic algorithm optimizationGarch - estimating and diagnosing heteroskedasticity in time series modelsGCE Data - managing, analyzing and displaying data and metadata stored using the GCE data structure specificationGCSV- growing cell structure visualizationGEMANOVA- fitting multilinear ANOVA modelsGenetic AlgorithmGeodetic - geodetic calculationsGHSOM - growing hierarchicalself-organizing mapglmlab - general linear modelsGPIB - wrapper for GPIB library from National InstrumentGTM - generative topographic mapping, a model for density modeling and data visualization GVF - gradient vector flow for finding 3-D object boundariesHFRadarmap - converts HF radar data fromradial current vectors to total vectorsHFRC - importing, processing andmanipulating HF radar dataHilbert- Hilbert transform by the rationaleigenfunction expansion methodHMM - hidden Markov modelsHMMBOX - for hidden Markov modeling usingmaximum likelihood EMHUTear - auditory modelingICALAB - signal and image processing usingICA and higher order statisticsImputation - analysis of incompletedatasetsIPEM - perception based musical analysis2007-8-29 15:04#1littleboy助理工程师精华 0JMatLink - Matlab Java classesKalman - Bayesian Kalman filterKalman Filter - filtering, smoothing and parameter estimation (using EM) for linear dynamical systemsKALMTOOL - state estimation of nonlinear systemsKautz - Kautz filter designKrigingLDestimate - estimation of scaling exponentsLDPC - low density parity check codes积分 49 帖子 76 水位 164技术分 0LISQ - wavelet lifting scheme on quincunx gridsLKER - Laguerre kernel estimation toolLMAM-OLMAM - Levenberg Marquardt with Adaptive Momentum algorithm for training feedforward neural networksLow-Field NMR - for exponential fitting, phase correction of quadrature data and slicingLPSVM- Newton method for LP support vector machine for machine learning problemsLSDPTOOL- robust control system design using the loop shaping design procedureLS-SVMlabLSVM - Lagrangian support vector machine for machine learning problemsLyngby - functional neuroimagingMARBOX - for multivariate autogressive modeling andcross-spectral estimationMatArray - analysis of microarray dataMatrix Computation - constructing test matrices, computing matrix factorizations, visualizing matrices, and direct search optimizationMCAT - Monte Carlo analysisMDP - Markov decision processesMESHPART - graph and mesh partioning methodsMILES- maximum likelihood fitting using ordinary least squares algorithmsMIMO - multidimensional code synthesisMissing - functions for handling missing data valuesM_Map - geographic mapping toolsMODCONS - multi-objective control system designMOEA - multi-objective evolutionary algorithmsMS - estimation of multiscaling exponentsMultiblock - analysis and regression on several data blocks simultaneouslyMultiscale Shape AnalysisMusic Analysis- feature extraction from raw audio signals for content-based music retrievalMWM - multifractal wavelet modelNetCDFNetlab - neural network algorithmsNiDAQ - data acquisition using the NiDAQ libraryNEDM - nonlinear economic dynamic modelsNMM - numerical methods in Matlab textNNCTRL - design and simulation of control systems based on neural networksNNSYSID- neural net based identification of nonlinear dynamic systemsNSVM - newton support vector machine for solving machine learning problemsNURBS - non-uniform rational B-splinesN-way - analysis of multiway data with multilinear models OpenFEM - finite element developmentPCNN - pulse coupled neural networksPeruna - signal processing and analysisPhiVis - probabilistic hierarchical interactive visualization, . functions for visual analysis of multivariate continuous dataPlanar Manipulator - simulation of n-DOF planar manipulators PRTools - pattern recognitionpsignifit - testing hyptheses about psychometric functions PSVM - proximal support vector machine for solving machine learning problemsPsychophysics - vision researchPyrTools - multi-scale image processingRBF - radial basis function neural networksRBN- simulation of synchronous and asynchronous random boolean networksReBEL - sigma-point Kalman filtersRegression - basic multivariate data analysis and regression Regularization ToolsRegularization Tools XPRestore ToolsRobot - robotics functions, . kinematics, dynamics and trajectory generationRobust Calibration - robust calibration in statsRRMT - rainfall-runoff modellingSAM - structure and motionSchwarz-Christoffel - computation of conformal maps to polygonally bounded regionsSDH - smoothed data histogramSeaGrid - orthogonal grid makerSEA-MAT - oceanographic analysisSLS - sparse least squaresSolvOpt - solver for local optimization problemsSOM - self-organizing mapSOSTOOLS- solving sums of squares (SOS) optimization problems Spatial and Geometric AnalysisSpatial RegressionSpatial StatisticsSpectral MethodsSPM - statistical parametric mappingSSVM - smooth support vector machine for solving machine learning problemsSTATBAG- for linear regression, feature selection, generation of data, and significance testingStatBox - statistical routinesStatistical Pattern Recognition- pattern recognition methods Stixbox - statisticsSVM - implements support vector machinesSVM ClassifierSymbolic Robot DynamicsTEMPLAR - wavelet-based template learning and pattern classificationTextClust - model-based document clusteringTextureSynth - analyzing and synthesizing visual textures TfMin- continous 3-D minimum time orbit transfer around Earth Time-Frequency - analyzing non-stationary signals usingtime-frequency distributionsTree-Ring - tasks in tree-ring analysisTSA- uni- and multivariate, stationary and non-stationary time series analysisTSTOOL - nonlinear time series analysisT_Tide - harmonic analysis of tidesUTVtools - computing and modifying rank-revealing URV and UTV decompositionsUvi_Wave - wavelet analysisvarimax - orthogonal rotation of EOFsVBHMM - variation Bayesian hidden Markov modelsVBMFA - variational Bayesian mixtures of factor analyzers VMT - VRML Molecule Toolbox, for animating results from molecular dynamics experimentsVOICEBOXVRMLplot - generates interactive VRML graphs and animations VSVtools - computing and modifying symmetric rank-revealing decompositionsWAFO - wave analysis for fatique and oceanographyWarpTB - frequency-warped signal processingWAVEKIT - wavelet analysisWaveLab - wavelet analysisWeeks - Laplace transform inversion via the Weeks methodWetCDF - NetCDF interfaceWHMT - wavelet-domain hidden Markov tree modelsWInHD - Wavelet-based inverse halftoning via deconvolution。
使用 MCAL4.3 中的 CSE (加密服务引擎) 模块 - NXP Semiconductors

Using the CSE (Cryptographic Services Engine) Module in MCAL4.3by: NXP Semiconductors1 IntroductionToday, people are concerned about sharing/transmittinginformation in a secure and trusted manner betweenparties in the automotive area. The security functionsimplemented with Cryptographic Services Engine(CSE)module are described in the Secure HardwareExtension(SHE) functional specification.This application note provides an introduction to theCSE module on the MPC5777C and explains how toconfigure and use this module in MCAL4.3. Afterreading this application note, you should be able to:• Understand the CSE configuration process inMCAL4.3• Understand how CSE module working on theMPC5777CThe application note also provides examples for specificconfigurations. The examples are provided in thesoftware package accompanying this document and isalso explained in detail. To aid in understanding of thisdocument and software package, you need to downloadthe MPC5777C reference manual from the NXPwebsite. The following table shows the abbreviationsused throughout the document.NXP SemiconductorsDocument Number: AN 13061 Application Notes Rev. 0 , 12/2020 Contents 1 Introduction ............................................................................ 1 3 CSE module on MPC5777C device ....................................... 2 3.1 Chip-specific CSE information ............................... 2 3.2 Main features .......................................................... 2 3.3 Modes of operation ................................................. 3 3.4 Block diagram ......................................................... 3 4 AES-128 encryption and decryption overview ....................... 5 4.1 Electronic Codebook (ECB) ................................... 5 4.2 Chiper-block chaining (CBC) ................................. 5 4.3 CMAC (Cipherbased Message Authentication Code) 6 5 CRYPTO module in MCAL4.3 ......................................... 7 6 CRYPTO loading key and processing primitive .............. 11 7 References . (12)2 CSE module on MPC5777CTable 1. Abbreviations and acronyms2 CSE module on MPC5777CThe Cryptographic Services Engine (CSE) is a peripheral module that implements the security functions described in the Secure Hardware Extension (SHE) Functional Specification Version 1.1.The CSE design includes a host interface with a set of memory mapped registers and a system bus interface. The host interface are used by the CPU to issue commands. The system bus interface allows the CSE to access system memory directly. Two dedicated blocks of system flash memory are used by the CSE for secure key storage.2.1 Chip-specific CSE informationThis chip has one instance of the CSE module. The module:•Executes the chip's secure boot process. See the System Boot details in the MPC5777C Reference Manual.•Exclusive access to the flash memory blocks mapped to the C55FMC_LOCK1 register, PASS_LOCK1_PGn registers, and TDRn_LOCK1 DCF client. See C55FMC_LOCK1 register bit mapping. The system MPU is automatically configured to prevent other bus masters frominterfering with CSE's access to the flash memory.2.2 FeaturesThe CSE has the following features:•Secure storage for cryptographic keys•AES-128 encryption and decryption•AES-128 CMAC authentication•True random number generation•Secure boot mode•System bus master interface2.3 Modes of operationThe CSE supports operation in Normal and Debug modes of operation. The use of the cryptographic keys stored by the CSE is controlled based on the activation of the CPU debug port and the successful completion of the secure boot process.The CSE has a low-power mode that disables the clock to all logic except the host interface. Register accesses are supported in this mode, but commands are not processed.2.4 Block diagramThe CSE design includes a command processor, host interface, system bus interface, local memory, AES logic, and True Random Number Generator (TRNG) as shown below.A host interface (via the peripheral bridge) with a set of memory mapped registers that are used by the CPU to issue commands. Furthermore, a system bus interface (via the crossbar interface) allows the CSE to directly access system memory. Here the crypto module behaves like any other master on the Crossbar switch (XBAR). Through the host interface, you can configure and control the CSE module, like putting the module into low power mode, enabling interrupts for finished command processing, or suspending command processing. A status and error register gives further system information. For a complete list of CSE commands see MPC5777C reference manual.Two dedicated blocks of system flash memory are used by the CSE for secure key and firmware storage. These blocks are not accessible by other masters from the system. Therefore, they are called secure flash. The command processing is done by a 32-bit CSE core with attached ROM and RAM running at system frequency. After system boot, the core comes out of reset and executes boot code from the module ROM. This code will load the firmware from the secure flash into the module RAM and start executing from there. This reduces the flash accesses by the crypto core on the Crossbar. The AES block is a slave to the crypto internal bus. It processes the encryption (plaintext → ciphertext) and decryption (ciphertext → plaintext) and offers AES CMAC authentication. This application note deals only with the authentication capabilities of the CSE.2 CSE module on MPC5777CFigure 1. CSE block diagram on MPC5777C3 AES-128 encryption and decryption overviewBlock ciphers like the AES algorithm, working with a defined granularity, are often 64 bits or 128 bits. The simplest way to encode data is to split the message in the cipher specific granularity. In this case, the cipher output depends only on the key and input value. The drawback of this cipher mode, which is called Electronic Code Book (ECB), is that the same input values will be decoded into the same output values. This gives attackers the opportunity to use statistical analysis (for example, in a normal text some letter combinations occur much more often than others).To overcome this issue other cipher modes were developed like the Cipher-block chaining (CBC), Cipher feedback (CFB), Output feedback (OFB) and Counter (CTR) mode.The CSE module supports only the ECB and the CBC mode which are described in the following sections.3.1 Electronic Codebook (ECB)Each block has no relationship with another block of the same message or information. The following figure shows the block diagram of the ECB mode.Figure 2. ECB block diagramThe following figure shows the drawback of the ECB mode. Taking the Freescale logo as an example it is still visible in the encoded form using this mode. It is obvious that this is not very secure.Figure 3. Encoding using ECB mode3.2 Cipher-block chaining (CBC)The Cipher-block (CBC) mode, invented in 1976, is one of the most important cipher modes. In this mode the output of the last encoding step is xor’ed with the input block of the actual encoding step. Because of this, an additional value for the first encoding step is necessary which is called initialization vector (IV). Using this method each cipher block depends on the plaintext blocks processed up to that point.3 AES-128 encryption and decryption overviewThe following figure shows the block diagram of the CBC mode.Figure 4. CBC block diagramThe following figure shows the encoding result of the Freescale logo using the CBC cipher mode. The difference from the ECB mode is self-evident. In many applications ECB mode may not be appropriate.Figure 5. Encoding using CBC mode3.3 CMAC (Cipher-based Message Authentication Code)A CMAC provides a method for authenticating messages and data. The CMAC algorithm accepts as input a secret key and an arbitrary-length message to be authenticated, and outputs a CMAC. The CMAC value protects both a message's data integrity as well as its authenticity, by allowing verifiers (who also possess the secret key) to detect any change in the message contentFigure 6. CMAC SchemeIf you want more information about CSE functional description and CSE commands, see MPC5777C reference manual.CRYPTO module in MCAL4.34 CRYPTO module in MCAL4.3The following figure shows the location of Crypto Driver module in the micro controller abstraction layer. It is below the Crypto Interface module and Crypto Service Manager module. It implements a generic interface for synchronous and asynchronous cryptographic primitives. It also supports key storage, key configuration, and key management for cryptographic services.To provide cryptographic functionalities an ECU needs to integrate one unique Crypto Service Manager module and one Crypto Interface. However, the Crypto interface can access several Crypto Drivers, each of them is configured according to the underlying Crypto Driver Object.Figure 7. AUTOSAR layered view with crypto moduleA Crypto Driver Object represents an instance of independent crypto hardware “device” (e.g. AES accelerator). There could be a channel for fast AES and CMAC calculations on a HSM for jobs with high priority, which ends on a native AES calculation service in the Crypto Driver. But it is also possible that a Crypto Driver Object is a piece of software, e.g. for RSA calculations where jobs are able to encrypt, decrypt, sign or verify. The Crypto Driver Object is the endpoint of a crypto channel.NOTECrypto have layers including Crypto Cryif and CSM, since CSM is alwaysa stub and only in order to avoid compiler error. Thejob_configuration_structure is responsible by CSM, so the job structurecannot generated by NXP CSM itself, as CSM is a stub in MCALperspective. Developers need to manually update the structure and passingit to Crypto_Process_Job. So if need more CSM package support andshould contact the third party(i.e vector DaVinci).CRYPTO module in MCAL4.3Figure 8 shows the relationship between different configuration items in EB:Cryptoprimitives ->CryptoDriverObject->CryIfChannel->CsmQueue->CsmJobs CryptokeyElement->CryptokeyType->Cryptokey->CryIfKey->CsmKeysCrypto Driver Object: A Crypto Driver implements one or more Crypto Driver Objects. The Crypto Driver Object can offer different crypto primitives in hardware or software. The Crypto Driver Objects of one Crypto Driver are independent of each other. There is only one workspace for each Crypto Driver Object (i.e. only one crypto primitive can be performed at the same time)CryptoKeyElement: Key elements are used to store data. This data can be key material or the IV needed for AES encryption. It can also be used to configure the behavior of the key management functions.CryptoKeyType: A key type consists of references to key elements. The key types are typically pre-configured by the vendor of the Crypto Driver.CryptoKey: A Key can be referenced by a job in the CSM. In the Crypto Driver, the key references a specific key type.CryptoPrimitive: A crypto primitive is an instance of a configured cryptographic algorithm realized in a Crypto Driver Object.Figure 8. Crypto configuration in EBCRYPTO module in MCAL4.3 CryIf: The crypto drivers are called by CryIf, the Crypto drivers access the underlying hardware and software objects to calculate results with their cryptographic primitives. The results are forwarded to CryIf.CsmJob: A job is an instance of a job’s configured in cryptographic primitive. An operation of a crypto primitive declares what part of the crypto primitive will be performed. There are three different operation modes:•START is a operation mode indicates a new request of a crypto primitive and will be cancel all previous request of the same job and preemptive•UPDATE mode indicates that the crypto primitive expects input data•FINISH mode indicates that after this part all data are fed completely and the crypto primitive can finalize the calculationThe priority of a job defines the importance of it. The higher the priority means more immediately the job is executed. The priority of a cryptographic job is part of the configuration.Figure 9. Cryif and CsmJobs in EBNOTEThe crypro driver does not have callback function in CryIf.c file, so itshould add SampleAppCrypto(job, result) intoCryIf_CallbackNotification(const Crypto_JobType* job, Std_ReturnTyperesult) function in CryIf.c file.CRYPTO module in MCAL4.3As show in the following figure, this sample configure three primitives, ENCRYPT, RNG(random number generated) and DECRYPT.Figure 10. CryptoPrimitive configuration in EBAs show in the following figure, A CryptoKeyElement having the CryptoKeyElementId set to 1 represents a key material and cannot be set be using the field CryptoKeyElementInitValue. All the other CryptoKeyElementIds can be set either using CryptoKeyElementSet function or the Tresos field CryptoKeyElementInitValue.Figure 11. CryptoKeyEelment configuration in EBAs show in the following figure, key elements and keys have to be configured for all primitives supported in this release. Containers CryptoKeyElements, CryptoKeyTypes and CryptoKeys should be activated or deactivated in Tresos in the same time. For a key it is mandatory to have a key type and configured key elements. The index of the different key elements from the different Crypto services are defined as in imported types table SWS_Csm_01022(in AUOTOSAR document Specification of Crypto Service Manager)A key has a state which is either 'valid' or 'invalid'. By default, all the keys are 'invalid' and have to be set to valid by using the function Crypto_KeySetValid. If a key is in the invalid state then the Crypto services which make use of the key returns CRYPTO_E_KEY_NOT_VALID value.Figure 12. CryptoKey configuration in EBCRYPTO loading key and processing primitive Because crypto driver not include CSM layer, so the Crypto_JobType structure should be initialized manually in the code.Figure 13. Csm in EB5 CRYPTO loading key and processing primitiveTo process a primitive (random number generation, MAC generation or verification, AESencrypt/decrypt), the following sequence should be followed:1.If keys are needed, the containers CryptoKeyElements, CryptoKeyTypes, CryptoKeys should beenabled2.Crypto_KeyElementSet(65536, CryptoKeyElementId_0, aes_test01_key, 16) meaning a keymaterial corresponding to key 65536 and having the size 16 bytes is configured3.Call the API function Crypto_KeySetValid(65536) to enable key 655364.Call the API function Crypto_ProcessJob() to process job, it process three jobs(randomgenerated, encryption and decryption) in this sample codeFigure 14. Process job in sample code6 ReferencesCall API function StringCompare ((uint8_t*)ucPlainText, ucDecText, 16) to verify the encryption and decryption functionality.Figure 15. Compare the ucPlainText and ucDecText6 References•MPC5777C Reference Manual (Document ID: MPC5777CPRM)•Specification of Crypto Service Manager(Document link)•Specification of Crypto Driver(Document link)•AUTOSAR_MCAL_CRYPTO_IM•AUTOSAR_MCAL_CRYPTO_UMDocument Number: AN 13061 Rev. 0 12/2020 How to Reach Us: Home Page: Web Support: /supportInformation in this document is provided solely to enable system and software implementers to use NXP products. There are no express or implied copyright licenses granted hereunder to design or fabricate any integrated circuits based on the information in this document. NXP reserves the right to make changes without further notice to any products herein. NXP makes no warranty, representation, or guarantee regarding the suitability of its products for any particular purpose, nor does NXP assume any liability arising out of the application or use of any product or circuit, and specifically disclaims any and all liability, including without limitation consequential or incidental damages. “Typical ” parameters that may be provided in NXP data sheets and/or specifications can and do vary in different applications, and actual performance may vary over time. All operating parameters, including “typicals,” must be validated for each customer application by customer's technical experts. NXP does not convey any license under its patent rights nor the rights of others. NXP sells products pursuant to standard terms and conditions of sale, which can be found at the following address:/SalesTermsandConditions . While NXP has implemented advanced security features, all products may be subject to unidentified vulnerabilities. Customers are responsible for the design and operation of their applications and products to reduce the effect of these vulnerabilities on customer’s applications and products, and NXP accepts no li ability for any vulnerability that is discovered. Customers should implement appropriate design and operating safeguards to minimize the risks associated with their applications and products. NXP, the NXP logo, NXP SECURE CONNECTIONS FOR A SMARTER WORLD, COOLFLUX, EMBRACE, GREENCHIP, HITAG, I2C BUS, ICODE, JCOP, LIFE VIBES, MIFARE, MIFARE CLASSIC, MIFARE DESFire, MIFARE PLUS, MIFARE FLEX, MANTIS, MIFARE ULTRALIGHT, MIFARE4MOBILE, MIGLO, NTAG, ROADLINK, SMARTLX, SMARTMX, STARPLUG, TOPFET, TRENCHMOS, UCODE, Freescale, the Freescale logo, AltiVec, C 5, CodeTEST, CodeWarrior, ColdFire, ColdFire+, C Ware, the Energy Efficient Solutions logo, Kinetis, Layerscape, MagniV, mobileGT, PEG, PowerQUICC, Processor Expert, QorIQ, QorIQ Qonverge, Ready Play, SafeAssure, the SafeAssure logo, StarCore, Symphony, VortiQa, Vybrid, Airfast, BeeKit, BeeStack, CoreNet, Flexis, MXC, Platform in a Package, QUICC Engine, SMARTMOS, Tower, TurboLink, and UMEMS are trademarks of NXP B.V. All other product or service names are the property of their respective owners. Arm, AMBA, Arm Powered, Artisan, Cortex, Jazelle, Keil, SecurCore, Thumb, TrustZone, and μVision are registered trademarks of Arm Limited (or its subsidiaries) in the EU and/or elsewhere. Arm7, Arm9, Arm11, big.LITTLE, CoreLink, CoreSight, DesignStart, Mali, Mbed, NEON, POP, Sensinode, Socrates, ULINK and Versatile are trademarks of Arm Limited (or its subsidiaries) in the EU and/or elsewhere. All rights reserved. Oracle and Java are registered trademarks of Oracle and/or its affiliates. The Power Architecture and word marks and the Power and logos and related marks are trademarks and service marks licensed by . © 2020 NXP B.V.。
- 1、下载文档前请自行甄别文档内容的完整性,平台不提供额外的编辑、内容补充、找答案等附加服务。
- 2、"仅部分预览"的文档,不可在线预览部分如存在完整性等问题,可反馈申请退款(可完整预览的文档不适用该条件!)。
- 3、如文档侵犯您的权益,请联系客服反馈,我们会尽快为您处理(人工客服工作时间:9:00-18:30)。
2007年11月
汽车环境标准
汽车零件,材料,燃料
避免有害物质,大众汽车康采恩的特殊技术要求
VW
911 01
附录 1 标准中心97 21 0
共 2 页第 1 页
翻译
曹哲
日期
2008.09.20
校对日期打字
牛红珍
日期
2008.10.15 主题词:有害物质,环境,材料一览表
以前版本
1996-08;2001-05
修订
同VW 911 01标准附件1比较:2001-05版本进行了如下修改:
— 删除了有害材料一览表
— 添加了第3条
目录
1适用范围
2概念
3技术要求
3.1 木材
3.2 放射性
3.3 1.3 – 二邻甲苯基胍
4相关参考文献
1适用范围
环境-目标的确定:大众汽车康采恩关于有害物质的禁令,其内容要胜过VW 911 01 标准中作出的规定。
该标准对大众汽车康采恩工业产品就其被确定要申报的和不同意申报的材料、备件、制品及其使用等方面的情况,进行了说明。
注意:
有申报义务的材料,必须在国际材料数据系统(IMDS)中有数据输入的情况下才会有输出。
2概念
参见VW 911 01标准第2条
3技术要求
3.1 木材
所采用的木材,都是经过申报手续的木材,并且带有相关标准DIN 4076给定的缩写符号。
汽车环境标准
汽车零件,材料,燃料
避免有害物质,大众汽车康采恩的特殊技术要求
VW
911 01
附录 1
共 2 页第2页
3.2 放射性
在VW 911 01标准第1条中提及的物质、配置品和产品,都不得有电离的辐射,并且也要避开自然辐射。
3.3
1.3
–
二邻甲苯基胍
二邻甲苯基胍(标准的、N-双(2-甲基·苯基、硫甲基苯基)胍,硫酸胺高纯.Nr 97-39-2)的使用,作为硫化促进剂,是有申报义务的。
4相关参考文献
下面是本标准引用过的文献,为了使用好本标准,这些文献是必须阅读的
VW 911 01 汽车环境保护;汽车零件,材料,燃料,避免有害物质
DIN 4076 木材制品方面的区分符和缩写符号。