IOS开发中常用的代码块收集整理
iphone开发常用编码

1. stringWithFormat 用法:[NSString stringWithFormat:@"Hight: %d°%@ Low: %d°%@", [Temp],@"C",[lTemp],@"C"];NSString to NSData:NSString* str= @"kilonet";NSData* data=[str dataUsingEncoding:NSUTF8StringEncoding];2. NSDate 用法:NSDate *today;NSDate *tomorrow;today = [NSDate date];tomorrow = [NSDate dateWithTimeInterval:(i*24*60*60) sinceDate:today]; //可能有更好的Date format用法:-(NSString *) getDay:(NSDate *) d {NSString *s ;NSDateFormatter *format = [[NSDateFormatter alloc] init];[format setDateFormat:@"YYYY/MM/dd hh:mm:ss"];s = [format stringFromDate:d];[format release];return s;}各地时区获取:代码NSDate *nowDate = [NSDate new];NSDateFormatter *formatter = [[NSDateFormatter alloc] init];[formatter setDateFormat:@"yyyy/MM/dd HH:mm:ss"];// 根据时区名字获取当前时间,如果该时区不存在,默认获取系统当前时区的时间// NSTimeZone* timeZone = [NSTimeZone timeZoneWithName:@"Europe/Andorra"];// [formatter setTimeZone:timeZone];//获取所有的时区名字NSArray *array = [NSTimeZone knownTimeZoneNames];// NSLog(@"array:%@",array);//for循环// for(int i=0;i<[array count];i++)// {// NSTimeZone* timeZone = [NSTimeZone timeZoneWithName:[array objectAtIndex:i]];// [formatter setTimeZone:timeZone];// NSString *locationTime = [formatterstringFromDate:nowDate];// NSLog(@"时区名字:%@ : 时区当前时间: %@",[arrayobjectAtIndex:i],locationTime);// //NSLog(@"timezone name is:%@",[array objectAtIndex:i]); // }//快速枚举法for(NSString *timeZoneName in array){[formatter setTimeZone:[NSTimeZone timeZoneWithName:timeZoneName]];NSLog(@"%@,%@",timeZoneName,[formatter stringFromDate:nowDate]);}[formatter release];[nowDate release];获取毫秒时间:代码NSDateFormatter *dateFormatter = [[NSDateFormatter alloc] init];[dateFormatter setDateStyle:NSDateFormatterMediumStyle];[dateFormatter setTimeStyle:NSDateFormatterShortStyle];//[dateFormatter setDateFormat:@"hh:mm:ss"][dateFormatter setDateFormat:@"yyyy-MM-dd HH:mm:ss.SSS"];NSLog(@"Date%@", [dateFormatter stringFromDate:[NSDate date]]); [dateFormatter release];3. NSCalendar用法:-(NSString *) getWeek:(NSDate *) d {NSCalendar *calendar = [[NSCalendar alloc] initWithCalendarIdentifier:NSGregorianCalendar];unsigned units = NSYearCalendarUnit | NSMonthCalendarUnit | NSDayCalendarUnit | NSWeekdayCalendarUnit;NSDateComponents *components = [calendar components:units fromDate:d];[calendar release];switch ([components weekday]) {case 2:return @"Monday";break;case 3:return @"Tuesday";break;case 4:return @"Wednesday";break;case 5:return @"Thursday";break;case 6:return @"Friday";break;case 7:return @"Saturday";break;case 1:return @"Sunday";break;default:return @"No Week";break;}// 用components,我们可以读取其他更多的数据。
Xcode常用代码块

Xcode常⽤代码块Xcode的代码⽚段(Code Snippets)创建⾃定义的代码⽚段,当你重⽤这些代码⽚段时,会给你带来很⼤的⽅便。
常⽤的:1.strong:@property (nonatomic,strong) <#Class#> *<#object#>;2.weak:@property (nonatomic,weak) <#Class#> *<#object#>;3.copy:@property (nonatomic,copy) NSString *<#string#>;4.assign:@property (nonatomic,assign) <#Class#> <#property#>;5.delegate:@property (nonatomic,weak) id<<#protocol#>> <#delegate#>;6.block:@property (nonatomic,copy) <#Block#> <#block#>;7.mark:#pragma mark <#mark#>8.ReUseCell:static NSString *rid=<#rid#>;<#Class#> *cell=[tableView dequeueReusableCellWithIdentifier:rid];if(cell==nil){cell=[[<#Class#> alloc] initWithStyle:UITableViewCellStyleDefault reuseIdentifier:rid];}return cell;9.MainGCD:dispatch_async(dispatch_get_main_queue(), ^{<#code#>});10.AfterGCD:dispatch_after(dispatch_time(DISPATCH_TIME_NOW, (int64_t)(<#delayInSeconds#> * NSEC_PER_SEC)), dispatch_get_main_queue(), ^{ <#code to be executed after a specified delay#>});11.OnceGCD:static dispatch_once_t onceToken;dispatch_once(&onceToken, ^{<#code to be executed once#>});⾃定义代码⽚段:以Strong为例:1.在书写@property属性的地⽅写下如下语句:@property (nonatomic,strong) <#Class#> *<#object#>;2.选中上述语句,⽤⿏标左键拖到下图中指⽰的代码⽚段在Xcode中的区域⾥,就新建了⼀个代码⽚段3.松开⿏标左键的同时,会弹出代码⽚段编辑窗⼝,如下图所⽰:图中从上到下的含义依次是:①Title代码⽚段的标题②Summary代码⽚段的描述⽂字③Platform可以使⽤代码⽚段的平台,有IOS/OS X/All三个选项④Language可以在哪些语⾔中使⽤该代码⽚段⑤Completion Shortcut代码⽚段的快捷⽅式,例:copy⑥Completion Scopes可以在哪些⽂件中使⽤当前代码⽚段,⽐如全部位置,头⽂件中等,当然可以添加多个⽀持的位置。
iOS开发代码规范

iOS开发代码规范iOS开发代码规范关于命名1.1统⼀要求含义清楚,尽量做到不需要注释也能了解其作⽤,若做不到,就加注释使⽤全称,不适⽤缩写1.2类名的命名⼤驼峰式命名:每个单词的⾸字母都采⽤⼤写字母$ HKHomePageViewController后缀要求a.ViewController: 使⽤ViewController做后缀$ HKPersonalInfoViewControllerb.View: 使⽤View做后缀$ HKAlertViewc.UITableCell:使⽤Cell做后缀$ HKProductCelld.Protocol: 使⽤Delegate或者DataSource作为后缀$ HKTableViewDelegate1.3私有变量⼩驼峰式命名:第⼀个单词以⼩写字母开始,后⾯的单词的⾸字母全部⼤写$ firstName lastName以 _ 开头,第⼀个单词⾸字母⼩写$ NSString * privateStr私有变量放在 .m ⽂件中声明1.4 property变量⼩驼峰式命名@property (nonatomic, copy) NSString *userName;//⽤户名禁⽌使⽤synthesize关键词1.5 宏命名全部⼤写,单词间⽤ _ 分隔。
[不带参数]#define HK_NAV_HEIGHT 64以字母 k 开头,后⾯遵循⼤驼峰命名。
[不带参数]#define kWidth self.frame.size.width⼩驼峰命名。
[带参数]#define getImageUrl(url) [NSURL URLWithString:[NSString stringWithFormat:@"%@%@",kBaseUrl,url]] 1.6 EnumEnum类型的命名与类的命名规则⼀致Enum中枚举内容的命名需要以该Enum类型名称开头typedef NS_ENUM(NSInteger, HKUpdateStatus) {HKUpdateStatusNone = 0,HKUpdateStatusOption = 1,//可选升级HKUpdateStatusRequired = 2//强制升级};1.7 Delegate命名类的实例必须为回调⽅法的参数之⼀$ -(NSInteger)tableView:(UITableView*)tableView numberOfRowsInSection:(NSInteger)section回调⽅法的参数只有类⾃⼰的情况,⽅法名要符合实际含义$ -(NSInteger)numberOfSectionsInTableView:(UITableView*)tableView以类的名字开头(回调⽅法存在两个以上参数的情况)以表明此⽅法是属于哪个类的$ -(UITableViewCell*)tableView:(UITableView*)tableView cellForRowAtIndexPath:(NSIndexPath *)indexPath使⽤did和will通知Delegate已经发⽣的变化或将要发⽣的变化a.-(NSIndexPath*)tableView:(UITableView*)tableView willSelectRowAtIndexPath:(NSIndexPath*)indexPath;b.-(void)tableView:(UITableView*)tableView didSelectRowAtIndexPath:(NSIndexPath*)indexPath;2. 私有⽅法及变量声明2.1 声明位置在.m⽂件中最上⽅,定义空的category进⾏声明代码区块"CodeStandardViewController.h"// 在这个category(类⽬)中定义变量和⽅法@interface CodeStandardViewController (){// 声明私有变量}// 私有⽅法- (void)samplePrivateMethod;@end@implementation CodeStandardViewController// 私有⽅法的实现- (void)samplePrivateMethod{//some code}3.关于注释1>最好的代码是不需要注释的尽量通过合理的命名2>良好的代码把含义表达清楚在必要的地⽅添加注释3>注释需要与代码同步更新4>如果做不到命名尽量的见名知意的话,就可以适当的添加⼀些注释或者mark3.1 属性注释/// 学⽣@property (nonatomic, strong) Student *student;3.2 ⽅法声明注释/*** @brief 登录验证** @param personId ⽤户名* @param password 密码* @param complete 执⾏完毕的block** @return*/+ (void)loginWithPersonId:(NSString *)personId password:(NSString *)password complete:(void (^)(CheckLogon *result))complete;4.格式化代码4.1 指针 "*" 位置定义⼀个对象时,指针 "*" 靠近变量NSString *userName;4.2 ⽅法的声明和定义在- 、+和返回值之间留⼀个空格,⽅法名和第⼀个参数之间不留空格- (id)initWithNibName:(NSString *)nibNameOrNilbundle:(NSBundle *)nibBundleOrNil{...}4.3 代码缩进使⽤ xcode 默认缩进,即 tab = 4空格使⽤ xcode 中 re-indent 功能定期对代码格式进⾏整理相同类型变量声明需要独⾏声明例⼦:CGFloatoringX = frame.origin.x;CGFloatoringY = frame.origin.y;CGFloatlineWidth = frame.size.width;Method与Method之间空⼀⾏//#pragma mark - private methods- (void)samplePrivateMethod{...}- (void)sampleForIf{...}4.4 对method进⾏分组使⽤ #pragma mark - ⽅式对类的⽅法进⾏分组//#pragma mark - private methods(void)samplePrivateMethod{...}(void)sampleForIf{...}(void)sampleForWhile{...}(void)sampleForSwitch{...}(void)wrongExamples{...}// #pragma mark - public methods(void)samplePublicMethodWithParam:(NSString*)sampleParam{...}//#pragma mark - life cycle methods(id)initWithNibName:(NSString *)nibNameOrNil bundle:(NSBundle *)nibBundleOrNil{...}(void)viewDidLoad{...}(BOOL)shouldAutorotateToInterfaceOrientation:(UIInterfaceOrientation)interfaceOrientation {...}4.5 ⼤括号写法对于类的method: 左括号另起⼀⾏写(遵循苹果官⽅⽂档)(id)initWithNibName:(NSString *)nibNameOrNilbundle:(NSBundle *)nibBundleOrNil{self = [super initWithNibName:nibNameOrNilbundle:nibBundleOrNil];if (self) {// Custom initialization}return self;}对于其他使⽤场景: 左括号跟在第⼀⾏后边(void)sampleForIf{BOOL someCondition = YES;if(someCondition) {// do something here}}(void)sampleForWhile{int i = 0;while (i < 10) {// do something herei = i + 1;}}(void)sampleForSwitch{SampleEnum testEnum = SampleEnumTwo;switch(testEnum) {caseSampleEnumUndefined:{// do somethingbreak;}caseSampleEnumOne:{// do somethingbreak;}caseSampleEnumTwo:{// do somethingbreak;}default:{NSLog(@"WARNING: there is an enum type not handled properly!");break;}}任何需要写⼤括号的部分,不得省略(void)wrongExamples{//错误⽰例:BOOLsomeCondition = YES;if (someCondition)NSLog(@"this is wrong!!!");while(someCondition)NSLog(@"this is wrong!!!");}。
IOS基本代码

IOS基本代码本人学习的时候自己做的一些笔记,希望可以对各位有点帮助[self. view endEditing:YES]; 隐藏键盘[NSThread sleepForTimeInterval:3.0]; 启动画面[self dismissViewControllerAnimated:YES completion:nil]; 返回上一个页面self.czz.enabled=sender.on; 判断某个控件能不能用。
enabled:可行的,是否可以执行。
CGRect rect=self.mybtn.bounds; 定义一个矩形,rect:矩形。
rect.origin.x(水平位置)/rect.origin.y(垂直位置)/rect.size.width(宽度)/rect.size.height(高度)修改一个矩形的各项属性self.ys.selectedSegmentIndex所选择的分段控件按钮的索引号(序号)(点完之后返回的数据)[self performSegueWithIdentifier:@"gotu" sender:self];借助按钮连线跳转到另一个页面UIStoryboard * mysbd=[UIStoryboardstoryboardWithName:@"myStoryboard" bundle:nil];利用mysbd指针指向当前故事板CViewController4 * myvc=[mysbd instantiateViewControllerWithIdentifier:@"myvc4"];利用myvc指针指向myvc4这个视图[self presentViewController:myvc animated:YES completion:nil];self presentViewController:myvc:将当前视图设置为myvc4视图纯代码跳转到另一个界面myvc.modalPresentationStyle=UIModalTransitionStyleFlipHorizontal;纯代码跳转到另一个界面时改变跳转时的效果UIColor * mycolor =[[UIColor alloc]initWithRed:self.r.valuegreen:self.g.value blue:self.b.value alpha:1];self.mybtn.titleLabel.textColor=mycolor;改变一个控件、按钮……的颜色CGRect rect=self.mybtn.bounds;rect.origin.x=sender.value;改变一个控件、按钮……的水平位置rect.origin.y=sender.value;改变一个控件、按钮……的垂直位置rect.size.width=sender.value;改变一个控件、按钮……的宽度rect.size.width=sender.value;改变一个控件、按钮……的高度self.mybtn.bounds=rect;改变一个控件、按钮……的水平、垂直位置和宽度、高度xiaoxie=[NSNumber numberWithInteger:0];附值语句,将xiaoxie的值改为0。
IOS 开发常用代码

self.appRecord.appIcon = UIGraphicsGetImageFromCurrentImageContext();
UIGraphicsEndImageContext();
[contentView setImage:[UIImage imageNamed:@"1.jpg"]];
[contentView setUserInteractionEnabled:YES];
self.view=[[UIView alloc] initWithFrame:[[UIScreen mainScreen] applicationFrame]];
[layer setCornerRadius:10.0];
[layer setBorderWidth:4.0];
*/
//为视图增加边框
yer.masksToBounds=YES;
yer.cornerRadius=20.0;
CGContextClosePath(context);
CGContextStrokePath(context);
原因是因为默认情况下,锯齿显示,所以它显示为宽度= 2.0,关闭消除锯齿可以解决问题了。
CGContextSetShouldAntialias(context, NO );
获取上下文
[yer setShadowOffset:CGSizeMake(0, 0)];
[yer setShadowOpacity:1.0];
[yer setShadowRadius:10.0];
[feeView setBackgroundColor:[UIColor whiteColor]];
ios开发视图布局(View Layout)效果源码分享
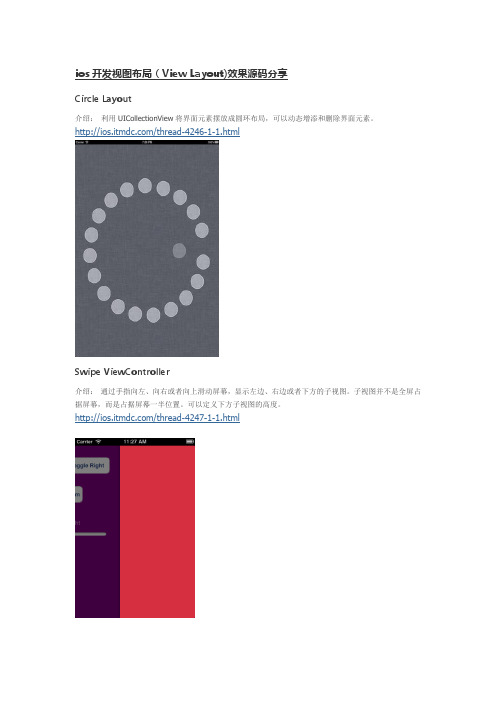
ios开发视图布局(View Layout)效果源码分享Circle Layout介绍:利用UICollectionView将界面元素摆放成圆环布局,可以动态增添和删除界面元素。
/thread-4246-1-1.htmlSwipe ViewController介绍:通过手指向左、向右或者向上滑动屏幕,显示左边、右边或者下方的子视图。
子视图并不是全屏占据屏幕,而是占据屏幕一半位置。
可以定义下方子视图的高度。
/thread-4247-1-1.htmlScaling For iPad mini介绍:看看你的app在iPad mini上的样子。
iPad mini发布之后,iOS开发者又得让自己的App适应iPad mini的屏幕尺寸。
这份代码利用简单的原理,让你看看你的app的布局在iPad mini般大小的屏幕尺寸下究竟是怎么样的。
代码使用十分简单。
/thread-4249-1-1.htmlSideBar Navigation介绍:类似于Faceboo App的Stacked View。
点击主界面上的一个按钮时,主界面左边滑动一半显示出一个子视图,点击列表上任意一行,右边部分出现新内容,左边子视图滑出界面。
当对左边视图进行搜索时,左边一半界面的视图变成全界面显示搜索内容。
/thread-4251-1-1.htmlFlip Grid View介绍:实现动态翻页切换内容的网格化视图(Grid View)效果。
界面上有多个网格子视图,每个网格子视图都可以自动翻页切换页面从而改变内容。
/thread-4253-1-1.htmlGrid Table View介绍:实现网格化视图(Grid View),或者可以视作为多列的表格(multiple column table)。
每个网格视图支持点击动作/thread-4254-1-1.html左右菜单Demo介绍:左右菜单例子,类似于Facebook的ViewControllerContainer,在一个UIViewController上面加载另外一个UIViewController。
iOS开发中一些有用的小代码

iOS开发中⼀些有⽤的⼩代码这是⼀些iOS开发中有⽤的⼩代码。
有判断邮箱格式是否正确的代码、图⽚压缩、亲测可⽤的图⽚上传代码和实现点击图⽚进⾏跳转的代码等。
AD:2013⼤数据全球技术峰会低价抢票中1.判断邮箱格式是否正确的代码://利⽤正则表达式验证-(BOOL)isValidateEmail:(NSString *)email{NSString *emailRegex = @"[A-Z0-9a-z._%+-]+@[A-Za-z0-9.-]+\\.[A-Za-z]{2,4}";NSPredicate *emailTest = [NSPredicate predicateWithFormat:@"SELF MATCHES%@",emailRegex];return [emailTest evaluateWithObject:email];}2.图⽚压缩⽤法:UIImage *yourImage= [self imageWithImageSimple:image scaledToSize:CGSizeMake(210.0, 210.0)];//压缩图⽚- (UIImage*)imageWithImageSimple:(UIImage*)image scaledToSize:(CGSize)newSize{// Create a graphics image contextUIGraphicsBeginImageContext(newSize);// Tell the old image to draw in this newcontext, with the desired// new size[image drawInRect:CGRectMake(0,0,newSize.width,newSize.height)];// Get the new image from the contextUIImage* newImage = UIGraphicsGetImageFromCurrentImageContext();// End the contextUIGraphicsEndImageContext();// Return the new image.return newImage;}3.亲测可⽤的图⽚上传代码- (IBAction)uploadButton:(id)sender {UIImage *image = [UIImage imageNamed:@"1.jpg"]; //图⽚名NSData *imageData = UIImageJPEGRepresentation(image,0.5);//压缩⽐例NSLog(@"字节数:%i",[imageData length]);// post urlNSString *urlString = @"http://192.168.1.113:8090/text/UploadServlet";//服务器地址// setting up the request object nowNSMutableURLRequest *request = [[NSMutableURLRequest alloc] init] ;[request setURL:[NSURL URLWithString:urlString]];[request setHTTPMethod:@"POST"];//NSString *boundary = [NSString stringWithString:@"---------------------------14737809831466499882746641449"];NSString *contentType = [NSString stringWithFormat:@"multipart/form-data;boundary=%@",boundary];[request addValue:contentType forHTTPHeaderField: @"Content-Type"];//NSMutableData *body = [NSMutableData data];[body appendData:[[NSString stringWithFormat:@"\r\n--%@\r\n",boundary] dataUsingEncoding:NSUTF8StringEncoding]]; [body appendData:[[NSString stringWithString:@"Content-Disposition:form-data; name="userfile"; filename="2.png"\r\n"] dataUsingEncoding:NSUTF8StringEncoding]]; //上传上去的图⽚名字[body appendData:[[NSString stringWithString:@"Content-Type: application/octet-stream\r\n\r\n"] dataUsingEncoding:NSUTF8StringEncoding]];[body appendData:[NSData dataWithData:imageData]];[body appendData:[[NSString stringWithFormat:@"\r\n--%@--\r\n",boundary] dataUsingEncoding:NSUTF8StringEncoding]]; [request setHTTPBody:body];// NSLog(@"1-body:%@",body);NSLog(@"2-request:%@",request);NSData *returnData = [NSURLConnection sendSynchronousRequest:request returningResponse:nil error:nil];NSString *returnString = [[NSString alloc] initWithData:returnData encoding:NSUTF8StringEncoding];NSLog(@"3-测试输出:%@",returnString);4.给imageView加载图⽚UIImage *myImage = [UIImage imageNamed:@"1.jpg"];[imageView setImage:myImage];[self.view addSubview:imageView];5.对图库的操作选择相册:UIImagePickerControllerSourceTypesourceType=UIImagePickerControllerSourceTypeCamera;if (![UIImagePickerControllerisSourceTypeAvailable:UIImagePickerControllerSourceTypeCamera]) {sourceType=UIImagePickerControllerSourceTypePhotoLibrary;}UIImagePickerController * picker = [[UIImagePickerControlleralloc]init];picker.delegate = self;picker.allowsEditing=YES;picker.sourceType=sourceType;[self presentModalViewController:picker animated:YES];选择完毕:-(void)imagePickerController:(UIImagePickerController*)pickerdidFinishPickingMediaWithInfo:(NSDictionary *)info{[picker dismissModalViewControllerAnimated:YES];UIImage * image=[info objectForKey:UIImagePickerControllerEditedImage];[self performSelector:@selector(selectPic:) withObject:imageafterDelay:0.1];}-(void)selectPic:(UIImage*)image{NSLog(@"image%@",image);imageView = [[UIImageView alloc] initWithImage:image];imageView.frame = CGRectMake(0, 0, image.size.width, image.size.height);[self.viewaddSubview:imageView];[self performSelectorInBackground:@selector(detect:) withObject:nil];}detect为⾃⼰定义的⽅法,编辑选取照⽚后要实现的效果取消选择:-(void)imagePickerControllerDIdCancel:(UIImagePickerController*)picker{[picker dismissModalViewControllerAnimated:YES];}6.跳到下个ViewnextWebView = [[WEBViewController alloc] initWithNibName:@"WEBViewController" bundle:nil];[self presentModalViewController:nextWebView animated:YES];7.创建⼀个UIBarButton右边按钮UIBarButtonItem *rightButton = [[UIBarButtonItem alloc] initWithTitle:@"右边" style:UIBarButtonItemStyleDone target:self action:@selector(clickRightButton)];[self.navigationItem setRightBarButtonItem:rightButton];8.设置navigationBar隐藏self.navigationController.navigationBarHidden = YES;//9.UIlabel多⾏⽂字⾃动换⾏(⾃动折⾏)UIView *footerView = [[UIView alloc]initWithFrame:CGRectMake(10, 100, 300, 180)];UILabel *label = [[UILabel alloc]initWithFrame:CGRectMake(10, 100, 300, 150)];label.text = @"Hello world! Hello world!Hello world! Hello world! Hello world! Hello world! Hello world! Hello world!Hello world! Hello world! Hello world! Hello world! Hello world! Helloworld!";//背景颜⾊为红⾊label.backgroundColor = [UIColor redColor];//设置字体颜⾊为⽩⾊label.textColor = [UIColor whiteColor];//⽂字居中显⽰label.textAlignment = UITextAlignmentCenter;//⾃动折⾏设置label.lineBreakMode = UILineBreakModeWordWrap;label.numberOfLines = 0;10.代码⽣成ButtonCGRect frame = CGRectMake(0, 400, 72.0, 37.0);UIButton *button = [UIButton buttonWithType:UIButtonTypeRoundedRect];button.frame = frame;[button setTitle:@"新添加的按钮" forState: UIControlStateNormal];button.backgroundColor = [UIColor clearColor];button.tag = 2000;[button addTarget:self action:@selector(buttonClicked:) forControlEvents:UIControlEventTouchUpInside];[self.view addSubview:button];11.让某个控件在View的中⼼位置显⽰:(某个控件,⽐如label,View)label.center = self.view.center;12.⾃定义text各种效果:cell.backgroundColor = [UIColorscrollViewTexturedBackgroundColor];//设置⽂字的字体cell.textLabel.font = [UIFont fontWithName:@"AmericanTypewriter" size:100.0f];//设置⽂字的颜⾊cell.textLabel.textColor = [UIColor orangeColor];//设置⽂字的背景颜⾊cell.textLabel.shadowColor = [UIColor whiteColor];//设置⽂字的显⽰位置cell.textLabel.textAlignment = UITextAlignmentCenter;13.隐藏statusBar:在程序的viewDidLoad中加⼊[[UIApplication sharedApplication]setStatusBarHidden:YES animated:NO];14.更改AlertView背景:UIAlertView *theAlert = [[[UIAlertViewalloc] initWithTitle:@"Atention"message: @"I'm a Chinese!"delegate:nilcancelButtonTitle:@"Cancel"otherButtonTitles:@"Okay",nil] autorelease];[theAlert show];UIImage *theImage = [UIImageimageNamed:@"loveChina.png"];theImage = [theImage stretchableImageWithLeftCapWidth:0topCapHeight:0];CGSize theSize = [theAlert frame].size;UIGraphicsBeginImageContext(theSize);[theImage drawInRect:CGRectMake(5, 5, theSize.width-10, theSize.height-20)];//这个地⽅的⼤⼩要⾃⼰调整,以适应alertview的背景颜⾊的⼤⼩。
ios block 的原理

ios block 的原理iOS Block的原理iOS Block是一种特殊的语言结构,它可以将代码块封装成一个对象,并将其作为参数传递给函数或方法。
它是Objective-C和Swift中非常重要的特性,也是开发iOS应用程序的重要基础。
1. 什么是Block?Block可以看作是一种匿名函数,它可以捕获其定义时所在作用域内的变量,并在后续执行时使用这些变量。
Block可以像普通函数一样调用,并且可以传递给其他函数或方法使用。
2. Block语法Block语法有两种形式:^{}和^{ }。
其中,^{}表示没有参数的Block;^{ }表示有参数的Block。
例如:```void (^myBlock)(void) = ^{NSLog(@"Hello, World!");};myBlock();```这段代码定义了一个没有参数、没有返回值的Block,并将其赋值给myBlock变量。
然后通过调用myBlock()来执行这个Block。
3. Block类型在Objective-C中,有三种类型的Block:NSGlobalBlock、NSStackBlock和NSMallocBlock。
- NSGlobalBlock:全局静态分配的block,不会捕获任何外部变量;- NSStackBlock:栈上分配的block,会捕获外部变量;- NSMallocBlock:堆上分配的block,也会捕获外部变量。
4. Block内存管理由于不同类型的block存在于不同的内存空间,因此它们的内存管理方式也不同。
- NSGlobalBlock:由系统自动管理,无需手动释放。
- NSStackBlock:在定义时会自动复制到堆上,当栈上的Block超出作用域时会被自动释放。
- NSMallocBlock:需要手动管理内存,使用完后需要调用release方法手动释放。
5. Block捕获变量Block可以捕获其定义时所在作用域内的变量。
- 1、下载文档前请自行甄别文档内容的完整性,平台不提供额外的编辑、内容补充、找答案等附加服务。
- 2、"仅部分预览"的文档,不可在线预览部分如存在完整性等问题,可反馈申请退款(可完整预览的文档不适用该条件!)。
- 3、如文档侵犯您的权益,请联系客服反馈,我们会尽快为您处理(人工客服工作时间:9:00-18:30)。
IOS 开发中常用的代码块收集整理收集常用的代码块是加快开发的有效途径,收集的操作步骤这里不在赘述,仅仅贡献上一些常用的功能性代码1、与高度和宽度有关的1 2 3 4 5 6 7 8 9 10 11 12 13 14 15 16 17 18 19 20 21 22 23 24 25 26 27 28 29 30 31 32 33 34 35 /*获取导航栏高度*/public func getNavigationBarHeight() -> CGFloat {let navRect:CGRect! = self.navigationController?.navigationBar.frame return navRect.size.height}/*获取标签栏高度*/public func getTabBarHeight() -> CGFloat {let tabBarRect:CGRect! = self.tabBarController?.tabBar.frame return tabBarRect.size.height}/*获取状态栏高度*/public func getStatusBarHeight() -> CGFloat {let rectStatus:CGRect = UIApplication.shared.statusBarFrame return rectStatus.size.height}/*根据提供的字体大小,宽度获取字文字的高度*/func getTextHeigh(textStr:String,font:UIFont,width:CGFloat) -> CGFloat {let normalText: NSString = textStr as NSStringlet size = CGSize(width: width, height: 10000)let dic:NSDictionary = NSDictionary(object: font, forKey: NSAttributedStringKey.font as NSCopying)let stringSize = normalText.boundingRect(with: size,options: .usesLineFragmentOrigin, attributes: dic as?[NSAttributedStringKey : Any], context:nil).sizereturn stringSize.height}/*提供文字大小,控件高度,获取到文字的宽度*/func getTexWidth(textStr:String,font:UIFont,height:CGFloat) -> CGFloat {let normalText: NSString = textStr as NSStringlet size = CGSize(width: 10000, height: height)let dic:NSDictionary = NSDictionary(object: font, forKey:36 37 38 39 40 41 42 43 44 45 46 47 48 49 50 51 NSAttributedStringKey.font as NSCopying)let stringSize = normalText.boundingRect(with: size,options: .usesLineFragmentOrigin, attributes: dic as?[NSAttributedStringKey : Any], context:nil).sizereturn stringSize.width + 40}UIScreen.main.bounds.size.width // 屏幕宽度UIScreen.main.bounds.size.height // 屏幕高度/*UIFont 的适配(创建UIFont 的扩展)*/+ (void )load {Method newMethod = class_getClassMethod([self class ],@selector (adjustFont:));Method method = class_getClassMethod([self class ],@selector (systemFontOfSize:));method_exchangeImplementations(newMethod, method);}+ (UIFont *)adjustFont:(CGFloat)fontSize {UIFont *newFont = nil;//BaseWidth 为设计图的尺寸newFont = [UIFont adjustFont:fontSize * [UIScreenmainScreen].bounds.size.width / BaseWidth];return newFont;}2、处理类相关1 2 3 4 5 6 7 8 9 10 11 12 13 14 15 /*十六进制颜色*/func RGBColorFromHex(rgbValue: Int) -> (UIColor) {return UIColor(red: ((CGFloat)((rgbValue & 0xFF0000) >> 16)) / 255.0, green: ((CGFloat)((rgbValue & 0xFF00) >> 8)) / 255.0,blue: ((CGFloat)(rgbValue & 0xFF )) / 255.0,alpha: 1.0)}/*时间戳转化成自定义时间格式*/func getTimeWithTimeInterval(timeInterval:TimeInterval,dataFormart:String) -> String {let date:Date = Date(timeIntervalSince1970: timeInterval / 1000) let formatter:DateFormatter = DateFormatter.init()formatter.dateFormat = dataFormartlet timeStr:String = formatter.string(from: date)1617181920212223242526272829303132333435363738394041424344454647484950515253545556575859 return timeStr}/*字符串MD5加密*/- (NSString *)md5String:(NSString *)str{if (!str) return nil;const char *cStr = str.UTF8String;unsigned char result[CC_MD5_DIGEST_LENGTH];CC_MD5(cStr, (CC_LONG)strlen(cStr), result);NSMutableString *md5Str = [NSMutableString string];for (int i = 0; i < CC_MD5_DIGEST_LENGTH; ++i) {[md5Str appendFormat:@"%02x", result[i]];}return md5Str;}/*微信支付签名*/-(NSString *)createMD5SingForPayWithAppID:(NSString *)appid_key partnerid:(NSString *)partnerid_key prepayid:(NSString *)prepayid_key package:(NSString *)package_key noncestr:(NSString *)noncestr_key timestamp:(UInt32)timestamp_key{NSMutableDictionary *signParams = [NSMutableDictionary dictionary]; [signParams setObject:appid_key forKey:@"appid"];//微信appid 例如wxfb132134e5342[signParams setObject:noncestr_key forKey:@"noncestr"];//随机字符串[signParams setObject:package_key forKey:@"package"];//扩展字段参数为 Sign=WXPay[signParams setObject:partnerid_key forKey:@"partnerid"];//商户账号[signParams setObject:prepayid_key forKey:@"prepayid"];//此处为统一下单接口返回的预支付订单号[signParams setObject:[NSStringstringWithFormat:@"%u",timestamp_key] forKey:@"timestamp"];//时间戳NSMutableString *contentString =[NSMutableString string];NSArray *keys = [signParams allKeys];NSArray *sortedArray = [keyssortedArrayUsingComparator:^NSComparisonResult(id obj1, id obj2) { return [obj1 compare:obj2 options:NSNumericSearch];}];for (NSString *categoryId in sortedArray) {if (![[signParams objectForKey:categoryId] isEqualToString:@""]&& ![[signParams objectForKey:categoryId] isEqualToString:@"sign"]&& ![[signParams objectForKey:categoryId] isEqualToString:@"key"]60 61 62 63 64 65 66 67 68 69 70 71 72 73 74 75 76 77 78 79 80 81 82 83 84 85 86 87 88 89 90 91 92 93 94 95 96 97 98 99 100 101 102 103 ){[contentString appendFormat:@"%@=%@&", categoryId, [signParams objectForKey:categoryId]];}}[contentString appendFormat:@"key=%@",@"utNO9LVL7LgMhfloAl8yO6ORrKIo2iky"];NSString *result = [self md5String:contentString];return result;}/*去除字符串的空格和换行符*/+ (NSString *) handleNewLineAndWhitSpaceForString:(NSString *)str;{ str = [str stringByReplacingOccurrencesOfString:@"\r"withString:@""];str = [str stringByReplacingOccurrencesOfString:@"\n"withString:@""];str = [str stringByReplacingOccurrencesOfString:@" " withString:@""]; return str;}/*数组去除重复数据*/public extension Array {func filterDuplicates<e: equatable="">(_ filter: (Element) -> E) -> [Element] {var result = [Element]()for value in self {let key = filter(value)if !result.map({filter($0)}).contains(key) {result.append(value)}}return result}}/*图片二维码识别(使用ZXing)*/+ (void )recognizeImage:(UIImage*)image block:(void (^)(ZXBarcodeFormat barcodeFormat,NSString *str))block {ZXCGImageLuminanceSource *source = [[ZXCGImageLuminanceSource alloc] initWithCGImage:image.CGImage];ZXHybridBinarizer *binarizer = [[ZXHybridBinarizer alloc]initWithSource: source];104 105 106 107 108 109 110 111 112 113 114 115 116 117 118 119 120 121 122 123 124 125 126 127 128 129 130 131 132 133 134 135 136 137 138 139 140 141 142 143 144 145 146 147 ZXBinaryBitmap *bitmap = [[ZXBinaryBitmap alloc]initWithBinarizer:binarizer];NSError *error;id<zxreader> reader;if (NSClassFromString(@"ZXMultiFormatReader")) {reader = [NSClassFromString(@"ZXMultiFormatReader")performSelector:@selector (reader)];}ZXDecodeHints *_hints = [ZXDecodeHints hints];ZXResult *result = [reader decode:bitmap hints:_hints error:&error]; if (result == nil) {block(kBarcodeFormatQRCode,nil);return ;}block(result.barcodeFormat,result.text);}/*swift 执行一次的Dispatch_once 函数*/public extension DispatchQueue {private static var _onceTracker = [String]()public class func once(key: String, block:()->Void) {objc_sync_enter(self)defer { objc_sync_exit(self) }if _onceTracker.contains(key) {return}_onceTracker.append(key)block()}}/*扩大按钮响应区域(创建UIButton 扩展)*/ static char topNameKey;static char rightNameKey;static char bottomNameKey;static char leftNameKey;- (void )setEnlargeEdgeWithTop:(CGFloat) top right:(CGFloat) right bottom:(CGFloat) bottom left:(CGFloat) left {objc_setAssociatedObject(self, &topNameKey, [NSNumbernumberWithFloat:top], OBJC_ASSOCIATION_COPY_NONATOMIC);objc_setAssociatedObject(self, &rightNameKey, [NSNumbernumberWithFloat:right], OBJC_ASSOCIATION_COPY_NONATOMIC);objc_setAssociatedObject(self, &bottomNameKey, [NSNumber148 149 150 151 152 153 154 155 156 157 158 159 160 161 162 163 164 165 166 167 168 169 170 171 172 173 174 175 176 177 178 179 180 181 182 183 184 185 numberWithFloat:bottom], OBJC_ASSOCIATION_COPY_NONATOMIC);objc_setAssociatedObject(self, &leftNameKey, [NSNumbernumberWithFloat:left], OBJC_ASSOCIATION_COPY_NONATOMIC);}- (void )setEnlargeEdge:(CGFloat) size {objc_setAssociatedObject(self, &topNameKey, [NSNumbernumberWithFloat:size], OBJC_ASSOCIATION_COPY_NONATOMIC);objc_setAssociatedObject(self, &rightNameKey, [NSNumbernumberWithFloat:size], OBJC_ASSOCIATION_COPY_NONATOMIC);objc_setAssociatedObject(self, &bottomNameKey, [NSNumbernumberWithFloat:size], OBJC_ASSOCIATION_COPY_NONATOMIC);objc_setAssociatedObject(self, &leftNameKey, [NSNumbernumberWithFloat:size], OBJC_ASSOCIATION_COPY_NONATOMIC);}- (CGRect) enlargedRect{NSNumber* topEdge = objc_getAssociatedObject(self, &topNameKey);NSNumber* rightEdge = objc_getAssociatedObject(self, &rightNameKey); NSNumber* bottomEdge = objc_getAssociatedObject(self,&bottomNameKey);NSNumber* leftEdge = objc_getAssociatedObject(self, &leftNameKey); if (topEdge && rightEdge && bottomEdge && leftEdge){return CGRectMake(self.bounds.origin.x - leftEdge.floatValue, self.bounds.origin.y - topEdge.floatValue,self.bounds.size.width + leftEdge.floatValue + rightEdge.floatValue, self.bounds.size.height + topEdge.floatValue +bottomEdge.floatValue);}else{return self.bounds;}}- (UIView*) hitTest:(CGPoint) point withEvent:(UIEvent*) event{CGRect rect = [self enlargedRect];if (CGRectEqualToRect(rect, self.bounds)){return [super hitTest:point withEvent:event];}return CGRectContainsPoint(rect, point) ? self : nil;}/*获取唯一设备号*/+(NSString *) getDeviceToken {NSError *error;NSString *deviceNumber;deviceNumber = [SSKeychain passwordForService:@"laihudong.app" account:@"deviceToken" error:&error];if (error){NSLog(@"出现错误");}if (deviceNumber == nil ||[deviceNumber isEqualToString:@""]) { CFUUIDRef uuidRef = CFUUIDCreate(kCFAllocatorDefault);CFStringRef stringRef = CFUUIDCreateString(kCFAllocatorDefault, uuidRef);[SSKeychain setPassword:[NSString stringWithFormat:@"%@", stringRef] forService:@"laihudong.app" account:@"deviceToken"];deviceNumber = [NSString stringWithFormat:@"%@",stringRef];}return deviceNumber;}</zxreader></e:> 3、验证类相关1 2 3 4 5 6 7 8 9 10 11 12 13 14 15 /*验证手机号*/class func validatePhonoNum(phoneNumber:String) -> Bool {let MOBIL = "^1(3[0-9]|5[0-35-9]|8[025-9])\\d{8}$";let CM = "^1(34[0-8]|(3[5-9]|5[017-9]|8[2378])\\d)\\d{7}$";let CU = "^1(3[0-2]|5[256]|8[56])\\d{8}$";let CT = "^1((33|53|8[019])[0-9]|349)\\d{7}$";let regextestmobile = NSPredicate(format: "SELF MATCHES %@", MOBIL) let regextestcm = NSPredicate(format: "SELF MATCHES %@", CM) let regextestcu = NSPredicate(format: "SELF MATCHES %@", CU) let regextestct = NSPredicate(format: "SELF MATCHES %@", CT) if regextestmobile.evaluate(with:phoneNumber)||regextestcm.evaluate(with:phoneNumber)||regextestcu.evaluate(with:phoneNumber)||regextestct.evaluate(with: phoneNumber) {return true16 17 18 19 20 21 22 23 24 25 26 27 28 29 30 31 32 33 34 35 36 37 38 39 40 41 42 43 44 45 46 47 48 49 50 51 52 53 54 55 56 57 58 59 }return false}/*验证身份证号*/class func validateIdCard(idCardNumber:String) -> Bool {let pattern = "(^[0-9]{15}$)|([0-9]{17}([0-9]|X)$)";let pred = NSPredicate(format: "SELF MATCHES %@", pattern)let isMatch:Bool = pred.evaluate(with: idCardNumber)return isMatch;}/*验证邮箱*/-(BOOL)isValidateEmail:(NSString *)email{NSString *emailRegex =@"[A-Z0-9a-z._%+-]+@[A-Za-z0-9.-]+\\.[A-Za-z]{2,4}";NSPredicate *emailTest = [NSPredicatepredicateWithFormat:@"SELFMATCHES%@",emailRegex];return [emailTest evaluateWithObject:email];}/*判断事时间后*/class func validateTimeInterval(timeInterval:TimeInterval) -> Bool { var isBefore:Bool!let orderDate:Date = Date.init(timeIntervalSince1970: timeInterval / 1000)let currentDate:Date = Date.init(timeIntervalSinceNow: 0)/*时间判断*/if pare(currentDate) == .orderedAscending {isBefore = false}if pare(currentDate) == .orderedSame {isBefore = false}if pare(currentDate) == .orderedDescending {isBefore = true}6061626364656667 return isBefore}/*判断当前周几*/class func getWeekDay() -> Int {let dateFormatter:DateFormatter = DateFormatter.init() dateFormatter.dateFormat = "yyyy-MM-dd HH:mm:ss"let date:Date = Date.init(timeIntervalSinceNow: 0)let interval = Int(date.timeIntervalSince1970)let days = Int(interval/86400)let weekday = ((days + 4)%7+7)%7return weekday == 0 ? 7 : weekday}。