easy_mock
Mockito框架教程:Java基础库的单元测试与API使用说明书

About the T utorialMockito is a mocking framework, JAVA-based library that is used for effective unit testing of JAVA applications. Mockito is used to mock interfaces so that a dummy functionality can be added to a mock interface that can be used in unit testing.This tutorial should help you learn how to create unit tests with Mockito as well as how to use its APIs in a simple and intuitive way.AudienceThis tutorial is meant for Java developers, from novice to expert level, who would like to improve the quality of their software through unit testing and test-driven development.After completing this tutorial, you should gain sufficient exposure to Mockito from where you can take yourself to next levels of expertise.PrerequisitesReaders must have a working knowledge of JAVA programming language in order to make the most of this tutorial. Knowledge of JUnit is an added advantage.Copyright & Disclaimer© Copyright 2018 by Tutorials Point (I) Pvt. Ltd.All the content and graphics published in this e-book are the property of Tutorials Point (I) Pvt. Ltd. The user of this e-book is prohibited to reuse, retain, copy, distribute or republish any contents or a part of contents of this e-book in any manner without written consent of the publisher.We strive to update the contents of our website and tutorials as timely and as precisely as possible, however, the contents may contain inaccuracies or errors. Tutorials Point (I) Pvt. Ltd. provides no guarantee regarding the accuracy, timeliness or completeness of our website or its contents including this tutorial. If you discover any errors on our website or in this tutorial, ******************************************T able of ContentsAbout the Tutorial (i)Audience (i)Prerequisites (i)Copyright & Disclaimer (i)Table of Contents (ii)1.MOCKITO – OVERVIEW (1)What is Mocking? (1)Mockito (1)Benefits of Mockito (1)2.MOCKITO – ENVIRONMENT SETUP (4)System Requirement (4)3.MOCKITO – FIRST APPLICATION (8)4.MOCKITO – JUNIT INTEGRATION (13)5.MOCKITO – ADDING BEHAVIOR (17)Example (17)6.MOCKITO – VERIFYING BEHAVIOR (21)Example - verify() with same arguments (21)Example - verify() with different arguments (24)7.MOCKITO – EXPECTING CALLS (28)Example (28)8.MOCKITO – VARYING CALLS (33)Example (33)9.MOCKITO – EXCEPTION HANDLING (37)Example (37)10.MOCKITO – CREATE MOCK (41)Example (41)11.MOCKITO – ORDERED VERIFICATION (45)Example (45)12.MOCKITO – CALLBACKS (50)Example (50)13.MOCKITO – SPYING (55)Example (55)14.MOCKITO – RESETTING A MOCK (60)Example (60)15.MOCKITO – BEHAVIOR DRIVEN DEVELOPMENT (64)Example (64)16.MOCKITO – TIMEOUTS (68)Example (68)Mockito1.What is Mocking?Mocking is a way to test the functionality of a class in isolation. Mocking does not require a database connection or properties file read or file server read to test a functionality. Mock objects do the mocking of the real service. A mock object returns a dummy data corresponding to some dummy input passed to it.MockitoMockito facilitates creating mock objects seamlessly. It uses Java Reflection in order to create mock objects for a given interface. Mock objects are nothing but proxy for actual implementations.Consider a case of Stock Service which returns the price details of a stock. During development, the actual stock service cannot be used to get real-time data. So we need a dummy implementation of the stock service. Mockito can do the same very easily, as its name suggests.Benefits of Mockito∙No Handwriting– No need to write mock objects on your own.∙Refactoring Safe– Renaming interface method names or reordering parameters will not break the test code as Mocks are created at runtime.∙Return value support– Supports return values.∙Exception support– Supports exceptions.∙Order check support– Supports check on order of method calls.∙Annotation support– Supports creating mocks using annotation.Consider the following code snippet.Let's understand the important concepts of the above program. The complete code is available in the chapter First Application.∙Portfolio– An object to carry a list of stocks and to get the market value computed using stock prices and stock quantity.∙Stock– An object to carry the details of a stock such as its id, name, quantity, etc.∙StockService– A stock service returns the current price of a stock.∙mock(...)– Mockito created a mock of stock service.∙when(...).thenReturn(...)– Mock implementation of getPrice method of stockService interface. For googleStock, return 50.00 as price.∙portfolio.setStocks(...)– The portfolio now contains a list of two stocks.∙portfolio.setStockService(...) - Assigns the stockService Mock object to the portfolio.∙portfolio.getMarketValue()–The portfolio returns the market value based on its stocks using the mock stock service.MockitoMockito is a framework for Java, so the very first requirement is to have JDK installed in your machine.System RequirementStep 1: Verify Java Installation on Your MachineOpen the console and execute the following java command.Let's verify the output for all the operating systems:2.If you do not have Java installed, To install the Java Software Development Kit (SDK) click here. We assume you have Java 1.6.0_21 installed on your system for this tutorial.Step 2: Set JAVA EnvironmentSet the JAVA_HOME environment variable to point to the base directory location where Java is installed on your machine. For example,Append the location of the Java compiler to your System Path.Verify Java Installation using the command java -version as explained above.Step 3: Download Mockito-All ArchiveTo download the latest version of Mockito from Maven Repository click here.Save the jar file on your C drive, let's say, C:\>Mockito.Step 4: Set Mockito EnvironmentSet the Mockito_HOME environment variable to point to the base directory location where Mockito and dependency jars are stored on your machine.The following table shows how to set the environment variable on different operating systems, assuming we've extracted mockito-all-2.0.2-beta.jar onto C:\>Mockito folder.Step 5: Set CLASSPATH VariableSet the CLASSPATH environment variable to point to the location where Mockito jar is stored. The following table shows how to set the CLASSPATH variable on different operating systems.Step 6: Download JUnit ArchiveDownload the latest version of JUnit jar file from Github. Save the folder at the location C:\>Junit.Step 7: Set JUnit EnvironmentSet the JUNIT_HOME environment variable to point to the base directory location where JUnit jars are stored on your machine.The following table shows how to set this environment variable on different operating systems, assuming we've stored junit4.11.jar and hamcrest-core-1.2.1.jar at C:\>Junit.Step 8: Set CLASSPATH VariableSet the CLASSPATH environment variable to point to the JUNIT jar location. The following table shows how it is done on different operating systems.End of ebook previewIf you liked what you saw…Buy it from our store @ https://。
mockconstruction原理
Mock构造原理解析1. 什么是Mock构造在软件开发过程中,为了测试一个模块的功能是否正常,我们经常需要依赖其他模块。
然而,有些模块可能并未开发完成或者不可用,这时候就需要使用Mock构造来模拟这些依赖模块的行为。
Mock构造是一种测试技术,它可以帮助我们创建虚拟的对象,并且控制这些虚拟对象的行为,使其能够替代真实的对象进行测试。
通过使用Mock构造,我们可以在没有真实依赖对象的情况下,进行独立、可重复、快速和准确的单元测试。
2. Mock构造的基本原理Mock构造的基本原理是利用动态代理技术,在运行时生成一个实现了被mock接口或类的代理对象。
该代理对象可以接收方法调用,并根据预先设定的规则返回预期结果。
通过这种方式,我们可以控制被mock对象在测试过程中所表现出来的行为。
具体来说,Mock构造主要包含以下几个步骤:步骤一:定义被mock接口或类首先,我们需要定义一个接口或类作为被mock对象。
被mock对象通常是一个外部依赖或者一个复杂的对象,我们希望在测试过程中对其进行模拟。
步骤二:创建mock对象在测试代码中,我们可以使用Mock构造框架提供的API来创建一个mock对象。
Mock构造框架会根据被mock接口或类生成一个代理对象,并返回给我们。
步骤三:设置mock对象的行为一旦我们获得了mock对象,就可以使用Mock构造框架提供的API来设置mock对象的行为。
这些行为包括方法调用的预期次数、参数匹配规则和返回结果等。
步骤四:执行测试代码在测试代码中,我们可以像调用真实对象一样调用mock对象。
当mock对象接收到方法调用时,它会根据预先设定的规则返回预期结果。
步骤五:验证mock对象的使用在测试完成后,我们可以使用Mock构造框架提供的API来验证mock对象是否按照预期进行了方法调用。
通过验证,我们可以确保被测模块与其他模块之间的交互是正确无误的。
3. Mock构造工具目前市面上有很多优秀的Mock构造工具可供选择。
自动化单元测试框架EasyMock分析及其应用

ON ANALYSIS AND ITS APPLICATION OF THE AUTOMATIC UNIT TEST FRAMEWORK EASYMOCK 作者: 陈丽萍 张勇 丁智敏
作者机构: 巢湖学院计算机与信息工程学院,安徽巢湖238000
出版物刊名: 巢湖学院学报
页码: 34-38页
年卷期: 2014年 第6期
主题词: EasyMock框架 测试驱动开发 JUnit框架 单元测试 PowerMock框架
摘要:EasyMock是一个可以和JUnit很好的集成在一起的Mock框架,它通过构建Mock对象可以减少开发代码与测试代码的耦合,快速有效的完成单元测试、分布式系统测试。
在介绍EasyMock特点、测试框架及其应用的基础上,分析了该框架的优缺点,并针对其缺点提出了相应的解决方案。
测试结果表明,注入解决方案后的EasyMock框架可以降低Mock对象的限制,应用范围更广。
easyhook 例子-概述说明以及解释

easyhook 例子-概述说明以及解释1.引言1.1 概述EasyHook是一个开源的Windows API Hooking 框架,它的设计目标是为了允许开发者在不修改原始代码的情况下,对已编译的应用程序或系统功能进行拦截和修改。
通过使用EasyHook,开发者可以实现对目标应用程序中指定函数的替换、监视和自定义功能的注入。
API Hooking是一种常见的技术,它通过拦截目标应用程序与操作系统之间的函数调用,使得我们可以截获这些函数的输入参数和返回值,并且可以在这些函数被调用前后做一些自定义的操作。
而EasyHook作为一个底层Hooking框架,提供了一套简单易用的API,帮助我们快速、方便地实现Hook功能。
与其他Hooking解决方案相比,EasyHook具有以下几个优点。
首先,它采用用户模式Hook的方式,不需要特权访问,因此可以安全地运行在普通用户账户下。
其次,EasyHook提供了友好的编程接口和详细的文档,降低了学习和使用的门槛。
再次,EasyHook支持跨平台,可以用于Windows XP到Windows 10的各个版本,并且还支持32位和64位应用程序。
此外,EasyHook还支持在不同的.NET Framework版本中使用,提供了强大而灵活的功能,使得开发人员能够快速解决各种Hooking问题。
EasyHook的使用场景非常广泛,例如:调试和逆向工程、性能分析、安全审计、游戏模块注入等。
它可以帮助我们监视和改变目标应用程序的行为,甚至可以在运行时动态修改应用程序的行为,从而满足我们的个性化需求。
在本文中,我们将介绍EasyHook框架的基本原理和使用方法,并分析其在实际应用中的优势和特点。
最后,我们将总结EasyHook的应用价值,展望和探讨其未来的发展方向。
通过对EasyHook的深入学习和实践,相信读者能够更好地掌握Hooking技术,并在实际项目中灵活运用。
1.2文章结构1.2 文章结构本文将按照以下结构来叙述和探讨easyhook的例子和使用方法:1. 引言:对easyhook进行简要介绍,并解释文章涉及的目的和意义。
fastmock常用语法

fastmock常用语法Fastmock是一种常用的接口模拟工具,可以帮助开发人员快速创建虚拟接口,并进行测试和调试。
下面将介绍Fastmock的常用语法,帮助读者更好地使用这个工具。
一、创建接口使用Fastmock创建接口非常简单,只需要在Fastmock的控制台中点击“创建接口”按钮,然后填写接口的名称、请求方式、路径等信息即可。
创建接口时,可以选择使用模板或自定义请求参数,以满足不同的需求。
二、定义请求参数在Fastmock中,可以定义接口的请求参数。
请求参数可以包括路径参数、查询参数、请求体等。
在定义请求参数时,可以指定参数的类型、名称、是否必填等属性。
通过定义请求参数,可以模拟真实的接口请求,更好地进行测试和调试。
三、设置响应数据Fastmock允许用户设置接口的响应数据,包括状态码、响应头和响应体等。
在设置响应数据时,可以选择使用模板或自定义数据。
使用模板时,可以根据需要选择预定义的模板,快速生成响应数据。
自定义数据可以通过JSON格式来定义,灵活满足不同的需求。
四、模拟接口调用使用Fastmock模拟接口调用非常简单,只需要在控制台中选择相应的接口,点击“发送请求”按钮即可。
在发送请求之后,可以查看接口的响应数据,并进行相应的调试和测试。
五、共享接口Fastmock支持接口的分享和共享。
用户可以将创建的接口分享给其他成员,方便团队协作和开发。
通过共享接口,团队成员可以共同编辑和测试接口,提高开发效率。
六、导入导出数据Fastmock支持接口数据的导入和导出。
用户可以将已创建的接口导出为JSON文件,方便备份和迁移。
同时,也可以将其他系统的接口数据导入到Fastmock中,方便进行管理和调试。
七、Mock规则Fastmock提供了丰富的Mock规则,可以满足不同场景的需求。
通过设置Mock规则,可以模拟接口的各种情况,包括正常响应、异常响应、超时等。
这样可以更全面地进行接口测试,提高系统的稳定性和可靠性。
mock测试工具——mockito

参考链接
Mockito 中文文档 https:///hehonghui/mockito-doc-zh
Thank you
// 测试桩( stubbing ) when(mockedList.get(0)).thenReturn("first"); when(mockedList.get(1)).thenThrow(new RuntimeException());
// 后面输出“first” System.out.println(mockedList.get(0));
望-运行-验证)方式,而 Mockito 则使用更简单,无需准备昂贵的前期启动 • Mockito 拥有的非常少的 API,所有开始使用 Mockito,几乎没有时间成本。
mock 具体类而不单止是接口
、
01
02 一点注解语法糖 - @Mock
干净的验证错误
点击堆栈跟踪,看看在测试中的失败验证;点
03
// 使用never()进行验证,never相当于times(0) verify(mockedList, never()).add("never happened");
// 使用atLeast()/atMost() verify(mockedList, atLeastOnce()).add("three times"); verify(mockedList, atLeast(2)).add("five times"); verify(mockedList, atMost(5)).add("three times");
// 下面的两个验证函数效果一样,因为verify默认验证的就是times(1) verify(mockedList).add("once"); verify(mockedList, times(1)).add("once");
mock的使用,easy-mock使用方法详解
mock的使⽤,easy-mock使⽤⽅法详解mock的重要性mock就是对某些不容易构造或者不容易获取的对象,⽤⼀个虚拟的对象来创建的⽅法。
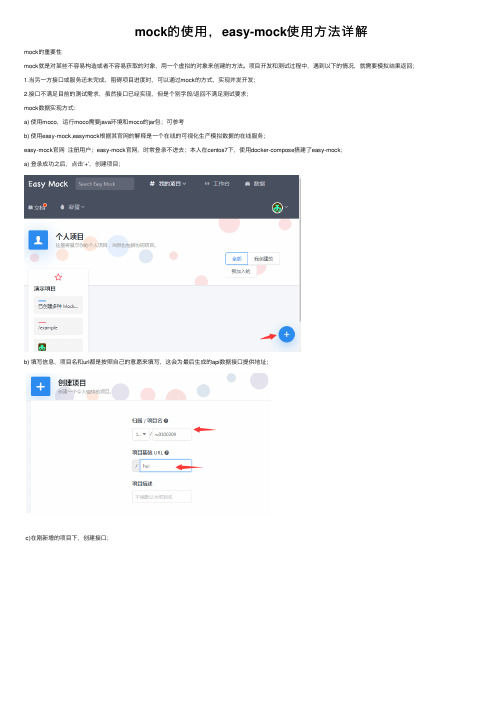
项⽬开发和测试过程中,遇到以下的情况,就需要模拟结果返回;1.当另⼀⽅接⼝或服务还未完成,阻碍项⽬进度时,可以通过mock的⽅式,实现并发开发;2.接⼝不满⾜⽬前的测试需求,虽然接⼝已经实现,但是个别字段/返回不满⾜测试要求;mock数据实现⽅式:a) 使⽤moco,运⾏moco需要java环境和moco的jar包;可参考b) 使⽤easy-mock,easymock根据其官⽹的解释是⼀个在线的可视化⽣产模拟数据的在线服务;easy-mock官⽹注册⽤户;easy-mock官⽹,时常登录不进去;本⼈在centos7下,使⽤docker-compose搭建了easy-mock;a) 登录成功之后,点击‘+’,创建项⽬;b) 填写信息,项⽬名和url都是按照⾃⼰的意愿来填写,这会为最后⽣成的api数据接⼝提供地址;c)在刚新增的项⽬下,创建接⼝;d)写下mock的代码准备⼯作Mock.js的语法规范a) 数据模板中的每个属性由3部分构成:属性名|⽣成规则:属性值;'name|rule':value;b) 数据占位只在属性值字符串中占个位置,并不出现在最终的属性值中;@占位符;如,first: '@FIRST',学习mock.js语法可以参考:Easy Mock重点来了,现在正式开始常见使⽤⽅式;a)静态数据使⽤postman,访问上⾯的接⼝;b)动态数据结合Mock.js的语法,将json改造⼀下,可以⽣成随机数据,这样就避免了每次都是⼀样的假数据,⽐较符合真实的开发场景;访问结果:{"code": 0,"message": "success","update_time": "2020-03-23 14:13:35","date": [{"id": "350000************","wechat_id": "uvejr","phone": "183********","name": "易平","index": 0},{"id": "710000************","wechat_id": "edwlf","phone": "14716374632","name": "郑芳","index": 1},{"id": "120000************","wechat_id": "kwqzr","phone": "14602287701","name": "邹刚","index": 2},{"id": "320000************","wechat_id": "pdizh","phone": "182********","name": "邵军","index": 3},{"id": "510000************","wechat_id": "qfqib","phone": "156********","name": "刘超","index": 4},{"id": "430000************","wechat_id": "dxdit","phone": "173********","name": "张杰","index": 5},{"id": "630000************","wechat_id": "orstl","phone": "184********","name": "潘芳","index": 6},{"id": "820000************","wechat_id": "cqnwa","phone": "175********","name": "蒋超","index": 7},{"id": "500000************","wechat_id": "pfhhj","phone": "14645062242","name": "钱洋", "index": 8},{"id": "360000************", "wechat_id": "ybqxh", "phone": "186********", "name": "吕涛", "index": 9},{"id": "410000************", "wechat_id": "etjjx", "phone": "157********", "name": "赖霞", "index": 10},{"id": "210000************", "wechat_id": "likhn", "phone": "178********", "name": "沈霞", "index": 11},{"id": "540000************", "wechat_id": "kjfid", "phone": "139********", "name": "邓娟", "index": 12},{"id": "130000************", "wechat_id": "qtxdi", "phone": "152********", "name": "范秀英", "index": 13},{"id": "500000************", "wechat_id": "cmtvi", "phone": "153********", "name": "⾦军", "index": 14},{"id": "340000************", "wechat_id": "nbacn", "phone": "157********", "name": "傅秀英", "index": 15},{"id": "340000************", "wechat_id": "tdygr", "phone": "17188330258", "name": "吴超", "index": 16},{"id": "540000************", "wechat_id": "osodq", "phone": "14704726452", "name": "任娟", "index": 17},{"id": "330000************", "wechat_id": "sviuj", "phone": "159********", "name": "段娟", "index": 18},{"id": "430000************", "wechat_id": "cyalv", "phone": "185********", "name": "徐涛", "index": 19}]}c) 响应式数据可以模拟真实的接⼝⼀样,根据传⼊的参数不同获取对应的数据;使⽤postman访问接⼝;不加参数,加参数,错误的请求⽅式;easy mock 快速⽣成数据字段,及常⽤语法;1234567891011121314151617181920212223242526272829303132333435363738394041{"cname": "@cname",//中⽂⼈名"id": "@id",//⽣成20 位数字"title": "@ctitle",//中⽂title"city": "@city",//中⽂城市"ip": "@ip",//ip 地址"email": "@email",//email"url": "@url",//url"cfirst": "@cfirst",//姓名,姓"clast": "@clast",//姓名,名"cword": "@cword('123456')",//123456 从中选取⼀个字符"csentence": "@csentence(1,5)",//⽂字⽂段"csentence5": "@csentence(5)",//⽂字⽂段"cparagraph": "@cparagraph(1,3)",//⽂字⽂段"string": "@string(11)",//输出11 个字符长度的字符串"float": "@float(0,10)",//0 到 10 的浮点数"int": "@integer(60,70)",//60 到 70 之间的整数"boolean": "@boolean",//boolean 类型 true,false"array|1-3": [{"id": "@integer(1,10)",//整数 1到10 取整数"name": "cname"}],//数组(随机 1 到3个)"array_sort_add|+1": ["1", "2", "3"],//数组1,2,3轮询输出"boolean|1-2": true,//boolean 类型 true,false"actionType|1": ['click_url', 'open_resource_detail', 'open_resource_search'],"payload": function() {var returnClickUrl = {"linkUrl": "/apph5"};var returnResourceDetail = {"resourceId": "606"};var returnResourceSearch = {"keyWords": "","tagCategory": "1","tag": "1"};var s = this.actionType == 'click_url' ? returnClickUrl : this.actionType == 'open_resource_detail' ? returnResourceDetail : returnResourceSearch; return s;预期返回如下数据;⽅式⼀、使⽤easymock构造;⽅式⼆、使⽤jmeter的 beanshell sampler;运⾏该请求,查看‘察看结果树’;。
chatgpt-easycode用法

ChatGPT-easycode是一款非常方便实用的工具,它可以帮助程序员更快速、更高效地编写代码。
在本篇文章中,我将详细探讨ChatGPT-easycode的用法,并共享我对这一工具的个人观点和理解。
1. 了解ChatGPT-easycodeChatGPT-easycode是由Open本人推出的一款人工智能代码编写助手,它基于GPT-3模型进行训练和优化。
通过对话式交互,ChatGPT-easycode能够理解程序员的需求,并生成符合逻辑、语法正确的代码片段。
这一工具的出现极大地提高了编程效率,让程序员能够更专注于解决问题,而不是为了编写代码而浪费大量时间。
2. 使用ChatGPT-easycode的步骤对于程序员来说,使用ChatGPT-easycode非常简单。
用户需要在支持ChatGPT-easycode的集成开发环境(IDE)或编辑器中安装相应的插件或扩展。
在需要编写代码的地方,用户可以直接使用快捷键或命令唤起ChatGPT-easycode的对话框。
在对话框中,用户可以输入自然语言描述的需求,例如“创建一个名为person的类,包含尊称和芳龄属性”,ChatGPT-easycode会立即生成符合要求的代码提示,并显示给用户进行选择和编辑。
3. ChatGPT-easycode的广度和深度在使用ChatGPT-easycode时,用户可以发现这一工具拥有令人惊叹的广度和深度。
无论是常见的语言特性、库函数的调用,还是复杂的算法实现、框架结构,ChatGPT-easycode都能够给出准确、合理的代码片段。
ChatGPT-easycode还能够根据用户的反馈和指导进行调整,使得生成的代码更加符合用户的意图和项目的需求。
4. 个人观点和理解从我个人的使用经验来看,ChatGPT-easycode的确是一款非常有价值的工具。
它不仅可以帮助我快速完成重复性工作,还能够在一定程度上拓展我的编程思路和解决问题的方式。
- 1、下载文档前请自行甄别文档内容的完整性,平台不提供额外的编辑、内容补充、找答案等附加服务。
- 2、"仅部分预览"的文档,不可在线预览部分如存在完整性等问题,可反馈申请退款(可完整预览的文档不适用该条件!)。
- 3、如文档侵犯您的权益,请联系客服反馈,我们会尽快为您处理(人工客服工作时间:9:00-18:30)。
}}}这个 Servlet实现简单的用户验证的功能,若用户名和口令匹配“ admin”和“123456”,则请求被转发到指定的 dispatcher上,否则,直接抛出 RuntimeException。
为了测试 doPost()方法,我们需要模拟httpServletRequest,ServletContext和 RequestDispatcher对象,以便脱离 J2EE容器来测试这Servlet。
我们建立 TestCase,名为LoginServletTest:public class LoginServletTest extends TestCase {}我们首先测试当用户名和口令验证失败的情形,演示如何使用 EasyMock来模拟 HttpServletRequest对象:public void testLoginFailed() throws Exception {MockControl mc = MockControl.createControl(HttpServletRequest.class); HttpServletRequest request = (HttpServletRequest)mc.getMock();// set Mock Object behavior:request.getParameter("username");mc.setReturnValue("admin", 1);request.getParameter("password");mc.setReturnValue("1234", 1);// ok, all behaviors are set!mc.replay();// now start test:LoginServlet servlet = new LoginServlet();try {servlet.doPost(request, null);fail("Not caught exception!");}catch(RuntimeException re) {assertEquals("Login failed.", re.getMessage());}// verify:mc.verify();}仔细观察测试代码,使用 EasyMock来创建一个 Mock对象需要首先创建一个MockControl:MockControl mc = MockControl.createControl(HttpServletRequest.class);然后,即可获得 MockControl创建的Mock对象:HttpServletRequest request = (HttpServletRequest)mc.getMock();下一步,我们需要“录制”Mock对象的预期行为。
在LoginServlet中,先后调用了request.getParameter("username")和request.getParameter("password")两个方法,因此,需要在MockControl中设置这两次调用后的指定返回值。
我们期望返回的值为“admin”和“1234”:request.getParameter("username"); // 期望下面的测试将调用此方法,参数为"username"mc.setReturnValue("admin", 1); //期望返回值为"admin",仅调用1次request.getParameter("password"); // 期望下面的测试将调用此方法,参数为" password"mc.setReturnValue("1234", 1); // 期望返回值为"1234",仅调用1次紧接着,调用mc.replay(),表示Mock对象“录制”完毕,可以开始按照我们设定的方式运行,我们对LoginServlet进行测试,并预期会产生一个RuntimeException:LoginServlet servlet = new LoginServlet();try {servlet.doPost(request, null);fail("Not caught exception!");}catch(RuntimeException re) {assertEquals("Login failed.", re.getMessage());}由于本次测试的目的是检查当用户名和口令验证失败后,LoginServlet是否会抛出RuntimeException,因此,response对象对测试没有影响,我们不需要模拟它,仅仅传入null即可。
最后,调用mc.verify()检查Mock对象是否按照预期的方法调用正常运行了。
运行JUnit,测试通过!表示我们的Mock对象正确工作了!下一步,我们来测试当用户名和口令匹配时,LoginServlet应当把请求转发给指定的RequestDispatcher。
在这个测试用例中,我们除了需要HttpServletRequest Mock对象外,还需要模拟ServletContext和RequestDispatcher对象:MockControl requestCtrl = MockControl.createControl(HttpServletRequest.class); HttpServletRequest requestObj = (HttpServletRequest)requestCtrl.getMock(); MockControl contextCtrl = MockControl.createControl(ServletContext.class);final ServletContext contextObj = (ServletContext)contextCtrl.getMock(); MockControl dispatcherCtrl =MockControl.createControl(RequestDispatcher.class);RequestDispatcher dispatcherObj = (RequestDispatcher)dispatcherCtrl.getMock();按照doPost()的语句顺序,我们设定Mock对象指定的行为:requestObj.getParameter("username");requestCtrl.setReturnValue("admin", 1);requestObj.getParameter("password");requestCtrl.setReturnValue("123456", 1);contextObj.getNamedDispatcher("dispatcher");contextCtrl.setReturnValue(dispatcherObj, 1);dispatcherObj.forward(requestObj, null);dispatcherCtrl.setVoidCallable(1);requestCtrl.replay();contextCtrl.replay();dispatcherCtrl.replay();public class LoginServletTest extends TestCase {public void testLoginFailed() throws Exception {MockControl mc = MockControl.createControl(HttpServletRequest.class); HttpServletRequest request = (HttpServletRequest)mc.getMock();// set Mock Object behavior:request.getParameter("username");mc.setReturnValue("admin", 1);request.getParameter("password");mc.setReturnValue("1234", 1);// ok, all behaviors are set!mc.replay();// now start test:LoginServlet servlet = new LoginServlet();try {servlet.doPost(request, null);fail("Not caught exception!");}catch(RuntimeException re) {assertEquals("Login failed.", re.getMessage());}// verify:mc.verify();}public void testLoginOK() throws Exception {// create mock:MockControl requestCtrl = MockControl.createControl(HttpServletRequest.class); HttpServletRequest requestObj = (HttpServletRequest)requestCtrl.getMock(); MockControl contextCtrl = MockControl.createControl(ServletContext.class);final ServletContext contextObj = (ServletContext)contextCtrl.getMock(); MockControl dispatcherCtrl =MockControl.createControl(RequestDispatcher.class);RequestDispatcher dispatcherObj = (RequestDispatcher)dispatcherCtrl.getMock();// set behavior:requestObj.getParameter("username");requestCtrl.setReturnValue("admin", 1);requestObj.getParameter("password");requestCtrl.setReturnValue("123456", 1);contextObj.getNamedDispatcher("dispatcher");contextCtrl.setReturnValue(dispatcherObj, 1);dispatcherObj.forward(requestObj, null);dispatcherCtrl.setVoidCallable(1);// done!requestCtrl.replay();contextCtrl.replay();dispatcherCtrl.replay();// test:LoginServlet servlet = new LoginServlet() {public ServletContext getServletContext() {return contextObj;}};servlet.doPost(requestObj, null);// verify:requestCtrl.verify();contextCtrl.verify();dispatcherCtrl.verify();}}总结:虽然EasyMock可以用来模仿依赖对象,但是,它只能动态模仿接口,无法模仿具体类。