WD-Ⅲ说明书
卧龙通用变频器WOLONG WD说明书 基本操作与运行

5.基本操作与运行5.1操作面板外观操作面板是变频器的人机互动界面。
通过操作面板,使用者可以对变频器进行功能参数修改、运行控制(起动、停止)和工作状态监控等操作,其外形及功能参见图5.1、表5.1。
图5.1操作面板外形表5.1操作面板各部分名称及功能序号名称符号功能特性1数据显示区——利用七段LED数码管显示功能参数及其设定值等。
2充电指示灯CHARGE 亮:变频器直流母线有(残留)电压;灭:变频器直流母线无残留电压。
3模式指示灯RUN亮:运行命令和频率设定均有效,变频器输出正常;闪:运行命令有效,但频率设定无效,变频器无输出;灭:当前无运行命令,变频器无输出,处于待机状态。
SET亮:当前处于参数设置模式;闪:当前处于参数校验模式;灭:当前处于除参数设置或参数校验外的其他模式。
MON亮:当前处于状态监视模式;闪:当前正在查询故障履历中;灭:当前处于非状态监视模式。
4模式键MODE选择变频器的工作模式或从子菜单返回到模式。
5向上键▲增加参数编号、参数设定值。
表5.1(完)操作面板各部分名称及功能序号名称符号功能特性6退出键ESC 退出当前状态,返回到上一级状态。
7向下键▼减小参数编号、参数设定值。
8确认键ENT 进入模式、查看参数或确认设定值。
9停止/复位键STOP 停止变频器输出,检出故障时变为故障复位键。
10点动复用键JOG 默认为快捷菜单3,设置详见参数f700.11运行键RUN 开启变频器输出。
12调速旋钮——调节转速。
13单位指示灯%当前显示数据为百分比。
Hz当前显示数据的单位为Hz。
5.2面板的基本操作5.2.1运行模式选择变频器共有四种运行模式:上电默认模式、参数设置模式、状态监视模式和参数校验模式。
通过MODE 键可以在四种模式之间任意切换,如图5.2所示。
(上电默认模式)(参数设置模式)(状态监视模式)(参数校验模式)0.0-f 0-u 000-uf -MODEMODEMODEMODE <1>:当f618=1时,才会显示参数校验模式。
西部数据mybook说明书

性能. . . . . . . . . . . . . . . . . . . . . . . . . . . . . . . . . . . . . . . . . . . . . . . . . . . . . . . . . . . . . . . . . . . . 1 工具包内容 . . . . . . . . . . . . . . . . . . . . . . . . . . . . . . . . . . . . . . . . . . . . . . . . . . . . . . . . . . . . . . 2
在保修期内,您的产品享有 30 天的免费电话支持。30 天的免费期从您第一次致电 WD 技 术支持部门之日算起。 电子邮件支持在整个保修期内免费,我们详尽的知识库一周内全天 候可用。为了有助于我们保证您获知新功能以及新服务,请记得访问 https:///register 在线注册您的产品。
可选附件 . . . . . . . . . . . . . . . . . . . . . . . . . . . . . . . . . . . . . . . . . . . . . . . . . . . . . . . . . . . . . . . . . . . 2 兼容性 . . . . . . . . . . . . . . . . . . . . . . . . . . . . . . . . . . . . . . . . . . . . . . . . . . . . . . . . . . . . . . . . . 2 格式. . . . . . . . . . . . . . . . . . . . . . . . . . . . . . . . . . . . . . . . . . . . . . . . . . . . . . . . . . . . . . . . . . . . 3 物理描述 . . . . . . . . . . . . . . . . . . . . . . . . . . . . . . . . . . . . . . . . . . . . . . . . . . . . . . . . . . . . . . . . 3
WDZB-3T说明书
目录1、用途及特点 (1)2、功能及型号 (1)3、主要技术参数 (2)4、基本工作原理 (3)5、操作指南 (3)6、使用及注意事项 (9)7、包装、运输、存储及其他 (9)8、保护器外部接口 (9)一、用途及特点1、用途:WDZB-3T型微电脑控制低压馈电综合保护器(以下简称保护器),采用先进的计算机技术,是为BKD系列矿用隔爆型低压交流真空馈电开关(以下简称馈电开关)而专门设计的保护装置。
适应于额定电压为380V、660V、1140V,额定电流至1000A三相中性点不接地供、变电系统中。
作为总开关、分支开关、也可作为大容量电动机不频繁起动控制之用。
当负载侧出现过载、短路、缺相或漏电时能自动切断电源。
作为总开关时具有三相对称性漏电和漏电闭锁保护,是分开关漏电保护的后备延时保护;作为分支开关使用时具有选择型漏电保护和漏电闭锁保护功能。
过流保护具有反时限特性,近端出口短路采用大电流无压释放电路。
该保护器是馈电开关内的一个备件,不能独立工作,使用时要安装于馈电开关内,是适合用于BKD系列矿用隔爆型低压交流真空馈电开关的理想保护器。
2、特点:它采用了液晶中文显示能清晰地显示馈电开关的各种工作状态。
它采用了先进的计算机数据处理技术,其核心部分是电脑。
它具有强大的数据采集和处理功能。
对传感器二次信号不经过任何变形处理,直接进行高速采样和实时测算,并进行连续量化处理,所获信息是真实情况的具体表现。
对电路中出现的短路、过载、漏电、三相不平衡、高压、低压等故障都具有保护功能并具有故障原因记忆和查询功能。
该保护器通过两个按钮不必打开箱体就可在显示菜单中整定工作参数和故障记忆查询。
二、功能及型号1、功能(1)短路保护:对馈电开关负载侧出现的短路故障,用相敏方式进行定时限速断保护。
(2)过载保护:对馈电开关负载侧出现的持续过载,实行反时限保护。
对馈电开关负载侧出现的断续过载,进行能量释放和积累运算,实行反时限保护。
西部数据 D3 Station 外置硬盘 用户手册说明书
USER MANUALMaxtor Hard Drive website (). Your product comes with a quick start guide and a user’s manual.Following the instructions and precautions of this manual will ensure easier and more enjoyable use of your D3 Station External Hard Drive.Refer to the Troubleshooting section first if you experience a problem with the product.A start guide is provided with the purchase of D3 Station External Hard Drive.The quick start guide explains product components and provides simple instructions on how to install the product.The User’s Manual contains detailed information about features and instructions on using your D3 Station External Hard Drive.Carefully read and understand the “Handling Precautions” section before using the product.Failure to follow all the instructions as outlined in the Handling Precautions section could result in damage toyou or to your D3 Station External Hard Drive.maxtorThis device is not intended for use in the direct field of view at visual display workplaces.To avoid incommoding reflections at visual display workplaces this device must not be placed in the direct field of view.•Read Me First22222About this Manual Quick Installation Guide User’s Manual Using this Manual Icon GuideHandling Precautions3333444444Installation RelatedData Cable UsageShockHumidityMagnetsDisassembly and Label Removal Always Backup your Important Data Regular Virus Scanning Cleaning the productCustody RelatedIntroduction6Introduction7D3 StationConnecting your D3 Station 8910Installation Windows MacintoshUsing your D3 Station1111131314Copying / Moving Files Removable Disk Method Safely Removing your D3 Station For WindowsFor MacintoshD3 Station Software151517Drive Manager Software Drive Manager Installation Using Drive ManagerTroubleshooting19FAQAppendix202020202121Partitioning and Changing File System Type Reformat to FAT32Reformat to NTFS32Reformat in MacintoshFCCSpecificationsProduct CertificationsThe D3 Station External Hard Drive is a high-performance external hard drive that supports USB 2.0 andUSB 3.0. Unlike conventional desktop disk drives, The D3 Station External Hard Drive makes it possible foryou to instantaneously add greater storage capacity to your system without having to take the computer apart.This means that your D3 Station External Hard Drive comes fully partitioned and formatted for your use andyou can instantly access to the drive by simply plugging it into your computer through a USB port.The D3 Station comes with Drive Manager which is a Windows-based integrated-management software that allows the convenient use of External Hard Drives.Drive Manager supports various functions including auto backup, file / folder security, drive diagnostic, partition setup. D3 Station 2TB : HX-D201TDB/GMD3 Station 3TB : HX-D301TDB/GMD3 Station 4TB : HX-D401TDB/GMD3 Station 5TB : HX-D501TDB/GMPower Adapter D3 Station USB 3.0-Cable(D3 Station)When you purchase a D3 Station External Hard Drive, make sure that all components have been included in your product package.USB PortTo use the Hard Drive at its Maximum speed, you need a PC or a Host Card that supports USB3.0 interface Windows Vista / 7 / 8 / 10Verify that the computer meets the minimum system requirements as outlined in System Requirements. Insert the USB cable to the desktop/laptop computer as shown in Figures 3 and 4:User’s ManualInstallation•• Figure 4. C onnecting to a Laptop ComputerTo use the Hard Drive at its maximum speed, you need a PC or a Host Card that supports USB 3.0 interface.Connecting your D3 StationWhen you connect D3 Station External Hard Drive to the computer a small icon will appear in the system tray at the lower right corner of the screen.You are now ready to use the Maxtor D3 Station External Hard Drive.Maxtor driveMaxtorConnect your D3 Station External Hard Drive to the computer. Your Macintosh operating system will then generate a Maxtor drive icon.You are now ready to use the Maxtor D3 Station External Hard Drive.(Software included with your D3 Station External Hard Drive does not support the Mac operating environment.)After clicking the Maxtor icon, the following folder will appear.MaxtorMaxtor()Using your D3 StationNow that you have successfully installed your new D3 Station External Hard Drive, you can copy or move files or whole folders from your new D3 Station to your computer and vice-versa.Copy and paste files from the computer to the D3 Station External Hard Drive (Removable Disk Method).From the Windows Explorer, you will see various drive letters; A, C, your C drive is your local Hard Drive.D3 Station will most likely be the E drive however, it could be any drive letter. For the purposes of this manual,we will assume that D3 Station is the E drive. As well, for practice copying folders and files, we will copy the Temp folder onto D3 Station.D3 Station External Hard Drive.Detaching the USB cable while file transfer is in progress can damage your computer and/or D3 Station External Hard Drive. If you need to disconnect the USB cable, wait for the transfer process to complete first andthen disconnect using the “Safely Remove Hardware” option.D3 StationNow, we will copy the Temp folder from the Local C drive, to the Maxtor E drive. From the left pane in the Windows Explorer : Right Click Maxtor E Click PasteMaxtorClick “Safely Remove Hardware.”Use the Safely Remove button of Drive Manager to safely remove your external hard drive.Safely Removing your D3 StationThis prompt will list all of the Mass Storage Devices like your Local Hard Drive and your D3 Station Hard Drive.Click “Eject Seagate D3 Station” device.MaxtorMaxtorDo not Disconnect D3 Station External Hard Drive's USB cable from the computer while file transfer is in progress. Interrupting the file transfer could lead to data corruption and/or damage to your D3 Station.MaxtorDrive Manager InstallationDrive Manager SoftwareD3 Station SoftwareDrive Manager is bundled software for Windows provided for the convenient use of your External Hard Drive.Drive Manager comprises AutoBackup (a personal backup solution), SecretZone™(a personal data protection solution), and External Hard Drive management tools.Drive Manager must be installed on a computer that is connected to your D3 Station to operate.For further details, refer to the user manual provided with your D3 Station.“Finish”.MaxtorMaxtorTicking noise is an indication of insufficient power.• Check the USB cable connection.• Check the LED light on the External Hard Drive.• Check the power supply to D3 Station External Hard Drive.•If the drive is not being recognized, try plugging it into a different USB port.- USB 3.0To use the Hard Driver at its Maximum speed, you need a PC or a Host Card that supports USB 3.0 interface and USB 3.0 Cable.Type of file system used for the drive, partitioning arrangement, type of operating system, and various other factors canaffect the actual storage capacity displayed by your computer.(1MB=1,000,000bytes and 1GB=1,000,000,000bytes and 1TB=1,000,000,000,000bytes.)Q6. I am using a Mac, and I can’t copy files.Q1. File transfer takes too long.A1.Q2. T he actual storage capacity of D3 Station External Hard Drive is different than the capacity shown on the packaging. A2. Q3. I connected my D3 Station External Hard Drive, and the computer seems to recognize it, but thedrive won’t show up under Windows Explorer.A3. D 3 Station External Hard Drive is by default formatted to NTFS and will work normally when you connect itto your computer. However, if the partition has been erased or the file system has been changed to a one that’s not recognized by Windows, the drive will not appear under Windows Explorer. Try formatting the drive to FAT32 or NTFS.(Caution : Formatting will erase all data stored in the drive.)Q4. I am using Windows and cannot format the drive to FAT32.A4. W indows operating systems that followed Windows NT have limited FAT32 formatting to 32GB.Therefore, if you wish to format your D3 Station External Hard Drive to FAT32, you will need to download a formatutility from our website.(Caution : Formatting will erase all data stored in the drive. We recommend that you back up your data before proceeding.) Q5. My computer will not boot up properly.A5. I f you boot up your system with a D3 Station External Hard Drive connected to the computer, it’s possible thatyour system’s BIOS is attempting to boot from the External Hard Drive.Change the BIOS booting sequence or disconnect the External Hard Drive from the system and then try booting again. A6. I f the drive has been formatted to NTFS, data stored in the drive can only be read by Mac systems.To use the drive on Mac OS X operating systems, use NTFS for Mac Driver or reformat your drive.NTFS for Mac Driver : Refer to page 10Reformat : Refer to page 20• • •- Connect the D3 Station External Hard Drive to the computer.- Click “Start” from the lower left corner of your screen.- Right-click “My Computer” and then select “Manage.”- From the “Computer Management” tool, select “Disk Management.”- Right-click the drive you wish to format and then select “Delete Partition.”- Once drive partition has been deleted, right-click the drive you wish to format and then select “New Partition” as shown in the diagram below.- From Create Partition Wizard, select “Primary Partition” and then enter the desired size of the partition.- From the “File System” menu, select “NTFS” and format.D3 Station15EACTUVThe maximum ambient temperature permitted by the manufacturer (Tma):45 C.This device is not intended for use in the direct field of view at visual display workplaces. To avoid incommoding reflections at visualdisplay workplaces this device must not be placed in the direct field of view.D3 Station External Hard Drive21© 2016 Seagate Technology LLC. All rights reserved. Seagate, Seagate Technology, the Spiral logo, Maxtor and Maxtor Logo are trademarks or registered trademarks of Seagate Technology LLC or one of its affiliated companies in the United States and/or other countries. All other trademarks or registered trademarks are the property of their respective owners. When referring to drive capacity, one gigabyte, or GB, equals one billion bytes and one terabyte, or TB, equals one thousand billion bytes. Your computer’s operating system may use a different standard of measurement and report a lower capacity. In addition, some of the listed capacity is used for formatting and other functions and will not be available for data storage. Quantitative usage examples for various applications are for illustrative purposes. Actual quantities will vary based on various factors, including file size, file format, features, and application software. The export or re-export of hardware or software containing encryption may be regulated by the U.S. Department of Commerce, Bureau of Industry and Security (for more information, visit) and controlled for import and use outside of the U.S. Actual data rates may vary depending on operating environment and other factors. Seagate reserves the right to change, without notice, product offerings or specifications.Seagate Singapore International Headquarters Pte. Ltd., Koolhovenlaan 1, 1119 NB Schiphol-Rijk, The NetherlandsD3 Station External Hard Drive User's Manual (01-16)。
DWYER INSTRUMENTS WE03自动三环球阀说明书

DWYER INSTRUMENTS, INC.| 466The Series WE03incorporates a full port 3-piece tri-clamp SS ball valve for great flow rates with minimal pressure drop. The valve features a blowout proof stem for added safety, reinforced PTFE seats and seals for longer life, and a 316 SS (ASTM CF8M) ball for better performance.Actuators are direct mounted creating a compact assembly for tight spaces. Limit switches are able to be mounted directly to the valves allowing for remote position indication.The Series WE03 can be configured with either an electric or pneumatic actuator.Electric actuators are available in weatherproof or explosion-proof, a variety of supply voltages and two-position or modulating control. Two-position actuators use the supply voltage to drive the valve open or closed, while the modulating actuator accepts a 4 to 20 mA input for valve positioning. Actuators feature thermal overload protection and permanently lubricated gear train.The pneumatic double acting actuator uses an air supply to drive the valve open and closed. The actuator has two supply ports with one driving the valve open and the other driving the valve closed. Spring return pneumatic actuators use the air supply to open the valve and internally loaded springs return the valve to the closed position. Also available is the SN solenoid valve to electrically switch the air supply pressure between the air supply ports for opening and closing the valve. Actuators are constructed of anodized and epoxy coated aluminum for years of corrosion free service.FEATURES• Capable of being configured to fit any application• Limit switches can be mounted to manual valves for remote monitoring • Cavity filled valve for sanitary applicationsSPECIFICATIONSVALVE Service:Compatible liquids and gases.Body: 3-piece.Line Sizes:1/2 to 2˝ .End Connections: Tri-clamp ends.Pressure Limits:28˝ Hg to 1000 psi(-0.7 to 69 bar) up to 250°F.Wetted Materials:Body and ball: 316 SS (CF8M);Stem: 316 SS;Seat: RTFE/PTFE;Seal, Washer, and Packing: PTFE.Temperature Limits:-20 to 392°F(-29 to 200°C).Other Materials:O-ring: Fluoroelastomer;Handle: 304 SS;Washer: 301 SS;Stem Nut, Locking Device,Gland Ring: 304 SS;Handle Sleeve: PVC.ACTUATORSPneumatic “DA” and “SR” Series Type:DA series is double acting and SR series is spring return (rack and pinion).Normal Supply Pressure:DA: 40 to 115 psi (2.7 to 7.9 bar);SR: 80 psi (5.5 bar).Maximum Supply Pressure:120 psi (8.6 bar).Air Connections:DA01: 1/8˝ female NPT;DA02: 1/4˝ female NPT;SR02 to SR04: 1/4˝ female NPT.Housing Material:Anodized aluminum body and epoxy coated aluminum end caps.Temperature Limits:-40 to 176°F (-40to 80°C).Accessory Mounting:NAMUR standard.Electric “TD” and “MD” Series Power Requirements: 110 VAC, 220 VAC, 24 VAC or 24 VDC (MD models not available in 24 VDC).Power Consumption:See instruction manual.Cycle Time (per 90°): TD01: 4 s;MD01: 10 s; TD02 and MD02: 20 s.Duty Rating:85%.Enclosure Rating:NEMA 4X (IP67).Housing Material:Powder coated aluminum.Temperature Limits: -22 to 140°F (-30 to 60°C).Electrical Connection:1/2˝ female NPT.Modulating Input:4 to 20 mA.Standard Features:Manual override,position indicator, and TD models come with two limit switches. Electric “TI” and “MI” Series Power Requirements: 110 VAC, 220 VAC, 24 VAC or 24 VDC.Power Consumption:See instruction manual.Cycle Time (per 90°): See instruction manual.Duty Rating: See instruction manual.Enclosure Rating:NEMA 7, designed to meet hazardous locations: Class I,Group C & D; Class II, Group E, F & G;Division I & II.Housing Material:Powder coated aluminum.Temperature Limits:-40 to 140°F (-40 to 60°C).Electrical Connection:1/2˝ female NPT.Modulating Input:4 to 20 mA.Standard Features:Position indicator and two limit switches.3-Piece Tri-Clamp Stainless Steel Ball ValveCavity Filled, Full Port, Electric or Pneumatic ActuatorsSeries WE03467CONTACT US | U.S. 219/879-8000 | U.K. (+44) (0)1494-461707| A.U. (+61) (0) 2 4272 2055| China +852-********ACCESSORIESR2-2120,Air RegulatorAFR2-2, Instrument Air Filter Regulator VB-01, Volume Booster。
三相驱动器WD3DV说明书(中文)
-6-
附加 1:力矩曲线图 测试条件:
1.电机:110BYG350B 电机,三角形接法,最大静力矩:12NM 2.驱动:步数为 60000 步/转,电流为 4.5A(有效值),输入电压 AC220V 3.测试仪器:ZJYW1 微机型转速转矩仪
-7-
附加 2:安装尺寸图
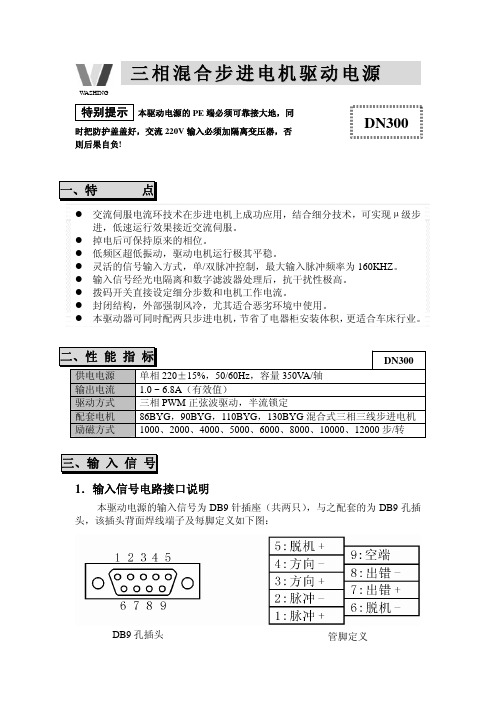
电流3 电流2 电流1 电流0 半流 细分2 细分1 细分0
三相混合步进电机驱动电源
WASHING
特别提示 本驱动电源的 PE 端必须可靠接大地,同
时把防护盖盖好,交流 220V 输入必须加隔离变压器,否 则后果自负!
DN300
一、特
点
交流伺服电流环技术在步进电机上成功应用,结合细分技术,可实现 µ 级步 进,低速运行效果接近交流伺服。
掉电后可保持原来的相位。 低频区超低振动,驱动电机运行极其平稳。 灵活的信号输入方式,单/双脉冲控制,最大输入脉冲频率为 160KHZ。 输入信号经光电隔离和数字滤波器处理后,抗干扰性极高。 拨码开关直接设定细分步数和电机工作电流。 封闭结构,外部强制风冷,尤其适合恶劣环境中使用。 本驱动器可同时配两只步进电机,节省了电器柜安装体积,更适合车床行业。
C相 X轴 B相 X轴 A相 X轴
电流3 电流2 电流1 电流0 半流 细分2 细分1 细分0
脱机+ 方向方向+ 脉冲脉冲+
全流
出错出错+ 脱机-
报警 正常
步 数 细分2 细分1细分0 1000 ON ON ON 2000 ON ON OFF 4000 ON OFF ON 5000 ON OFF OFF 6000 OFF ON ON 8000 OFF ON OFF 10000 OFF OFF ON 12000 OFF OFF OFF
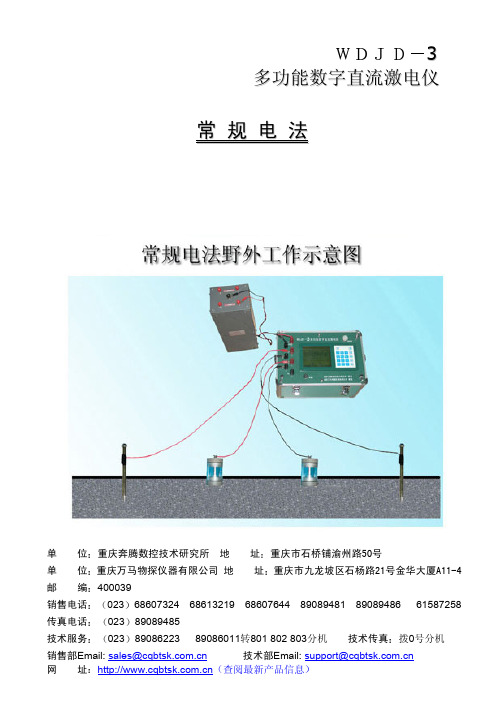
WDJD-3多功能数字直流激电仪说明书
录
仪器主要特点与功能 ·············································································2 仪器主要技术指标 ·················································································2 仪器工作原理 ··························································································3 仪器结构 ···································································································4 操作说明 ···································································································5 5-1 开机与对比度调节 ···········································································5 5-2 菜单操作 ····························································································5 5-2.0 主菜单 ···························································································5 5-2.1 设置工作参数 ··············································································5 5-2.2 测量 ································································································7 5-2.3 测线表 ·························································································10 5-2.4 显示曲线 ····················································································11 5-2.5 显示数据 ····················································································11 5-2.6 RS-232C 通讯 ···········································································12 5-2.7 硬件测试 ····················································································12 5-3 存贮操作 ··························································································13 5-4 清除操作 ··························································································13 5-5 选择测量功能 ·················································································14 5-6 关机 ··································································································15 5-7 测量操作一般工作流程 ································································15 5-8 野外操作实例 ·················································································16 5-9 操作注意事项 ·················································································21 六 故障诊断 ··································································································21 七 仪器保养 ··································································································22 八 仪器成套性 ································································································22 附录 A 附录 B 附录 C 附录 D 附录E 数据接收与格式转换软件 BTRC 使用说明 电极排列的说明 主要参数含义及计算方法 问题解答 无极差电极的制做
wd无敌系列卡pci 总线rs232 扩展卡 说明书

WD(无敌)系列卡PCI总线 RS232 扩展卡用户手册目录一、 性能指标二、 软件支持环境三、 硬件安装3.1、在Windows95/98/Me/2000/XP下安装3.2、WindowsNT4.0串口设备安装3.3、SCO Unix3.2/5.0.5安装3.4、在SCO Unix 下安装调制解调器(MODEM)3.5、在Linux 下安装WD系列多用户卡四、 注意事项五、 产品清单欢迎您选购本公司的WD(无敌)系列卡。
本系列产品使用高性能的通信芯片,每个端口收发各有128字节FIFO,由PCI总线扩展2,4,8,16,32,64个RS232口。
一、 性能指标1. 符合PCI2.1规范2. I/O地址和中断由PC BIOS自动分配3. 端口数量:a. WD-100 为 2 个串口,并口符合IEEE1284规范b. WD-200 为 4 个串口,并口符合IEEE1284规范c. WD-400 为 8 个串口,并口符合IEEE1284规范d. WD-800 为16个串口,并口符合IEEE1284规范4. Windows95/98/Me/2000/XP,Windows NT4.0系统可支持多块WD(无敌)系列卡。
5. 端口数据信号:a. WD-100/200为TX,RX,RTS,CTS,DTR,DSR,DCD,RI,GNDb. WD-400/800为TX,RX,RTS,CTS,DTR,DSR,DCD,GND6. 端口属性(Windows 95/98/Me/2000/XP)a. 端口速率:正常为115.2Kbpsb. 芯片模式可选择:16C450或16C550或16C950,使用16C950时,收发各128字节的FIFO。
并且端口FIFO数量可调整,FIFO中断触发水平可调整。
c. 数据位长度:5,6,7,8d. 校验方式:None,Even,Old,Space,Marke. 停止位长度:1,1.5,2f. 数据流控制方式:None,RTS/CTS,DTR/DSR,Xon/Xoff7. 每个端口的数据信号都有过压保护装置,可防止静电打坏端口8. 为了驱动程序的稳定性和耐用性,驱动程序可能会用CD-R光盘形式配送的,而非软盘。
- 1、下载文档前请自行甄别文档内容的完整性,平台不提供额外的编辑、内容补充、找答案等附加服务。
- 2、"仅部分预览"的文档,不可在线预览部分如存在完整性等问题,可反馈申请退款(可完整预览的文档不适用该条件!)。
- 3、如文档侵犯您的权益,请联系客服反馈,我们会尽快为您处理(人工客服工作时间:9:00-18:30)。
中心气的设置根据焊接电流及喷嘴的直径大小来选择合适的气体流量。见图4
送粉气的设置根据送粉量的大小来选择,一般在1-2.5升/分之间。
保护气的设置一般视工件大小而定,在10升/分左右。
3.1.8保护气流量表(9)、送粉气流量表(10)、中心气流量表(11)——用于气体的流量调节。
代号
名称
规格
厂家
数量
1
PLC
可编程控制器
CP1H-X40DR-A
OMRON
1
2
D/A单元-DC24V
数/模转换
CP1W-DA041
OMRON
1
3
A/D单元-DC-24V
模/数转换
CP1W-AD041
OMRON
1
4
触摸屏
触摸屏
PL104-VST
台湾
1
5
U4
直流电机驱动器
110DP04BL
科亚
1
6
U5
直流电机驱动器
电弧上升延时
XX.X
秒
06
电弧下降延时
XX.X
秒
07
电弧上升时间
XX.X
秒
08
电弧下降时间
XX.X
秒
09
转台启动延时
XX.X
秒
10
转台速度
XX.X
转/分
11
粉末上升时间
XX.X
秒
12
粉末下降时间
XX.X
秒
13
粉末下降延时
XX.X
秒
14
送粉量1#
XX.X
克/分
15
送粉量2#
XX.X
克/分
16
送粉量3#
3.2参数设定说明:
3.2.1系统上电后,用手指点触摸屏上的设定画面按钮,输入密码将触摸屏翻至《设定画面》页。如下图
3.2.3自动焊接参数设定共有四页,例如需进入第一页进行参数修改,则直接点触相应数据,会弹出如图5的数字输入键盘,输入数据后按“ENT”完成。
3.2.2本系统一共可存储100组(0~99)自动焊接参数供焊接不同类型工件时调用。例如需将参数存入第5组步骤:
断路器
10A/2P
台安
3
14
Y1-Y3
电磁阀
24V
亚德克
3
15
Y4
电磁阀
24V
亚德克
1
16
HL1 HL2
电流变送器
成都
2
17
SB2
急停
1NC
富士
1
18
SB4,SB5,SB6
自锁按钮(绿)
LED/24V/1NC
富士
2
19
SB1
二位旋钮(黑)
1NC
富士
2
20
RS232
通讯电缆
3.1.4急停开关——当焊接过程中出现意外时,按下此按纽,被锁住,直到故障被排除后,再放置此按纽作复位解除。
3.1.5形式转换开关——该开关有两档位置:手动位置和自动位置。当开关置于手动位置时,触摸屏立即切换到“手动画面”,送粉启动、转台启动、焊接启动及参数设定均为人工通过触摸屏手动操作,(手动焊接页面如下图)。当开关置于自动位置时,只要关闭小门,上述功能均由PLC自动控制启动,完成自动堆焊操作。
3.4.8焊接操作
按“引弧”按纽,几秒钟后,引弧被引燃。引弧引燃后,在将工件放在胎具上,向关的方向拉动观察小门,工件夹紧气缸将工件压紧,关闭小门焊接将自动进行。在焊接过程中,触摸屏中的焊接时间不断增加。当一个气门焊接完毕后,电弧自动停止,触摸屏中工件计数器读数增加1。完全打开观察小门,夹紧气缸释放取下工件,装上新的待焊工件,此时重复上述动作压紧工件,关上观察窗,上述焊接过程将自动重复。一个工件进行自动焊接后,每次关闭观察窗都会自动起弧。所以操作者在关闭观察窗时一定要小心,没有装夹工件时,一定不要关闭观察窗。若需要在没有工件时关闭观察窗,则可将形式转换开关转到手动位置处于非自动焊接状态,然后再关闭观察窗。
3.4.9关机时,应先停止电弧,再关闭空气压缩源和氩气源。
3.4.10按下“试气”按钮将管路中的余气排尽。
3.4.11断开电器控制柜内的电源总开关。
3.4.12关闭水冷器面板上的电源。
3.5手动参数设定:
手动参数设定与自动方式相同,分别按相应的数字键可弹出数字键盘,然后设定需要的数值。按对应的按钮则可单独运行相应的项目,一般手动操作用于调试设备或补焊。
2.8焊枪上下微调行程:400mm。
2.9保护气流量:0~25L/min
2.10送粉气流量:0~5L/min
2.11中心气流量:0~2.5L/min
3.操作说明:
3.1操作面板说明:
3.1.1触摸屏——用作参数设定、显示。
3.1.2运行画面显示:焊接电流、焊接电压、引弧电流、工件转速、送分量等。
3.1.3报警画面与复位按钮:系统出现故障时,复位按钮灯亮,同时触摸屏报警页面弹出,相应的故障条闪烁;处理后可按此钮进行系统复位,(故障报警如下图)
焊机电源没开。
无氩气。
检查k3及焊机电源开关是否和上。
检测气路。
焊机故障。
参考焊机使用手册,排除焊机故障。
高频点火弱或没有。
检查高频打火装置,调整钨极。
4
无焊接电弧。
焊接电源开关未合。
工件地线接触不良。
引弧电弧不良。
小门接近开关没信号。
合上断路气k2及焊接电源开关。
检查地线。
调整中心气、引弧电流、打磨钨极等,使引弧电弧可有效接触工件。
XX.X
克/分
17
送粉量4#
XX.X
克/分
18
转台角度1#
XXX
度
19
转台角度2#
XXX
度
20
转台角度3#
XXX
度
21
转台角度4#
XXX
度
22
摆动启动延时
XX.X
秒
23
前气流时间
XX.X
秒
24
后气流时间
XX.X
秒
引弧连续开关——运行画面里的小弧连续按钮设定为“连续”时,引弧电流只受<引弧启停>按钮控制,焊接工件时引弧电流同时存在。设定为“断续”时,焊接工件时,焊接电弧建立后引弧电流则自动断弧,焊接完成焊接电弧熄灭后引弧电流则自动引燃。
3.3自动焊接动作时序图:
图10表示了自动焊接时,从焊接开始到焊接结束整个过程中,各焊接参数之间的动作关系。其中纵坐标表示焊接参数的功能,横坐标表示动作时间。
3.4操作步骤:
3.4.1合上电源总闸。
3.4.2打开水箱面板上的电源开关,等待几秒后。水压检测正常,系统才能正常工作。
3.4.3打开氩气瓶的气压阀,高速气压表的压力为4Kg/cm2。打开压缩空气源,高速三联件的压力为3 Kg/cm2左右。
2.技术参数:
2.1电源: 380V/3P/60A/50HZ。
2.2气源:0.5MPa20L/min(压缩空气)。
2.3转移电弧电流:≤300A。
2.4引弧电弧电流:≤100A。
2.5旋转速度: 0~12r/min连续可调(主轴减速2:1)。
2.6送粉速度:0~50 mg/min连续可调。
2.7焊枪横向微调行程:300mm。
2
转台不能旋转
直流电机驱动器电源无。
k6未合,合上。
驱动器有故障。
驱动器红灯亮,更换或送厂家维修。
机械堵转。
立即停止运行,排除机械故障。
电机或接线端子接线松动。
参考接线图,从驱动器输出逐一检查接线。
PLC无输出信号。
PLC相应输出点无输出显示,检查是否在故障状态。
3
无引弧电流
焊枪故障。
检测焊枪是否短路或断开。
110DP04BL
科亚
1
7
KA1-KA8
继电器
MY2NJ DC24V
OMRON
8
8
SA3
接近开关
PR12-4DN
AUTONICS
2
9
24V电源
开关电源
DC24V/3A
台湾明伟
1
10
T
隔离变压器
380V/220V500W
北京
1
11
K1K2
断路器
60A/3P
台安
2
12
K3
断路器
20A/2P
台安
1
13
K4K5K6K7
更换粉末,调整焊枪,增加送粉气或堵漏
气门烧边
电流太大,转速太慢,中心气太大,送粉量太小,气门偏心,底板太脏
降低电流,加大转速,减小中心气及送粉,检查或更换底板
表3常见工艺故障及其排除方法
6.电器故障及原因:
序号
故障现象
原因
处理方法
1
主控柜不能上电
电源进线断路器没合。
合上Q0。
断路器烧坏。
查找是否有线路短路,排除后更换断路器。
3.6焊接质量的判别:
在焊接时,有三个主要参数,即焊接电流、送粉量和转台速度。这三个参数对焊接成型及焊接质量的影响最大。当这三个参数的配合达到最佳状态时,才能获得满意的焊接成型及内部质量。通过焊接时观察熔池状态及焊后观察焊接成型,可大致判断出这三个参数的正确性。
要获得一个满意的焊接成型,焊接时,熔池前沿应出现“润湿”的现象,无生粉。焊后焊道表面平整,焊道宽度一致,两边没有粉珠。通过上述现象可大致判别焊接质量的好坏。常见工艺故障原因见表3
打磨钨极,清洗喷嘴,检查电缆,检查水气压力,检查设备