打印机设置默认纸盒二的方法
打印机设置方法

打印机设置方法打印机是我们日常生活和工作中经常使用的办公设备,正确的设置打印机不仅可以提高打印效率,还能保证打印质量。
下面,我们将介绍如何正确设置打印机,以便您能够更好地使用它。
首先,确保打印机已经正确连接到电脑上。
通常情况下,打印机会通过USB线或者无线网络连接到电脑上。
如果是USB连接,只需将USB线插入电脑的USB接口即可;如果是无线连接,需要在电脑上进行相应的无线设置,确保打印机和电脑处于同一局域网内。
接下来,打开电脑上的打印机设置界面。
在Windows系统中,可以通过控制面板找到“设备和打印机”选项,然后选择添加打印机来进行设置;在Mac系统中,可以通过系统偏好设置中的“打印机与扫描仪”选项来进行设置。
在打印机设置界面中,可以对打印机的各项参数进行调整。
首先是打印机的默认设置,包括纸张大小、打印质量、打印方向等。
根据实际需求,选择合适的默认设置,以便在日常使用中能够满足不同的打印需求。
其次是打印机的高级设置,包括打印机驱动程序的安装、打印队列的管理、打印机的共享设置等。
在这些设置中,可以对打印机进行更详细的调整,以满足特定的打印需求。
例如,可以安装打印机的最新驱动程序,以确保打印机能够正常工作;还可以设置打印队列,对打印任务进行管理;还可以设置打印机的共享权限,使其他电脑也能够使用这台打印机进行打印。
最后,需要测试打印机的设置是否正确。
可以选择一个测试文档进行打印,检查打印效果和打印速度,以确保打印机的设置是符合实际需求的。
如果发现打印效果不理想,可以返回打印机设置界面进行调整,直到满意为止。
总之,正确的打印机设置能够提高打印效率,保证打印质量,为我们的日常生活和工作带来便利。
希望通过本文的介绍,能够帮助您更好地设置打印机,享受高效的打印体验。
在程序中设置默认打印机和默认纸张

*ENDIF
Set Library To myfll.fll
ssa=''
ssa=ssa+'DRIVER=winspool'+chr(13)
*ssa=ssa+'DEVICE='+ALLTRIM(PaperInfo(bo1.displayValue,2))+chr(13)&&自定义纸张名称
Set Library To
ssa=ssa+'DEVICE='+ALLTRIM(cCurrentPrinter)+chr(13)&&获得缺省打印机名称
ssa=ssa+'OUTPUT='+ALLTRIM(cPort)+chr(13)&&输出打印机端口
ssa=ssa+'ORIENTATION='+ALLTRIM(STR(PRTINFO(1, cCurrentPrinter)))+chr(13) &&纸张方向
=messagebox("默认打印机“"+ALLTRIM(bo1.displayValue)+"”设置成功!",0+0+0,"默认打印机")
Else
=messagebox("设置失败!",0+0+0,"默认打印机")
EndIf
Set Library To
nPrintCount=APRINTERS(aArrayPrint) &&将安装在 Windows 打印管理器中的打印机名称存入内存变量数组中
打印机调试方法
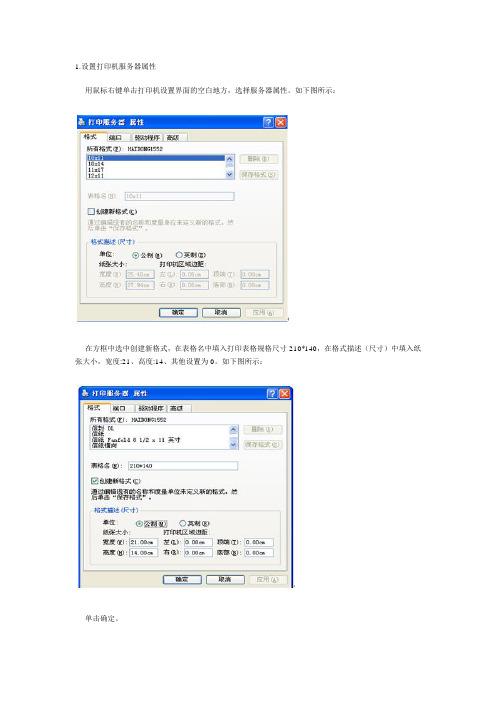
1.设置打印机服务器属性
用鼠标右键单击打印机设置界面的空白地方,选择服务器属性。
如下图所示:
在方框中选中创建新格式,在表格名中填入打印表格规格尺寸210*140,在格式描述(尺寸)中填入纸张大小,宽度:21、高度:14、其他设置为0。
如下图所示:
单击确定。
2.打印机参数设置用
鼠标右击打印机选择属性。
如下图所示:
鼠标单击打印首选项按钮。
如下图所示:
鼠标单击高级,设置纸张规格。
如下图所示:
单击确定鼠标右击打印机属性,选择设备设置,按图中纸张大小设置。
如下图所示:
单击确定,打印机初始设置完成。
打印机使用指南

震旦复印机使用指南
一装入纸张
A4纸将纸装入纸盒1
A3纸将纸装入纸盒2
1 将横向倒板滑到适合要装入的纸张尺寸的位置
2 将纸张装入纸盒
装入纸张,使要打印的表面朝上
装入纸张时堆顶部不得超过黑色三角标记
最多可装入500张普通纸。
3 手送纸使用
打开手送纸盒(装入大尺寸纸张时,拉出纸盒扩展器)
将纸张装入纸盒
装入纸张,使要打印的一侧朝下
装入纸张时纸堆顶部不得超过黑色三角标记
最多可装入150普通纸
将横向导板滑动到适合要装入的纸张尺寸的位置
二基本复印操作
1 放置要复印的文件
2选择基本屏幕设置
浓度:根据自己需要来修改
纸张:选择要用的纸盒,作为出厂默认设置,选择‘自动’
缩放:若要放大/缩小复印,更改缩放比率。
出厂默认设置为‘100%’
3输入所需份数
如需更改份数,按[C](清除)键,然后输入所需数量
4按[开始]键
三基本打印操作
1发送打印数据
在应用程序中创建文档,然后选择打印命令
2打印指定的页面和份数
3确定
注:如特殊情况不会操作,请不要随意尝试,咨询李会后再操作。
HP CP5225 打印机解决

HP Color LaserJet CP5225打印机-设置选择纸张问题解决方案1.CP5225打印机驱动中英文版驱动默认打印纸张类型为Letter。
NOTE:纸盒1的尺寸为A4,纸盒2中的尺寸为A3,由此与实际客户端的默认纸张类型Letter冲突,导致打印作业无法完成,滞留在打印内存中,影响后续打印作业。
造成目前使用故障情况。
2.解决:所有使用该设备的用户端PC必须设置默认打印纸张类型为A4纸张。
打印作业的页面设置中纸张选择好要使用的纸张尺寸,打印机就会自动选择正确纸张来进行打印。
3.更改方法:开始—控制面板—打印机—右键—属性—打印机首选项—纸张尺寸(下拉菜单中选择A4)—确定即可HP Color LaserJet CP5225打印机系列-打印速度慢故障排除解决方案影响打印速度的因素有很多,比如:纸张类型、纸张尺寸、连接线的质量、网络环境、所打印的文档大小及复杂程度、打印机驱动的端口等等。
下面分三方面来说明一下这个问题:1.打印机方面:确保所用的纸张尺寸是A4,纸张类型是普通纸,打印机菜单中的纸张设置不用改,保持为出厂默认设置。
2.连接方面:1.网络点对点连接方式:测试一下是否网络中每台电脑打印速度都很慢,如果打印速度都很慢的话,请用交叉网线将打印机和某台电脑直接连接,再测试打印速度,如果速度正常,说明是网络环境的问题。
如果只是某台电脑打印慢,参考步骤2。
1/ 22.网络共享连接方式:测试打印机所连接的主机电脑打印速度是否正常,如果很慢,按上述方法检测,如果正常,再测试客户端电脑的打印速度,客户端电脑打印都很慢的话,建议检查网络环境。
3.电脑方面:1.打印的文档太大或者内容比较复杂,格式比较特殊,会影响打印机的打印速度。
2/ 2。
设置打印机以选择不同纸盒的纸张格式,并定义输出纸盒和双面打印说明书
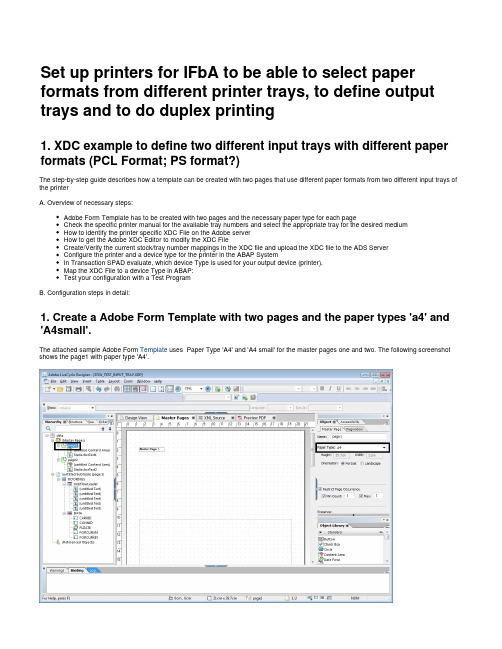
Set up printers for IFbA to be able to select paper formats from different printer trays, to define output trays and to do duplex printing1. XDC example to define two different input trays with different paper formats (PCL Format; PS format?)The step-by-step guide describes how a template can be created with two pages that use different paper formats from two different input trays of the printerA. Overview of necessary steps:Adobe Form Template has to be created with two pages and the necessary paper type for each pageCheck the specific printer manual for the available tray numbers and select the appropriate tray for the desired mediumHow to identify the printer specific XDC File on the Adobe serverHow to get the Adobe XDC Editor to modify the XDC FileCreate/Verify the current stock/tray number mappings in the XDC file and upload the XDC file to the ADS ServerConfigure the printer and a device type for the printer in the ABAP SystemIn Transaction SPAD evaluate, which device Type is used for your output device (printer).Map the XDC File to a device Type in ABAP:Test your configuration with a Test ProgramB. Configuration steps in detail:1. Create a Adobe Form Template with two pages and the paper types 'a4' and 'A4small'.TemplateThe attached sample Adobe Form uses Paper Type 'A4' and 'A4 small' for the master pages one and two. The following screenshot shows the page1 with paper type 'A4'.Verify after the paper types are selected in the Designer with a switch to the 'XML Source' Tab in the Designer that the followingXML Elements are part of the Template.stock="a4"<pageArea id="Page1" name="page1"><medium long="297mm" short="210mm" />stock="a4mall<pageArea id="Page2" name="page2"><medium long="297mm" short="210mm" "/>Optional: The definition of new paper types can be done in the Designer.xdc file located at:%ProgramFiles%\Adobe\<DesignerVersion>\Designer.xdcThe paper types 'a4' and 'a4Small' are already shipped with the Designer and are part of the Designer.xdc. Both paper types are represented with the following XML elements:<medium stock="a4" short="210mm" long="297mm"/><medium stock="a4Small" short="210mm" long="297mm"/>Newly defined Papers Types can be added, if for example the following definition is added to the Designer.xdcmyMediumStock<medium stock="" short="210mm" long="297mm"/>To display the new paper Type in the Designer DropDownlistBox the mediumstocklist.xml must be modified in the language specific version of the Designer.myMediumStockDescriptionFor the German version the element <stock name="myMediumStock" desc=""/> must be added to the MediumStockList.xmllocated in directory: %ProgramFiles%\Adobe\<DesignerVersion>\DE\MediumStockList.xml.With the description the paper type 'myMediumStock' will appear as 'myMediumStockDescription' in the DropDownlistBox of the Designer for the selection of the paper type.Further Details regarding XDC File configuration are available in the .Adobe LiveCycle Documentation2. Check the specific printer manual for the available tray numbers and select the appropriate tray for the desired mediumPlease note that the Tray Settings are different for the output formats PCL or PS. In this example we are using the printer 'HP Laserjet M5035 MFP'. The following documentation describes for each printer language (PS, PCL5, PCL 6) which Tray Numbers are mapped to the corresponding media source commands. The media source commands are needed in the next steps for creating/adapting the Input Tray mapping in the XDC Files.The Tray Settings are described at page 297 of the Printer Guide for HP Laserjet M5035MFP./bc/docs/support/SupportManual/c00767053/c00767053.pdf.If you want to use Tray 4 for the PostScript format you have to use '4' for the Media position and for Tray 5 you need '38' (see Table below).3. How to identify the printer specific XDC File (several XDC files are already delivered)SAP ships several XDC Files for common printers and printer languages already that can be used for customizing a XDC file. The shipped XDC Files can be found at the NetWeaver (ADS) Server at:<instance>\SYS\global\AdobeDocumentServices\lib\In this example we are using a HP Printer with support for PCL5 (Black and White printers are using for PCL the XDC File 'hppcl5e.xdc') and for Post Script the XDC file 'ps_plain.xdc'. After identifying the right XDC fileit is strongly recommended to copy the file an adapt the file name. The next step is to modify the XDC File with XDC Editor.Further information is available in the XDC Editor Help Documentation (Todo: Link).4. How to get the Adobe XDC EditorThe Adobe XDC Editor is an Eclipse based editor that is available to download from the SAP web site located:(Related Resources -> Downloads -> XDC Editor) and have to be used to adapt your /community/interactive-forms-by-adobeXDC file.Further information is available in the XDC Editor Help Documentation (Todo: Link).5. Create the Tray mappings for a medium type in the XDC file and upload the XDC file to the ADS Server.The next step is to create the mappings for the Input Trays 4 and 5 for the Medium Types 'A4' and 'A4Small'. In Eclipse edit your customized XDC file (in our example my_ps_plain.xdc file) via the editor.Goto File -> Open File and select your copied XDC file. Add the Trays in section 'Input Trays' and add the mappings in the Secion 'Medium to Tray Mappings' like in the screenshot below.The above settings are dependent on the postscript level and are done for PostScript 3 Level. Check in your Printer settings which Post Script level is supported. Dependent on the supported Post Script Level of your printer you should select the coresponding XDC File for that PostScript Level. Select Tab 'Printer Capabilites' in the XDC Editor to check which PostScript Level is defined in the current XDC File (see screenshot below).PostScriptNote: For Formats the Tag DeferredMediaSelection must be set to 'false', so that the customized XDC file will be applied otherwise printer configuration will decide which medium will be selected.Changing the DeferreMediaSelection can be done in the XDC Editor on 'Sequences' Tab.Copy your modified XDC File onto the ADS Server at the same directory next to the other XDC Files. Path:<instance>\SYS\global\AdobeDocumentServices\lib\.Further information is available in the XDC Editor Help Documentation (Todo: Link).6. Configure the printer and a device type for the printer in the ABAP System In Transaction SPAD evaluate which device type is used for your output device (printer). Then copy the device type by putting the cursor in the corresponding line of the list and choosing 'Device type->Create using template' (short key F5) from the menu.Then copy the device (= printer) and choose the new device type (ZPOSTOH in the example below) for the new device.7. Map the XDC File to your printer specific device Type in ABAPStart Transcation SA38 in your ABAP system and start report 'RSPO0022'. Choose Action 'Create/Change XDC Entry' and choose the device Type identified for your printer in SPAD.It is also important to select the target print format (here PS for PostScript). Press F8 and upload your copied and adapted XDC File in the following screen.Execute the program to create the mapping.8. Test your configuration with the test report: FP_TEST_03To test your configuration you can run report FP_TEST_03. The report needs the template name (here: ZGW_TEST_INPUT_TRAY) and the ADS Connection (here: ADS_Bommel).Press F8 to execute the report.At the following screen enter your device type where you mapped the XDC File (here: T540OH) and select 'Print Immediately' and 'New Spoolrequest'.'Click on the 'Print' Button. Start Transaction SP02 to get an overview of your spool requests and see the print status of your print job. the sreenshot below shows that the coresponding spool request no. 19112is currently in process.9. Troubleshooting:Problem: Paper is not selected from the configured Tray in PostScript Format. Please check, if the PostScript Level of the XDC is the same as supported from your printer.PCL PostScript10. Sample XDC files for and for an HP Printer2. XDC-Example to define a specific Output Tray3. XDC-Example to define dublex printing。
妙用word 设置书籍装订式双面打印

妙用word 设置书籍装订式双面打印我打印Word文档做资料的时候,为了节省纸张,常常要把A4纸一面打印两页内容,双面打印后,做成书籍。
按照word自带的双面打印功能,打印出来的页码会乱,肯定不行,所以我在经过一番试验浪费了几张A4纸后,终于都找到了切实可行的办法:1.文件-打印-页码范围填:1,3,5,7,9,11,13,15(依此类推);2.每页的版数:2版;3.按纸张大小缩放:A4;4.确定,打印完后依顺序把纸反过来(第1,3页的要放在最上面,下面依次放好,要注意纸张方向要放对,不然的话打出来就会倒过来了!)放到送纸盒里;5.文件-打印-页码范围填:4,2,8,6,12,10,16,114(依此类推);.每页的版数:2版;7.按纸张大小缩放:A4;8.确定。
这样做的原理就是word在打印页码时,页码范围方框里填写在前的页码会先输出打印,所以在打偶数页时,把第4页放到第2页的前面。
打印出来的结果是正面1,3,反面4,2。
把A4纸对折,从中间裁开,就样就象书本一样第1页的反面为第2页,第3页的反面是第页。
注:裁纸时,我试过割纸刀等,但最好用的就是男人刮胡须的刀片,这样裁出来的纸张边缘非常整齐。
2也谈如何用WORD打印小册子一、文章录入和编辑按照正常方法编辑好文章并存盘(不用考虑页码及页面设置)。
二、在EXCEL中自动生成页码顺序打开EXCEL,在相应的单元格中填入如下公式:C3=A1 D3=1 E3=2 F3=C3-1C4=C3-2向下填充,所需行数应满足页数的需要D4=D3+2向下填充,所需行数应满足页数的需要E4=E3+2向下填充,所需行数应满足页数的需要F4=F3-2向下填充,所需行数应满足页数的需要在A1单元格内填入你的小册子所需要的页数,比如你的小册子做成后共有64页,就在A1中填入64,此时EXCEL就会自动生成对应的页码顺序。
其中左边两列为奇数页(也就是正面)的页码,右边两列为偶数页(也就是反面)的页码(指打印时的正、反面)。
电脑怎么设置为默认打印机打印

电脑怎么设置为默认打印机打印
如果办公室有多台打印机时候,每次打印都会提示我们选择,那么怎么设置为默认打印机呢?下面由小编为你整理了电脑怎么设置默认打印机设备的相关方法,希望对你有帮助!
电脑设置默认打印机方法
1首先是在电脑端左下角点击开始选项,如下图所指示,找到设备和打印机选项:
2点击设备和打印机进入到打印机界面,如下图所指示,打的对勾是说明这个默认的是这款打印机:
3读者可以右击某一款打印机,出现选择为默认打印机选项,如下图所指示。
选择即可改变打印机的默认状态。
相关阅读:电脑常用使用小技巧
如何我们要离开座位,又不想让人看到我们的电脑中的内容或者一些聊天信息的话,可以使用快捷键【Windows+L】键,可以将电脑锁屏。
使用快捷键【ctrl+w】,可以关闭所有的页面,包括浏览器页面和记事本页面等等
如果桌面的图片太多太乱,很难找到“我的电脑或计算机”图标的话,可以使用快捷键【Windows+E】,即可打开资源管理器。
当有人做过来的时候,你不想让人看到你在浏览什么网页的话,可以使用快捷键【Windows+D】,直接返回桌面,一步到位。
想要直接打开电脑自带的录像功能的话,可以使用快捷键【Windows+R】,然后输入【prs.exe】,点击下回车键即可打开录像功能。
如果你想同时打开某些进程,以3D效果的形式打开的话,可以使用快捷键【ctrl+Tab】,可以让页面以3D效果呈现。
想要打开虚拟键盘的话,只需使用快捷键【windows+R 】,然后输入【osk】,即可出现虚拟键盘啦。