NBC维修手册.ppt
维修操作手册

紧缩空气供给系统中的水会带来一些诸如排放气体结冰或冻结的问题,由此致使泵运转不正常或停止运转。能够通过在用户的空气干燥设备上补充利用点空气干燥装置的方式来减少空气供给系统中的水分。那个装置不但能够清除紧缩空气供给系统中的水分,还能够减轻气体结冰和冻结的问题。
进气口和启动注水
启动泵时,将气阀拧开大约1/2"到3/4"。启动注水以后,能够打开气阀以便气流能够增加到需要的程度。若是阀门的开启只增加循环率而不增加流速,说明显现了气蚀现象。这时,少量关闭阀门,使空气流量与泵流量的比值达到最优效率点
3020-050-001润滑器
4空气干燥器
问题解答
可能会显现的问题:
泵不循环
泵循环,但没有流量
泵循环,但流量未达到要求
泵循环似乎不稳固
泵循环似乎震动太大
问题:系统中过大的吸入高度。
纠正方法:若是吸入高度超过20英尺(6米),在大多数情形下用液体充满泵室即可启动泵。
问题:系统过大的正吸入高度。
纠正方法:当液体正吸入高度超过10英尺(3米)时,应安装一个背压装置。
180°F
82°C
-35°F
-37°C
若是要用于特殊用途,请务必参考《Warren Rupp的耐化学品性能图表》
依照设计,SANDPIPER®只能用紧缩空气作为动力。
泵术语说明
S1F型金属·1级设计·球阀
型号
泵品牌
泵尺寸
止回阀
类型
设计级别
过水部件材料
隔膜/
止回阀材料
止回阀底座
非过水部件材料选项
进出口型式
维修&操作手册
WARREN RUPP牌泵
S1F型金属1级设计
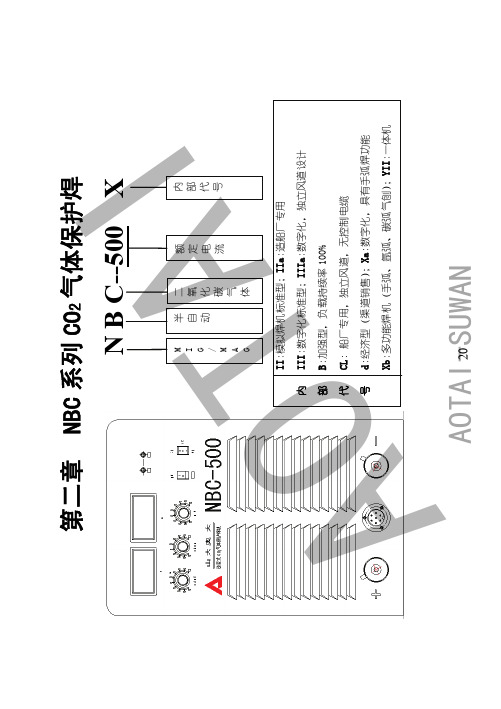
3.NBC速查手册教程
2A-5×20 10A-5×20 2A-6×30
1
350
1
250
2-4
通用
YII、Ⅲa
Ⅲa
II、III
1
630,500B
1
500
1
350
1
250
1
250/350/500
1
630,500B
1
250、280
电容吸收板 220005-00022
1
350
AOTAI-28SUWAN
220005-00007
311029-00055
Φ1.6(诺斯)紫铜
1
AOTAI 六、控制板插头接线 1、主控板
主控板插头 1X1
供电电源
1X2 送丝电机、 电磁阀供电
电源
1X3 送丝机接 口:电机、 电磁阀、开 关、电流电 压给定信号
引脚编号 1 2 3 1 2 3 4 5 6 7 8 1 2
3
4 5 6
接线端
4脚
电源变压 器 T2 的
手动送丝
+
M1
-
+
QN1
送丝机
AOTAI-25SUWAN
四、前面板接线图
1X4:4 1X4:3 1X4:5 1X4:6
正常
1X4:1 1X4:2
L2 L1 保护 工作
气检
41 52 63
丝检
1X8:2 1X8:1
1X8:5
AOTAI A E IN AC9V + + -
1X6:3 1X6:2 1X6:5
2XJ1 2XG1 2XG2 2XJ2 2XJ3 2XG3 2XG4 2XJ4 2X 3:1 2X 3:2
焊接机维修手册

焊接机维修手册一、引言焊接机是用于连接金属材料的工具和设备,它在各个领域都有广泛的应用。
为了确保焊接机的正常运行和延长其使用寿命,本手册将介绍焊接机维修的基本知识和相关操作方法。
二、故障排查与维修1. 电源故障- 插头松动或损坏:检查插头是否牢固连接,如有问题,更换新的插头。
- 电源线断裂:检查电源线是否完好,如发现断裂,应及时更换电源线。
- 电源过载:检查是否连接了额定电流以上的设备,确保不超过焊接机的额定负荷。
2. 焊接电极故障- 电极磨损:检查电极是否磨损,如磨损严重,应更换新的电极。
- 电极松动:检查电极是否牢固固定,如松动,需重新紧固电极。
3. 焊接质量问题- 电流过大或过小:根据焊接材料的特性和焊接要求,调整焊接机的电流大小。
- 焊接时间不足或过长:根据焊接要求和材料特性,调整焊接机的焊接时间。
- 电压不稳定:检查电压供应是否稳定,如发现问题,应及时修复或更换电源。
三、维护与保养1. 清洁焊接机外壳:定期使用柔软的布料擦拭焊接机外壳,保持外观整洁。
2. 罩套保护:对于不常使用的焊接机,可以使用罩套进行遮盖,防止灰尘及湿气进入机器内部。
3. 定期检查电源连接:检查焊接机的电源连接是否牢固,如有松动或损坏,应及时修复。
4. 保持通风良好:确保焊接机周围通风良好,避免过热导致故障。
5. 定期维护:按照生产商的说明书进行定期维护,如更换润滑油、清洗过滤网等。
四、安全注意事项1. 使用防护手套和面罩:在操作焊接机时,务必佩戴防护手套和面罩,以防止火花溅入眼睛和皮肤。
2. 注意周围环境:焊接机操作时,要确保周围没有易燃物品,以免引发火灾。
3. 了解紧急停机装置:熟悉焊接机的紧急停机装置的位置和使用方法,在紧急情况下及时停机。
4. 接地保护:确保焊接机与接地线连接良好,以防止电击等安全事故的发生。
5. 学习使用说明书:在使用焊接机之前,仔细阅读并理解使用说明书,确保正确操作。
五、结论本手册介绍了焊接机维修的基本知识和维护方法,希望能帮助读者解决焊接机故障并保持其正常运行。
焊王-NBC系列说明书

欢迎您使用请仔细阅警告:本机内有危险电压,非专业人员请勿打开机盖!本公司是集焊接切割设备开发设计、生产制造、销售及售后技术服务为一体的专业781005111。
旨,在本行业中位居前列本公司拥有下述几大类产品系列,年生品均通过 “CQC”认证,获得 “3C”本系列的3C 证书编号为:2003010605034220 本公司生产的“焊王”牌产品现有系列: *直流氩 *交直流 *气保护 *直流手*空气等*数控*储能螺柱焊机系列 *埋弧焊机系列 *焊接自动化专机系列 *焊接辅助专用设备系列“焊王”焊机产品!在使用本机之前,读本说明书,并妥善保存,以备查询。
公司简介~~~~~~~~~~~~~~~~~~~~~~~~~~~~公司,已通过德国TUVISO9001质量体系认证,认证号码为:我公司始终贯彻“追求卓越,品质第一”的企业宗,销售及售后服务网络已遍及全国。
产销售万台焊接切割设备。
各系列产认证证书。
NBC 系列CO 2气保焊机弧焊机系列 氩弧焊机系列 焊机系列 工焊机系列离子切割机系列 电阻焊机系列用性能阅读使用说明书。
在害,因此在焊接时作好防护。
详细情况请参考符合生产商事故预防要求的操作人员安全防护指南..按 .在皮肤祼露、戴有湿手套或穿着湿衣服时,禁止接触带电部件或电焊条。
.确.确烟气— .让头部保持在烟气之外。
.在弧光辐射———可能会损坏您的眼睛,灼伤皮肤!.使用合适的焊接面罩和滤光镜,穿上防护服,以保护您的眼睛和身体。
.用火灾.焊噪音 .戴上您的 .警告旁观者,噪音会对其听觉造成潜在伤害。
.如应商或本公司的服务中心取得联系,寻求专业人士的帮助。
靠性接近或达到国际先进水平。
及可在焊机安装\使用前,请认真安全警告!使用焊机过程中,可能会给您和他人造成伤——可能会导致死亡! !照应用标准,安装好接地装置。
保您和地面及工作间是绝缘状态。
认您的工位是安全状态。
——可能会有害健康!弧焊时,使用通风或抽气装置,避免吸入烟气。
维修手册
逆变等离子切割机引弧的问题!非转移弧的比较简单,枪接触工件高频打火引起空气电离,立即产生电弧。
转移弧问题比效复杂;-,先打高频,在枪头产生转移弧,这个转移弧被压缩空气吹向工件引起主弧,所以距离工件5-6毫米就能起弧称为转移弧起弧!目前有二种方法1,转移弧和高频是定时的.即1-2秒后停止。
2,不定时,有主电流后才停止。
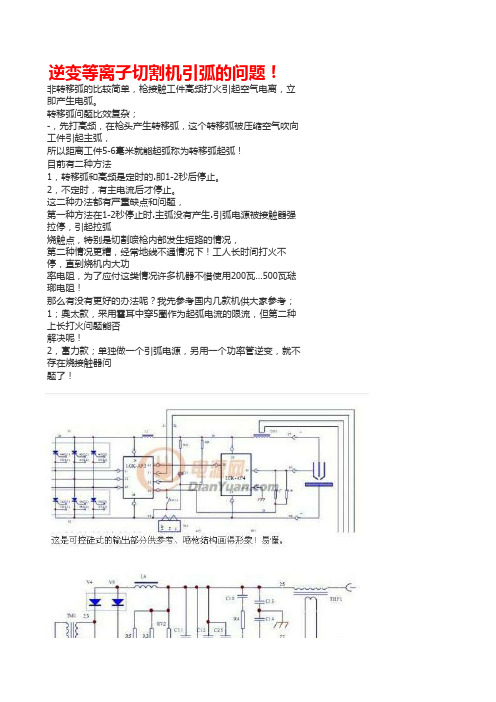
这二种办法都有严重缺点和问题,第一种方法在1-2秒停止时.主弧没有产生.引弧电源被接触器强拉停,引起拉弧烧触点,特别是切割喷枪内部发生短路的情况,第二种情况更糟,经常地线不通情况下!工人长时间打火不停,直到烧机内大功率电阻,为了应付这类情况许多机器不惜使用200瓦…500瓦琺瑯电阻!那么有没有更好的办法呢?我先参考国内几款机供大家参考;1;奧太款,采用霍耳中穿5圈作为起弧电流的限流,但第二种上长打火问题能否解决呢!2,富力款;单独做一个引弧电源,另用一个功率管逆变,就不存在烧接触器问题了!逆变式空气等离子切空气等离子切割机原理它是以高温高速的等离子弧为热源柱和高速气流通过割炬喷嘴小孔时高,将被切割材料局部熔化,并同成狭窄切口。
我公司生产的LGK系列空气等离子切割准JB/T7438-94《空气等离子弧切割机相电源,无需昂贵的气体,就能对不种金属材料进行切割作业,具有切割成本低廉等特点,所涉及的领域比氧可广泛用于造船、机动车化、厨具等设备生产的板材下料和装组成及结构特点:●切割机主要由三相变压器、控制变压、程序控制电路、高频引弧器、气路器。
切割机的输出外特性为下降特性量和割炬的使用寿命。
切割机配以相成一个完整的切割系统。
接通电源,●主机采用电子无触点开关程控电路、。
●切割机内装有温度继电器,当用户超温度太高时,温度保护器会自动切断坏。
●切割机底盘装有四只滚轮,可以很方和装运。
操作步骤:★启动空气压缩机,待压需气压。
★打开切割机电源开关,再次调准减压阀的气压,一般LGK-40 0.4MPa,LGK-100型气压为0.5MPa,★按焊枪开关,应有气体LGK-0.5-1S,释放割炬开关后气体应有一段★引弧切割时,应从工件先开一小孔,再从小孔的边缘开始引★LGK-40和63型的割炬为接触式的。
NBC维修手册(精)

焊枪接口
导电铜头 入口导 丝管
压丝轮
压臂
出口导丝管 中间导 丝管 送丝轮
导丝嘴 卡簧
2
山大奥太
山东山大奥太电气有限公司
7
+
6.1c 遥控盒接线图: 送丝机
+
1
丝 电 机 DJ 送 磁 阀 DF 电
-
6 1 2 2 5 3 4 6
+
遥控盒
S1
手 动送 丝
R1 Z1 1 0K 1 W /7. 5 V V1 R2 2 W /20 0Ω
山大奥太
山东山大奥太电气有限公司
电流调 整Ri 电压调 整Rv
6.1a 单驱送丝机结构:
遥控盒 YKH 加压手柄
松下2 芯插座 出气嘴
焊枪接口
压臂 铝本体
手动送 丝S1
矫正轮
矫正支座 送丝电 机DJ 电磁 阀DF
导丝嘴
送丝轮
矫正手轮
1
山大奥太
山东山大奥太电气有限公司
6.1b 欧式双驱送丝机结构:
遥控盒 YKH 压丝手柄
控制插头
焊枪接口
5
山大奥太
山东山大奥太电气有限公司
7.2 欧式气保焊枪:
欧式气冷焊枪
欧式水冷焊枪
导电嘴等 配件
回水管 控制电极1 控制电极2 进气接头 进水管 进丝通道
6
山大奥太
山东山大奥太电气有限公司
7.3 送丝软管:
特氟龙软管
钢丝软管
松下式
欧式
7
KC
控制插头
3
S2
焊 枪开 关
4 00 7
Rv 电 压调 整
4
V2
4 00 7
美国汽车品牌的车辆维修手册说明书
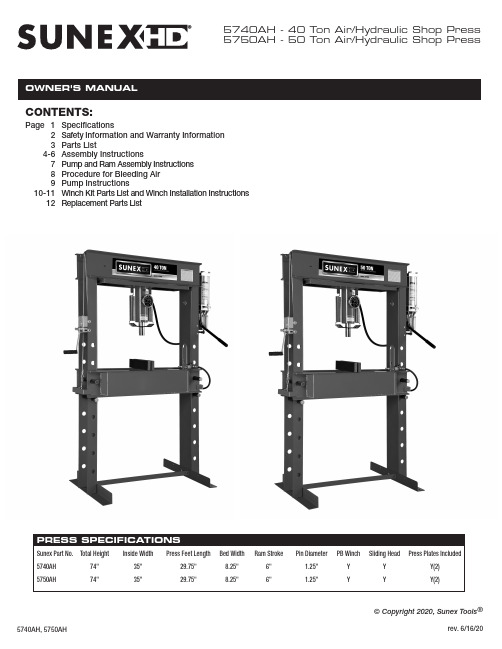
5740AH - 40 Ton Air/Hydraulic Shop Press 5750AH - 50 Ton Air/Hydraulic Shop PressCONTENTS:Page 1Specifications2Safety Information and Warranty Information 3Parts List4-6Assembly Instructions789Pump and Ram Assembly Instructions Procedure for Bleeding Air Pump Instructions10-11Winch Kit Parts List and Winch Installation Instructions 12Replacement Parts List© Copyright 2020, Sunex Tools ®SAFETY INFORMATIONThis symbol alerts you to the possibility of serious injury or death if instructions are not followed.This symbol alerts you to the possibility of damage to or destruction of equipment if instructions are not followed.Failure to heed these warnings may result in lossof load, damage to the press and/or failure resulting in property damage, personal or fatal injury. Thisoperating manual contains important details concern-ing the safe operation of this tool. The user must read and understand these details before any use of the tool. This manual must be retained for future reference.• Read, study, understand and follow all instructions before operating this press.• Always wear safety goggles, (users and bystanders).•Parts being pressed may splinter, shatter, or be ejected from the press at a dangerous rate of speed. Because there are a variety of press applications, it is the responsibility of the press owner to provide adequate guards, eye protection and protective clothing to the press operator.• Visual inspection of the press should be made before use, checking for signs of cracked welds, bent bed pins, loose or missing bolts, leaks, or any other structural damage. Corrections must be made before using the press.•Do not go near leaks. High pressure hydraulic uid can puncture skin and cause serious injury,gangrene, or death. If injured, seek emergency medical help as immediate surgery is required to remove the uid.• Prior to use make sure the press is securely anchored to a concrete oor.•Keep hands, arms, feet, and legs out of work area. Accidental slippage can result in personal injury.• Always use an accurate force gauge to measure pressing force.• Do not exceed the rated capacity or tamper with the pressure/force settings. When attachments and adapters are used the rated capacity of the system shall be no greater than the rated capacity of the lowest rated component or combination of components that make up the system. • Avoid off-center loads. Offset loads can damage ram and may cause load to eject at a dangerous rate of speed. Do not use any spacer or extender between the press ram plunger and the item being pressed. If there is not enough ram stroke, adjust the height of the movable bolster.•Remove all loads from movable bolster before attempting to adjust bolster height. Beware of possible falling bolster.•Press only on loads supported by movable bolster and press plates included. Do not support loads on oor or press frame legs.• When using any accessories such as press plates or arbor plates, be certain they are centered on the movable bolster and in full contact with both sides of the bolster.• Before applying load, be certain all movable bolster supporting pins are fully engaged. Verify lift cables (if equipped) are slack before pressing on the bolster.• Always use a bearing shield when pressing bearings.•Use caution when positioning work to be pressed to ensure the item to be pressed cannot be ejected at a dangerous rate of speed.• Release hydraulic pressure before loosening any ttings.• Maintain proper hydraulic uid levels.• Do not make any alterations or modi cations to the press.•This product may contain one or more chemicals known to the State of California to cause cancer and birth defects or other reproductive harm. Wash hands thoroughly after handling.•Failure to heed and understand these markings may result in serious or fatal personal injury and/or property damage.OWNER/USER RESPONSIBILITYThe owner and/or user must have an understanding of the manufacturer'soperating instructions and warnings before using this press. Personnel involvedin the use and operation of equipment shall be careful, competent, trained,and quali ed in the safe operation of the equipment and its proper use whenservicing motor vehicles and their components. Warning information shouldbe emphasized and understood.If the operator is not uent in English, the manufacturer's instructions andwarnings shall be read to and discussed with the operator in the operator'snative language by the purchaser/owner, making sure that the operatorcomprehends its contents.Owner and/or user must study and maintain for future reference the manufactur-er’s instructions. Owner and/or user is responsible for keeping all warning labels and instruction manuals legible and intact. Replacement labels and literature are available from the manufacturers.INSPECTIONVisual inspection of the shop press should be made before each use of the press, checking for damaged, loose or missing parts. Each press must be inspected by a manufacturer’s repair facility immediately, if subjected to an abnormal load or shock. Any press which appears to be damaged in any way, is found to be badly worn, or operates abnormally must be removed fromservice until necessary repairs are made by a manufacturers's authorized repair facility. It is recommended that an annual inspection of the press be made by a manufacturer’s authorized repair facility and that any defective parts, decals or warning labels be replaced with manufacturer’s speci ed parts. A list of authorized repair facilities is available from the manufacturer.SAFETY INSTRUCTIONS•CHECK YOUR LOCAL, STATE AND FEDERAL REGULATIONSREGARDING THE SAFE USE OF THIS EQUIPMENT.•Your safety is top priority. Please handle equipment with care.•Fully retract unit and remove all items from the press bed frame.•Support the press bed, and remove the pins.•Raise or lower bed to desired height and reinstall press pins. Be certainpins are fully engaged in the parallel anges of the upright columns.•Position press on a at, level, hard surface, preferably concrete.Make sure all nuts and bolts are tight.•Clear the area of bystanders, especially small children, before using.•Set the press bed to the required height. The press is most effectivewhen the work piece is located 1 inch below the ram’s retracted position.The compression stroke can include the entire 5 inch working range.•The press is designed to exert a force on anything which is positionedbeneath its ram. The work piece can pop out from under the ram at a high rate of speed and injure someone.•Pressing Bearings: It is essential that you use the bearing shield whenpressing bearings on or off.LIMITED WARRANTY:SUNEX INTERNATIONAL, INC. WARRANTS TO ITS CUSTOMERS THAT THE COMPANY’S SUNEX TOOLS ® BRANDED PRODUCTS ARE FREE FROM DEFECTS IN WORKMANSHIP AND MATERIALS.Sunex International, Inc. will repair or replace its Sunex T ools ® branded products which fail to give satisfactory service due to defective workmanship or materials, based upon the terms and conditions of the following described warranty plans attributed to that speci c product. This product carries a ONE-YEAR warranty. During this warranty period, Sunex T ools ® will repair or replace at our option any part or unit which proves to be defective in material or workmanship. Other important warranty information....This warranty does not cover damage to equipment or tools arising fromalteration, abuse, misuse, damage and does not cover any repairs or replace-ment made by anyone other than Sunex Tools ® or its authorized warranty service centers. The foregoing obligation is Sunex Tools ®’ sole liability under this or any implied warranty and under no circumstances shall we be liable for any incidental or consequential damages. Note: Some states do not allow the exclusion or limitation of incidental or consequential damages, so the abovelimitation or exclusion may not apply to you. Return equipment or parts to Sunex Tools ®, transportation prepaid. Be certain to include your name and address, evidence of the purchase date, and description of the suspected defect.If you have any questions about warranty service, please write to Sunex Tools ®.This warranty gives you speci c legal rights and you may also have other rightswhich vary from state to state. Repair kits and replacement parts are available for many of Sunex Tools ® products regardless of whether or not the product is still covered by a warranty plan.SHIPPING ADDRESS: MAILING ADDRESS:Sunex Tools Sunex Tools 315 Hawkins Rd. P .O. Box 4215Travelers Rest, South Carolina 29690 Greenville, South Carolina 29608THIS OPERATING MANUAL CONTAINS IMPORTANT SAFETY INFORMATION. READ CAREFULLY AND UNDERSTAND ALL INFORMATION BEFORE OPERATING THIS TOOL. SAVE THIS MANUAL FOR FUTURE USE.WARNING: This product can expose you to chemicals including nickel, which is known to the State of California to cause cancer and birth defects or other reproductive harm.For more information go to .Press Frame - 1Press Bed - 1Press Feet - 2Z Bar - 11/2"-13 x 1-1/2" Hex Head Bolts - 101/2" Nuts - 10Air MotorPump and Ram - 1Pump Extension Handle - 11" x 3" x 14"Press Plates - 2Accessory only -Not needed for assemblyPushing Adapter - 1Accessory only -Not needed for assemblyBearing Shield - 1Accessory only -Not needed for assemblyESTIMATED ASSEMBLY TIME: 30 MINUTESACCESSORIESASSEMBL CONTINUEDPUMP AND RAM ASSEMBL Y INSTRUCTIONSPROCEDURE FOR BLEEDING AIRPUMP INSTRUCTIONSWINCH INSTALLATION INSTRUCTIONS CONTINUED。
特种设备维修手册

特种设备维修手册介绍本手册旨在提供特种设备维修的指导和技术支持。
特种设备维修是一项复杂的任务,需要经验丰富的技术人员来进行操作。
本手册将介绍特种设备的基本维修知识、常见故障排除方法以及安全操作规范。
特种设备分类特种设备包括但不限于电梯、起重机械、锅炉、压力等。
针对不同的特种设备,维修工作也会有所不同。
在进行维修前,需要明确特种设备的分类和特点,以便有针对性地进行维修工作。
维修工作流程1. 故障检测与分析:通过仔细观察和检测,确定特种设备的故障原因。
可以采用传统的检查方法,如目测、听觉、手触等,也可以结合现代技术,如红外热像仪、振动分析仪等。
2. 故障排除与维修:根据故障分析的结果,确定相应的维修方案并执行。
维修过程中应注意安全操作,遵循相关的操作规程和标准。
3. 维修记录与报告:在维修过程中,需将关键信息、操作步骤、维修结果等进行记录,以备后续参考和报告使用。
常见故障排除方法1. 电气故障:通过测量电阻、电压和电流等参数,确定电气部件的工作状态。
对于损坏的电气元件,需要进行更换或修复。
2. 机械故障:通过观察运动部件的工作情况,检查是否存在卡滞、摩擦或磨损等问题。
对于机械故障,需要进行润滑、校准和更换零部件等维修工作。
3. 液压故障:检查液压系统的压力、流量和泄漏情况,判断是否存在泄露、管路堵塞或液压元件损坏等问题。
对于液压故障,需要进行相应的维修和调试。
4. 控制系统故障:通过检查控制系统的电路、传感器和执行机构等部分,确定是否存在连接问题、信号异常或设备程序错误等情况。
对于控制系统故障,需要进行故障排查和重编程等操作。
安全操作规范1. 操作前需确认设备处于停机状态,并采取安全措施,如拉闸、断电等。
2. 在进行维修工作时,需佩戴适当的个人防护装备,如安全帽、防护眼镜、防护手套等,以保障人身安全。
3. 严禁在未经许可的情况下进行设备改装或拆解,以避免可能的安全隐患。
4. 在维修过程中,需保持工作区域整洁,避免杂物堆积和滑倒等事故发生。
- 1、下载文档前请自行甄别文档内容的完整性,平台不提供额外的编辑、内容补充、找答案等附加服务。
- 2、"仅部分预览"的文档,不可在线预览部分如存在完整性等问题,可反馈申请退款(可完整预览的文档不适用该条件!)。
- 3、如文档侵犯您的权益,请联系客服反馈,我们会尽快为您处理(人工客服工作时间:9:00-18:30)。
4 00 7
Rv 电压调整
4
V2
4 00 7
Ri 电流调整
5
1
6
KC
控制插头
2
5
34
注意:早期的遥控盒无Z1和R2,若使用在新焊机上,可能会导致点动送丝不起作用。 3
山东山大奥太电气有限公司
山大奥太
7 气保焊枪
4
山东山大奥太电气有限公司
山大奥太
7.1 松下式气保焊枪:
导电嘴等 配件
气接头
控制插头
山东山大奥太电气有限公司
山大奥太
6.1a 单驱送丝机结构:
遥控盒 YKH
加压手柄
电流调 整Ri
松下2 芯插座 出气嘴
铝本体
焊枪接口 压臂
矫正轮 矫正支座 导丝嘴 送丝轮 矫正手轮
送丝电 机DJ
1
电压调 整Rv
手动送 丝S1
电磁 阀DF
山东山大奥太电气有限公司
山大奥太
6.1b 欧式双驱送丝机结构:
遥控盒 YKH
焊枪接口
5
山东山大奥太电气有限公司
山大奥太
7.2 欧式气保焊枪:
欧式气冷焊枪 欧式水冷焊枪
导电嘴等 配件
回水管 控制电极1 控制电极2 进气接头
进水管
6
进丝通道
山东山大奥太电气有限公司
山大奥太
7.3 送丝软管:
特氟龙软管 钢丝软管 欧式
7
松下式
压丝手柄 焊枪接口
导电铜头
压臂 出口导丝管
导卡丝簧嘴
2
压丝轮
中间导 丝管
送丝轮
入口导 丝管
山东山大奥太电气有限公司
山大奥太
6.1c 遥控盒送接丝线机 图:
7
+
1
+
DJ 送丝电机ຫໍສະໝຸດ --6-DF 电磁阀
+
2
遥控盒
S2
焊枪开关
R1
3
S1
手动送丝
Z1
1 0K
R2
1 W/7 .5 V 2 W/2 0 0 Ω
V1