Prohear 平台操作指南
Domino Pro 无线个人听力辅助系统(专业版)说明书
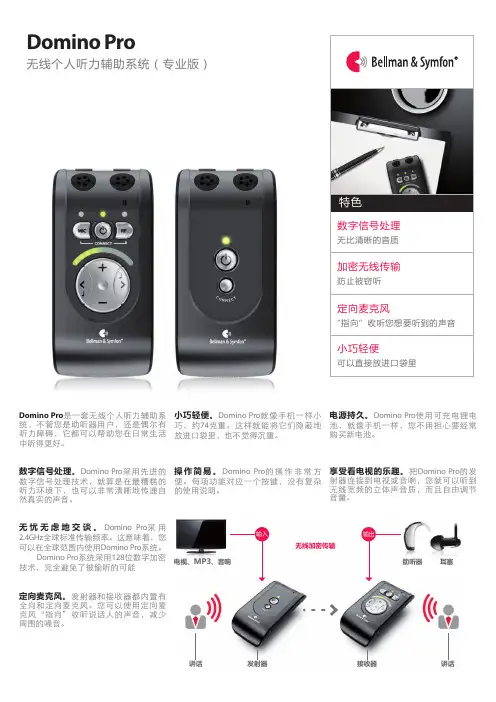
Domino Pro无线个人听力辅助系统(专业版)数字信号处理。
Domino Pro 采用先进的数字信号处理技术,就算是在最糟糕的听力环境下,也可以非常清晰地传递自然真实的声音。
无忧无虑地交谈。
Domino Pro 采用2.4GHz 全球标准传输频率。
这意味着,您可以在全球范围内使用Domino Pro 系统。
Domino Pro 系统采用128位数字加密技术,完全避免了被偷听的可能定向麦克风。
发射器和接收器都内置有全向和定向麦克风。
您可以使用定向麦克风“指向”收听说话人的声音,减少周围的噪音。
操作简易。
Domino Pro 便。
每项功能对应一个按键,没有复杂的使用说明。
的操作非常方Domino Pro 是一套无线个人听力辅助系统,不管您是助听器用户,还是偶尔有听力障碍,它都可以帮助您在日常生活中听得更好。
小巧轻便。
Domino Pro 巧,约74放进口袋里,也不觉得沉重。
就像手机一样小克重。
这样就能将它们隐蔽地电源持久。
Domino Pro 池,就像手机一样,您不用担心要经常购买新电池。
使用可充电锂电享受看电视的乐趣。
把的发射器连接到电视或音响,您就可以听到无线宽频的立体声音质,而且自由调节音量。
Domino Pro 电视、MP3、音响无线加密传输耳塞讲话发射器接收器讲话输入输出技术规格尺寸和重量高:3.9英寸(99毫米)宽:1.9英寸(48米)厚:0.9英寸(22米)重量:2.5 盎司74 克毫毫()产品包装包含您通常情况下使用BE8005 Domino Pro所需的配件,都包含在这个包装盒里BE2210接收器和BE2230发射器BE9142 USB通用充电器,包括4个主要插头BE9135 有安全扣的挂颈绳BE9124 入耳式立体声耳塞BE9141 精美旅行包BE9136领夹麦克风BE9137 音频转换线,1.2米,带3.5mm接口转换头和电视莲花头转换头使用说明书和快速操作指引也可选配BE9159 电感颈圈(配合助听器T档使用)接收器按键和调控音调音量内置麦克风选择开关麦克风耳机输出选择发射器音量、音调指示灯充电接口发射器按键和调控与接收器配对LED指示灯麦克风音频线接口开关充电接口满足所有需求的配件BE2210接收器BE9122立体声耳机BE9124立体声耳塞BE9125下挂式耳塞BE9136领夹麦克风BE9137音频转换线,1.2米,带3.5mm接口转换头和电视莲花头转换头B E9159电感颈圈输入信号麦克风:发射器和接收器都内置有全向及定向外部声源接入:2.5mm立体声插头信号0 dBV(最大输入)输出信号耳机接口:3.5mm立体声接口失真:0.05% THD电子频率:40 - 10 000赫兹音调控制:9级音量控制:9,截至频率1.6 kHz输出功率:100mW (16 Ω 负载)()级电源和电池接收器和发射器都内置可充电锂电池工作时间:8-12小时 (标准电池)充电时间:2.5小时(标准电池)无线电传输传输频率:2.4GHz,3频道传输距离:室内25米(直线距离),室外100米()特点:加密传输自动搜索频道可与其它无线电发射器共存使用2.4 GHz频率传输直线距离声学规格使用BE9124耳塞最大输出:132dB SPL使用BE9124耳塞最大增量(60 dB SPL 输入信号):57,5 dB @ 1kHz 56 dB HFA失真:使用BE9124:0.08 % THD使用BE9122:0.6 % THD操作环境需求环境温度:32 ° - 95 °华氏度(0° 到35 °摄氏度相对湿度:5% - 95% (非冷凝))监管认证产品已通过以下认证:CE, FCC, RoHS, WEEE, C-Tick UL, NCC,0.9英寸(22毫米)1.9英寸(48毫米)1.9英寸(48毫米)3.9英寸(99毫米)Bellman 和 Bellman & Symfon 是注册商标,由Bellman &Symfon AB所拥有并保留所有权利。
Sennheiser HeadSetup Pro Manager说明书

HeadSetup™ Pro ManagerKeep in touch with yourbusinessHeadSetup™ Pro Manager is a power f ul cloud- based IT Management solu t ion to manage, up d ate and configure settings for Sennheiser headsets and speakerphones in your company.Put an end to time-consuming manual headset updates and lengthy reporting, with a simple, secure and flexible tool that you can use anywhere.Save your company hours of valuable work time and free up IT resources by managing your resources effectively, improving productivity while minimizing downtime and workflow disruption.KEY FEATURES–Simplicity – Manage, update and configure your Sennheiser audio devices from one location–Easy mass deployment – Smooth roll out of new Sennheiser headsets and speakerphones on more locations–Inventory control – Full visibility of your headset andspeakerphone inventory including non-Sennheiser devices –Report function – Extract reports on device mix, headset usage and gain insight into your company’s UC environment –Fast overview – See active/inactive devices as well as firmware versions and settings–Save time – Push new updates and settings to an unlimited number of headset users across your organization–Flexibility – Schedule updates to cause minimum downtime and get access to update status to ensure a successful roll out–Control settings – Centrally push configurations or lock specific settings on all or selected devices to comply with company policies and regulatory compliance settings–High security – All communication to the HeadSetup™ Pro client is encrypted and no sensitive data is stored–Responsive web design – Access the tool from any device (optimized for PC, laptop and tablet)Technical DataSennheiser USB devices supported Culture Series SC 30 USB CTRL / SC 60 USB CTRL, SC 30 USB ML / SC 60 USB MLCulture Plus Series SC 40 USB CTRL / SC 70 USB CTRL, SC 40 USB MS / SC 70 USB MS, SC 45 USB CTRL / SC 75 USB CTRL, SC 45 USB MS / SC 75 USB MSSC 100 Series SC 130 USB/SC 160 USB, SC 130 USB-C/SC 160 USB-C, SC 135 USB/SC 165 USB, SC 135 USB-C/SC 165 USB-CCircle Series SC 230 USB / SC 260 USB, SC 230 USB CTRL II / SC 260 USB CTRL II, SC 230 USB MS II / SC 260 USB MS IICentury Series SC 630 USB CTRL / SC 660 USB CTRL, SC 630 USB ML / SC 660 USB ML, SC 635 USB/ SC 665 USB MB Series MB Pro 1 UC / MB Pro 2 UC, MB Pro 1 UC ML / MB Pro 2 UC ML, MB 660 UC / MB 660 UC MS PRESENCE Series PRESENCE UC / PRESENCE UC ML, PRESENCE Grey UCSDW 5000 Series SDW 5016/SDW 5013, SDW 5036/SDW 5033, SDW 5066/SDW 5063DW Series DW Office / DW Office ML / DW Office USB / DW Office USB ML, DW Pro 1 / DW Pro 1 ML / DW Pro 1 USB / DW Pro 1 USB ML, DW Pro 2 / DW Pro 2 ML / DW Pro 2 USB / DW Pro 2 USB ML SD Series*SD Office / SD Office ML, SD Pro 1 / SD Pro 1 ML, SD Pro 2 / SD Pro 2 ML D 10 Series D 10 USB / D 10 USB MLSP Series SP 10, SP 10 ML, SP 20, SP 20 ML, SP 220 UC, SP 220 MS, SP 30Dongles BTD 800 USB / BTD 800 USB ML Busy lightUI 20 BL USBIT deployment toolHeadSetup™ Pro Manager is compatible with standard deployment tools supporting MSI & EXE software deployments such as Microsoft® System Center Configuration Microsoft® System Center OperationsIT admin PC requirementsHeadSetup™ Pro Manager is compatible with standard web browsers such as Internet Explorer (IE) 10, Internet Explorer (IE) 11, Google Chrome Mozilla Firefox, Safari (Mac OS)End-user PC requirementsTo run the HeadSetup™ Pro clientapplication on end-user PC´s, the PC must meet the following minimum requirements Microsoft Windows 7 or higherProcessor: minimum 1.6 gigahertz (GHz)RAM: 2 GB (64-bit) Hard disk space: 500 MBPrivacy Policy GDPR Compliant. For more info, check the license agreementSecurityFor improved security, the following precautions are metAll network traffic between the solution entities is secured using TLS1.2 with 256-bit AES encryption. All data stored in the cloud by the IT administrator is encrypted using 256-bit AES. Only end-users with a company unique key file installed can be enrolled into the system.1525 06-19HeadSetup Pro Manager Software license Art. no.EAN no.UPC no.Up to 50 users 50837040 44155 24688 9 6 15104 33359 8Up to 100 users 50837140 44155 24689 6 6 15104 33361 1Up to 200 users 50830040 44155 23808 2 6 15104 31531 0Up to 500 users 50830140 44155 23809 9 6 15104 31532 7Up to 1.000 users 50830240 44155 23810 5 6 15104 31533 4Up to 2.200 users 50830340 44155 23811 2 6 15104 31534 1Up to 11.000 users 50830440 44155 23812 9 6 15104 31535 8+11.000 users50830540 44155 23813 66 15104 31536 5(12 month subscription/1 account)*SD Series available in Americas onlyHeadSetup™ Pro ManagerFACT SHEET。
Sennheiser HeadSetup Pro 用户指南说明书

Sennheiser HeadSetup ™ Pro END-USER MANUALContent1. Introduction 4 1.1 Product overview 4 1.2 Scope of the document 4 1.3 Intended audience of this document 42. System requirement 4 2.1 Hardware requirement 4 2.2 Operating system requirements 4 2.3 Device service 43. Installing Sennheiser HeadSetup™ Pro 5 3.1 Installed by IT administrator 5 3.2 Manual installation by the end-user 54. Getting started 6 4.1 Home 7 4.2 Details 8 4.3 Updates 8 4.4 Settings 10 4.5 Options 134.6 System Tray Options 145. Uninstalling Sennheiser HeadSetup™ Pro 15 5.1 Uninstalling using the control panel 15 5.2 Uninstalling using the setup file 151. Introduction1.1 Product overviewSennheiser HeadSetup™ Pro is an easy to use desktop application that enables an end-user to keep Sennheiser UC devices connected to the PC and updated with the latest available firmware.It is a plug and play solution that interfaces with Sennheiser USB audio devices seamlessly with a range of softphones via the embedded drivers.Personal settings need to be configured when running the application for the first time. Thereafter, Sennheiser HeadSetup™ Pro ensures that your headset interfaces with the softphone seamlessly.The device firmware, software and settings available in Sennheiser HeadSetup™ Pro are deployed by the IT administrator in the company.1.2 Scope of the documentThis document provides installation steps and a description of functionalities available in the desktop application Sennheiser HeadSetup™ Pro.1.3 Intended audience of this documentThe Sennheiser HeadSetup™ Pro Guide is intended for end-users.2. System requirement2.1 Hardware requirementTo run the Sennheiser HeadSetup™ Pro application, your computer must meet the following minimum requirements:– P rocessor: Minimum 1.6 gigahertz (GHz) or faster processor– R AM: 2 gigabytes (GB) RAM– H ard disk space: 500 MB2.2 Operating system requirementsWindows operating systems Win7 and newer are supported.2.3 Device serviceFor the IT administrator to be able to deploy updates and perform asset management to the end-users, the Sennheiser HeadSetup™ Pro application must be running in the background on an end-user PC.The Sennheiser HeadSetup™ Pro will run in the background and monitor for any connected Sennheiser devices.3. I nstalling Sennheiser HeadSetup™ Pro3.1 Installed by an IT administratorThe most common way of having Sennheiser HeadSetup™ Pro installed onto an end-user PC is via remote installation by the company’s IT administrator. If you have Sennheiser HeadSetup™ Pro remotely installed on your computer, you just need to start up the software Sennheiser HeadSetup™ Pro (a shortcut to the application will be present on the desktop). Sennheiser HeadSetup™ Pro will automatically be started when the PC is booted. Note: I f the remote machine already has Sennheiser HeadSetup™ installed, please ensure to uninstall Sennheiser HeadSetup™before deploying the Sennheiser HeadSetup™ Pro.3.2 Manual installation by the end-userIf you are requested by an IT administrator to manually install Sennheiser’s HeadSetup™ Pro, the Sennheiser HeadSetup™ Pro installer and a file named TenantConfiguration.dat will be provided to you. The files should be placed in same folder.If you are a freeware user then you get the Sennheiser HeadSetup™ Pro installer from the Sennheiser website.Step 1:Right click on the setup icon and select “Run as administrator.”Step 2:If asked for permission to make changes to your system, accept by clicking “OK.” Step 3:Select your preferred language for Sennheiser HeadSetup™ Pro.Step 4:W hen the Sennheiser HeadSetup™ Pro Welcome window of the installation wizard appears, click “Next.”Step 5:A license agreement page will appear. Read it and if acceptable, Click “Accept”and “Next.”Step 6: A ready to install page will appear. Click “Install” to start the installation.Step 7:W hen the “Installation completed” window appears, remember to select the create shortcut to create an icon on the desktop. Click “Finish” to closeStep 8:I f asked for uninstall Sennheiser HeadSetup™ in order to proceed with the installation of Sennheiser HeadSetup™ Pro, then please uninstall Sennheiser HeadSetup™ andtry to install Sennheiser HeadSetup™ Pro again.4. Getting startedSennheiser HeadSetup™ Pro can be started from a shortcut located on your desktop, or from the start menu. The application will automatically be started when your PC is booted, and will keep running in the background until closed. It is advised not to close the application for the IT administrator to be able to administer devices, end-users and the application itself..When Sennheiser HeadSetup™ Pro is running, it can be accessed by right-clicking the application icon located in the notification bar.Double click on the icon to view the application or right click on the Sennheiser icon and select “Open.”The following menus are available in Sennheiser HeadSetup™ Pro:– Home– Details– Updates– Settings– OptionsClicking either or icons in the top-right corner of the application will hide the window.To exit the application, select “Exit” in the menu “Options.”4.1 HomeThe home tab in the application will display information of the devices that are connected to the PC.If no devices are connected to the USB port, the “Home” window will only display the Sennheiser HeadSetup™ Pro application information.If a Sennheiser supported device is connected to the PC via a USB port, the connected device and its connected Sennheiser devices will be shown and product information will be displayed.”The multiple device widgets view of connected devices will help you to manage updates efficiently. The number of shown subjects per page is set to a maximum of four devices. If the number exceeds four, navigation arrows will help you to view additional connected devices and their respective options.Each device shown has a “Details” button. This will lead to detailed information about the device.If an update to a device is available, an update icon appears in the widget accompanied with this symbol.It is possible to set the default headset to be used for communications in the home / Details page by selecting the checkbox of Default Headset.”4.2 DetailsIn the menu “Details” a detailed product description for each connnected device is shown. In case of SDW, DW, SD and D 10 base stations and BTD 800 dongle, i nformation related to the connected headsets is also shown.For additional device information, click the URL in the details page, which will access the latest available device information at /cco4.3 UpdatesIn the menu “Updates” all connected devices are listed together with a status about the installed firmware and available updates. Sennheiser HeadSetup™ Pro will periodically perform a check to identify if your IT administrator has released an update for a device. If so, the update button will next to the relevant device become active.The IT administrator can choose to deploy a “Forced Update”an important update will be performed immediately. A popup box will inform you that an important update to a device is about to be performed. If a call is active, the user can choose to postpone the update up to three times.If the update is accepted, possible active calls will be terminated and the update will be executed.New Version Release Notes 3.0.456893 3.0.5 Notes 1.0.93 1.2 Notes Up to date Notes Up to date Notes Any active call will be disconnected.Continue the update?The IT administrator can also choose to deploy a “Silent Update” for device firmware’s only, to ensure that an update will be performed in the background, even when the user logs off from the machine.Note: T he following warning window will appear if you try to update a Bluetooth devicelike Sennheiser PRESENCE™ not connected to an USB port using a USB cable.Installed Version File Name DW Pro 2 3.1.0 Select Firmware....BTD 800 USB ML 1.2.452 Select Firmware...PRESENCE™ UC 2.8.3548 2.9.0DW Pro 2 1.2.79 Select Firmware...Browse...Browse...Home Details Updates Settings Please connect the device to the USB Portusing a cable and power off the device.Continue Cancel 9SENNHEISER HEADSETUP™ PRO – END-USER MANUALInstalled Version New Version Release Notes 3.0.456893 3.0.5 Notes1.0.93 1.2 Notes2.8.3548 Up to date Notes1.2.79 Up to date NotesMultiple wired devices detected.Ensure that only one wired device to be updated is connected.OK 4.4 SettingsIn the menu “Options,” it is possible to access settings available in the application. The Settings tab in the application displays the information about the configuration of the Sennheiser devices connected to the PC.If Tenant Admin deploy any configuration to Sennheiser devices, then those configura-tions will be applied for the corresponding devices and shown in the Settings tab.Tenant Admin can choose the preference of the features while deploying configuration – T enant preference configuration feature is always disabled and user can’t change those features.– U ser preference configuration feature is always enabled and end user can change those features according to his/her preference and can click on the Save button to apply those features to the device.The end-user also has an option to restore the configuration to default settings. This can be achieved by clicking on the Restore default button.Sennheiser HeadSetup™ Pro also supports an additional feature under “Settings” tab with the separate tab called ‘Softphone’. The user can select his default headset/softphone,ON/OFF pause media, configure Windows sound, audio settings, etc.The settings are enabled with no devices connected and loaded with default softphone tab which provides the way to set the default headset and default softphone.Softphone tab Features–Default HeadSet - This drop-down box lists all the connected USB headsets. The selection here determines which headset to use for communication. You can select the headset and make it a default headset by clicking the Save button.–Default soft phone for outgoing calls – This drop-down box lists all the supported softphones installed on the computer. The selection sets the default softphone, which will be used for making outgoing calls.–Disable headset call control – Check Disable Call Control box and click on the Save button to enable this feature. When enabled, call control from the default headset will be used only for Microsoft Office Communicator. This feature will not be available if Microsoft Office Communicator is not installed and running.– D isable Call Control option will be hidden when the headset supports the dual soft-phone feature–Pause Media – Controls the function of media players when receiving a softphone call –Always Audio – Enable audio link so that audio can be transferred to the headset regardless of whether a call is active on the softphone.–Windows Sound and Audio Settings – Clicking the Configure button opens the Windows audio device control panel. This control panel allows you to change default audio input and audio output devices to play sounds. This option is helpful for supported softphones that use Windows default audio input and audio output devices to play sounds.–Warning message for non-dual softphone – the headset will inform the user if the selected default headset is not supporting the Dual softphone feature.Note: W ith SDW 5000 Series as Default HeadSet, User can view Additional Configuration “Softphone Integration”This is a support for Busy Light Integration with Softphone status and busy indication in SoftphoneOn Setting Busy light option to enable. Busy light integration option is displayed which has following options,1. Manuala. Red – User can set the Busy Light to Busy Statusb. Yellow – User can set the Busy Light to Away Statusc. Green – User can set the Busy Light to Available Status2. S oftphone Integration – Current Softphone status (Busy, Away & Available) will be applied on the Busy Light3. H eadset Integration only – with settings, SDW 5000 series device will determine the status of Busy Light4. Off – Turns Off the Busy LightHeadSet Sync Status – Enable/Disable the synchronization of the busy state of the headset to the softphoneMute Notification – Enable/Disable a notification in case speak is detected while you are on mute.Transfer Cal l – Enable/Disable call transfer to mobile phone functionality. This can be triggered by holding smart button on SDW base station or clicking on Transfer Call button Currently Transfer Call functionality is supported with Skype for Business/Microsoft Lync4.5 OptionsIn the menu “Options,” it is possible to access settings available in the application.Release NotesAction OptionsAbout...Update ModeLanguage Help Check for UpdatesExit“Update Mode”You can set the Update Mode to the following two categories:1. “N ormal Mode”is the default automatic update mode. When an update to yourinstalled device is deployed by your IT administrator, the device specific update button will be activated. Simply press the “Update” button to execute the device update. If buttons are greyed out, no updates are available.2. “ U pdate from file” can be set if a manual update of a device is required. Select thismode if the IT administrator puts available firmware updates in a shared location. Selecting “Update from file” will prompt the location of the firmware files to be used. When a firmware has been selected, the “Update” button will be activated in the “Updates” view.“Language”Select your preferred available language to be used in the application.Supported languages in the current release:English - US JapaneseDanish ItalianDutch PortugueseFrench RussianGerman SpanishKorean Turkish“Help – Logfile”The log contains technical details for Sennheiser HeadSetup™ Pro activities. If technical support related to the behavior of the application is requested, the log can be saved to a text file and mailed to your technical support for possible error tracing.Select “Exit” to terminate the application.“Help – Send Logs”Clicking the Send Logs menu item will open an Email where the logfile is attached. This can be used to send log information to the IT department or to Sennheiser support in case that is needed.“Help – User guide”Clicking this menu item opens.“the user guide Check for Updates”Clicking the Check for updates menu item will trigger the application to check fornew updates or configurations available. The application will also automatically check for these based on a predetermined interval, so generally it is not required to do this manually unless instructed to.“Exit”Select Exit to terminate the application.4.6 System Tray IconsFour different icons represent the different application status.No devices are connected.Default headset is connected and is idle (no call/call on hold/ringing).Default headset is connected and call is active.Default headset is connected and muted while call is active.Note: Call status is not supported for the Skype for Business softphone.5. U ninstalling Sennheiser HeadSetup™ ProThe following two methods can be followed to uninstall Sennheiser HeadSetup™ Pro application from the system.1. Using the Control Panel.2. Using the Setup file.5.1 Uninstalling using the control panelStep 1: Open Control Panel.Step 2: Select Programs.Step 3: Click “Uninstall a Program from Programs and Features.”Step 4:S elect the Sennheiser HeadSetup™ Pro file and click on the “Uninstall” button in the control panel window.Step 5: In the Programs and Features dialog box, click “Yes.”Step 6: A progress bar will track the uninstalling of the application.5.2 Uninstalling using the setup fileStep 1: Open Sennheiser HeadSetup™ Pro installer folder from the given location. Step 2: Right click on the setup icon and select “Run as administrator.”Step 3: A welcome window will appear. Click “Next.”Step 4: Select “Remove” in the program maintenance window and click “Next”.Step 5: Click “Remove” in the “Remove the program” window.Step 6:T he “application is uninstalled” information window appears. Click “Finish”to close the setup window.1395 01-2019Sennheiser Communications A ⁄ SIndustriparken 27, DK-2750 Ballerup, Denmark Contact informationSupport Portal: /cco-support E-mail: ********************Phone: Find your local support phone number and opening hours here below.Asia-Pacific Australia T +61 2 9910 67008:00 - 17:00China T +86 10573196669:00 - 18:00Hong Kong S.A.R., China T +85 2341284009:00 - 18:00India T 1 800 200 36329:00 - 18:00Japan T +81 364 068 9199:00 - 18:00New Zealand T +64 (9) 580 04898:00 - 17:00Singapore T +65 6408 51439:00 - 18:00South Korea T +82 1544 169910:00 - 18:00Europe Austria T +43 7208808578:00 - 17:00Belgium T +32 280807848:00 - 17:00Denmark T +45 898828418:00 - 17:00Finland T +358 9424503528:00 - 17:00FranceT +33 1706103868:00 - 17:00GermanyT +49 30308080458:00 - 17:00HungaryT +36 140880568:00 - 17:00IcelandT +353 152625728:00 - 17:00IrelandT +353 152625728:00 - 17:00LuxembourgT +352 278602348:00 - 17:00NetherlandsT +31 20-80809568:00 - 17:00Norway T +47 239610528:00 - 17:00Russia T 8800-10085578:00 - 17:00Spain T +34 9112380858:00 - 17:00Sweden T +46 8446808958:00 - 17:00Switzerland T +41 3152811328:00 - 17:00United Kingdom T +44 20351440728:00 - 17:00Latin America Brazil T +55 11438075568:00 - 17:00Mexico T +52 55535024018:00 - 17:00North America Canada T 1-800-895-74128:00 - 17:00United States T 1-800-895-74128:00 - 17:00Middle East / Africa United Arab Emirates T 800 0357038448:00 - 17:00。
个人无线FM听音系统用户手册说明书
PFM PRO RCHPFM PROPFM PRO and PFM PRO RCHPersonal Wireless FM Listening SystemsMAN 199APersonal FM Wireless Listening Systems2ContentsSafety Information and Recycling Instructions .......................................................................................................................................2System Overview ..................................................................................................................................................................................3System Components ............................................................................................................................................................................3Setting up the PPA T46 Transmitter ......................................................................................................................................................4Setting up the PPA R37 Receiver .........................................................................................................................................................5Using the CHG 3502 Charger ...............................................................................................................................................................6Troubleshooting ....................................................................................................................................................................................7Specifications FM Transmitter PPA T46................................................................................................................................................8Specifications FM Receiver PPA R37 ...................................................................................................................................................9Lifetime PLUS Limited Warranty . (10)Notes (11)Safety Information and Recycling InstructionsHeaRIng SafetyCaUtIOn!This product is designed to amplify sounds to a high volume level which could potentially cause hearing damage if used improperly. To protect your hearing and the hearing of others:1. T urn the volume down before putting on the earphone or headphone, and then adjust the volume to a comfortable level.2. S et the volume level at the minimum setting that you need to hear.3. I f you experience feedback (a squealing or howling sound), reduce the volume setting and move the microphone away from the earphone or headphone.4. Do not allow children or other unauthorized persons to have access to this product.BatteRy SafetyCaUtIOn!This product is supplied with disposable Alkaline batteries. Do not attempt to recharge disposable batteries, which may explode, release dangerous chemicals, cause burns, or other serious harm to the user or product.MedICal devICe SafetyCaUtIOn!1. Before using this product with an implantable or other medical device, consult your physician or the manufacturer of your implantable or other medical device.2. I f you have a pacemaker or other medical device, make sure that you are using this product in accordance with safety guidelines established by your physician or the implantable device manufacturer.ReCyClIng InStRUCtIOnSBattery Safety and DisposalHelp Williams Sound protect the environment! Please take time to dispose of your equipment properly. Please do NOT dispose of batteries in the household trash. Please take the batteries to a retail or community collection point for recycling.Product Recycling:Please do NOT dispose of your Williams Sound equipment in the household trash. Please take the equipment to an electronics recycling center or return the product to the factory for proper disposal.Personal FM Wireless Listening Systems3System OverviewThank you for purchasing a Personal FM Wireless Listening System from Williams Sound. Anyone needing auditory assistance to overcome background noise, reverberation, or distance from a sound source can benefit from a Personal FM Wireless Listening System.Your PFM System has two principal parts: the Transmitter and the Receiver. Much like a miniature radio station, the microphone picks up the sounds you want to hear and the Transmitter broadcasts them over an FM radio signal. The receiver and earphone are used to pick up the broadcast up to 150 feet away.SPEAKER USES THE BODY PACK TRANSMITTER WITH MICROPHONELISTENER USES PERSONAL RECEIVER WITH INCLUDED EARPHONE, HEADPHONES, OR OPTIONAL NECKLOOPTo avoid difficulties, please read through these instructions as you begin using the system. Then save them for questions that arise as you continue to use your Williams Sound Personal FM Wireless Listening System.The speaker wears the belt-clip transmitter and a clip-on microphone. The speaker’s voice is broadcast as an FM radio signal over a distance of 150 feet. Listeners use the pocket receiver and earphones or headphones to hear the speaker’s voice directly, with reduced background noise. An optional neckloop telecoil coupler allows the system to be used with telecoil (T -switch) equipped hearing aids.If you have problems with the PFM system, don’t hesitate to call us toll-free at 1-800-843-3544.System ComponentsThe PFM PRO System includes:The PFM PRO RCH System includes the PFM PRO, plus:(1) FM Body-pack Transmitter (PPA T46) (1) Dual Drop-in Charger (CHG 3502)(1) FM Body-pack Receiver (PPA R37) (2) AA Rechargeable NiMH Batteries (BAT 026-2) - (1) Single Mini Earphone (EAR 041) (replaces BAT 001-2) (1) Folding Headphone (HED 021)(1) Audio Input Cable (WCA 087)(1) Lavalier Microphone (MIC 090)(2) AA Alkaline Batteries (BAT 001-2)(1) System Carry Case (CCS 043)(1) System User Manual (MAN 199)Personal FM Wireless Listening Systems4Setting up the PPa t46 transmitterIMPORTANT: If Alkaline (non rechargeable) batteries are being installed, slide the battery selection switch in the battery compartment to the “Alkaline” position. See FIG 1 below. If installing NiMH (or rechargeable) batteries, slide the battery selection switch to the “NiMH” position.1. Install two (2) AA batteries into the battery compartment. If using Alkaline batteries, switch the battery switch to the Alkaline position. Note: If rechargeable batteries will be used, the battery switch must be switched to the NiMH position before inserting the transmitter into the charger (See Figure 1). If using rechargeable batteries without the charger, the batteries must be charged externally before use. To remove the batteries, pull up on the Battery Removal Fabric Strip.figure 1: PPa t46 Battery Selection Switchfigure 2: PPa t46 transmitter Jacks and PowerA311FABRIC STRIPT46 TOPINPUT JACKJACK 2. Plug the microphone cord into the “Mic Jack” () on top of the transmitter. (See Figure 2).Note: The microphone with 39 inch cord MUST be used with the Transmitter (the cord is the transmitting antenna).3. Turn the unit on: press and hold the “ON/OFF/MUTE” button for three seconds. The “Power On” indicator () should illuminate green. (See Figure 2).4. Change the transmitter to the desired channel. To access the channel setting, push the menu button until you see the channel displayed. Change the channel by pushing the left or right arrow buttons. Push the menu button to save the channel (Figure 3). Note: To choose by frequency, see Advanced Settings. Note: Remember the channel chosen in this step as you will need tofigure 4: Belt Clip InstallationLEFT ARROW BUTTON RIGHT ARROW BUTTONMENU BUTTONOLED DISPLAY 5. to secure the clip. The transmitter can now be clipped onto a belt. To remove, turn the belt clip 180˚ so the open end of the clip points up, and gently pull the belt clip off (See Figure 4).6. Place the transmitter in a pocket, or clip it onto a belt or waistband.Personal FM Wireless Listening Systems57. Attach the lapel clip microphone on a collar or lapel, as close to the speaker’s mouth as possible. If using an optional headset microphone, position the mic as close to the side of the mouth as possible without touching the mouth (See Figure 5).figure 5: lapel Microphone Placement8. To mute the microphone, press the “ON/OFF/MUTE” button momentarily. The “ON/OFF/MUTE” button will flash red. To unmute the microphone, press the “ON/OFF/MUTE” button momentarily again (Figure 2).IMPORTANT: When the PPA T46 transmitter is not being used, remember to turn the unit OFF by pressing and holding the “ON/OFF/MUTE” button for three seconds. The Power On indicator will not be lit.Setting up the PPa R37 ReceiverIMPORTANT: If Alkaline (non rechargeable) batteries are being installed, slide the battery selection switch in the battery compartment to the “Alkaline” position. If installing NiMH (or rechargeable) batteries, slide the battery selection switch to the “NiMH” position.1.figure 7: PPa R37 earphone Jack & Power ControlsALKALINE/CHANNELSEEK BUTTONJACK FLASH CODE INDICATOR2. Plug the earphone or headphone into the “Earphone Jack” () on top of the receiver. See Figure 7. Place the headphones onyour head or earphone in your ear.Note: the earphone cord is also the receiving antenna. Do not bunch up the cord or wrap it around the receiver. For bestreception, the cord should hang as straight as possible.3. Turn the power on by rotating the “On/Off/Volume” control switch to the right (as pictured). The “On/Low Battery Indicator” () should illuminate green (Figure 7).Personal FM Wireless Listening Systems64. Select the desired channel (this will be the same channel you chose for the transmitter (under “Setting up the T45 Transmitter”).Make sure the transmitter is on, then press the Channel Seek button (Figure 6) once to search for the active transmitter channel. The LED will blink while searching for an active transmitter channel. The receiver will retain the channel setting when the unit is turned off.5. Install the belt clip on the rear of the R37 by positioning the belt clip on the back of transmitter. Turn the belt clip 180˚ left orright to secure the clip. The transmitter can now be clipped onto a belt. To remove, turn the belt clip 180˚ so the open end of the clip points up, and gently pull the belt clip off (See Figure 4).6. Place the transmitter in a pocket, or clip it onto a belt or waistband.7. Rotate the “On/Off/ Volume” switch to adjust the volume to a comfortable listening level.IMPORTANT: Make sure the receiver is turned OFF when not in use. Turn the “ON/OFF Volume” switch completely counter-clockwise. It should “click” and the “Power On” indicator should turn off.Using the CHg 3502 ChargerWARNING: Use this charger with Williams Sound NiMH rechargeable batteries only. DO NOT use non-rechargeable batteries, such as alkaline and carbon zinc, which may heat up and burst, causing possible injury and damage to the equipment.Before inserting the receiver or transmitter into the charger, be sure each unit has NiMH rechargeable batteries installed. Also, check to make sure the switch setting in the receiver or transmitter battery compartment indicates the “NiMH” setting.1. Plug the CHG 3502 power supply into the AC wall outlet. Plug the power connector into the rear of the CHG 3502 unit asshown in Figure 8.2. Insert the receiver or transmitter into the charging slot as illustrated in Figure 8. The unit(s) must be placed in the charger facingforward to make contact with charger contacts. A red LED indicator on the charger will illuminate when the batteries are being charged.• You may charge up to 2 receiver / transmitter units per CHG 3502 charger.• It will take approximately 16 hours to fully charge the batteries.NOTE: It is safe to leave the receiver/transmitter units in the charger, even after the batteries are fully charged.figure 8: CHg 3502RECEIVER ORTRANSMITTERCHARGING INDICATOR DC POWER CONNECTIONPersonal FM Wireless Listening Systems7troubleshootingSound IssuesStatic audio in the receiver• Make sure the Transmitter and Receiver are set to the same channel.• Make sure you are using fresh or fully recharged batteries.• Microphone cord and earphone cord serve as transmitting and receiving antennas. Try to keep the antennas in a vertical orientation. The microphone with 39 inch cord MUST be used with the Transmitter.• Only one Transmitter can be used in the same area at one time. If another Transmitter is in use it must be set to a different channel.• You may be out of range for the system. Move closer to the Transmitter.No sound in receiver• Check batteries are good.• Check the batteries are installed correctly.• Make sure earphone is plugged into the earphone jack.Charger light not coming on• Make sure the power supply is plugged in.• Make sure rechargeable batteries are installed into the Transmitter and Receiver and that the ALK/NiMH selector inside the battery compartments is switched to NiMH.• The Transmitter and Receiver should be turned OFF while charging.PPa R37 led flash CodesLIGHT CODE INDICATES DESCRIPTION1 Blink Channel locked Press “Seek”, receiver remains on same channel2 Blinks Channel unlockedPress “Seek”, receiver tunes to next available channel 3 BlinksChannel unlocked-No channel presentPress “Seek”, receiver attempts to find an available channel On-Off-On-Off(continuous)Low BatteriesReplace or recharge batteriesFade-on, Fade-off (continuous)No transmitter on current channelSleep/power save mode (extends battery life)Personal FM Wireless Listening Systems8Specifications FM Transmitter PPA T46Dimensions: 4.1” L x 2.8” W x 1.1” D (104 mm x 71 mm x 28 mm)Weight: 2.6 oz (74 g), no batteries Color:Black/SilverEnclosure Material:Shatter-resistant PC/ABS plastic with textured scratch-resistant aluminum faceplateBattery Type options:Two (2) AA 1.5 V non-rechargeable Alkaline batteries (BAT 001-2), 75 mA nominal current drain, up to30 hours battery lifeTwo (2) AA 1.5 V NiMH rechargeable batteries (BAT 026-2), 75 mA nominal current drain, up to 20 hours battery life per charge, recharges in 14–16 hours, uses CHG 3502 or CHG 3512 ChargerOperating Frequencies:Selectable, 17 channels, 72.1 – 75.9 MHz*. Switchable 8 or 17 Channel Mode. (8-channel modesetting corresponds with PPA R35-8 receiver channels)Stability:± .005%, frequency synthesized, crystal reference, PLL Modulation:Wide-band FM, 75 kHz peak, 75 µS pre-emphasis RF Output:80 mV/m at 3 m (max. allowed by FCC rules)Frequency Response:180 Hz to 13 kHz, ± 3 dB at 1% max. THD Signal-to-Noise Ratio: 65 dB (typical) transmittedTransmit Antenna:Integral with microphone cordMicrophone:Electret type, 3.5 mm mono plugExternal Display:OLED for status and menu information.Status: Ch/Freq, Mic Audio Level, Auxiliary Input Audio Level, Battery Status, Mic Mute, Channel Lock, Dual-Preset mode.Menu: Ch/Freq display mode select, Volume, Aux Input, Compression,17 or 8-channel mode, screen time out, screen brightness, restore default settings External Controls:Momentary push button: push and hold 3 seconds for power On/Off, push and release for microphonemute On/Off. “Up”, “Down” and “Menu” buttons for accessing and changing transmitter settings. Battery type switch (Alkaline or NiMH) located behind the battery compartment door External Indicators:Power LED - Green, flashes when battery is lowMic Input: 3.5 mm mono jack with electret mic bias, adjustable gain with25 dB range Aux Input: 2.5 mm stereo jack, adjustable gain with 60 dB rangeAudio Compression:1:1 (off) or 2:1 (on) selectable in menuCompatible Receivers:PFM R31, PFM R32, PFM R33, PFM R36, PPA R35, PPA R37, PPA R35-8, PPA R1600, PPA R38Approvals/Directives:FCC, Industry Canada, RoHS, WEEEWarranty:Lifetime PLUS Limited Warranty, 90 Days on most accessories.Personal FM Wireless Listening Systems Specifications FM Receiver PPA R37Dimensions: 4.1” x 2.85” x 1.38” (104 x 72 x 35mm)Weight: 4.6oz (130g) with batteries. 2.6oz (73g) without batteriesColor:BlackBattery Type:(2) AA Alkaline or 2 x AA NiMHBattery Life:Two (2) AA non-rechargeable alkaline batteries (BAT 001), approx. 50 hrs(2) AA rechargeable NiMH batteries (BAT 026), 1500 mAh, approx. 32 hrsCurrent Consumption:52mA nominalTemperature Range:– 0 to 50CChannels17, accessed via seek button in battery compartmentOperating Freq.:72.1, 72.2, 72.3, 72.4, 72.5, 72.6, 72.7, 72.8, 72.9, 74.7, 75.3, 75.4, 75.5, 75.6, 75.7, 75.8, 75.9 MHz* Intermediate Freq.:75 kHzFM Deviation:75 kHzDe-Emphasis:75 µSLED Indicator:Power: Green; Low Battery: Flashes GreenAFC Range:± 120 kHzSensitivity: 2 µV at 12 dB Sinad with squelch defeatedInput Overload:100 mVFrequency Response:200 – 15 kHzModulation: FM, +/- 75 kHz peak deviationSignal-to-Noise Ratio:65 dB min @ 100 uVReceive Antenna:Integral with earphone/headphone cordAudio Output:35 mW max, peak into 16 ohmsOutput Connector: 3.5 mm stereo/mono phone jackEarphone:Earbud-type with foam cushion, 3.5 mm plug, 32 ΩAuto Shut-off Enters sleep mode after approx 6 mins of no RF signalApprovals:FCC, Industry Canada, RoHS, WEEEWarranty:Lifetime PLUS Limited Warranty, 90 Days on most accessories.9Personal FM Wireless Listening Systems10lifetime PlUS limited WarrantyWilliams Sound products are engineered, designed, and manufactured under carefully controlled conditions to provide you with many years of reliable service.Effective January 1, 2014, Williams Sound warrants the FM Listening transmitter and receiver models PPA T46 and PPA R37 against defects in materials and workmanship under normal use and conditions for the useful lifetime of the product from date of purchase.This warranty is available to the original end purchaser of the product and CAN BE transferred to subsequent purchasers of the product.WILLIAMS SOUND HAS NO CONTROL OVER THE CONDITIONS UNDER WHICH THIS PRODUCT IS USED. WILLIAMS SOUND, THEREFORE, DISCLAIMS ALL WARRANTIES NOT SET FORTH ABOVE, BOTH EXPRESS AND IMPLIED, WITH RESPECT TO THE DEVICES, INCLUDING BUT NOT LIMITED TO, ANY IMPLIED WARRANTY OF MERCHANTABILITY OR FITNESS FOR A PARTICULAR PURPOSE. WILLIAMS SOUND SHALL NOT BE LIABLE TO ANY PERSON OR ENTITY FOR ANY MEDICAL EXPENSES OR ANY DIRECT, INCIDENTAL OR CONSEQUENTIAL DAMAGES CAUSED BY ANY USE, DEFECT, FAILURE OR MALFUNCTION OF THE PRODUCT, WHETHER A CLAIM FOR SUCH DAMAGES IS BASED UPON WARRANTY , CONTRACT, TORT OR OTHERWISE. THE SOLE REMEDY FOR ANY DEFECT, FAILURE OR MALFUNCTION OF THEPRODUCT IS REPLACEMENT OF THE PRODUCT. NO PERSON HAS ANY AUTHORITY TO BIND WILLIAMS SOUND TO ANY REPRESENTATION OR WARRANTY WITH RESPECT TO THE DEVICES. UNAUTHORIZED REPAIRS OR MODIFICATIONS WILL VOID THE WARRANTY.The exclusions and limitations set out above are not intended to, and should not be construed so as to contravene mandatory provisions of applicable law. If any part or term of this Disclaimer of Warranty is held to be illegal, unenforceable or in conflict with applicable law by a court of competent jurisdiction, the validity of the remaining portions of this Disclaimer of Warranty shall not be affected, and all rights and obligations shall be construed and enforced as if this Lifetime PLUS Limited Warranty did not contain the particular part or term held to be invalid.If you experience difficulty with your system, call Toll-Free for Customer Assistance:1-800-843-3544 (U.S.A.) or 1-952-943-2252 (Outside the U.S.A.)If it is necessary to return the system for service, your Customer Service Representative will give you a Return Authorization Number (RA) and shipping instructions.Pack the system carefully and send it to:Williams Sound Attn: Repair Dept.10300 Valley View Rd.Eden Prairie, MN 55344Personal FM Wireless Listening Systems notes1110300 Valley View Rd • Eden Prairie, MN 55344800-328-6190 / 952-943-2252 • FAX: 952-943-2174MAN 199A©2015 Williams Sound • All Rights Reserved。
PXAES Pro for PXWAE 声发射系统使用说明书V4.5

PXAES proSOFTWARE Installation, Operation and User’s Reference ManualPXAES pro软件安装、操作及用户参考手册Table of Contents目录1. INTRODUCTION介绍 11.1 System Requirements系统要求 21.2 Software Installation软件安装 21.2.1 Installing AEwin from the installation CD:由安装光盘安装AEwin 21.2.2 Activate the AEwin software using the Start Menu option使用开始菜单激活AEwin软件 3 1.2.3 Installing the Data Acquisition Board driver if you are doing acquisition安装声发射板驱动程序 4鹏翔Audio board driver if using the Audio Board安装鹏翔音频板驱动程序 5 the1.2.4 InstallingNotes安装注意事项 51.2.5 Warning1.2.6 Installing a Shortcut Icon for AEwin on the Desktop在桌面上创建AEwin快捷方式 51.2.7 Upgrading AEwin Software Using the Existing License Code使用已有激活码升级AEwin软件 62. AEwin LAYOUT (.LAY) FILES AND DATA (.DTA) FILESAEwin设置文件(.LAY)及数据文件(.DTA) 73. OPERATING AEwin 运行AEwin 83.1 Starting AEwin 启动AEwin 83.2 AEwin Screen Layout Familiarization 熟悉AEwin屏幕布局 93.3 Navigating the AEwin Menus 浏览AEwin菜单 10Menu文件菜单 103.3.1 File3.3.2 Acquisition Setup Menu 采集设置菜单 12采集/重放菜单 323.3.3 Acquire/ReplayMenu图形菜单 353.3.4 GraphingMenuMenu 工作台菜单 393.3.5 Tables显示菜单 39Menu3.3.6 ViewMenu 扩展功能菜单 393.3.7 UtilitiesMenu页菜单 393.3.8 Page窗口菜单 39Menu3.3.9 WindowMenu 帮助菜单 393.3.10 Help3.4 Acquiring AE Data with AEwin for the First Time第一次使用AEwin采集声发射数据 403.4.1 Loading a Layout File into AEwin 调用一个配置文件到AEwin中 40进行采集 40Acquisition3.4.2 Entering3.4.3 Actions within Data Acquisition 数据采集中的工作 42Acquisition退出数据采集 453.4.4 ExitingData3.5 Operational Sequence of Replaying AE Data重放声发射数据的操作顺序 453.5.1 Loading a Layout File into AEwin调用一个配置文件到AEwin中 46进行重放 46Replay3.5.2 Entering3.5.3 Actions within Replay 重放中的工作 46退出重放 463.5.4 ExitingReplay3.6 Using Line Listing Mode 使用行列表模式 463.6.1 Enabling Line Dump Listing for Viewing 使行列表显示可用 473.6.2 Modifying The Line Display 修改行列表显示内容 483.6.3 Sizing and Moving the Line listing Display 行列表显示框的尺寸改变及移动 483.7 Clustering Setup and Operation 聚类设置及操作 483.8 Graphing in AEwin AEwin中的图形设置 523.8.1 Graph Setup Procedure 图形设置过程 533.8.2 Screen Page and Tab Management 屏幕页及标签管理 543.8.3 Adding, Placing and Sizing Graphs on a Screen Page在一个屏幕页中增加、放置图形和设置图形尺寸 543.8.4 Graph Setup Function 图形设置功能 553.9 Hit/Event Linking and the Data Lookup Display Dialog Box Hit/Event 链接和数据查找显示对话框 57 3.9.1 Procedure过程 57控制583.9.2 Controls3.9.3 Exporting Hits, Waves and Events 输出Hits,Waves和Event 603.9.4 Changing the Time of Arrival of a Waveform and Recalculating an Event改变一个波形的到达时间和重新计算一个事件 60其它功能 603.9.5 OtherFeatures3.9.6 Notes注释 60Timing定制到达时间功能 61Feature3.9.7 CustomArrival3.10 Cluster/Area History 聚类/区域历程 623.10.1 Setup 设置 623.10.2 Starting a Cluster History Process 开始一个聚类历程的过程 623.10.3 Starting an Area History Process 开始一个区域历程的过程 623.10.4 Execution 执行 633.10.5 Notes 注释 633.11 Graph Alarms 图形报警 633.11.1 How to setup a graph alarm: 如何设置一个图形报警: 633.11.2 How an alarm is detected/triggered: 一个报警如何被检测/触发: 633.11.3 What happens when an alarm is triggered: 当一个报警被触发时发生了什么: 64 3.11.4 Tips: 提示: 643.12 List of Shortcut Keys 快捷键列表 654. LOCATION 定位 664.1 Theoretical Background 背景原理 664.2 Location Setup Dialog 定位设置对话框 68Settings:通用标签中的设置: 69Tab4.2.1 General时间标签中的设置: 71Settings:Tab4.2.2 Timing4.2.3 Distance Units Dialog 距离单位设置对话框 734.2.4 Material Properties Dialog 材料特性设置对话框 73衰减设置对话框 74Dialog4.2.5 Attenuation卫士探头设置对话框75Dialog4.2.6 GuardSensor4.3 Location View & Sensor Placement Dialog 定位显示及探头布置对话框 754.4 Notes on Regression Location Modes 关于回归定位模式的注释 774.4.1 2D Planar & 2D Planar (XY) 2D平面及2D平面(XY)定位 784.4.2 3D Location, 2D Planar (YZ) & 2D Planar (XZ)3D定位,2D平面(YZ)定位及2D平面(XZ)定位 80球形定位 844.4.3 SphericalLocation4.4.4 Cylinder筒形定位 87LocationLocation锥形定位 904.4.5 Conical4.5 Location Examples 定位实例 934.5.1 Set Up and Testing of a Zonal or Linear Location Group 一个区域或线性定位组的设置及试验 94 4.5.2 Setup and Testing of a 2D Planar Location Group 一个2D平面定位组的设置及试验 1014.5.3 Setup and Testing of a Tank Bottom Location Group 一个罐底定位组的设置及试验 1045. OPTIONS FOR AEwin AEwin选项 1125.1 Supervisor Option 超级用户选项 1125.2 LeakTEC Alarms 泄漏报警 112设置 1125.2.1 Setup操作 1135.2.2 Operation5.2.3 What happens when an alarm is triggered 当报警触发后发生了什么 1135.3 On-Line Crack Alarms 在线开裂报警 113设置 1145.3.1 Setup5.3.2 Operation操作 1155.3.3 What happens when an alarm is triggered当报警触发后发生了什么 115APPENDIX 附录 116 软件扩展功能菜单 116UTILITIES MENU AEwin SOFTWARE AEwin1. INTRODUCTION介绍PXAES forAEwin是32位的Windows软件,可以运行于鹏翔公司的PXDAQ系列声发射采集卡产品上,进行数据采集和重放。
调音台正确使用方法
调音台正确使用方法调音台(MIXER)与功率放大器(ROWER AMPLIFIER)1.调音台(MIXER)过载指示灯是用于警告输入信号瞬间过载,指示灯将在峰值(信号过大发生失真的电平)电平下面3dB时发光,便于帮助设置增益开关的位置。
注意不要让此信号灯冒红!!!2.功放输出电平显示器:显示器为彩色发光二极管梯形组,用于即时显示功放的电平高度。
正常的电平处于绿色;当功放要求传送高音的持续性的信号时,电平信号处于黄色;在乐曲的音频信号高峰或打鼓时,红色发光二极管闪亮(时而闪亮)。
以上均为正常现象。
如果红色发光二极管一直亮着,这说明功放可能过载。
在一路功放驱动多路扬声器时,这种情况经常发生,这时应重新配置一下系统,以消除这种过载现象。
功放峰值显示器(PEAK):当PEAK峰值二极管闪亮时,应将增益控制降下来。
呵呵!以下是教你们如何地调用---调音台(MIXER)中的高中低:1、高频:10kHz¡15dB/坡影响区域:乐器高音区的高次谐波。
增益效果:金属声增多,音色比较尖,增益过多,噪声能明显听见。
衰减效果:可有效地去除嘶嘶声,衰减过多则高音区的透明感就会失落。
2、中频:3kHz¡15dB/峰影响区域:乐器,人声的高音区。
增益效果:音色明亮,质感较硬,增益过多听觉易感疲劳。
衰减效果:音乐的平衡会倾向低音,包括声音也会有同感。
中频:1kHz¡15dB/峰影响区域:乐器,人声的中音区。
增益效果:音色轮廓明确,声相向前凸出,鼓声音头调强。
衰减效果:声相后缩。
中频:500Hz¡15dB/峰影响区域:乐器,人声的中低音区。
增益效果;音色厚实有力,增益过多就会出现电话音色。
衰减效果:音头较硬,平衡倾向高音,衰减过多质感就薄。
3、低频:100Hz¡15dB/坡影响区域:乐器的低音区。
增益效果:音色浑厚,增益过多,则齿音不清晰。
衰减效果:音响较轻松,齿音良好,背景噪声和嗡声可有效去除。
Oticon Streamer Pro 用户指南说明书
Wearing the StreamerCharging the StreamerP LA P LA C E P LA 0000128153000001Lea atentamente esta guía del usuario antes de utilizar su nuevo Streamer128153E S /01.13Su nuevo Streamer Pro GamuzaCordón para el cuello- mediano Base de carga (ver la pág. 23 de lasCaja 4Funda protectora (ver pág.62 en las IntroducciónGracias por haber elegido nuestro producto como medio para mejorar su audición.El Streamer le permite utilizar distin-tas soluciones de conectividad adap-tadas a los audífonos Oticon, todas ellas pensadas para mejorar su vida diaria.Para más información, funciones adicionales y funciones más avanza-das, consulte las instrucciones de uso y la documentación suministrada , o la documentación en línea que incluye vídeos informativos: www.oticon.es/connectlineCaja 1Caja 3Cable USB para carga a través de otro dispositivo (por ejemplo, un Cable de audio de 3,5mm para utilizar *Opcional0000EncenderMantenga pulsado el botón de encendido/apagado durante aprox. 2 segundos hasta que todas las luces delanteras se enciendan y el indicador de encendido/apagado situado en la parte superior se ilumine en verde.ApagarMantenga pulsado el botón de encendido/apagado durante aprox. 2 segundos hasta que el indicador verde de encendido/apagado se apague.Emparejamiento del StreamerPara que el Streamer pueda trabajar con otros dispositi-vos (por ejemplo, con un teléfono móvil), primero espreciso llevar a cabo un proceso llamado emparejamiento.Ponga el Streamer en modo de emparejamiento. Mantenga pulsado el botón de encendido/apagado durante aprox. 5 segundos hasta que el indicador de encendido/apagado se ponga azul y empiece aparpadear. Cuando el indicador de encendido/apagado se ilumina en azul fijo, el emparejamiento se ha realizado con éxito. Tanto el Streamer como el teléfono móvil (por ejemplo) tienen que estar enmodo de emparejamiento. El código PIN del Streamer (si lo solicita el teléfono) es 0000 (cuatro ceros).Más información: página 20 de las instrucciones de uso.Más información: página 30 de las instrucciones de usoMás información: página 35 de las instrucciones de uso.Teléfono móvilRecibir una llamadaCuando le suene el móvil, oirá un aviso de llamada entrante en sus audífonos. El botón de teléfono del Streamer y el indicador de estado empezarán a parpadear en verde.Pulse el botón de teléfono breve-mente para responder a la llamada.Rechazar una llamada Para rechazar unallamada entrante pulse brevemente el botón de bajar el volumen.Hacer una llamada Para hacer una llamada, utilice de forma normal el teléfono móvil. La llamada se transfiere automáticamente a su Streamer.MicrófonoBobina de inducciónStreamer tiene un receptor de bucle de inducción incorporado (bobina de inducción).Para recibir el sonido de la bobina, mantega pulsado el selector AUX durante aprox. 2 segundos.Más información: página 56 de las instrucciones de uso.Uso del Streamer como mando a distancia de los audífonosCuando el Streamer no se utiliza para transmitir sonido, puedeemplearse como mando a distancia de los audífonos.Control de volumenPulse brevemente los botones de subir o bajar volumen Cambiar el programa de los audífonosMantenga pulsado el botón subir volumen o bajar volumen para cambiar de programaMás información: pág. 28 de las instrucciones de uso.MúsicaPuede escuchar música conectando el cable provisto de mini conector a la parte inferior del Streamer, o de forma inalámbrica mediante Bluetooth.Para seleccionar la música pulse brevemente el selector AUX.Más información: página 50 de las instrucciones de uso.Micrófono ConnectLineNota: requiere equipo adicional. Permite transmitir el sonido de un interlocutor concreto a sus audífo-nos mediante el Streamer.Pulse el botón de micrófono breve-mente para activar el micrófono.Más información: /micSolución para teléfonoNota: requiere equipo adicional. Permite utilizar el Streamer con un teléfono fijo analógico tradicional.Para aceptar una llamada, pulse el botón de teléfono brevemente .Más información:/phoneSolución para televisiónNota: requiere equipo adicional. Permite transmitir el sonido de un televisor a sus audífonos a través del Streamer.Pulse el botón TV brevemente para activar la transmisión del sonido de la televisión.Más información: /tv。
Pro Ears Stealth Elite 使用说明书
The Stealth EliteUser’s GuidePro Ears Ampli cation & Protection DevicesImprove Hearing amplifying what you want to hear and ltering out noise.Thank you for choosing the Stealth Elite.We at Pro Ears strive to provide our customers with quality products at an a ordable price.If for any reason you are not satis ed please contact us and we will be happy nd a solution.Please read this User Guide carefully before use.You’ll nd instructions on the use and care of your electronic ear buds.* * *COMPONENTS* 1 Pair of Stealth Elite earbuds* Stealth Elite MMCX bluetooth lanyard* 4 Pairs foam tips (XS,S,M,L)* 3 Pairs silicon tips (S,M,L)* 3 Pairs of earhooks (S,M,L)* Rope neckcord* 4 x A10 Battery* Charging carry case* USB-C charging cableFITTING INSTRUCTIONS1.Select one of the 3 sizes of ear hooks and place thehook on the housing prior to putting the ear tip on thehousing. The ear hook should t securely in the fossa ofthe outer ear as per the image.2.Select one of the enclosed ear tips based on size of earcanal and intended purpose of use. The foam tips areintended for maximum hearing protection and isolation.The silicone tips are primarily for listening to media orphone calls. You may need to experiment with each sizeear tip to nd the most comfortable and secure t.3.Select the proper size ear tip and ear hook to t your earand ear canal. Use the largest size that ts comfortablyfor most protection. The ear tip should form a completeseal blocking out sound. This is critical to achieve thehighest NRR rating and protect your hearing.4.Compress the foam tip by rolling between your ngers asmuch as possible before inserting into the ear canal.5.Hold in place and gently rotate the ear bud untilexternal sound is mu ed.6.Test with earphone turned o . Clap your hands andlisten to the sound level. If the ear bud tips are thecorrect size and properly inserted outside soundshould be signi cantly muted. If not, repeat steps1-4 with an alternative size ear tip.BATTERY INSTALLATION Remove the sticker from the battery. To insert battery, openbattery compartment by pulling down on the rim ofcompartment door. The battery is held in place by a smalllip on the bottom of the compartment. Place the batteryinto the compartment so that the (+) sign side of thebattery is facing up; when battery is inserted correctly,compartment door will close with ease. The Battery doorwill not close easily if the battery is not properly inserted.DO NOT FORCE THE DOOR.A BROKEN DOOR WILL VOID THE WARRANTY!Please remove the battery when the Stealth Elite is not in use.Any moisture on the battery should be wiped o .WARNING: Button Cell Batteries are Dangerous if Swallowed• Keep batteries out of the reach of children.• Discard batteries very carefully.• Never allow children to play with batteries.• Never change batteries in front of children.• Never put batteries in your mouth for any reason,as they are slippery and easy to swallow by accident.• Always check medication before swallowing, as batterieshave been confused as medications.In the event a battery is swallowed call:The National Button Battery Ingestion Hotline(202) 625-3333 for counsel or treatmentA #10 battery is required. Expected battery life isapproximately 80 - 100 hours.For the Stealth Elite Ear BudsTurning the Unit On and OFlip the MODE SWITCH from 0 to I or II to turn on the unit.When not in use ip the MODE SWITCH back to 0 to conserve battery.Operating Control1. Flip the MODE SWITCH to I to use Pass Through sound. In position I hear ambient sound naturally while still providing z compression of loud sounds. Position I is recommended in high wind or situations where echoes are present.2. Flip the MODE SWITCH to II to use Ampli cation Mode. In position II ambient sounds are fully ampli ed allowing the wearer to hear faint sounds more clearly.3. Always start with the unit set to O or Isolation Mode.For the Stealth Elite Bluetooth LanyardTurning On and O1. Connect the BLUETOOTH LANYARD to the EARBUDS by gently snapping the MMCX connectors together until you hear a snap.2. Press and hold BLUETOOTH BUTTON for 3 seconds and INDICATOR LIGHT will ash blue.3. The earphone will then enter automatic pairing and the INDICATOR LIGHT will ash alternately red and blue. Enter your Bluetooth settings on your device and connect earphone by choosing Stealth Elite from the list of devices. Once connected the INDICATOR LIGHT will ash slowly blue and your ear buds will be ready to use.To Make Calls1. Tap BLUETOOTH BUTTON once to pick up or end calls2. Tap BLUETOOTH BUTTON twice to redial last incoming or outgoing number.3. When there is another incoming call during another call, tap BLUETOOTH BUTTON once to end original call and pick up incoming call.. Tap BLUETOOTH BUTTON twice to put original call on hold and receive incoming call. Tap BLUETOOTH BUTTON twice to alternate between the two calls.For Media1.Tap BLUETOOTH BUTTON once to play/pause music2.Tap VOLUME UP/DOWN BUTTON once to increase/decrease media volume3.Press and hold VOLUME UP/DOWN BUTTON for 2 seconds t skip to previous/next track4.Press and hold BLUETOOTH BUTTON to activate SIRI/BIXBY/ALEXA etc. platforms.CARING FOR YOUR STEALTH ELITE1. Never allow any liquid to enter the Stealth Elite as this may damage the components within the device. If the battery door is closed the unit is water resistant to IPX Rating 5.2. Do not store your device in any location which would expose it to excessive heat (e.g. direct sunlight, heaters, or radiators.)3. Be careful not to drop the device as this may damage its components.4. Never insert any foreign objects into your device; this could result in serious damage to the instrument.5. Never permit solvents to come into contact with your device as this can damage the unit.6. Clean your device by wiping with a damp (not wet) cloth moistened with an antiseptic liquid.OPERATING INSTRUCTIONSNOTE: THE STEALTH ELITE HAS A BUILT-IN “SAFETY” CIRCUIT WHICH LIMITS THE OUTPUT OF THE INSTRUMENT TO A MAXIMUM OF 110dB SPLLIMITED WARRANTYAltus Brands warrants this product to the original purchaser to be free from defects in materials and workmanship, under normal use and conditions for a period of one-year parts/90 days labor from the date of the original purchase. Under this warranty, this unit will be replaced or repaired at our option, without charge for parts or labor, excluding batteries, for a period of 90 days after the purchase. After 90 days, the cost of labor with Shipping/Handling and Insurance of $29.95 is the customer’s responsibility.This warranty is void if any of the following occur:1. The warranty card was not sent in at the time or purchase2. The unit is not owned by the original purchaser at the time of the warranty claim3. The unit has been tampered with, opened or punctured4. The unit has been immersed in water or other liquids, allowed to be lled with dirt or dust, or otherwise physically abused5. The 12-month limited warranty has expiredThis shall be the exclusive written warranty of the original purchaser and neither this warranty or any other warranty, expressed or implied, shall extend beyond the 12-month period listed above. In no event shall Altus Brands, LLC be liable for consequential damages, consequential property damage, or consequential personal injury. (Some states do not allow limitations on implied warranties or exclusions of consequential damages, so that these restrictions may not apply to you). This warranty gives you speci c legal rights, and you may have other rights, which vary from state to state.Record serial # for future reference:Serial # ___________________________________Request an RMA from Altus Brands. • 6873 Sullivan Road •Grawn, MI 49637 Tel 800.891.3660Register your product online at: Warranty Registration Model: Stealth Elite Date of Purchase:The Stealth Elite is used to reduce harmful loud sounds like gunshot noise. Gun re is a hazardous exposure noise. Altus Brands carries no implied guarantee for over-exposure to noise. We recommend hearing tests to insure the continued health of your hearing.FCC STATEMENT1. This device complies with Part 15 of the FCC Rules. Operation is subject to the following two conditions:(1) This device may not cause harmful interference.(2) This device must accept any interference received, including interference that may cause undesired operation.2. Changes or modi cations not expressly approved by the party responsible for compliance could void the user's authority to operate the equipment.7. Remember to clean your ear after showering or swimming before inserting the ear bud.8. Use a quali ed battery to guarantee proper functioning.9. Remember to remove the battery while your ear buds are not in use.10. Do not try to repair or disassemble the Stealth Elite yourself.11. We recommend replacing your foam ear tips periodically as the foam maybe come hard or unsanitary. Use Pro Ears ear tips as not all replacement tips have the same dimensions and may not provide the same attenuation.12. For any other questions about maintenance, please contact Customer Service.SERVICE AND WARRANTYYour Stealth Elite is covered by a manufacturer’s limited warranty. This covers all manufacturing and material defects. Problems arising from improper handling or repairs made by unauthorized party arenot covered and may void the warranty. Please contact Customer Service for details of this warranty.Toll-free customer support 800-891-3660or Remember that your Stealth Elite is a quality instrument and should be treated in the same careful manner as any other precision-engineered device.RF WARNING STATEMENTThe device has been evaluated to meet general RF exposure requirement. The device can be used in portable exposure condition without restriction.NOTE:This equipment has been tested and found to comply with the limits for a Class B digital device, pursuant to Part 15 of the FCC Rules. These limits are designed to provide reasonable protection against harmful interference in a residential installation. This equipment generates uses and can radiate radio frequency energy and, if not installed and used in accordance with the instructions, may cause harmful interference to radio communications. However, there is no guarantee that interference will not occur in a particular installation. If this equipment does cause harmful interference to radio or television reception, which can be determined by turning the equipment o and on, the user is encouraged to try to correct the interference by one or more of the following measures: Reorient or relocate the receiving antenna. Increase the separation between the equipment and receiver. Connect the equipment into an outlet on a circuit di erent from that to which the receiver is connected. Consult the dealer or an experienced radio/TV technician for help.。
SBA ProConnect 7.2 版本发布说明书
Release Notes ContentsVersion 7.2 3 SBA ProConnect Table of Contents1 Features (7)1.1 Version 7.2.15 (7)1.1.1 Add Bios and Disk Information (7)1.2 Version 7.2.12 (7)1.2.1 Support for Windows Server 2016 (7)1.3 Version 7.2.11 (8)1.3.1 Display the CU Component in SBA List .................................................................... 8 1.3.2 Auto Synchronization of SBA after Task ................................................................... 8 1.3.3 Synchronize a Single SBA ......................................................................................... 8 1.3.4 Change Date Format . (8)1.4 Version 7.2.0 (9)1.4.1 Security Support ........................................................................................................ 9 1.4.2 Remove Install Files .................................................................................................. 9 1.4.3 Skype for Business Support .. (9)2 Resolved Constraints (11)2.1 Version 7.2.15 (11)2.2 Version 7.2.11 ...................................................................................................... 11 3Known Constraints ........................................................................................... 13 3.1 Version 7.2 ........................................................................................................... 13 4Upgrade Procedure (15)SBA ProConnectRelease Notes 4Document #: LTRT-38945 This page is intentionally left blank.Release Notes NoticesVersion 7.2 5 SBA ProConnect NoticeInformation contained in this document is believed to be accurate and reliable at the time of printing. However, due to ongoing product improvements and revisions, AudioCodes cannot guarantee accuracy of printed material after the Date Published nor can it accept responsibility for errors or omissions. Updates to this document can be downloaded from https:///library/technical-documents.This document is subject to change without notice.Date Published: June-03-2019WEEE EU DirectivePursuant to the WEEE EU Directive, electronic and electrical waste must not be disposed of with unsorted waste. Please contact your local recycling authority for disposal of this product. Customer SupportCustomer technical support and services are provided by AudioCodes or by an authorized AudioCodes Service Partner. For more information on how to buy technical support for AudioCodes products and for contact information, please visit our Web site at https:///services-support/maintenance-and-support .Abbreviations and TerminologyEach abbreviation, unless widely used, is spelled out in full when first used.SBA ProConnectRelease Notes 6Document #: LTRT-38945 Related DocumentationDocumentation FeedbackAudioCodes continually strives to produce high quality documentation. If you have any comments (suggestions or errors) regarding this document, please fill out the Documentation Feedback form on our Web site at https:///documentation-feedback ..Release Notes 1. Features Version 7.2 7 SBA ProConnect1Features 1.1Version 7.2.15 1.1.1 Add Bios and Disk InformationBios information (version and date) has been added to the SBA Server Details page.After upgrading to this version, perform SBA synchronization to retrieve the new information from the SBA Server List.1.2Version 7.2.12 1.2.1 Support for Windows Server 2016This version supports the Windows Server 2016 platform. The installation procedureincludes an additional procedure for installing IIS.SBA ProConnectRelease Notes 8Document #: LTRT-38945 1.3Version 7.2.11 1.3.1 Display the CU Component in SBA ListThe SBA ProConnect Management Interface supports viewing of the SBA server Skype for Business/Lync version from the SBA servers list without the need to open the SBA Details page. Hovering over the SBA version column displays a tooltip with details of the SBA Skype for Business/Lync versions.1.3.2 Auto Synchronization of SBA after TaskAfter the CU update task ends successfully, the SBA ProConnect server retrieves the new SfB/Lync component details and updates the SBA server details.1.3.3 Synchronize a Single SBAThe SBA ProConnect Management Interface supports synchronization of a single SBA server separately from the SBA servers list page.1.3.4 Change Date FormatThe SBA Pro Connect also supports American date format: month/day/year. The default setting of the SBA ProConnect uses European format. New configuration values are used to determine the date format of the SBA ProConnect. It is required to restart the SBA ProConnect Service after making changes in configuration file. New configuration values are updated as follows:C:\Program Files\Audiocodes\ProConnectService\Config\System.config: phpDateFormat: The date format that be used by GUI PHP part. American format: m-d-Y H:i European format(default): d/m/Y H:i jsDateFormat: The date format that be used by GUI Java script part American format: MM-DD-YYYY hh:mm European format(default): DD/MM/YYYY HH:mm pickerDateFormat: The date format that be used by GUI picker component American format: mm-dd-yyyy hh:ii European format(default): dd/mm/yyyy hh:iiRelease Notes 1. FeaturesVersion 7.2 9 SBA ProConnect1.4Version 7.2.0 1.4.1 Security SupportThe ProConnect server now supports an HTTPS connection with SBA servers (for events and install file download operations).1.4.2 Remove Install FilesInstall files can now be removed from the SBA ProConnect server. A new page in the SBA Management Interface "Install File List" enables this action to be performed. The removal action also deletes the file from the disk.1.4.3Skype for Business Support The ProConnect server now supports an upgrade from Lync 2010 server and Lync 2013 server to Skype for Business server.SBA ProConnectRelease Notes 10Document #: LTRT-38945 This page is intentionally left blank.Release Notes 2. Resolved Constraints Version 7.2 11 SBA ProConnect2Resolved Constraints 2.1 Version 7.2.15This release includes the following resolved constraint:⏹ The SBA device cannot download .part11 file from the SBA ProConnect server– Thisproblem is due to a missing mime type configuration value in the IIS Manager, WIM slices with extension ‘.part11’ , ‘.part12’.2.2 Version 7.2.11This release includes the following resolved constraint:⏹ SBA Server Details – CU List is broken In Skype for Business systems, the lines in thelist of ‘Component Versions’ in SBA details page is truncated. The fix uses different method to retrieve the CU list from the OS.SBA ProConnectRelease Notes 12Document #: LTRT-38945 This page is intentionally left blank.Release Notes 3. Known Constraints Version 7.2 13 SBA ProConnect3Known Constraints 3.1 Version 7.2This release includes the following known constraints:⏹ When upgrading, the following message may appear; select Repair option and Next .⏹Only Windows Imaging File Format (wim) installation image files can be used with the ProConnect server. Other SBA image formats cannot be used. ⏹Currently SBA ProConnect only supports the Mediant 800B and Mediant 1000B products. ⏹SBA ProConnect SBA list Synchronization takes several minutes, during which time the SBA ProConnect GUI is locked. ⏹ The SBA ProConnect installation does not include any CU or SBA software image. Touse these files in the system, the administrator must download them from the AudioCodes Web site and copy them manually to the ProConnect server at: c:\Proconnect\InstallFile folder.⏹ The Download task does not apply to CU files – Only OS burn images (Lync 2010 andLync 2013 images) can be applied in the Download task.⏹ Non-secure HTTPS Webadmin access is enabled by default. Enabling secure accessto the Webadmin requires further IIS configuration and certificate signing.⏹ The SBA setup must be completed manually after the burn operation when running atask to upgrade the OS image from Lync 2010 to Lync 2013 or SfB.SBA ProConnectRelease Notes 14Document #: LTRT-38945 ⏹ The administrator must move the SBA users to another Skype for Business poolbefore commencing the OS upgrade procedure and return them after completing the new SBA configuration in the new image.⏹ Only 10 simultaneous download operations can be performed. When a task has morethan 10 SBA servers to perform downloads, the download operation for the additional SBA’s only occurs once resources are freed.⏹ When a task has been terminated manually by the administrator, it can take up to onehour until the SBAs assigned to this task can be reassigned to a new task. Therefore, such an SBA should not be assigned to a new task for at least one hour.⏹ If there is no network connection between the SBA and the SBA ProConnect serverwhen a CU or OS burn task is started on the ProConnect server, the SBA is marked as “failed” in the task result. In this case, the SBA needs to be assigned to a new task altogether.Release Notes 4. Upgrade Procedure 4 Upgrade ProcedureThis section describes how to upgrade the SBA ProConnect server.To upgrade SBA ProConnect:1. Download the file ProConnectWixBootstrapper_7.2.14 from:https:///services-support/maintenance-and-support2. On the SBA ProConnect server, stop the ProConnect service before running setup.3. Run the setup and verify that it is completes successfully.4. After the setup, verify that the service “SBA ProConnect Service” is running.5. Login to the SBA ProConnect Web at https://<ip_of_server>/webadmin/login.php.6. Synchronize the SBA List.7. Schedule several tasks and verify that these actions are successful.Version 7.2 15 SBA ProConnectInternational Headquarters1 Hayarden Street,Airport CityLod 7019900, IsraelTel: +972-3-976-4000Fax: +972-3-976-4040AudioCodes Inc.200 Cottontail LaneSuite A101ESomerset NJ 08873Tel: +1-732-469-0880Fax: +1-732-469-2298Contact us: https:///corporate/offices-worldwideWebsite: https:///©2019 AudioCodes Ltd. All rights reserved. AudioCodes, AC, HD VoIP, HD VoIP Sounds Better, IPmedia, Mediant, MediaPack, What’s Inside Matters, OSN, SmartTAP, User Management Pack, VMAS, VoIPerfect, VoIPerfectHD, Your Gateway To VoIP, 3GX, VocaNom, AudioCodes One Voice and CloudBond are trademarks or registered trademarks of AudioCodes Limited. All other products or trademarks are property of their respective owners. Product specifications are subject to change without notice.Document #: LTRT-38945。
PRO HD使用说明书
3. CONNECT
从手机上显示的蓝牙设备列表中选 择“PLT_VoyagerPRO”。 如果手机要求输入密码,请输入四 个零 (0000)。您可以看到屏幕上出 现 ****。 某些手机还会要求在配对后确认耳机 连接。 在手机和耳机已成功配对/连接后, 耳机 LED 指示灯将停止闪烁红/蓝。
确定最佳舒适性
1 2
为获得最佳的声音清晰度、 舒适 感和传感器识别性能, 请确保 稳定佩戴。
3
耳机配备有中号的耳塞, 但您可以使用提供 的小号或大号耳塞 (可选) 进行更换。
有关多点技术的更多信息
Plantronics VoyagerPRO HD 支持多点技术,从而允许 将一个耳机同时用于两部 不同的蓝牙手机。 要将您的耳机与第二部 手机配对,请参阅 “连接至您的手机”。 如何开始通话 在启用多点技术时,耳机将从 您最近拨出呼叫的手机上起动 或重拨呼叫。 要转而使用第二部已配对的手机, 请使用该手机上的控件进行通话。 第二部手机将通过耳机激活该 链接。 注:耳机无法在通过第二部手机 应答手机时暂停当前的呼叫。 如何在一部手机正在通话的情况下 应答另一部已配对手机上的呼叫 要在另一部手机上应答第二个呼叫, 则必须挂断当前通话或转接回第一部手机。 要转接呼叫,请参阅“详细查看”。 如果您选择拒绝接听第二个呼叫, 则第二个呼叫将转为语音邮件。 当您在应答另一个呼叫时,应答 第二部手机的来电: 1. 要 应答第二个呼叫,请通过轻触 通话按钮结束第一个呼叫。 2. 通 过再次轻触通话按钮, 应答第二个呼叫。 提示:为避免出现与多点有关的 问题,请使用耳机上的通话按钮, 而不使用手机控件。
操作温度 存储温度 充电温度
LED
• 正在充电(红灯长亮。充满电时,LED 指示 灯关闭。) • 电池状态(低电量 = 红灯闪烁 2 次、需 充电 = 红灯闪烁 3 次) • 配对模式(闪烁红灯/蓝灯)
- 1、下载文档前请自行甄别文档内容的完整性,平台不提供额外的编辑、内容补充、找答案等附加服务。
- 2、"仅部分预览"的文档,不可在线预览部分如存在完整性等问题,可反馈申请退款(可完整预览的文档不适用该条件!)。
- 3、如文档侵犯您的权益,请联系客服反馈,我们会尽快为您处理(人工客服工作时间:9:00-18:30)。
Prohear 平台操作指南
一:登入Prohear
二:建立客户档案
三:输入听力图
四:进入inspire 调试界面
一:登入Prohear
用户名:ABC
密码:123
二:建立客户档案。
1.点击左边导航栏中的,然后输入客户姓名、出生日期等详细信息。
Last:姓First:名
Birth date:出生日期,月/日/年,输入之后会在age中自动生成年龄。
2.点击左边保存按钮。
三:输入听力图
1.点击右下角Prohear。
2.出现下图,点击右边第一个图标。
3.如图,点击audiogram(听力图)。
4.出现以下界面,点击中间第二个图标(红圈所示),意思为编辑听力图。
5.出现以下界面,直接用鼠标在听力图上输入听力,完成后点击右下角的save&exit,保存
并退出。
如果想在同一个图上显示双耳听力,点击。
四:进入Inspire 调试界面。
点击下图inspire 图标进入inspire调试界面。