Surface Hub发布 84英寸的“大平板”
贝朗说明书
Dialog+透析机使用说明书目录1. 安全操作..........................................................................1-31.1 关于使用说明.........................................................................1-3 1.1.1 有效性...............................................................................1-3 1.1.2 目标人群...........................................................................1-3 1.1.3 本使用说明书中的警告、注意事项与符号.................1-4 1.1.4 缩写词...............................................................................1-5 1.2 用途及适应症.........................................................................1-5 1.3 禁忌症.........................................................................1-61.4 副作用.........................................................................1-61.5 特殊危害与预防措施.............................................................1-6 1.5.1 患者的特殊条件..............................................................1-6 1.5.2 电气危险...........................................................................1-7 1.5.3电磁相互作用....................................................................1-7 1.5.4维护与过滤器的更换........................................................1-7 1.6 操作人员信息.........................................................................1-8 1.6.1 试运行之前厂家的培训..................................................1-8 1.6.2 对使用人员的要求..........................................................1-8 1.6.3 法规符合性......................................................................1-9 1.6.4 厂家责任...........................................................................1-91.6.5 技术变更........................................................................1-102. 产品说明..........................................................................2-32.1 基本机型.........................................................................2-32.1.1 Dialog 单泵透析机............ +............................................2-5 2.1.2 Dialog 双泵透析机.............+ ............................................2-6 2.1.3 Dialog血液透析滤过-联机系统(HDF-online)+ ........2-7 2.2 透析机上的符号......................................................................2-8 2.3 控制元件与监视器上的信息.................................................2-9 2.4 全部图标总览.......................................................................2-11 2.5 输入数值......................................................................2-172.6 疗法种类......................................................................2-212.6.1 血液透析(HD)..........................................................2-21 2.6.2 单纯超滤(ISO UF)....................................................2-21 2.6.3 血液滤过-联机系统(HF/HF-online).......................2-22 2.6.4 血液透析滤过-联机系统(HDF/HDF-online).........2-22 2.7 治疗方法......................................................................2-232.7.1 双针程序........................................................................2-23 2.7.2 单针程序........................................................................2-23 2.8 透析的有效性(Kt/V).......................................................2-262.9 定时器的使用......................................................................2-273 安装与调试..........................................................................3-3 3.1 供货范围.........................................................................3-33.2 储存.........................................................................3-33.2.1 装在原包装内储存..........................................................3-33.2.2 用前临时储存..................................................................3-33.2.3 停止运行...........................................................................3-3 3.3 运输.........................................................................3-43.3.1 滚轮运输...........................................................................3-4 3.3.2 搬运...................................................................................3-4 3.4 安装现场.........................................................................3-53.4.1 电气连接...........................................................................3-6 3.4.2 水损防护...........................................................................3-6 3.4.3 潜在的爆炸区域..............................................................3-63.5 水源.........................................................................3-63.5.1 水源质量与透析液..........................................................3-63.5.2 用过液体的处置..............................................................3-73.6 初始调试.........................................................................3-73.7 设置日期与时间......................................................................3-73.8 开机与关机.........................................................................3-84 血液透析的准备..........................................................................4-3 4.1 调用血液透析主屏幕.............................................................4-3 4.2 自检.........................................................................4-44.2.1 自检期间的操作..............................................................4-44.2.2 终止自检程序..................................................................4-54.2.3 完成自检程序..................................................................4-54.3 减少准备治疗阶段的报警声音.............................................4-5 4.4 连接浓缩液.........................................................................4-8 4.5 设置冲洗参数.........................................................................4-9 4.6 安装和冲洗管路系统..........................................................4-10 4.6.1 安装管路系统...............................................................4-104.6.2 冲洗和测试管路系统...................................................4-124.7 肝素泵的准备......................................................................4-12 4.7.1 安装肝素注射器...........................................................4-124.7.2 肝素管路排气...............................................................4-134.8 设置治疗参数......................................................................4-14 4.8.1 设置透析液参数...........................................................4-154.8.2 透析液的监测...............................................................4-164.8.3 设置超滤参数...............................................................4-174.8.4 置压力范围...................................................................4-184.8.5 设置肝素参数...............................................................4-204.9 冲洗透析器......................................................................4-21 4.10 待机模式......................................................................4-214.10.1 激活待机模式.............................................................4-224.10.2 关闭待机模式.............................................................4-224.11 准备阶段中停电的处理....................................................4-225. 启动血液透析..........................................................................5-3 5.1 检查患者数据.........................................................................5-35.2 连接患者连接与启动血液透析.............................................5-45.3 血液透析期间.........................................................................5-5 5.3.1 血液侧血压范围的监测..................................................5-55.3.2 用最低超滤速度治疗......................................................5-75.3.3 肝素的追加注射..............................................................5-75.3.4 动脉追加注射..................................................................5-85.3.5 治疗参数图形显示(趋势图.........................................5-105.3.6 血液透析的中断(旁路...............................................5-125.4 治疗的完成......................................................................5-135.4.1 终止治疗........................................................................5-135.4.2 继续治疗........................................................................5-136. 结束血液透析治疗..........................................................................6-2 6.1 再输注.........................................................................6-26.2 排空透析器.........................................................................6-46.3 治疗执行情况总览.................................................................6-47. 消毒..........................................................................7-37.1 程序与消毒剂.........................................................................7-3 7.2 消毒准备.........................................................................7-47.2.1 消毒剂罐的定位..............................................................7-47.2.2 选择消毒程序..................................................................7-57.3 自动关机与重新启动.............................................................7-67.3.1 消毒后自动关机..............................................................7-67.3.2 自动关机和重新启动......................................................7-67.4 化学消毒.........................................................................7-87.5 短时间化学消毒......................................................................7-9 7.6 热消毒.........................................................................7-97.7 水源来水的消毒...................................................................7-10 7.7.1 用来自闭合主管路的消毒溶液进行化学消毒...........7-117.7.2 用来自闭合主管路的热渗透剂进行热消毒..............7-127.7.3 冲洗渗透剂的进口管...................................................7-147.8 检查消毒剂残留物..............................................................7-15 7.9 脱钙......................................................................7-167.10 终止消毒......................................................................7-167.11 旧机器的处置.....................................................................7-168. 血液透析滤过-联机系统/血液滤过-联机系统............................8-3 8.1 血液透析滤过/血液滤过的准备............................................8-4 8.1.1 调用血液透析滤过/血液滤过屏幕................................8-48.1.2 连接浓缩剂......................................................................8-48.1.3 输入置换参数..................................................................8-58.1.4 插入管路系统..................................................................8-78.1.5 用来自联机系统的置换溶液充注和冲洗管路系统....8-78.1.6 检查管路系统...............................................................8-108.2 血液透析滤过/血液滤过的执行.........................................8-10 8.2.1 将患者与血液透析滤过/血液滤过系统进行连接....8-108.2.2 血液透析滤过/血液滤过期间.......................................8-118.3 血液透析滤过/血液滤过的完成.........................................8-138.3.1 再输注置换溶液...........................................................8-13 8.3.2 排空透析器...................................................................8-15 8.4 消毒......................................................................8-158.4.1 定时消毒........................................................................8-15 8.4.2 显示联机过滤器数据...................................................8-15 8.4.3 更换联机过滤器...........................................................8-168.4.4 置换液的取样...............................................................8-199. 针程序..........................................................................9-39.1 单针交叉(SN-CO)..............................................................9-3 9.1.1 治疗准备...........................................................................9-3 9.1.2 治疗运行...........................................................................9-5 9.1.3 结束治疗...........................................................................9-7 9.2 单针阀.........................................................................9-89.2.1 治疗准备...........................................................................9-8 9.2.2 治疗运行........................................................................9-109.2.3 结束治疗........................................................................9-1010. 可选功能.......................................................................10-5 10.1 血压自动监测.....................................................................10-5 10.1.1 (血压计)袖带.........................................................10-5 10.1.2 设置..............................................................................10-7 10.1.3 启动/停止措施............................................................10-9 10.1.4 列出与图形显示测量值..........................................10-1010.2 bioLogic RR. - 自动血压稳定.........................................10-1110.2.1 操作模式....................................................................10-11 10.2.2 设置血压下限和最大超滤速度................................10-11 10.2.3 超滤与血压发展图形显示.......................................10-1310.3 bioLogic RR. Comfort曲线图向导法自动血压稳定功能...........10-1410.3.1 程序............................................................................10-14 10.3.2 设置收缩压的最小值(SLL)和超滤率的最大值.....10-15 10.3.3 推荐的收缩压下限值的设置(SLL)........................10-17 10.3.4 使用BioLogic RR. Comfort功能.............................10-17 10.3.5 血压级数和超滤图表屏幕.......................................10-18 10.4 碳酸氢盐筒固定器..........................................................10-19 10.4.1 插入碳酸氢盐筒.......................................................10-20 10.4.2 透析期间更换碳酸氢盐筒1.......................................0-21 10.4.3 透析之后排空碳酸氢盐筒.......................................10-21 10.5 血液透析滤过(HDF)袋...............................................10-22 10.5.1 调用血液透析滤过/血液滤过屏幕.........................10-22 10.5.2 置置换参数...............................................................10-23 10.5.3 血液透析滤过袋的准备.1.........................................0-24 10.5.4 用袋装的置换溶液充注和冲洗管路系统..............10-25 10.5.5 换袋............................................................................10-26 10.5.6 报警范围...................................................................10-2610.6 浓缩液的集中供给..........................................................10-28 10.7 透析液超净滤器..............................................................10-28 10.7.1 使用与操作模式.......................................................10-28 10.7.2 更换透析液过滤器...................................................10-30 10.7.3 数据复位...................................................................10-32 10.7.4 消毒............................................................................10-33 10.7.5 对透析液取样...........................................................10-34 10.8 应急电源/蓄电池.............................................................10-36 10.8.1 充电指示器...............................................................10-37 10.8.2 动电池测试...............................................................10-37 10.8.3 电池操作结束...........................................................10-38 10.9 通信接口....................................................................10-38 10.9.1 BSL(床边连接)......................................................10-38 10.9.2 Dialog+透析机的计算机接口....................................10-3810.9.3 护士呼叫...................................................................10-3811. 配置........................................................................11-311.1 配置每周消毒计划..............................................................11-3 11.2 配置曲线^ .......................................................................11-4 11.2.1 基本原则.......................................................................11-4 11.2.2 设置曲线参数..............................................................11-5 11.3 UF曲线.......................................................................11-711.3.2 UF曲线表......................................................................11-9 11.4 患者磁盘/IC卡.................................................................11-14 11.4.1 使用患者磁盘/IC卡..................................................11-14 11.4.2 患者磁盘的格式化/清除IC卡内容........................11-1411.4.3 输入患者姓名...........................................................11-1511.4.4 阅读患者数据...........................................................11-1611.4.5 储存患者数据(参数设定值)...............................11-1611.5 输入计算透析有效性的参数..........................................11-17 11.6 调整监视器的亮度...........................................................11-22 11.7 选择屏幕显示语言...........................................................11-2311.8 编辑趋势图表参数...........................................................11-2412. 维护与清洗.......................................................................12-3 12.1 外部清洗......................................................................12-312.2 维修与技术安全检查........................................................12-3 12.2.1 定期维修.....................................................................12-412.2.2 技术安全检查(TSC)..................................................12-4 12.3 技术维修和保修................................................................12-5 12.3.1 保修..............................................................................12-512.4 旧透析机的处置................................................................12-513. 报警和纠正措施.......................................................................13-3 13.1 显示和复位报警................................................................13-3 13.2 报警和结果......................................................................13-5 13.2.1 透析报警.....................................................................13-513.2.2 ABPM 报警................................................................13-11 13.3 SAD 纠正报警..................................................................13-12 13.4 手动血液回流..................................................................13-13 13.5 部分声音信号的省略......................................................13-14 13.5.1 部分报警声音的省略..............................................13-1413.5.2 部分操作提示声音的省略.......................................13-1514. 配件.......................................................................14-314. 选项......................................................................14-314.2 机械配件......................................................................14-414.3 其它耗材......................................................................14-415 技术规范......................................................................15-315.1 一般技术规范....................................................................15-3 15.2 环境条件......................................................................15-415.3 建议安全距离....................................................................15-5 15.4 透析液系统......................................................................15-6 15.5 体外循环......................................................................15-915.6 接触到透析液的物质材料..............................................15-12 15.7 HDF/HF-联机系统技术规范............................................15-13 15.8 挂袋式的技术规范..........................................................15-14 15.9 ABPM 血压监测装置.......................................................15-1515.10 对环境有毒有害的物质名称和含量............................15-1616 录 ......................................................................16-316.1 透析液流量表....................................................................16-3 16.1.1 主要透析液流量表....................................................16-316.1.2 Dialog+流程表..............................................................16-516.2 维修协议......................................................................16-6目录1. 安全操作..........................................................................................1-3 1.1 关于使用说明...........................................................................1-3 1.1.1 有效性................................................................................1-31.1.2 目人群............................................................................1-31.1.3 本使用说明书中的警告、注意事项与符号.................1-41.1.4 缩写词................................................................................1-51.2 用途及适应症...........................................................................1-5 1.3 禁忌症.......................................................................................1-6 1.4 副作用.......................................................................................1-6 1.5 特殊危害与预防措施..............................................................1-6 1.5.1 患者的特殊条件...............................................................1-61.5.2 电气危险............................................................................1-71.5.3 电磁相互作用....................................................................1-71.5.4 维护与过滤器的更换........................................................1-71.6 操作人员信息...........................................................................1-8 1.6.1 试运行之前厂家的培训...................................................1-81.6.2 对使用人员的要求...........................................................1-81.6.3 法规符合性.......................................................................1-91.6.4 厂家责任............................................................................1-91.6.5 技术变更.........................................................................1-10警告术语含义DANGER(危险)如果不加防范,将存在可能导致人员死亡或严重受伤的极大危险。
健伍TS-2000中文说明书

· 室外天线与电力线之间的距离最低应该保持天线及 其相关支撑结构的一倍半。这个距离才能保证一旦支 撑结构出现问题时不会影响到电力线路。
TS-2000:HF/ VHF/ UHF 全模式多频段电台 TS-2000X:HF/ VHF/ UHF/ 1.2 GHz 全模式多频段电台 TS-B2000:HF/ VHF/ UHF 全模式多频段电台
关于 TS-B2000 如何操作和控制电台,请参阅联机帮助。 安装和连接请参照第 2、3 和第 13 页。
· 电台的安放位置要通风良好。不要在电台上放置书籍 或其他设备,以免阻碍空气流动。电台后部与墙壁之 间最低保持 10 厘米的间隔。
· 不要在潮湿或靠近水的位置使用电台。例如,应避免 在浴缸、水槽、游泳池附近或在潮湿的地下室使用。
· 出现不正常的气味或烟雾往往是设备故障的表现。立 即关闭电源并拔下电源线,然后联系健伍服务站或您 的经销商。
数量
TS-2000 TS-2000X
TS-B2000
1
1
1
1
1
1
1
1
1
1
1
1
1
1
1
1
4
4
1
1
1
1
-
1
1
1
1
1
1
1
文档中的描述约定
为避免不必要的重复,以下的文档中将使用下表所列的
简化方式。
描述
操作方法
按[KEY]
按一下 KEY 键然后放开。
按住 KEY1 键不放,再按 KEY2 键。
可攜式投影機 V300X V260X V230X V260 V230 使用手冊说明书

型號
V300X/V260X/V230X/V260/V230
使用手冊
2011 年 1 月第一版
DLP 和 BrilliantColor 是 Texas Instruments (德州儀器有限公司)的商標。 IBM 爲 International Business Machines Corporation (國際商業機器公司)的商標或註冊商標。 Macintosh, Mac OS X 和 PowerBook 爲 Apple Inc. (蘋果公司)在美國和其他國家註冊的商標。 Microsoft、Windows、Windows Vista、Internet Explorer、 .NET Framework 和 PowerPoint 爲 Microsoft Corporation (微軟公司)在美國和/或其他國家的註冊商標或商標。 MicroSaver 爲 ACCO 品牌的一個分公司 Kensington Computer Products Group 的註冊商標。 Virtual Remote Tool (虛擬遙控工具)使用 WinI2C/DDC library, © Nicomsoft Ltd。 HDMI、HDMI 標誌和 High-Definition Multimedia Interface 爲 HDMI Licensing LLC.的商標或註冊商標。
切勿讓紙夾和紙屑等異物掉入投影機內。切勿試圖找回可能掉入投影機內的任何物品。切勿將鐵絲或者螺絲起子 等金屬物體插入投影機內。若發現有物體掉入投影機內部,須立即斷開電源,然後委託有維修資格的維修服務人 員取出物體。 切勿在投影機上面放置任何物體。 雷雨天不要觸摸電源插頭。此舉可能引起電擊或者火災。 投影機規定操作電源爲 200-240 伏特 50/60 赫茲交流電。在使用投影機之前,須確認所用電源是否符合本投影機 要求。 切勿在投影機啓動狀態下窺視鏡頭。此舉會導致眼睛嚴重受傷。
中兴10.1英寸的Win8平板电脑V98并没有让人失望
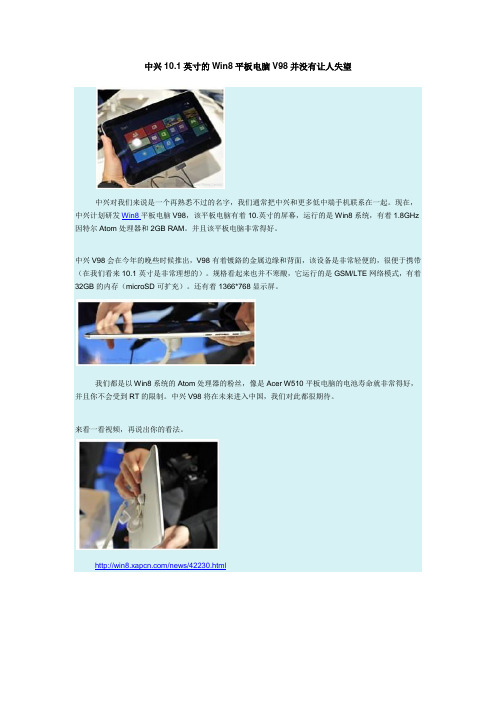
中兴10.1英寸的Win8平板电脑V98并没有让人失望
中兴对我们来说是一个再熟悉不过的名字,我们通常把中兴和更多低中端手机联系在一起。
现在,中兴计划研发Win8平板电脑V98,该平板电脑有着10.英寸的屏幕,运行的是Win8系统,有着1.8GHz 因特尔Atom处理器和2GB RAM。
并且该平板电脑非常得好。
中兴V98会在今年的晚些时候推出,V98有着镀鉻的金属边缘和背面,该设备是非常轻便的,很便于携带(在我们看来10.1英寸是非常理想的)。
规格看起来也并不寒酸,它运行的是GSM/LTE网络模式,有着32GB的内存(microSD可扩充)。
还有着1366*768显示屏。
我们都是以Win8系统的Atom处理器的粉丝,像是Acer W510平板电脑的电池寿命就非常得好,并且你不会受到RT的限制。
中兴V98将在未来进入中国,我们对此都很期待。
来看一看视频,再说出你的看法。
/news/42230.html。
投影仪操作手册说明书

伯朗特操作说明书
微软Surface Hub 55英寸 84英寸地面支持杆安装指南说明书

Microsoft Surface HubFloor Support Mount Assembly and Mounting Guide (55”/84”)For wall-mounted installations requiring floor supportThese instructions assume wood stud and gypsum board wall construction with 2-by-4 studs spaced 16 inches apart. The supplied mounting screws are for use only in 1/2-inch-thick or 5/8-inch-thick gypsum board walls less than 10 feet high. For any other kind of wall, ask a professional installer for advice on the appropriate hardware and methods.Important safety warningsBefore assembling and mounting Microsoft Surface Hub on the floor support mount, read these important safety warnings.This symbol identifies safety and health messages in this device guide.WARNING: Read safety and health informationRead this guide for important safety and health information. Keep all printed guides for future reference. Failure to follow instructions and properly set up, use, and care for this product can increase the risk of serious injury or death, or damage to the device or devices.For an online version of this guide and additional support, safety, and health information go to:/support/surface-hubWARNING: Installation experts—knowledgeImproper handling or installation could result in injury or death. To avoid hazards related to improper installation, ensure the installation is performed by people who have read and understand the installation instructions prior to beginning. In some cases, installation should be performed by trained and authorized installation professionals. It is the consumer’sresponsibility to ensure that the flooring and wall can properly support the total weight.WARNING: Minimum number of installersIn order to reduce the risk of injury, Microsoft Surface Hub 55” requires a minimum of two people and Microsoft Surface Hub 84” requires a minimum of four people to perform the installation.WARNING: Proper mounting to wallTo reduce the risk of the device falling, resulting in injury, death or damage to the device, ensure that:∙The wall strength and mounting method are appropriate to support the weight of this device. While this stand is designed to support the device from the floor, the wallmust be strong enough to firmly hold the anchoring system. The included fastenersare for use in ½” or thicker gypsum wall board. For other wall types, ask aprofessional installer for advice.Reinforcement might be necessary for somematerials such as plaster/thin plastic board/wood before starting installation.∙If your wall is not ½” or thicker gypsum board and10 feet high or less, purchase the correct hardware to support the device in your installation.∙Use only wall mounts intended for use with the Microsoft Surface Hub model you’re mounting.∙Securely tighten all fasteners according to the instructions. Do not overtighten.WARNING: Proper installation environmentTo reduce risks related to the environment, the unit must be installed indoors only.∙It is the consumer’s responsibility to ensure that structural engineering requirements for potential seismic activity are met per your local requirements. This may requirewall reinforcement.∙Do not install near sources of high heat or steam, or where condensation is likely to occur, such as near air conditioners.∙Do not install on a structure that is prone to vibration or movement.∙Do not install in such a way as to block ventilation holes. Allow for proper ventilation according to the device specifications.∙Do not install in areas with potentially explosive atmospheres. These areas are often, but not always, posted and can include fueling areas, such as below decks on boats, fuel or chemical transfer or storage facilities, or areas where the air containschemicals or particles, such as grain dust or metal powders. The Surface Hub should not be used in these areas. In such areas, sparks can occur and cause an explosion or fire.IMPORTANT: Avoid damage to your device.The Surface Hub 55” may be supported only by its bottom edge when not supported by the mounting system or lifting handles. Rest it only on its bottom edge, and support it to keep it vertical. The Surface Hub 84” is intended to be lifted only by the lifting handles when being carried. Do not place either device on its face, back, top, or sides.WARNING: Handling and site preparationDo not attempt to install the device with fewer than the required number of individuals. To reduce the risk of injury due to the size and weight of the device, keep the device upright. When placing the device onto the mount, be certain it is properly seated before releasing it. Keep the assembly area clear of packing materials. Remove materials after each step.WARNING: Designated load capacityWall mounts are rated for a designated load capacity. To reduce risk of personal injury, death, or damage to the device, never exceed the designated load capacity of the wall mount.Refer to the specification section for weights and load capacities.WARNING: Tip-over and fall hazardThe wall mount is designed to handle the weight of the device. To reduce the risk of injury or death, never allow anyone to hang from the unit. Never suspend anything other than the designated device.WARNING: Do not attempt to repair or modifyAssemble mount components using only fasteners provided by Microsoft, as shown on the parts list. Do not attempt to take apart, open, service, or modify the product, accessories, or power supply. Doing so could present the risk of electric shock or other hazard. Any evidence of any attempt to open and/or modify this device, including peeling, puncturing, or removing any of the labels, will void the Limited Warranty. Heed all warnings and follow all instructions.WARNING: Electrical outlet locationTo reduce risks related to electric shock, ensure that there is an appropriate electrical outlet within reach of the power cord provided with device to be mounted. Do not use extension cords, or a power cord other than what is provided with the display assembly.WARNING: Pinch hazardWhen mounting the wall support and installing the device, take care to avoid pinching fingers.WARNING: Choking hazardThis device or its accessories may contain small parts, which may be a choking hazard to children under 3. Keep small parts away from children.WARNING: Small childrenThis device and its accessories are not toys. To reduce the potential for injury, death or product damage, do not allow small children to play with them. Never allow children to climb on or hang from the device or its stand.WARNING: Mounting surface orientationThe wall mounting assembly is designed for vertical surfaces only. To reduce the risk of injury or death, do not mount to any surface other than a vertical wall. Do not mount in any orientation other than landscape.This guide outlines the steps for assembling the Surface Hub 55” and Surface Hub 84” floor support mount. Before you begin, make sure you have all of the components in the parts list. SpecificationsRequired tools (not included)#2 Phillips screwdriver4mm hex key5mm hex key (Surface Hub 84” only)8mm hex key10mm wrenchDrill1/16-inch drill bit1/2-inch drill bitLevelStud finderFurther specifications for Surface Hub can be found at/surface/support/surface-hubParts listImages are not to scale.Upright (1 each) Wall Plate (1 each)Braces (2 each) Hanger Bars (2 each) Front Cover (1 each)M6 nuts (6 each)M6x12 screw (4 each): stand assembly screw Short screw (4 each): hanger bar screw Surface Hub 55”: M6x12Surface Hub 84”: M8x12M6 split washer (4 each)Stand assembly split washersM6 washer (4 each)Stand assembly washersToggle bolts (6 each)Assembly and mounting instructionsStep 1: Build the floor support mount assemblyy the upright on a horizontal surface flat side down and with the alignmentbolts pointing up.y the wall plate on the upright, with the alignment bolts on the uprightprotruding through the wall plate.Note: When the upright and the wall plate are aligned properly,∙The alignment bolts on the upright will protrude through the wall plate.∙The orientation arrows on the wall plate will point to the top of theassembly.C.Begin connecting the wall plate to the upright by threading the M6 nuts on thetwo center alignment bolts.Note: Leave the nuts loose enough to allow the wall plate to move freely. You willtighten them later.D.Attach the right-hand brace to the assembly.a.With the assembly still horizontal, place one of the braces over the two right-hand bolts.b.Thread M6 screws (long) into the holes at the top and bottom of the brace.c.Thread M6 nuts onto the alignment bolts protruding through the wall plate.Note: Leave the nuts loose enough to allow the wall plate to move freely. You will tighten them later.E.Attach the left-hand brace to the assembly.a.With assembly still horizontal, place the remaining brace over the two left-hand bolts.b.Thread M6 screws (long) into the holes at the top and bottom of the brace.c.Thread M6 nuts onto the alignment bolts protruding through the wall plate.Note: Leave the nuts loose enough to allow the wall plate to move freely. You will tighten them later.F.Before tightening the bolts, lift the assembly and place the flat side against thewall.Note: The wall plate should be at the top of the assembly, with the alignment arrow on the wall plate pointed toward the ceiling.G.Beginning with the nuts on the two alignment bolts in the middle of the wallplate, tighten all of the nuts.WARNING: Ensure screws are securely tightenedTo reduce the risk of the product falling, ensure that all screws are securelytightened before mounting the display. Do not overtighten.Step 2: Anchor the floor support mount assembly to the walle a stud finder to locate and mark the studs behind the wall where Surface Hubwill be permanently anchored.WARNING: Hidden hazardsWalls can contain electrical wires and other unseen hazards and obstacles such aswater or gas lines. It is the installer’s responsibility to locate and avoid thesehazards during installation. If drilling and/or cutting into the mounting surface,always make sure that there are no electrical wires, water lines, or gas lines in thewall. Cutting or drilling into any of these may cause serious injury or death.B.Place the assembly against the wall, with the orientation arrow in the wall platepointing toward the ceiling.C.Verify that at least one mounting slot, in each of the six groups of verticalmounting slots, is not aligned over a stud.Note: The anchoring bolts are designed to anchor behind the gypsum wallboard, not into the stud.D.Mark the wall at the center of each of the six slots you have chosen.E.Temporarily set the floor support mount assembly aside.F.Verify there is no stud behind the six marks you created, by drilling a 1/16-inchtest hole.Note: If you find a stud, choose new slots by starting at the beginning of this step again and using a stud finder to re-identify and marking new anchor locations.G.After completing the six test holes, drill a ½-inch hole at each test location.H.Place the floor support mount assembly back against the wall, aligning the sixchosen mounting slots with the six drill holes.I.Insert toggle bolts through each of the mounting slots and into the ½-inch holesin the wall.J.Make sure that the toggle bolt keys are seated in the mounting slots.K. Tighten each bolt enough to keep the key secure in the slot.L. When all anchor bolts are inserted, fully tighten the toggle bolts to secure thestand to the wall.WARNING: Ensure screws are securely tightenedTo reduce the risk of the product falling, ensure that all screws are securelytightened before mounting the display. Do not overtighten . Step 3: Attach the hanger bars to Surface HubA. Place one of the hanger bars over the left mounting screw holes on the back ofSurface Hub.Note : The tightening screw is located at the base of the hanger bar. The base of thehanger bar should face down. The left mounting screw holes are the holes closest to the left edge of Surface Hub.Key seated in sloting the hanger bar screws, attach the hanger bar to the mounting screw holes.C.Tighten the screws securely.WARNING: Ensure screws are securely tightenedTo reduce the risk of the product falling, ensure that all screws are securely tightenedbefore mounting the display. Do not overtighten.D.Repeat these steps for the right-side hanger bar.Step 4: Hang Surface Hub on the wall plateWARNING: Ergonomic LiftingTo reduce the potential for lifting related injuries, follow good ergonomic liftingguidelines.Ergonomic lifting guidance• Pla n ahead. Ensure that everyone lifting the display knows the lifting plan and theirrole.• Determine if you can lift the unit. Is it too heavy or too awkward?• Decide if you need lifting aid.• Check your environment for obstructions and slippery surfaces.• Make sure the lifting team agrees on the plan.• Lift with your legs, not your back.• Bend at your knees, keeping your back s traight.• Keep the unit close to your body.• Center your body over the unit.• Keep your feet about shoulder width apart.• Lift straight up smoothly.• Keep your torso straight; do not twist while lifting or after the load is lifted.• Grasp the prope r handhold locations as shown below.• Set the unit onto the stand or wall mount slowly and smoothly with a straight back .• Do not release the display panel until you are certain that it is properly seated.WARNING: To reduce the risk of injury or product damage, use only the handholdlocations shown below for the Surface Hub 55”. Lifting requires a minimum of twopeople.WARNING: To reduce risk of injury or product damage, use only the handholdlocations shown below for the Surface Hub 84”. Lifting requires a minimum of fourpeople.Person 1Person 2 Person 1 Person 2 Person 3Person 4A. Confirm that the hanger bar clamps are open.Note : If the clamps are not fully open, turn the clamp screws counterclockwise to open them (see images below).B. Lift Surface Hub and align the top hooks of the hanger bars with the top edge of the wallplate.C.Lift Surface Hub, aligning the top hanger bar hooks above the wall plate. D. GENTLY lower Surface Hub to seat and rest the top hanger bar hooks on the top wallplate flange. WARNING: Ensure hanger bar is resting on wall plate Do not release Surface Hub until you are sure the hanger bars are properly seated on the wall plate . E.Slide the lower hanger bar hook under lower wall plate flange. F. Secure Surface Hub to the lower wall plate flange by tightening the hanger bar clampscrews.Clamp OpenClamp Closed Clamp ScrewTop HooksFully EngagedNot EngagedWARNING: Ensure screws are securely tightenedTo reduce the risk of the product falling, ensure that all screws are securely tightenedbefore mounting the display. Do not overtighten.Step 5: Remove the lifting handles (Surface Hub 84” only)Note: Surface Hub 84” is shipped with the lifting handles a ttached. Once Surface Hub is mounted, remove the handles and store them in case you need to remove Surface Hub from its mounting location.A.Remove the screws from the lifting handle mounting bars.ing a hex key, unscrew the screw that attaches the handle on the right side.b. Have someone secure the handles on the right side before working on theleft handle.Note : This step prevents dropping the right handle when removing the lefthandle.c. On the left handle, unscrew the screw that attaches the handle on the leftside.d. Remove the handles and set them aside for storage.B. Slide the mounting bar into Surface Hub ’s frame.a. Depress the lever inside the mounting bar.b. Once it releases, slide the mounting bar into the frame.c. Close the plastic door cover.Press toreleaseClosedoord. Repeat for all extended mounting bars.Step 6: Adjust and level the assemblyA. Use the leveling screws at the bottom of the upright to level the Surface Hub.a. Adjust the base of the upright to be flat on the floorb. With the base flat on both edges, adjust the leveling screws until the floorsupport mount and Surface Hub are level.Note: When you are done, all edges of the upright should be flush against thefloor.Step 7: Connect cables and attach the front coverWARNING: 55” tilting featureTo reduce potential pinch concerns, d o not push on the face of the Surface Hub 55” while you are accessing the back of the system.WARNING: Cable routingTo reduce risks related to electrical shock, ensure cables are routed in such a way as to not become pinched, crushed or cut.A. For Surface Hub 55”,a. Gently pull on the bottom edge to tilt Surface Hub away from the wall so you can access the connectors on the bottom. Leveling ScrewsNote : Surface Hub will remain in this position until you push it back to the normaluse position.B. For both Surface Hubs, connect the power, network, and any optional cables.C. Using the power switch next to the power cable, set the power to "On."D. For a Surface Hub 55”,a. Gently push the bottom edge toward the wall to return it to the normal useposition.E. Cover the cables by clipping the front cover to the base of the upright.a. Lift the cover behind Surface Hub, with the front cover clips above theupright catches.b. With the front cover flush against the upright, lower the front cover clipsonto the catches on the upright.Note : When you’re done, the bottom of the front cover should be flush with the base of the upright. No cables or gaps should be showing behind the front cover.Pull/pushhereTiltedposition Normal use position Power SwitchWhat’s next?Your Surface Hub is mounted and ready to set up. See the Setup Guide in your Welcome Kit.。
65寸75寸86寸98寸100寸会议平板,智能会议平板参数方案

智能会议平板技术参数(品牌:融创方圆)型号:RC65SHW/RC75SHW/RC86SHW/RC98SHW/RC100SHW1、整机产品概述1)铝合金外框,表面拉丝并阳极氧化处理,铁壳后盖,主动散热;2)4mm物理钢化防暴高透玻璃;加强视觉效果,提升触摸体验;3)高速10点触控书写体验,更好的圆滑度,更快的书写速度;4)支持无线投屏(手机/平板/笔记本/PC)会议功能。
5)使用国际通用标准的OPS插槽,一体化插拔式设计,方便升级与维护,外部无可见电脑模块的连接线,机身美观。
6)前置扩展端口:1路PC-USB、1路TV-USB 1路方便用户拓展使用。
7)前置三合一电视电脑开关按键;一体化设计,既能在临时不用此设备的时候,集中学生注意力;也能节省能源,节能环保;同时还能延长机器寿命。
方便用户使用。
8)喇叭出音前置,防止因内嵌环境导致声音效果变质。
9)有单机/双击/左右快捷键同一界面上进行多人多点触摸操作控制显示的信息内容并具有人性化的点击、互动、查询、放大缩小、旋转、翻页等互动展示功能。
10)触摸菜单,支持任何通道书写、批注、截图等功能。
2、技术参数参考:(融创方圆)触摸激活不需要任何激活安全可按要求选择不同等级的钢化玻璃噪音无噪音透光材料ABS透光条安装方式嵌入壁挂式,环境工作温度0℃〜40℃储藏温度-20℃~55℃储藏湿度10%〜90% RH Non-Condensing 工作湿度20%〜80% RH Non-Condensing外观外壳材料金属外壳颜色白色+黑色,壁挂孔位参考700*400mm)包装附件电源线(L5M)x1遥控器*1,说明书x1,保修卡x1,触控笔x2,无线传屏器x1,壁挂支架x1备注以上详细规格参数有多项为可选功能,仅供参考,最终解释权归我司所有,可选功能会相应的增加费用,请按需选择相关功能参数,最终确认参数以业务人员相互确认为准。
- 1、下载文档前请自行甄别文档内容的完整性,平台不提供额外的编辑、内容补充、找答案等附加服务。
- 2、"仅部分预览"的文档,不可在线预览部分如存在完整性等问题,可反馈申请退款(可完整预览的文档不适用该条件!)。
- 3、如文档侵犯您的权益,请联系客服反馈,我们会尽快为您处理(人工客服工作时间:9:00-18:30)。
Surface Hub发布84英寸的“大平板”
腾讯数码讯(吴彬)微软在Windows 10的发布会上除了发布全新的系统外,还发布了一个名为Surface Hub的硬件产品。
你可以将Surface Hub看作是一个大平板,之所以称之为“大”平板,是因为它本身拥有84英寸的显示屏,同时拥有摄像头、麦克风、传感器、蓝牙以及WiFi模块。
系统自然使用的是Windows 10,还有个亮点,84英寸的Surface Hub显示分辨率达到了4K。
针对Surface Hub大屏幕,微软对Win 10系统进行了一定的优化,在Surface Hub不但可以分屏显示摄像头和常规桌面视角,同时Surface Hub还支持手写。
微软的初衷是将Surface Hub搬进你的办公室,它可以替代白板和远程会议系统,成为多合一的办公产品。
微软表示这台“大”家伙会让你的会议更有趣味。