在lunix上安装以及更新WebSphere7相关操作教程
红旗Linux下安装WebSphere 7
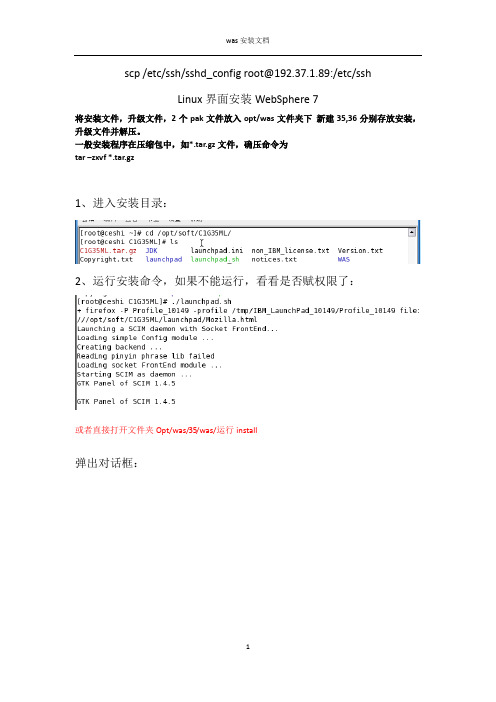
scp /etc/ssh/sshd_config root@192.37.1.89:/etc/sshLinux界面安装WebSphere 7将安装文件,升级文件,2个pak文件放入opt/was文件夹下新建35,36分别存放安装,升级文件并解压。
一般安装程序在压缩包中,如*.tar.gz文件,确压命令为tar –zxvf *.tar.gz1、进入安装目录:2、运行安装命令,如果不能运行,看看是否赋权限了:或者直接打开文件夹Opt/was/35/was/运行install弹出对话框:选择安装选项,如图红框中所示:然后弹出来安装界面,选择下一步:然后,接受条款:点击下一步:点击下一步:点击下一步,选择安装目录,可选择默认:点击下一步,选择应用程序服务器:下一步,可以设置安全登录,可以不设置:下一步:下一步:下一步,开始安装:最后点击完成,关闭窗口。
3、安装之后安装升级程序WebSphere,进入升级目录:运行命令:或者进入36/updateInstaller文件夹,运行install 弹出窗口:下一步:接受条款:下一步:下一步,选择安装目录,选择默认:下一步:下一步:点击完成:若不弹出下面窗口,可以进入文件夹ibm/webSphere/UpadateInstaller/中运行update.sh下一步,选择目录,选择默认:下一步:下一步,选择pak文件所在目录:选择更新:下一步:下一步:下一步:下一步:点击完成,完成安装:卸载:卸载升级包:Opt/ibm/webSphere/UpdatInstaller/ uninstall/运行uninstall 卸载安装包:Opt/ibm/webSphere/Appserver/uninstall/运行uninstall。
Websphere-7-安装及打补丁-Linux-CentOS+Mysql数据源配置

7安装
7安装
7安装
7安装
7安装
7安装
7安装
7安装
7安装
7安装
7安装
7安装
7安装
安装成功后自动生成一个属性文件:
7安装
7安装
例如第一个链接:
7安装
在物理机访问:
7安装
最新补丁包下载地址:
7安装
也可以通过找的网页向导 来找到那些是你需要的。
7安装
直接把包放到虚拟机上解压后,发现竟然是这个样子的:
7安装
7安装
特别要注意的:
7安装
复制安装包(文件)到 目录下面后继续下一步:
7安装
7安装
验证失败:
7安装
如果升级包是格式的就不用改了。 如果下载下来的文件是那么把后缀改成。改了之后再来一遍 就可以进到下面的界面了:
7安装
7安装
验证过程:
7安装
验证成功:
7安装
开始安装,此过程时间会有点长,耐心等待。。。
7安装
下载后的文件:
解压缩后:
7安装
第四块磁盘: –l
7安装
格式化 4 2 挂载: –t 4 2
7安装
上传的安装文件到虚拟机上。执行
命令行执行的时候会出错。
7安装
于是转向虚拟机上操作执行
7安装
安装7: 在虚拟机上执行 输入公司的代理后:
7安装
安装指南: 自述文件:
信息中心(类似帮助文档):
7安装
安装成功:
7安装
启动访问一下控制台:
至此最新的已经安装完成
7安装
下面建立一个数据源,指向数据库。 先上载一个的驱动类到虚拟机上,然后配置一个变量。
WebSphere7.0安装部署卸载手册
WebSphere7.0安装部署卸载手册目录一. 安装WebSphere (3)1.1 安装程序 (3)1.2 安全验证 (8)1.3 访问控制台 (10)二. 启动类 (10)三. JVM参数配置 (12)四. 创建数据源 (15)4.1 新建JDBC提供程序 (16)4.2 新建数据源 (18)4.3 J2C认证 (21)4.4 设置数据源与J2C认证关联 (22)五. 安装应用程序 (25)5.1 部署War包 (25)5.2 启动应用程序 (28)5.3 修改端口号 (29)六. 卸载WebSphere (29)6.1 卸载程序 (29)6.2 删除残余文件 (31)6.3 删除注册表 (32)一.安装WebSphere1.1 安装程序第一步:打开文件夹,双击应用程序第二步:点击【启动WebSphere Application Server Network Deployment安装向导】开始安装第三步:接受条款,点击【下一步】第四步:系统必备软件检查,点击【下一步】第五步:安装可选的功能部件,点击【下一步】第六步:选择产品安装位置,点击【下一步】第七步:选择“应用程序服务器”,点击【下一步】第八步:取消勾选“启用管理安全性”,即登录控制台不需要密码,点击【下一步】第九步:检查安装摘要,点击【下一步】,这里可能需要一些时间,请耐心等待第十步:安装成功,点击【完成】1.2 安全验证在第一步页面,点击【安全验证】安装验证完成,服务器即已启动,关闭验证窗口。
1.3 访问控制台通过以下三种方式进入控制台:1.在“第一步”窗口中点击【管理控制台】2.在开始程序中点击【管理控制台】3.在浏览器中输入http://localhost:9060/ibm/console二.启动类第一步:进入服务器-服务器类型-WebSphere Applcation Server,点击应用程序服务器【server1】第二步:在右侧容器设置中找到容器服务,点击【Startup Bean服务】第三步:勾选“在服务器启动时启动服务”,点击【应用】第四步:保存到主配置三.JVM参数配置第一步:进入服务器-服务器类型-WebSphere Applcation Server,点击应用程序服务器【server1】第二步:找到右侧Java和进程管理,点击【进程定义】第三步:点击右侧【Java虚拟机】第四步:输入初始堆大小:256,最大堆大小:512,通用JVM参数:-Ddefault.client.encoding=GBK -Dfile.encoding=GBK nguage=Zh -Duser.region=CN,这里主要是配置支持中文第五步:保存到主配置四.创建共享库第一步:进入环境-共享库,选择节点,点击【新建】第二步:输入名称、类路径,点击【确定】第三步:保存到主配置五.创建数据源5.1 新建JDBC提供程序第一步:进入资源-JDBC-JDBC提供程序,选择节点,点击【新建】第二步:选择数据库类型、提供程序类型、实现类型,前三项设置好会自动带出名称和描述,图示以DB2为例,点击【下一步】第三步:输入Jar驱动包所在路径,点击【下一步】第四步:点击【完成】第五步:保存到主配置5.2 新建数据源第一步:进入资源-数据源,选择节点,点击【新建】第二步:填写数据源名、JNDI名称,点击【下一步】第三步:选择现有的JDBC提供程序,即上面刚创建的JDBC提供程序,点击【下一步】第四步:输入数据库名、服务器名称和端口号,点击【下一步】第五步:直接点击【下一步】,后面再做J2C认证第六步:检查摘要,点击【完成】第七步:保存到主配置5.3 J2C认证第一步:进入资源-数据源,点击数据源名【HNSTAND】第二步:点击右侧【JAAS - J2C认证数据】第三步:点击【新建】第四步:输入别外、用户标识、密码,点击【应用】第五步:保存到主配置5.4 设置数据源与J2C认证关联第一步:进入资源-数据源,点击数据源名【HNSTAND】第二步:向下拉找到安全性设置,设置组件管理的认证别名和容器管理的认证别名为刚才新建的J2C认证,点击【应用】第三步:保存到主配置第四步:测试数据源是否或用。
WebSphere7.0安装及部署手册
WebSphere7.0安装部署手册目录1 安装说明 (3)2 安装WebSphere (3)3 测试WebSphere (12)3.1 访问自带测试页面验证 (12)4 部署应用程序 (12)4.1 拷贝数据库驱动 (12)4.2 设置Web Sphere变量 (13)4.3 新建JDBC提供程序 (14)4.4 新建数据源 (17)4.5 新建应用程序 (27)5 卸载WebSphere (35)5.1 停止服务 (35)5.2 卸载 (36)1 安装说明本手册适合WebSphere7.0的安装和卸载。
<WAS_HOME>表示:C:\Program Files\IBM\WebSphere\AppServer2 安装WebSphere1、安装插入安装光盘会自动进入安装欢迎界面,若是安装文件请双击install.exe运行安装程序,选择“安装WebSphere Application Server”,启动WebSphere Application Server - Express 安装向导。
根据安装向导的指示安装WebSphere。
在欢迎界面点击[下一步]:接受协议并点击[下一步]:确认通过安装WebSphere的必要检测,然后点击[下一步]:如果需要安装示例程序则选中“安装样本应用程序”的复选框,点击[下一步]:输入WebSphere的安装目录,点击[下一步]:选择应用程序服务器环境,然后点击[下一步]:输入管理控制台的用户名和密码,点击[下一步]:该用户名和密码用于登录控制台以及停止WebSphere服务。
确认安装信息无误后,点击[下一步]开始安装:安装成功,点击[完成]默认情况下,安装完成后会自动创建默认的概要文件AppSrv01(<W AS_HOME>/profiles/AppSrv01):安装成功后,从开始菜单进入“第一步”点击[安装验证],等待完成验证验证完成,关闭窗口验证完成后,服务器已经启动,这里可以直接进入管理控制台。
linux下WebSphere7安装与卸载手册
Linux WebSphere7 安装与卸载手册V0.12013年7月目录1说明 (4)1.1安装配置步骤 (4)1.2运行环境 (4)1.2.1硬件环境 (4)1.2.2软件环境 (4)2安装前准备 (5)2.1远程桌面配置 (5)2.1.1Suse配置远程桌面 (5)2.1.2Redhat配置远程桌面 (8)2.1.3Xmanager连接远程桌面 (10)3WebSphere安装配置 (11)3.1上传文件 (11)3.2安装WebSphere (11)3.3启动/停止WebSphere (20)3.4配置WebSphere 7 (20)3.5DB2配置JNDI (24)3.6Oracle配置JNDI (32)3.7创建概要文件 (39)3.8删除概要文件 (40)4部署应用 (41)4.1控制台部署应用 (41)4.2替换程序包部署应用 (54)5系统自启Websphere设置 (55)6WebSphere卸载 (56)7常见问题及解决方案 (59)1说明本文档对linux安装WebSphere的安装步骤进行了详细描述,可供安装人员参考使用。
注:由于word格式原因,文档中涉及到的命令不建议复制粘贴。
1.1 安装配置步骤1.2 运行环境1.2.1硬件环境机器类型建议配置作用数量备注PC Server 1-2CPU,4GB内存应用服务器 1100GB硬盘10/100Mb网卡1.2.2软件环境序号名称说明1 WebSphere 7 64位中间件2安装前准备2.1 远程桌面配置2.1.1Suse配置远程桌面修改配置文件修改/etc/opt/gnome/gdm/gdm.confAllowRemoteRoot=false改为AllowRemoteRoot=true如下:[xdmcp]Enable=false改为Enable=true#Port=177 去掉 #修改/etc/sysconfig/displaymanager DISPLAYMANAGER_REMOTE_ACCESS="yes" DISPLAYMANAGER_ROOT_LOGIN_REMOTE="yes" DISPLAYMANAGER_XSERVER_TCP_PORT_6000_OPEN="yes" 如下:修改/etc/X11/xdm/xdm-config注销掉这一行(在起点加一个!)! DisplayManager.requestPort: 0 如下:重启服务命令:/usr/sbin/rcxdm restart如下:2.1.2Redhat配置远程桌面 修改配置文件修改/usr/share/gdm/defaults.conf AllowRemoteRoot=false改为AllowRemoteRoot=true如下:[xdmcp]Enable=false改为Enable=true#Port=177 去掉#修改/etc/inittab把默认的加#注释掉,增加x:5:respawn:/usr/sbin/gdm重启gdm:gdm-restart //说明:中间没有空格查看gdm端口:netstat -nltpu | grep 177监听成功如下:2.1.3Xmanager连接远程桌面点“文件”→“新建”→“XDMCP会话”输入服务器IP其他保持默认,点击确定即可3WebSphere安装配置3.1 上传文件用FTP工具将安装包上传到服务器/usr/src下。
Websphere MQ 7.0.1 For Linux版安装
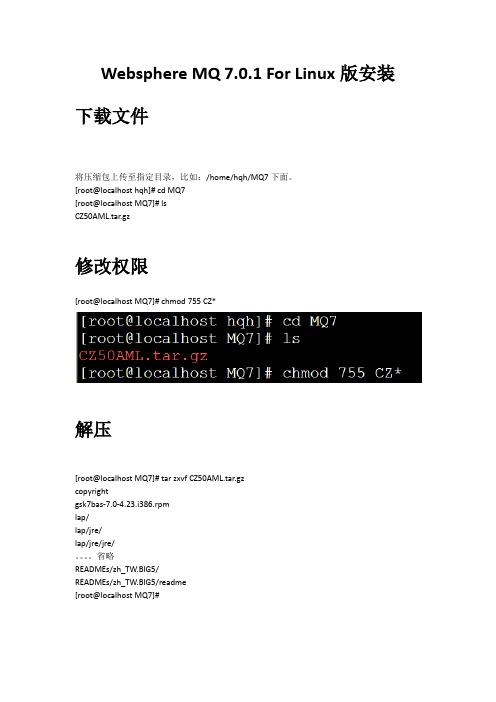
Websphere MQ 7.0.1 For Linux版安装下载文件将压缩包上传至指定目录,比如:/home/hqh/MQ7下面。
[root@localhost hqh]# cd MQ7[root@localhost MQ7]# lsCZ50AML.tar.gz修改权限[root@localhost MQ7]# chmod 755 CZ*解压[root@localhost MQ7]# tar zxvf CZ50AML.tar.gzcopyrightgsk7bas-7.0-4.23.i386.rpmlap/lap/jre/lap/jre/jre/。
省略READMEs/zh_TW.BIG5/READMEs/zh_TW.BIG5/readme[root@localhost MQ7]#同意license:[root@localhost MQ7]# ./mqlicense.sh -text_onlyLicensed Materials - Property of IBM5724-H72(C) Copyright IBM Corporation 1994, 2009 All rights reserved.US Government Users Restricted Rights - Use, duplication or disclosure restricted by GSA ADP Schedule Contract with IBM Corp.License has already been accepted: Proceed with install.License解决办法如果不是上面的提示,可用如下方法解决:在/tmp/ mq_license/ license/下面新建空文件status.datroot@localhost MQ]# cd /tmp[root@localhost tmp]# lsgconfd-root orbit-root scim-panel-socket:0-root hsperfdata_root scim-bridge-0.3.0.lockfile-0@localhost:0.0 scim-socket-frontend-root keyring-pDTCX5 scim-bridge-0.3.0.socket-0@localhost:0.0 ssh-YrKzyL3494mapping-root scim-helper-manager-socket-root virtual-root.m0Nmsa [root@localhost tmp]# mkdir mq_license[root@localhost tmp]# cd mq*[root@localhost mq_license]# mkdir license[root@localhost mq_license]# cd license[root@localhost license]# ls[root@localhost license]# vi status.dat[root@localhost license]# lsstatus.dat给所有rpm包赋予可执行权限:[root@localhost MQ7]# chmod 755 *.rpm再ls一下,变成绿色的了吧安装[root@localhost MQ7]# rpm -ivh MQSeriesRuntime-7.0.1-0.i386.rpmPreparing... ########################################### [100%] Creating group mqmCreating user mqm1:MQSeriesRuntime ########################################### [100%] [root@localhost MQ7]# rpm -ivh MQSeriesSDK-7.0.1-0.i386.rpmPreparing... ########################################### [100%] 1:MQSeriesSDK ########################################### [100%] [root@localhost MQ7]# rpm -ivh MQSeriesServer-7.0.1-0.i386.rpmPreparing... ########################################### [100%] 1:MQSeriesServer ########################################### [100%] [root@localhost MQ7]# rpm -ivh MQSeriesJava-7.0.1-0.i386.rpmPreparing... ########################################### [100%] 1:MQSeriesJava ########################################### [100%] [root@localhost MQ7]# rpm -ivh MQSeriesSamples-7.0.1-0.i386.rpmPreparing... ########################################### [100%] 1:MQSeriesSamples ########################################### [100%] [root@localhost MQ7]# rpm -ivh MQSeriesClient-7.0.1-0.i386.rpmPreparing... ########################################### [100%] 1:MQSeriesClient ########################################### [100%] [root@localhost MQ7]# rpm -ivh MQSeriesMsg_Zh_CN-7.0.1-0.i386.rpmPreparing... ########################################### [100%] 1:MQSeriesMsg_Zh_CN ########################################### [100%] [root@localhost MQ7]# rpm -ivh MQSeriesMan-7.0.1-0.i386.rpmPreparing... ########################################### [100%] 1:MQSeriesMan ########################################### [100%] [root@localhost MQ7]# rpm -ivh MQSeriesTXClient-7.0.1-0.i386.rpmPreparing... ########################################### [100%] 1:MQSeriesTXClient ########################################### [100%] [root@localhost MQ7]#检查安装完毕。
WEBSPHERE在LINUX下的安装配置过程
WebSphere在linux下的安装配置过程一.Linux的安装没有特殊的要求,按照默认的情况安装就可以。
二.Websphere的安装1.以root用户登陆到linux服务器。
(Websphere要求以root用户权限安装)2.把websphere安装光盘,放入光驱。
3.打开一个linux终端,执行下列命令:[root@test root]#mount/dev/cdrom[root@test root]#cd/mnt/cdrom/linux/[root@test linux]#./install.sh4.进入安装程序画面:点击Next,继续安装。
5.选择标准类型的安装6.进行数据库配置数据库的名:输入创建的数据库的SID名。
DB Home:如果你的oracle的数据库安装在本机器上,这里填写oracle数据库的安装路径。
否则就先随便输入一个路径,后面将做处理。
SERVER名:输入安装数据库机器的IP地址。
端口号:默认是1521用户名:密码:上述内容输入完成后,点击Next继续安装。
7.设置安装目录默认安装在/opt下面(注意一点,就是看安装目录的空间够不够)。
典型安装也会把IBM HTTPServer一同安装上。
8.安装完成9.安装完成后,先不要启动Websphere,还需要做一些配置。
三.配置Websphere1.如果你的oracle数据库不是安装在本机器上,你需要从oracle安装机器的$ORACLE_HOME/jdbc/lib下面拷贝classes12.zip,nls_charset12.zip到linux的服务器上,比如放到/usr/local/oracle_lib下面。
2.修改配置文件。
修改/opt/WebSphere/AppServer/bin/setupCmdLine.sh文件。
找到DBDRIVER_JARS=这一行,按照刚才我们拷贝classes12.zip的目录修改好:DBDRIVER_JARS=/usr/local/oracle_lib/classes12.zip:/usr/local/oracle_lib/nls_charset12.zip修改/opt/WebSphere/AppServer/bin/admin.config文件。
Websphere7打补丁安装
使用was用户登录,was用户密码:was123
补丁存储位置:/usr/was/fix
补丁安装程序位置:/usr/was/fix/UpdateInstaller
安装补丁安装程序:
# cd /usr/was/fix/UpdateInstaller
# ./install
下一步继续
选择接受协议,下一步继续
下一步继续
默认安装路径,下一步继续
下一步继续
下一步继续
选完成,继续
下一步继续
选择AppServer所在目录:/usr/was/IBM/WebSphere/AppServer,下一步继续
下一步继续
选择升级包所在目录:/usr/was/fix,下一步
选择需要升级的包,分别是:7.0.0-WS-WAS-AixPPC64-FP0000011.pak,7.0.0-WS-WASSDK-AixPPC64-FP0000011.pak,下一步继续
下一步继续
下一步继续
下一步继续
通过下面的命令检查安装补丁后的AppServer版本
# /usr/was/IBM/WebSphere/AppServer/bin/versionInfo.sh
版本为7.0.0.15则为安装完成。
Linux下WebSphere安装步骤
WebSphere 安装步骤安装步骤本次安装过程中,有一台LINUX 主机的WebSphere 是使用图形界面进行的安装,另外两台LINUX 主机的WebSphere 由于图形界面Bug 的原因,造成安装无法正常进行【RedFlag 系统不是经过认证的操作系统】,使用命令行silent 方式进行安装,下面详细说明两种安装的具体步骤具体步骤公共的准备工作准备工作mount /mnt/cdromcd /optmkdir install cd installcp /mnt/cdrom/was5.1/WebSphere5.1.tar.gz .tar xzvf WebSphere5.1.tar.gz图形界面安装步骤图形界面安装cd linuxi386./install命令行方式安装步骤命令行方式安装cd linuxi386./install ./install ––options options ““/opt/install/linuxi386/myresponsefile.txt /opt/install/linuxi386/myresponsefile.txt”” -silentmyresponsefile.txt# *******************************************## Response file for WebSphere Application Server 5.1 Install## Please follow the comments to use the response file and# understand the various options. You must carefully complete# or change the various values. If the values are not completed # properly, the install may be unsuccessful.## NOTE: This file is for silent install only.### IMPORTANT: ALL V ALUES MUST BE ENCLOSED IN DOUBLE QUOTES ( "" ). ## *******************************************# *******************************************# This value is required.# PLEASE DO NOT REMOVE THIS V ALUE.# *******************************************-W setupTypes.selectedSetupTypeId="custom"# *******************************************# Below is the beginning of the response file that needs to be# filled in by the user.# *******************************************# *******************************************# The below value specifies silent install. This value# indicates that the install will be silent.# *******************************************# -silent# *******************************************# WebSphere Application Server Install Location## Please specify the destination directory for the WebSphere Application# Server installation. You will need to change this for UNIX# platforms. As an example for AIX, the value may be# "/usr/WebSphere/AppServer"# *******************************************-P wasBean.installLocation="/opt/WebSphere/AppServer1"# *******************************************# IBM HTTP Server Install Location## Please specify the destination directory for the IBM HTTP Server# installation. This value will need to be completed if you# choose to install IBM HTTP Server. If you choose to not install IBM# HTTP Server, then this value is not required. You will need to change # the default value below for UNIX platforms. As an example for AIX, the # value may be "/usr/IBMHTTPServer"# *******************************************-P ihsFeatureBean.installLocation="/opt/IBMHTTPServer"# *******************************************# Below are the features that you may choose to install.# Set the following values to "true" or "false," depending upon whether # you want to install the following features or not.## NOTE: The default settings for features in this response file# detail the defaults for a typical installation.# *******************************************# *******************************************# Install Server# *******************************************-P serverBean.active="true"# *******************************************## Begin Features for Administration## *******************************************# *********# Install Administration# *********-P adminBean.active="true"# *********# The next 2 features are part of Administration. In order for any of these # features to be installed, the property to install Administration denoted # above must be set to "true."# *********# *********# Install Admin Scripting# *********-P adminScriptingFeatureBean.active="true"# *********# Install Administrative Console# *********-P adminConsoleFeatureBean.active="true"# *******************************************## End Features for Administration## *******************************************# *******************************************## Begin Features for Application Assembly and Deployment Tools## *******************************************# *********# Install Application Assembly and Deployment Tools# *********-P applicationAndAssemblyToolsBean.active="true"# *********# The next 3 features are part of Application Assembly and Deployment # Tools. In order for any of these features to be installed,# the property to install Application And Assembly Tools denoted # above must be set to "true."# *********# *********# Install Deploy Tool# *********-P deployToolBean.active="true"# *********# Install Ant Utilities# *********-P antUtilityBean.active="true"# *******************************************## End Features for Application Assembly and Deployment Tools## *******************************************# *******************************************## Begin Features for Embedded Messaging## *******************************************# *********# Install Embedded Messaging# *********-P mqSeriesBean.active="false"# *********# The next three features are for Embedded Messaging. In order to install# any of the following three subfeatures, the property to install Embedded# Messaging denoted above must be set to "true."## IMPORTANT NOTE: If you do not want to install Embedded Messaging, please # ensure all of the following options are set to "false" as well as the above# option.# *********# *********# Install Embedded Messaging Server and Client## You may only install the Embedded Messaging Server and Client or the Embedded # Messaging client below. If you set the Server and Client to "true," please# ensure that the Client only option below is set to "false." The same applies# if you set the Client only option to "true," please ensure the server and client# option is set to "false."# *********-P mqSeriesServerBean.active="false"# *********# Embedded Messaging Server and Client install location## If you choose to install Embedded Messaging Server and Client above, please# specify an install location below for Windows platforms only.# The directory may not be configured by the user for UNIX platforms # as it is predetermined.# *********-P mqSeriesServerBean.installLocation=""# *********# Install Embedded Messaging Client only# *********-P mqSeriesClientBean.active="false"# *********# Embedded Messaging Client Only install location## If you choose to install Embedded Messaging Client only above, please # specify an install location below for Windows platforms only.# The directory may not be configured by the user for UNIX platforms # as it is predetermined.# *********-P mqSeriesClientBean.installLocation=""# *********# Install Message-driven beans Samples# *********-P mqSeriesSamplesBean.active="false"# *******************************************## End Features for Embedded Messaging## *******************************************# *******************************************# Install IHS WebServer 1.3.28# *******************************************-P ihsFeatureBean.active="false"# ******************************************* ## Begin Features for Web Server Plugins## *******************************************# *********# Install Web Server Plugins# *********-P pluginBean.active="false"# *********# The next 5 features are part of Web Server Plugins. # In order for any of these features to be installed,# the property to install Web Server Plugins denoted # above must be set to "true."# *********# *********# Install IBM HTTP Server v1.3 Plugin# *********-P ihsPluginBean.active="false"# *********# Install IBM HTTP Server v2.0 Plugin# *********-P ihs20PluginBean.active="false"# *********# Install Apache Web Server v1.3 Plugin# *********-P apachePluginBean.active="false"# *********# Install Apache Web Server v2.0 Plugin# *********-P apache20PluginBean.active="false"# *********# Install Microsoft Internet Information Services (IIS) Plugin # *********-P iisPluginBean.active="false"# *********# Install iPlanet Web Server Plugin# *********-P iplanet60PluginBean.active="false"# *********# Install Domino Web Server Plugin# *********-P dominoPluginBean.active="false"# *******************************************## End Features for Web Server Plugins## *******************************************# *******************************************# Install Samples# *******************************************-P samplesBean.active="true"# *******************************************## Begin Features for Performance and Analysis Tools## *******************************************# *********# Install Performance And Analysis Tools# *********-P performanceAndAnalysisToolsBean.active="true"# *********# The next 3 features are part of Performance And Analysis# Tools. In order for any of these features to be installed,# the property to install Performance And Analysis Tools denoted # above must be set to "true."# *********# *********# Install Tivoli Performance Viewer# *********-P tivoliPerfBean.active="true"# *********# Install Dynamic Cache Monitor# *********-P DCMBean.active="true"# *********# Install Performance Servlet# *********-P performanceServletBean.active="true"# *********# Install Log Analyzer# *********-P logAnalyzerBean.active="true"# *******************************************## End Features for Performance and Analysis Tools## *******************************************# *******************************************# Install Javadocs# *******************************************-P javadocBean.active="true"# *******************************************# Please enter a node name and hostname for this installation.# The node name is used for administration, and must be unique# within its group of nodes (cell). The hostname is the DNS name# or IP address for this computer. You must replace the# "DefaultNode" with the node name that you want the default node # to be and "127.0.0.1" to a resolveable hostname or IP address# for your machine.# Warning:# 1. If you are migrating now or plan to do so after# installation, enter the same node name as the previous version.# 2. If you are performing coexistence, enter a unique node name.# *******************************************-W nodeNameBean.nodeName="localhost"-W nodeNameBean.hostName="127.0.0.1"# *******************************************# Begin Installing Services## The following are to install Services for IHS and Websphere# Application Server on Windows. Using Services, you can start and # stop services, and configure startup and recovery actions.# You can ignore these or comment them out for other Operating Systems. # *******************************************-W serviceSettingsWizardBean.active="true"# *********# The next 2 options are part of Installing Services.# In order for any of these to be set to "true,"# the property to install Services denoted above must be set# to "true."# *********# *********# Install the IHS service# *********-W serviceSettingsWizardBean.ihsChoice="true"# *********# Install the WebSphere Application Server service# *********-W serviceSettingsWizardBean.wasChoice="true"# *********# If you chose to install a service above, then you must# specify the User Name and Password which are required to# install the Services. The current user must be admin or must# have admin authority to install a Service. Also the username# which is given here must have "Log On as a Service " authority # for the service to run properly.# *********# *********# Replace YOUR_USER_NAME with your username.# *********-W erName="YOUR_USER_NAME"# *********# Replace YOUR_PASSWORD with your valid password.# *********-W serviceSettingsWizardBean.password="YOUR_PASSWORD"# *******************************************## End Installing Services## *******************************************# *******************************************# Set any or all of the following to false if the launcher# icon is not to be installed. These settings will only affect# an install in which the corresponding product component# is also selected for install.# *******************************************-P StartServerIconBean.active="true"-P StopServerIconBean.active="true"-P AdminConsolIconBean.active="true"-P SamplesGalleryIconBean.active="true"-P TivoliPerfIconBean.active="true"-P infoCenterIconBean.active="true"-P firstStepsIconBean.active="true"-P logAnalyzerIconBean.active="true"# *******************************************# Change the path to the prerequisite checker configuration# file only if a new file has been provided. This can be a# relative path or an absolute path. Make sure both the# prereqChecker.xml and prereqChecker.dtd files are present at the provided path.# *******************************************-W osLevelCheckActionBean.configFilePath="waspc/prereqChecker.xml"# *******************************************# Begin Plugin Config File Location## If you chose to install plugins above, then you will# need to specify the fully qualified path, including# the config file name, for the plugins you selected. If you want to# install the plugin, you must specify this path, otherwise the# installer will fail to install the plugins properly. Also, the# value must be included in double quotes.# *******************************************# *********# IBM HTTP Server Plugin v1.3 Config File Location# *********-W defaultIHSConfigFileLocationBean.value="/opt/IBMHTTPServer/conf/httpd.conf"# *********# IBM HTTP Server Plugin v2.0Config File Location# *********-W defaultIHS20ConfigFileLocationBean.value=# *********# Apache Web Server v1.3 Config File Location# *********-W defaultApacheConfigFileLocationBean.value=# *********# Apache Web Server v2.0 Config File Location# *********-W defaultApache20ConfigFileLocationBean.value=# *********# iPlanet Web Server Config File Location# *********-W defaultIPlanetConfigFileLocationBean.value=# *********# Begin Domino Web Server Plugin Config File Locations ## The Notes.jar and names.nsf locations are required# for the Domino Plugin. Please be sure to enter values in # double quotes for both of these files.# *********# *********# Domino Notes.jar File Location# *********-W dominoPanelBean.notesJarFile=# *********# Domino names.nsf File Location# *********-W sFile=# *********# End Domino Web Server Plugin Config File Locations # *********# *******************************************## End Plugin Config File Location## *******************************************# *******************************************# Product Registration Tool## To launch the Product Registration Tool, please# change the value to "true." This is only for# GUI install.# *******************************************-W launchPRTBean.active="false"# *******************************************# Install Default App## Please specify if you would like to install the# Default App by setting the value to "true" or "false."# *******************************************-W installSampleAppSequenceBean.active="true"# *******************************************# First Steps## If you would the First Steps to display at the end# of the installation, please change the value to "true."# *******************************************-W firstStepsSequenceBean.active="false"# *******************************************# Installation Verification Tool (IVT)## Please specify if you would like to run the Installation# Verification Tool by setting the value to "true" or "false."# *******************************************-W installIVTAppSequenceBean.active="true"# *********************************************************** # ** Support for Silent Coexistence# **# ** NOTE:# ** 1. You must uncomment and modify the properties in# ** this section for silent coexistence to work properly.# ** 2. You can not perform migration and coexistence at# ** the same time.# ***********************************************************# *********************************************************** # Tell the installer that you want to perform coexistence# ***********************************************************#-W coexistenceOptionsBean.doCoexistence="true"# *********************************************************** # Set this property if you want to modify the default IHS# and IHS Admin ports# ***********************************************************#-W eIhs="true"# *********************************************************** # The new value for the Bootstrap Port# ***********************************************************#-W coexistencePanelBean.bootstrapPort="2810"# *********************************************************** # The new values for the IHS and IHS Admin ports# NOTE: These values are only used if# eIhs is set to "true"# ***********************************************************#-W coexistencePanelBean.ihsPort="81"#-W coexistencePanelBean.ihsAdminPort="8009"# *********************************************************** # The new values for the HTTP and HTTPs transports.# ***********************************************************#-W coexistencePanelBean.httpTransportPort="9086"#-W coexistencePanelBean.httpsTransportPort="9044"# *********************************************************** # Thew new values for the admin console an secure admin# console ports.# ***********************************************************#-W coexistencePanelBean.adminConsolePort="9091"#-W coexistencePanelBean.secureAdminConsolePort="9444"# *********************************************************** # The new values for the csivServerAuthListener and# the csivMultiAuthListener ports.# NOTE: You can usually leave these set to 0# ***********************************************************#-W coexistencePanelBean.csivServerAuthListenerAddr="0"#-W coexistencePanelBean.csivMultiAuthListenerAddr="0"# *********************************************************** # The new value for the sasSSLServerAuth port.# ***********************************************************#-W coexistencePanelBean.sasSSLServerAuthAddr="0"# *********************************************************** # The new values for the JMS Server Direct Address,# JMS Server Security, and JMS Server QueuedAddress ports# ***********************************************************#-W coexistencePanelBean.jmsServerDirectAddress="5569"#-W coexistencePanelBean.jmsServerSecurityPort="5567"#-W coexistencePanelBean.jmsServerQueuedAddress="5568"# *********************************************************** # The new value for the soap connector address port# ***********************************************************#-W coexistencePanelBean.soapConnectorAddress="8881"# *********************************************************** # ** Support for Silent Migration# **# ** NOTE:# ** 1. You must uncomment and modify EVERY property# ** in this section for silent migration to work properly.# ** 2. You can not perform migration and coexistence at# ** the same time.# **# ***********************************************************# ***********************************************************# The installer must be informed that you wish to operate on# a previous version, so you must tell it that one is present# by uncommenting the next line.# ***********************************************************# -W previousVersionDetectedBean.previousVersionDetected="true"# ***********************************************************# Direct the installer to operate on a specific previous version by# uncommenting the next line and entering one of these values:## Value Edition# ***** *******# AE WAS Advanced Edition (V3.x, V4.0.x)# advanced AE# AEs WAS Advanced Single Server Edition (V4.0.x)# standard WAS Standard Edition (V3.x)## Note:# For migration from WAS V5.0.x, this field is not used. So simply# set previousVersionPanelBean.selectedVersionEdition to "<NONE>".# ************************************************************# -W previousVersionPanelBean.selectedVersionEdition="AEs"# ************************************************************# Specify the location where the previous version is installed.# ************************************************************# -W previousVersionPanelBean.selectedVersionInstallLocation="/opt/WebSphere/AppServer"# ************************************************************# Specify the path to the configuration file for the# previous version. Configuration filenames are:## Value previousVersionPanelBean.selectedVersionEdition# ***** ***********************************************# admin.config AE# admin.config advanced# server-cfg AEs# server-cfg standard## Note:# For migration from WAS V5.0.x, this field is not used. So simply# set previousVersionPanelBean.selectedVersionConfigFile to "<NONE>".# ************************************************************# -WpreviousVersionPanelBean.selectedVersionConfigFile="/opt/WebSphere/AppServer/config/server -cfg.xml"# ************************************************************# Specify the version number of the previous version: 5.0.2,5.0.1,5.0.0,4.0,4.0.1,3.5, etc...# ************************************************************# -W previousVersionPanelBean.previousVersionSelected="4.0"# ************************************************************# Uncomment the below line to indicate that you wish to# migrate the previous version.# ************************************************************# -W previousVersionPanelBean.migrationSelected="true"# ************************************************************# Specify the directory where migration will backup# information about the previous version.# ************************************************************# -W migrationInformationPanelBean.migrationBackupDir="/tmp/migrationbackup"# ************************************************************# Specify the directory where migration logs will be stored.# ************************************************************# -W migrationInformationPanelBean.migrationLogfileDir="/tmp/migrationlogs"。
linux下websphere的安装配置
Linux下安装部署websphere一、安装1、[root@www Desktop]#mkdir /usr/local/websphere 建立一个新的文件夹2、tar –zxvf was.cd.6100.trial.base.linux.ia32.tar.gz –C /usr/local/websphere/ 解压软件包到指定的位置,-C是指定位置3、[root@www Desktop]#cd /usr/local/websphere/4、[root@www websphere]#export LANG=en_US 解决乱码问题5、[root@www websphere]# ./launchpad.sh 执行脚本后出现安装的界面,参照《WebSphere安装配置文档(完整版).doc》安装。
6、linux下websphere的基础知识:启动服务:/opt/IBM/WebSphere/AppServer/bin/startServer.sh server1 停止服务:/opt/IBM/WebSphere/AppServer/bin//stopServer.sh server1 -username websphere -password websphere后台日志:(包括启动日志、停止日志、错误日志、输出日志等)/opt/IBM/WebSphere/AppServer/profiles/AppSrv01/logs/server1/应用程序二进制文件保存在:/opt/IBM/WebSphere/AppServer/profiles/AppSrv01/wstemp/-228498399 /workspace/cells/wwwNode01Cell/applications/ 中二、配置数据源安装成功后通过:http://192.168.2.229:9060/admin启动控制台(根据安装的具体情况写ip,一般默认的端口是9060,如有改动则根据具体情况)1、配置JDBC提供程序在控制台的左边“资源”->“JDBC”->“提供JDBC程序”,在控制台的右边点击“新建”如图所示:(根据实际情况填写)填写完后点击“下一步”,注意此项下的“类路径”里边的变量名称,需要按照之后的第2步配置websphere变量配置该变量。
- 1、下载文档前请自行甄别文档内容的完整性,平台不提供额外的编辑、内容补充、找答案等附加服务。
- 2、"仅部分预览"的文档,不可在线预览部分如存在完整性等问题,可反馈申请退款(可完整预览的文档不适用该条件!)。
- 3、如文档侵犯您的权益,请联系客服反馈,我们会尽快为您处理(人工客服工作时间:9:00-18:30)。
第1章WebSphere7安装1.1安装1.1.1版本WebSphere71.1.2静默安装静默安装可以通配置一个应答文件,在安装过程中自动应答,以实现WAS7无图形化无交互的静默安装。
安装过程中除特别说明外,全部使用tsaip用户。
1.编辑~/.bash_profile文件(使用tsaip用户)添加下面内容:umask=0222.检查和安装软件包(使用root用户)在linux基本系统环境下,websphere安装需要如下包:compat-db-4.2.52-5.1.i386.rpmcompat-db-4.2.52-5.1.x86_64.rpmcompat-libstdc++-296-2.96-138.i386.rpmcompat-libstdc++-33-3.2.3-61.i386.rpmcompat-libstdc++-33-3.2.3-61.x86_64.rpmelfutils-0.137-3.el5.x86_64.rpmelfutils-devel-0.137-3.el5.i386.rpmelfutils-devel-0.137-3.el5.x86_64.rpmelfutils-devel-static-0.137-3.el5.i386.rpmelfutils-devel-static-0.137-3.el5.x86_64.rpmelfutils-libelf-0.137-3.el5.i386.rpmelfutils-libelf-0.137-3.el5.x86_64.rpmelfutils-libelf-devel-0.137-3.el5.i386.rpmelfutils-libelf-devel-0.137-3.el5.x86_64.rpmelfutils-libelf-devel-static-0.137-3.el5.i386.rpmelfutils-libelf-devel-static-0.137-3.el5.x86_64.rpmelfutils-libs-0.137-3.el5.i386.rpmelfutils-libs-0.137-3.el5.x86_64.rpmlibXp-1.0.0-8.1.el5.i386.rpmlibXp-1.0.0-8.1.el5.x86_64.rpmrpm-build-4.4.2.3-18.el5.x86_64.rpm使用如下命令检查:rpm -qa | grep compat-dbrpm -qa | grep compat-libstdc++rpm -qa | grep elfutilsrpm -qa | grep elfutils-develrpm -qa | grep elfutils-devel-staticrpm -qa | grep elfutils-libelfrpm -qa | grep elfutils-libelf-develrpm -qa | grep elfutils-libsrpm -qa | grep libXprpm -qa | grep rpm-build3.上传和解压安装介质(以下如无特别说明,均使用tsaip用户)使用xftp上传安装介质时,必须使用binray模式,再执行如下命令解压:cd<WAS安装介质所在目录>tar-zxvf <WAS安装介质的文件名>解压时报错:gzip: stdin: invalid compressed data--format violated【解决方法】linux用ftp下载时有时候会出现这样的问题,得用bin模式下载文件才行。
一般我们是用xftp上传时默认是auto模式,一般是ascii的上传模式,必须修改为binary 模式。
修改方法为在xftp中进入Commands | TransferType菜单,改为binary,如下图所示:4.修改responsefile.nd.txt文件进入WAS目录,修改responsefile.nd.txtcd <解压后得到的WAS目录>mkdir -p /opt/ibm/WebSphere/AppServer创建目录时报错,原因是tsaip用户没有对/opt的写权限【解决办法】创建一个/opt/ibm目录,并把所有者赋给tsaip1.使用root用户:mkdir/opt/ibmchown -R tsaip:tsaip /opt/ibm2.使用tsaip用户mkdir -p /opt/ibm/WebSphere/AppServercp responsefile.nd.txt myresponsefile.nd.txtvi myresponsefile.nd.txt修改如下内容:resp o nsef i l e.nd.t xtresponsefile.nd.txt的示例文件如下所示:5.确认安装目录存在且为空WebSphere安装前指定的安装目录必须已经存在且内容为空6.安装cd<解压后得到的WAS目录>./install -options myresponsefile.nd.txt-silent上面命令执行完成后,可以通过如下命令查看安装日志,确认是否安装成功:tail -f /opt/ibm/WebSphere/AppServer/logs/install/log.txt安装时报错:com.ibm.ws.install.ni.ismp.actions.FeaturePanelControlAction, err, java.io.FileNotFoundException: /tmp/normalFeaturePanelControl.xml (Permission denied) 【解决办法】原因是tasip用户没有/tmp目录的权限普通情况下/tmp目录的权限应该是如下所示:但不知道什么原因,会缺少了最后一个t权限,则此时tsaip用户无法向/tmp目录写入,可以使用root用户登录,输入如下命令:cd /chmod 1777 tmp在Centos5.3下安装时报错:ge(Mar 18, 2012 12:34:25 PM), Process, com.ibm.ws.install.ni.ismp.actions.OSPrereqCheckAction, err, System Prerequisites Check Warning: A supported operating system was not detected.Support for your operating system might have been added after the release of the product. See the WebSphere Application Server detailed system requirements Web pages for more information about supported operating systems. You can continue with the installtion, but the installation or product operation might not succeed without applying maintenance. Go to the product support Web pages to obtain the latest maintenance packages to apply after installation.(Mar 18, 2012 12:34:25 PM), Process, com.ibm.ws.install.ni.ismp.actions.OSPrereqCheckAction, wrn,To disable operating system prerequisite checking, set option disableOSPrereqChecking to true, or refer to the "Operating System Prerequisite Checking" section in the sample response file.(Mar 18, 2012 12:34:25 PM), Process, com.ibm.ws.install.ni.ismp.actions.SettleNIFRegistryAction, msg1, Current install/uninstall process failed.(Mar 18, 2012 12:34:25 PM), Process, com.ibm.ws.install.ni.ismp.actions.SetExitCodeAction, msg1, CWUPI0000I: EXITCODE=1(Mar 18, 2012 12:34:25 PM), Process, com.ibm.ws.install.ni.ismp.actions.ISMPLogSuccessMessageAction, msg1, INSTCONFFAILED [tsaip@OIP-TEST2 W AS]$ vi myresponsefile.nd.txtcom.ibm.ws.install.ni.ismp.actions.FeaturePanelControlAction, err, java.io.FileNotFoundException: /tmp/normalFeaturePanelControl.xml (Permission denied) 【解决办法】注意上述报错信息中用红色标出的部分,根据其指示,修改myresponsefile.nd.txt文件,将将disableOSPrereqChecking=true前面的注释去掉,使之生效在Centos5.3下安装时报错:ge./install: line 401: [: -ge: unary operator expected【解决办法】因为install文件里有一段会读取/etc/redhat-release,并从中取第7个字段与5作比较,而Centos中这个文件只有3个字段,因此可以备份intall文件后修改install文件,将401行中的$7改为$3。
1.1.3补丁静默安装部署应用包,需要将was 7.0 升到7.0.0.1。
上传补丁工具7.0.0.11-WS-UPDI-LinuxAMD64.tar.gz和两个补丁7.0.0-WS-WAS-LinuxX64-FP0000011.pak、7.0.0-WS-WASSDK-LinuxX64-FP0000011.pak。