DataGridView 写入到EXCEL 好用
将DataGridView中的数据导出至Excel中(亲测成功)
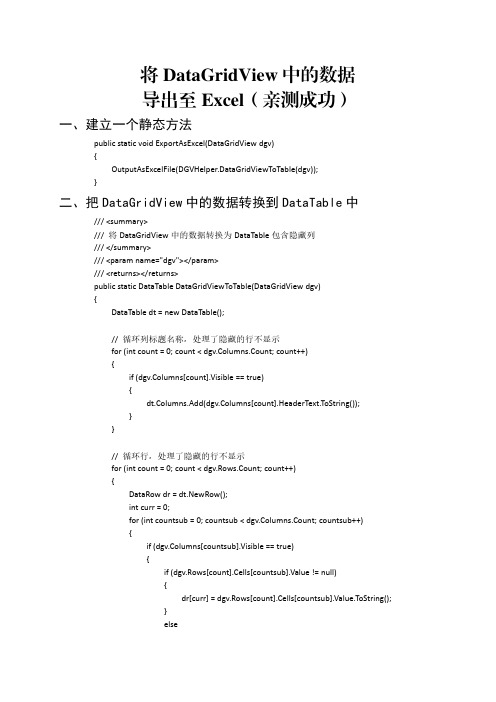
将DataGridView中的数据导出至Excel(亲测成功)一、建立一个静态方法public static void ExportAsExcel(DataGridView dgv){OutputAsExcelFile(DGVHelper.DataGridViewToTable(dgv));}二、把DataGridView中的数据转换到DataTable中///<summary>///将DataGridView中的数据转换为DataTable包含隐藏列///</summary>///<param name="dgv"></param>///<returns></returns>public static DataTable DataGridViewToTable(DataGridView dgv){DataTable dt=new DataTable();//循环列标题名称,处理了隐藏的行不显示for(int count=0;count<dgv.Columns.Count;count++){if(dgv.Columns[count].Visible==true){dt.Columns.Add(dgv.Columns[count].HeaderText.ToString());}}//循环行,处理了隐藏的行不显示for(int count=0;count<dgv.Rows.Count;count++){DataRow dr=dt.NewRow();int curr=0;for(int countsub=0;countsub<dgv.Columns.Count;countsub++){if(dgv.Columns[countsub].Visible==true){if(dgv.Rows[count].Cells[countsub].Value!=null){dr[curr]=dgv.Rows[count].Cells[countsub].Value.ToString();}else{dr[curr]="";}curr++;}}dt.Rows.Add(dr);}return dt;}三、把DataTable中的数据导出到Excel中public static void OutputAsExcelFile(DataTable dt){if(dt.Rows.Count<=0){MessM.PromptInfo("提示","无数据!");return;}SaveFileDialog s=new SaveFileDialog{Title="保存Excel文件",Filter="Excel文件(*.xls)|*.xls",FilterIndex=1};if(s.ShowDialog()==DialogResult.OK)filePath=s.FileName;elsereturn;DTExportToExcel(dt);}///<summary>///第二步:导出dataTable到Excel///</summary>///<param name="dt"></param>private static void DTExportToExcel(DataTable dt){//第二步:导出dataTable到Excellong rowNum=dt.Rows.Count;//行数int columnNum=dt.Columns.Count;//列数Excel.Application m_xlApp=new Excel.Application{DisplayAlerts=false,//不显示更改提示Visible=false};Excel.Workbooks workbooks=m_xlApp.Workbooks;Excel.Workbook workbook=workbooks.Add(Excel.XlWBATemplate.xlWBATWorksheet);Excel.Worksheet worksheet=(Excel.Worksheet)workbook.Worksheets[1];//取得sheet1try{string[,]datas=new string[rowNum+1,columnNum];for(int i=0;i<columnNum;i++)//写入字段datas[0,i]=dt.Columns[i].Caption;//Excel.Range range=worksheet.get_Range(worksheet.Cells[1,1],worksheet.Cells[1, columnNum]);Excel.Range range=m_xlApp.Range[worksheet.Cells[1,1],worksheet.Cells[1, columnNum]];range.Interior.ColorIndex=15;//15代表灰色range.Font.Bold=true;range.Font.Size=10;int r=0;for(r=0;r<rowNum;r++){for(int i=0;i<columnNum;i++){object obj=dt.Rows[r][dt.Columns[i].ToString()];datas[r+1,i]=obj==null?"":"'"+obj.ToString().Trim();//在obj.ToString()前加单引號是为了防止自己主动转化格式}Application.DoEvents();//加入进度条}//Excel.Range fchR=worksheet.get_Range(worksheet.Cells[1,1], worksheet.Cells[rowNum+1,columnNum]);Excel.Range fchR=m_xlApp.Range[worksheet.Cells[1,1],worksheet.Cells[rowNum+1, columnNum]];fchR.Value2=datas;worksheet.Columns.EntireColumn.AutoFit();//列宽自适应。
C#DataGridView导出excel的几种方法
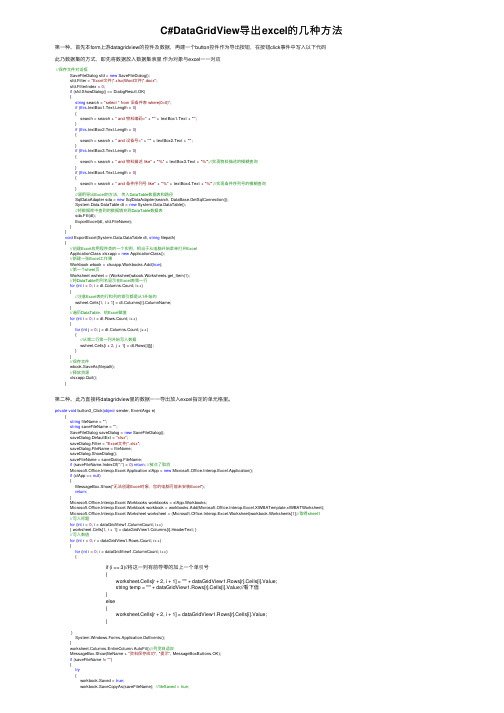
C#DataGridView导出excel的⼏种⽅法第⼀种、⾸先本form上游datagridview的控件及数据,再建⼀个button控件作为导出按钮,在按钮click事件中写⼊以下代码此乃数据集的⽅式,即先将数据放⼊数据集表⾥作为对象与excel⼀⼀对应//保存⽂件对话框SaveFileDialog sfd = new SaveFileDialog();sfd.Filter = "Excel⽂件|*.xlsx|Word⽂件|*.docx";sfd.FilterIndex = 0;if (sfd.ShowDialog() == DialogResult.OK){string search = "select * from 旧备件表 where(0=0)";if (this.textBox1.Text.Length > 0){search = search + " and 物料编码=" + "'" + textBox1.Text + "'";}if (this.textBox2.Text.Length > 0){search = search + " and 设备号=" + "'" + textBox2.Text + "'";}if (this.textBox3.Text.Length > 0){search = search + " and 物料描述 like" + "'%" + textBox3.Text + "%'";//实现物料描述的模糊查询}if (this.textBox4.Text.Length > 0){search = search + " and 备件序列号 like" + "'%" + textBox4.Text + "%'";//实现备件序列号的模糊查询}//调⽤导出Excel的⽅法,传⼊DataTable数据表和路径SqlDataAdapter sda = new SqlDataAdapter(search, DataBase.GetSqlConnection());System.Data.DataTable dt = new System.Data.DataTable();//将数据库中查到的数据填充到DataTable数据表sda.Fill(dt);ExportExcel(dt, sfd.FileName);}}void ExportExcel(System.Data.DataTable dt, string filepath){//创建Excel应⽤程序类的⼀个实例,相当于从电脑开始菜单打开ExcelApplicationClass xlsxapp = new ApplicationClass();//新建⼀张Excel⼯作簿Workbook wbook = xlsxapp.Workbooks.Add(true);//第⼀个sheet页Worksheet wsheet = (Worksheet)wbook.Worksheets.get_Item(1);//将DataTable的列名显⽰在Excel表第⼀⾏for (int i = 0; i < dt.Columns.Count; i++){//注意Excel表的⾏和列的索引都是从1开始的wsheet.Cells[1, i + 1] = dt.Columns[i].ColumnName;}//遍历DataTable,给Excel赋值for (int i = 0; i < dt.Rows.Count; i++){for (int j = 0; j < dt.Columns.Count; j++){//从第⼆⾏第⼀列开始写⼊数据wsheet.Cells[i + 2, j + 1] = dt.Rows[i][j];}}//保存⽂件wbook.SaveAs(filepath);//释放资源xlsxapp.Quit();}第⼆种、此乃直接将datagridview⾥的数据⼀⼀导出放⼊excel指定的单元格⾥。
LabVIEW中向Excel写入数据
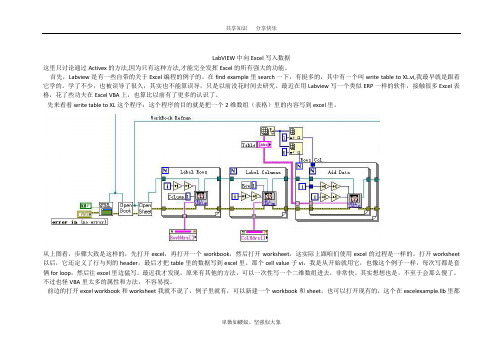
卑微如蝼蚁、坚强似大象LabVIEW 中向Excel 写入数据这里只讨论通过Activex 的方法,因为只有这种方法,才能完全发挥Excel 的所有强大的功能。
首先,Labview 是有一些自带的关于Excel 编程的例子的。
在find example 里search 一下,有挺多的,其中有一个叫write table to XL.vi,我最早就是跟着它学的。
学了不少,也被误导了很久,其实也不能算误导,只是以前没花时间去研究。
最近在用Labview 写一个类似ERP 一样的软件,接触很多Excel 表格,花了些功夫在Excel VBA 上,也算比以前有了更多的认识了。
先来看看write table to XL 这个程序:这个程序的目的就是把一个2维数组(表格)里的内容写到excel 里。
从上图看,步骤大致是这样的,先打开excel ,再打开一个workbook ,然后打开worksheet ,这实际上跟咱们使用excel 的过程是一样的。
打开worksheet 以后,它还定义了行与列的header ,最后才把table 里的数据写到excel 里。
那个cell value 子vi ,我是从开始就用它,也像这个例子一样,每次写都是套俩for loop ,然后往excel 里边猛写。
最近我才发现,原来有其他的方法,可以一次性写一个二维数组进去,非常快。
其实想想也是,不至于会那么傻了。
不过也怪VBA 里太多的属性和方法,不容易找。
前边的打开excel workbook 和worksheet 我就不说了,例子里就有,可以新建一个workbook 和sheet ,也可以打开现有的,这个在excelexample.llb里都能找到。
(excelexample在哪里?这个……,打开这些个VI,saveas一下就知道在哪里了,ok?)接下来说一下这几天找到的几个方法和属性。
首先是Insert,插入行或者列(就像你在excel里右键插入一样,每次只能一行或者一列,要多行的话,只能多来几次了,是这样吧?)在说这个之前,先说下怎么找这些属性和方法,在Excel里,打开VB编辑器(工具-》宏-》VB 编辑器,excel2007是在菜单开发工具下,我用的是Excel2007),打开以后看VB语言参考,重点就是里边的方法和属性,对应在Labview里边的Property和Method节点。
wpf datagridview 用法
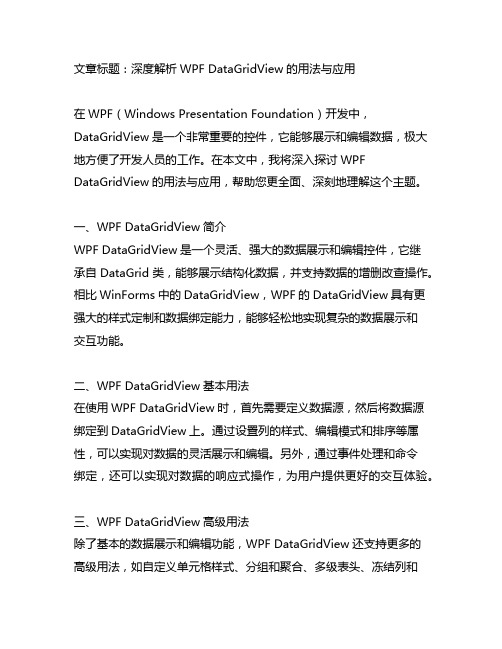
文章标题:深度解析WPF DataGridView的用法与应用在WPF(Windows Presentation Foundation)开发中,DataGridView是一个非常重要的控件,它能够展示和编辑数据,极大地方便了开发人员的工作。
在本文中,我将深入探讨WPF DataGridView的用法与应用,帮助您更全面、深刻地理解这个主题。
一、WPF DataGridView简介WPF DataGridView是一个灵活、强大的数据展示和编辑控件,它继承自DataGrid类,能够展示结构化数据,并支持数据的增删改查操作。
相比WinForms中的DataGridView,WPF的DataGridView具有更强大的样式定制和数据绑定能力,能够轻松地实现复杂的数据展示和交互功能。
二、WPF DataGridView基本用法在使用WPF DataGridView时,首先需要定义数据源,然后将数据源绑定到DataGridView上。
通过设置列的样式、编辑模式和排序等属性,可以实现对数据的灵活展示和编辑。
另外,通过事件处理和命令绑定,还可以实现对数据的响应式操作,为用户提供更好的交互体验。
三、WPF DataGridView高级用法除了基本的数据展示和编辑功能,WPF DataGridView还支持更多的高级用法,如自定义单元格样式、分组和聚合、多级表头、冻结列和行等功能。
通过这些高级用法,可以实现更复杂的数据展示和交互需求,提升用户体验和系统性能。
四、个人观点和理解就我个人而言,WPF DataGridView是我在WPF开发中使用频率最高的控件之一。
它不仅能够满足基本的数据展示和编辑需求,还能够通过样式定制和事件响应实现更复杂的功能。
我认为深入掌握WPF DataGridView的用法和应用,对于提高开发效率和系统质量都是非常重要的。
总结回顾通过本文的深度解析,相信您对WPF DataGridView的用法和应用已经有了更全面、深刻的理解。
C#实现连接数据库查询,将dgv控件数据导出和导入Excel

C#实现连接数据库查询,将dgv控件数据导出和导⼊Excel 前提:主页⾯主页⾯FOm1的代码DataTable dt = new DataTable();dt.Columns.Add("epc");dt.Columns.Add("crc");dt.Columns.Add("pc");dt.Columns.Add("time");dataGridView1.DataSource = dt;dataGridView1.Columns[0].Width = 205;dataGridView1.Columns[1].Width = 200;dataGridView1.Columns[2].Width = 190;dataGridView1.Columns[3].Width = 200;进度条⽅法代码:private void SetProgressMessage(int pro, ProgressBar proBar){//如果当前调⽤⽅不是创建控件的⼀⽅,则需要使⽤this.Invoke()//在这⾥,ProgressBar控件是由主线程创建的,所以⼦线程要对该控件进⾏操作//必须执⾏this.InvokeRequired进⾏判断。
if (this.InvokeRequired){DelSetPro setPro = new DelSetPro(SetProgressMessage);this.Invoke(setPro, new object[] { pro, proBar });}else{proBar.Value = Convert.ToInt32(pro);}}//调⽤进度条的主⽅法private void SleepForProgressBar01(){for (int i = 1; i <= 100; i++){Thread.Sleep(10);SetProgressMessage(i, progressBar1);}//DialogResult dr01 = MessageBox.Show("ProgressBar01 has been finished!");//if (dr01.Equals(DialogResult.OK))//{// SetProgressBarVisi(progressBar1);//}}好了,界⾯布局代码写好之后就开始写功能代码了第⼀步:连接数据,把数据库表的数据放⼊DGV控件⾥1、⾸先新建⼀个sqlbase类public class sqlbase{//我这⾥连接的是Sqlserver数据库(server:数据库服务器名称,database:你要操作的数据库名称,其余的是你的登录名称和密码)public static string ConnectionStr = "server=Lenovo;database=TEST;uid=sa;pwd=aa1997924";//这个⽅法表⽰可以对数据库进⾏增删改的操作public static int ExecuteNonQuery(string sql){int result = 0;using (SqlConnection con = new SqlConnection(ConnectionStr)) {if (con.State == ConnectionState.Closed){con.Open();}try{SqlCommand cmd = new SqlCommand(sql, con);result = cmd.ExecuteNonQuery();}catch{result = 0;}}return result;}//这个⽅法是对数据库进⾏查询public static DataSet GetDataTableBySql(string sql){//DataTable dt = new DataTable();DataSet ds = new DataSet();using (SqlConnection con = new SqlConnection(ConnectionStr)) {if (con.State == ConnectionState.Closed){con.Open();}try{SqlDataAdapter sda = new SqlDataAdapter(sql, con);sda.Fill(ds);}catch{ds = null;}}return ds;}2、双击查询按钮,在事件中写如下代码string strsql = "select * from test";//查询语句DataSet data1 = sqlbase.GetDataTableBySql(strsql); dataGridView1.DataSource = data1.Tables[0]; SleepForProgressBar01();点击查询按钮:如下显⽰第⼆步:将Excel导⼊1、在导⼊按钮事件中写如下代码:private void btn_daoru_Click(object sender, EventArgs e){try{//获取Excel⽂件路径和名称OpenFileDialog odXls = new OpenFileDialog();//指定相应的打开⽂档的⽬录 AppDomain.CurrentDomain.BaseDirectory定位到Debug⽬录,再根据实际情况进⾏⽬录调整string folderPath = AppDomain.CurrentDomain.BaseDirectory + @"databackup\";odXls.InitialDirectory = folderPath;// 设置⽂件格式odXls.Filter = "Excel files office2003(*.xls)|*.xls|Excel office2010(*.xlsx)|*.xlsx|All files (*.*)|*.*";//openFileDialog1.Filter = "图⽚⽂件(*.jpg)|*.jpg|(*.JPEG)|*.jpeg|(*.PNG)|*.png";odXls.FilterIndex = 2;odXls.RestoreDirectory = true;if (odXls.ShowDialog() == DialogResult.OK){this.txtFilePath.Text = odXls.FileName;this.txtFilePath.ReadOnly = true;string sConnString = string.Format("Provider=Microsoft.ACE.OLEDB.12.0;" + "Data Source={0};" + "Extended Properties='Excel8.0;HDR=NO;IMEX=1';", odXls.FileName);if ((System.IO.Path.GetExtension(txtFilePath.Text.Trim())).ToLower() == ".xls"){sConnString = "Provider=Microsoft.Jet.OLEDB.4.0;" + "data source=" + odXls.FileName + ";Extended Properties=Excel 5.0;Persist Security Info=False";//sConnString = "Provider=Microsoft.Jet.OLEDB.4.0;Data Source=" + txtFilePath.Text.Trim() + ";Extended Properties=\"Excel 8.0;HDR=" + strHead + ";IMEX=1\"";}using (OleDbConnection oleDbConn = new OleDbConnection(sConnString)){oleDbConn.Open();DataTable dt = oleDbConn.GetOleDbSchemaTable(OleDbSchemaGuid.Tables, new object[] { null, null, null, "TABLE" });//判断是否cmb中已有数据,有则清空if (cmbtablename.Items.Count > 0){cmbtablename.DataSource = null;cmbtablename.Items.Clear();}//遍历dt的rows得到所有的TABLE_NAME,并Add到cmb中foreach (DataRow dr in dt.Rows){cmbtablename.Items.Add((String)dr["TABLE_NAME"]);}if (cmbtablename.Items.Count > 0){cmbtablename.SelectedIndex = 0;}SleepForProgressBar01();// btnshow_Click();MessageBox.Show("导⼊成功");//加载Excel⽂件数据按钮// this.btnshow.Enabled = true;}}}catch (Exception ex){MessageBox.Show(ex.Message);}}2、点击导⼊后会弹框让你选择⽂件3、选择你要导⼊的Excel⽂件,显⽰如下界⾯,textbox控件会显⽰⽂件地址,combox会显⽰⽂件的多个分表第三步、将导⼊的⽂档放⼊DGV控件中1、新增⼀个加载⽅法private void btnshow_Click(){#region 读取相应的表名的Excel⽂件中数据到当前DataGridview中显⽰OleDbConnection ole = null;OleDbDataAdapter da = null;DataTable dt = null;string strConn = string.Format("Provider=Microsoft.ACE.OLEDB.12.0;" + "Data Source={0};" + "Extended Properties='Excel8.0;HDR=NO;IMEX=1';", txtFilePath.Text.Trim());if ((System.IO.Path.GetExtension(txtFilePath.Text.Trim())).ToLower() == ".xls"){strConn = "Provider=Microsoft.Jet.OLEDB.4.0;" + "data source=" + txtFilePath.Text.Trim() + ";Extended Properties=Excel 5.0;Persist Security Info=False";//sConnString = "Provider=Microsoft.Jet.OLEDB.4.0;Data Source=" + txtFilePath.Text.Trim() + ";Extended Properties=\"Excel 8.0;HDR=" + strHead + ";IMEX=1\"";}string sTableName = cmbtablename.Text.Trim();string strExcel = "select * from [" + sTableName + "]";try{ole = new OleDbConnection(strConn);ole.Open();da = new OleDbDataAdapter(strExcel, ole);dt = new DataTable();da.Fill(dt);this.dataGridView1.DataSource = dt;//因为⽣成Excel的时候第⼀⾏是标题,所以要做如下操作://1.修改DataGridView列头的名字,//2.数据列表中删除第⼀⾏for (int i = 0; i < dt.Columns.Count; i++){//dgvdata.Columns[i].AutoSizeMode = DataGridViewAutoSizeColumnMode.AllCells;//dgvdata.Columns[i].Name = dt.Columns[i].ColumnName;dataGridView1.Columns[i].HeaderCell.Value = dt.Rows[0][i].ToString();//c# winform ⽤代码修改DataGridView列头的名字,设置列名,修改列名}//DataGridView删除⾏dataGridView1.Rows.Remove(dataGridView1.Rows[0]);//删除第⼀⾏//dgvdata.Rows.Remove(dgvdata.CurrentRow);//删除当前光标所在⾏//dgvdata.Rows.Remove(dgvdata.Rows[dgvdata.Rows.Count - 1]);//删除最后⼀⾏//dgvdata.Rows.Clear();//删除所有⾏ole.Close();}catch (Exception ex){MessageBox.Show(ex.Message);}finally{if (ole != null)ole.Close();}#endregion}2、在加载按钮事件中调⽤上⾯⽅法即可3、点击加载按钮,如下显⽰注意:这⾥可以选择,第⼆个分表进⾏导⼊(导⼊的字段名可以和绑定dgv列名不同,并不限制列的个数)第四部:导出Excel(将dgv控件的数据表导出Excel⽂档)1、新建⽅法导出⽅法private void ExportExcels(string fileName, DataGridView myDGV){string saveFileName = "";SaveFileDialog saveDialog = new SaveFileDialog();saveDialog.DefaultExt = "xls";saveDialog.Filter = "Excel⽂件|*.xls";saveDialog.FileName = fileName;saveDialog.ShowDialog();saveFileName = saveDialog.FileName;if (saveFileName.IndexOf(":") < 0) return; //被点了取消Microsoft.Office.Interop.Excel.Application xlApp = new Microsoft.Office.Interop.Excel.Application();if (xlApp == null){MessageBox.Show("⽆法创建Excel对象,可能您的机⼦未安装Excel");return;}Microsoft.Office.Interop.Excel.Workbooks workbooks = xlApp.Workbooks;Microsoft.Office.Interop.Excel.Workbook workbook = workbooks.Add(Microsoft.Office.Interop.Excel.XlWBATemplate.xlWBATWorksheet); Microsoft.Office.Interop.Excel.Worksheet worksheet = (Microsoft.Office.Interop.Excel.Worksheet)workbook.Worksheets[1];//取得sheet1//写⼊标题for (int i = 0; i < myDGV.ColumnCount; i++){worksheet.Cells[1, i + 1] = myDGV.Columns[i].HeaderText;}bel6.Visible = true;bel6.Text = myDGV.Rows.Count.ToString();//总进度//写⼊数值for (int r = 0; r < myDGV.Rows.Count; r++){bel3.Visible = true;bel3.Text = r.ToString();//实时进度for (int i = 0; i < myDGV.ColumnCount; i++){worksheet.Cells[r + 2, i + 1] = myDGV.Rows[r].Cells[i].Value;}System.Windows.Forms.Application.DoEvents();}worksheet.Columns.EntireColumn.AutoFit();//列宽⾃适应if (saveFileName != ""){try{workbook.Saved = true;workbook.SaveCopyAs(saveFileName);}catch (Exception ex){MessageBox.Show("导出⽂件时出错,⽂件可能正被打开!\n" + ex.Message);}}xlApp.Quit();GC.Collect();//强⾏销毁MessageBox.Show("⽂件: " + fileName + ".xls 保存成功", "信息提⽰", MessageBoxButtons.OK, rmation); }2、在导出事件写如下代码private void btnshow_Click(object sender, EventArgs e){if (this.dataGridView1.Rows.Count<=0){MessageBox.Show("当前没有可导出的数据!");return;}string a = "D:" + "\\KKHMD.xls";ExportExcels(a, dataGridView1);}3、单击导出,显⽰如下,选择保存地址注意:我这⾥添加了进度显⽰:4、导出成功好了,⾄此所有功能以实现1、连接数据库,将数据绑定到的dgv控件2、Excel的导⼊3、Excel的导出。
C#DataGridView导出到Excel

objData[rowIndex, colIndex] = myDataGridView.Rows[rowIndex - 1].Cells[colIndexs[colIndex]].Value.ToString();
}
System.Windows.Forms.Application.DoEvents();
System.Runtime.InteropServices.Marshal.ReleaseComObject(xlSheet);
System.Runtime.InteropServices.Marshal.ReleaseComObject(range);
xlSheet = null;
if (filenameString.Trim() == "") return false;
FileInfo file = new FileInfo(filenameString);
if (file.Exists)
{
try
int rowCount = myDataGridView.RowCount;
List<int> colIndexs = new List<int>();
// 创建缓存数据
object[,] objData = new object[rowCount + 1, dispcolCount];
{
MessageBox.Show("保存出错,请检查!");
return false;
}
finally
{
System.Runtime.InteropServices.Marshal.ReleaseComObject(xlBook.Worksheets);
DataGridView中实现复制、剪切、粘贴功能

DataGridView中实现复制、剪切、粘贴功能 ⽤户在使⽤WinForms应⽤程序时,为了快速的输⼊数据,通常会在DataGridView与Excle之间进⾏复制、剪切、粘贴操作。
将Excel中的数据复制到DataGridView时,直接使⽤Excel中的复制、剪切功能,需要在DataGridView中实现粘贴功能;将DataGridView中数据复制到DataGridView或Excel中时,需要在DataGridView中实现复制、剪切、粘贴功能。
DataGridView.ClipboardCopyMode 属性被设定为 DataGridViewClipboardCopyMode.Disable 以外的情况时,「Ctrl + C」按下的时候,被选择的单元格的内容会拷贝到系统剪切板内(DataGridView已提供了复制⽅法),可以直接粘贴到Excel 中,但在DataGridView中没有提供粘贴⽅法,需要⾃⼰定义。
以下分别演⽰在DataGridView中实现复制、剪切、粘贴功能:/// <summary>/// 实现复制功能,将DataGridView中选定单元格的值复制到剪贴板中/// </summary>/// <param name="dgv_Test"></param>private void CopyData(DataGridView dgv_Test){Clipboard.SetDataObject(dgv_Test.GetClipboardContent());}/// <summary>/// 实现剪切功能,将DataGridView中选定单元格的值复制到剪贴板中,并将选中的单元格的值清空/// </summary>/// <param name="dgv_Test"></param>private void CutData(DataGridView dgv_Test){//将选定单元格的值复制到剪贴板中Clipboard.SetDataObject(dgv_Test.GetClipboardContent());string clipboardText = Clipboard.GetText(); //获取剪贴板的内容if (string.IsNullOrEmpty(clipboardText)){return;}int colnum = 0;int rownum = 0;for (int i = 0; i < clipboardText.Length; i++){if (clipboardText.Substring(i,1) == "\t"){colnum++;}if (clipboardText.Substring(i,1) == "\n"){rownum++;}}//粘贴板上的数据来源于EXCEL时,每⾏末尾都有\n,来源于DataGridView是,最后⼀⾏末尾没有\nif (clipboardText.Substring(clipboardText.Length-1,1) == "\n"){rownum--;}colnum = colnum / (rownum + 1);//获取当前选中的最后⼀个单元格的列、⾏序号int colIndex = dgv_Test.SelectedCells[0].ColumnIndex;int rowIndex = dgv_Test.SelectedCells[0].RowIndex;for (int i = 0; i <= rownum; i++){for (int j = 0; j <= colnum; j++){dgv_Test.Rows[rowIndex - i].Cells[colIndex - j].Value = "";}}}/// <summary>/// 实现粘贴功能,将剪贴板中的内容粘贴到DataGridView中/// </summary>/// <param name="dgv_Test"></param>private void PasteData(DataGridView dgv_Test){try{string clipboardText = Clipboard.GetText(); //获取剪贴板中的内容if (string.IsNullOrEmpty(clipboardText)){return;}int colnum = 0;int rownum = 0;for (int i = 0; i < clipboardText.Length; i++){if (clipboardText.Substring(i,1) == "\t"){colnum++;}if (clipboardText.Substring(i,1) == "\n"){rownum++;}}//粘贴板上的数据来源于EXCEL时,每⾏末尾都有\n,来源于DataGridView是,最后⼀⾏末尾没有\n if (clipboardText.Substring(clipboardText.Length-1,1) == "\n"){rownum--;}colnum = colnum / (rownum + 1);object[,] data; //定义object类型的⼆维数组data = new object[rownum + 1, colnum + 1]; //根据剪贴板的⾏列数实例化数组string rowStr = "";//对数组各元素赋值for (int i = 0; i <= rownum; i++){for (int j = 0; j <= colnum; j++){//⼀⾏中的其它列if (j != colnum){rowStr = clipboardText.Substring(0, clipboardText.IndexOf("\t"));clipboardText = clipboardText.Substring(clipboardText.IndexOf("\t") + 1);}//⼀⾏中的最后⼀列if (j == colnum && clipboardText.IndexOf("\r") != -1){rowStr = clipboardText.Substring(0, clipboardText.IndexOf("\r"));}//最后⼀⾏的最后⼀列if (j == colnum && clipboardText.IndexOf("\r") == -1){rowStr = clipboardText.Substring(0);}data[i, j] = rowStr;}//截取下⼀⾏及以后的数据clipboardText = clipboardText.Substring(clipboardText.IndexOf("\n") + 1);}//获取当前选中单元格的列序号int colIndex = dgv_Test.CurrentRow.Cells.IndexOf(dgv_Test.CurrentCell);//获取当前选中单元格的⾏序号int rowIndex = dgv_Test.CurrentRow.Index;for (int i = 0; i <=rownum; i++){for (int j = 0; j <= colnum; j++){dgv_Test.Rows[i + rowIndex].Cells[j + colIndex].Value = data[i, j];}}}catch{MessageBox.Show("粘贴区域⼤⼩不⼀致");return;}} //测试代码private void tsmi_Copy_Click(object sender, EventArgs e){CopyData(dgv_PersonInfo);}private void tsmi_Cut_Click(object sender, EventArgs e){CutData(dgv_PersonInfo);}private void tsmi_Paste_Click(object sender, EventArgs e){PasteData(dgv_PersonInfo);}⼀本深⼊了解CLR和.NET Framework的C#经典书籍,值得有⼀定基础的⼈员所拥有,在此推荐给⼤家。
LabVIEW中向Excel写入数据
卑微如蝼蚁、坚强似大象LabVIEW 中向Excel 写入数据这里只讨论通过Activex 的方法,因为只有这种方法,才能完全发挥Excel 的所有强大的功能。
首先,Labview 是有一些自带的关于Excel 编程的例子的。
在find example 里search 一下,有挺多的,其中有一个叫write table to XL.vi,我最早就是跟着它学的。
学了不少,也被误导了很久,其实也不能算误导,只是以前没花时间去研究。
最近在用Labview 写一个类似ERP 一样的软件,接触很多Excel 表格,花了些功夫在Excel VBA 上,也算比以前有了更多的认识了。
先来看看write table to XL 这个程序:这个程序的目的就是把一个2维数组(表格)里的内容写到excel 里。
从上图看,步骤大致是这样的,先打开excel ,再打开一个workbook ,然后打开worksheet ,这实际上跟咱们使用excel 的过程是一样的。
打开worksheet 以后,它还定义了行与列的header ,最后才把table 里的数据写到excel 里。
那个cell value 子vi ,我是从开始就用它,也像这个例子一样,每次写都是套俩for loop ,然后往excel 里边猛写。
最近我才发现,原来有其他的方法,可以一次性写一个二维数组进去,非常快。
其实想想也是,不至于会那么傻了。
不过也怪VBA 里太多的属性和方法,不容易找。
前边的打开excel workbook 和worksheet 我就不说了,例子里就有,可以新建一个workbook 和sheet ,也可以打开现有的,这个在excelexample.llb里都能找到。
(excelexample在哪里?这个……,打开这些个VI,saveas一下就知道在哪里了,ok?)接下来说一下这几天找到的几个方法和属性。
首先是Insert,插入行或者列(就像你在excel里右键插入一样,每次只能一行或者一列,要多行的话,只能多来几次了,是这样吧?)在说这个之前,先说下怎么找这些属性和方法,在Excel里,打开VB编辑器(工具-》宏-》VB 编辑器,excel2007是在菜单开发工具下,我用的是Excel2007),打开以后看VB语言参考,重点就是里边的方法和属性,对应在Labview里边的Property和Method节点。
- 1、下载文档前请自行甄别文档内容的完整性,平台不提供额外的编辑、内容补充、找答案等附加服务。
- 2、"仅部分预览"的文档,不可在线预览部分如存在完整性等问题,可反馈申请退款(可完整预览的文档不适用该条件!)。
- 3、如文档侵犯您的权益,请联系客服反馈,我们会尽快为您处理(人工客服工作时间:9:00-18:30)。
using System;using System.Collections.Generic;using System.Text;using System.Windows.Forms;using Microsoft.Office.Interop.Excel;using System.Xml;using System.Xml.Serialization;using System.IO;namespace txt批处理{class 保存{internal static bool 写入EXCEL(DataGridView gridView, string fileName, bool isShowExcle){Microsoft.Office.Interop.Excel.Application app = new Microsoft.Office.Interop.Excel.Application();try{if (app == null){return false;}app.Visible = isShowExcle;Workbooks workbooks = app.Workbooks;_Workbook workbook =workbooks.Add(XlWBATemplate.xlWBATWorksheet);Sheets sheets = workbook.Worksheets;_Worksheet worksheet = (_Worksheet)sheets.get_Item(1); if (worksheet == null){return false;}string sLen = "";//取得最后一列列名char H = (char)(64 + gridView.ColumnCount / 26);char L = (char)(64 + gridView.ColumnCount % 26);if (gridView.ColumnCount < 26){sLen = L.ToString();}else{sLen = H.ToString() + L.ToString();}//标题string sTmp = sLen + "1";Range ranCaption = worksheet.get_Range(sTmp, "A1");string[] asCaption = new string[gridView.ColumnCount]; for (int i = 0; i < gridView.ColumnCount; i++){asCaption[i] = gridView.Columns[i].HeaderText;}ranCaption.Value2 = asCaption;//数据for (int r = 0; r < gridView.RowCount; r++){for (int l = 0; l < gridView.Columns.Count; l++) {if (gridView[l, r].Value != null){worksheet.Cells[r + 2, l + 1] = gridView[l, r].Value.ToString().Trim();}}}workbook.SaveCopyAs(fileName);workbook.Saved = true;workbook.Close(false, true, null);}catch{return false;}finally{//关闭erControl = false;app.Quit();}return true;}internal static bool 写入xml(DataGridView dataGridView, string 文件名){XmlTextWriter writer = null;bool 处理结果;try{writer = new XmlTextWriter(文件名, null);writer.Formatting = Formatting.Indented; //为使文件易读,使用缩进writer.WriteComment("采集的数据"); //写入注释writer.WriteStartElement("信息列表");int 行 = dataGridView.Rows.Count;int 列 = dataGridView.Columns.Count;string[] 标题 = new string[列];for (int j = 0; j < 列; j++){标题[j] = dataGridView.Columns[j].HeaderText;}for (int i = 0; i < 行; i++){writer.WriteStartElement("信息");for (int j = 0; j < 列; j++){string 信息 = dataGridView[j, i].Value != null ? dataGridView[j, i].Value.ToString() : "";writer.WriteElementString(标题[j], 信息);}writer.WriteEndElement();}writer.WriteEndElement();writer.Flush();writer.Close();处理结果 = true;}catch (Exception aa){MessageBox.Show(aa.Message);处理结果 = false;}finally{if (writer != null){writer.Close();}}return 处理结果;}//XML序列化写入//string 文件名 = AppDomain.CurrentDomain.BaseDirectory + "\\配置.xml";//T 为可序列化的类public static bool 写入配置<T>(string 文件名, T 任务A){try{XmlSerializer XML序列 = new XmlSerializer(typeof(T)); Stream 数据流 = new FileStream(文件名, FileMode.Create, FileAccess.Write, FileShare.ReadWrite);XML序列.Serialize(数据流, 任务A);数据流.Close();return true;}catch (Exception ee){return false;}}//XML序列化读出//T 为可反序列化的类public static T 读出配置<T>(string 文件名){XmlSerializer xs = new XmlSerializer(typeof(T));Stream stream = null;try{stream = new FileStream(文件名, FileMode.Open, FileAccess.Read, FileShare.ReadWrite);T 结果 = (T)xs.Deserialize(stream);stream.Close();return 结果;}catch (Exception ee){if (stream != null)stream.Close();MessageBox.Show(ee.Message, "读取失败");return default(T);}}public static bool 写入TXT(DataGridView 数据表, string 文件名) {if (文件名.Trim() == "")return false;StringBuilder s = new StringBuilder();int 行数 = 数据表.Rows.Count;int 列数 = 数据表.Columns.Count;for (int i = 0; i < 行数; i++){for (int j = 0; j < 列数; j++){if (数据表[j, i].Value != null){s.AppendLine(数据表[j,i].Value.ToString().Trim() );}}s.AppendLine("");}StreamWriter MyWriter = null;try{MyWriter = new StreamWriter(文件名, false,System.Text.Encoding.Default);MyWriter.Write(s);return true;}catch (Exception Err){MessageBox.Show(Err.Message, "写文本文件发生错误", MessageBoxButtons.OK, rmation);return false;}finally{if (MyWriter != null){MyWriter.Close();}}}}}。