Red Hat Enterprise Linux 4 UP 2 (X86-64)上构建Oracle RAC 10g Release 2 Cluster
戴尔易安信iDRAC6集成式远程访问控制器3.00版说明书

###################################################################### INTEGRATED DELL(TM) REMOTE ACCESS CONTROLLER 6 (iDRAC6) VERSION 3.00 ######################################################################This document contains updated information about the Integrated DellRemote Access Controller 6.For more information about iDRAC6, including installation andconfiguration information, see the "Integrated Dell Remote AccessController 6 (iDRAC6) Enterprise for Blade Servers Version 3.00User Guide" and the "Dell OpenManage(TM) Server AdministratorUser's Guide." These documents are located on the Dell Supportwebsite at "/manuals." On the "Manuals" page, click"Software" > "Systems Management". Click on the appropriate productlink on the right-side to access the documents.######################################################################TABLE OF CONTENTS######################################################################This file contains the following sections:* Criticality* Minimum Requirements* Release Highlights* Important Notes and Known Issues###################################################################### CRITICALITY######################################################################2 - Recommended###################################################################### MINIMUM REQUIREMENTS######################################################################====================================================================== SUPPORTED SYSTEMS====================================================================== iDRAC6 is supported on the following Dell PowerEdge(TM) systemsin the Dell PowerEdge M1000e system enclosure:* Dell PowerEdge M610* Dell PowerEdge M710* Dell PowerEdge M910* Dell PowerEdge M610x* Dell PowerEdge M710HD====================================================================== SUPPORTED MANAGED SERVER OPERATING SYSTEMS====================================================================== The iDRAC6 is supported by the following operating systems:* Microsoft(R) Windows Server(R) 2003 familyThe Windows Server 2003 family includes:- Windows Server 2003 (Standard, Enterprise, and DataCenterEditions) with SP2 (x86, x86_64)- Windows Server 2003 Web Edition with SP2 (x86, x86_64) on M910 only- Windows Server 2003 R2 (Standard, Enterprise, and DataCenterEditions) with SP2 (x86, x86_64)* Microsoft Windows Server 2008 SP2 (Standard, Enterprise,and DataCenter Editions) (x86, x86_64)- Windows Server 2008 SP2 Web Edition (x86, x86_64) on M910 only* Microsoft Windows Server 2008 EBS SP1 (Standard and Premium Editions)* Microsoft Windows Server 2008 R2 (Standard, Enterprise,and DataCenter Editions) (x86_64)- Windows Server 2008 R2 Web Edition (x86_64) on M910 only* SUSE(R) Linux Enterprise Server (SLES) 10 SP3 (x86_64)* SUSE Linux Enterprise Server (SLES) 11 (x86_64)* Red Hat(R) Enterprise Linux (RHEL) 4.8 (x86, x86_64)* Red Hat(R) Enterprise Linux (RHEL) 5.5 (x86, x86_64)* Hyper-V(TM) and Hyper-V R2* VMware(R) ESX 4.0 Update 1* ESXi(TM) 4.0 Update1 Flash* XenServer(TM) 6.0 HDDNote:Use the Dell-customized ESXi 4.0 Update 1 Embedded edition. Thisimage is available at and . The remotedeployment and local installation of ESXi through Virtual Media isnot supported for standard ESXi Embedded version 4.0, as theinstallation may fail with the error message, "Installation failedas more than one USB device found."====================================================================== SUPPORTED WEB BROWSERS====================================================================== * Microsoft Internet Explorer(R) 7.0 for Windows Server 2003 SP2,Windows Server 2008 SP2, Windows XP SP3, and Windows Vista(R) SP2* Microsoft Internet Explorer 8.0 for Windows Server 2003 SP2,Windows Server 2008 SP2, Windows Server 2008 R2, Windows XP SP3,Windows 7, and Windows Vista(R) SP2.Internet Explorer 8 requires Java(TM) Runtime Environment (JRE)version 1.6.14 or later* Microsoft Internet Explorer 8.0 (64-bit) for Windows 7 (x86_64)and Windows Server 2008 R2 (x86_64)* Mozilla(R) Firefox(R) 3.0 on Windows XP SP3, Windows Server 2003 SP2,Windows Server 2008 SP2, Windows Server 2008 R2, Windows Vista SP2,Windows 7, RHEL 4.8, RHEL 5.4, SLES 10 SP3, and SLES 11* Mozilla(R) Firefox(R) 3.6 on Windows Server 2008 SP2,Windows Server 2008 R2, Windows Vista SP2, Windows 7, RHEL 4.8,RHEL 5.4, and SLES 11* Mozilla(R) Firefox(R) 3.6 (64-bit) on RHEL 5.4 (x86_64) andSLES 11 (x86_64)====================================================================== FIRMWARE VERSIONS====================================================================== Recommended firmware versions for CMC and BIOS:* CMC Firmware: 3.0 (required for M610x and M710HD)* Dell PowerEdge M610 BIOS: 2.1.8 or later* Dell PowerEdge M710 BIOS: 2.1.8 or later* Dell PowerEdge M910 BIOS: 1.1.6 or later* Dell PowerEdge M610x BIOS: 2.1.8 or later* Dell PowerEdge M710HD BIOS: 1.0.x or later###################################################################### RELEASE HIGHLIGHTS (FIRMWARE VERSION 3.00)######################################################################* Support for M610x and M710HD systems* Remote Enablement enhancements* vFlash enhancements* New Web GUI visual design* Virtual Console preview* Regular maintenance###################################################################### IMPORTANT NOTES AND KNOWN ISSUES FOR iDRAC6 3.00######################################################################This section provides important notes and additional information aboutknown issues for the iDRAC6 Firmware version 3.00:* If you are upgrading from iDRAC versions 2.1 or 2.2, you must firstinstall iDRAC version 2.30 or 2.31 before installing the 3.00 version.* When connecting to the iDRAC Web interface with a certificate thebrowser does not trust, the browser's certificate error warning maydisplay a second time after you acknowledge the first warning. Thisis the expected behavior to ensure security.* To use Virtual Console with Java plug-in, the supported JRE versionis 1.6.0_20 or higher.* When the JRE is configured to verify the certificate againsta Certificate Revocation List (CRL) and/or online certificatevalidation the certificate validation may sometimes fail. Thisis because the Certificate Authority (CA) that issued the certificateis not accessible due to connectivity problems or is notresponding in a timely manner. In such cases, wait and retry ata later time.* Remote Services: When using TFTP to download an ISO image to thevFlash, if the image exceeds the partition size, no error messagewill be generated. However, subsequent operations on the ISO willfail.* On certain hardware configurations, based on the firmware release,firmware downgrades are not allowed.* For Remote Enablement auto-discovery, ensure that the user ID onthe provisioning server does not contain any spaces, as iDRAC6 userIDs may not contain spaces. If a user ID containing spaces isconfigured on the provisioning server, the auto-discovery processmay be successful, but the resulting iDRAC6 account will not be usable.* If you run Dell Update Packages (DUPs) when vFlash is in-use, thevFlash is disconnected and reconnected. If a write operation isin-progress, this action can corrupt the vFlash contents. If thisoccurs, the vFlash SD card will have to be re-initialized.* Reboot the managed system running on VMware ESX 3.x operatingsystem after an iDRAC6 update is completed. This ensures thatthe VMware ESX operating system re-enumerates the virtualdevices and enables virtual floppy and virtual CD-ROMfeatures of the iDRAC6. After the reboot, virtual devicesincluding virtual floppy, work as expected.* Updating iDRAC6 using the DOS Utility when DOS is booted using PXE. The iDRAC6 can be updated using the DOS utility when DOS is booted using PXE. However, the new firmware image has to be on a local media on the system for this to work properly. Local media can be a RAMDISK, HD, or a USB key on the server. When the image is stored on non-local devices like a network drive, PXE server drive, and so on, the iDRAC6update on multiple systems must be sequenced that is, it should bedone one system after the other. After the first system completes theupdate, the second system starts the update. After the second systemcompletes the update, the third system starts the update and so on.* On systems running Windows operating systems, theExplorer window(s) for any media does not close automatically if you remove the media. You must close the window(s) after you removethe media.On systems running Linux operating systems, the filebrowser window(s) for any media closes automatically if you removethe media.* iDRAC6 Linux DUPs do not support VMware ESX 4.0 operatingsystems. If the Linux DUP for iDRAC6 is run on VMwareESX 4.0, the DUP will fail.You can update iDRAC6 using one of the following methods:- CMC GUI-based update- iDRAC6 GUI-based update- Remote RACADM-based update* If you receive the message "A webpage is not responding onthe following website" in Internet Explorer 8.0, see:"/ie/archive/2009/05/04/ie8-in-windows-7-rc-reliability-and-telemetry.aspx""/?kbid=970858"* In Internet Explorer 7.0, if several tabs are open and you launchthe iDRAC6 Virtual Console, all the tabs are hidden whilethe Virtual Console is open. If the tab warning is turned off andyou close the Virtual Console, all the tabs and the browsercloses without warning.To prevent this, go to "Internet Properties" > "Tabs" >"Settings" and select the "Warn me when closing multiple tabs"option.* If a Virtual Media drive is disconnected using the "OS eject"option, then the drive may not be available until the operatingsystem re-enumerates the USB devices. For the operating systemto auto-detect the Virtual Media drive, the iDRAC6 Virtual Mediadevice can be reattached. To do this:1. Go to "System" > "Virtual Console/Media" >"Configuration".2. Set the "Attach Virtual Media" option to "Detach" and click "Apply".3. Set the "Attach Virtual Media" option to "Attach" and click "Apply". * The "racresetcfg" command in RACADM restores all properties totheir default values except "cfgDNSRacName" in the"cfgLanNetworking" group.* The iDRAC6 Linux DUP cannot be run on 64-bit RHEL 4 Update 7due to known issues in that operating system. See the Red HatKB article at "/faq/docs/DOC-3402" touse the DUP on RHEL 4 Update 7.* Smart Card login fails after a logout from the same browser window.Open a new browser window to login.* When using a configuration file with RACADM to configureiDRAC6, changing objects that affect the networkconnection stops the rest of the configuration filefrom taking effect.* To execute iDRAC DUPs in XenServer(TM) 5.6, you must installthe procmail package. You can install the procmail RPM in CentOS5.4 i386, which can be downloaded from any public site that hostsCentOS packages. However, it is recommend not to install *any*RPMs manually on XenServer, instead it is recommended that youdownload and install the OpenManage Supplemental Pack from. It contains the procmail package and is thesupported method for installing third party packages and applicationsin XenServer.* Using the iDRAC web console to shutdown the XenServer operatingsystem by selecting "Graceful Shutdown" does not shut down theserver. As best practice, it is recommended that you use theshutdown menu option in the XenServer console or in the XenCentermanagement GUI.* TFTP firmware update from local RACADM will not work after aracresetcfg or if IPv6 addresses are used. Use the firmwareRACADM for TFTP firmware update.* When using the virtual console on RHEL with Firefox, if thenetwork connection to the iDRAC is lost a blank message boxmay pop up. If the network connection is shortly restoredthe message box may eventually display the “Virtual Consoleis restarted” message and will then close. Normally themessage will immediately display in the message box but onrare occasions it may not display. The display of the messageis controlled by the JRE and if the blank message box isseen this is not an iDRAC firmware issue.* When connecting to the iDRAC GUI using browsers supportinglocalized languages, some popups may have generic messages thatare not localized in the title such as: "The page athttps://10.35.155.207 says:". This is a browser limitationand cannot be changed in the iDRAC.* When using the Virtual Console that uses the Java plug-in with attached Virtual Media, occasionally when disconnecting the Virtual Media the console also closes unexpectedly. When this happens, restartthe Virtual Console to regain access.* When the system is configured for extended schema and a device objectis created in the Active Directory(TM) child domain, iDRAC launch usingSingle Sign-On (SSO) fails for the user created in the child domain andthe root domain. To successfully perform SSO when the user object isdefined in the child domain, associate the user object in the childdomain with “Authenticated user” group.* During the SLES 11 installation through the "Dell Systems ManagementTools and Documentation" DVD, if the DVD is connected through VirtualMedia, the image installation may not proceed after the systemconfiguration step. It shows a warning dialog message similar tothe following:"Empty destination in URL: hd:///install/?device=/dev/sdc1".To continue the installation, delete the question mark ‘?’, refreshthe URL and the installation will proceed. This issue is not seen whenusing the managed system's local CD/DVD or using the operating system DVDdirectly instead of the "Dell Systems Management Tools andDocumentation" DVD.* When using the WSMan DCIM_RAIDService GetAvailableDisks method to retrieve specific RAID devices, the XML file passed to the command will contain a“RaidLevel” value for selection. No error checking is done on the RaidLevelValue. Therefore, if an incorrect or invalid value is specified, incorrectresults may be returned (for example, “abcd” becomes “0”; “64.999” becomes“64”). The RaidLevel specified must be an appropriate integer RAIDlevel value (“1”, “2”, “4”, “64”, “128”, “2048”, “8192”, “16384”, perDCIM_VirtualDiskView.mof).* When all the 16 iDRAC-supported user accounts are configured, attempts tomodify user privileges through the iDRAC GUI fails with the error message“Cannot delete or disable the user. At least one user must be enabled”.Temporarily disabling any one user account restores the ability to modify(all) user account settings. After completing the required accountprivilege changes, the disabled account may be re-enabled.Alternatively, RACADM may be used to modify account settings,irrespective of the number of user accounts that are configured.* At times, the Virtual Console feature of iDRAC becomes unavailable.When this happens issue a “racadm racreset” command to reaccess theVirtual Console.* On few Windows operating systems, under certain conditions, the iDRACivmcli.exe will fail. This is due to run-time components of Visual C++(R)Libraries (VC++ 2008 redistributable package) required to run applicationsthat are not available. To resolve this, download and install MicrosoftVisual C++ 2008 Redistributable Package (x86) from the following location:/downloads/details.aspx?familyid=9B2DA534-3E03-4391- 8A4D-074B9F2BC1BF&displaylang=en* When launching both the iDRAC GUI and the Virtual Console from CMC forthe same managed server, a cmc_root GUI session may not be closed properlyeven when properly logging out of the CMC launched iDRAC GUI window. Ifthis happens, it must be closed manually or the session will remain openuntil it reaches the session timeout. This reduces the available Web sessionsfor logging into the iDRAC until it times out. This session can be closedthrough the “racadm closessn” command or by navigating to the iDRAC SessionsGUI page at "System / Remote Access / iDRAC6" > "Network/Security" > "Sessions". * When using the iDRAC Virtual Console to connect to a managed server with arecent Linux distribution operating system installed, you may experiencemouse synchronization problems. This may be due to the Predictable PointerAcceleration feature of the GNOME desktop. For proper mouse synchronizationin the iDRAC Virtual Console, this feature must be disabled. To disablePredictable Pointer Acceleration, in the mouse section of the/etc/X11/xorg.conf file, add: Option "AccelerationScheme" "lightweight".If synchronization problems continue to be experienced, make the followingadditional changes: In the <user_home>/.gconf/desktop/gnome/peripherals/mouse/%gconf.xml file, change the values for "motion_threshold" and"motion_acceleration" to "-1".* To use Virtual Media with recent Windows releases on the management station,you should log into the management station with an Administrator's account.If you do not, the CD/DVD redirection may not work properly and may causecontinuous USB bus resets. If this happens, set the “Attach Virtual Media”option to “Detach” to stop the USB bus resets and allow CD/DVD redirectionto work properly when you log in again with an Administrator's account.* When you create a vFlash partition from an image file using the GUI orRACADM, if you do not have an open browser for the iDRAC GUI, you will notbe able to connect to the GUI until the create operation is completed. Ifyou need to connect to the iDRAC GUI, you must first have the browserconnected to the iDRAC URL to have access. This is important when a largepartition is being created from an image file since it may take a longtime to complete.* If the browser is enabled to use a proxy server, you will not be able toconnect to the iDRAC GUI. The browser must be set to not use a proxyserver for the iDRAC IP address.* The mention of WS-MAN support for digest authentication in chapter 16 ofthe User Guide is incorrect. iDRAC6 does not support digest authentication.###################################################################### Information in this document is subject to change without notice.(C) 2010 Dell Inc. All rights reserved.Reproduction of these materials in any manner whatsoever withoutthe written permission of Dell Inc. is strictly forbidden.Trademarks used in this text: "Dell", "OpenManage", and "PowerEdge"are trademarks of Dell Inc.; "Microsoft", "Windows", "InternetExplorer", "Windows Server", "Windows Vista", "ActiveX","Hyper-V Server", "Hyper-V", "Visual C++", and "Active Directory"are either trademarks or registered trademarks of Microsoft Corporationin the United States and/or other countries; "Intel" isa registered trademark of Intel Corporation in the United Statesand other countries; "SUSE" is a registered trademark of Novell Corporation; "Red Hat" and "Red Hat Enterprise Linux" are registered trademarks of Red Hat, Inc. in the United States and other countries; "VMware", "ESX Server", and "ESXi Server” are registered trademarks or trademarks of VMware, Inc. in the United States and/or other jurisdictions; "XenServer" is a trademark of Citrix Systems, Inc. in the United States and/or other countries; "Java" is a trademarks of Sun Microsystems, Inc. in the United States and other countries; "Mozilla" and "Firefox" are either registered trademarks or trademarks of Mozilla Foundation.Other trademarks and trade names may be used in this document to refer to either the entities claiming the marks and names or their products. Dell Inc. disclaims any proprietary interest in trademarks and trade names other than its own.July 2010。
手把手教你安装Red Hat Enterprise 4.0 (RHEL 4.0)

在经历了两次跳票以后, Red Hat于2007年3月14日正式发布了RHEL5. RHEL 5将是Red Hat的商业服务器操作系统版本的第四次重要版本发布, Red Hat酝酿发布RHEL 5已经超过了两年, 主要变化包括Linux内核由2.6.9升级为2.6.18, 支持Xen虚拟化技术, 集群存储等.RHEL5的版本主要分为Sever和Desktop两个版本。
具体来说,Server版本分为:· Red Hat Enterprise Linux Advanced Platform - 对应以前的· Red Hat Enterprise Linux AS· Red Hat Enterprise Linux - 对应以前的Red Hat Enterprise Linux ASDesktop版本分为:· Red Hat Enterprise Linux Desktop - 对应以前的Red Hat Desktop · Red Hat Enterprise L inux Desktop with Workstation option - 对应以前的Red Hat Enterprise Linux WSRed Hat最新推出Red Hat Enterprise Linux 4.0(RHEL 4.0)时,相关权威机构在对这种操作系统软件包进行了第一手的测试(测试了RHEL 4.0 Advanced Server,即Red Hat的最强健的Linux版本)。
测试发现,新的4.0版本较之以前版本有了相当大的性能提高,增强了安全选件,大大改进了硬件检测机制。
RHEL 4.0速度的提高得益于新的Linux 2.6.9内核。
RHEL 4.0在Web 事务处理测试中得到了比运行在同样硬件上的RHEL 3.0高23%的速度。
在此,笔者也在最新对Red Hat Enterprise Linux 4.1.8进行了尝试,写下了安装的详细步骤,为初学者提供参考:1、Red Hat Enterprise Linux 4.0(RHEL 4.0)总共四张安装CD-ROM光盘,将第一张放入光盘,并在CMOS中设置光驱启动,出现图1画面:按Enter键进行图形化安装。
曙光天阔A840r-G用户手册V1.1
硬件及数据损坏负责; 8、 当服务器出现故障时,如果您不能确定故障的原因,请及时与曙光技术支持部门联系以
获得帮助; 9、 如主板 CMOS 电池失效,请使用与本机配备的电池相同型号的电池进行更换,替换下的
的稳定运行,并将可以延长服务器的使用寿命; 2、 请使用带接地保护的三芯电源线与插座,并使用220V 交流电,不正确的电源设置可能
会导致漏电、烧毁、爆炸甚至人身伤害; 3、 请不要在服务器正在运行时插拔背板连线或是移动服务器,否则将可能造成服务器当机
或是部件损坏; 4、 请尽量避免频繁重启或开关机,以延长服务器的使用寿命; 5、 请用户及时备份重要数据,曙光信息产业有限公司不为任何情况导致的数据丢失负责; 6、 请使用正版操作系统及软件,并进行正确配置。曙光信息产业有限公司对由于操作系统
声明及注意事项
感谢您选用曙光服务器!
曙光服务器将给您带来强大的应用支持和全新的性能体验。为了您能够更安全、方便的 使用曙光服务器,在使用之前,请详细阅读本节所提示的信息。
曙光服务器在设计和制造过程中均遵循了严格的标准,以保证您所使用的服务器拥有卓 越的品质和完美的“SUMA”特性。但是服务器属于精密电子设备,在使用过程中仍然可能因 为各种原因而导致异常,所以请务必明确以下事项: 1、 请将服务器放置在阴凉、干燥、通风、洁净、无强磁场的环境中使用,这有助于服务器
电池请妥善回收处理。 曙光信息产业有限公司保留对以上条款的解释权。
再次感谢您选用曙光服务器!
-3-
曙光天阔 A840r-G 服务器用户手册 V1.1
目录
第一章 系统简介 ........................
安装RedHat_Enterprise_Linux_Server_6操作系统
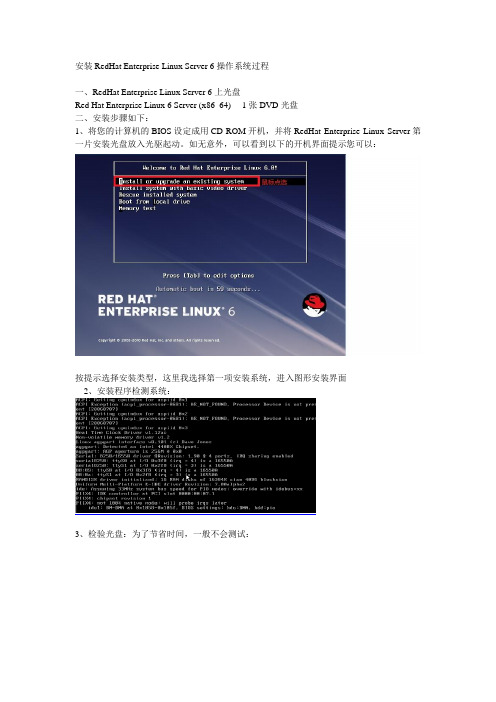
安装RedHat Enterprise Linux Server 6操作系统过程一、RedHat Enterprise Linux Server 6上光盘Red Hat Enterprise Linux 6 Server (x86_64) 1张DVD光盘二、安装步骤如下:1、将您的计算机的BIOS设定成用CD-ROM开机,并将RedHat Enterprise Linux Server第一片安装光盘放入光驱起动。
如无意外,可以看到以下的开机界面提示您可以:按提示选择安装类型,这里我选择第一项安装系统,进入图形安装界面2、安装程序检测系统:3、检验光盘:为了节省时间,一般不会测试:按tab键切到Skip选项,按Enter键进入下一页4、安装欢迎界面:点选Next5、选择安装过程中使用的语言:首先安装程序会问您安装GUN/Linux时使用那种语言来显示信息,您在此选择的语言也会成为安装后RedHat Enterprise Linux Server 6.0的缺省语言,RedHat Enterprise Linux Server 6.0对中文的支持算是不错,您可以选择『Chinese(Simplified)简体中文』,按『Next』键进入下一步安装界面。
6、为系统选择键盘:不同国家键盘的排列可能会有少许分别,对一般中国、香港、澳门、台湾的用户来说,请选择『美国英语式』,按『下一步(N)』键进入下一步安装界面;7、选择系统安装的设备:Rhel6直接支持安装在本地磁盘、网络磁盘、SAN等设备上,如选择指定的设备的话,则会出现类似以下界面的提示,显示所有已连接的设备供您选择。
8、安装程序提示分区表无法读取,需要创建分区:9、设置主机名和网络:选择安装程序自动分割硬盘或配置好启动管理器后,接着来到配置网络的界面;特别说明:rhel6安装支持直接设定网络IP等信息,已方便安装后马上使用网络,也可以先不设置,直接下一步;10、时区选择:为了方便日常日常操作,您需要配置您所在地区的时区。
Red+Hat企业版Linux+4.6的安装
Red Hat企业版Linux 4.6的安装一.安装VMWare 6.0文件名:VMware-workstation-6.0.0-45731.exe序列号:ALEH1-Q206J-82H6F-4PTQ2注:安装VMWare6.0的过程中,可以一直点击“Next”,然后重启计算机。
二.创建RHEL 4.6虚拟机注:此过程实际上是建立一个具有虚拟内存、硬盘、网卡等的“虚拟的计算机”,用于安装RHEL4.6。
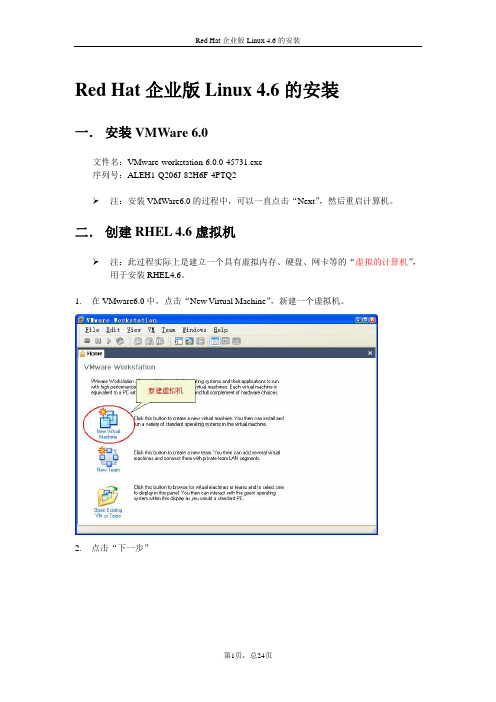
1.在VMware6.0中,点击“New Virtual Machine”,新建一个虚拟机。
2.点击“下一步”3.选择“Typical”(典型配置),然后点击“下一步”4.选择“Linux”操作系统,且Linux的版本为“Red Hat Enterprise Linux 4”,然后点击“下一步”。
注:步骤4的选择不能错误,否则在后续安装过程中会出现“无法找到硬盘”的问题。
5.设置RHEL4.6的虚拟机文件的存放位置(一般使用剩余空间较大的硬盘存放)6.选择“host-only”联网模式7.设置磁盘空间大小,如12G8.点击“完成”后的界面9.由于现在的计算机通常没有安装软驱,因此需要删除软驱。
删除软驱的过程:(1)点击“VM”菜单中的“Settings….”(2)选择“Floppy”(软驱),然后按“Remove”(删除)按钮。
(3)点击“OK”10.RHEL4.6虚拟机安装完成后的效果图三.安装RHEL4.61.下载RHEL4.6的DVD光盘,文件名为:r46asx86-xiso;大小为:2.27G。
2.点击“CD-ROM”(光驱)3.插入RHEL4.6的DVD光盘:r46asx86-xiso4.点击绿色“三角形”按钮,开机(相当于按真实计算机上的电源开关)5.开机后,进入RHEL4.6的安装界面,将鼠标点入虚拟机的内部,然后按“回车”键。
注:释放鼠标的方法:按Ctrl+Alt键6.按“Skip”键,跳过“光盘”检测7.点击“Next”按钮8.选择安装过程的语言为“简体中文”,然后点击“Next”按钮9.在“键盘配置”页面,点击“下一步”按钮10.磁盘分区设置,选择“自动分区”,点击“下一步”按钮11.在弹出的“警告”对话框中,点击“是”按钮12.选择“保存所有分区,使用现有的空闲空间”;点击“下一步”按钮13.接受默认磁盘设置,点击“下一步”按钮14.在“引导装载程序配置”页面,点击“下一步”按钮15.在“网络配置”页面,点击“下一步”按钮16.在“防火墙配置”页面,点击“下一步”按钮最好将默认语言设置为English(USA),点击“下一步”按钮18.在“时区选择”页面,点击“下一步”按钮19.设置root(根)用户的口令(最少6个字符),点击“下一步”按钮钮21.在“选择软件包组”页面,选择“全部”,单击“下一步”按钮22.在“即将安装”页面,点击“下一步”按钮23.在“安装软件包”页面,等待……….24.安装完成后,点击“重新引导”按钮25.在“Welcome”页面,点击“Next”按钮26.在“License Agreement”页面,点击“Next”按钮27.在“Date and Time”页面,点击“Next”按钮28.在“Display”页面,点击“Next”按钮29.在“System User”页面,创建一个用户(如xiaoyk),并设置该用户的登录口令30.在“Sound Card”页面,点击“Next”按钮31.在“Additional CDs”页面,点击“Next”按钮32.在“Finish Setup”页面,点击“Next”按钮33.进入“用户登录”界面34.安装完成。
RedHat Enterprise Linux 6.2_x86_64下编译安装vsftpd并配置Helix Server流媒体服务器

3.添加vsftpd的服务和虚拟宿主用户
[root@rmserver /]# useradd vsftpd -s /sbin/nologin
vsftpd服务的宿主用户
[root@rmserver /]# useradd -d /movie ftpuser -s /sbin/nologin
如果有libpam.so.0 => /....说明加载pam成功。
[root@rmserver vsftpd-2.3.5]# mkdir /etc/vsftpd/
[root@rmserver vsftpd-2.3.5]# cp vsftpd.conf /etc/vsftpd
复制配置文件至/etc/vsftpd目录,并按附件1修改。
vsftpd虚拟宿主用户
[root@rmserver /]# chmod 755 /movie
*不允许相关用户登录,给予ftp目录相应的权限。
一、安装vsftpd
下载vsftpd的最新版,目录最新版是vsftpd-2.3.5.tar.gz
[root@rmserver ~]# cd /movie
编译提示usr/bin/ld: cannot find -l*
[root@rmserver Packages]# rpm -ivh libtool-ltdl-2.2.6-15.5.el6.x86_64.rpm libtool-ltdl-devel-2.2.6-15.5.el6.x86_64.rpm
[root@rmserver movie]# wget /distfiles/vsftpd-2.3.5.tar.gz
《Linux操作系统及应用(第四版)》课后习题答案

国家十二五规划教材《Linux操作系统及应用(第四版)》课后习题答案Windows & Linux老师交流群:189934741 作者QQ:68433059 项目1 安装Red Hat Enterprise Linux1.6 练习题一、填空题1. GNU's Not Unix的递归缩写2. 内核(kernel)、命令解释层(Shell或其他操作环境)、实用工具3. System V BSD4. Copyleft(无版权)General Public License,GPL)5. FSF,Free Software Foundation6. 便携式操作系统接口(Portable Operating System Interface)7. 企业应用个人应用8. 内核版本发行版本9. swap交换分区/(根)分区10. root11. X Server、X Client和通信通道二、选择题1.B2.C3.B4.A5. D6. C项目2 管理文件系统2.5 练习题一、填空题1. 区分Tab2. 分号3. 反斜杠“\”“>”4. “&”5. 保存管理6. 扩展文件系统ext2/ext3/ext47. 级块索引节点表数据块8. 树状目录“/”9. umask umask 777 00010. . ..11. 隐藏文件12. chmod a+x filename二、选择题1. C2. C3. C4. C5. A6. A7. A8. B9. D10. D项目3 shell与vim编辑器3.5 练习题一、填空题1. shell2. /etc/shells3. /etc/passwd4. 命令编辑功能;命令与文件补全功能;命令别名设置功能;作业控制、前台与后台控制;程序化脚本;通配符等。
5. 全局变量局部变量6. set7. *、?、[]8. 行9. 查找、删除、替换10. 通配符(wild card)正则表示法项目4 shell编程-shell script4.5 练习题一、填空题1. shell shell 的语法与命令(含外部命令)正则表达式管道命令数据流重导向2. 上下左右3. r r 与x4. shell (#!/bin/bash) 程序用途版本作者5. read date6. 父程序7. test 中括号( [] )8. if...then case $var in ... esac9. 不定循环(while, until) 固定循环(for)10. sh -x script.sh三、实践习题1.请创建一个script ,当你运行该script 的时候,该script 可以显示:①你目前的身份(用whoami );②你目前所在的目录(用pwd)。
红帽企业版Linux 6安装指南

红帽企业版 Linux 6安装指南一、简介 二、启动选项 三、无盘(GRUB)安装 四、准备服务器 五、使用 Kickstart 无人值守安装 六、无人值守安装的完整示例 七、故障示例分析 一、简介: 本文翻译自 Red_Hat_Enterprise_Linux-6-Installation_Guide-en-US。
闲来无事、游手好闲,因此特将该文件的第28至33章翻译出来。
内容较多,若翻译有误望大家指点。
在翻译原文的过程中会对原文做一些补充说明,望大家可以忍受。
本手册描述了如何启动红帽企业版 Linux 6安装程序(anaconda)以及如何安装红帽企业版6操作系统,同时还 涵盖了高级安装方式,如 Kickstart 无人值守安装、VNC 安装。
最后还将对常见问题进行分析说明。
二、Boot Options(启动选项): 2.1 概述 红帽企业 Linux 6安装程序为管理员提供了一系列的功能与选项,要使用这些选项你可以在 boot:提示符后 输入 linux option。
在 RHEL6的图形安装中,如果要得到 boot:提示符,可以按 Esc 键。
如何你希望在此指定多个安装选项, 那么在选项之间需要一个空格分隔。
linux option1 option2 option3 ... 如: 2.2 RHEL6启动菜单简单选项: 语言 显示分辨率 接口类型(图形、字符) 安装方式 网络设置 # 语言: 为安装程序及系统设置语言, 使用 lang 选项指定语言(采用的是 ISO 标准语言编码, 中文为 zh), 使用 keymap 选项指定键盘类型。
如:使用 ISO 编码 el_GR 和 gr 分别指定希腊语言与系列键盘linux lang=el_GR keymap=gr# 分辨率: 输入 resolution=setting 选项设置显示分辨率,如设置分辨率为:1024*768linux resolution=1024*768# 文本模式: 输入 linux text 进入文本安装模式 使用 display=ip:0允许将安装图形转发到远程主机,在远程主机你需要执行 xhost +remotehostname 命令 # 升级 anaconda(红帽安装程序的名称)输入 linux updates 升级新版本的 anaconda 安装程序linux updates= 通过网络加载 anaconda 升级程序,后跟 URL 地址# 指定安装方式 首先,开机出现安装界面后可以按 Tab 键,将显示以>vmlinuz initrd=initrd.img 开始的附加界面,在此我们 可以输入 askmethod 回车, >vmlinuz initrd=initrd.img askmethod 几个下一步之后安装程序会询问我们安装方式。
- 1、下载文档前请自行甄别文档内容的完整性,平台不提供额外的编辑、内容补充、找答案等附加服务。
- 2、"仅部分预览"的文档,不可在线预览部分如存在完整性等问题,可反馈申请退款(可完整预览的文档不适用该条件!)。
- 3、如文档侵犯您的权益,请联系客服反馈,我们会尽快为您处理(人工客服工作时间:9:00-18:30)。
在Red Hat Enterprise Linux 4 UP 2 (X86-64)上构建Oracle RAC 10g Release 2 Cluster版本:0.2第一部分Oracle 10G RAC简介及系统软硬件配置清单 (4)一、Oracle RAC 10g 概述 (4)二、系统配置构成: (5)1、软硬件配置清单: (5)2、网络规划: (5)A.服务器命名: (5)B.网络地址分配: (6)C.网络拓扑: (7)3、磁盘规划: (7)A.主机磁盘划分: (7)B.盘阵磁盘划分: (7)4、数据库规划: (8)第二部分硬件就绪及Red Hat Enterprise Linux 4 UP 2 (X86-64)操作系统的安装: .. 9一、磁盘阵列规划,主机安装 (9)1、硬件就绪: (9)2、磁盘阵列配置: (9)二、Linux 操作系统的安装和配置: (9)1、Linux操作系统安装 (9)2、Linux操作系统的配置: (12)三、配置网络 (14)1、网络设置简介 (14)2、配置公共网络和专用网络 (14)3、关于虚拟 IP (16)4、确保 RAC 节点名没有出现在回送地址中 (17)5、调整网络设置(可选,后面统一设置) (17)6、检查并关闭UDP ICMP rejections规则 (18)7、检查并关闭防火墙和Selinux功能: (19)第三部分 RAC安装前的准备及系统就绪 (20)一、创建“oracle”用户和目录 (20)1、创建 Oracle 用户和组,以及配置Oracle用户环境: (20)2、为 OCFS2/集群件创建挂载点 (22)3、确保为 OUI 提供足够的临时空间 (22)二、在共享的盘柜上上创建分区: (22)1、在盘柜上创建所有分区 (23)三、为 Oracle 配置 Linux 服务器 (25)1、概述 (25)2、对交换空间的考虑因素 (26)3、设置共享内存 (26)4、设置信号 (27)5、设置文件句柄 (28)6、设置IP端口范围: (29)四、配置 hangcheck-timer 内核模块 (29)1、hangcheck-timer.ko 模块 (30)2、安装 hangcheck-timer.ko 模块 (30)3、配置并加载 hangcheck-timer 模块 (30)4、配置 Hangcheck 内核模块参数 (30)5、手动加载 Hangcheck 内核模块并测试设置情况 (31)6、自动加载 Hangcheck 内核模块: (31)五、为远程访问配置 RAC 节点 (31)1、使用Secure Shell模式: (32)2、使用Remote Shell方式: (37)六、用于每个 RAC 节点的所有启动命令 (38)1、检查/etc/modprobe.conf 文件: (38)2、检查/etc/sysctl.conf 文件: (39)3、检查/etc/hosts 文件: (40)4、检查/etc/hosts.equiv 文件: (41)5、检查/etc/rc.local文件: (41)七、检查 Oracle 10g 第 2 版的 RPM 程序包 (42)1、检查必需的 RPM: (42)2、重新启动系统 (43)第四部分 OCFS2、ASM、裸设备的配置管理 (43)一、安装和配置 Oracle 集群文件系统 (OCFS2) (43)1、下载 OCFS2相关软件包: (44)2、安装 OCFS2软件包: (44)3、禁用 SELinux(可选): (44)4、配置 OCFS2文件系统: (46)5、让系统自动启动o2cb服务: (48)6、调整 O2CB 心跳阈值:(可选) (49)7、Format和Mount OCFS2 文件系统 (50)8、用DEADLINE I/O Scheduler替换CFQ I/O Scheduler(针对(RHEL4 U2和 U3版本)(可选): (53)9、重新启动机器,并检查系统配置情况: (54)二、安装和配置自动存储管理 (ASMLib 2.0) (55)1、使用 Linux 配置 ASM 的方法: (55)2、下载 ASMLib 2.0 程序包 (55)3、安装 ASMLib 2.0 程序包 (56)4、配置和加载 ASMLib 2.0 程序包 (56)5、启用ASMlib驱动程序: (56)6、为 Oracle 创建 ASM 磁盘 (57)7、在集群中的所有其他节点上,执行磁盘扫描程序以识别新卷: (57)8、测试验证ASM卷是否成功创建: (58)三、使用裸设备: (58)1、修改/etc/sysconfig/rawdevices 文件: (58)2、重新启动裸设备服务: (58)3、创建启动脚本rawboot.sh(名字自己定) (58)4、把rawboot.sh添加到/etc/rc.local文件,以便启动加载: (59)5、创建映射目录: (59)6、创建符号链接(以Oracle用户身份): (59)7、在安装CRS时指定 ocr和css: (59)第五部分安装Oracle 10G RAC集群软件配置数据库 (60)一、下载 Oracle 10g RAC 软件 (60)二、安装 Oracle 10g 集群件软件 (60)1、RAC集群简单介绍: (60)2、安装前的系统检查和验证: (61)3、安装CRS软件: (62)4、验证CRS安装: (72)三、安装 Oracle 10g 数据库软件 (72)1、安装前的系统检查和验证: (72)2、安装 Oracle 数据库 10g 第 2 版软件 (73)四、创建 TNS 监听器进程 (77)1、接下来会出现图形配置界面,按照下面的步骤完成配置过程即可!782、验证配置: (80)五、创建 Oracle 集群数据库 (81)1、创建集群化数据库: (81)2、创建 orcltest 服务: (91)六、验证 TNS 联网文件 (92)七、验证 RAC 集群与数据库配置 (92)八、启动/停止集群 (94)九、透明的应用程序故障切换 - (TAF) (95)第一部分Oracle 10G RAC简介及系统软硬件配置清单一、Oracle RAC 10g 概述随 Oracle9i 一同推出的 Oracle RAC 是 Oracle 并行服务器 (OPS) 的后续版本。
RAC 允许多个实例同时访问同一数据库(存储器)。
它通过允许系统进行扩展,提供了容错、负载均衡和性能效益,同时由于所有节点访问同一数据库,因此一个实例的故障不会导致无法访问数据库。
Oracle RAC 的核心是共享磁盘子系统。
集群中的所有节点必须能够访问集群中所有节点的所有数据、重做日志文件、控制文件和参数文件。
数据磁盘必须在全局范围内可用,以便允许所有节点访问数据库。
每个节点拥有自己的重做日志和控制文件,但是其他节点必须能够访问这些文件,以便在系统故障时恢复该节点。
Oracle RAC 与 OPS 之间的一个较大区别是,它采用了高速缓存合并技术。
在 OPS 中,节点间的数据请求需要先将数据写入磁盘,然后发出请求的节点才可以读取该数据。
使用高速缓存合并时,一起传递数据与使用复杂锁定算法的高速互联。
不是所有的集群解决方案都使用共享存储器。
有些厂商使用一种称为联合集群的方法,在这种方法中,数据分布在多台计算机中,而不是由所有计算机共享。
但是,在使用 Oracle RAC 10g 时,多个节点使用相同的磁盘集来存储数据。
利用 Oracle RAC,数据文件、重做日志文件、控制文件和归档日志文件保存在原始磁盘设备的共享存储器、NAS、SAN、ASM 或集群文件系统中。
Oracle 的集群方法利用了集群中所有节点的集体处理能力,同时提供了故障切换安全性。
有关 Oracle RAC 的更多背景知识,请访问 OTN 上的 Oracle RAC 产品中心。
二、系统配置构成:1、软硬件配置清单:2、网络规划:A.服务器命名:i.服务器一:主机名linux1;ii.服务器二:主机名linux2;B.网络地址分配:C.网络拓扑:3、磁盘规划:A.主机磁盘划分:服务器自带的硬盘主要用于操作系统和数据库软件的安装;注意:由于服务器有2G内存,因而交换分区最少要为4G才能保证Oracle 10G RAC的正常安装;B.盘阵磁盘划分:4、数据库规划:Oracle 集群件软件即集群就绪服务(CRS),将安装到构成 RAC 集群的每个节点上的/u01/app/oracle/product/crs 中。
但集群件软件需要将其两个文件(Oracle 集群注册表(OCR) 文件和表决磁盘文件)与集群中的所有节点共享。
这两个文件将安装到使用 OCFS2 的共享存储器中。
可以(但 Oracle 不建议)使用 RAW 设备存储这些文件,但不能使用 ASM 存储这两个集群件文件。
Oracle 数据库 10g 第 2 版软件将安装到构成 RAC 集群每个节点的 Oracle Home (即 /u01/app/oracle/product/10.2.0/db_1)中。
所有 Oracle 物理数据库文件(数据、联机重做日志、控制文件、归档重做日志)将安装到由 ASM 管理的共享驱动器的不同分区上。
注意: CRS和数据库要安装到不同的目录下;第二部分硬件就绪及Red Hat Enterprise Linux 4 UP 2 (X86-64)操作系统的安装:一、磁盘阵列规划,主机安装1、硬件就绪:服务器和盘柜摆放好,把电缆线,以及盘阵到主机的连接线连接好,主机接入网络(主机的两个网卡都要接入网络)设备加电测试,如果能够正常启动,引导则设备正常。
否则需要检查设备,查看问题的所在。
2、磁盘阵列配置:在安装操作系统之前,需要对盘阵进行配置,根据数据库的应用情况,做RAID划分逻辑盘,该部分内容,相关盘阵的安装手册都有介绍,在此略过!二、Linux 操作系统的安装和配置:1、L inux操作系统安装准备好RedHat AS 4 up 2光盘,将 1 号盘插入到第一个服务器(linux1),启动电源,并按照以下说明来回应安装屏幕的提示。
在第一个节点上安装完 Linux 后,在第二个节点上执行相同的 Linux 安装,但将节点名 linux1 替换为 linux2 并设定适当的不同 IP 地址。
注意:在安装操作系统时尽量将磁盘阵列关闭,以免发生错误!A.Boot Screen:第一个屏幕是 RedHat Enterprise Linux 引导屏幕。
在 boot:提示符处按 [Enter] 键启动安装过程。